Takex FS-3500 Instruction Manual
•
0 gefällt mir•304 views

Buy the Takex FS-3500 at JMAC Supply. https://www.jmac.com/product_p/takex-fs-3500.htm

Empfohlen
Empfohlen
Weitere ähnliche Inhalte
Was ist angesagt?
Was ist angesagt? (20)
Andere mochten auch
Andere mochten auch (15)
Ähnlich wie Takex FS-3500 Instruction Manual
Ähnlich wie Takex FS-3500 Instruction Manual (20)
Mehr von JMAC Supply
Mehr von JMAC Supply (20)
Kürzlich hochgeladen
Kürzlich hochgeladen (20)
Takex FS-3500 Instruction Manual
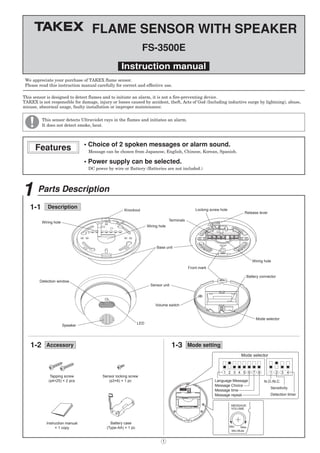
- 1. 1 Features We appreciate your purchase of TAKEX flame sensor. Please read this instruction manual carefully for correct and effective use. Message can be chosen from Japanese, English, Chinese, Korean, Spanish. FLAME SENSOR WITH SPEAKER Instruction manual DC power by wire or Battery (Batteries are not included.) FS-3500E This sensor is designed to detect flames and to initiate an alarm, it is not a fire-preventing device. TAKEX is not responsible for damage, injury or losses caused by accident, theft, Acts of God (Including inductive surge by lightning), abuse, misuse, abnormal usage, faulty installation or improper maintenance. 1-1 1-3 1 Parts Description Knockout Wiring hole Wiring hole Detection window Speaker LED Front mark Volume switch Battery connector Mode selector Wiring hole Terminals Release lever Locking screw hole Base unit Sensor unit Mode selector Message repeat 1 2 3 4 5 6 7 8 1 2 3 4 Language Message Message Choice Message time N.O./N.C. Sensitivity Detection timer Tapping screw (f4×25) × 2 pcs Sensor locking screw (f3×6) × 1 pc Instruction manual × 1 copy Battery case (Type-AA) × 1 pc This sensor detects Ultraviolet rays in the flames and initiates an alarm. It does not detect smoke, heat.
- 2. Do not modify the unit, it may cause fire or electric shock. Do not touch the unit with wet hand. 2 ATTENTION Warning Notice Description If this is ignored, people could face the possibility of death or serious injury. If this is ignored, people may suffer injury or personal property may suffer damages. This icon indicates actions to be avoided. This icon indicates instructions that should be strictly followed. Warning Stop using the unit in case of strange smoke, smell, or noise generated from the unit. Do not recharge the included battery. In case the water leaks into the unit, stop using the unit and power it off, contact the dealer. When using batteries, ensure to keep the correct polarity. Do not install the unit in a location that cannot support its weight. Do not heat, remodel the battery, do not put it into water, fire. Use the designated power voltage only. Batteries are a choking hazard. Please keep away from children. Do not mix old and new batteries. Do not short-circuit the battery with the metal objects which may cause fire. Avoid subjecting the unit to impact. This model is designed for indoor use only. Do not install outdoor. Use the designated battery only. Battery life may shorten depending on circumstances. Do not install the unit in the following locations. Notice Construction site where welding is done. The arc lamp of welding includes a very strong ultraviolet rays which reach flame sensors even indirectly by the reflection. In a site subject to direct or reflecting sunlight and rain. (This sensor is for indoor use only) Near any device which generates a strong magnetic field. Near the railway (Spark by pantograph) Near high voltage power line In front of the object that intercepts light. (including glass and transparent resin) In a site where fire is usually used such as a kitchen. Do not install the unit in a humid place.
- 3. 3 Caution Use designated battery only. The magnetism or magnetic field which this sensor emits will give some influence to the devices nearby. Check the situation prior to operation. When the patient who carries isotope treatment comes near to detection area, Flame sensor may issue an alarm, in this case set detection sensitivity as "L". Battery life may vary depending on usage and installation environment. Although this unit is for indoor use, when it is installed in semi-outdoor, the location must be under eaves without sunshine and rain. Also it is recommended to set Detection timer longer than 3 sec. and Sensitivity "L". This sensor is designed to detect ultraviolet rays in flames, and to output a warning message. This unit is neither fire detector nor heat detector nor smoke detector. TAKEX is not responsible for damage, injury or losses by fire, accident, calamity, Acts of God (Including inductive surge by lightning), abuse, misuse, abnormal usage, faulty installation or improper maintenance. This unit detects ultraviolet rays from a flame. At the same time it detects ultraviolet rays from other objects. Ultraviolet rays are sometimes reflected by walls or floors which causes unexpected detection resulting in a false alarm. This unit does not detect the objects which are burning without flame. Prior to the actual operation, adjust the detection area carefully and test the performance. * Possible cause of false alarm. Do not install the sensor nearby the followings. Halogen lamp Electric dischaging lamp such as mercury lamp Electric sterilizer lamp Spark from welding Electric spark (Caused by motor, pantograph) Sunlight Lightning discharge High voltage electric field All objects which emit ultraviolet rays * Followings are not detected by flame sensor Flames through glass or transparent resin Lit portion of cigarette Burning charcoal or briquet Electric stove Smouldering object When the performance of the installed sensor is unstable and the cause cannot be specified, select Sensitivity "L" and detection time one step longer than current setting. When the sensor window is soiled by dust, oil, cigarette smoke, clean with soft cloth moistened with alcohol. ( ) 1 sec Longer than 3 sec Detection timer Semi-outdoor installation H L Sensitivity Factory set : Sensitivity "H" Detection timer 1 sec Front view : Ceiling mount Top view : Wall mount Side view : Ceiling/wall mount 1 2 3 4 5 6 77 6 5 4 3 2 1 5 4 3 2 1 1 2 3 4 5 6 7 8 9 10 [m] 1 2 3 4 5 6 7 8 9 10 [m] [m] 1 2 3 4 5 [m] Object : Flame of gas lighter (7cm) Sensitivity : H Detection timer : 1 sec. Detection area Sensitivity : L H H DETECTION AREA3 Detection area spreads out in front of the sensor at approx. 120° conically. The size of the detection area is in proportion to the size of the flame and detection time. Confirm the detection area using a lighter prior to actual operation. Use the optional BCW-401 universal bracket if area adjustment is required. approx. 120°
- 4. 4 WIRING4 INSTALLATION5 Terminal arrangement Wiring example Power supply Alarm output Tamper output Power Sensor 2Sensor 1 Signal Control panel (2 sensors connected) Battery (1) (1)* Keep the correct polarity 4321 65 50mf0.65mm 100mf0.90mm 150mf1.20mm 300mf1.60mm 350m 650m 1200m 2100m Size DC12V DC24V (3) * In case of open wiring, remove the knockout and arrange wiring. (2) Dry contact N.O./N.C. selectable Off delay (2 sec.) DC30V, 0.25A or less Dry contact N.C. AC / DC30V, 0.1A or less DC10 to 30V (Polarized) Stand by : 40mA or less Alarm : 300mA or less * Take care not to catch the wire between terminal and battery. Battery case - Optional Between sensor and power supplyWiring distance <<Notice>> 1. In case connecting more than 2 sensors, the wiring distance is divided by the number of units. 2. Signal line can be connected as far as 1,000m by f0.65 OP wire. } 1 Locate the installation site 4 Arrange power supply by wire or by battery. (Batteries are not included.) 3 Fix the base with the screws included. 2 Slide the release lever to detach the sensor unit from the base. (1) Insert the battery into battery case with the correct polarity. (2) Plug the connector of battery case into the main body and confirm the buzzer sound. (3) Put the battery case into the main body. By battery (1) Connect the wire to the power terminal. By wiring
- 5. 5 FUNCTION6 Marking Installation hole Flame Signal Message Detection ON Operation LED ON 2s ON OFF Detection 2s Detection 2s ON OFF ON OFF ON ON OFF Detection 2s ON 5mm ON Blink ON Blink ON Blink (Battery operation) Mode selector Message repeat 1 2 3 4 5 6 7 8 1 2 3 4 Language Message Message Choice Message time N.O./N.C. Sensitivity Detection timer 5 Choose message language, set detection timer and detection sensitivity and adjust message volume. This product is equipped with installation holes (Pitch 3.29" or 83.5mm) to make installation easy and sensor's direction adjustable. 8 To detach the sensor unit, grip sensor as shown and slide the release lever. 9 To lock sensor unit, insert sensor locking screw into locking screw hole and tighten it. 6 Attach the sensor unit to base unit. (1) Turn front marks of base unit and sensor unit to point in the same direction. (2) Insert sensor unit into base unit. (3) Push sensor unit until release lever is locked. 7 Check operation and area. [Installation of base] (1) Operation (2) Function setting (1) Place the base on the site and mark X on 2 points 180° (2) Drive the 2 pcs. of tapping screws (accessory) leaving 5mm exposed from the surface. (3) Adjust the sensor's direction by turning the base. (4) Tighten the screws. Installation hole Alarm (Basic action) This product gives the following one-shot output only by detecting the flame continuing for the set time of detection timer. Power on notice will sound when the power is turned on. Speaker sounds intermittently 3 times. When voltage is low, power on notification will not be heard. Check the power supply. Power on notice When volume switch is set to minimum, the volume will be mute. Volume setting In case of low battery, LED flashes every 5 sec. In this case change the battery for new one immediately. Battery life is limited to 2 weeks after initial notification. Low battery alarm Sensor locking screw
- 6. 6 Message can be chosen among Japanese, English, Chinese, Korean, Spanish, or just buzzer sound. (Approx. 10 sec.). Only chosen message by dip switch will be announced. When no message chosen, only buzzer sound will be announced. The order of anouncement is Japanese Æ English Æ Chinese Æ Korean Æ Spanish which cannot be changed. (Non-smoking) or (Fire prohibition) modes are available. There are short and long message choices respectively. Can be set either once or twice. * This setting is for announcement only. * Choose all 5 languages, Fire-prohibition, Twice setting will be 55 sec. long. N.O./N.C. selectable. Regardless of the setting, N.O. will be automatically chosen in case of battery operation. Announcement MessageSettting Non-smoking 6 7 6 7 Fire prohibition Long message (1) JAP. (2) ENG. (3) CHI. (4) KOR. (5) SPA. 6 7 Short message (1) JAP. (2) ENG. (3) CHI. (4) KOR. (5) SPA. 6 7 Japanese Æ Chinese English Æ Chinese Æ Korean Buzzer sound PiPiPiPi 1 2 3 4 5 Chosen Delete TimeSET Once TimeSET Twice SET N.C. SET N.O. (Factory set : English) Factory set : Non-smorking Long message (Factory set : Once) (Factory set : N.C.) Japanese English Chinese Korean Spanish ( ) [ここは火気厳禁です。火気の使用はお断りいたします。] (4.9s) [Open flame is prohibited. Please refrain from using open flame in this area.] (6.4s) [ ] (4.1s) [ ] (5.5s) [Prohibido encender fuego. No se permite el uso de productos inflamables en el servicio.] (5.9s) [ここは火気厳禁です。] (2.2s) [Open flame is prohibited.] (2.3s) [ ] (2.2s) [ ] (3.2s) [Prohibido encender fuego.] (2.1s) Language selection Announcement choice Message repeat Output contact Long message (1) JAP. (2) ENG. (3) CHI. (4) KOR. (5) SPA. Short message (1) JAP. (2) ENG. (3) CHI. (4) KOR. (5) SPA. [ここは禁煙です。お煙草はご遠慮ください。] (3.8s) [This is a non-smoking area. Please refrain from smoking in this area.] (5.6s) [ ] (3.9s) [ ] (5.0s) [Prohibido fumar. Absténgase de fumar en el servicio.] (4.2s) [ここは禁煙です。] (1.8s) [This is a non-smoking area.] (2.6s) [ ] (2.1s) [ ] (2.4s) [Prohibido fumar.] (1.6s)
- 7. The following setting is about detection performance. This unit detects ultraviolet rays in a flame and issues a signal. In the semi-outdoors, there are many objects which generate ultraviolet rays and because there are no walls or windows in open area, there is a much higher possibility for the unit to detect those objects, in comparison with indoor installations. The detection performance should be set using the dip switches according to the circumstances of the installation site. When the performance of the installed sensor is unstable and the cause cannot be identified, select Sensitivity "L" and detection time one step longer than current setting. Detection sensitivity is selectable H or L. * Detection distance on "L" setting is 50% shorter than that on "H" setting. * If the operation is unstable on "H", switch to "L". * When installed semi-outdoor, "L" setting is recommended. Sensitivity An alarm output occurs when the flame continues for set time of detection timer or longer. * When the ultraviolet rays of flame are weak (it is related to size of flame and distance to the sensor), Alarm initiation may be delayed beyond the set time. * When installed semi-outdoor, set detection timer 3 sec or longer. Detection timer OPERATION CHECK7 1 Turn power on. In case of battery operation, the buzzer "PiPiPi" sounds. In case of DC operated, no buzzer sounds. 3 Warning message sounds intermittently and LED flashes. 2 Ignite a lighter etc. within detection area for more than the set time. 4 After turning off the lighter, check if the output stops at the set up time. (When external output is used by wiring, a continuous output is issued during the above 3. and 4. alarm action. Confirm the operation of the connected devices.) TROUBLE SHOOTING8
- 8. 8 TAKEX products are warranted to be free from defects in material and workmanship for 12 months from original date of shipment. Our warranty does not cover damage or failure caused by Acts of God (including inductive surge by lightning), abuse, misuse, abnormal usage, faulty installation, improper maintenance or any repairs other than those provided by TAKEX. All implied warranties with respect to TAKEX, including implied warranties for merchantability and implied warranties for fitness, are limited in duration to 12 months from original date of shipment. During the Warranty Period, TAKEX will repair or replace, at its sole option, free of charge, any defective parts returned prepaid. Please provide the model number of the products, original date of shipment and nature of difficulty being experienced. There will be charges rendered for product repairs made after our Warranty period has expired. No.05-731 In Japan 4/15 Howleys Road, Notting Hill, VIC, 3168 Tel : +61 (03) 9544-2477 Fax : +61 (03) 9543-2342 83-1, Gojo-sotokan, Higashino, Yamashina-ku, Kyoto 607-8156, Japan Tel : 81-75-501-6651 Fax : 81-75-593-3816 http : // www. takex-eng. co. jp / 3350, Montgomery Drive, Santa Clara, CA 95054, U.S.A Tel : 408-747-0100 Fax : 408-734-1100 http : // www. takex. com Takex House, Aviary Court, Wade Road, Basingstoke, Hampshire. RG24 8PE, U.K. Tel : (+44) 01256-475555 Fax : (+44) 01256-466268 http : // www. takexeurope. com In the U.S. In the U.K.In Australia 1401 DIMENSIONS nOPTIONALS (mm) When low battery LED blinks, change battery for new one immediately. If it is left, it could cause inactiveness of the sensor. Check the operation once a week. Maintenance SPECIFICATIONS9 Ceiling/wall mount attachment (BCW-401) The recorded message can be changed to custom order. FLAME SENSOR WITH SPEAKER FS-3500E (B)FS-3500E (W) Ultraviolet Rays detection (185 to 260nm) 10m (7cm flame) About 120° Sensitivity 2 steps (H [100%], L [50%]) Detection timer 4 steps (1s, 3s, 6s, 15s) Type-AA alkaline battery ... approx. 2 years Lithium battery ... approx. 5 years Stand-by : 40mA or less Alarm : 300mA or less Indication : RED Alarm : Flash during message output Low battery : Flash 0.1 sec every 5 sec • 5 language message Non-smoking (1) JAP. (2) ENG. (3) CHI. (4) KOR. (5) SPA. [ここは禁煙です。お煙草はご遠慮ください。] [This is a non-smoking area. Please refrain from smoking in this area.] [ ] [ ] [Prohibido fumar. Absténgase de fumar en el servicio.] Fire prohibition (1) JAP. (2) ENG. (3) CHI. (4) KOR. (5) SPA. [ここは火気厳禁です。火気の使用はお断りいたします。] [Open flame is prohibited. Please refrain from using open flame in this area.] [ ] [ ] [Prohibido encender fuego. No se permite el uso de productos inflamables en el servicio.] Buzzer sound (1) [PiPiPiPi...] • Long/Short message selectable • Message repeat : Once/twice selectable • Volume : Mute - Max.80dB (1m from the sensor) Relay contact output N.O./N.C. selectable Detection time plus 2 sec. Output DC30V, 0.1A Relay contact output N.C. is issued when the sensor unit is detached from the base unit AC/DC30V, 0.1A By terminals -10°C to +60°C without condensation (Battery performance may decrease under 0°C or beyond 40°C) Indoor 230g (Including 50g battery) ABS resin (white) ABS resin (brown) Model Model No. Detection system Detection distance Angle Sensitivity Power supply Battery life Power consumption (DC Power) LED Message Output Tamper Wiring Ambient temperature Istallation Weight Appearance • Type-AA alkaline battery LR6 × 2 (3V) • External wiring DC10 to 30V (Polarized) (45mm) 1.77" (f103mm) f4.06" (f83.5mm) f3.29" 2.63" (66.7mm) f4.72" (f120mm) (8mm) 0.31" (4.2mm) 0.17" (R15mm) R0.59" (5-f4.2mm) 5-f0.17" (34mm)(10.5mm) 0.41"1.34" (f9mm) f0.35" 35° 35°35° 35° Speaker (Red) LED Sensor unit Detection window (built in) Wiring hole Release lever Locking screw hole Base unit MOUNT&WIRING HOLE When detector elements are stained, spray alcohol to the elements and remove the stain. Do not use such chemicals as mild detergent, thinner or benzine to clean the detector elements. When housing is stained, clean it with a soft cloth. alcohol detector elements 10