This document provides instructions for creating a combo box in WPF that displays individual tooltips for each item. It demonstrates binding the combo box to a data source, creating a data template to display item names, and adding a tooltip to each item to display additional data from the bound object. The tooltip is added by defining it within the data template using another binding to access a second property of the data object. This allows each combo box item to display a unique tooltip when hovered over.
Creating a combo box with individual tooltips for each item
1. 12/26/12 Creating a ComboBox with Individual ToolTips for each Item
Should LastPass remember this passw ord?
DevCity.NET - http://devcity.net
Creating a ComboBox with Individual ToolTips for each Item
http://devcity.net/Articles/391/1/article.aspx
by Ged Mead
Published on 2/24/2010
Ged Mead
Ged Mead
In this article, Ged Mead demonstrates an easy way to use WPF and Windows Forms Interop to create and use a ComboBox that
(XTab) is a
displays ToolTips for individual ComboBox items.
Microsoft Visual
Basic MVP who
has been
working on
computer
software and design for more
than 25 years. His journey has
taken him through many
different facets of IT. These
include training as a Systems
Analyst, working in a
mainframe software
development environment,
creating financial management
systems and a short time spent
on military laptop systems in
Interop with a WPF UserControl the days when it took two
strong men to carry a 'mobile'
Introduction system.
This came up as a Windows Forms question a short while ago. Someone wanted to create a data bound ComboBox and have a
relevant tooltip appear whenever the user hovered any of the items in the list. The strings for the tooltips would be stored in the Based in an idyllic lochside
database along with all the other data. location in the West of
Scotland, he is currently
I’ve seen the proposed WinForms way of creating this result and, although I‘m sure it works fine, it really did look like a very involved in an ever-widening
complicated way of solving a relatively simple request. My immediate reaction was to think that there is probably an easy way of range of VB.NET, WPF and
producing this result in WPF and hosting the resulting ComboBox-With-Tooltip control inside a Windows Form. Silverlight development
projects. Now working in a
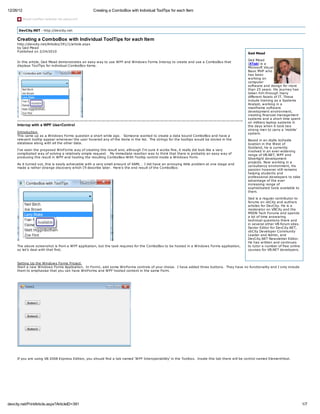
As it turned out, this is easily achievable with a very small amount of XAML . I did have an annoying little problem at one stage and
consultancy environment, his
made a rather strange discovery which I’ll describe later. Here’s the end result of the ComboBox:
passion however still remains
helping students and
professional developers to take
advantage of the ever
increasing range of
sophisticated tools available to
them.
Ged is a regular contributor to
forums on vbCity and authors
articles for DevCity. He is a
moderator on VBCity and the
MSDN Tech Forums and spends
a lot of time answering
technical questions there and
in several other VB forum sites.
Senior Editor for DevCity.NET,
vbCity Developer Community
Leader and Admin, and
DevCity.NET Newsletter Editor.
He has written and continues
The above screenshot is from a WPF application, but the task requires for the ComboBox to be hosted in a Windows Forms application, to tutor a number of free online
so let’s deal with that first. courses for VB.NET developers.
Setting Up the Windows Forms Project
Start a new Windows Forms Application. In Form1, add some WinForms controls of your choice. I have added three buttons. They have no functionality and I only include
them to emphasise that you can have WinForms and WPF hosted content in the same Form.
If you are using VB 2008 Express Edition, you should find a tab named ‘WPF Interoperability’ in the Toolbox. Inside this tab there will be control named ElementHost.
devcity.net/PrintArticle.aspx?ArticleID=391 1/7
2. 12/26/12 Creating a ComboBox with Individual ToolTips for each Item
This tab may not be available in other editions. In the Pro edition, for example, you will need to add the ElementHost to the toolbox in the usual way:
Drag this control from the Toolbox and drop it on to your Form.
The smart tag will invite you to select the hosted content (currently set to none). As you haven’t created the content yet, just click anywhere on the Form’s surface to close
the smart tag dialog box.
Add a WPF UserControl
To add a WPF UserControl to the Windows Forms project, Select Project > Add New Item… from the IDE main menu.
devcity.net/PrintArticle.aspx?ArticleID=391 2/7
3. 12/26/12 Creating a ComboBox with Individual ToolTips for each Item
In the Add New Item dialog which appears, select WPF from the categories list, then click on User Control (WPF). Assign a name of your choice to this new user control.
Adding this WPF User Control automatically causes some new References to be added to your project – most notably PresentationCore and PresentationFramework. These
are core WPF namespaces. If you select the UserControl by double clicking on it in the Solution Explorer, you will see that the Toolbox has now changed and you are offered
a list of WPF controls instead of the Windows Forms ones.
Create the UserControl Content
Resize the UserControl boundaries so that it measures 100 x 70. You can do this in the XAML pane:
<UserControl x:Class="ComboWithToolTips"
xmlns="http://schemas.microsoft.com/winfx/2006/xaml/presentation"
xmlns:x="http://schemas.microsoft.com/winfx/2006/xaml" Width="100" Height="70">
Or in the Properties pane. The screenshot shows the Height setting. The Width property is also available, although the WPF Properties pane doesn’t offer you the Size
property you may be used to in Windows Forms:
Drag a WPF ComboBox on to the surface of the WPF UserControl. It will be given some default values, not all of which suit our purposes, so manually change the XAML for
the ComboBox so that it looks like the following:
<ComboBox Height="23" HorizontalAlignment="Left"
Name="ComboPerson" VerticalAlignment="Top" Width="100" />
The UserControl should now look like this in the Design Pane:
devcity.net/PrintArticle.aspx?ArticleID=391 3/7
4. 12/26/12 Creating a ComboBox with Individual ToolTips for each Item
Assign the UserControl to the Windows Forms ElementHost
Now that you have a UserControl built, you can assign this to the ElementHost previously added to the Windows Form.
Rebuild the project to ensure that the UserControl is fully built. Select the Windows Form and click on the ElementHost. Click on the smart tag arrowhead and you will see
the ElementHost Tasks dialog.
Click on the dropdown arrow at the right hand side of the ‘Select Hosted Content’ combo and you will see that the new UserControl has now been added to the list.
Select this control, then click anywhere on the Form to close the smart tag dialog. You will probably see an exclamation mark icon inside the ElementHost, possibly with
some additional text, depending on the size of the host. Although this may make you think there is a problem, the UserControl will in fact display OK at run time. If you
want to test things so far you can hit F5. The WPF ComboBox will be visible and will drop down when its arrow is clicked Of course as we haven’t bound the data yet or
finished the look of the ComboBox there will be nothing to see.
Add a Data Source to the Application
The demonstration data that will be displayed in the ComboBox is provided by a simple class named ‘Person’. The class has three properties – FullName, Status and
Category – although we only use two of these in the ComboBox. The class contains a function which creates a List of Type Person. You can of course use any data source
you want, as long as it has at least two properties defined – one to populate the ComboBox list and one to be used as the ToolTip. Here is the class definition I have used:
Imports System.ComponentModel
Imports System.Collections.ObjectModel
Public Class Person
Implements INotifyPropertyChanged
Sub New(ByVal personname As String, ByVal personstatus As String, ByVal personsgroup As String)
Me.FullName = personname
Me.Status = personstatus
Me.Category = personsgroup
End Sub
Private _name As String
Public Property FullName() As String
Get
Return _name
End Get
Set(ByVal value As String)
_name = value
OnPropertyChanged(New PropertyChangedEventArgs("FullName"))
End Set
End Property
Private _status As String
Public Property Status() As String
Get
Return _status
End Get
Set(ByVal value As String)
_status = value
OnPropertyChanged(New PropertyChangedEventArgs("Status"))
End Set
End Property
Private _Category As String
Public Property Category() As String
Get
Return _Category
devcity.net/PrintArticle.aspx?ArticleID=391 4/7
5. 12/26/12 Creating a ComboBox with Individual ToolTips for each Item
End Get
Set(ByVal value As String)
_Category = value
OnPropertyChanged(New PropertyChangedEventArgs("Category"))
End Set
End Property
Public Sub OnPropertyChanged(ByVal e As PropertyChangedEventArgs)
If Not PropertyChangedEvent Is Nothing Then
RaiseEvent PropertyChanged(Me, e)
End If
End Sub
Public Event PropertyChanged(ByVal sender As Object, ByVal e As System.ComponentModel.PropertyChangedEventArgs) Implements
System.ComponentModel.INotifyPropertyChanged.PropertyChanged
Public Shared Function GetPersons() As List(Of Person)
Dim GP As New List(Of Person)
GP.Add(New Person("Neil Birch", "Available", "My Friends"))
GP.Add(New Person("Joe Brown", "On Site", "Work Colleagues"))
GP.Add(New Person("Larry Blake", "Available", "VB City"))
GP.Add(New Person("Fran Mead", "At Work", "Family"))
GP.Add(New Person("Elaine Javan", "On Vacation", "Work Colleagues"))
GP.Add(New Person("Matt Higginbotham", "On Line", "VB City"))
GP.Add(New Person("Zoe Flint", "On Site", "Work Colleagues"))
Return GP
End Function
End Class
I’m not going to look at this class in detail because it isn’t really part of the ‘ComboBox with ToolTips’ concept. As I’ve mentioned, it doesn’t matter how you get the data,
so long as it has two public properties you can use.
The GetPersons function at the bottom of the code generates a List of 7 Person objects. This function is called from the code-behind of the WPF UserControl:
Partial Public Class ComboWithToolTips
Dim ComboData As New List(Of Person)
Private Sub ComboWithToolTips_Loaded(ByVal sender As Object, ByVal e As System.Windows.RoutedEventArgs) Handles Me.Loaded
ComboData = Person.GetPersons
Me.DataContext = ComboData
End Sub
End Class
The code snippet above creates an empty List (Of Person). When the user control is loaded, it then accesses the GetPersons function in the Person Class and populates
that ComboData List with the details of the seven Persons. The final code line sets the DataContext of the user control to that List. This automatically links all the data in
that List to any control or element inside the user control that wishes to be bound to it. You will see this data binding in action next.
DataBinding and DataTemplate
DataBinding and DataTemplate
Now that we have a data source – the DataContext – the ComboBox can be bound to it. The syntax is very simple and requires only that you point the ItemsSource
property of the ComboBox to the Binding.
ItemsSource="{Binding}"
The word ‘Binding’ is placed inside the curly braces to signify that this is a markup extension in XAML.
If you were to run the project now you would actually have some bound data. However, it isn’t yet in a format that is useful to users:
This will be an issue you are familiar with if you have done data binding in the past. At this stage, all that is capable of being displayed is the ToString representation of the
Person instances. Without more detailed instructions, the application has no way of knowing which specific part(s) of the data should be listed in the ComboBox. The
easiest way of doing this is to create a DataTemplate for the ComboBoxItems.
You make this as plain or fancy as you like. For demo purposes I have just placed the string representation of the FullName property in a TextBlock and then surrounded
this with a Border.
Here is the XAML used to create the first part of the DataTemplate, which I’ve placed in the Resources collection of the Grid:
<Grid.Resources>
<DataTemplate x:Key="StatusToolTip">
<TextBlock Text="{Binding Path=FullName}">
</TextBlock>
</DataTemplate>
</Grid.Resources>
The TextBlock is bound to the FullName property of those Person instances.
devcity.net/PrintArticle.aspx?ArticleID=391 5/7
6. 12/26/12 Creating a ComboBox with Individual ToolTips for each Item
The next step is to point the ItemTemplate property of the ComboBox to this DataTemplate, which has a Key named StatusToolTip. The final version of the markup for the
ComboBox looks like this:
<ComboBox Height="23" HorizontalAlignment="Left"
Name="ComboPerson" VerticalAlignment="Top" Width="100"
ItemsSource="{Binding}"
ItemTemplate="{StaticResource StatusToolTip}"/>
Running the application again will produce the list of names in the ComboBox:
All that remains to do is to add a ToolTip to the TextBlock:
<TextBlock.ToolTip>
<Border BorderBrush="Navy" BorderThickness="2"
CornerRadius="4">
<TextBlock Text="{Binding Path=Status}" Margin="3"/>
</Border>
</TextBlock.ToolTip>
This time the Binding Path points to the Status property of those Person instances.
Now when the application runs and the mouse hovers over the name of a Person, the ToolTip showing the status of that Person will display:
Here is the complete XAML for the UserControl:
<UserControl x:Class="ComboWithToolTips"
xmlns="http://schemas.microsoft.com/winfx/2006/xaml/presentation"
xmlns:x="http://schemas.microsoft.com/winfx/2006/xaml" Width="100" Height="70">
<Grid Height="70">
<Grid.Resources>
<DataTemplate x:Key="StatusToolTip">
<TextBlock Text="{Binding Path=FullName}">
<TextBlock.ToolTip>
<Border BorderBrush="Navy" BorderThickness="2"
CornerRadius="4">
<TextBlock Text="{Binding Path=Status}" Margin="3"/>
</Border>
</TextBlock.ToolTip>
</TextBlock>
</DataTemplate>
</Grid.Resources>
<ComboBox Height="23" HorizontalAlignment="Left"
Name="ComboPerson" VerticalAlignment="Top" Width="100"
ItemsSource="{Binding}"
ItemTemplate="{StaticResource StatusToolTip}"/>
</Grid>
</UserControl>
The glitch that caught me out was that I thought it would be logical to use a ComboBoxItem in the DataTemplate and have a TextBlock inside that ComboBoxItem.
However when I did that, the names and the ToolTips would appear, but the ComboBox wouldn’t collapse if the user clicked on the actual name. The mouse had to be
clicked on a blank area anywhere to the right of the name. This obviously would be confusing and unacceptable to most users, so I had to get some outside help on this -
Thanks, Sirga and Jie Wang for showing me the workaround. Surprisingly, it turns out that if you include a ComboBoxItem in the DataTemplate then it stops working
correctly in this kind of scenario. The markup above will cause the ToolTip to display whenever the mouse hovers over a name (that is specifically the string representation
of the name, but not any of the blank space to the right on the line).
If you want the ToolTip to appear, no matter where on the ComboBox line the mouse hovers, then this alternative markup will produce the desired result:
<Grid Height="70">
<Grid.Resources>
<DataTemplate x:Key="StatusToolTip">
devcity.net/PrintArticle.aspx?ArticleID=391 6/7
7. 12/26/12 Creating a ComboBox with Individual ToolTips for each Item
<TextBlock Text="{Binding Path=FullName}" />
</DataTemplate>
<Border x:Key="ToolTipContent" BorderBrush="Navy"
BorderThickness="2" CornerRadius="4">
<TextBlock Text="{Binding Path=Status}" Margin="3"/>
</Border>
</Grid.Resources>
<ComboBox Height="23" HorizontalAlignment="Left"
Name="ComboPerson" VerticalAlignment="Top" Width="100"
ItemsSource="{Binding}"
ItemTemplate="{StaticResource StatusToolTip}">
<ComboBox.ItemContainerStyle>
<Style TargetType="{x:Type ComboBoxItem}">
<Setter Property="ToolTip" Value="{StaticResource ToolTipContent}" />
</Style>
</ComboBox.ItemContainerStyle>
</ComboBox>
</Grid>
As the highlighting shows, The ToolTip has been pulled out of the DataTemplate. The Border and TextBlock that comprise the ToolTip visuals are stored as a Resource and
given a Key. This keyed resource is then used directly in the ComboBox’s ItemContainerStyle to style the individual ComboBoxItems.
Apart from my little tussle with the ComboBoxItem template, this was a very easy solution overall. A few lines of XAML together with the use of an ElementHost in the
Windows Form and the job’s done. Another good example of how WPF and Windows Forms Interop can help achieve GUI enhancements more easily than trying to hack or
extend WinForms controls.
devcity.net/PrintArticle.aspx?ArticleID=391 7/7