Configuring cisco asa and pix firewalls part1
•Als DOCX, PDF herunterladen•
0 gefällt mir•594 views

Configuring cisco asa and pix firewalls.

Empfohlen
Weitere ähnliche Inhalte
Mehr von IT Tech
Mehr von IT Tech (20)
Kürzlich hochgeladen
Kürzlich hochgeladen (20)
Configuring cisco asa and pix firewalls part1
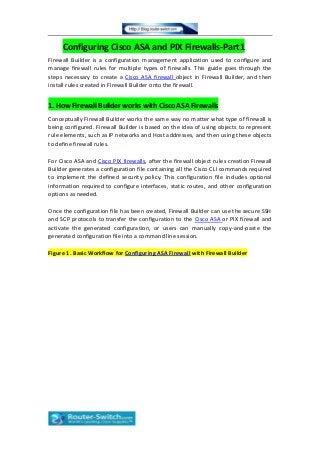
- 1. Configuring Cisco ASA and PIX Firewalls-Part1 Firewall Builder is a configuration management application used to configure and manage firewall rules for multiple types of firewalls. This guide goes through the steps necessary to create a Cisco ASA firewall object in Firewall Builder, and then install rules created in Firewall Builder onto the firewall. 1. How Firewall Builder works with Cisco ASA Firewalls Conceptually Firewall Builder works the same way no matter what type of firewall is being configured. Firewall Builder is based on the idea of using objects to represent rule elements, such as IP networks and Host addresses, and then using these objects to define firewall rules. For Cisco ASA and Cisco PIX firewalls, after the firewall object rules creation Firewall Builder generates a configuration file containing all the Cisco CLI commands required to implement the defined security policy. This configuration file includes optional information required to configure interfaces, static routes, and other configuration options as needed. Once the configuration file has been created, Firewall Builder can use the secure SSH and SCP protocols to transfer the configuration to the Cisco ASA or PIX firewall and activate the generated configuration, or users can manually copy-and-paste the generated configuration file into a command line session. Figure 1. Basic Workflow for Configuring ASA Firewall with Firewall Builder
- 2. 2. Firewall Builder GUI Layout Before we get started configuring our example firewall, let's take a minute to orient ourselves with the Firewall Builder application. The GUI is comprised of three primary panels, shown in the screenshot below. Figure 2. Firewall Builder GUI Layout
- 3. Object Panel. Objects in the active Library are displayed in an object tree in the Object Panel. Empty folders are defined for all possible object types that a user can create in the User library. Rules Panel. When a Policy object is opened for editing it is displayed in the Rules Panel. Clicking on the green icon at the top of the panel creates a new rule. Editor Panel. Double-clicking on objects opens them for editing in the Editor Panel. Changes to object attribute fields take effect immediately. Panels open dynamically based on what activity the user is performing. For example, double-clicking an object to edit it will open the Editor Panel if it is not already open. Now we are ready to get started configuring our firewall example. 3. Example Cisco ASA Deployment This Getting Started Guide demonstrates how to configure a Cisco ASA 5505 to match the network deployment shown in the diagram below. Figure 3. Example Cisco ASA Configuration
- 4. The goal of this Getting Started Guide is to familiarize users with the basic Firewall Builder steps needed to configure a Cisco ASA or PIX firewall object. There are many advanced features that won't be covered here, please refer to the User’s for a complete listing of all Firewall Builder features. More… Cisco Guide: Migration of Cisco PIX 500 Series to Cisco ASA 5500 Series Cisco PIX Firewall Basics