Angiosperms and gymnosperms
•Als PPT, PDF herunterladen•
3 gefällt mir•1,220 views


Empfohlen
Weitere ähnliche Inhalte
Was ist angesagt?
Was ist angesagt? (20)
Andere mochten auch
Andere mochten auch (16)
Ähnlich wie Angiosperms and gymnosperms
Ähnlich wie Angiosperms and gymnosperms (20)
Mehr von subject specialist biology
Mehr von subject specialist biology (17)
Kürzlich hochgeladen
Kürzlich hochgeladen (20)
Angiosperms and gymnosperms
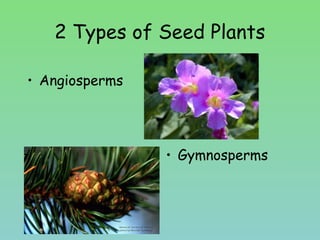
- 1. 2 Types of Seed Plants • Angiosperms • Gymnosperms
- 2. Gymnosperms • Have cones for reproduction instead of flowers • 4 Types – Cycad – Ginkgo – Conifer – Gnetophyte
- 3. Gymnosperms • Cycads: look like ferns except they have seeds • Ginkgo: very large trees found mainly in China
- 4. Gymnosperms • Conifers: seeds are in cones or berrylike structures • Gnetophytes: shrubs and climbing vines
- 5. Angiosperms • Largest group of plant in the world • Found in all types of climates • Produce flowers for reproduction
- 6. Angiosperms • Parts of the flower: – Sepals – Petals – Stamen – Pistil
- 7. Sepals • The sepals protect the flower before it opens. sepal
- 8. Petals • The petals attract pollinating insects with their bright color and attractive scent.
- 9. Male Parts • The stamens are the male structures of the flower. • Made up of two parts: – Anther – Filament
- 10. Male Parts • Anther: top part of the stamen, that makes pollen. • Filament: this is the stalk of the Anther
- 11. Female Parts • Pistil is the female structure of flower that has 3 parts: – Stigma – Style – Ovary
- 12. Female Parts • Stigma: – The pollen from another flower collects on the stigma’s sticky surface. • Style: – raises the stigma away from the Ovary stigma
- 13. Female Parts • Ovary protects the ovules(egg). • Once fertilization has taken place it will become the fruit.
- 14. Write the correct words in the boxes: stamens, stigma, petals, ovary, sepals these attract insects 4 where the pollen is made pollen sticks to this 5 2 where the seeds grow 1 These protect the flower before it opens 3 Write the correct words in the boxes: stamens, stigma, petals, ovary, sepals
- 16. Plants Reproductive Structures • Cones: Gymnosperms – Female cones contain the ovules which contains the egg cell – Male cones contain pollen which are like sperm cells • Flowers: Angiosperms – Pistil: female part of flower – Stamen: Male part of flower
- 17. Pollination • Insects visit flowers to search for nectar – their food. • But the flowers use the insects for their own purposes!
- 18. • As the insect probes for nectar, its body rubs against the stamens. • Pollen gets stuck on the insect’s legs. • You can often see bees with a heavy load of yellow pollen on their hind legs.
- 19. Pollination When the insect visits another flower of the same type, the pollen will stick to the pistal. This is called pollination.
- 20. Fertilization The pollen travels to the ovary, where it joins with an ovule. This is called fertilization.
- 21. Seeds • Seeds: the fertilized egg • Seed Structure: consists of a seed coat, a young plant, and stored food
- 22. Types of Seeds
- 23. Types of Seeds
- 24. Seeds • The seeds develop inside the ovary, which grows to become the seed pod or fruit.
- 25. Seed Dispersal • The seeds are dispersed; some by animals, some by the wind, some by explosion and some by water.
Hinweis der Redaktion
- Please feel free to change anything in order to tailor these slides for your own use – you might wish to use this presentation as revision or as an introduction to the topic – I hope that it is of use!!
- You might like to stop the show here and print out this slide. If you are using the Powerpoint version, go to Format, Background, Background Fill, and choose white, then click on Apply. This will change the background of this slide only to white so that you can print more economically. Change back to the original colour before you show the slides again. The children could now examine some flowers, identifying the parts, looking at them through a hand lens etc. When you think they are ready to move on to pollination, show the slides again from the beginning for revision, or start at the first pollination slide.
- Slides 18 and 19 can be printed and used as worksheets – remember to change the background colour to white if you want to save ink (see notes with slide 10)– for black and white copying a white background is of course preferable anyway.