1. 4. How did you use media technologies in the construction and
research, planning and evaluation stages?
To document all my work this year I have been posting on my blog
(http://hannahwintermediaagain.blogspot.co.uk/). This allowed me to show a
progression of all my thoughts and ideas but also my finished outcomes and how
I’d made improvements.
The main websites I have used have been:
Blogger
YouTube
SlideShare
Survey Monkey
Prezi
Facebook/Twitter (social media to promote)
The purpose of these websites was to document, promote and collate
information.
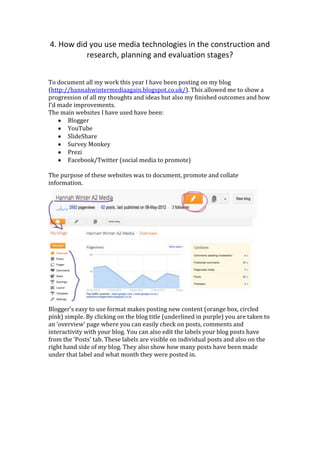
Blogger’s easy to use format makes posting new content (orange box, circled
pink) simple. By clicking on the blog title (underlined in purple) you are taken to
an ‘overview’ page where you can easily check on posts, comments and
interactivity with your blog. You can also edit the labels your blog posts have
from the ‘Posts’ tab. These labels are visible on individual posts and also on the
right hand side of my blog. They also show how many posts have been made
under that label and what month they were posted in.
2. I used YouTube to upload my own music video (and drafts) to. YouTube is easily
accessible and fast loading; it also has easy sharing features. It was also very
important in my research into other artists and their music videos. Slideshare
allowed me to use Microsoft Word at home to type up my main documents (e.g.
this evaluation question!) and then share the document in a smart and simple
way. It’s easy to scroll through the document and it helps me to keep the
presentation of my work the way I want it to be as blogger can sometimes resize
images once they have been posted. An example of how SlideShare documents
looks once uploaded onto my blog can bee seen in the image above. Survey
Monkey was vital as it allowed me to obtain audience feedback in an easy way,
the link for my surveys was easy to
share via email and social
networking and all the results
ended up in one place and it
allowed my feedback to be much
more targeted to the answers that
I wanted.
Prezi is similar, in some respects,
to SlideShare except you create
new presentation on the website.
Prezi enhances the interactivity of
a presentation and allows
embedding of YouTube videos to
completely revolutionize the way
you can present, especially when
trying to show/compare many images or video and other things. Plus, these
presentations are easily embedded so sharing my presentations was easy. Social
media was also of great use as it allowed me to connect with people I know and
ask for feedback on my work, it also helped share my work and find my target
audience.
For the production of my music video I used a Sony
Handycam (Sony HVR-HD1000E). Due to the weather
being poor at the time it was wise to avoid damaging
3. any expensive equipment plus it was far easier to use in a outside location. Using
the HD mode on the camera allowed to still achieve very high quality footage but
due to the camera being more compact it allowed me to get interesting vantage
point shots and to see what I
was doing more clearly.
To edit my music video I
used Final Cut Express on an
iMac. The large iMac screen
allowed editing to be far
easier as the screen was
clear and allowed precise
cuts to be made and colour
corrections far easier. Using
such high quality editing
equipment made the overall
finished music video look very professional as opposed to me having edited it
using iMovie or a more basic editing software. It was also possible to produce
split screens on this software; this made the outcome a lot more interesting.
To produce my digipak and magazine article I used Photoshop CS5 and CS6.
Having the use of my Macbook at home made this far easier as I could use more
advanced tools to polish anything I wanted to. To produce the magazine article I
used a screen grab from the music video, selected the two parts I wanted and
placed them onto a nice simplistic colour background. I then played around with
the hue and contrast until I was happy with the colours in the image. Using the
draw tool I ‘traced the outlines’ and used the text tool to do the text parts. It was
a fairly similar process for my digipak, except I didn’t use the ‘outline’ as I felt it
wasn’t as effective on the digipak. For the back cover I produced a typographic
portrait from a sourced image of the artist. To do this I changed the sourced
image to black and white, changed it to threshold 4 and then chose the words I
wanted to be in the portrait. By selecting each individual word I then created a
default brush preset and then used these brushes as stamps. I selected one of the
4 shades of the sourced image at a time and then went on ‘select… similar’ and
stamped until the entire image was full. This creates a really personal deep
image, which is what I felt the song represented. I wanted to show the layers of
the song in the portrait and how it’s more complex and has more layers than
people think. I stuck with the same font throughout both design pieces and
experimented with typography some more on the inside cover of my digipak.
Using another 2 screen grabs I manipulated the images on top of one another by
changing the opacity and desaturating them. This then became the image for the
disk inside the digipak.
The use of all of this technology has certainly been of incredible benefit to me, I
don’t actually think any of my results would have been possible without them.