1. RMAN Archiving Configuration Scenarios
node so that it can access directories on the other nodes remotely. For example, use
NFS on UNIX-based systems or mapped drives on Windows-based systems.
Therefore, each node writes only to a local destination, but each node can also read
archived redo log files in remote directories on the other nodes.
Considerations for Using Non-Cluster File System Local Archiving
If you use non-cluster file system local archiving for media recovery, then you must
configure the node that is performing recovery for remote access to the other nodes so
that it can read the archived redo log files in the archiving directories on the other
nodes. In addition, if you are in recovery and if you do not have all of the available
archive logs, then you must perform an incomplete recovery up to the first missing
archived redo log sequence number. You do not have to use a specific configuration
for this scheme. However, if you want to distribute the backup processing onto
multiple nodes, then the easiest method is to configure channels as described in the
backup scenarios in Chapter 8, quot;Managing Backup and Recoveryquot;.
Initialization Parameter Settings for Non-Cluster File System Local Archiving
You can set the archiving destination values as follows in the initialization parameter
file:
sid1.LOG_ARCHIVE_DEST_1=quot;LOCATION=/arc_dest_1quot;
sid2.LOG_ARCHIVE_DEST_1=quot;LOCATION=/arc_dest_2quot;
sid3.LOG_ARCHIVE_DEST_1=quot;LOCATION=/arc_dest_3quot;
The following list shows the possible archived redo log entries in the database control
file. Note that any node is able to archive logs from any of the threads:
/arc_dest_1/log_1_1000_23435343.arc
/arc_dest_2/log_1_1001_23452345.arc <- thread 1 archived in node 2
/arc_dest_2/log_3_1563_23452345.arc <- thread 3 archived in node 2
/arc_dest_1/log_2_753_23452345.arc <- thread 2 archived in node 1
/arc_dest_2/log_2_754_23452345.arc
/arc_dest_3/log_3_1564_23452345.arc
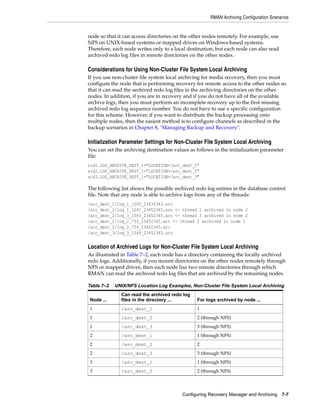
Location of Archived Logs for Non-Cluster File System Local Archiving
As illustrated in Table 7–2, each node has a directory containing the locally archived
redo logs. Additionally, if you mount directories on the other nodes remotely through
NFS or mapped drives, then each node has two remote directories through which
RMAN can read the archived redo log files that are archived by the remaining nodes.
Table 7–2 UNIX/NFS Location Log Examples, Non-Cluster File System Local Archiving
Can read the archived redo log
Node ... files in the directory ... For logs archived by node ...
1 1
/arc_dest_1
1 2 (through NFS)
/arc_dest_2
1 3 (through NFS)
/arc_dest_3
2 1 (through NFS)
/arc_dest_1
2 2
/arc_dest_2
2 3 (through NFS)
/arc_dest_3
3 1 (through NFS)
/arc_dest_1
3 2 (through NFS)
/arc_dest_2
Configuring Recovery Manager and Archiving 7-7
2. Changing the Archiving Mode in Real Application Clusters
Table 7–2 (Cont.) UNIX/NFS Location Log Examples, Non-Cluster File System Local
Can read the archived redo log
Node ... files in the directory ... For logs archived by node ...
3 3
/arc_dest_3
File System Configuration for Non-Cluster File System Local Archiving
If you are performing recovery and a surviving instance must read all of the logs that
are on disk but not yet backed up, then you should configure NFS as shown in
Table 7–3.
Table 7–3 UNIX/NFS Configuration for Shared Read Local Archiving Examples
Node Directory ... Is configured ... And mounted on ... On node ...
1 Local read/write n/a n/a
/arc_dest_1
1 NFS read 2
/arc_dest_2 /arc_dest_2
1 NFS read 3
/arc_dest_3 /arc_dest_3
2 NFS read 1
/arc_dest_1 /arc_dest_1
2 Local read/write n/a n/a
/arc_dest_2
2 NFS read 3
/arc_dest_3 /arc_dest_3
3 NFS read 1
/arc_dest_1 /arc_dest_1
3 NFS read 2
/arc_dest_2 /arc_dest_2
3 Local read/write n/a n/a
/arc_dest_3
Windows users can achieve the same results depicted in the
Note:
examples in this section by using mapped drives.
Changing the Archiving Mode in Real Application Clusters
You can run the ALTER DATABASE SQL statement to change the archiving mode in
RAC as long as the database is mounted by the local instance but not open in any
instances. You do not need to modify parameter settings to run this statement.
You can also change the archive log mode by using the
Note:
Recovery Settings page in the Maintenance tab of the Enterprise
Manager RAC Database Home Page.
Monitoring the Archiver Processes
After your RMAN configuration is operative in your RAC environment, use the
GV$ARCHIVE_PROCESSES and V$ARCHIVE_PROCESSES views to determine the
status of the archiver processes. Depending on whether you query the global or local
views, these views display information for all database instances, or for only the
instance to which you are connected. Refer to Oracle Database Reference for more
information about the database views.
7-8 Oracle Clusterware and RAC Administration and Deployment Guide
3. 8
Managing Backup and Recovery
This chapter explains instance recovery and how to use Recovery Manager (RMAN) to
back up and restore Oracle Real Application Clusters (RAC) databases. This chapter
also describes RAC instance recovery, parallel backup, recovery with SQL*Plus, and
using the Flash Recovery Area in RAC. The topics in this chapter include:
RMAN Backup Scenario for Non-Cluster File System Backups
■
RMAN Restore Scenarios for Real Application Clusters
■
RMAN Recovery Through Resetlogs in Real Application Clusters
■
RMAN and Oracle Net in Real Application Clusters
■
Instance Recovery in Real Application Clusters
■
Media Recovery in Real Application Clusters
■
Parallel Recovery in Real Application Clusters
■
Using a Flash Recovery Area in Real Application Clusters
■
For restore and recovery in RAC environments, you do not
Note:
have to configure the instance that performs the recovery to also be
the sole instance that restores all of the datafiles. IN RAC, datafiles are
accessible from every node in the cluster, so any node can restore
archived log files.
See Also: Chapter 3, quot;Administering Oracle Clusterware
Componentsquot; for information about backing and restoring the Oracle
Clusterware components such as the Oracle Cluster Registry (OCR)
and the voting disk
RMAN Backup Scenario for Non-Cluster File System Backups
In a non-cluster file system environment, each node can back up only its own local
archived redo logs. For example, node 1 cannot access the archived redo logs on node
2 or node 3 unless you configure the network file system for remote access. If you
configure a network file system file for backups, then each node will backup its
archived logs to a local directory.
RMAN Restore Scenarios for Real Application Clusters
This section describes the following common RMAN restore scenarios:
Managing Backup and Recovery 8-1
4. RMAN Restore Scenarios for Real Application Clusters
Cluster File System Restore Scheme
■
Non-Cluster File System Restore Scheme
■
Using RMAN or Enterprise Manager to Restore the Server Parameter File (SPFILE)
■
The restore and recovery procedures in a cluster file system
Note:
scheme do not differ substantially from Oracle single-instance
scenarios.
Cluster File System Restore Scheme
The scheme that this section describes assumes that you are using the quot;Automatic
Storage Management and Cluster File System Archiving Schemequot; on page 7-5. In this
scheme, assume that node 3 performed the backups to a CFS. If node 3 is available for
the restore and recovery operation, and if all of the archived logs have been backed up
or are on disk, then run the following commands to perform complete recovery:
RESTORE DATABASE;
RECOVER DATABASE;
If node 3 performed the backups but is unavailable, then configure a media
management device for one of the remaining nodes and make the backup media from
node 3 available to this node.
Non-Cluster File System Restore Scheme
The scheme that this section describes assumes that you are using the quot;Non-Cluster
File System Local Archiving Schemequot; on page 7-6. In this scheme, each node archives
locally to a different directory. For example, node 1 archives to /arc_dest_1, node 2
archives to /arc_dest_2, and node 3 archives to /arc_dest_3. You must configure
a network file system file so that the recovery node can read the archiving directories
on the remaining nodes.
If all nodes are available and if all archived redo logs have been backed up, then you
can perform a complete restore and recovery by mounting the database and running
the following commands from any node:
RESTORE DATABASE;
RECOVER DATABASE;
Because the network file system configuration enables each node read access to the
other nodes, then the recovery node can read and apply the archived redo logs located
on the local and remote disks. No manual transfer of archived redo logs is required.
Using RMAN or Enterprise Manager to Restore the Server Parameter File (SPFILE)
RMAN can restore the server parameter file either to the default location or to a
location that you specify. This procedure is described in Oracle Database Backup and
Recovery Basics.
You can also use Enterprise Manager to restore SPFILE. From the Backup/Recovery
section of the Maintenance tab, click Perform Recovery. The Perform Recovery link is
context-sensitive and navigates you to the SPFILE restore only when the database is
closed.
8-2 Oracle Clusterware and RAC Administration and Deployment Guide
5. Instance Recovery in Real Application Clusters
RMAN Recovery Through Resetlogs in Real Application Clusters
The resetlogs operation automatically archives online logs. This ensures that your
database has the necessary archived redo logs if recovery was done to a point in time
in the online or in the standby logs. You do not need to perform a full backup after a
resetlogs operation.
The default archivelog format includes a resetlogs identifier. You do not need to
change the backup scripts after performing a reset logs operation. RMAN backs up
earlier incarnation logs on running BACKUP ARCHIVELOG ALL or BACKUP
ARCHIVELOG FROM TIME or BACKUP ARCHIVELOG FROM SCN command.
RMAN and Oracle Net in Real Application Clusters
To facilitate RMAN in Oracle Net, RMAN only needs a net service name that creates a
dedicated server connection. You can configure this net service name on any active
instance within your RAC environment.
For any RMAN connection made through a net service name, each net service name
must specify only one instance. This applies to all RMAN connections, whether you
configure these connections from the command line or through the CONNECT clause in
ALLOCATE CHANNEL or CONFIGURE CHANNEL RMAN commands. Additionally, when
you use RMAN from the command line, you can only connect to one instance in a
RAC database at a time. For example, assume that node1, node2, and node3 are net
service names for three instances in a RAC environment. In this case, connect to the
target database with only one of these net service names, for example:
% rman TARGET SYS/oracle@node2 CATALOG rman/cat@catdb
Instance Recovery in Real Application Clusters
Instance failure occurs when software or hardware problems disable an instance. After
instance failure, Oracle automatically uses the online redo logs to perform recovery as
described in this section.
Single Node Failure in Real Application Clusters
Instance recovery in RAC does not include the recovery of applications that were
running on the failed instance. Oracle clusterware restarts the instance automatically.
You can also use callout programs as described in the example on OTN to trigger
application recovery.
Applications that were running continue by using failure recognition and recovery.
This provides consistent and uninterrupted service in the event of hardware or
software failures. When one instance performs recovery for another instance, the
surviving instance reads online redo logs generated by the failed instance and uses
that information to ensure that committed transactions are recorded in the database.
Thus, data from committed transactions is not lost. The instance performing recovery
rolls back transactions that were active at the time of the failure and releases resources
used by those transactions.
All online redo logs must be accessible for instance recovery.
Note:
Therefore, Oracle recommends that you mirror your online redo logs.
Managing Backup and Recovery 8-3
6. Instance Recovery in Real Application Clusters
Multiple-Node Failures in Real Application Clusters
When multiple node failures occur, as long as one instance survives, RAC performs
instance recovery for any other instances that fail. If all instances of a RAC database
fail, then Oracle automatically recovers the instances the next time one instance opens
the database. The instance performing recovery can mount the database in either
cluster database or exclusive mode from any node of a RAC database. This recovery
procedure is the same for Oracle running in shared mode as it is for Oracle running in
exclusive mode, except that one instance performs instance recovery for all of the
failed instances.
Using RMAN to Create Backups in Real Application Clusters
Oracle provides RMAN for backing up and restoring the database. RMAN enables
you to back up, restore, and recover datafiles, control files, SPFILEs, and archived redo
logs. RMAN is included with the Oracle server and it is installed by default. You can
run RMAN from the command line or you can use it from the Backup Manager in
Oracle Enterprise Manager. In addition, RMAN is the recommended backup and
recovery tool if you are using Automatic Storage Management (ASM).
The procedures for using RMAN in RAC environments do not differ substantially
from those for Oracle single-instance environments. Refer to the Oracle Backup and
Recovery documentation set for more information about single-instance RMAN
backup procedures.
Channel Connections to Cluster Instances
Channel connections to the instances are determined using the connect string defined
by channel configurations. For example, in the following configuration, three channels
are allocated using user1/pwd1@service_name. If you configure the SQL Net
service name with load balancing turned on, then he channels are allocated at a node
as decided by the load balancing algorithm.
CONFIGURE DEVICE TYPE sbt PARALLELISM 3;
CONFIGURE DEFAULT DEVICE TYPE TO sbt;
CONFIGURE CHANNEL DEVICE TYPE SBT CONNECT 'user1/pwd1@<service_name>'
However, if the service name used in the connect string is not for load balancing, then
you can control at which instance the channels are allocated using separate connect
strings for each channel configuration as follows:
CONFIGURE DEVICE TYPE sbt PARALLELISM 3;
CONFIGURE CHANNEL 1.. CONNECT 'user1/pwd1@node1';
CONFIGURE CHANNEL 2.. CONNECT 'user2/pwd2@node2';
CONFIGURE CHANNEL 3.. CONNECT 'user3/pwd3@node3';
In the previous example, it is assumed that node1, node2 and node3 are SQL Net
service names that connect to pre-defined nodes in your RAC environment.
Alternatively, you can also use manually allocated channels to backup your database
files. For example, the following command backs up the spfile, controlfile, datafiles
and archived logs:
RUN
{
ALLOCATE CHANNEL CH1 CONNECT 'user1/pwd1@node1';
ALLOCATE CHANNEL CH2 CONNECT 'user2/pwd2@node2';
ALLOCATE CHANNEL CH3 CONNECT 'user3/pwd3@node3';
BACKUP DATABASE PLUS ARCHIVED LOG;
}
8-4 Oracle Clusterware and RAC Administration and Deployment Guide
7. Instance Recovery in Real Application Clusters
During a backup operation, as long as at least one of the channels allocated has access
to the archived log, RMAN automatically schedules the backup of the specific log on
that channel. Because the control file, spfile, and datafiles are accessible by any
channel, the backup operation of these files is distributed across the allocated
channels.
For a local archiving scheme, there must be at least one channel allocated to all of the
nodes that write to their local archived logs. For a CFS archiving scheme, assuming
that every node writes to the archived logs in the same CFS, the backup operation of
the archived logs is distributed across the allocated channels.
During a backup, the instances to which the channels connect must be either all
mounted or all open. For example, if the node1 instance has the database mounted
while the node2 and node3 instances have the database open, then the backup fails.
Node Affinity Awareness of Fast Connections
In some cluster database configurations, some nodes of the cluster have faster access to
certain datafiles than to other datafiles. RMAN automatically detects this, which is
known as node affinity awareness. When deciding which channel to use to back up a
particular datafile, RMAN gives preference to the nodes with faster access to the
datafiles that you want to back up. For example, if you have a three-node cluster, and
if node 1 has faster read/write access to datafiles 7, 8, and 9 than the other nodes, then
node 1 has greater node affinity to those files than nodes 2 and 3.
See Also: Oracle Database Backup and Recovery Reference for more
information about the CONNECT clause of the CONFIGURE CHANNEL
statement
Deleting Archived Redo Logs after a Successful Backup
Assuming that you have configured the automatic channels as defined in section
quot;Channel Connections to Cluster Instancesquot; on page 8-4, you can use the following
example to delete the archived logs that you backed up n times. The device type can
be DISK or SBT:
DELETE ARCHIVELOG ALL BACKED UP n TIMES TO DEVICE TYPE device_type;
During a delete operation, as long as at least one of the channels allocated has access to
the archived log, RMAN will automatically schedule the deletion of the specific log on
that channel. For a local archiving scheme, there must be at least one channel allocated
that can delete an archived log. For a CFS archiving scheme, assuming that every node
writes to the archived logs on the same CFS, the archived log can be deleted by any
allocated channel.
If you have not configured automatic channels, then you can manually allocate the
maintenance channels as follows and delete the archived logs.
ALLOCATE CHANNEL FOR MAINTENANCE DEVICE TYPE DISK CONNECT 'SYS/oracle@node1';
ALLOCATE CHANNEL FOR MAINTENANCE DEVICE TYPE DISK CONNECT 'SYS/oracle@node2';
ALLOCATE CHANNEL FOR MAINTENANCE DEVICE TYPE DISK CONNECT 'SYS/oracle@node3';
DELETE ARCHIVELOG ALL BACKED UP n TIMES TO DEVICE TYPE device_type;
Autolocation for Backup and Restore Commands
RMAN automatically performs autolocation of all files that it needs to back up or
restore. If you use the non-cluster file system local archiving scheme, then a node can
Managing Backup and Recovery 8-5
8. Media Recovery in Real Application Clusters
only read the archived redo logs that were generated by an instance on that node.
RMAN never attempts to back up archived redo logs on a channel it cannot read.
During a restore operation, RMAN automatically performs the autolocation of
backups. A channel connected to a specific node only attempts to restore files that
were backed up to the node. For example, assume that log sequence 1001 is backed up
to the drive attached to node 1, while log 1002 is backed up to the drive attached to
node 2. If you then allocate channels that connect to each node, then the channel
connected to node 1 can restore log 1001 (but not 1002), and the channel connected to
node 2 can restore log 1002 (but not 1001).
Media Recovery in Real Application Clusters
Media recovery must be user-initiated through a client application, whereas instance
recovery is automatically performed by the database. In these situations, use RMAN to
restore backups of the datafiles and then recover the database. The procedures for
RMAN media recovery in RAC environments do not differ substantially from the
media recovery procedures for single-instance environments.
The node that performs the recovery must be able to restore all of the required
datafiles. That node must also be able to either read all of the required archived redo
logs on disk or be able to restore them from backups.
Parallel Recovery in Real Application Clusters
Oracle automatically selects the optimum degree of parallelism for instance, crash, and
media recovery. Oracle applies archived redo logs using an optimal number of parallel
processes based on the availability of CPUs. You can use parallel instance recovery
and parallel media recovery in RAC databases as described under the following
topics:
Parallel Recovery with RMAN
■
Disabling Parallel Recovery
■
See Also: Oracle Database Backup and Recovery Advanced User's Guide
for more information on these topics
Parallel Recovery with RMAN
With RMAN's RESTORE and RECOVER commands, Oracle automatically makes
parallel the following three stages of recovery:
Restoring Datafiles When restoring datafiles, the number of channels you allocate in
the RMAN recover script effectively sets the parallelism that RMAN uses. For
example, if you allocate five channels, you can have up to five parallel streams
restoring datafiles.
Applying Incremental Backups Similarly, when you are applying incremental
backups, the number of channels you allocate determines the potential parallelism.
Applying Archived Redo Logs With RMAN, the application of archived redo logs is
performed in parallel. Oracle automatically selects the optimum degree of parallelism
based on available CPU resources.
8-6 Oracle Clusterware and RAC Administration and Deployment Guide
9. Using a Flash Recovery Area in Real Application Clusters
Disabling Parallel Recovery
You can override this using the procedures under the following topics:
Disabling Instance and Crash Recovery Parallelism
■
Disabling Media Recovery Parallelism
■
Disabling Instance and Crash Recovery Parallelism
To disable parallel instance and crash recovery on a multi-CPU system, set the
RECOVERY_PARALLELISM parameter to 0.
Disabling Media Recovery Parallelism
Use the NOPARALLEL clause of the RMAN RECOVER command or the ALTER
DATABASE RECOVER statement to force Oracle to use non-parallel media recovery.
Using a Flash Recovery Area in Real Application Clusters
To use a flash recovery area in RAC, you must place it on an ASM disk group, a
Cluster File System, or on a shared directory that is configured through a network file
system file for each RAC instance. In other words, the flash recovery area must be
shared among all of the instances of a RAC database. In addition, set the parameter
DB_RECOVERY_FILE_DEST to the same value on all instances.
Enterprise Manager enables you to set up a flash recovery area. To use this feature:
From the Cluster Database home page, click the Maintenance tab.
1.
Under the Backup/Recovery options list, click Configure Recovery Settings.
2.
Specify your requirements in the Flash Recovery Area section of the page.
3.
Click the Help for this page for more information.
4.
Managing Backup and Recovery 8-7
10. Using a Flash Recovery Area in Real Application Clusters
8-8 Oracle Clusterware and RAC Administration and Deployment Guide
11. 9
Administrative Options
This chapter describes administrative tasks or options within Oracle tools that are
specific to Oracle Real Application Clusters (RAC) and not discussed elsewhere in this
book. In some cases, you have a choice of tools to perform a task while other tasks
must be performed through a specific tool, such as Enterprise Manager or SRVCTL. In
addition, this chapter describes how to quiesce a RAC database and how to administer
network interfaces with the Oracle Interface Configuration Tool (OIFCFG). The topics
in this chapter are:
Enterprise Manager Tasks for Real Application Clusters
■
Real Application Clusters Administration Procedures for Enterprise Manager
■
Additional Information About SQL*Plus in Real Application Clusters
■
Quiescing Real Application Clusters Databases
■
Administering System and Network Interfaces with OIFCFG
■
Changing VIP Addresses
■
See Also: Oracle Enterprise Manager Concepts and the Enterprise
Manager online help for more information about Enterprise Manager
Enterprise Manager Tasks for Real Application Clusters
Within Enterprise Manager, RAC-specific administrative tasks generally focus on two
levels: tasks that affect an entire cluster database and tasks that affect specific
instances. For example, you can use Enterprise Manager to administer storage, the
schema, and security at the cluster database level. Or you can perform
instance-specific commands such as setting parameters or creating resource plans.
Because there is one Enterprise Manager Agent on each node of a RAC database, for
Database Control you can use any URL for that database to administer it with
Enterprise Manager. You can manage all of the following RAC components as targets
in your Enterprise Manager framework:
Host cluster—Accessible from the Cluster Database Home Page.
■
Cluster database instances—Links to the instance pages appear on the Cluster
■
Database Home Page.
Hosts and Listeners—Links to hosts and Listeners appear on the Cluster Database
■
Instance Pages.
Administrative Options 9-1
12. Using Enterprise Manager Grid Control to Discover Nodes and Instances
See Also: Oracle Enterprise Manager Concepts for information
about creating administrator accounts, using privileges, defining
roles, and so on, and Oracle Enterprise Manager Advanced
Configuration for information about configuring Enterprise
Manager Grid Control for multiple RAC databases
Using Enterprise Manager Grid Control to Discover Nodes and Instances
Discovering RAC database and instance targets in Enterprise Manager enables
monitoring and administration from the console. Database Control does not require
discovery because DBCA performs any necessary configuration while creating the
database. But for Grid Control, Enterprise Manager console interface can be used to
discover RAC database and instance targets. If the Grid Control agents are installed on
a cluster that already has RAC database, RAC database targets are discovered at install
time. You can use the console interface to discover targets if a database is created after
agents are installed or if a database is not automatically discovered at agent install
time. To discover nodes and instances, use Enterprise Manager Grid Control as
follows:
Log in to Enterprise Manager and click the Targets tab.
1.
Click the Database tab to view all of the available targets. The column labeled
2.
Types shows the RAC databases using the entry quot;Cluster Databasequot;.
Add the database target by selecting the target name, then clicking Add. The Add
3.
Database Target: Specify Host page appears, which enables you to add databases,
Listeners, and Automatic Storage Management (ASM) as monitored targets.
Click the flashlight icon to display the available host names, select a host, then
4.
click Continue. The Add Database: Specify Source page appears.
Either request Enterprise Manager to discover only single-instance databases and
5.
Listeners, or to discover all cluster databases, single-instance databases, and
Listeners on the cluster, then click Continue.
Enterprise Manager performs discovery to locate and display the cluster database
and its associated instances. The Targets Discovered on Cluster page appears. If
this procedure did not discover your reconfigured cluster database and all of its
instances, you can use this page to manually configure your cluster databases and
single-instance databases.
Enterprise Manager Pages for Real Application Clusters
This section describes the following Enterprise Manager pages for RAC:
Databases Summary Page
■
Cluster Database Home Page
■
Cluster Database Instances Pages
■
The Databases Overview Page for Real Application Clusters
■
The Cluster Home Page for Real Application Clusters
■
Databases Summary Page
This is a top-level page in Enterprise Manager Grid Control. The page shows cluster
and single-instance databases. If there are cluster databases in your environment, the
Databases Summary page displays quot;Cluster Databasequot; in the Type column. The page
9-2 Oracle Clusterware and RAC Administration and Deployment Guide
13. Enterprise Manager Pages for Real Application Clusters
also indicates cluster database availability as well as the ratio of active instances to
inactive instances. Click a cluster database link and Enterprise Manager displays the
Cluster Database Home Page for that database, which is described under the following
heading.
Cluster Database Home Page
From the Cluster Database Home Page you can manage the cluster nodes and hosts as
well as cluster subcomponents such as instances, Listeners, and interconnects. The
Cluster Database Home Page is also a summary page for cluster database management
that provides an overview of cluster database activity. Enterprise Manager uses a
unique database name to identify the cluster database it represents. You can use the
Administration tab on this page to perform many activities such as:
Create undo tablespaces and redo threads and assign them to specific instances,
■
SPFILE, create a backup
Start, stop, and relocate database services at the cluster database level
■
You can use the Maintenance tab on this page to perform operations such as:
Create backup and recovery scenarios
■
Toggle the archive mode on and off
■
Administer recovery settings
■
Manage resource plans for the database and its instances
■
You can define and modify the resource plans for the cluster database and also
activate and deactivate resource plans for specific instances. You can also use the
Resource Plan Schedule to schedule resource plan activation.
You can use the Interconnects tab on this page to perform tasks such as:
Monitoring the interconnect interfaces
■
Determining the load added by individual instances and databases on the
■
interconnect
Determining configuration issues
■
Identifying transfer rate-related issues including excess traffic, and so on
■
Cluster Database Instances Pages
Instances’ pages show instance-specific information similar to the information that you
would see on a single-instance Oracle database. The RAC-specific contents of Instance
Pages are:
Configuration—You can view instance states, view and edit initialization
■
parameters at the instance level and at the cluster database level, and view
resource plan performance statistics. You can also view and modify the undo
tablespaces assigned to an instance and the undo tablespace retention period.
Sessions—You can list the statuses of connected users, view the latest SQL for
■
specific sessions, and terminate sessions.
Locks—You can view details for currently held User type and System type locks.
■
Administrative Options 9-3
14. Real Application Clusters Administration Procedures for Enterprise Manager
The Databases Overview Page for Real Application Clusters
The Databases Overview Page links to Cluster Home Pages and to the node or
instance Home Pages.
The Cluster Home Page for Real Application Clusters
The Cluster Home Page displays an overview of activities and detailed reports at both
the cluster and instance levels. The Cluster Home Page has the following sections:
General Section—Provides a cluster status overview.
■
Configuration Section—Lists the hardware platform, operating system and
■
version, and Oracle or vendor clusterware version.
Cluster Databases Table—Displays the cluster databases associated with a cluster,
■
their availability, and any cluster database alerts. You can access the individual
Cluster Database Home Pages from the Cluster Databases Table.
Alerts Table—Provides alert information such as severity rating.
■
Hosts Table—Displays information about the hosts or nodes in the cluster.
■
Real Application Clusters Administration Procedures for Enterprise
Manager
The Cluster Database Home page shows all of the instances in the RAC database and
provides an aggregate collection of several RAC-specific statistics that are collected by
the Automatic Workload Repository (AWR) for server manageability.
You do not need to navigate to an instance-specific page to see these details. However,
on the Cluster Database Home page, if an instance is down that should be operating,
or if an instance has a high number of alerts, then you can drill down to the
instance-specific page for each alert.
To perform specific administrative tasks as described in the remainder of this section,
log in to the target RAC database, navigate to the Cluster Database Home page, and
click the Administration tab.
Administering Enterprise Manager Jobs in Real Application Clusters
You can administer Enterprise Manager jobs at both the database and instance levels.
For example, you can create a job at the cluster database level and the job will run on
any active instance of the target RAC database. Or you can create a job at the instance
level and the job will only run on the specific instance for which you created it. In the
event of a failure, recurring jobs can run on a surviving instance.
Creating Enterprise Manager Jobs in Real Application Clusters
Because you can create jobs at the instance level, cluster level, or cluster database level,
jobs can run on any available host in the cluster database. This applies to scheduled
jobs as well. Enterprise Manager also displays job activity in several categories,
namely, Active, History, and Library.
Use the Jobs tab to submit operating system scripts and SQL scripts and to examine
scheduled jobs. For example, to create a backup job for a specific RAC database:
Click Targets and click the database for which you want to create the job.
1.
Log in to the target database.
2.
9-4 Oracle Clusterware and RAC Administration and Deployment Guide
15. Additional Information About SQL*Plus in Real Application Clusters
When Enterprise Manager displays the Database Home page, click Maintenance.
3.
Complete the Enterprise Manage Job Wizard panels to create the job.
4.
Administering Alerts in Real Application Clusters with Enterprise Manager
You can use Enterprise Manager to configure RAC environment alerts. You can also
configure special RAC database tests, such as global cache converts, consistent read
requests, and so on.
Enterprise Manager distinguishes between database- and instance-level alerts in RAC
environments. Alert thresholds for instance level alerts, such as archive log alerts, can
be set at the instance target level. This enables you to receive alerts for the specific
instance if performance exceeds your threshold. You can also configure alerts at the
database level, such as setting alerts for tablespaces. This enables you to avoid
receiving duplicate alerts at each instance.
See Also: OTN for an example of configuring alerts in RAC and
the Oracle Database PL/SQL Packages and Types Reference for
information about using packages to configure thresholds
Performing Scheduled Maintenance Using Defined Blackouts in Enterprise Manager
You can define blackouts for all managed targets of a RAC database to prevent alerts
from occurring while performing maintenance. You can define blackouts for an entire
cluster database or for specific cluster database instances.
Additional Information About SQL*Plus in Real Application Clusters
The following sections describe the use of SQL*Plus in RAC environments:
How SQL*Plus Commands Affect Instances
■
Verifying that Instances are Running
■
How SQL*Plus Commands Affect Instances
Most SQL statements affect the current instance. You can use SQL*Plus to start and
stop instances in the RAC database. You do not need to run SQL*Plus commands as
root on UNIX-based systems or as Administrator on Windows-based systems. You
need only the proper database account with the privileges that you normally use for a
single-instance Oracle database. Some examples of how SQL*Plus commands affect
instances are:
ALTER SYSTEM CHECKPOINT LOCAL affects only the instance to which you are
■
currently connected, rather than the default instance or all instances.
ALTER SYSTEM CHECKPOINT or ALTER SYSTEM CHECKPOINT GLOBAL affects
■
all instances in the cluster database.
ALTER SYSTEM SWITCH LOGFILE affects only the current instance.
■
To force a global log switch, use the ALTER SYSTEM ARCHIVE LOG
■
CURRENT statement.
The INSTANCE option of ALTER SYSTEM ARCHIVE LOG enables you to
■
archive each online redo log file for a specific instance.
Table 9–1 describes how SQL*Plus commands affect instances.
Administrative Options 9-5
16. Quiescing Real Application Clusters Databases
Table 9–1 How SQL*Plus Commands Affect Instances
SQL*Plus Command Associated Instance
Always affects the current instance.
ARCHIVE LOG
Affects the default instance if no instance is specified in the CONNECT command.
CONNECT
Affects the node running the SQL*Plus session, regardless of the location of the
HOST
current and default instances.
Does not affect any particular instance, but rather the database.
RECOVER
Displays information about the current instance, which can be different from the
SHOW INSTANCE
default local instance if you have redirected your commands to a remote instance.
SHOW PARAMETER and Displays parameter and SGA information from the current instance.
SHOW SGA
STARTUP and SHUTDOWN Always affects the current instance. These are privileged SQL*Plus commands.
Verifying that Instances are Running
To verify that instances are running, on any node from a SQL*Plus prompt enter:
CONNECT SYS/password as SYSDBA
SELECT * FROM V$ACTIVE_INSTANCES;
Oracle returns output similar to the following:
INST_NUMBER INST_NAME
----------- -----------------
1 db1-sun:db1
2 db2-sun:db2
3 db3-sun:db3
The output columns for this example are shown in Table 9–2.
Table 9–2 Descriptions of V$ACTIVE_INSTANCES Columns
Column Description
Identifies the instance number.
INST_NUMBER
Identifies the host name and instance name.
INST_NAME
Quiescing Real Application Clusters Databases
The procedure for quiescing RAC databases is identical to quiescing a single-instance
database. You use the ALTER SYSTEM QUIESCE RESTRICTED statement from one
instance. You cannot open the database from any instance while the database is in the
process of being quiesced. Once all non-DBA sessions become inactive, the ALTER
SYSTEM QUIESCE RESTRICTED statement finishes, and the database is considered as
in a quiesced state. In an Oracle RAC environment, this statement affects all instances,
not just the one from which the statement is issued.
To successfully issue the ALTER SYSTEM QUIESCE RESTRICTED statement in a RAC
environment, you must have the Database Resource Manager feature activated, and it
must have been activated since instance startup for all instances in the cluster
database. It is through the facilities of the Database Resource Manager that non-DBA
sessions are prevented from becoming active. Also, while this statement is in effect,
any attempt to change the current resource plan will be queued until after the system
is unquiesced.
9-6 Oracle Clusterware and RAC Administration and Deployment Guide
17. Administering System and Network Interfaces with OIFCFG
These conditions apply to RAC:
If you issued the ALTER SYSTEM QUIESCE RESTRICTED statement but Oracle has
■
not finished processing it, you cannot open the database.
You cannot open the database if it is already in a quiesced state.
■
The ALTER SYSTEM QUIESCE RESTRICTED and ALTER SYSTEM UNQUIESCE
■
statements affect all instances in a RAC environment, not just the instance that
issues the command.
Quiesced State and Cold Backups
You cannot use the quiesced state to take a cold backup. This is because Oracle
background processes may still perform updates for Oracle internal purposes even
while the database is in quiesced state. In addition, the file headers of online datafiles
continue to look like they are being accessed. They do not look the same as if a clean
shutdown were done. You can still take online backups while the database is in a
quiesced state. Refer to the Oracle Database Administrator's Guide for details on the
quiesce database feature and the Oracle Database Reference for more information about
the ALTER SYSTEM QUIESCE RESTRICTED syntax.
Administering System and Network Interfaces with OIFCFG
This section describes the following Oracle Interface Configuration (OIFCFG) topics:
Defining Network Interfaces with OIFCFG
■
Syntax and Commands for the OIFCFG Command-Line Tool
■
Use the OIFCFG command-line tool in single-instance Oracle databases and in RAC
database environments to:
Allocate and de-allocate network interfaces to components
■
Direct components to use specific network interfaces
■
Retrieve component configuration information
■
The Oracle Universal Installer (OUI) also uses OIFCFG to identify and display the
interfaces available on the system.
Defining Network Interfaces with OIFCFG
The specification for a network interface uniquely identifies it using the interface
name, its associated subnet, and interface type. The interface type indicates the
purpose for which the network is configured. The supported interface types are:
Public—An interface that can be used for communication with components
■
external to RAC instances, such as Oracle Net and Virtual Internet Protocol (VIP)
addresses
Cluster interconnect—A private interface used for the cluster interconnect to
■
provide inter-instance or Cache Fusion communication
A network interface can be stored as a global interface or as a node-specific interface.
An interface is stored as a global interface when all of the nodes of a RAC cluster have
the same interface connected to the same subnet (recommended). It is stored as a
node-specific interface only when there are some nodes in the cluster that have a
different set of interfaces and subnets. If an interface is configured as both a global and
Administrative Options 9-7
18. Administering System and Network Interfaces with OIFCFG
a node-specific interface, the node-specific definition takes precedence over the global
definition.
A network interface specification is in the form of:
interface_name/subnet:interface_type
For example, the following identifies qfe0 as a cluster interconnect located at the
address 204.152.65.32:
qfe0/204.152.65.32:cluster_interconnect
Syntax and Commands for the OIFCFG Command-Line Tool
Use the oifcfg -help command to display online help for OIFCFG. The elements of
OIFCFG commands, some of which are optional depending on the command, are:
nodename—Name of the Oracle Clusterware node as listed in the output from the
■
olsnodes command
if_name—Name by which the interface is configured in the system
■
subnet—Subnet address of the interface
■
if_type—Type of interface: public or cluster_interconnect
■
You can use OIFCFG to list the interface names and the subnets of all of the interfaces
available on the local node by executing the iflist keyword as shown in this
example:
oifcfg iflist
hme0 139.185.141.0
qfe0 204.152.65.16
You can also retrieve specific OIFCFG information with a getif command using the
following syntax:
oifcfg getif [ [-global | -node nodename] [-if if_name[/subnet]] [-type if_type] ]
To store a new interface use the setif keyword. For example, to store the interface
hme0, with the subnet 139.185.141.0, as a global interface (to be used as an interconnect
for all of the RAC instances in your cluster), you would use the command:
oifcfg setif -global hme0/139.185.141.0:cluster_interconnect
For a cluster interconnect that exists between only two nodes, for example rac1 and
rac2, you could create the cms0 interface with the following commands, assuming
139.185.142.0 is the subnet addresses for the interconnect on rac1 and rac2
respectively:
oifcfg setif -global cms0/139.185.142.0:cluster_interconnect
Use the OIFCFG delif command to delete the stored configuration for global or
node-specific interfaces. A specific node-specific or global interface can be deleted by
supplying the interface name, with an optional subnet, on the command line. Without
the -node or -global options, the delif keyword deletes either the given interface
or all of the global and node-specific interfaces on all of the nodes in the cluster. For
example, the following command deletes the global interface named qfe0 for the
subnet 204.152.65.0:
oifcfg delif -global qfe0/204.152.65.0
9-8 Oracle Clusterware and RAC Administration and Deployment Guide
19. Changing VIP Addresses
On the other hand, the next command deletes all of the global interfaces stored with
OIFCFG:
oifcfg delif -global
Changing VIP Addresses
Use the following procedure to change a VIP address:
Stop all database and ASM instances.
1.
Stop the Listeners, and node applications using the srvctl stop nodeapps
2.
command.
Run the following command to verify node connectivity between all of the nodes
3.
for which your cluster is configured. This command discovers all of the network
interfaces available on the cluster nodes and verifies the connectivity between all
of the nodes by way of the discovered interfaces. This command also lists all of the
interfaces available on the nodes which are suitable for use as VIPs.
cluvfy comp nodecon -n all [-verbose]
See Also: Appendix A, quot;Troubleshootingquot; for more information
about enabling and using the Cluster Verification Utility (CVU)
Run the srvctl modify nodeapps command with the -A option as described
4.
in Appendix E. Use the crs_stat command to identify all active node
applications.
Restart all of the instances and node applications that you stopped in Step 1 and 2.
5.
Administrative Options 9-9