Mailchimp rsvp recap March 2019
•
1 gefällt mir•72 views

MailChimp RSVP Workbook. A 5-minute review of how to get a CalendarSnack to track RSVP's from a MailChimp Call to Action.

Empfohlen
Weitere ähnliche Inhalte
Was ist angesagt?
Was ist angesagt? (13)
Ähnlich wie Mailchimp rsvp recap March 2019
Ähnlich wie Mailchimp rsvp recap March 2019 (20)
Mehr von 31events.com
Mehr von 31events.com (20)
Kürzlich hochgeladen
Kürzlich hochgeladen (20)
Mailchimp rsvp recap March 2019
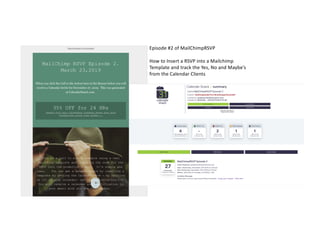
- 1. Episode #2 of MailChimpRSVP How to Insert a RSVP into a Mailchimp Template and track the Yes, No and Maybe’s from the Calendar Clients
- 2. Create a CalendarSnack by sending us, or ”copy us” at create@invitethis.com from your calendar client. We support Outlook Web, Outlook Fat Client and Google Calendars. Our auto bot, will send you a email with the hyperlink to get started. It will include instructions. Step 1 Get a Calendar Snack
- 3. This is the Calendar Snack Notification. email. The persona or the person who creates the Calendar Invite will receive the email with the details. It contains the individual calendarsnack itself for the particular event, documentation, You Tube Channel and additional how to guides. Step 2 The Calendar Snack.
- 4. Click Get Code. Click Email CTA. Step 3 Click to Copy link to clipboard to insert into MailChimp Campaign. Step 4 Step 5 This is the copy code area for the MailChimp RSVP.
- 5. In MailChimp, Click the Call to Action button or the Graphic you have created for inserting the MailChimp RSVP code from the calendarsnack. Step 6 MailChimp RSVP.
- 6. This MailChimp Campaign in email inbox. Customer clicks here and gets routed to a landing page and the calendar invite is sent an tracked. Step 7 - Send MailChimp Campaign.
- 7. This is the Calendar Invite in the Email Client Inbox and on the Calendar. This is the detailed Calendar Snack reporting in the in the Invite Details. Click Invitee Details Click Invitee Info Detailed RSVP Tracking Per Event, Per Person
- 8. 1. CalendarSnack Code is inserted in Campaign. 2. Customer Clicks on Call to Action. 3. CTA Click routed to landing page of your choice and gets sent the Calendar Invitation that we track in the reporting engine. 4. Full reporting of customer info on RSVP’s- and any changes they make on their calendar.