SlideShare ist ein Scribd-Unternehmen logo
1 von 151
Manipulating Fabric
POLKA DOT SMOCKING TUTORIAL
Black Marks = Sewing Guides for this tutorial only
Red Floss = For this tutorial only
1. Thread your needle with a 6-strand embroidery floss; knot one end
2. Starting from the back of the fabric, poke the needle UP through one polka dot as
shown in the pic
3. Next, run your needle through the bottom of the second polka dot
4. Repeat step 3 for the third and fourth polka dots. Then poke your needle through
the bottom of the first polka dot as shown in the pic
5. Slowly pull the threads together
6. Knot the thread on the back side. Cut thread.
7. Repeat steps for next cluster of 4 polka dots.
8. For this particular project, the polka dot clusters in the second row is in the between
the clusters in the first row. Repeat as many rows as your smocking heart desires.
Materials:
fabric: your desired height x 3 times your desired width. I’m making a fourteen inch
pillow, and I decided to play it safe by cutting a 18 x 54 in. piece of fabric. Your
fabric should be cotton or something else that can stand up to a good bit on ironing.
No melty fabrics.
embroidery floss
quilting ruler or yardstick
disappearing ink marking pen or light pencil
thin cardboard, like from a cereal box
iron and ironing board
spray starch
straight pins
Step 1: cut your cardboard strip
Cut your cardboard into a long, thin strip. I made mine 3/4 inches wide by 20 inches
long. Ideally you want your strip to be longer than your fabric, but this is not a
necessity. If you want wider pleats, make your strip wider than 3/4 inches.
Step 2: the first press
Use light starch for all pressing.
Lay your fabric on your ironing board so that the short edge is parallel with the sides
of the board the long edge falls down in front of you. Place the cardboard strip across
your fabric, about 3 inches from the short edge. Fold the 3 inches over the cardboard
strip. Press, using the strip as a straight edge for a nice, crisp pleat.
Step 3: the second press
Remove cardboard and flip your work over. Now the extra fabric falls over the far
side of the ironing board. Slide the edge of the cardboard onto the fold line made by
the first press. Fold the long side of your fabric halfway onto the cardboard strip and
then back on itself. Press.
Step 4: the pleat press
Remove the cardboard and flip your work over (again!). Tuck the cardboard into the
little fold you just made. Your cardboard should be halfway covered by the fabric.
Fold fabric up around the other side and back on itself. Press. Turn your fabric over to
see that you have made a full pleat! Cool.
Keep making pleats until you are 3 inches from the far edge or pleating reaches your
desired width. Remember to use starch—it’s your friend. Once you have a few pleats,
you’ll probably want to put some straight pins in your work to keep it from unfolding
as you flip it over and over.
Step 5: mark it
Lay your ruler across your work, about 2 inches from the top, perpendicular to the
pleats. Using the disappearing ink marking pen or the pencil, make a little mark on
each place where two pleats meet. Then mark the next row. The length between rows
should be double the width of your pleat. My pleats were 3/4 in. so I made 1.5 inches
between rows. If you’re using a pencil, make really light, tiny marks so they don’t
show later. If you’re using a disappearing ink pen, just make a couple rows at a time
so they don’t disappear before you can sew them!
Step 6: sew flat pleats
Thread a needle with two strands of embroidery floss. On the top row, on the first
mark of the row, sew up through all layers on one pleat and down through all layers
of the touching side of the adjacent pleat. Repeat stitch in the same place in order to
tack the pleat in place. Continue across the row, then for all rows until the smocked
portion of the work is the desired size (in my case, about 13 inches).
Step 7: sew pinch pleats
Start at one corner of your smocking. From the back, wiggle your threaded needle up
through one of the flat folds of your pleat, centering your needle between two stitched
rows. Pinch the pleat so that the sides come up and make an X. Make a tiny, stitch
right in the center of the X. Stitch through it again to tack it down. Wiggle your
needle down into the flat fold opposite where it came up. Repeat, pinching all pleats
in your work.
Taa-daa! You’ve done honeycomb smocking.
For this tutorial I chose a thick grey denim fabric, you can use most fabrics.. my
recommendation is something with a heavier weight, this will help retain the texture
shape. However you can use a fusible interfacing/backing after texture is complete,
just be careful not to smash down folds/texture to interfacing while ironing. I used a
interfacing on the red clutch above because it was a very lightweight fabric.
To begin, cut a piece of fabric LARGER than what you need for your project by a
couple inches each direction. The texture shrinks the fabric size! You can remeasure
& cut the dimentions you need once you have created your texture.
Start by graphing out the BACK of your fabric, the lines depend upon how much/less
texture you want your project to have. I chose 1.5 x 2 inch squares for my purse.
Next mark DOTS where you will be pinching the fabric to create texture.
I recommend alternately stacking your dots, not placing a dot directly on top of the
other.... this is just a preference however. Practice with your design on scrap
fabric first! :)
Pinch the dot point between your fingers...
Then fold keeping that dot point at the very outer edge. You can pin your fold in place
and repeat till all your dots have been pinched, folded & pinned.
Then sew along the edge of your fold, the further back your seam the deeper texture
folds you will have. I sewed mine along the yellow line, be sure to backstich each
seam!!
DONE! - The back of the fabric.
Notice there are no seams showing from the front! You can carefully iron your texture
to create sharper edges for a more polished look. Now you are ready to use the fabric
to create your own project. :)
I created this purse for my daughter with mine.
Cross shirring closeup
Block type: log cabin
Block size: 11 inches
Colour scheme: reds and neutrals
Texture/fabric manipulation: cross shirring
Quilt size: The finished quilt is 52 ½ x 52 ½.
Needs:
one 7 in x 7 in square in cream / white
two 5 in x 3 1/2 in rectangles and two 11 in x 3 1/2 in rectangles for the border
Making the cross shirring
Cut one 7 in x 7 in square.
Using a baste stitch start stitching at 1/4 inch from the edge in one straight line.
Continue to stitch at around 1/2 intervals until the end. No need to mark the lines. The
last stitching line should also be 1/4 inch from the edge.
When finished, start pulling the bottom thread from each stitching line. Do this from
each side. Spread the gathering all along the stitching line. Stop gathering the fabric
once the width is 5 inches.
Do this for all stitching lines.
Now do the same as before but in the opposite direction.
Again, pull the bottom thread of each stitching line and gather the fabric until you
reach 5 inches width.
Make your square edges as straight as possible so it is easy to attach the border to it
and the block irons as flat as possible.
Cut two 5 in x 3 1/2 in rectangles and two 11 in x 3 1/2 in rectangles for the border
and sew to the centre square.
Your block is done!
Ripples closeup
Block type: log cabin
Block size: 11 inches
Colour scheme: reds and neutrals
Texture/fabric manipulation: double controlled pleats with centre ripple effect
Quilt size: The finished quilt is 52 ½ x 52 ½.
Needs:
one 6 in x 15 in rectangle in red tones for the textured centre square
two 5 in x 3 1/2 in rectangles and two 11 in x 3 1/2 in rectangles for the border
Making the ripples
The pleats for this block are done in the same manner as we did in block 3. The only
difference is that the pleats are folded to opposites sides creating a ripple effect.
To make the pleats, mark the fabric at 7/8 and 3/8 inches intervals on both sides of the
square, top and bottom.
Make a small cut on each mark.
Start by folding the fabric onto the first mark/cut. The first segment is 7/8 wide (see
picture below).
Now fold the fabric into the next fold (see picture below).
Pin each fold as you go.
Make sure marks/cuts coincide neatly so that the folds are the same width.
Once you finish one side, do the same thing on the other but this time make the fold in
the opposite direction. This will achieve a ripple effect.
Stitch both sides leaving 3/4 inch allowance on each side.
Then trim to 5 inch square (1/2 inch from each side).
Cut two 5 in x 3 1/2 in rectangles and two 11 in x 3 1/2 in rectangles for the border
and attach it to the centre square.
Now you need to iron the ripples.
To accentuate the ripple effect use the iron lightly and press to opposite sides as if you
were “combing” the ripple.
Close up
Block type: log cabin
Block size: 11 inches
Colour scheme: reds and neutrals
Texture/fabric manipulation: centered tucks with bow ties
Quilt size: The finished quilt is 52 ½ x 52 ½.
Needs:
one 6 in x 10 1/2 in rectangle in red tones for the textured centre square
two 5 in x 3 1/2 in rectangles and two 11 in x 3 1/2 in rectangles for the border
Making the centred tucks with bow ties
Cut one 6 in x 10 1/2 in rectangle in cream tones.
Mark the fabric in the following way centering the lines in the piece of fabric:
5/8, 5/8 (left tuck) | 6/8 (space between tucks), 5/8, 5/8 (central tuck), 6/8 (space
between tucks), 5/8, 5/8 (right tuck).
Make small cuts on each line.
Starting with the middle tuck, make a light mark from cut to cut, fold making both
marks on the sides of each tuck coincide and pin.
Stitch along the marked line.
Do the same for the three tucks.
Press the tucks lightly open.
Mark the centre.
Stitch along the line. Then square the block to 5 inch square and stitch on both sides
of the tucks leaving a 1/4 inch seam allowance.
Now mark the middle from the centre for each tuck and make a bow tie as in the
picture below.
Leave the middle tuck as is.
Cut two 5 in x 3 1/2 in rectangles and two 11 in x 3 1/2 in rectangles for the border
and attach to the centre square.
Close up
Block type: 4-patch
Block size: 10 1/2 inches
Colour scheme: reds, greens and neutrals
Texture/fabric manipulation: fabric origami
Cut:
one red 6 in square
one 6 in pale green square
a 10 in cream square
a left over two triangles square from block 10
16 small white beads
Making the fabric origami
Cut a 10 in cream square and draw a grid with 1 inch intervals.
Pick up stitches in a criscross fashion as per picture.
Pull together and make a tight knot.
Continue to the end of the row.
This is what the right side will look like.
There’s no shape to it, I know. And it will be a bit tricky to find the shape.
In some instances you will see the diamond emerge like in the picture below. If not,
you’ll have to try and find it by pulling the corners of each corner that you just
stitched together previously.
Finding the folds and pushing them to the correct sides as per picture may help.
To help you, find the folds at the edges of the origami square as per picture.
You may find the diamonds are not perfectly square.
The back of the piece will look like this.
As you find the diamonds, it may help to iron them flat.
Here is the piece. Press well.
Now it’s time to stitch the beads.
As well as stitching the beads, we’re going to stitch each fold together as per picture.
And here is what the end result is.
Trim the square to 5 1/2 inches.
Closeup
Block type: log cabin
Block size: 11 inches
Colour scheme: reds and neutrals
Texture/fabric manipulation: fabric folding
Quilt size: The finished quilt is 52 1/2 x 52 1/2.
Needs:
one 5 inch square in white
about 80 1 1/2 inch squares in neutrals and some reds to add some interest
two 5 in x 3 1/2 in rectangles and two 11 in x 3 1/2 in rectangles for the border
Making the echidna
Cut about 80 1 1/2 inch squares in neutrals and some reds to add some interest.
Take one 1 1/2 inch square and fold in half into a triangle.
Then fold it again into a smaller triangle.
Just press with your fingers.
Pin small triangle to the cream square as per picture. Start at the bottom edge.
Add a full row of small triangles.
Stitch as close to the triangle edge as possible.
Then do the second row filling in the spaces between the first row triangles.
Stitch as close to the edge as possible.
Continue like that.
Just go all the way to the top edge of the square.
Turn square around to trim edges off.
The centre is done.
Cut border.
Attach border to square.
Closeup of finished block.
Close up
The spacing determines the size of the tube. For a more subtle finish use spacing
which is closer.
Block type: log cabin
Block size: 11 inches
Colour scheme: reds and neutrals
Texture/fabric manipulation: lozenge smocking
Quilt size: The finished quilt is 52 1/2 x 52 1/2.
Needs:
a 10 1/2 inch x 6 inches rectangle in cream tones for the centre square
two 5 in x 3 1/2 in rectangles and two 11 in x 3 1/2 in rectangles for the border
Making the lozenge smocking
Cut a 10 1/2 inch x 6 inches rectangle and mark at 1/2 inch intervals.
Smocking diagram
There are two kinds of stitching for this pattern. They alternate along each row of
smocking. The first type is when you pull two stitches together as per a and b on the
diagram. The next stitch is when you go from b to c but do not pull the stitches. In this
case you double stitch on c so that there is no pulling.
This is the first example where you pick up a and b and pull together.
After pulling the stitches together, do a double stitch before moving on to c.
With your needle pick up c without pulling.
Double stitch at c.
And so on following the diagram above.
As you go you will see the pattern emerge.
When finished, stretch the rectangle on a padded surface and pin well. Slightly crush
the tubes with your fingers to obtain a more rounded shape.
Apply steam with the iron touching the tubes but without pressing.
Let it dry. When dry trim to 5 inch squares.
Cut two 5 in x 3 1/2 in rectangles and two 11 in x 3 1/2 in rectangles for the border.
Stitch and the block is done.
Lattice closeup
This block requires hand sewing.
Block type: log cabin
Block size: 11 inches
Colour scheme: reds and neutrals
Texture/fabric manipulation: lattice smocking
Quilt size: The finished quilt is 52 ½ x 52 ½.
Needs:
one 7 in x 7 in rectangle in red tones for the textured centre square
two 5 in x 3 1/2 in rectangles and two 11 in x 3 1/2 in rectangles for the border
Making the lattice
Draw a 7 in x 7 in grid on a piece of fabric and mark it as per photo. Lines are 1/2
inch apart on both directions.
Diagram
Sew the lattice in groups of 4, i.e. 1 – 2, 3 – 4, 5 – 6 and 7 – 8. Then move to the next
4 lot, i.e. 9 – 10 , 11 – 12, etc and complete each pair of lines up to the end of the grid.
Then start from the left again in groups of 4 until the end of the line.
Arrow = pick up both dots together and stitch together and then do another stitch so
the stitch doesn’t open
Red dotted line = pick up dot without joining with previous dot, ie carry the thread to
the next dot
When moving from one pair of stitches, e.g. moving from 2 to 3, or from 5 to 6,
always make a double stitch on the first dot, i.e. on 1, 3, 5, etc. and then make another
double stitch after you join a pair, e.g. 1 and 2, 3 and 4, etc.
This is how it goes
Put needle through 1 and then pick up number 2. Pull both dots together and do a
double stitch.
Now carry the thread to number 3 and pick it up but do not pull, just do a double
stitch on number 3. Now pick up 4 and pull thread to stitch 3 and 4 together. Double
stitch there. Now carry the thread to 5 and double stitch. And so on.
You will start seeing the pattern after you complete the first line.
Once you have stitched the grid, you need to stretch the square rather than iron it.
Pin the lattice to for ironing board or other padded surface and steam it with your iron.
Let it dry.
Once it is dry, trim it to 5 inches. Iron the edges no more than 1/4 inches around well
before stitching the border.
Cut two 5 in x 3 1/2 in rectangles and two 11 in x 3 1/2 in rectangles for the border.
This is one of my favourite blocks so far. The texture is very rich and it looks great in
red.
Close up
This block requires hand stitching.
Block type: log cabin
Block size: 11 inches
Colour scheme: reds and neutrals
Texture/fabric manipulation: smocked tucks
Quilt size: The finished quilt is 52 ½ x 52 ½.
Needs:
one 16 in x 5 in rectangle in red
two 5 in x 3 ½ in rectangles and two 11 in x 3 ½ in rectangles for the border
Making the smocked tucks
one 16 in x 5 in rectangle in red and make marks at 3/4 in intervals starting at 1 inch
for the first interval off the side.
Iron each mark well.
Now, stitch each ironed fold leaving a 1/4 inch allowance.
This will be your centre square when all tucks have been stitched.
Iron the tucks to both sides lightly just enough to flatten the fabric between tucks.
Turn around tucked piece and mark it at 3/4 in intervals.
Start stitching two tucks together on the 3/4 in intervals. Stitch tucks a couple of
times.
Each time the needle goes down, do a double stitch on the back to avoid pulling down
the tucks you just stitched together.
Do a double stitch as well when you move from one pair of stitched tucks to the next
pair to avoid pulling.
When you finish the first line, start on the second line.
Make sure you stitch the tucks in a honeycomb shape, i.e. in the first line you started
stitching tuck 1 and tuck 2 together and so on; on the second line you will start
stitching tuck 2 and tuck 3 together and so on.
Complete the honeycomb stitching.
Either iron the ends of the tucks or add a stitch to each couple of tucks as per photo.
This will help when stitching the square to the border.
Stretch the square on to a padded surface and pin.
Steam it with the iron and let it dry.
Unpin when dried.
Close up
Block type: 4-patch
Block size: 10 1/2 inches
Colour scheme: reds, greens and neutrals
Texture/fabric manipulation: Canadian smocking
Cut:
one 6 1/4 in red square
one 6 1/4 in pale green square
one 4 1/2 in red square
one 4 1/2 in pale green square
one 9 in cream square
Making the shell smocking
Shell stitching diagram
As you can see in the diagram, shell smocking is stitched in rows.
The black line implies that both points, A and B, C and D, E and F, etc are pulled and
stitched together.
The dotted line implies that you drag your thread from the last pulled stitch to the next
stitching point, without pulling. Then you need to double stitch on the next stitching
point to act as an anchor for the next pulled stitches. If this is not clear, keep reading
below.
Get the 9 in fabric square and draw a grid with lines at 1/2 in intervals. Then draw the
diagonal lines as per photo below.
Double stitch on the first dot, then pick up the next dot.
Pull together and stitch. This is A and B pulled together.
Now move the thread to B and stitch without pulling.
Double stitch to anchor the thread on C.
Repeat the previous steps with C and D, and so on.
At the end of Row 1 you will have something like this.
Continue with Row 2, and so on.
Now stretch your smocking on a padded table as per picture below.
Use the steam from your iron to set the smocking. Place you iron close to the
smocking with the steam setting on and hoover over the piece. Let the piece get dry
and cold.
Then trim the piece to 5 1/2 inches.
Now get the red and greem 6 1/4 in squares and place them with right side facing
together. Trade a diagonal and pin.
Stitch on each side of the diagonal using a 1/4 in seam allowance.
Block type: log cabin
Block size: 11 inches
Colour scheme: reds and neutrals
Texture/fabric manipulation: undulating tucks
Quilt size: The finished quilt is 52 ½ x 52 ½.
Needs:
1 rectangle 10 in x 6 in in white/cream
two 5 in x 3 1/2 in rectangles and two 11 in x 3 1/2 in rectangles for the border
Making the undulating tucks
Cut one 10 in x 6 in rectangle and draw lines at 1 inch intervals on the back of the
fabric.
You could make small cuts on each end of the markings to make it easier when
pressing.
Press on each marking like below.
Start stitching tucks that are 1/4 inch deep. When done, press to one side, then to the
other.
Then square the block to 5 inch square.
Mark the square along the middle, at 2 1/2 inches from each side and then mark along
the middle or each half, i.e. at 1 1/4 from the middle on both sides.
Stitch along the marked line (see below) in the middle making sure the tucks face the
same direction.
Then stitch along each of the lines on the sides making sure the tucks face the
opposite direction.
Now, you could attach the borders to the square like I did and later, when sewing the
larger border stitch the tucks in opposite direction or stitch a last line on each side
with the tucks facing the opposite direction.
What I did was a bit more difficult to handle in the end, and I’ve learned from it. I
ironed the tucks facing the opposite side and then pinned them to the border to keep
them in place while I stitched the border.
The block is finished.
Closeup
Block type: log cabin
Block size: 11 inches
Colour scheme: reds and neutrals
Texture/fabric manipulation: fabric folding / fabric origami
Quilt size: The finished quilt is 52 1/2 x 52 1/2.
Needs:
two 10 in x 10 in squares in contrasting neutral tones for the centre square.
5 1/2 square to appliqué the origami
two 5 in x 3 1/2 in rectangles and two 11 in x 3 1/2 in rectangles for the border
Making the origami centre
Cut two 10 in x 10 in squares in contrasting neutral tones and place with right sides
facing together.
Fold twice into a square to find the centre and pin.
Open the square and trace a circle as per picture.
The mark is the line where you will cut. Sew within 1/4 inch from the marked line
leaving a 2 inch opening to turn the circle inside out.
Then cut around the marked line.
Turn inside out.
With an invisible stitch close the opening.
Iron circle well.
Find the centre of the circle again.
Open the circle and fold one side 1 1/2 inches in as per picture.
Do the same for all four sides and pin in place.
Then do another fold in the opposite direction making a square shape as per picture
below.
Now find the point where both folds join (see picture) and make a stitch.
Do the same for all 4 corners.
Now find the middle point between two corners and make a stitch.
Do the same on all sides.
Now look at the corner. Pick up both sides of the fabric and fold out as per picture. It
may be a bit tricky to do as the opening is small. Fold out the sides, insert your finger
in the opening to give it some shape and pull at the corner towards the outside to
mould the fabric into the shape. Do this several times to get the fold right.
Do this for all four corners.
Turn square around. The pin that identifies the centre point should still be there.
Now bring one corner to meet the centre and pin.
Now make a stitch in the corner.
Do the same for all corners.
This is what it should look like when you have stitched all corners in the centre.
The square is a bit bulky because it has not been ironed.
You can press the block on the outer corners a bit to flatten it.
The square is about 4 1/2 inches. We’ll be sewing it to a 5 inch square.
Cut a 5 1/2 inch square and appliqué the origami piece to it.
Manipulating fabric - The Art of Manipulating Fabric

Weitere ähnliche Inhalte

Was ist angesagt? (20)

Knitting
KnittingKnitting
Knitting
 
Knitting process and its Types
Knitting process and its TypesKnitting process and its Types
Knitting process and its Types
 
Seam
SeamSeam
Seam
 
Garment Costing
Garment CostingGarment Costing
Garment Costing
 
Types of fabric
Types of fabricTypes of fabric
Types of fabric
 
Yarn manufacturing processes
Yarn manufacturing processesYarn manufacturing processes
Yarn manufacturing processes
 
PLEATS......
 PLEATS...... PLEATS......
PLEATS......
 
Weaving
WeavingWeaving
Weaving
 
fabric structure .pptx
fabric structure .pptxfabric structure .pptx
fabric structure .pptx
 
Woven fabric making using shuttle loom
Woven fabric making using shuttle loomWoven fabric making using shuttle loom
Woven fabric making using shuttle loom
 
Fashion draping
Fashion drapingFashion draping
Fashion draping
 
Jacquard loom
Jacquard loomJacquard loom
Jacquard loom
 
INTRODUCTION TO PATTERN MAKING
INTRODUCTION TO PATTERN MAKINGINTRODUCTION TO PATTERN MAKING
INTRODUCTION TO PATTERN MAKING
 
Childrens body measurement
Childrens body measurementChildrens body measurement
Childrens body measurement
 
Knit garment costing
Knit garment costingKnit garment costing
Knit garment costing
 
Dept._of_Merchanidising
Dept._of_MerchanidisingDept._of_Merchanidising
Dept._of_Merchanidising
 
Seams and stitches
Seams and stitchesSeams and stitches
Seams and stitches
 
Marker
MarkerMarker
Marker
 
Resist printing
Resist printingResist printing
Resist printing
 
Knitting types
Knitting typesKnitting types
Knitting types
 

Andere mochten auch

Phân tích tình hình tài chính công ty cổ phần thăng long số 9
Phân tích tình hình tài chính công ty cổ phần thăng long số 9Phân tích tình hình tài chính công ty cổ phần thăng long số 9
Phân tích tình hình tài chính công ty cổ phần thăng long số 9https://www.facebook.com/garmentspace
 
Varsha karadia,B.Sc-Fashion Design + one year Fashion Design Womens wear dipl...
Varsha karadia,B.Sc-Fashion Design + one year Fashion Design Womens wear dipl...Varsha karadia,B.Sc-Fashion Design + one year Fashion Design Womens wear dipl...
Varsha karadia,B.Sc-Fashion Design + one year Fashion Design Womens wear dipl...dezyneecole
 
Phân tích tình tài chính tại công ty tnhh xây dựng và thương mại nam hải
Phân tích tình tài chính tại công ty tnhh xây dựng và thương mại nam hảiPhân tích tình tài chính tại công ty tnhh xây dựng và thương mại nam hải
Phân tích tình tài chính tại công ty tnhh xây dựng và thương mại nam hảihttps://www.facebook.com/garmentspace
 
The Game of Fashion: Textiles and Gaming.'
The Game of Fashion: Textiles and Gaming.'The Game of Fashion: Textiles and Gaming.'
The Game of Fashion: Textiles and Gaming.'Rachel Sayers
 
Aanchal Gupta,BCA 2nd year
Aanchal Gupta,BCA 2nd yearAanchal Gupta,BCA 2nd year
Aanchal Gupta,BCA 2nd yeardezyneecole
 
Trc investor presentation final
Trc investor presentation finalTrc investor presentation final
Trc investor presentation finaltrcsolutions
 
Fashion Technology Portfolio Surbhi Inani Post Graduate Diploma in Fashion Te...
Fashion Technology Portfolio Surbhi Inani Post Graduate Diploma in Fashion Te...Fashion Technology Portfolio Surbhi Inani Post Graduate Diploma in Fashion Te...
Fashion Technology Portfolio Surbhi Inani Post Graduate Diploma in Fashion Te...dezyneecole
 
Textile ecology
Textile ecologyTextile ecology
Textile ecologymona verma
 
Graffit. Is it art? by TH
Graffit. Is it art? by THGraffit. Is it art? by TH
Graffit. Is it art? by THISV4
 
Ready to Wear Analysis
Ready to Wear AnalysisReady to Wear Analysis
Ready to Wear AnalysisStevie Otap
 
Vdis10041 fabric in fashion lecture 1 copy
Vdis10041 fabric in fashion lecture 1 copyVdis10041 fabric in fashion lecture 1 copy
Vdis10041 fabric in fashion lecture 1 copyVirtu Institute
 
Akshay sharma,BS.c-Fashion Technology,+2 years Diploma
 Akshay sharma,BS.c-Fashion Technology,+2 years Diploma  Akshay sharma,BS.c-Fashion Technology,+2 years Diploma
Akshay sharma,BS.c-Fashion Technology,+2 years Diploma dezyneecole
 
Heena Soni,B.Sc fashion Technology+2 years Diploma
 Heena Soni,B.Sc fashion Technology+2 years Diploma Heena Soni,B.Sc fashion Technology+2 years Diploma
Heena Soni,B.Sc fashion Technology+2 years Diplomadezyneecole
 
Aksay Sharma,B.Sc-fashion Technology ,+ 2 years diploma
 Aksay Sharma,B.Sc-fashion Technology ,+ 2 years diploma  Aksay Sharma,B.Sc-fashion Technology ,+ 2 years diploma
Aksay Sharma,B.Sc-fashion Technology ,+ 2 years diploma dezyneecole
 

Andere mochten auch (20)

Fabric Art
Fabric ArtFabric Art
Fabric Art
 
Phân tích tình hình tài chính công ty cổ phần thăng long số 9
Phân tích tình hình tài chính công ty cổ phần thăng long số 9Phân tích tình hình tài chính công ty cổ phần thăng long số 9
Phân tích tình hình tài chính công ty cổ phần thăng long số 9
 
Pattern magic vol. 1
Pattern magic vol. 1Pattern magic vol. 1
Pattern magic vol. 1
 
Phân tích kết quả hoạt động kinh doanh
Phân tích kết quả hoạt động kinh doanhPhân tích kết quả hoạt động kinh doanh
Phân tích kết quả hoạt động kinh doanh
 
Varsha karadia,B.Sc-Fashion Design + one year Fashion Design Womens wear dipl...
Varsha karadia,B.Sc-Fashion Design + one year Fashion Design Womens wear dipl...Varsha karadia,B.Sc-Fashion Design + one year Fashion Design Womens wear dipl...
Varsha karadia,B.Sc-Fashion Design + one year Fashion Design Womens wear dipl...
 
Phân tích tình tài chính tại công ty tnhh xây dựng và thương mại nam hải
Phân tích tình tài chính tại công ty tnhh xây dựng và thương mại nam hảiPhân tích tình tài chính tại công ty tnhh xây dựng và thương mại nam hải
Phân tích tình tài chính tại công ty tnhh xây dựng và thương mại nam hải
 
The Game of Fashion: Textiles and Gaming.'
The Game of Fashion: Textiles and Gaming.'The Game of Fashion: Textiles and Gaming.'
The Game of Fashion: Textiles and Gaming.'
 
Aanchal Gupta,BCA 2nd year
Aanchal Gupta,BCA 2nd yearAanchal Gupta,BCA 2nd year
Aanchal Gupta,BCA 2nd year
 
Textile work
Textile workTextile work
Textile work
 
Trc investor presentation final
Trc investor presentation finalTrc investor presentation final
Trc investor presentation final
 
Fashion Technology Portfolio Surbhi Inani Post Graduate Diploma in Fashion Te...
Fashion Technology Portfolio Surbhi Inani Post Graduate Diploma in Fashion Te...Fashion Technology Portfolio Surbhi Inani Post Graduate Diploma in Fashion Te...
Fashion Technology Portfolio Surbhi Inani Post Graduate Diploma in Fashion Te...
 
Textile ecology
Textile ecologyTextile ecology
Textile ecology
 
Graffit. Is it art? by TH
Graffit. Is it art? by THGraffit. Is it art? by TH
Graffit. Is it art? by TH
 
Ready to Wear Analysis
Ready to Wear AnalysisReady to Wear Analysis
Ready to Wear Analysis
 
Vdis10041 fabric in fashion lecture 1 copy
Vdis10041 fabric in fashion lecture 1 copyVdis10041 fabric in fashion lecture 1 copy
Vdis10041 fabric in fashion lecture 1 copy
 
Akshay sharma,BS.c-Fashion Technology,+2 years Diploma
 Akshay sharma,BS.c-Fashion Technology,+2 years Diploma  Akshay sharma,BS.c-Fashion Technology,+2 years Diploma
Akshay sharma,BS.c-Fashion Technology,+2 years Diploma
 
Heena Soni,B.Sc fashion Technology+2 years Diploma
 Heena Soni,B.Sc fashion Technology+2 years Diploma Heena Soni,B.Sc fashion Technology+2 years Diploma
Heena Soni,B.Sc fashion Technology+2 years Diploma
 
use of steaming in textile processing machinery
use of steaming in textile processing machineryuse of steaming in textile processing machinery
use of steaming in textile processing machinery
 
Smart textile (2)
Smart textile (2)Smart textile (2)
Smart textile (2)
 
Aksay Sharma,B.Sc-fashion Technology ,+ 2 years diploma
 Aksay Sharma,B.Sc-fashion Technology ,+ 2 years diploma  Aksay Sharma,B.Sc-fashion Technology ,+ 2 years diploma
Aksay Sharma,B.Sc-fashion Technology ,+ 2 years diploma
 

Ähnlich wie Manipulating fabric - The Art of Manipulating Fabric

At Play with Applique
At Play with AppliqueAt Play with Applique
At Play with AppliqueNancy Walkup
 
Quilted Chair Caddy
Quilted Chair CaddyQuilted Chair Caddy
Quilted Chair Caddymlwilburn
 
Leather strap tote bag by rachel faucett for we allsew
Leather strap tote bag by rachel faucett for we allsewLeather strap tote bag by rachel faucett for we allsew
Leather strap tote bag by rachel faucett for we allsewqyuniku
 
Quick quilts#100 – animal parade wall hanging, blocks, and bib
Quick quilts#100 – animal parade wall hanging, blocks, and bibQuick quilts#100 – animal parade wall hanging, blocks, and bib
Quick quilts#100 – animal parade wall hanging, blocks, and bibNguyen Van LInh
 
Tessellation on a fabric
Tessellation on a fabricTessellation on a fabric
Tessellation on a fabriclauttasaari
 
How To Sew: Heart Appliqué Quilt
How To Sew: Heart Appliqué QuiltHow To Sew: Heart Appliqué Quilt
How To Sew: Heart Appliqué QuiltCandCSewing
 
bag pattern_pleated
bag pattern_pleatedbag pattern_pleated
bag pattern_pleatedteafunky
 
Creating a baby quilt 2016
Creating a baby quilt 2016Creating a baby quilt 2016
Creating a baby quilt 2016Amy Siems MAL
 
How To Sew: Embellished Curtain Panel
How To Sew: Embellished Curtain PanelHow To Sew: Embellished Curtain Panel
How To Sew: Embellished Curtain PanelCandCSewing
 
Embroidery
EmbroideryEmbroidery
Embroiderykibrom G
 
Sewing a Wool Felt Beret in your home
Sewing a Wool Felt Beret in your homeSewing a Wool Felt Beret in your home
Sewing a Wool Felt Beret in your homeShine Hats
 
How To Make A Classroom Chair Cover
How To Make A Classroom  Chair CoverHow To Make A Classroom  Chair Cover
How To Make A Classroom Chair Coverberri2529
 
classic stocking
classic stockingclassic stocking
classic stockingmaxter1
 

Ähnlich wie Manipulating fabric - The Art of Manipulating Fabric (20)

At Play with Applique
At Play with AppliqueAt Play with Applique
At Play with Applique
 
Pillow sham 101
Pillow sham 101Pillow sham 101
Pillow sham 101
 
Quilted Chair Caddy
Quilted Chair CaddyQuilted Chair Caddy
Quilted Chair Caddy
 
Bolsa qua drada
Bolsa qua dradaBolsa qua drada
Bolsa qua drada
 
Leather strap tote bag by rachel faucett for we allsew
Leather strap tote bag by rachel faucett for we allsewLeather strap tote bag by rachel faucett for we allsew
Leather strap tote bag by rachel faucett for we allsew
 
Quick quilts#100 – animal parade wall hanging, blocks, and bib
Quick quilts#100 – animal parade wall hanging, blocks, and bibQuick quilts#100 – animal parade wall hanging, blocks, and bib
Quick quilts#100 – animal parade wall hanging, blocks, and bib
 
Tessellation on a fabric
Tessellation on a fabricTessellation on a fabric
Tessellation on a fabric
 
How To Sew: Heart Appliqué Quilt
How To Sew: Heart Appliqué QuiltHow To Sew: Heart Appliqué Quilt
How To Sew: Heart Appliqué Quilt
 
bag pattern_pleated
bag pattern_pleatedbag pattern_pleated
bag pattern_pleated
 
Creating a baby quilt 2016
Creating a baby quilt 2016Creating a baby quilt 2016
Creating a baby quilt 2016
 
How To Sew: Embellished Curtain Panel
How To Sew: Embellished Curtain PanelHow To Sew: Embellished Curtain Panel
How To Sew: Embellished Curtain Panel
 
Embroidery
EmbroideryEmbroidery
Embroidery
 
Sewing a Wool Felt Beret in your home
Sewing a Wool Felt Beret in your homeSewing a Wool Felt Beret in your home
Sewing a Wool Felt Beret in your home
 
How to Make a Standard Pillowcase.pdf
How to Make a Standard Pillowcase.pdfHow to Make a Standard Pillowcase.pdf
How to Make a Standard Pillowcase.pdf
 
How To Make A Classroom Chair Cover
How To Make A Classroom  Chair CoverHow To Make A Classroom  Chair Cover
How To Make A Classroom Chair Cover
 
File 1366639180
File 1366639180File 1366639180
File 1366639180
 
File 1366639180
File 1366639180File 1366639180
File 1366639180
 
File 1366639717
File 1366639717File 1366639717
File 1366639717
 
File 1366639717
File 1366639717File 1366639717
File 1366639717
 
classic stocking
classic stockingclassic stocking
classic stocking
 

Mehr von https://www.facebook.com/garmentspace

Khóa luận tốt nghiệp ngành Luật Bảo hộ quyền sở hữu trí tuệ đối với nhãn hiệu...
Khóa luận tốt nghiệp ngành Luật Bảo hộ quyền sở hữu trí tuệ đối với nhãn hiệu...Khóa luận tốt nghiệp ngành Luật Bảo hộ quyền sở hữu trí tuệ đối với nhãn hiệu...
Khóa luận tốt nghiệp ngành Luật Bảo hộ quyền sở hữu trí tuệ đối với nhãn hiệu...https://www.facebook.com/garmentspace
 
Khóa luận tốt nghiệp Kinh tế Nâng cao hiệu quả kinh doanh của Công ty cổ phần...
Khóa luận tốt nghiệp Kinh tế Nâng cao hiệu quả kinh doanh của Công ty cổ phần...Khóa luận tốt nghiệp Kinh tế Nâng cao hiệu quả kinh doanh của Công ty cổ phần...
Khóa luận tốt nghiệp Kinh tế Nâng cao hiệu quả kinh doanh của Công ty cổ phần...https://www.facebook.com/garmentspace
 
Khóa luận tốt nghiệp Xây dựng hệ thống hỗ trợ tương tác trong quá trình điều ...
Khóa luận tốt nghiệp Xây dựng hệ thống hỗ trợ tương tác trong quá trình điều ...Khóa luận tốt nghiệp Xây dựng hệ thống hỗ trợ tương tác trong quá trình điều ...
Khóa luận tốt nghiệp Xây dựng hệ thống hỗ trợ tương tác trong quá trình điều ...https://www.facebook.com/garmentspace
 
Khóa luận tốt nghiệp Luật kinh tế Pháp luật về hợp đồng cung ứng dịch vụ thi ...
Khóa luận tốt nghiệp Luật kinh tế Pháp luật về hợp đồng cung ứng dịch vụ thi ...Khóa luận tốt nghiệp Luật kinh tế Pháp luật về hợp đồng cung ứng dịch vụ thi ...
Khóa luận tốt nghiệp Luật kinh tế Pháp luật về hợp đồng cung ứng dịch vụ thi ...https://www.facebook.com/garmentspace
 
Khóa luận tốt nghiệp Quản trị kinh doanh Hoàn thiện cơ cấu tổ chức và phân qu...
Khóa luận tốt nghiệp Quản trị kinh doanh Hoàn thiện cơ cấu tổ chức và phân qu...Khóa luận tốt nghiệp Quản trị kinh doanh Hoàn thiện cơ cấu tổ chức và phân qu...
Khóa luận tốt nghiệp Quản trị kinh doanh Hoàn thiện cơ cấu tổ chức và phân qu...https://www.facebook.com/garmentspace
 
Khóa luận tốt nghiệp Kinh tế Thu hút vốn đầu tư trực tiếp nước ngoài vào các ...
Khóa luận tốt nghiệp Kinh tế Thu hút vốn đầu tư trực tiếp nước ngoài vào các ...Khóa luận tốt nghiệp Kinh tế Thu hút vốn đầu tư trực tiếp nước ngoài vào các ...
Khóa luận tốt nghiệp Kinh tế Thu hút vốn đầu tư trực tiếp nước ngoài vào các ...https://www.facebook.com/garmentspace
 
Khóa luận tốt nghiệp Phân tích, thiết kế hệ thống thông tin quản lý nhân sự t...
Khóa luận tốt nghiệp Phân tích, thiết kế hệ thống thông tin quản lý nhân sự t...Khóa luận tốt nghiệp Phân tích, thiết kế hệ thống thông tin quản lý nhân sự t...
Khóa luận tốt nghiệp Phân tích, thiết kế hệ thống thông tin quản lý nhân sự t...https://www.facebook.com/garmentspace
 
Khóa luận tốt nghiệp Kinh tế Nâng cao năng lực cung ứng dịch vụ vận tải hàng ...
Khóa luận tốt nghiệp Kinh tế Nâng cao năng lực cung ứng dịch vụ vận tải hàng ...Khóa luận tốt nghiệp Kinh tế Nâng cao năng lực cung ứng dịch vụ vận tải hàng ...
Khóa luận tốt nghiệp Kinh tế Nâng cao năng lực cung ứng dịch vụ vận tải hàng ...https://www.facebook.com/garmentspace
 
Khóa luận tốt nghiệp Tuyển dụng nhân lực tại Công ty Cổ phần Miken Việt Nam.pdf
Khóa luận tốt nghiệp Tuyển dụng nhân lực tại Công ty Cổ phần Miken Việt Nam.pdfKhóa luận tốt nghiệp Tuyển dụng nhân lực tại Công ty Cổ phần Miken Việt Nam.pdf
Khóa luận tốt nghiệp Tuyển dụng nhân lực tại Công ty Cổ phần Miken Việt Nam.pdfhttps://www.facebook.com/garmentspace
 
Khóa luận tốt nghiệp ngành Luật Nâng cao hiệu quả áp dụng chính sách tiền lươ...
Khóa luận tốt nghiệp ngành Luật Nâng cao hiệu quả áp dụng chính sách tiền lươ...Khóa luận tốt nghiệp ngành Luật Nâng cao hiệu quả áp dụng chính sách tiền lươ...
Khóa luận tốt nghiệp ngành Luật Nâng cao hiệu quả áp dụng chính sách tiền lươ...https://www.facebook.com/garmentspace
 
Khóa luận tốt nghiệp ngành Luật Pháp luật về an toàn lao động và vệ sinh lao ...
Khóa luận tốt nghiệp ngành Luật Pháp luật về an toàn lao động và vệ sinh lao ...Khóa luận tốt nghiệp ngành Luật Pháp luật về an toàn lao động và vệ sinh lao ...
Khóa luận tốt nghiệp ngành Luật Pháp luật về an toàn lao động và vệ sinh lao ...https://www.facebook.com/garmentspace
 
Khóa luận tốt nghiệp Giải pháp phát triển hoạt động marketing điện tử cho Côn...
Khóa luận tốt nghiệp Giải pháp phát triển hoạt động marketing điện tử cho Côn...Khóa luận tốt nghiệp Giải pháp phát triển hoạt động marketing điện tử cho Côn...
Khóa luận tốt nghiệp Giải pháp phát triển hoạt động marketing điện tử cho Côn...https://www.facebook.com/garmentspace
 
Khóa luận tốt nghiệp Luật kinh tế Pháp luật về hợp đồng mua bán hàng hóa - Th...
Khóa luận tốt nghiệp Luật kinh tế Pháp luật về hợp đồng mua bán hàng hóa - Th...Khóa luận tốt nghiệp Luật kinh tế Pháp luật về hợp đồng mua bán hàng hóa - Th...
Khóa luận tốt nghiệp Luật kinh tế Pháp luật về hợp đồng mua bán hàng hóa - Th...https://www.facebook.com/garmentspace
 
Khóa luận tốt nghiệp Luật kinh tế Pháp luật về giao kết và thực hiện hợp đồng...
Khóa luận tốt nghiệp Luật kinh tế Pháp luật về giao kết và thực hiện hợp đồng...Khóa luận tốt nghiệp Luật kinh tế Pháp luật về giao kết và thực hiện hợp đồng...
Khóa luận tốt nghiệp Luật kinh tế Pháp luật về giao kết và thực hiện hợp đồng...https://www.facebook.com/garmentspace
 
Khóa luận tốt nghiệp Kinh tế Nâng cao năng lực cạnh tranh xuất khẩu mặt hàng ...
Khóa luận tốt nghiệp Kinh tế Nâng cao năng lực cạnh tranh xuất khẩu mặt hàng ...Khóa luận tốt nghiệp Kinh tế Nâng cao năng lực cạnh tranh xuất khẩu mặt hàng ...
Khóa luận tốt nghiệp Kinh tế Nâng cao năng lực cạnh tranh xuất khẩu mặt hàng ...https://www.facebook.com/garmentspace
 
Khóa luận tốt nghiệp Hoàn thiện công tác hoạch định của Công ty Cổ phần Đầu t...
Khóa luận tốt nghiệp Hoàn thiện công tác hoạch định của Công ty Cổ phần Đầu t...Khóa luận tốt nghiệp Hoàn thiện công tác hoạch định của Công ty Cổ phần Đầu t...
Khóa luận tốt nghiệp Hoàn thiện công tác hoạch định của Công ty Cổ phần Đầu t...https://www.facebook.com/garmentspace
 
Khóa luận tốt nghiệp ngành Luật Pháp luật về đăng ký kinh doanh và thực tiễn ...
Khóa luận tốt nghiệp ngành Luật Pháp luật về đăng ký kinh doanh và thực tiễn ...Khóa luận tốt nghiệp ngành Luật Pháp luật về đăng ký kinh doanh và thực tiễn ...
Khóa luận tốt nghiệp ngành Luật Pháp luật về đăng ký kinh doanh và thực tiễn ...https://www.facebook.com/garmentspace
 
Đề tài Tác động của đầu tư đến sự chuyển dịch cơ cấu kinh tế.doc
Đề tài Tác động của đầu tư đến sự chuyển dịch cơ cấu kinh tế.docĐề tài Tác động của đầu tư đến sự chuyển dịch cơ cấu kinh tế.doc
Đề tài Tác động của đầu tư đến sự chuyển dịch cơ cấu kinh tế.dochttps://www.facebook.com/garmentspace
 
Luận văn đề tài Nâng cao sự hài lòng về chất lượng dịch vụ tại công ty TNHH D...
Luận văn đề tài Nâng cao sự hài lòng về chất lượng dịch vụ tại công ty TNHH D...Luận văn đề tài Nâng cao sự hài lòng về chất lượng dịch vụ tại công ty TNHH D...
Luận văn đề tài Nâng cao sự hài lòng về chất lượng dịch vụ tại công ty TNHH D...https://www.facebook.com/garmentspace
 
Khóa luận tốt nghiệp Phân tích và thiết kế hệ thống thông tin quản lý nhân sự...
Khóa luận tốt nghiệp Phân tích và thiết kế hệ thống thông tin quản lý nhân sự...Khóa luận tốt nghiệp Phân tích và thiết kế hệ thống thông tin quản lý nhân sự...
Khóa luận tốt nghiệp Phân tích và thiết kế hệ thống thông tin quản lý nhân sự...https://www.facebook.com/garmentspace
 

Mehr von https://www.facebook.com/garmentspace (20)

Khóa luận tốt nghiệp ngành Luật Bảo hộ quyền sở hữu trí tuệ đối với nhãn hiệu...
Khóa luận tốt nghiệp ngành Luật Bảo hộ quyền sở hữu trí tuệ đối với nhãn hiệu...Khóa luận tốt nghiệp ngành Luật Bảo hộ quyền sở hữu trí tuệ đối với nhãn hiệu...
Khóa luận tốt nghiệp ngành Luật Bảo hộ quyền sở hữu trí tuệ đối với nhãn hiệu...
 
Khóa luận tốt nghiệp Kinh tế Nâng cao hiệu quả kinh doanh của Công ty cổ phần...
Khóa luận tốt nghiệp Kinh tế Nâng cao hiệu quả kinh doanh của Công ty cổ phần...Khóa luận tốt nghiệp Kinh tế Nâng cao hiệu quả kinh doanh của Công ty cổ phần...
Khóa luận tốt nghiệp Kinh tế Nâng cao hiệu quả kinh doanh của Công ty cổ phần...
 
Khóa luận tốt nghiệp Xây dựng hệ thống hỗ trợ tương tác trong quá trình điều ...
Khóa luận tốt nghiệp Xây dựng hệ thống hỗ trợ tương tác trong quá trình điều ...Khóa luận tốt nghiệp Xây dựng hệ thống hỗ trợ tương tác trong quá trình điều ...
Khóa luận tốt nghiệp Xây dựng hệ thống hỗ trợ tương tác trong quá trình điều ...
 
Khóa luận tốt nghiệp Luật kinh tế Pháp luật về hợp đồng cung ứng dịch vụ thi ...
Khóa luận tốt nghiệp Luật kinh tế Pháp luật về hợp đồng cung ứng dịch vụ thi ...Khóa luận tốt nghiệp Luật kinh tế Pháp luật về hợp đồng cung ứng dịch vụ thi ...
Khóa luận tốt nghiệp Luật kinh tế Pháp luật về hợp đồng cung ứng dịch vụ thi ...
 
Khóa luận tốt nghiệp Quản trị kinh doanh Hoàn thiện cơ cấu tổ chức và phân qu...
Khóa luận tốt nghiệp Quản trị kinh doanh Hoàn thiện cơ cấu tổ chức và phân qu...Khóa luận tốt nghiệp Quản trị kinh doanh Hoàn thiện cơ cấu tổ chức và phân qu...
Khóa luận tốt nghiệp Quản trị kinh doanh Hoàn thiện cơ cấu tổ chức và phân qu...
 
Khóa luận tốt nghiệp Kinh tế Thu hút vốn đầu tư trực tiếp nước ngoài vào các ...
Khóa luận tốt nghiệp Kinh tế Thu hút vốn đầu tư trực tiếp nước ngoài vào các ...Khóa luận tốt nghiệp Kinh tế Thu hút vốn đầu tư trực tiếp nước ngoài vào các ...
Khóa luận tốt nghiệp Kinh tế Thu hút vốn đầu tư trực tiếp nước ngoài vào các ...
 
Khóa luận tốt nghiệp Phân tích, thiết kế hệ thống thông tin quản lý nhân sự t...
Khóa luận tốt nghiệp Phân tích, thiết kế hệ thống thông tin quản lý nhân sự t...Khóa luận tốt nghiệp Phân tích, thiết kế hệ thống thông tin quản lý nhân sự t...
Khóa luận tốt nghiệp Phân tích, thiết kế hệ thống thông tin quản lý nhân sự t...
 
Khóa luận tốt nghiệp Kinh tế Nâng cao năng lực cung ứng dịch vụ vận tải hàng ...
Khóa luận tốt nghiệp Kinh tế Nâng cao năng lực cung ứng dịch vụ vận tải hàng ...Khóa luận tốt nghiệp Kinh tế Nâng cao năng lực cung ứng dịch vụ vận tải hàng ...
Khóa luận tốt nghiệp Kinh tế Nâng cao năng lực cung ứng dịch vụ vận tải hàng ...
 
Khóa luận tốt nghiệp Tuyển dụng nhân lực tại Công ty Cổ phần Miken Việt Nam.pdf
Khóa luận tốt nghiệp Tuyển dụng nhân lực tại Công ty Cổ phần Miken Việt Nam.pdfKhóa luận tốt nghiệp Tuyển dụng nhân lực tại Công ty Cổ phần Miken Việt Nam.pdf
Khóa luận tốt nghiệp Tuyển dụng nhân lực tại Công ty Cổ phần Miken Việt Nam.pdf
 
Khóa luận tốt nghiệp ngành Luật Nâng cao hiệu quả áp dụng chính sách tiền lươ...
Khóa luận tốt nghiệp ngành Luật Nâng cao hiệu quả áp dụng chính sách tiền lươ...Khóa luận tốt nghiệp ngành Luật Nâng cao hiệu quả áp dụng chính sách tiền lươ...
Khóa luận tốt nghiệp ngành Luật Nâng cao hiệu quả áp dụng chính sách tiền lươ...
 
Khóa luận tốt nghiệp ngành Luật Pháp luật về an toàn lao động và vệ sinh lao ...
Khóa luận tốt nghiệp ngành Luật Pháp luật về an toàn lao động và vệ sinh lao ...Khóa luận tốt nghiệp ngành Luật Pháp luật về an toàn lao động và vệ sinh lao ...
Khóa luận tốt nghiệp ngành Luật Pháp luật về an toàn lao động và vệ sinh lao ...
 
Khóa luận tốt nghiệp Giải pháp phát triển hoạt động marketing điện tử cho Côn...
Khóa luận tốt nghiệp Giải pháp phát triển hoạt động marketing điện tử cho Côn...Khóa luận tốt nghiệp Giải pháp phát triển hoạt động marketing điện tử cho Côn...
Khóa luận tốt nghiệp Giải pháp phát triển hoạt động marketing điện tử cho Côn...
 
Khóa luận tốt nghiệp Luật kinh tế Pháp luật về hợp đồng mua bán hàng hóa - Th...
Khóa luận tốt nghiệp Luật kinh tế Pháp luật về hợp đồng mua bán hàng hóa - Th...Khóa luận tốt nghiệp Luật kinh tế Pháp luật về hợp đồng mua bán hàng hóa - Th...
Khóa luận tốt nghiệp Luật kinh tế Pháp luật về hợp đồng mua bán hàng hóa - Th...
 
Khóa luận tốt nghiệp Luật kinh tế Pháp luật về giao kết và thực hiện hợp đồng...
Khóa luận tốt nghiệp Luật kinh tế Pháp luật về giao kết và thực hiện hợp đồng...Khóa luận tốt nghiệp Luật kinh tế Pháp luật về giao kết và thực hiện hợp đồng...
Khóa luận tốt nghiệp Luật kinh tế Pháp luật về giao kết và thực hiện hợp đồng...
 
Khóa luận tốt nghiệp Kinh tế Nâng cao năng lực cạnh tranh xuất khẩu mặt hàng ...
Khóa luận tốt nghiệp Kinh tế Nâng cao năng lực cạnh tranh xuất khẩu mặt hàng ...Khóa luận tốt nghiệp Kinh tế Nâng cao năng lực cạnh tranh xuất khẩu mặt hàng ...
Khóa luận tốt nghiệp Kinh tế Nâng cao năng lực cạnh tranh xuất khẩu mặt hàng ...
 
Khóa luận tốt nghiệp Hoàn thiện công tác hoạch định của Công ty Cổ phần Đầu t...
Khóa luận tốt nghiệp Hoàn thiện công tác hoạch định của Công ty Cổ phần Đầu t...Khóa luận tốt nghiệp Hoàn thiện công tác hoạch định của Công ty Cổ phần Đầu t...
Khóa luận tốt nghiệp Hoàn thiện công tác hoạch định của Công ty Cổ phần Đầu t...
 
Khóa luận tốt nghiệp ngành Luật Pháp luật về đăng ký kinh doanh và thực tiễn ...
Khóa luận tốt nghiệp ngành Luật Pháp luật về đăng ký kinh doanh và thực tiễn ...Khóa luận tốt nghiệp ngành Luật Pháp luật về đăng ký kinh doanh và thực tiễn ...
Khóa luận tốt nghiệp ngành Luật Pháp luật về đăng ký kinh doanh và thực tiễn ...
 
Đề tài Tác động của đầu tư đến sự chuyển dịch cơ cấu kinh tế.doc
Đề tài Tác động của đầu tư đến sự chuyển dịch cơ cấu kinh tế.docĐề tài Tác động của đầu tư đến sự chuyển dịch cơ cấu kinh tế.doc
Đề tài Tác động của đầu tư đến sự chuyển dịch cơ cấu kinh tế.doc
 
Luận văn đề tài Nâng cao sự hài lòng về chất lượng dịch vụ tại công ty TNHH D...
Luận văn đề tài Nâng cao sự hài lòng về chất lượng dịch vụ tại công ty TNHH D...Luận văn đề tài Nâng cao sự hài lòng về chất lượng dịch vụ tại công ty TNHH D...
Luận văn đề tài Nâng cao sự hài lòng về chất lượng dịch vụ tại công ty TNHH D...
 
Khóa luận tốt nghiệp Phân tích và thiết kế hệ thống thông tin quản lý nhân sự...
Khóa luận tốt nghiệp Phân tích và thiết kế hệ thống thông tin quản lý nhân sự...Khóa luận tốt nghiệp Phân tích và thiết kế hệ thống thông tin quản lý nhân sự...
Khóa luận tốt nghiệp Phân tích và thiết kế hệ thống thông tin quản lý nhân sự...
 

Kürzlich hochgeladen

1029 - Danh muc Sach Giao Khoa 10 . pdf
1029 -  Danh muc Sach Giao Khoa 10 . pdf1029 -  Danh muc Sach Giao Khoa 10 . pdf
1029 - Danh muc Sach Giao Khoa 10 . pdfQucHHunhnh
 
fourth grading exam for kindergarten in writing
fourth grading exam for kindergarten in writingfourth grading exam for kindergarten in writing
fourth grading exam for kindergarten in writingTeacherCyreneCayanan
 
Z Score,T Score, Percential Rank and Box Plot Graph
Z Score,T Score, Percential Rank and Box Plot GraphZ Score,T Score, Percential Rank and Box Plot Graph
Z Score,T Score, Percential Rank and Box Plot GraphThiyagu K
 
Key note speaker Neum_Admir Softic_ENG.pdf
Key note speaker Neum_Admir Softic_ENG.pdfKey note speaker Neum_Admir Softic_ENG.pdf
Key note speaker Neum_Admir Softic_ENG.pdfAdmir Softic
 
Call Girls in Dwarka Mor Delhi Contact Us 9654467111
Call Girls in Dwarka Mor Delhi Contact Us 9654467111Call Girls in Dwarka Mor Delhi Contact Us 9654467111
Call Girls in Dwarka Mor Delhi Contact Us 9654467111Sapana Sha
 
social pharmacy d-pharm 1st year by Pragati K. Mahajan
social pharmacy d-pharm 1st year by Pragati K. Mahajansocial pharmacy d-pharm 1st year by Pragati K. Mahajan
social pharmacy d-pharm 1st year by Pragati K. Mahajanpragatimahajan3
 
9548086042 for call girls in Indira Nagar with room service
9548086042  for call girls in Indira Nagar  with room service9548086042  for call girls in Indira Nagar  with room service
9548086042 for call girls in Indira Nagar with room servicediscovermytutordmt
 
Explore beautiful and ugly buildings. Mathematics helps us create beautiful d...
Explore beautiful and ugly buildings. Mathematics helps us create beautiful d...Explore beautiful and ugly buildings. Mathematics helps us create beautiful d...
Explore beautiful and ugly buildings. Mathematics helps us create beautiful d...christianmathematics
 
microwave assisted reaction. General introduction
microwave assisted reaction. General introductionmicrowave assisted reaction. General introduction
microwave assisted reaction. General introductionMaksud Ahmed
 
Accessible design: Minimum effort, maximum impact
Accessible design: Minimum effort, maximum impactAccessible design: Minimum effort, maximum impact
Accessible design: Minimum effort, maximum impactdawncurless
 
IGNOU MSCCFT and PGDCFT Exam Question Pattern: MCFT003 Counselling and Family...
IGNOU MSCCFT and PGDCFT Exam Question Pattern: MCFT003 Counselling and Family...IGNOU MSCCFT and PGDCFT Exam Question Pattern: MCFT003 Counselling and Family...
IGNOU MSCCFT and PGDCFT Exam Question Pattern: MCFT003 Counselling and Family...PsychoTech Services
 
Student login on Anyboli platform.helpin
Student login on Anyboli platform.helpinStudent login on Anyboli platform.helpin
Student login on Anyboli platform.helpinRaunakKeshri1
 
Software Engineering Methodologies (overview)
Software Engineering Methodologies (overview)Software Engineering Methodologies (overview)
Software Engineering Methodologies (overview)eniolaolutunde
 
The Most Excellent Way | 1 Corinthians 13
The Most Excellent Way | 1 Corinthians 13The Most Excellent Way | 1 Corinthians 13
The Most Excellent Way | 1 Corinthians 13Steve Thomason
 
Paris 2024 Olympic Geographies - an activity
Paris 2024 Olympic Geographies - an activityParis 2024 Olympic Geographies - an activity
Paris 2024 Olympic Geographies - an activityGeoBlogs
 
A Critique of the Proposed National Education Policy Reform
A Critique of the Proposed National Education Policy ReformA Critique of the Proposed National Education Policy Reform
A Critique of the Proposed National Education Policy ReformChameera Dedduwage
 
Advanced Views - Calendar View in Odoo 17
Advanced Views - Calendar View in Odoo 17Advanced Views - Calendar View in Odoo 17
Advanced Views - Calendar View in Odoo 17Celine George
 
Measures of Dispersion and Variability: Range, QD, AD and SD
Measures of Dispersion and Variability: Range, QD, AD and SDMeasures of Dispersion and Variability: Range, QD, AD and SD
Measures of Dispersion and Variability: Range, QD, AD and SDThiyagu K
 
Sanyam Choudhary Chemistry practical.pdf
Sanyam Choudhary Chemistry practical.pdfSanyam Choudhary Chemistry practical.pdf
Sanyam Choudhary Chemistry practical.pdfsanyamsingh5019
 
Sports & Fitness Value Added Course FY..
Sports & Fitness Value Added Course FY..Sports & Fitness Value Added Course FY..
Sports & Fitness Value Added Course FY..Disha Kariya
 

Kürzlich hochgeladen (20)

1029 - Danh muc Sach Giao Khoa 10 . pdf
1029 -  Danh muc Sach Giao Khoa 10 . pdf1029 -  Danh muc Sach Giao Khoa 10 . pdf
1029 - Danh muc Sach Giao Khoa 10 . pdf
 
fourth grading exam for kindergarten in writing
fourth grading exam for kindergarten in writingfourth grading exam for kindergarten in writing
fourth grading exam for kindergarten in writing
 
Z Score,T Score, Percential Rank and Box Plot Graph
Z Score,T Score, Percential Rank and Box Plot GraphZ Score,T Score, Percential Rank and Box Plot Graph
Z Score,T Score, Percential Rank and Box Plot Graph
 
Key note speaker Neum_Admir Softic_ENG.pdf
Key note speaker Neum_Admir Softic_ENG.pdfKey note speaker Neum_Admir Softic_ENG.pdf
Key note speaker Neum_Admir Softic_ENG.pdf
 
Call Girls in Dwarka Mor Delhi Contact Us 9654467111
Call Girls in Dwarka Mor Delhi Contact Us 9654467111Call Girls in Dwarka Mor Delhi Contact Us 9654467111
Call Girls in Dwarka Mor Delhi Contact Us 9654467111
 
social pharmacy d-pharm 1st year by Pragati K. Mahajan
social pharmacy d-pharm 1st year by Pragati K. Mahajansocial pharmacy d-pharm 1st year by Pragati K. Mahajan
social pharmacy d-pharm 1st year by Pragati K. Mahajan
 
9548086042 for call girls in Indira Nagar with room service
9548086042  for call girls in Indira Nagar  with room service9548086042  for call girls in Indira Nagar  with room service
9548086042 for call girls in Indira Nagar with room service
 
Explore beautiful and ugly buildings. Mathematics helps us create beautiful d...
Explore beautiful and ugly buildings. Mathematics helps us create beautiful d...Explore beautiful and ugly buildings. Mathematics helps us create beautiful d...
Explore beautiful and ugly buildings. Mathematics helps us create beautiful d...
 
microwave assisted reaction. General introduction
microwave assisted reaction. General introductionmicrowave assisted reaction. General introduction
microwave assisted reaction. General introduction
 
Accessible design: Minimum effort, maximum impact
Accessible design: Minimum effort, maximum impactAccessible design: Minimum effort, maximum impact
Accessible design: Minimum effort, maximum impact
 
IGNOU MSCCFT and PGDCFT Exam Question Pattern: MCFT003 Counselling and Family...
IGNOU MSCCFT and PGDCFT Exam Question Pattern: MCFT003 Counselling and Family...IGNOU MSCCFT and PGDCFT Exam Question Pattern: MCFT003 Counselling and Family...
IGNOU MSCCFT and PGDCFT Exam Question Pattern: MCFT003 Counselling and Family...
 
Student login on Anyboli platform.helpin
Student login on Anyboli platform.helpinStudent login on Anyboli platform.helpin
Student login on Anyboli platform.helpin
 
Software Engineering Methodologies (overview)
Software Engineering Methodologies (overview)Software Engineering Methodologies (overview)
Software Engineering Methodologies (overview)
 
The Most Excellent Way | 1 Corinthians 13
The Most Excellent Way | 1 Corinthians 13The Most Excellent Way | 1 Corinthians 13
The Most Excellent Way | 1 Corinthians 13
 
Paris 2024 Olympic Geographies - an activity
Paris 2024 Olympic Geographies - an activityParis 2024 Olympic Geographies - an activity
Paris 2024 Olympic Geographies - an activity
 
A Critique of the Proposed National Education Policy Reform
A Critique of the Proposed National Education Policy ReformA Critique of the Proposed National Education Policy Reform
A Critique of the Proposed National Education Policy Reform
 
Advanced Views - Calendar View in Odoo 17
Advanced Views - Calendar View in Odoo 17Advanced Views - Calendar View in Odoo 17
Advanced Views - Calendar View in Odoo 17
 
Measures of Dispersion and Variability: Range, QD, AD and SD
Measures of Dispersion and Variability: Range, QD, AD and SDMeasures of Dispersion and Variability: Range, QD, AD and SD
Measures of Dispersion and Variability: Range, QD, AD and SD
 
Sanyam Choudhary Chemistry practical.pdf
Sanyam Choudhary Chemistry practical.pdfSanyam Choudhary Chemistry practical.pdf
Sanyam Choudhary Chemistry practical.pdf
 
Sports & Fitness Value Added Course FY..
Sports & Fitness Value Added Course FY..Sports & Fitness Value Added Course FY..
Sports & Fitness Value Added Course FY..
 

Manipulating fabric - The Art of Manipulating Fabric

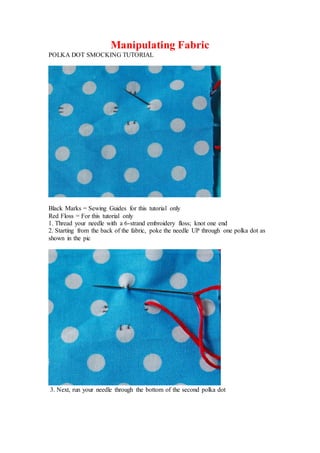
  • 1. Manipulating Fabric POLKA DOT SMOCKING TUTORIAL Black Marks = Sewing Guides for this tutorial only Red Floss = For this tutorial only 1. Thread your needle with a 6-strand embroidery floss; knot one end 2. Starting from the back of the fabric, poke the needle UP through one polka dot as shown in the pic 3. Next, run your needle through the bottom of the second polka dot
  • 2. 4. Repeat step 3 for the third and fourth polka dots. Then poke your needle through the bottom of the first polka dot as shown in the pic
  • 3. 5. Slowly pull the threads together 6. Knot the thread on the back side. Cut thread.
  • 4. 7. Repeat steps for next cluster of 4 polka dots.
  • 5. 8. For this particular project, the polka dot clusters in the second row is in the between the clusters in the first row. Repeat as many rows as your smocking heart desires. Materials: fabric: your desired height x 3 times your desired width. I’m making a fourteen inch pillow, and I decided to play it safe by cutting a 18 x 54 in. piece of fabric. Your fabric should be cotton or something else that can stand up to a good bit on ironing. No melty fabrics. embroidery floss quilting ruler or yardstick disappearing ink marking pen or light pencil thin cardboard, like from a cereal box iron and ironing board spray starch straight pins Step 1: cut your cardboard strip
  • 6. Cut your cardboard into a long, thin strip. I made mine 3/4 inches wide by 20 inches long. Ideally you want your strip to be longer than your fabric, but this is not a necessity. If you want wider pleats, make your strip wider than 3/4 inches. Step 2: the first press Use light starch for all pressing. Lay your fabric on your ironing board so that the short edge is parallel with the sides of the board the long edge falls down in front of you. Place the cardboard strip across your fabric, about 3 inches from the short edge. Fold the 3 inches over the cardboard strip. Press, using the strip as a straight edge for a nice, crisp pleat. Step 3: the second press
  • 7. Remove cardboard and flip your work over. Now the extra fabric falls over the far side of the ironing board. Slide the edge of the cardboard onto the fold line made by the first press. Fold the long side of your fabric halfway onto the cardboard strip and then back on itself. Press. Step 4: the pleat press Remove the cardboard and flip your work over (again!). Tuck the cardboard into the little fold you just made. Your cardboard should be halfway covered by the fabric. Fold fabric up around the other side and back on itself. Press. Turn your fabric over to see that you have made a full pleat! Cool. Keep making pleats until you are 3 inches from the far edge or pleating reaches your desired width. Remember to use starch—it’s your friend. Once you have a few pleats, you’ll probably want to put some straight pins in your work to keep it from unfolding as you flip it over and over.
  • 8. Step 5: mark it Lay your ruler across your work, about 2 inches from the top, perpendicular to the pleats. Using the disappearing ink marking pen or the pencil, make a little mark on each place where two pleats meet. Then mark the next row. The length between rows should be double the width of your pleat. My pleats were 3/4 in. so I made 1.5 inches between rows. If you’re using a pencil, make really light, tiny marks so they don’t show later. If you’re using a disappearing ink pen, just make a couple rows at a time so they don’t disappear before you can sew them! Step 6: sew flat pleats
  • 9. Thread a needle with two strands of embroidery floss. On the top row, on the first mark of the row, sew up through all layers on one pleat and down through all layers of the touching side of the adjacent pleat. Repeat stitch in the same place in order to tack the pleat in place. Continue across the row, then for all rows until the smocked portion of the work is the desired size (in my case, about 13 inches). Step 7: sew pinch pleats Start at one corner of your smocking. From the back, wiggle your threaded needle up through one of the flat folds of your pleat, centering your needle between two stitched rows. Pinch the pleat so that the sides come up and make an X. Make a tiny, stitch right in the center of the X. Stitch through it again to tack it down. Wiggle your needle down into the flat fold opposite where it came up. Repeat, pinching all pleats in your work.
  • 10. Taa-daa! You’ve done honeycomb smocking.
  • 11.
  • 12. For this tutorial I chose a thick grey denim fabric, you can use most fabrics.. my recommendation is something with a heavier weight, this will help retain the texture shape. However you can use a fusible interfacing/backing after texture is complete, just be careful not to smash down folds/texture to interfacing while ironing. I used a interfacing on the red clutch above because it was a very lightweight fabric. To begin, cut a piece of fabric LARGER than what you need for your project by a couple inches each direction. The texture shrinks the fabric size! You can remeasure & cut the dimentions you need once you have created your texture. Start by graphing out the BACK of your fabric, the lines depend upon how much/less texture you want your project to have. I chose 1.5 x 2 inch squares for my purse. Next mark DOTS where you will be pinching the fabric to create texture. I recommend alternately stacking your dots, not placing a dot directly on top of the other.... this is just a preference however. Practice with your design on scrap fabric first! :)
  • 13. Pinch the dot point between your fingers...
  • 14. Then fold keeping that dot point at the very outer edge. You can pin your fold in place and repeat till all your dots have been pinched, folded & pinned. Then sew along the edge of your fold, the further back your seam the deeper texture folds you will have. I sewed mine along the yellow line, be sure to backstich each seam!!
  • 15. DONE! - The back of the fabric.
  • 16.
  • 17. Notice there are no seams showing from the front! You can carefully iron your texture to create sharper edges for a more polished look. Now you are ready to use the fabric to create your own project. :) I created this purse for my daughter with mine. Cross shirring closeup
  • 18. Block type: log cabin Block size: 11 inches Colour scheme: reds and neutrals Texture/fabric manipulation: cross shirring Quilt size: The finished quilt is 52 ½ x 52 ½. Needs: one 7 in x 7 in square in cream / white two 5 in x 3 1/2 in rectangles and two 11 in x 3 1/2 in rectangles for the border Making the cross shirring Cut one 7 in x 7 in square. Using a baste stitch start stitching at 1/4 inch from the edge in one straight line. Continue to stitch at around 1/2 intervals until the end. No need to mark the lines. The last stitching line should also be 1/4 inch from the edge.
  • 19. When finished, start pulling the bottom thread from each stitching line. Do this from each side. Spread the gathering all along the stitching line. Stop gathering the fabric once the width is 5 inches.
  • 20. Do this for all stitching lines. Now do the same as before but in the opposite direction.
  • 21. Again, pull the bottom thread of each stitching line and gather the fabric until you reach 5 inches width. Make your square edges as straight as possible so it is easy to attach the border to it and the block irons as flat as possible.
  • 22. Cut two 5 in x 3 1/2 in rectangles and two 11 in x 3 1/2 in rectangles for the border and sew to the centre square.
  • 23. Your block is done! Ripples closeup
  • 24.
  • 25. Block type: log cabin Block size: 11 inches Colour scheme: reds and neutrals Texture/fabric manipulation: double controlled pleats with centre ripple effect Quilt size: The finished quilt is 52 ½ x 52 ½. Needs: one 6 in x 15 in rectangle in red tones for the textured centre square two 5 in x 3 1/2 in rectangles and two 11 in x 3 1/2 in rectangles for the border Making the ripples The pleats for this block are done in the same manner as we did in block 3. The only difference is that the pleats are folded to opposites sides creating a ripple effect. To make the pleats, mark the fabric at 7/8 and 3/8 inches intervals on both sides of the square, top and bottom.
  • 26. Make a small cut on each mark.
  • 27. Start by folding the fabric onto the first mark/cut. The first segment is 7/8 wide (see picture below). Now fold the fabric into the next fold (see picture below).
  • 28. Pin each fold as you go. Make sure marks/cuts coincide neatly so that the folds are the same width.
  • 29. Once you finish one side, do the same thing on the other but this time make the fold in the opposite direction. This will achieve a ripple effect.
  • 30. Stitch both sides leaving 3/4 inch allowance on each side. Then trim to 5 inch square (1/2 inch from each side). Cut two 5 in x 3 1/2 in rectangles and two 11 in x 3 1/2 in rectangles for the border and attach it to the centre square. Now you need to iron the ripples. To accentuate the ripple effect use the iron lightly and press to opposite sides as if you were “combing” the ripple.
  • 32.
  • 33. Block type: log cabin Block size: 11 inches Colour scheme: reds and neutrals Texture/fabric manipulation: centered tucks with bow ties Quilt size: The finished quilt is 52 ½ x 52 ½. Needs: one 6 in x 10 1/2 in rectangle in red tones for the textured centre square two 5 in x 3 1/2 in rectangles and two 11 in x 3 1/2 in rectangles for the border Making the centred tucks with bow ties Cut one 6 in x 10 1/2 in rectangle in cream tones. Mark the fabric in the following way centering the lines in the piece of fabric: 5/8, 5/8 (left tuck) | 6/8 (space between tucks), 5/8, 5/8 (central tuck), 6/8 (space between tucks), 5/8, 5/8 (right tuck).
  • 34. Make small cuts on each line.
  • 35. Starting with the middle tuck, make a light mark from cut to cut, fold making both marks on the sides of each tuck coincide and pin. Stitch along the marked line.
  • 36. Do the same for the three tucks. Press the tucks lightly open.
  • 38. Stitch along the line. Then square the block to 5 inch square and stitch on both sides of the tucks leaving a 1/4 inch seam allowance.
  • 39. Now mark the middle from the centre for each tuck and make a bow tie as in the picture below.
  • 40. Leave the middle tuck as is. Cut two 5 in x 3 1/2 in rectangles and two 11 in x 3 1/2 in rectangles for the border and attach to the centre square.
  • 41.
  • 42. Close up Block type: 4-patch Block size: 10 1/2 inches Colour scheme: reds, greens and neutrals Texture/fabric manipulation: fabric origami Cut: one red 6 in square one 6 in pale green square a 10 in cream square a left over two triangles square from block 10 16 small white beads
  • 43. Making the fabric origami Cut a 10 in cream square and draw a grid with 1 inch intervals.
  • 44. Pick up stitches in a criscross fashion as per picture.
  • 45.
  • 46. Pull together and make a tight knot.
  • 47. Continue to the end of the row.
  • 48. This is what the right side will look like.
  • 49. There’s no shape to it, I know. And it will be a bit tricky to find the shape.
  • 50. In some instances you will see the diamond emerge like in the picture below. If not, you’ll have to try and find it by pulling the corners of each corner that you just stitched together previously.
  • 51. Finding the folds and pushing them to the correct sides as per picture may help.
  • 52. To help you, find the folds at the edges of the origami square as per picture.
  • 53. You may find the diamonds are not perfectly square.
  • 54. The back of the piece will look like this.
  • 55. As you find the diamonds, it may help to iron them flat.
  • 56.
  • 57.
  • 58. Here is the piece. Press well.
  • 59. Now it’s time to stitch the beads.
  • 60. As well as stitching the beads, we’re going to stitch each fold together as per picture.
  • 61. And here is what the end result is.
  • 62. Trim the square to 5 1/2 inches.
  • 64.
  • 65. Block type: log cabin Block size: 11 inches Colour scheme: reds and neutrals Texture/fabric manipulation: fabric folding Quilt size: The finished quilt is 52 1/2 x 52 1/2. Needs: one 5 inch square in white about 80 1 1/2 inch squares in neutrals and some reds to add some interest two 5 in x 3 1/2 in rectangles and two 11 in x 3 1/2 in rectangles for the border Making the echidna Cut about 80 1 1/2 inch squares in neutrals and some reds to add some interest.
  • 66. Take one 1 1/2 inch square and fold in half into a triangle.
  • 67. Then fold it again into a smaller triangle.
  • 68. Just press with your fingers. Pin small triangle to the cream square as per picture. Start at the bottom edge. Add a full row of small triangles.
  • 69. Stitch as close to the triangle edge as possible. Then do the second row filling in the spaces between the first row triangles.
  • 70. Stitch as close to the edge as possible. Continue like that.
  • 71. Just go all the way to the top edge of the square. Turn square around to trim edges off.
  • 72. The centre is done.
  • 74. Attach border to square. Closeup of finished block.
  • 76. The spacing determines the size of the tube. For a more subtle finish use spacing which is closer.
  • 77. Block type: log cabin Block size: 11 inches Colour scheme: reds and neutrals Texture/fabric manipulation: lozenge smocking Quilt size: The finished quilt is 52 1/2 x 52 1/2. Needs: a 10 1/2 inch x 6 inches rectangle in cream tones for the centre square two 5 in x 3 1/2 in rectangles and two 11 in x 3 1/2 in rectangles for the border Making the lozenge smocking Cut a 10 1/2 inch x 6 inches rectangle and mark at 1/2 inch intervals.
  • 78. Smocking diagram There are two kinds of stitching for this pattern. They alternate along each row of smocking. The first type is when you pull two stitches together as per a and b on the diagram. The next stitch is when you go from b to c but do not pull the stitches. In this case you double stitch on c so that there is no pulling.
  • 79. This is the first example where you pick up a and b and pull together.
  • 80. After pulling the stitches together, do a double stitch before moving on to c.
  • 81. With your needle pick up c without pulling.
  • 83. And so on following the diagram above.
  • 84. As you go you will see the pattern emerge. When finished, stretch the rectangle on a padded surface and pin well. Slightly crush the tubes with your fingers to obtain a more rounded shape. Apply steam with the iron touching the tubes but without pressing.
  • 85. Let it dry. When dry trim to 5 inch squares. Cut two 5 in x 3 1/2 in rectangles and two 11 in x 3 1/2 in rectangles for the border.
  • 86. Stitch and the block is done. Lattice closeup
  • 87. This block requires hand sewing. Block type: log cabin Block size: 11 inches Colour scheme: reds and neutrals Texture/fabric manipulation: lattice smocking Quilt size: The finished quilt is 52 ½ x 52 ½. Needs: one 7 in x 7 in rectangle in red tones for the textured centre square two 5 in x 3 1/2 in rectangles and two 11 in x 3 1/2 in rectangles for the border Making the lattice Draw a 7 in x 7 in grid on a piece of fabric and mark it as per photo. Lines are 1/2 inch apart on both directions.
  • 88. Diagram Sew the lattice in groups of 4, i.e. 1 – 2, 3 – 4, 5 – 6 and 7 – 8. Then move to the next 4 lot, i.e. 9 – 10 , 11 – 12, etc and complete each pair of lines up to the end of the grid. Then start from the left again in groups of 4 until the end of the line.
  • 89. Arrow = pick up both dots together and stitch together and then do another stitch so the stitch doesn’t open Red dotted line = pick up dot without joining with previous dot, ie carry the thread to the next dot When moving from one pair of stitches, e.g. moving from 2 to 3, or from 5 to 6, always make a double stitch on the first dot, i.e. on 1, 3, 5, etc. and then make another double stitch after you join a pair, e.g. 1 and 2, 3 and 4, etc. This is how it goes Put needle through 1 and then pick up number 2. Pull both dots together and do a double stitch. Now carry the thread to number 3 and pick it up but do not pull, just do a double stitch on number 3. Now pick up 4 and pull thread to stitch 3 and 4 together. Double stitch there. Now carry the thread to 5 and double stitch. And so on. You will start seeing the pattern after you complete the first line.
  • 90. Once you have stitched the grid, you need to stretch the square rather than iron it.
  • 91. Pin the lattice to for ironing board or other padded surface and steam it with your iron. Let it dry. Once it is dry, trim it to 5 inches. Iron the edges no more than 1/4 inches around well before stitching the border.
  • 92. Cut two 5 in x 3 1/2 in rectangles and two 11 in x 3 1/2 in rectangles for the border.
  • 93. This is one of my favourite blocks so far. The texture is very rich and it looks great in red.
  • 95.
  • 96. This block requires hand stitching. Block type: log cabin Block size: 11 inches Colour scheme: reds and neutrals Texture/fabric manipulation: smocked tucks Quilt size: The finished quilt is 52 ½ x 52 ½. Needs: one 16 in x 5 in rectangle in red two 5 in x 3 ½ in rectangles and two 11 in x 3 ½ in rectangles for the border Making the smocked tucks one 16 in x 5 in rectangle in red and make marks at 3/4 in intervals starting at 1 inch for the first interval off the side.
  • 97. Iron each mark well. Now, stitch each ironed fold leaving a 1/4 inch allowance.
  • 98. This will be your centre square when all tucks have been stitched.
  • 99. Iron the tucks to both sides lightly just enough to flatten the fabric between tucks. Turn around tucked piece and mark it at 3/4 in intervals.
  • 100. Start stitching two tucks together on the 3/4 in intervals. Stitch tucks a couple of times.
  • 101. Each time the needle goes down, do a double stitch on the back to avoid pulling down the tucks you just stitched together. Do a double stitch as well when you move from one pair of stitched tucks to the next pair to avoid pulling. When you finish the first line, start on the second line.
  • 102. Make sure you stitch the tucks in a honeycomb shape, i.e. in the first line you started stitching tuck 1 and tuck 2 together and so on; on the second line you will start stitching tuck 2 and tuck 3 together and so on.
  • 103. Complete the honeycomb stitching.
  • 104. Either iron the ends of the tucks or add a stitch to each couple of tucks as per photo. This will help when stitching the square to the border.
  • 105. Stretch the square on to a padded surface and pin.
  • 106. Steam it with the iron and let it dry. Unpin when dried.
  • 107.
  • 108. Close up Block type: 4-patch Block size: 10 1/2 inches Colour scheme: reds, greens and neutrals Texture/fabric manipulation: Canadian smocking Cut: one 6 1/4 in red square one 6 1/4 in pale green square one 4 1/2 in red square one 4 1/2 in pale green square one 9 in cream square Making the shell smocking Shell stitching diagram
  • 109. As you can see in the diagram, shell smocking is stitched in rows. The black line implies that both points, A and B, C and D, E and F, etc are pulled and stitched together. The dotted line implies that you drag your thread from the last pulled stitch to the next stitching point, without pulling. Then you need to double stitch on the next stitching point to act as an anchor for the next pulled stitches. If this is not clear, keep reading below. Get the 9 in fabric square and draw a grid with lines at 1/2 in intervals. Then draw the diagonal lines as per photo below.
  • 110. Double stitch on the first dot, then pick up the next dot.
  • 111. Pull together and stitch. This is A and B pulled together.
  • 112. Now move the thread to B and stitch without pulling.
  • 113. Double stitch to anchor the thread on C.
  • 114. Repeat the previous steps with C and D, and so on. At the end of Row 1 you will have something like this.
  • 115. Continue with Row 2, and so on.
  • 116. Now stretch your smocking on a padded table as per picture below.
  • 117. Use the steam from your iron to set the smocking. Place you iron close to the smocking with the steam setting on and hoover over the piece. Let the piece get dry and cold.
  • 118. Then trim the piece to 5 1/2 inches.
  • 119. Now get the red and greem 6 1/4 in squares and place them with right side facing together. Trade a diagonal and pin. Stitch on each side of the diagonal using a 1/4 in seam allowance. Block type: log cabin Block size: 11 inches Colour scheme: reds and neutrals Texture/fabric manipulation: undulating tucks Quilt size: The finished quilt is 52 ½ x 52 ½. Needs: 1 rectangle 10 in x 6 in in white/cream two 5 in x 3 1/2 in rectangles and two 11 in x 3 1/2 in rectangles for the border Making the undulating tucks Cut one 10 in x 6 in rectangle and draw lines at 1 inch intervals on the back of the fabric.
  • 120. You could make small cuts on each end of the markings to make it easier when pressing.
  • 121. Press on each marking like below. Start stitching tucks that are 1/4 inch deep. When done, press to one side, then to the other.
  • 122. Then square the block to 5 inch square. Mark the square along the middle, at 2 1/2 inches from each side and then mark along the middle or each half, i.e. at 1 1/4 from the middle on both sides. Stitch along the marked line (see below) in the middle making sure the tucks face the same direction.
  • 123. Then stitch along each of the lines on the sides making sure the tucks face the opposite direction.
  • 124. Now, you could attach the borders to the square like I did and later, when sewing the larger border stitch the tucks in opposite direction or stitch a last line on each side with the tucks facing the opposite direction.
  • 125. What I did was a bit more difficult to handle in the end, and I’ve learned from it. I ironed the tucks facing the opposite side and then pinned them to the border to keep them in place while I stitched the border.
  • 126. The block is finished. Closeup
  • 127.
  • 128. Block type: log cabin Block size: 11 inches Colour scheme: reds and neutrals Texture/fabric manipulation: fabric folding / fabric origami Quilt size: The finished quilt is 52 1/2 x 52 1/2. Needs: two 10 in x 10 in squares in contrasting neutral tones for the centre square. 5 1/2 square to appliqué the origami two 5 in x 3 1/2 in rectangles and two 11 in x 3 1/2 in rectangles for the border Making the origami centre Cut two 10 in x 10 in squares in contrasting neutral tones and place with right sides facing together.
  • 129. Fold twice into a square to find the centre and pin.
  • 130. Open the square and trace a circle as per picture.
  • 131. The mark is the line where you will cut. Sew within 1/4 inch from the marked line leaving a 2 inch opening to turn the circle inside out.
  • 132. Then cut around the marked line.
  • 134. With an invisible stitch close the opening.
  • 136. Find the centre of the circle again.
  • 137. Open the circle and fold one side 1 1/2 inches in as per picture.
  • 138. Do the same for all four sides and pin in place.
  • 139. Then do another fold in the opposite direction making a square shape as per picture below.
  • 140. Now find the point where both folds join (see picture) and make a stitch.
  • 141. Do the same for all 4 corners.
  • 142. Now find the middle point between two corners and make a stitch.
  • 143. Do the same on all sides.
  • 144. Now look at the corner. Pick up both sides of the fabric and fold out as per picture. It may be a bit tricky to do as the opening is small. Fold out the sides, insert your finger in the opening to give it some shape and pull at the corner towards the outside to mould the fabric into the shape. Do this several times to get the fold right.
  • 145. Do this for all four corners.
  • 146. Turn square around. The pin that identifies the centre point should still be there.
  • 147. Now bring one corner to meet the centre and pin.
  • 148. Now make a stitch in the corner. Do the same for all corners.
  • 149. This is what it should look like when you have stitched all corners in the centre. The square is a bit bulky because it has not been ironed.
  • 150. You can press the block on the outer corners a bit to flatten it. The square is about 4 1/2 inches. We’ll be sewing it to a 5 inch square. Cut a 5 1/2 inch square and appliqué the origami piece to it.