Setting Up a Facebook Fan Page
•Als DOCX, PDF herunterladen•
0 gefällt mir•668 views

Here's a step-by-step primer on setting

Empfohlen
Weitere ähnliche Inhalte
Was ist angesagt?
Was ist angesagt? (17)
Ähnlich wie Setting Up a Facebook Fan Page
Ähnlich wie Setting Up a Facebook Fan Page (20)
Mehr von Evelyn McCormack
Mehr von Evelyn McCormack (20)
Kürzlich hochgeladen
Kürzlich hochgeladen (20)
Setting Up a Facebook Fan Page
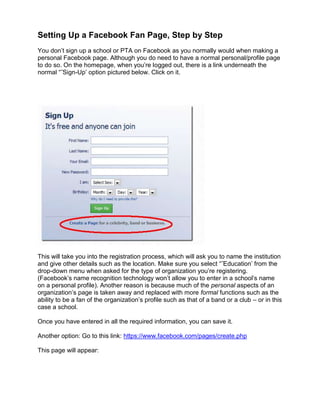
- 1. Setting Up a Facebook Fan Page, Step by Step You don’t sign up a school or PTA on Facebook as you normally would when making a personal Facebook page. Although you do need to have a normal personal/profile page to do so. On the homepage, when you’re logged out, there is a link underneath the normal “˜Sign-Up’ option pictured below. Click on it. This will take you into the registration process, which will ask you to name the institution and give other details such as the location. Make sure you select “˜Education’ from the drop-down menu when asked for the type of organization you’re registering. (Facebook’s name recognition technology won’t allow you to enter in a school’s name on a personal profile). Another reason is because much of the personal aspects of an organization’s page is taken away and replaced with more formal functions such as the ability to be a fan of the organization’s profile such as that of a band or a club – or in this case a school. Once you have entered in all the required information, you can save it. Another option: Go to this link: https://www.facebook.com/pages/create.php This page will appear:
- 2. Click on the box labeled “Company, Organization or Institution.” This dialogue box will appear: In the drop-down, choose “Education” as your category. Then type in the name of your PTA. Click on the “I agree” box and on “Get Started.”
- 3. This will then take you to the administration page, which will be bare. See the example pictured above. Your first steps will be basic and should be focused on improving the look of the page. First, add a profile picture by placing your mouse cursor over the picture area. Then click “˜Add picture’ when the button appears. Upload a picture of your PTA, or its logo. Next, add a little bit of information about the school/PTA in the area below the picture. Then, click “˜Edit Page’ underneath the photograph. This will bring you to a page with options to alter pretty much anything about your page. For a PTA on Facebook, maybe you’ll want to place a location or age restriction on the site for security reasons. All of this can be done here. You can also set up your mobile version to publish status updates, and add notes, events, pictures and videos to your profile.
- 4. When you set up your Wall Settings, above, make sure you decide what “fans” can and cannot do on your page. Do you want them to be able to post on your page? Can they post photos, videos and links? My default is NOT to allow posting on my walls, but I DO allow fans to comment.
- 5. Your administration panel With Facebook’s Timeline, administrators of Facebook pages will always see this admin panel appear at the top of their pages. This is important – it tells you about new notifications from fans, new “likes” for your page, gives you Facebook Insights (analytics that allow you to see what posts are most particular and who your fans are), and a way to see Page Tips from Facebook. You can also sign up to get the Pages app installed on your iPhone or Android. Other Notes Each time you post on Facebook, you can see with each post how many people saw the post (bottom of photo).
- 6. When you hover your cursor over a post, the star and pencil will appear. The star allows you to “Highlight” a post, which stretches it across the entire page until you un-highlight it. The pencil allows you to hide a post, delete a post, and “pin” a post to the top of your page for a while. To unpin a post, simply click on “unpin” later.