MongoDB Sharding Guide: Intro to Horizontal Scaling and Sharding Concepts
•
1 gefällt mir•1,769 views

Sharding and MongoDB Release 2.6.4 MongoDB Documentation Project

Empfohlen
Weitere ähnliche Inhalte
Was ist angesagt?
Was ist angesagt? (17)
Andere mochten auch
Andere mochten auch (13)
Ähnlich wie MongoDB Sharding Guide: Intro to Horizontal Scaling and Sharding Concepts
Ähnlich wie MongoDB Sharding Guide: Intro to Horizontal Scaling and Sharding Concepts (20)
Kürzlich hochgeladen
Kürzlich hochgeladen (20)
MongoDB Sharding Guide: Intro to Horizontal Scaling and Sharding Concepts
- 1. Sharding and MongoDB Release 2.6.4 MongoDB Documentation Project September 16, 2014 Contents 1 Sharding Introduction 3 1.1 Purpose of Sharding . . . . . . . . . . . . . . . . . . . . . . . . . . . . . . . . . . . . . . . . . . . . 3 1.2 Sharding in MongoDB . . . . . . . . . . . . . . . . . . . . . . . . . . . . . . . . . . . . . . . . . . 3 1.3 Data Partitioning . . . . . . . . . . . . . . . . . . . . . . . . . . . . . . . . . . . . . . . . . . . . . 6 Shard Keys . . . . . . . . . . . . . . . . . . . . . . . . . . . . . . . . . . . . . . . . . . . . . . . . 6 Range Based Sharding . . . . . . . . . . . . . . . . . . . . . . . . . . . . . . . . . . . . . . . . . . 6 Hash Based Sharding . . . . . . . . . . . . . . . . . . . . . . . . . . . . . . . . . . . . . . . . . . . 7 Performance Distinctions between Range and Hash Based Partitioning . . . . . . . . . . . . . . . . . 7 Customized Data Distribution with Tag Aware Sharding . . . . . . . . . . . . . . . . . . . . . . . . . 7 1.4 Maintaining a Balanced Data Distribution . . . . . . . . . . . . . . . . . . . . . . . . . . . . . . . . 8 Splitting . . . . . . . . . . . . . . . . . . . . . . . . . . . . . . . . . . . . . . . . . . . . . . . . . . 8 Balancing . . . . . . . . . . . . . . . . . . . . . . . . . . . . . . . . . . . . . . . . . . . . . . . . . 8 Adding and Removing Shards from the Cluster . . . . . . . . . . . . . . . . . . . . . . . . . . . . . 8 2 Sharding Concepts 9 2.1 Sharded Cluster Components . . . . . . . . . . . . . . . . . . . . . . . . . . . . . . . . . . . . . . . 10 Shards . . . . . . . . . . . . . . . . . . . . . . . . . . . . . . . . . . . . . . . . . . . . . . . . . . . 10 Config Servers . . . . . . . . . . . . . . . . . . . . . . . . . . . . . . . . . . . . . . . . . . . . . . 12 2.2 Sharded Cluster Architectures . . . . . . . . . . . . . . . . . . . . . . . . . . . . . . . . . . . . . . 13 Sharded Cluster Requirements . . . . . . . . . . . . . . . . . . . . . . . . . . . . . . . . . . . . . . 14 Production Cluster Architecture . . . . . . . . . . . . . . . . . . . . . . . . . . . . . . . . . . . . . 14 Sharded Cluster Test Architecture . . . . . . . . . . . . . . . . . . . . . . . . . . . . . . . . . . . . 15 2.3 Sharded Cluster Behavior . . . . . . . . . . . . . . . . . . . . . . . . . . . . . . . . . . . . . . . . . 16 Shard Keys . . . . . . . . . . . . . . . . . . . . . . . . . . . . . . . . . . . . . . . . . . . . . . . . 16 Sharded Cluster High Availability . . . . . . . . . . . . . . . . . . . . . . . . . . . . . . . . . . . . 19 Sharded Cluster Query Routing . . . . . . . . . . . . . . . . . . . . . . . . . . . . . . . . . . . . . . 20 2.4 Sharding Mechanics . . . . . . . . . . . . . . . . . . . . . . . . . . . . . . . . . . . . . . . . . . . . 24 Sharded Collection Balancing . . . . . . . . . . . . . . . . . . . . . . . . . . . . . . . . . . . . . . 25 Chunk Migration Across Shards . . . . . . . . . . . . . . . . . . . . . . . . . . . . . . . . . . . . . 26 Chunk Splits in a Sharded Cluster . . . . . . . . . . . . . . . . . . . . . . . . . . . . . . . . . . . . 28 Shard Key Indexes . . . . . . . . . . . . . . . . . . . . . . . . . . . . . . . . . . . . . . . . . . . . 29 Sharded Cluster Metadata . . . . . . . . . . . . . . . . . . . . . . . . . . . . . . . . . . . . . . . . . 30 3 Sharded Cluster Tutorials 30 3.1 Sharded Cluster Deployment Tutorials . . . . . . . . . . . . . . . . . . . . . . . . . . . . . . . . . . 31 Deploy a Sharded Cluster . . . . . . . . . . . . . . . . . . . . . . . . . . . . . . . . . . . . . . . . . 31
- 2. Considerations for Selecting Shard Keys . . . . . . . . . . . . . . . . . . . . . . . . . . . . . . . . . 35 Shard a Collection Using a Hashed Shard Key . . . . . . . . . . . . . . . . . . . . . . . . . . . . . . 37 Add Shards to a Cluster . . . . . . . . . . . . . . . . . . . . . . . . . . . . . . . . . . . . . . . . . . 37 Deploy Three Config Servers for Production Deployments . . . . . . . . . . . . . . . . . . . . . . . 39 Convert a Replica Set to a Replicated Sharded Cluster . . . . . . . . . . . . . . . . . . . . . . . . . . 39 Convert Sharded Cluster to Replica Set . . . . . . . . . . . . . . . . . . . . . . . . . . . . . . . . . . 45 3.2 Sharded Cluster Maintenance Tutorials . . . . . . . . . . . . . . . . . . . . . . . . . . . . . . . . . . 46 View Cluster Configuration . . . . . . . . . . . . . . . . . . . . . . . . . . . . . . . . . . . . . . . . 46 Migrate Config Servers with the Same Hostname . . . . . . . . . . . . . . . . . . . . . . . . . . . . 48 Migrate Config Servers with Different Hostnames . . . . . . . . . . . . . . . . . . . . . . . . . . . . 48 Replace Disabled Config Server . . . . . . . . . . . . . . . . . . . . . . . . . . . . . . . . . . . . . 49 Migrate a Sharded Cluster to Different Hardware . . . . . . . . . . . . . . . . . . . . . . . . . . . . 50 Backup Cluster Metadata . . . . . . . . . . . . . . . . . . . . . . . . . . . . . . . . . . . . . . . . . 53 Configure Behavior of Balancer Process in Sharded Clusters . . . . . . . . . . . . . . . . . . . . . . 53 Manage Sharded Cluster Balancer . . . . . . . . . . . . . . . . . . . . . . . . . . . . . . . . . . . . 55 Remove Shards from an Existing Sharded Cluster . . . . . . . . . . . . . . . . . . . . . . . . . . . . 59 3.3 Sharded Cluster Data Management . . . . . . . . . . . . . . . . . . . . . . . . . . . . . . . . . . . . 61 Create Chunks in a Sharded Cluster . . . . . . . . . . . . . . . . . . . . . . . . . . . . . . . . . . . 61 Split Chunks in a Sharded Cluster . . . . . . . . . . . . . . . . . . . . . . . . . . . . . . . . . . . . 62 Migrate Chunks in a Sharded Cluster . . . . . . . . . . . . . . . . . . . . . . . . . . . . . . . . . . . 63 Merge Chunks in a Sharded Cluster . . . . . . . . . . . . . . . . . . . . . . . . . . . . . . . . . . . 64 Modify Chunk Size in a Sharded Cluster . . . . . . . . . . . . . . . . . . . . . . . . . . . . . . . . . 67 Tag Aware Sharding . . . . . . . . . . . . . . . . . . . . . . . . . . . . . . . . . . . . . . . . . . . . 67 Manage Shard Tags . . . . . . . . . . . . . . . . . . . . . . . . . . . . . . . . . . . . . . . . . . . . 68 Enforce Unique Keys for Sharded Collections . . . . . . . . . . . . . . . . . . . . . . . . . . . . . . 70 Shard GridFS Data Store . . . . . . . . . . . . . . . . . . . . . . . . . . . . . . . . . . . . . . . . . 72 3.4 Troubleshoot Sharded Clusters . . . . . . . . . . . . . . . . . . . . . . . . . . . . . . . . . . . . . . 73 Config Database String Error . . . . . . . . . . . . . . . . . . . . . . . . . . . . . . . . . . . . . . . 73 Cursor Fails Because of Stale Config Data . . . . . . . . . . . . . . . . . . . . . . . . . . . . . . . . 73 Avoid Downtime when Moving Config Servers . . . . . . . . . . . . . . . . . . . . . . . . . . . . . 73 4 Sharding Reference 74 4.1 Sharding Methods in the mongo Shell . . . . . . . . . . . . . . . . . . . . . . . . . . . . . . . . . . 74 4.2 Sharding Database Commands . . . . . . . . . . . . . . . . . . . . . . . . . . . . . . . . . . . . . . 74 4.3 Reference Documentation . . . . . . . . . . . . . . . . . . . . . . . . . . . . . . . . . . . . . . . . 75 Config Database . . . . . . . . . . . . . . . . . . . . . . . . . . . . . . . . . . . . . . . . . . . . . . 75 Index 81 Sharding is the process of storing data records across multiple machines and is MongoDB’s approach to meeting the demands of data growth. As the size of the data increases, a single machine may not be sufficient to store the data nor provide an acceptable read and write throughput. Sharding solves the problem with horizontal scaling. With sharding, you add more machines to support data growth and the demands of read and write operations. Sharding Introduction (page 3) A high-level introduction to horizontal scaling, data partitioning, and sharded clus-ters in MongoDB. Sharding Concepts (page 9) The core documentation of sharded cluster features, configuration, architecture and be-havior. Sharded Cluster Components (page 10) A sharded cluster consists of shards, config servers, and mongos in-stances. 2
- 3. Sharded Cluster Architectures (page 13) Outlines the requirements for sharded clusters, and provides exam-ples of several possible architectures for sharded clusters. Sharded Cluster Behavior (page 16) Discusses the operations of sharded clusters with regards to the automatic balancing of data in a cluster and other related availability and security considerations. Sharding Mechanics (page 24) Discusses the internal operation and behavior of sharded clusters, including chunk migration, balancing, and the cluster metadata. Sharded Cluster Tutorials (page 30) Tutorials that describe common procedures and administrative operations rele-vant to the use and maintenance of sharded clusters. Sharding Reference (page 74) Reference for sharding-related functions and operations. 1 Sharding Introduction Sharding is a method for storing data across multiple machines. MongoDB uses sharding to support deployments with very large data sets and high throughput operations. 1.1 Purpose of Sharding Database systems with large data sets and high throughput applications can challenge the capacity of a single server. High query rates can exhaust the CPU capacity of the server. Larger data sets exceed the storage capacity of a single machine. Finally, working set sizes larger than the system’s RAM stress the I/O capacity of disk drives. To address these issues of scales, database systems have two basic approaches: vertical scaling and sharding. Vertical scaling adds more CPU and storage resources to increase capacity. Scaling by adding capacity has lim-itations: high performance systems with large numbers of CPUs and large amount of RAM are disproportionately more expensive than smaller systems. Additionally, cloud-based providers may only allow users to provision smaller instances. As a result there is a practical maximum capability for vertical scaling. Sharding, or horizontal scaling, by contrast, divides the data set and distributes the data over multiple servers, or shards. Each shard is an independent database, and collectively, the shards make up a single logical database. Sharding addresses the challenge of scaling to support high throughput and large data sets: • Sharding reduces the number of operations each shard handles. Each shard processes fewer operations as the cluster grows. As a result, a cluster can increase capacity and throughput horizontally. For example, to insert data, the application only needs to access the shard responsible for that record. • Sharding reduces the amount of data that each server needs to store. Each shard stores less data as the cluster grows. For example, if a database has a 1 terabyte data set, and there are 4 shards, then each shard might hold only 256GB of data. If there are 40 shards, then each shard might hold only 25GB of data. 1.2 Sharding in MongoDB MongoDB supports sharding through the configuration of a sharded clusters. Sharded cluster has the following components: shards, query routers and config servers. 3
- 4. Figure 1: Diagram of a large collection with data distributed across 4 shards. 4
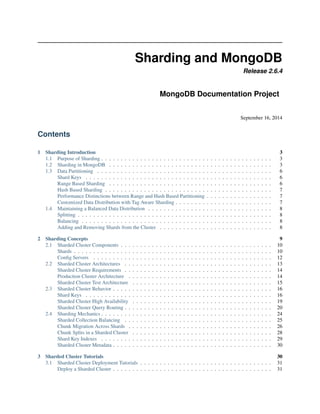
- 5. Figure 2: Diagram of a sample sharded cluster for production purposes. Contains exactly 3 config servers, 2 or more mongos query routers, and at least 2 shards. The shards are replica sets. 5
- 6. Shards store the data. To provide high availability and data consistency, in a production sharded cluster, each shard is a replica set 1. For more information on replica sets, see Replica Sets. Query Routers, or mongos instances, interface with client applications and direct operations to the appropriate shard or shards. The query router processes and targets operations to shards and then returns results to the clients. A sharded cluster can contain more than one query router to divide the client request load. A client sends requests to one query router. Most sharded cluster have many query routers. Config servers store the cluster’s metadata. This data contains a mapping of the cluster’s data set to the shards. The query router uses this metadata to target operations to specific shards. Production sharded clusters have exactly 3 config servers. 1.3 Data Partitioning MongoDB distributes data, or shards, at the collection level. Sharding partitions a collection’s data by the shard key. Shard Keys To shard a collection, you need to select a shard key. A shard key is either an indexed field or an indexed compound field that exists in every document in the collection. MongoDB divides the shard key values into chunks and distributes the chunks evenly across the shards. To divide the shard key values into chunks, MongoDB uses either range based partitioning or hash based partitioning. See the Shard Key (page 16) documentation for more information. Range Based Sharding For range-based sharding, MongoDB divides the data set into ranges determined by the shard key values to provide range based partitioning. Consider a numeric shard key: If you visualize a number line that goes from negative infinity to positive infinity, each value of the shard key falls at some point on that line. MongoDB partitions this line into smaller, non-overlapping ranges called chunks where a chunk is range of values from some minimum value to some maximum value. Given a range based partitioning system, documents with “close” shard key values are likely to be in the same chunk, and therefore on the same shard. Figure 3: Diagram of the shard key value space segmented into smaller ranges or chunks. 1 For development and testing purposes only, each shard can be a single mongod instead of a replica set. Do not deploy production clusters without 3 config servers. 6
- 7. Hash Based Sharding For hash based partitioning, MongoDB computes a hash of a field’s value, and then uses these hashes to create chunks. With hash based partitioning, two documents with “close” shard key values are unlikely to be part of the same chunk. This ensures a more random distribution of a collection in the cluster. Figure 4: Diagram of the hashed based segmentation. Performance Distinctions between Range and Hash Based Partitioning Range based partitioning supports more efficient range queries. Given a range query on the shard key, the query router can easily determine which chunks overlap that range and route the query to only those shards that contain these chunks. However, range based partitioning can result in an uneven distribution of data, which may negate some of the benefits of sharding. For example, if the shard key is a linearly increasing field, such as time, then all requests for a given time range will map to the same chunk, and thus the same shard. In this situation, a small set of shards may receive the majority of requests and the system would not scale very well. Hash based partitioning, by contrast, ensures an even distribution of data at the expense of efficient range queries. Hashed key values results in random distribution of data across chunks and therefore shards. But random distribution makes it more likely that a range query on the shard key will not be able to target a few shards but would more likely query every shard in order to return a result. Customized Data Distribution with Tag Aware Sharding MongoDB allows administrators to direct the balancing policy using tag aware sharding. Administrators create and associate tags with ranges of the shard key, and then assign those tags to the shards. Then, the balancer migrates tagged data to the appropriate shards and ensures that the cluster always enforces the distribution of data that the tags describe. Tags are the primary mechanism to control the behavior of the balancer and the distribution of chunks in a cluster. Most commonly, tag aware sharding serves to improve the locality of data for sharded clusters that span multiple data centers. See Tag Aware Sharding (page 67) for more information. 7
- 8. 1.4 Maintaining a Balanced Data Distribution The addition of new data or the addition of new servers can result in data distribution imbalances within the cluster, such as a particular shard contains significantly more chunks than another shard or a size of a chunk is significantly greater than other chunk sizes. MongoDB ensures a balanced cluster using two background process: splitting and the balancer. Splitting Splitting is a background process that keeps chunks from growing too large. When a chunk grows beyond a specified chunk size (page 29), MongoDB splits the chunk in half. Inserts and updates triggers splits. Splits are a efficient meta-data change. To create splits, MongoDB does not migrate any data or affect the shards. Figure 5: Diagram of a shard with a chunk that exceeds the default chunk size of 64 MB and triggers a split of the chunk into two chunks. Balancing The balancer (page 25) is a background process that manages chunk migrations. The balancer runs in all of the query routers in a cluster. When the distribution of a sharded collection in a cluster is uneven, the balancer process migrates chunks from the shard that has the largest number of chunks to the shard with the least number of chunks until the collection balances. For example: if collection users has 100 chunks on shard 1 and 50 chunks on shard 2, the balancer will migrate chunks from shard 1 to shard 2 until the collection achieves balance. The shards manage chunk migrations as a background operation between an origin shard and a destination shard. During a chunk migration, the destination shard is sent all the current documents in the chunk from the origin shard. Next, the destination shard captures and applies all changes made to the data during the migration process. Finally, the metadata regarding the location of the chunk on config server is updated. If there’s an error during the migration, the balancer aborts the process leaving the chunk unchanged on the origin shard. MongoDB removes the chunk’s data from the origin shard after the migration completes successfully. Adding and Removing Shards from the Cluster Adding a shard to a cluster creates an imbalance since the new shard has no chunks. While MongoDB begins migrating data to the new shard immediately, it can take some time before the cluster balances. 8
- 9. Figure 6: Diagram of a collection distributed across three shards. For this collection, the difference in the number of chunks between the shards reaches the migration thresholds (in this case, 2) and triggers migration. When removing a shard, the balancer migrates all chunks from a shard to other shards. After migrating all data and updating the meta data, you can safely remove the shard. 2 Sharding Concepts These documents present the details of sharding in MongoDB. These include the components, the architectures, and the behaviors of MongoDB sharded clusters. For an overview of sharding and sharded clusters, see Sharding Introduction (page 3). Sharded Cluster Components (page 10) A sharded cluster consists of shards, config servers, and mongos instances. Shards (page 10) A shard is a mongod instance that holds a part of the sharded collection’s data. Config Servers (page 12) Config servers hold the metadata about the cluster, such as the shard location of the data. Sharded Cluster Architectures (page 13) Outlines the requirements for sharded clusters, and provides examples of several possible architectures for sharded clusters. Sharded Cluster Requirements (page 14) Discusses the requirements for sharded clusters in MongoDB. Production Cluster Architecture (page 14) Sharded cluster for production has component requirements to pro-vide redundancy and high availability. Continue reading from Sharded Cluster Architectures (page 13) for additional descriptions of sharded cluster deployments. Sharded Cluster Behavior (page 16) Discusses the operations of sharded clusters with regards to the automatic bal-ancing of data in a cluster and other related availability and security considerations. Shard Keys (page 16) MongoDB uses the shard key to divide a collection’s data across the cluster’s shards. Sharded Cluster High Availability (page 19) Sharded clusters provide ways to address some availability con-cerns. Sharded Cluster Query Routing (page 20) The cluster’s routers, or mongos instances, send reads and writes to the relevant shard or shards. Sharding Mechanics (page 24) Discusses the internal operation and behavior of sharded clusters, including chunk migration, balancing, and the cluster metadata. 9
- 10. Sharded Collection Balancing (page 25) Balancing distributes a sharded collection’s data cluster to all of the shards. Sharded Cluster Metadata (page 30) The cluster maintains internal metadata that reflects the location of data within the cluster. Continue reading from Sharding Mechanics (page 24) for more documentation of the behavior and operation of sharded clusters. 2.1 Sharded Cluster Components Sharded clusters implement sharding. A sharded cluster consists of the following components: Shards A shard is a MongoDB instance that holds a subset of a collection’s data. Each shard is either a single mongod instance or a replica set. In production, all shards are replica sets. For more information see Shards (page 10). Config Servers Each config server (page 12) is a mongod instance that holds metadata about the cluster. The meta-data maps chunks to shards. For more information, see Config Servers (page 12). Routing Instances Each router is a mongos instance that routes the reads and writes from applications to the shards. Applications do not access the shards directly. For more information see Sharded Cluster Query Routing (page 20). Enable sharding in MongoDB on a per-collection basis. For each collection you shard, you will specify a shard key for that collection. Deploy a sharded cluster, see Deploy a Sharded Cluster (page 31). Shards A shard is a replica set or a single mongod that contains a subset of the data for the sharded cluster. Together, the cluster’s shards hold the entire data set for the cluster. Typically each shard is a replica set. The replica set provides redundancy and high availability for the data in each shard. Important: MongoDB shards data on a per collection basis. You must access all data in a sharded cluster via the mongos instances. If you connect directly to a shard, you will see only its fraction of the cluster’s data. There is no particular order to the data set on a specific shard. MongoDB does not guarantee that any two contiguous chunks will reside on a single shard. Primary Shard Every database has a “primary” 2 shard that holds all the un-sharded collections in that database. To change the primary shard for a database, use the movePrimary command. The process of migrating the primary shard may take significant time to complete, and you should not access the collections until it completes. When you deploy a new sharded cluster with shards that were previously used as replica sets, all existing databases continue to reside on their original shard. Databases created subsequently may reside on any shard in the cluster. 2 The term “primary” shard has nothing to do with the term primary in the context of replica sets. 10
- 11. Figure 7: Diagram of a sharded cluster. 11
- 12. Figure 8: Diagram of a primary shard. A primary shard contains non-sharded collections as well as chunks of docu-ments from sharded collections. Shard A is the primary shard. Shard Status Use the sh.status() method in the mongo shell to see an overview of the cluster. This reports includes which shard is primary for the database and the chunk distribution across the shards. See sh.status() method for more details. Config Servers Config servers are special mongod instances that store the metadata (page 30) for a sharded cluster. Config servers use a two-phase commit to ensure immediate consistency and reliability. Config servers do not run as replica sets. All config servers must be available to deploy a sharded cluster or to make any changes to cluster metadata. A production sharded cluster has exactly three config servers. For testing purposes you may deploy a cluster with a single config server. But to ensure redundancy and safety in production, you should always use three. Warning: If your cluster has a single config server, then the config server is a single point of failure. If the config server is inaccessible, the cluster is not accessible. If you cannot recover the data on a config server, the cluster will be inoperable. Always use three config servers for production deployments. Each sharded cluster must have its own config servers. Do not use the same config servers for different sharded clusters. Tip 12
- 13. Use CNAMEs to identify your config servers to the cluster so that you can rename and renumber your config servers without downtime. Config Database Config servers store the metadata in the config database (page 75). The mongos instances cache this data and use it to route reads and writes to shards. Read and Write Operations on Config Servers MongoDB only writes data to the config server in the following cases: • To create splits in existing chunks. For more information, see chunk splitting (page 28). • To migrate a chunk between shards. For more information, see chunk migration (page 26). MongoDB reads data from the config server data in the following cases: • A new mongos starts for the first time, or an existing mongos restarts. • After a chunk migration, the mongos instances update themselves with the new cluster metadata. MongoDB also uses the config server to manage distributed locks. Config Server Availability If one or two config servers become unavailable, the cluster’s metadata becomes read only. You can still read and write data from the shards, but no chunk migrations or splits will occur until all three servers are available. If all three config servers are unavailable, you can still use the cluster if you do not restart the mongos instances until after the config servers are accessible again. If you restart the mongos instances before the config servers are available, the mongos will be unable to route reads and writes. Clusters become inoperable without the cluster metadata. Always, ensure that the config servers remain available and intact. As such, backups of config servers are critical. The data on the config server is small compared to the data stored in a cluster. This means the config server has a relatively low activity load, and the config server does not need to be always available to support a sharded cluster. As a result, it is easy to back up the config servers. If the name or address that a sharded cluster uses to connect to a config server changes, you must restart every mongod and mongos instance in the sharded cluster. Avoid downtime by using CNAMEs to identify config servers within the MongoDB deployment. See Renaming Config Servers and Cluster Availability (page 19) for more information. 2.2 Sharded Cluster Architectures The following documents introduce deployment patterns for sharded clusters. Sharded Cluster Requirements (page 14) Discusses the requirements for sharded clusters in MongoDB. Production Cluster Architecture (page 14) Sharded cluster for production has component requirements to provide redundancy and high availability. Sharded Cluster Test Architecture (page 15) Sharded clusters for testing and development can have fewer compo-nents. 13
- 14. Sharded Cluster Requirements While sharding is a powerful and compelling feature, sharded clusters have significant infrastructure requirements and increases the overall complexity of a deployment. As a result, only deploy sharded clusters when indicated by application and operational requirements Sharding is the only solution for some classes of deployments. Use sharded clusters if: • your data set approaches or exceeds the storage capacity of a single MongoDB instance. • the size of your system’s active working set will soon exceed the capacity of your system’s maximum RAM. • a single MongoDB instance cannot meet the demands of your write operations, and all other approaches have not reduced contention. If these attributes are not present in your system, sharding will only add complexity to your system without adding much benefit. Important: It takes time and resources to deploy sharding. If your system has already reached or exceeded its capacity, it will be difficult to deploy sharding without impacting your application. As a result, if you think you will need to partition your database in the future, do not wait until your system is overcapacity to enable sharding. When designing your data model, take into consideration your sharding needs. Data Quantity Requirements Your cluster should manage a large quantity of data if sharding is to have an effect. The default chunk size is 64 megabytes. And the balancer (page 25) will not begin moving data across shards until the imbalance of chunks among the shards exceeds the migration threshold (page 26). In practical terms, unless your cluster has many hundreds of megabytes of data, your data will remain on a single shard. In some situations, you may need to shard a small collection of data. But most of the time, sharding a small collection is not worth the added complexity and overhead unless you need additional write capacity. If you have a small data set, a properly configured single MongoDB instance or a replica set will usually be enough for your persistence layer needs. Chunk size is user configurable. For most deployments, the default value is of 64 megabytes is ideal. See Chunk Size (page 29) for more information. Production Cluster Architecture In a production cluster, you must ensure that data is redundant and that your systems are highly available. To that end, a production cluster must have the following components: Components Config Servers Three config servers (page 12). Each config server must be on separate machines. A single sharded cluster must have exclusive use of its config servers (page 12). If you have multiple sharded clusters, you will need to have a group of config servers for each cluster. Shards Two or more replica sets. These replica sets are the shards. For information on replica sets, see http://docs.mongodb.org/manualreplication. 14
- 15. Query Routers (mongos) One or more mongos instances. The mongos instances are the routers for the cluster. Typically, deployments have one mongos instance on each application server. You may also deploy a group of mongos instances and use a proxy/load balancer between the application and the mongos. In these deployments, you must configure the load balancer for client affinity so that every connection from a single client reaches the same mongos. Because cursors and other resources are specific to an single mongos instance, each client must interact with only one mongos instance. Example Figure 9: Diagram of a sample sharded cluster for production purposes. Contains exactly 3 config servers, 2 or more mongos query routers, and at least 2 shards. The shards are replica sets. Sharded Cluster Test Architecture Warning: Use the test cluster architecture for testing and development only. For testing and development, you can deploy a minimal sharded clusters cluster. These non-production clusters have the following components: • One config server (page 12). • At least one shard. Shards are either replica sets or a standalone mongod instances. 15
- 16. • One mongos instance. Figure 10: Diagram of a sample sharded cluster for testing/development purposes only. Contains only 1 config server, 1 mongos router, and at least 1 shard. The shard can be either a replica set or a standalone mongod instance. See Production Cluster Architecture (page 14) 2.3 Sharded Cluster Behavior These documents address the distribution of data and queries to a sharded cluster as well as specific security and availability considerations for sharded clusters. Shard Keys (page 16) MongoDB uses the shard key to divide a collection’s data across the cluster’s shards. Sharded Cluster High Availability (page 19) Sharded clusters provide ways to address some availability concerns. Sharded Cluster Query Routing (page 20) The cluster’s routers, or mongos instances, send reads and writes to the relevant shard or shards. Shard Keys The shard key determines the distribution of the collection’s documents among the cluster’s shards. The shard key is either an indexed field or an indexed compound field that exists in every document in the collection. MongoDB partitions data in the collection using ranges of shard key values. Each range, or chunk, defines a non-overlapping range of shard key values. MongoDB distributes the chunks, and their documents, among the shards in the cluster. When a chunk grows beyond the chunk size (page 29), MongoDB splits the chunk into smaller chunks, always based on ranges in the shard key. 16
- 17. Figure 11: Diagram of the shard key value space segmented into smaller ranges or chunks. Considerations Shard keys are immutable and cannot be changed after insertion. See the system limits for sharded cluster for more information. The index on the shard key cannot be a multikey index. Hashed Shard Keys New in version 2.4. Hashed shard keys use a hashed index of a single field as the shard key to partition data across your sharded cluster. The field you choose as your hashed shard key should have a good cardinality, or large number of different values. Hashed keys work well with fields that increase monotonically like ObjectId values or timestamps. If you shard an empty collection using a hashed shard key, MongoDB will automatically create and migrate chunks so that each shard has two chunks. You can control how many chunks MongoDB will create with the numInitialChunks parameter to shardCollection or by manually creating chunks on the empty collection using the split command. To shard a collection using a hashed shard key, see Shard a Collection Using a Hashed Shard Key (page 37). Tip MongoDB automatically computes the hashes when resolving queries using hashed indexes. Applications do not need to compute hashes. Impacts of Shard Keys on Cluster Operations The shard key affects write and query performance by determining how the MongoDB partitions data in the cluster and how effectively the mongos instances can direct operations to the cluster. Consider the following operational impacts of shard key selection: Write Scaling Some possible shard keys will allow your application to take advantage of the increased write capacity that the cluster can provide, while others do not. Consider the following example where you shard by the values of the default _id field, which is ObjectId. 17
- 18. MongoDB generates ObjectId values upon document creation to produce a unique identifier for the object. How-ever, the most significant bits of data in this value represent a time stamp, which means that they increment in a regular and predictable pattern. Even though this value has high cardinality (page 36), when using this, any date, or other monotonically increasing number as the shard key, all insert operations will be storing data into a single chunk, and therefore, a single shard. As a result, the write capacity of this shard will define the effective write capacity of the cluster. A shard key that increases monotonically will not hinder performance if you have a very low insert rate, or if most of your write operations are update() operations distributed through your entire data set. Generally, choose shard keys that have both high cardinality and will distribute write operations across the entire cluster. Typically, a computed shard key that has some amount of “randomness,” such as ones that include a cryptographic hash (i.e. MD5 or SHA1) of other content in the document, will allow the cluster to scale write operations. However, random shard keys do not typically provide query isolation (page 18), which is another important characteristic of shard keys. New in version 2.4: MongoDB makes it possible to shard a collection on a hashed index. This can greatly improve write scaling. See Shard a Collection Using a Hashed Shard Key (page 37). Querying The mongos provides an interface for applications to interact with sharded clusters that hides the com-plexity of data partitioning. A mongos receives queries from applications, and uses metadata from the config server (page 12), to route queries to the mongod instances with the appropriate data. While the mongos succeeds in mak-ing all querying operational in sharded environments, the shard key you select can have a profound affect on query performance. See also: The Sharded Cluster Query Routing (page 20) and config server (page 12) sections for a more general overview of querying in sharded environments. Query Isolation The fastest queries in a sharded environment are those that mongos will route to a single shard, using the shard key and the cluster meta data from the config server (page 12). For queries that don’t include the shard key, mongos must query all shards, wait for their response and then return the result to the application. These “scatter/gather” queries can be long running operations. If your query includes the first component of a compound shard key 3, the mongos can route the query directly to a single shard, or a small number of shards, which provides better performance. Even if you query values of the shard key that reside in different chunks, the mongos will route queries directly to specific shards. To select a shard key for a collection: • determine the most commonly included fields in queries for a given application • find which of these operations are most performance dependent. If this field has low cardinality (i.e not sufficiently selective) you should add a second field to the shard key making a compound shard key. The data may become more splittable with a compound shard key. See Sharded Cluster Query Routing (page 20) for more information on query operations in the context of sharded clusters. Sorting In sharded systems, the mongos performs a merge-sort of all sorted query results from the shards. See Sharded Cluster Query Routing (page 20) and index-sort for more information. 3 In many ways, you can think of the shard key a cluster-wide unique index. However, be aware that sharded systems cannot enforce cluster-wide unique indexes unless the unique field is in the shard key. Consider the http://docs.mongodb.org/manualcore/indexes page for more information on indexes and compound indexes. 18
- 19. Sharded Cluster High Availability A production (page 14) cluster has no single point of failure. This section introduces the availability concerns for MongoDB deployments in general and highlights potential failure scenarios and available resolutions. Application Servers or mongos Instances Become Unavailable If each application server has its own mongos instance, other application servers can continue access the database. Furthermore, mongos instances do not maintain persistent state, and they can restart and become unavailable without losing any state or data. When a mongos instance starts, it retrieves a copy of the config database and can begin routing queries. A Single mongod Becomes Unavailable in a Shard Replica sets provide high availability for shards. If the unavailable mongod is a primary, then the replica set will elect a new primary. If the unavailable mongod is a secondary, and it disconnects the primary and secondary will continue to hold all data. In a three member replica set, even if a single member of the set experiences catastrophic failure, two other members have full copies of the data. 4 Always investigate availability interruptions and failures. If a system is unrecoverable, replace it and create a new member of the replica set as soon as possible to replace the lost redundancy. All Members of a Replica Set Become Unavailable If all members of a replica set within a shard are unavailable, all data held in that shard is unavailable. However, the data on all other shards will remain available, and it’s possible to read and write data to the other shards. However, your application must be able to deal with partial results, and you should investigate the cause of the interruption and attempt to recover the shard as soon as possible. One or Two Config Databases Become Unavailable Three distinct mongod instances provide the config database using a special two-phase commits to maintain consistent state between these mongod instances. Cluster operation will continue as normal but chunk migration (page 25) and the cluster can create no new chunk splits (page 62). Replace the config server as soon as possible. If all config databases become unavailable, the cluster can become inoperable. Note: All config servers must be running and available when you first initiate a sharded cluster. Renaming Config Servers and Cluster Availability If the name or address that a sharded cluster uses to connect to a config server changes, you must restart every mongod and mongos instance in the sharded cluster. Avoid downtime by using CNAMEs to identify config servers within the MongoDB deployment. To avoid downtime when renaming config servers, use DNS names unrelated to physical or virtual hostnames to refer to your config servers (page 12). 4 If an unavailable secondary becomes available while it still has current oplog entries, it can catch up to the latest state of the set using the normal replication process, otherwise it must perform an initial sync. 19
- 20. Generally, refer to each config server using the DNS alias (e.g. a CNAME record). When specifying the config server connection string to mongos, use these names. These records make it possible to change the IP address or rename config servers without changing the connection string and without having to restart the entire cluster. Shard Keys and Cluster Availability The most important consideration when choosing a shard key are: • to ensure that MongoDB will be able to distribute data evenly among shards, and • to scale writes across the cluster, and • to ensure that mongos can isolate most queries to a specific mongod. Furthermore: • Each shard should be a replica set, if a specific mongod instance fails, the replica set members will elect another to be primary and continue operation. However, if an entire shard is unreachable or fails for some reason, that data will be unavailable. • If the shard key allows the mongos to isolate most operations to a single shard, then the failure of a single shard will only render some data unavailable. • If your shard key distributes data required for every operation throughout the cluster, then the failure of the entire shard will render the entire cluster unavailable. In essence, this concern for reliability simply underscores the importance of choosing a shard key that isolates query operations to a single shard. Sharded Cluster Query Routing MongoDB mongos instances route queries and write operations to shards in a sharded cluster. mongos provide the only interface to a sharded cluster from the perspective of applications. Applications never connect or communicate directly with the shards. The mongos tracks what data is on which shard by caching the metadata from the config servers (page 12). The mongos uses the metadata to route operations from applications and clients to the mongod instances. A mongos has no persistent state and consumes minimal system resources. The most common practice is to run mongos instances on the same systems as your application servers, but you can maintain mongos instances on the shards or on other dedicated resources. Note: Changed in version 2.1. Some aggregation operations using the aggregate command (i.e. db.collection.aggregate()) will cause mongos instances to require more CPU resources than in previous versions. This modified performance profile may dictate alternate architecture decisions if you use the aggregation framework extensively in a sharded environment. Routing Process A mongos instance uses the following processes to route queries and return results. How mongos Determines which Shards Receive a Query A mongos instance routes a query to a cluster by: 1. Determining the list of shards that must receive the query. 2. Establishing a cursor on all targeted shards. 20
- 21. In some cases, when the shard key or a prefix of the shard key is a part of the query, the mongos can route the query to a subset of the shards. Otherwise, the mongos must direct the query to all shards that hold documents for that collection. Example Given the following shard key: { zipcode: 1, u_id: 1, c_date: 1 } Depending on the distribution of chunks in the cluster, the mongos may be able to target the query at a subset of shards, if the query contains the following fields: { zipcode: 1 } { zipcode: 1, u_id: 1 } { zipcode: 1, u_id: 1, c_date: 1 } How mongos Handles Query Modifiers If the result of the query is not sorted, the mongos instance opens a result cursor that “round robins” results from all cursors on the shards. Changed in version 2.0.5: In versions prior to 2.0.5, the mongos exhausted each cursor, one by one. If the query specifies sorted results using the sort() cursor method, the mongos instance passes the $orderby option to the shards. When the mongos receives results it performs an incremental merge sort of the results while returning them to the client. If the query limits the size of the result set using the limit() cursor method, the mongos instance passes that limit to the shards and then re-applies the limit to the result before returning the result to the client. If the query specifies a number of records to skip using the skip() cursor method, the mongos cannot pass the skip to the shards, but rather retrieves unskipped results from the shards and skips the appropriate number of documents when assembling the complete result. However, when used in conjunction with a limit(), the mongos will pass the limit plus the value of the skip() to the shards to improve the efficiency of these operations. Detect Connections to mongos Instances To detect if the MongoDB instance that your client is connected to is mongos, use the isMaster command. When a client connects to a mongos, isMaster returns a document with a msg field that holds the string isdbgrid. For example: { "ismaster" : true, "msg" : "isdbgrid", "maxBsonObjectSize" : 16777216, "ok" : 1 } If the application is instead connected to a mongod, the returned document does not include the isdbgrid string. Broadcast Operations and Targeted Operations In general, operations in a sharded environment are either: • Broadcast to all shards in the cluster that hold documents in a collection • Targeted at a single shard or a limited group of shards, based on the shard key 21
- 22. For best performance, use targeted operations whenever possible. While some operations must broadcast to all shards, you can ensure MongoDB uses targeted operations whenever possible by always including the shard key. Broadcast Operations mongos instances broadcast queries to all shards for the collection unless the mongos can determine which shard or subset of shards stores this data. Figure 12: Read operations to a sharded cluster. Query criteria does not include the shard key. The query router mongos must broadcast query to all shards for the collection. Multi-update operations are always broadcast operations. The remove() operation is always a broadcast operation, unless the operation specifies the shard key in full. Targeted Operations All insert() operations target to one shard. All single update() (including upsert operations) and remove() operations must target to one shard. Important: All update() and remove() operations for a sharded collection that specify the justOne or multi: false option must include the shard key or the _id field in the query specification. update() and remove() operations specifying justOne or multi: false in a sharded collection without the shard key or the _id field return an error. 22
- 23. For queries that include the shard key or portion of the shard key, mongos can target the query at a specific shard or set of shards. This is the case only if the portion of the shard key included in the query is a prefix of the shard key. For example, if the shard key is: { a: 1, b: 1, c: 1 } The mongos program can route queries that include the full shard key or either of the following shard key prefixes at a specific shard or set of shards: { a: 1 } { a: 1, b: 1 } Figure 13: Read operations to a sharded cluster. Query criteria includes the shard key. The query router mongos can target the query to the appropriate shard or shards. Depending on the distribution of data in the cluster and the selectivity of the query, mongos may still have to contact multiple shards 5 to fulfill these queries. 5 mongos will route some queries, even some that include the shard key, to all shards, if needed. 23
- 24. Sharded and Non-Sharded Data Sharding operates on the collection level. You can shard multiple collections within a database or have multiple databases with sharding enabled. 6 However, in production deployments, some databases and collections will use sharding, while other databases and collections will only reside on a single shard. Figure 14: Diagram of a primary shard. A primary shard contains non-sharded collections as well as chunks of documents from sharded collections. Shard A is the primary shard. Regardless of the data architecture of your sharded cluster, ensure that all queries and operations use the mongos router to access the data cluster. Use the mongos even for operations that do not impact the sharded data. 2.4 Sharding Mechanics The following documents describe sharded cluster processes. Sharded Collection Balancing (page 25) Balancing distributes a sharded collection’s data cluster to all of the shards. Chunk Migration Across Shards (page 26) MongoDB migrates chunks to shards as part of the balancing process. Chunk Splits in a Sharded Cluster (page 28) When a chunk grows beyond the configured size, MongoDB splits the chunk in half. Shard Key Indexes (page 29) Sharded collections must keep an index that starts with the shard key. Sharded Cluster Metadata (page 30) The cluster maintains internal metadata that reflects the location of data within the cluster. 6 As you configure sharding, you will use the enableSharding command to enable sharding for a database. This simply makes it possible to use the shardCollection command on a collection within that database. 24
- 25. Figure 15: Diagram of applications/drivers issuing queries to mongos for unsharded collection as well as sharded collection. Config servers not shown. Sharded Collection Balancing Balancing is the process MongoDB uses to distribute data of a sharded collection evenly across a sharded cluster. When a shard has too many of a sharded collection’s chunks compared to other shards, MongoDB automatically balances the chunks across the shards. The balancing procedure for sharded clusters is entirely transparent to the user and application layer. Cluster Balancer The balancer process is responsible for redistributing the chunks of a sharded collection evenly among the shards for every sharded collection. By default, the balancer process is always enabled. Any mongos instance in the cluster can start a balancing round. When a balancer process is active, the responsible mongos acquires a “lock” by modifying a document in the lock collection in the Config Database (page 75). Note: Changed in version 2.0: Before MongoDB version 2.0, large differences in timekeeping (i.e. clock skew) between mongos instances could lead to failed distributed locks. This carries the possibility of data loss, particularly with skews larger than 5 minutes. Always use the network time protocol (NTP) by running ntpd on your servers to minimize clock skew. To address uneven chunk distribution for a sharded collection, the balancer migrates chunks (page 26) from shards with more chunks to shards with a fewer number of chunks. The balancer migrates the chunks, one at a time, until there is an even dispersion of chunks for the collection across the shards. Chunk migrations carry some overhead in terms of bandwidth and workload, both of which can impact database performance. The balancer attempts to minimize the impact by: • Moving only one chunk at a time. See also Chunk Migration Queuing (page 27). 25
- 26. • Starting a balancing round only when the difference in the number of chunks between the shard with the greatest number of chunks for a sharded collection and the shard with the lowest number of chunks for that collection reaches the migration threshold (page 26). You may disable the balancer temporarily for maintenance. See Disable the Balancer (page 57) for details. You can also limit the window during which the balancer runs to prevent it from impacting production traffic. See Schedule the Balancing Window (page 56) for details. Note: The specification of the balancing window is relative to the local time zone of all individual mongos instances in the cluster. See also: Manage Sharded Cluster Balancer (page 55). Migration Thresholds To minimize the impact of balancing on the cluster, the balancer will not begin balancing until the distribution of chunks for a sharded collection has reached certain thresholds. The thresholds apply to the difference in number of chunks between the shard with the most chunks for the collection and the shard with the fewest chunks for that collection. The balancer has the following thresholds: Changed in version 2.2: The following thresholds appear first in 2.2. Prior to this release, a balancing round would only start if the shard with the most chunks had 8 more chunks than the shard with the least number of chunks. Number of Chunks Migration Threshold Fewer than 20 2 20-79 4 80 and greater 8 Once a balancing round starts, the balancer will not stop until, for the collection, the difference between the number of chunks on any two shards for that collection is less than two or a chunk migration fails. Shard Size By default, MongoDB will attempt to fill all available disk space with data on every shard as the data set grows. To ensure that the cluster always has the capacity to handle data growth, monitor disk usage as well as other performance metrics. When adding a shard, you may set a “maximum size” for that shard. This prevents the balancer from migrating chunks to the shard when the value of mapped exceeds the “maximum size”. Use the maxSize parameter of the addShard command to set the “maximum size” for the shard. See also: Change the Maximum Storage Size for a Given Shard (page 54) and http://docs.mongodb.org/manualadministration/monitoring. Chunk Migration Across Shards Chunk migration moves the chunks of a sharded collection from one shard to another and is part of the balancer (page 25) process. 26
- 27. Figure 16: Diagram of a collection distributed across three shards. For this collection, the difference in the number of chunks between the shards reaches the migration thresholds (in this case, 2) and triggers migration. Chunk Migration MongoDB migrates chunks in a sharded cluster to distribute the chunks of a sharded collection evenly among shards. Migrations may be either: • Manual. Only use manual migration in limited cases, such as to distribute data during bulk inserts. See Migrating Chunks Manually (page 63) for more details. • Automatic. The balancer (page 25) process automatically migrates chunks when there is an uneven distribution of a sharded collection’s chunks across the shards. See Migration Thresholds (page 26) for more details. All chunk migrations use the following procedure: 1. The balancer process sends the moveChunk command to the source shard. 2. The source starts the move with an internal moveChunk command. During the migration process, operations to the chunk route to the source shard. The source shard is responsible for incoming write operations for the chunk. 3. The destination shard begins requesting documents in the chunk and starts receiving copies of the data. 4. After receiving the final document in the chunk, the destination shard starts a synchronization process to ensure that it has the changes to the migrated documents that occurred during the migration. 5. When fully synchronized, the destination shard connects to the config database and updates the cluster metadata with the new location for the chunk. 6. After the destination shard completes the update of the metadata, and once there are no open cursors on the chunk, the source shard deletes its copy of the documents. Changed in version 2.4: If the balancer needs to perform additional chunk migrations from the source shard, the balancer can start the next chunk migration without waiting for the current migration process to finish this deletion step. See Chunk Migration Queuing (page 27). The migration process ensures consistency and maximizes the availability of chunks during balancing. Chunk Migration Queuing Changed in version 2.4. To migrate multiple chunks from a shard, the balancer migrates the chunks one at a time. However, the balancer does not wait for the current migration’s delete phase to complete before starting the next chunk migration. See Chunk Migration (page 27) for the chunk migration process and the delete phase. 27
- 28. This queuing behavior allows shards to unload chunks more quickly in cases of heavily imbalanced cluster, such as when performing initial data loads without pre-splitting and when adding new shards. This behavior also affect the moveChunk command, and migration scripts that use the moveChunk command may proceed more quickly. In some cases, the delete phases may persist longer. If multiple delete phases are queued but not yet complete, a crash of the replica set’s primary can orphan data from multiple migrations. Chunk Migration and Replication By default, each document operation during chunk migration propagates to at least one secondary before the balancer proceeds with the next document. To override this behavior and allow the balancer to continue without waiting for replication to a secondary, set the _secondaryThrottle parameter to false. See Change Replication Behavior for Chunk Migration (Secondary Throttle) (page 54) to update the _secondaryThrottle parameter for the balancer. Independent of the secondaryThrottle setting, certain phases of the chunk migration have the following repli-cation policy: • MongoDB briefly pauses all application writes to the source shard before updating the config servers with the new location for the chunk, and resumes the application writes after the update. The chunk move requires all writes to be acknowledged by majority of the members of the replica set both before and after committing the chunk move to config servers. • When an outgoing chunk migration finishes and cleanup occurs, all writes must be replicated to a majority of servers before further cleanup (from other outgoing migrations) or new incoming migrations can proceed. Changed in version 2.4: In previous versions, the balancer did not wait for the document move to replicate to a secondary. For details, see Secondary Throttle in the v2.2 Manual7 Chunk Splits in a Sharded Cluster As chunks grow beyond the specified chunk size (page 29) a mongos instance will attempt to split the chunk in half. Splits may lead to an uneven distribution of the chunks for a collection across the shards. In such cases, the mongos instances will initiate a round of migrations to redistribute chunks across shards. See Sharded Collection Balancing (page 25) for more details on balancing chunks across shards. Figure 17: Diagram of a shard with a chunk that exceeds the default chunk size of 64 MB and triggers a split of the chunk into two chunks. 7http://docs.mongodb.org/v2.2/tutorial/configure-sharded-cluster-balancer/#sharded-cluster-config-secondary-throttle 28
- 29. Chunk Size The default chunk size in MongoDB is 64 megabytes. You can increase or reduce the chunk size (page 67), mindful of its effect on the cluster’s efficiency. 1. Small chunks lead to a more even distribution of data at the expense of more frequent migrations. This creates expense at the query routing (mongos) layer. 2. Large chunks lead to fewer migrations. This is more efficient both from the networking perspective and in terms of internal overhead at the query routing layer. But, these efficiencies come at the expense of a potentially more uneven distribution of data. For many deployments, it makes sense to avoid frequent and potentially spurious migrations at the expense of a slightly less evenly distributed data set. Limitations Changing the chunk size affects when chunks split but there are some limitations to its effects. • Automatic splitting only occurs during inserts or updates. If you lower the chunk size, it may take time for all chunks to split to the new size. • Splits cannot be “undone”. If you increase the chunk size, existing chunks must grow through inserts or updates until they reach the new size. Note: Chunk ranges are inclusive of the lower boundary and exclusive of the upper boundary. Shard Key Indexes All sharded collections must have an index that starts with the shard key. If you shard a collection without any documents and without such an index, the shardCollection command will create the index on the shard key. If the collection already has documents, you must create the index before using shardCollection. Changed in version 2.2: The index on the shard key no longer needs to be only on the shard key. This index can be an index of the shard key itself, or a compound index where the shard key is a prefix of the index. Important: The index on the shard key cannot be a multikey index. A sharded collection named people has for its shard key the field zipcode. It currently has the index { zipcode: 1 }. You can replace this index with a compound index { zipcode: 1, username: 1 }, as follows: 1. Create an index on { zipcode: 1, username: 1 }: db.people.ensureIndex( { zipcode: 1, username: 1 } ); 2. When MongoDB finishes building the index, you can safely drop the existing index on { zipcode: 1 }: db.people.dropIndex( { zipcode: 1 } ); Since the index on the shard key cannot be a multikey index, the index { zipcode: 1, username: 1 } can only replace the index { zipcode: 1 } if there are no array values for the username field. If you drop the last valid index for the shard key, recover by recreating an index on just the shard key. For restrictions on shard key indexes, see limits-shard-keys. 29
- 30. Sharded Cluster Metadata Config servers (page 12) store the metadata for a sharded cluster. The metadata reflects state and organization of the sharded data sets and system. The metadata includes the list of chunks on every shard and the ranges that define the chunks. The mongos instances cache this data and use it to route read and write operations to shards. Config servers store the metadata in the Config Database (page 75). Important: Always back up the config database before doing any maintenance on the config server. To access the config database, issue the following command from the mongo shell: use config In general, you should never edit the content of the config database directly. The config database contains the following collections: • changelog (page 76) • chunks (page 77) • collections (page 78) • databases (page 78) • lockpings (page 78) • locks (page 78) • mongos (page 79) • settings (page 79) • shards (page 79) • version (page 80) For more information on these collections and their role in sharded clusters, see Config Database (page 75). See Read and Write Operations on Config Servers (page 13) for more information about reads and updates to the metadata. 3 Sharded Cluster Tutorials The following tutorials provide instructions for administering sharded clusters. For a higher-level overview, see Shard-ing (page 2). Sharded Cluster Deployment Tutorials (page 31) Instructions for deploying sharded clusters, adding shards, select-ing shard keys, and the initial configuration of sharded clusters. Deploy a Sharded Cluster (page 31) Set up a sharded cluster by creating the needed data directories, starting the required MongoDB instances, and configuring the cluster settings. Considerations for Selecting Shard Keys (page 35) Choose the field that MongoDB uses to parse a collection’s documents for distribution over the cluster’s shards. Each shard holds documents with values within a certain range. Shard a Collection Using a Hashed Shard Key (page 37) Shard a collection based on hashes of a field’s values in order to ensure even distribution over the collection’s shards. Add Shards to a Cluster (page 37) Add a shard to add capacity to a sharded cluster. Continue reading from Sharded Cluster Deployment Tutorials (page 31) for additional tutorials. 30
- 31. Sharded Cluster Maintenance Tutorials (page 46) Procedures and tasks for common operations on active sharded clusters. View Cluster Configuration (page 46) View status information about the cluster’s databases, shards, and chunks. Remove Shards from an Existing Sharded Cluster (page 59) Migrate a single shard’s data and remove the shard. Migrate Config Servers with Different Hostnames (page 48) Migrate a config server to a new system that uses a new hostname. If possible, avoid changing the hostname and instead use the Migrate Config Servers with the Same Hostname (page 48) procedure. Manage Shard Tags (page 68) Use tags to associate specific ranges of shard key values with specific shards. Continue reading from Sharded Cluster Maintenance Tutorials (page 46) for additional tutorials. Sharded Cluster Data Management (page 61) Practices that address common issues in managing large sharded data sets. Troubleshoot Sharded Clusters (page 73) Presents solutions to common issues and concerns relevant to the adminis-tration and use of sharded clusters. Refer to http://docs.mongodb.org/manualfaq/diagnostics for general diagnostic information. 3.1 Sharded Cluster Deployment Tutorials The following tutorials provide information on deploying sharded clusters. Deploy a Sharded Cluster (page 31) Set up a sharded cluster by creating the needed data directories, starting the required MongoDB instances, and configuring the cluster settings. Considerations for Selecting Shard Keys (page 35) Choose the field that MongoDB uses to parse a collection’s doc-uments for distribution over the cluster’s shards. Each shard holds documents with values within a certain range. Shard a Collection Using a Hashed Shard Key (page 37) Shard a collection based on hashes of a field’s values in order to ensure even distribution over the collection’s shards. Add Shards to a Cluster (page 37) Add a shard to add capacity to a sharded cluster. Deploy Three Config Servers for Production Deployments (page 39) Convert a test deployment with one config server to a production deployment with three config servers. Convert a Replica Set to a Replicated Sharded Cluster (page 39) Convert a replica set to a sharded cluster in which each shard is its own replica set. Convert Sharded Cluster to Replica Set (page 45) Replace your sharded cluster with a single replica set. See also: http://docs.mongodb.org/manualtutorial/enable-authentication-in-sharded-cluster Deploy a Sharded Cluster Use the following sequence of tasks to deploy a sharded cluster: Warning: Sharding and “localhost” Addresses If you use either “localhost” or 127.0.0.1 as the hostname portion of any host identifier, for example as the host argument to addShard or the value to the --configdb run time option, then you must use “localhost” or 127.0.0.1 for all host settings for any MongoDB instances in the cluster. If you mix localhost addresses and remote host address, MongoDB will error. 31
- 32. Start the Config Server Database Instances The config server processes are mongod instances that store the cluster’s metadata. You designate a mongod as a config server using the --configsvr option. Each config server stores a complete copy of the cluster’s metadata. In production deployments, you must deploy exactly three config server instances, each running on different servers to assure good uptime and data safety. In test environments, you can run all three instances on a single server. Important: All members of a sharded cluster must be able to connect to all other members of a sharded cluster, including all shards and all config servers. Ensure that the network and security systems including all interfaces and firewalls, allow these connections. 1. Create data directories for each of the three config server instances. By default, a config server stores its data files in the /data/configdb directory. You can choose a different location. To create a data directory, issue a command similar to the following: mkdir /data/configdb 2. Start the three config server instances. Start each by issuing a command using the following syntax: mongod --configsvr --dbpath <path> --port <port> The default port for config servers is 27019. You can specify a different port. The following example starts a config server using the default port and default data directory: mongod --configsvr --dbpath /data/configdb --port 27019 For additional command options, see http://docs.mongodb.org/manualreference/program/mongod or http://docs.mongodb.org/manualreference/configuration-options. Note: All config servers must be running and available when you first initiate a sharded cluster. Start the mongos Instances The mongos instances are lightweight and do not require data directories. You can run a mongos instance on a system that runs other cluster components, such as on an application server or a server running a mongod process. By default, a mongos instance runs on port 27017. When you start the mongos instance, specify the hostnames of the three config servers, either in the configuration file or as command line parameters. Tip To avoid downtime, give each config server a logical DNS name (unrelated to the server’s physical or virtual host-name). Without logical DNS names, moving or renaming a config server requires shutting down every mongod and mongos instance in the sharded cluster. To start a mongos instance, issue a command using the following syntax: mongos --configdb <config server hostnames> For example, to start a mongos that connects to config server instance running on the following hosts and on the default ports: • cfg0.example.net • cfg1.example.net 32
- 33. • cfg2.example.net You would issue the following command: mongos --configdb cfg0.example.net:27019,cfg1.example.net:27019,cfg2.example.net:27019 Each mongos in a sharded cluster must use the same configDB string, with identical host names listed in identical order. If you start a mongos instance with a string that does not exactly match the string used by the other mongos instances in the cluster, the mongos return a Config Database String Error (page 73) error and refuse to start. Add Shards to the Cluster A shard can be a standalone mongod or a replica set. In a production environment, each shard should be a replica set. Use the procedure in http://docs.mongodb.org/manualtutorial/deploy-replica-set to deploy replica sets for each shard. 1. From a mongo shell, connect to the mongos instance. Issue a command using the following syntax: mongo --host <hostname of machine running mongos> --port <port mongos listens on> For example, if a mongos is accessible at mongos0.example.net on port 27017, issue the following command: mongo --host mongos0.example.net --port 27017 2. Add each shard to the cluster using the sh.addShard() method, as shown in the examples below. Issue sh.addShard() separately for each shard. If the shard is a replica set, specify the name of the replica set and specify a member of the set. In production deployments, all shards should be replica sets. Optional You can instead use the addShard database command, which lets you specify a name and maximum size for the shard. If you do not specify these, MongoDB automatically assigns a name and maximum size. To use the database command, see addShard. The following are examples of adding a shard with sh.addShard(): • To add a shard for a replica set named rs1 with a member running on port 27017 on mongodb0.example.net, issue the following command: sh.addShard( "rs1/mongodb0.example.net:27017" ) Changed in version 2.0.3. For MongoDB versions prior to 2.0.3, you must specify all members of the replica set. For example: sh.addShard( "rs1/mongodb0.example.net:27017,mongodb1.example.net:27017,mongodb2.example.net:• To add a shard for a standalone mongod on port 27017 of mongodb0.example.net, issue the fol-lowing command: sh.addShard( "mongodb0.example.net:27017" ) Note: It might take some time for chunks to migrate to the new shard. 33
- 34. Enable Sharding for a Database Before you can shard a collection, you must enable sharding for the collection’s database. Enabling sharding for a database does not redistribute data but make it possible to shard the collections in that database. Once you enable sharding for a database, MongoDB assigns a primary shard for that database where MongoDB stores all data before sharding begins. 1. From a mongo shell, connect to the mongos instance. Issue a command using the following syntax: mongo --host <hostname of machine running mongos> --port <port mongos listens on> 2. Issue the sh.enableSharding() method, specifying the name of the database for which to enable sharding. Use the following syntax: sh.enableSharding("<database>") Optionally, you can enable sharding for a database using the enableSharding command, which uses the following syntax: db.runCommand( { enableSharding: <database> } ) Enable Sharding for a Collection You enable sharding on a per-collection basis. 1. Determine what you will use for the shard key. Your selection of the shard key affects the efficiency of sharding. See the selection considerations listed in the Considerations for Selecting Shard Key (page 35). 2. If the collection already contains data you must create an index on the shard key using ensureIndex(). If the collection is empty then MongoDB will create the index as part of the sh.shardCollection() step. 3. Enable sharding for a collection by issuing the sh.shardCollection() method in the mongo shell. The method uses the following syntax: sh.shardCollection("<database>.<collection>", shard-key-pattern) Replace the <database>.<collection> string with the full namespace of your database, which consists of the name of your database, a dot (e.g. .), and the full name of the collection. The shard-key-pattern represents your shard key, which you specify in the same form as you would an index key pattern. Example The following sequence of commands shards four collections: sh.shardCollection("records.people", { "zipcode": 1, "name": 1 } ) sh.shardCollection("people.addresses", { "state": 1, "_id": 1 } ) sh.shardCollection("assets.chairs", { "type": 1, "_id": 1 } ) sh.shardCollection("events.alerts", { "_id": "hashed" } ) In order, these operations shard: (a) The people collection in the records database using the shard key { "zipcode": 1, "name": 1 }. This shard key distributes documents by the value of the zipcode field. If a number of documents have the same value for this field, then that chunk will be splittable (page 36) by the values of the name field. 34
- 35. (b) The addresses collection in the people database using the shard key { "state": 1, "_id": 1 }. This shard key distributes documents by the value of the state field. If a number of documents have the same value for this field, then that chunk will be splittable (page 36) by the values of the _id field. (c) The chairs collection in the assets database using the shard key { "type": 1, "_id": 1 }. This shard key distributes documents by the value of the type field. If a number of documents have the same value for this field, then that chunk will be splittable (page 36) by the values of the _id field. (d) The alerts collection in the events database using the shard key { "_id": "hashed" }. New in version 2.4. This shard key distributes documents by a hash of the value of the _id field. MongoDB computes the hash of the _id field for the hashed index, which should provide an even distribution of documents across a cluster. Considerations for Selecting Shard Keys Choosing a Shard Key For many collections there may be no single, naturally occurring key that possesses all the qualities of a good shard key. The following strategies may help construct a useful shard key from existing data: 1. Compute a more ideal shard key in your application layer, and store this in all of your documents, potentially in the _id field. 2. Use a compound shard key that uses two or three values from all documents that provide the right mix of cardinality with scalable write operations and query isolation. 3. Determine that the impact of using a less than ideal shard key is insignificant in your use case, given: • limited write volume, • expected data size, or • application query patterns. 4. New in version 2.4: Use a hashed shard key. Choose a field that has high cardinality and create a hashed index on that field. MongoDB uses these hashed index values as shard key values, which ensures an even distribution of documents across the shards. Tip MongoDB automatically computes the hashes when resolving queries using hashed indexes. Applications do not need to compute hashes. Considerations for Selecting Shard Key Choosing the correct shard key can have a great impact on the perfor-mance, capability, and functioning of your database and cluster. Appropriate shard key choice depends on the schema of your data and the way that your applications query and write data. Create a Shard Key that is Easily Divisible An easily divisible shard key makes it easy for MongoDB to distribute content among the shards. Shard keys that have a limited number of possible values can result in chunks that are “unsplittable.” 35
- 36. See also: Cardinality (page 36) Create a Shard Key that has High Degree of Randomness A shard key with high degree of randomness prevents any single shard from becoming a bottleneck and will distribute write operations among the cluster. See also: Write Scaling (page 17) Create a Shard Key that Targets a Single Shard A shard key that targets a single shard makes it possible for the mongos program to return most query operations directly from a single specific mongod instance. Your shard key should be the primary field used by your queries. Fields with a high degree of “randomness” make it difficult to target operations to specific shards. See also: Query Isolation (page 18) Shard Using a Compound Shard Key The challenge when selecting a shard key is that there is not always an obvious choice. Often, an existing field in your collection may not be the optimal key. In those situations, computing a special purpose shard key into an additional field or using a compound shard key may help produce one that is more ideal. Cardinality Cardinality in the context of MongoDB, refers to the ability of the system to partition data into chunks. For example, consider a collection of data such as an “address book” that stores address records: • Consider the use of a state field as a shard key: The state key’s value holds the US state for a given address document. This field has a low cardinality as all documents that have the same value in the state field must reside on the same shard, even if a particular state’s chunk exceeds the maximum chunk size. Since there are a limited number of possible values for the state field, MongoDB may distribute data unevenly among a small number of fixed chunks. This may have a number of effects: – If MongoDB cannot split a chunk because all of its documents have the same shard key, migrations involv-ing these un-splittable chunks will take longer than other migrations, and it will be more difficult for your data to stay balanced. – If you have a fixed maximum number of chunks, you will never be able to use more than that number of shards for this collection. • Consider the use of a zipcode field as a shard key: While this field has a large number of possible values, and thus has potentially higher cardinality, it’s possible that a large number of users could have the same value for the shard key, which would make this chunk of users un-splittable. 36
- 37. In these cases, cardinality depends on the data. If your address book stores records for a geographically dis-tributed contact list (e.g. “Dry cleaning businesses in America,”) then a value like zipcode would be sufficient. However, if your address book is more geographically concentrated (e.g “ice cream stores in Boston Mas-sachusetts,”) then you may have a much lower cardinality. • Consider the use of a phone-number field as a shard key: Phone number has a high cardinality, because users will generally have a unique value for this field, MongoDB will be able to split as many chunks as needed. While “high cardinality,” is necessary for ensuring an even distribution of data, having a high cardinality does not guarantee sufficient query isolation (page 18) or appropriate write scaling (page 17). Shard a Collection Using a Hashed Shard Key New in version 2.4. Hashed shard keys (page 17) use a hashed index of a field as the shard key to partition data across your sharded cluster. For suggestions on choosing the right field as your hashed shard key, see Hashed Shard Keys (page 17). For limitations on hashed indexes, see index-hashed-index. Note: If chunk migrations are in progress while creating a hashed shard key collection, the initial chunk distribution may be uneven until the balancer automatically balances the collection. Shard the Collection To shard a collection using a hashed shard key, use an operation in the mongo that resembles the following: sh.shardCollection( "records.active", { a: "hashed" } ) This operation shards the active collection in the records database, using a hash of the a field as the shard key. Specify the Initial Number of Chunks If you shard an empty collection using a hashed shard key, MongoDB automatically creates and migrates empty chunks so that each shard has two chunks. To control how many chunks MongoDB creates when sharding the collection, use shardCollection with the numInitialChunks parameter. Important: MongoDB 2.4 adds support for hashed shard keys. After sharding a collection with a hashed shard key, you must use the MongoDB 2.4 or higher mongos and mongod instances in your sharded cluster. Warning: MongoDB hashed indexes truncate floating point numbers to 64-bit integers before hashing. For example, a hashed index would store the same value for a field that held a value of 2.3, 2.2, and 2.9. To prevent collisions, do not use a hashed index for floating point numbers that cannot be reliably converted to 64-bit integers (and then back to floating point). MongoDB hashed indexes do not support floating point values larger than 253. Add Shards to a Cluster You add shards to a sharded cluster after you create the cluster or any time that you need to add capacity to the cluster. If you have not created a sharded cluster, see Deploy a Sharded Cluster (page 31). 37
- 38. In production environments, all shards should be replica sets. Considerations Balancing When you add a shard to a sharded cluster, you affect the balance of chunks among the shards of a cluster for all existing sharded collections. The balancer will begin migrating chunks so that the cluster will achieve balance. See Sharded Collection Balancing (page 25) for more information. Capacity Planning When adding a shard to a cluster, always ensure that the cluster has enough capacity to support the migration required for balancing the cluster without affecting legitimate production traffic. Add a Shard to a Cluster You interact with a sharded cluster by connecting to a mongos instance. 1. From a mongo shell, connect to the mongos instance. For example, if a mongos is accessible at mongos0.example.net on port 27017, issue the following command: mongo --host mongos0.example.net --port 27017 2. Add a shard to the cluster using the sh.addShard() method, as shown in the examples below. Issue sh.addShard() separately for each shard. If the shard is a replica set, specify the name of the replica set and specify a member of the set. In production deployments, all shards should be replica sets. Optional You can instead use the addShard database command, which lets you specify a name and maximum size for the shard. If you do not specify these, MongoDB automatically assigns a name and maximum size. To use the database command, see addShard. The following are examples of adding a shard with sh.addShard(): • To add a shard for a replica set named rs1 with a member running on port 27017 on mongodb0.example.net, issue the following command: sh.addShard( "rs1/mongodb0.example.net:27017" ) Changed in version 2.0.3. For MongoDB versions prior to 2.0.3, you must specify all members of the replica set. For example: sh.addShard( "rs1/mongodb0.example.net:27017,mongodb1.example.net:27017,mongodb2.example.net:• To add a shard for a standalone mongod on port 27017 of mongodb0.example.net, issue the fol-lowing command: sh.addShard( "mongodb0.example.net:27017" ) Note: It might take some time for chunks to migrate to the new shard. 38
- 39. Deploy Three Config Servers for Production Deployments This procedure converts a test deployment with only one config server (page 12) to a production deployment with three config servers. Tip Use CNAMEs to identify your config servers to the cluster so that you can rename and renumber your config servers without downtime. For redundancy, all production sharded clusters (page 3) should deploy three config servers on three different ma-chines. Use a single config server only for testing deployments, never for production deployments. When you shift to production, upgrade immediately to three config servers. To convert a test deployment with one config server to a production deployment with three config servers: 1. Shut down all existing MongoDB processes in the cluster. This includes: • all mongod instances or replica sets that provide your shards. • all mongos instances in your cluster. 2. Copy the entire dbPath file system tree from the existing config server to the two machines that will provide the additional config servers. These commands, issued on the system with the existing Config Database (page 75), mongo-config0.example.net may resemble the following: rsync -az /data/configdb mongo-config1.example.net:/data/configdb rsync -az /data/configdb mongo-config2.example.net:/data/configdb 3. Start all three config servers, using the same invocation that you used for the single config server. mongod --configsvr 4. Restart all shard mongod and mongos processes. Convert a Replica Set to a Replicated Sharded Cluster Overview Following this tutorial, you will convert a single 3-member replica set to a cluster that consists of 2 shards. Each shard will consist of an independent 3-member replica set. The tutorial uses a test environment running on a local system UNIX-like system. You should feel encouraged to “follow along at home.” If you need to perform this process in a production environment, notes throughout the document indicate procedural differences. The procedure, from a high level, is as follows: 1. Create or select a 3-member replica set and insert some data into a collection. 2. Start the config databases and create a cluster with a single shard. 3. Create a second replica set with three new mongod instances. 4. Add the second replica set as a shard in the cluster. 5. Enable sharding on the desired collection or collections. 39
- 40. Process Install MongoDB according to the instructions in the MongoDB Installation Tutorial. Deploy a Replica Set with Test Data If have an existing MongoDB replica set deployment, you can omit the this step and continue from Deploy Sharding Infrastructure (page 41). Use the following sequence of steps to configure and deploy a replica set and to insert test data. 1. Create the following directories for the first replica set instance, named firstset: • /data/example/firstset1 • /data/example/firstset2 • /data/example/firstset3 To create directories, issue the following command: mkdir -p /data/example/firstset1 /data/example/firstset2 /data/example/firstset3 2. In a separate terminal window or GNU Screen window, start three mongod instances by running each of the following commands: mongod --dbpath /data/example/firstset1 --port 10001 --replSet firstset --oplogSize 700 --rest mongod --dbpath /data/example/firstset2 --port 10002 --replSet firstset --oplogSize 700 --rest mongod --dbpath /data/example/firstset3 --port 10003 --replSet firstset --oplogSize 700 --rest Note: The --oplogSize 700 option restricts the size of the operation log (i.e. oplog) for each mongod instance to 700MB. Without the --oplogSize option, each mongod reserves approximately 5% of the free disk space on the volume. By limiting the size of the oplog, each instance starts more quickly. Omit this setting in production environments. 3. In a mongo shell session in a new terminal, connect to the mongodb instance on port 10001 by running the following command. If you are in a production environment, first read the note below. mongo localhost:10001/admin Note: Above and hereafter, if you are running in a production environment or are testing this process with mongod instances on multiple systems, replace “localhost” with a resolvable domain, hostname, or the IP address of your system. 4. In the mongo shell, initialize the first replica set by issuing the following command: db.runCommand({"replSetInitiate" : {"_id" : "firstset", "members" : [{"_id" : 1, "host" : "localhost:10001"}, {"_id" : 2, "host" : "localhost:10002"}, {"_id" : 3, "host" : "localhost:10003"} ]}}) { "info" : "Config now saved locally. Should come online in about a minute.", "ok" : 1 } 5. In the mongo shell, create and populate a new collection by issuing the following sequence of JavaScript operations: 40
- 41. use test switched to db test people = ["Marc", "Bill", "George", "Eliot", "Matt", "Trey", "Tracy", "Greg", "Steve", "Kristina", for(var i=0; i<1000000; i++){ name = people[Math.floor(Math.random()*people.length)]; user_id = i; boolean = [true, false][Math.floor(Math.random()*2)]; added_at = new Date(); number = Math.floor(Math.random()*10001); db.test_collection.save({"name":name, "user_id":user_id, "boolean": } The above operations add one million documents to the collection test_collection. This can take several minutes, depending on your system. The script adds the documents in the following form: { "_id" : ObjectId("4ed5420b8fc1dd1df5886f70"), "name" : "Greg", "user_id" : 4, "boolean" : true, "added_Deploy Sharding Infrastructure This procedure creates the three config databases that store the cluster’s metadata. Note: For development and testing environments, a single config database is sufficient. In production environments, use three config databases. Because config instances store only the metadata for the sharded cluster, they have minimal resource requirements. 1. Create the following data directories for three config database instances: • /data/example/config1 • /data/example/config2 • /data/example/config3 Issue the following command at the system prompt: mkdir -p /data/example/config1 /data/example/config2 /data/example/config3 2. In a separate terminal window or GNU Screen window, start the config databases by running the following commands: mongod --configsvr --dbpath /data/example/config1 --port 20001 mongod --configsvr --dbpath /data/example/config2 --port 20002 mongod --configsvr --dbpath /data/example/config3 --port 20003 3. In a separate terminal window or GNU Screen window, start mongos instance by running the following com-mand: mongos --configdb localhost:20001,localhost:20002,localhost:20003 --port 27017 --chunkSize 1 Note: If you are using the collection created earlier or are just experimenting with sharding, you can use a small --chunkSize (1MB works well.) The default chunkSize of 64MB means that your cluster must have 64MB of data before the MongoDB’s automatic sharding begins working. In production environments, do not use a small shard size. The configDB options specify the configuration databases (e.g. localhost:20001, localhost:20002, and localhost:2003). The mongos instance runs on the default “Mon-goDB” port (i.e. 27017), while the databases themselves are running on ports in the 30001 series. In the this example, you may omit the --port 27017 option, as 27017 is the default port. 41
- 42. 4. Add the first shard in mongos. In a new terminal window or GNU Screen session, add the first shard, according to the following procedure: (a) Connect to the mongos with the following command: mongo localhost:27017/admin (b) Add the first shard to the cluster by issuing the addShard command: db.runCommand( { addShard : "firstset/localhost:10001,localhost:10002,localhost:10003" } ) (c) Observe the following message, which denotes success: { "shardAdded" : "firstset", "ok" : 1 } Deploy a Second Replica Set This procedure deploys a second replica set. This closely mirrors the process used to establish the first replica set above, omitting the test data. 1. Create the following data directories for the members of the second replica set, named secondset: • /data/example/secondset1 • /data/example/secondset2 • /data/example/secondset3 2. In three new terminal windows, start three instances of mongod with the following commands: mongod --dbpath /data/example/secondset1 --port 10004 --replSet secondset --oplogSize 700 --rest mongod --dbpath /data/example/secondset2 --port 10005 --replSet secondset --oplogSize 700 --rest mongod --dbpath /data/example/secondset3 --port 10006 --replSet secondset --oplogSize 700 --rest Note: As above, the second replica set uses the smaller oplogSizeMB configuration. Omit this setting in production environments. 3. In the mongo shell, connect to one mongodb instance by issuing the following command: mongo localhost:10004/admin 4. In the mongo shell, initialize the second replica set by issuing the following command: db.runCommand({"replSetInitiate" : {"_id" : "secondset", "members" : [{"_id" : 1, "host" : "localhost:10004"}, {"_id" : 2, "host" : "localhost:10005"}, {"_id" : 3, "host" : "localhost:10006"} ]}}) { "info" : "Config now saved locally. Should come online in about a minute.", "ok" : 1 } 5. Add the second replica set to the cluster. Connect to the mongos instance created in the previous procedure and issue the following sequence of commands: use admin db.runCommand( { addShard : "secondset/localhost:10004,localhost:10005,localhost:10006" } ) This command returns the following success message: 42
- 43. { "shardAdded" : "secondset", "ok" : 1 } 6. Verify that both shards are properly configured by running the listShards command. View this and example output below: db.runCommand({listShards:1}) { "shards" : [ { "_id" : "firstset", "host" : "firstset/localhost:10001,localhost:10003,localhost:10002" }, { "_id" : "secondset", "host" : "secondset/localhost:10004,localhost:10006,localhost:10005" } ], "ok" : 1 } Enable Sharding MongoDB must have sharding enabled on both the database and collection levels. Enabling Sharding on the Database Level Issue the enableSharding command. The following example en-ables sharding on the “test” database: db.runCommand( { enableSharding : "test" } ) { "ok" : 1 } Create an Index on the Shard Key MongoDB uses the shard key to distribute documents between shards. Once selected, you cannot change the shard key. Good shard keys: • have values that are evenly distributed among all documents, • group documents that are often accessed at the same time into contiguous chunks, and • allow for effective distribution of activity among shards. Typically shard keys are compound, comprising of some sort of hash and some sort of other primary key. Selecting a shard key depends on your data set, application architecture, and usage pattern, and is beyond the scope of this document. For the purposes of this example, we will shard the “number” key. This typically would not be a good shard key for production deployments. Create the index with the following procedure: use test db.test_collection.ensureIndex({number:1}) See also: The Shard Key Overview (page 16) and Shard Key (page 16) sections. Shard the Collection Issue the following command: use admin db.runCommand( { shardCollection : "test.test_collection", key : {"number":1} }) { "collectionsharded" : "test.test_collection", "ok" : 1 } 43