Apidays New York 2024 - Passkeys: Developing APIs to enable passwordless auth...
Prezi Manual
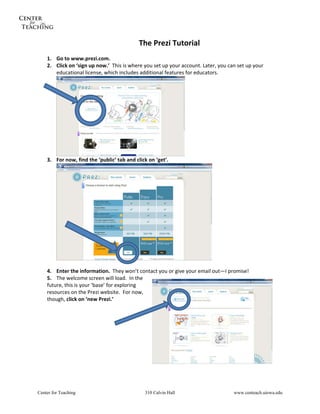
1. The Prezi Tutorial
1. Go to www.prezi.com.
2. Click on ‘sign up now.’ This is where you set up your account. Later, you can set up your
educational license, which includes additional features for educators.
3. For now, find the ‘public’ tab and click on ‘get’.
4. Enter the information. They won’t contact you or give your email out—I promise!
5. The welcome screen will load. In the
future, this is your ‘base’ for exploring
resources on the Prezi website. For now,
though, click on ‘new Prezi.’
Center for Teaching 310 Calvin Hall www.centeach.uiowa.edu
2. 6. Type a name and description for your Prezi. This will
put it in Prezi’s searchable database. When you have
an educational license, you won’t have to make your
Prezis public.
7. Close the tutorial Box.
8. The canvas!
‘Save’ – Saves your Prezi.
Arrows – ‘Undo’ or ‘redo’ – use to experiment
and fix mistakes.
Meeting – Online meeting functions.
Print – Prints out a PDF as a lecture
The Prezi Wheel –
accompaniment (one slide per ‘step’).
We’ll discuss this later. Help – Opens up a help menu.
Exit – Quits Prezi.
Navigation Menu
House – Centers on entire Prezi.
Magnifying glasses – Use to zoom in
and out.
9. Click anywhere on the canvas to add text. Type something.
Center for Teaching 310 Calvin Hall www.centeach.uiowa.edu
3. Use this to adjust the size of your text
box.
Use these
buttons to
align text to
the left, right,
or center, just
like Word.
The fourth
button is used
to make a
bulleted list.
These three options allow you to automatically
make your text conform to preformed styles.
10. Click on the text box outside of the canvas to stop editing the text. To edit existing text after
closing the box, double‐click on the text.
11. Click elsewhere on canvas to add new boxes. Make a few different boxes and put related
ideas in each, as though you are outlining a lecture.
12. Add boxes at varying levels of zoom to show hierarchy or relationships.
13. Next, single‐click on a box that is not currently selected. You will see the Prezi ‘zebra wheel’.
14. Click the outer ring and, keeping the left mouse button pressed, drag your cursor around the
screen. This will rotate the selected text.
Center for Teaching 310 Calvin Hall www.centeach.uiowa.edu
4. 15. Click the middle ring and, keeping the left mouse button pressed, drag your cursor around the
screen. This will change the size of the selected text.
16. Click the vertical lines in the center of the text and, keeping the left mouse button pressed,
drag your cursor around the screen. This move the text.
17. You can still copy and paste things using the right mouse button.
18. Click on the ‘Insert’ button in the top‐left corner
of the screen.
19. Three ‘sub‐options’ will appear in its place.
a. ‘File’ enables you to embed any image
from your hard drive into your Prezi.
b. ‘Youtube’ enables you to embed any
Youtube video directly from the Internet.
c. ‘Shapes’ opens up a sub‐menu with
three drawing options: a highlighter, a
pen, and an arrow.
20. Click on ‘shapes’ and use arrows to connect
your ideas. Draw lines and use the highlighter
to show relationships or highlight important ideas.
21. Click on the ‘back’ arrow in the upper left hand corner for your ‘shapes’ bubble to back up to
the previous menu. Do this again so that you are back on the ‘write’ bubble.
22. The next menu option is ‘frame.’ Frames do two things. First, and most simply, they can be
used as shapes. Click on ‘Frame’ and experiment with the first three types: circles, brackets,
and squares.
23. However, frames can also be used to provide anchors for your ‘path.’ Specifying a ‘path’ is how
you design a presentation. Much like going from slide to slide, Prezi will go from object to
object in a way that you specify. Here’s how.
24. Click on the ‘Path’ bubble. You may have to click the little arrow in the upper‐left hand corner
of the screen to return to the main ‘Write’ bubble first.
25. Click on the most important word or object on your screen. Then click on the next one.
Notice that Prezi draws a line between them with ‘1’ and ‘2’. This shows the order in which
Prezi will focus on these things in presentation mode. Each mouse click will bring you from ‘1’ to
‘2’ and so on (remember—we aren’t in presentation mode yet).
26. Keep adding destinations to your path, as
though you are making a presentation.
27. You can drag numbers around, changing Path objects ‘1’ and ‘2,’ respectively.
their order.
28. You can also click on the unnumbered dots
in the middle of the lines to insert new
numbers.
29. Finally, let’s say that you want to show
multiple objects at once. This is where you
use frames!
30. Click on ‘Present’ (in the main menu
bubble) to present! Use this to insert new numbers in
the middle of a path.
Center for Teaching 310 Calvin Hall www.centeach.uiowa.edu