SlideShare ist ein Scribd-Unternehmen logo
1 von 43
Downloaden Sie, um offline zu lesen
Copyright © 2014 The Real Deal MeetUp Charles Blair, “The Mad Scientist” www.RealDealMeetup.com
MAD SCIENTIST PODIO CHEAT SHEET
SELLER LEADS
In this cheat sheet, you will learn how to set up your Podio to automate and manage your Real Estate Business.
This sheet will explain how to set up your “Seller Leads” funnel.
STEP 1.
The first thing you will want to do if you have not already done so is to go to Podio and sign up for a free account. Go to
www.podio.com and set up your free account.
As you can see above. This is the home page where you can sign up and/or sign in. Once you have signed up for a free
account, now you will want to login if you are not already logged in.
Step 2.
Now it is time to set up your “Workspace” in Podio. If you have multiple teams or departments in your business, working
on lots of projects or in different locations, Workspaces allow you to organize your work accordingly. Inside of each
workspace, you will be able to create “Apps”. Think of Apps as templates for creating and structuring any kind of work
activity - meetings, projects, deliverables, contacts, etc. You can set up several workspaces. Podio automatically sets up 3
for you. You want to set up your own Workspaces. This is how…
When you first log in, you should be on this screen here:
This is your project management page. This is the first page you will see each time you login to Podio. Yours should be
empty just like this…however, when you create your workspaces and input data into them, this screen will show you and
your team’s data, activity, tasks, completions, etc. We want to create our custom workspace…
Click on the Menu at the very top left of the page:
A menu will drop down… Click on “Create a workspace”.
Then name the workspace. I named this one “Real Deal Example”.
Press “Create” to proceed.
Copyright © 2014 The Real Deal MeetUp Charles Blair, “The Mad Scientist” www.RealDealMeetup.com
After you name and create the workspace, you will be able to add members of your team to the workspace, but they will
need a Podio account also in order to be a part of your workspace where they can see updates and tasks in real time. You
can even assign tasks to specific members of your team to complete and you can see the progress of their task and when
the task is completed. You can add members of your team now or later. For now, save it for later…
STEP 3.
As you can see above, you are now at your workspace screen. Here you can do several things. Each time there is any kind
of activity in the workspace from any member, it will show up in your timeline. The first task of the workspace should be
you creating the workspace. When you add a member, it will be in the timeline. When you create a task, it will be in the
timeline. When you create an app, it will be in the timeline. Anything that you or a member that is a part of the workspace
will be logged in the timeline.
An “App” in Podio is a template that you will create that can be used in several ways. The app that we will be creating now
will be for “Seller Leads”. This app will allow you to capture and manage your leads. In my Podio, I have created this app to
log all of my leads which tracks where the lead came from, when I got the lead, contact info, etc. This is how you will create
an app…
Click “ADD APP” at the top of this page.
Click on the blue “Create App” Button to create your own app.
Name the app “Seller Leads”. Name the item “Seller Leads. Choose an icon and then leave everything else as it is. You can
play with these setting when you start to create your own apps on your own. Click the green “Create App” button.
Copyright © 2014 The Real Deal MeetUp Charles Blair, “The Mad Scientist” www.RealDealMeetup.com
STEP 4.
To create your app. You will need to click and drag “Fields” over to the right side of the screen, then give the field a name.
Each field has its own icon which lets you know what kind of field it is when you begin to build the app. For example, the
first field that is automatically placed in your app is a “Text Field”. When you slide this field over to the right, it will be used
to input text. Another field in your “Field” section is a “Category Field”. This field will allow you to make a variety of
categories to pick and choose. Another example is the “Date Field”. When you slide this field over to the right, it will allow
you to pick a date and time in your app.
The first field type that you will use to build your app is the “Text” field which is already placed to the right automatically for
you. Name this field “Property Address”.
Next, find the “Map” field, then click and drag it to the right and place it directly under the field that you just named
“Property Address”.
Name this field “Property Address Map”.
This field will allow you to see a map of the property when you type in the address after the app is built.
Now, find the “Category” field and drag it to the right. Name the Category Field “Lead Next Action Status”.
If you notice, this field has a field for you to create an option. Place your cursor in the field that says “Enter a category
option”.
Type in that field “Open Intake Form”.
Hit “Enter” on your keyboard and another text field will pop up.
Type and create the following options. (Hit “Enter” on your keyboard after you type each option).
“Deal Under Review” “Go See Property” “Make Offer” No Deal”
“Property Under Contract” “Initiate Closing Process” “Go To Closing”
Copyright © 2014 The Real Deal MeetUp Charles Blair, “The Mad Scientist” www.RealDealMeetup.com
Your Screen should look like this when you fill in all of the options listed above.
Click and drag a “Date” field over to the right and name it “Next Action Due Date”.
Now that you know how to click and drag the fields over to the right and name them…do the following to create the rest of
the app (We will start at #5 because you already have 4 fields set up until this point. There are 33 fields in this app total):
5. Drag an “Image” field and name it “Property Photo”
6. Drag a “Date” field and name it “Lead Date”
7. Drag a “Contact” field and name it “Contact Person”
8. Drag a “Category” field and name it “Lead Source”, then create the following options inside the field:
“Bandit Signs” “Bird Dog” “CraigsList” “Direct Mail” “Driving For Dollars” “Flyers”
“Pay Per Click – PPC” “Pretty N Pinks” “Radio” “Referral” “TV” “Wholesaler”
“Zillow” “Other”
9. Drag a “Category” field and name it “Sellers Motivation Level” and create the following options inside of the field:
“Hot” “Warm” “Cold”
10. Drag a “Text” field and name it “Sellers Name”
11. Drag a “Text” field and name it “Sellers Address”
12. Drag a “Text” field and name it “Sellers Email”
13. Drag a “Text” field and name it “Sellers Phone”
14. Drag a “Date” field and name it “Duration from New Lead to Appointment Medeate”
15. Drag a “Progress” field and name it “From New Lead To Close”
16. Drag a “Category” field and name it “Property Type” and create the following options inside of the field:
“Row House / Townhouse” “Detached Single Family” “Multi Family” “Condo” “Land”
17. Drag a “Category” field and name it “Bedrooms” and create the following options inside of the field:
“1” “2” “3” “4” “5”
18. Drag a “Category” field and name it “Bathrooms” and create the following options inside of the field:
“1” “1.5” “2” “3”
19. Drag a “Text” field and name it “What can you tell me about the property?”
20. Drag a “Text” field and name it “Does your property need any repairs?”
21. Drag a “Money” field and name it “Asking Price – How much do you need to sell your property?”
22. Drag a “Text” field and name it “If you don’t mind me asking, How did you come up with that number?”
23. Drag a “Money” field and name it “How much do you currently owe on the property?”
24. Drag a “Money” field and name it “What is your monthly payment on your loan?”
25. Drag a “Category” field and name it “Is your mortgage current?” and create the following options inside:
“Yes” “No”
26. Drag a “Text” field and name it “If not current, how many months are you behind?”
27. Drag a “Text” field and name it “What do properties like yours normally sell for in this area?”
28. Drag a “Text” field and name it “If you don’t sell your property, what do you plan on doing?”
29. Drag a “Money” field and name it “After Repair Value”
30. Drag a “Number” field and name it “Loan To Value”
31. Drag a “Money” field and name it “Estimated Repairs Needed”
32. Drag a “Money” field and name it “Desired profit”
33. Drag a “Money” field and name it “Offer Price”
Next to each field that you created, there is an icon. Next to the icon, there is an drop-down arrow. If you click on that
arrow, a menu will drop down with more settings for that field.
Each field has different menus, however, all of the menus have the same “Required Field” option. You can make certain
fields a “Required Field” for you or your team members to complete in order to save their lead into your app that you just
created. Some fields can be left as they are (not requiring any info). Imortant fields such as “Property Address” or “Sellers
Name” should be required fields. Scroll through your created fields then for each field listed below, click on the drop down
arrow and select “Required field”.
- Property Address
- Lead Next Action Status
- Next Action Due Date
- Lead Date
Copyright © 2014 The Real Deal MeetUp Charles Blair, “The Mad Scientist” www.RealDealMeetup.com
- Contact Person
- Sellers Motivation Level
- Sellers Name
- Sellers Address
- Sellers Email
- Sellers Phone
- Property Type
Click Done! Your Seller Leads App is now set up and ready for you or a member of your team to input data from your leads.
Now that you set up an app, that app is now posted at the top of your Workspace. It shows the icon that you chose for the
app as well as the name that you named the app. You may modify or manage your created apps at any time. You can also
delete apps and create more by following the same process you just completed to set up the app. It is up to you to figure
out which fields you would like to be in your app, what title you want to name the fields, which fields should be required or
not, and what other options you may or may not want inside of your apps.
STEP 5.
Now lets test out the app that you just created in your Workspace. Lets create a scenerio. Lets say that you are on the
phone with a motivated seller and this is your first time speaking to them and you need to get some information from them
in order to make a decision to invest in their property or not. All you have to do is pull up your app and ask the questions
that are in your app, then input the data into the app to capture the answers that you need.
To open up your app to add a new motivated seller, click on the green “+ Add Seller Leads” button to the right of your
workspace.
This is your “Seller Leads” app that you just created. While on the phone with your Motivated Seller, you can put in the info
that you receive from the seller into the app to save the info.
As you scroll down, you will see all the fields that you created…
1.
2.
3.
4.
5.
6.
7.
8.
9.
10.
11.
12.
13.
Copyright © 2014 The Real Deal MeetUp Charles Blair, “The Mad Scientist” www.RealDealMeetup.com
14.
15.
16.
17.
18.
19.
20.
21.
22.
23.
24.
25.
26.
27.
28.
29.
30.
31.
If you notice, at the very bottom of the app, there is an extra space for “Files” and “Tags” This will be in every app that you
create.
With this app, you can keep track of your photos of a property, the sellers info, when to follow up, how much the seller is
asking, where you found the seller, information about the house, etc. You can be completely organized and this will help
you automate your business. Anyone from your team that has Podio will be able to input a lead into your apps if you allow
them to do so.
There are other ways to help your business using Podio. This is just one of many. Make sure to check other Podio tutorials
from the Mad Scientist by going to www.RealDealMeetup.com.
32.
33.
Copyright © 2014 The Real Deal MeetUp Charles Blair, “The Mad Scientist” www.RealDealMeetup.com
MAD SCIENTIST PODIO CHEAT SHEET
BUYER LEADS
In this cheat sheet, you will learn how to set up your Podio to automate and manage your Real Estate Business.
This sheet will explain how to set up your “Buyer Leads” funnel.
STEP 1.
The first thing you will want to do if you have not already done so is to go to Podio and sign up for a free account. Go to
www.podio.com and set up your free account.
As you can see above. This is the home page where you can sign up and/or sign in. Once you have signed up for a free
account, now you will want to login if you are not already logged in.
Step 2.
Now it is time to set up your “Workspace” in Podio. If you have multiple teams or departments in your business, working
on lots of projects or in different locations, Workspaces allow you to organize your work accordingly. Inside of each
workspace, you will be able to create “Apps”. Think of Apps as templates for creating and structuring any kind of work
activity - meetings, projects, deliverables, contacts, etc. You can set up several workspaces. Podio automatically sets up 3
for you. You want to set up your own Workspaces. This is how…
When you first log in, you should be on this screen here:
This is your project management page. This is the first page you will see each time you login to Podio. Yours should be
empty just like this…however, when you create your workspaces and input data into them, this screen will show you and
your team’s data, activity, tasks, completions, etc. We want to create our custom workspace…
Click on the Menu at the very top left of the page:
A menu will drop down… Click on “Create a workspace”.
Then name the workspace. I named this one “Real Deal Example”.
Press “Create” to proceed.
Copyright © 2014 The Real Deal MeetUp Charles Blair, “The Mad Scientist” www.RealDealMeetup.com
After you name and create the workspace, you will be able to add members of your team to the workspace, but they will
need a Podio account also in order to be a part of your workspace where they can see updates and tasks in real time. You
can even assign tasks to specific members of your team to complete and you can see the progress of their task and when
the task is completed. You can add members of your team now or later. For now, save it for later…
STEP 3.
As you can see above, you are now at your workspace screen. Here you can do several things. Each time there is any kind
of activity in the workspace from any member, it will show up in your timeline. The first task of the workspace should be
you creating the workspace. When you add a member, it will be in the timeline. When you create a task, it will be in the
timeline. When you create an app, it will be in the timeline. Anything that you or a member that is a part of the workspace
will be logged in the timeline.
An “App” in Podio is a template that you will create that can be used in several ways. The app that we will be creating now
will be for “Buyer Leads”. This app will allow you to capture and manage your leads. In my Podio, I have created this app to
log all of my leads which tracks where the lead came from, when I got the lead, contact info, etc. This is how you will create
an app…
Click “ADD APP” at the top of this page.
Click on the blue “Create App” Button to create your own app.
Name the app “Buyer Leads”. Name the item “Buyer Lead. Choose an icon and then leave everything else as it is. You can
play with these setting when you start to create your own apps on your own. Click the green “Create App” button.
Copyright © 2014 The Real Deal MeetUp Charles Blair, “The Mad Scientist” www.RealDealMeetup.com
STEP 4.
To create your app. You will need to click and drag “Fields” over to the right side of the screen, and then give the field a
name. Each field has its own icon which lets you know what kind of field it is when you begin to build the app. For
example, the first field that is automatically placed in your app is a “Text Field”. When you slide this field over to the right,
it will be used to input text. Another field in your “Field” section is a “Category Field”. This field will allow you to make a
variety of categories to pick and choose. Another example is the “Date Field”. When you slide this field over to the right, it
will allow you to pick a date and time in your app.
The first field type that you will use to build your app is the “Text” field which is already placed to the right automatically for
you. Name this field “Buyers Name”.
Next, find the “Text” field, then click and drag it to the right and place it directly under the field that you just named “Buyers
Name”.
Name this field “Buyers Phone”.
This field will allow you to type in one or more phone numbers for your buyer’s lead phone number.
Now, find the “Text” field again and drag it to the right. Name the Text Field “Buyers Email”.
Drag another “Text” field to the right and name this one “How many properties have you purchased in the past 12
months?”.
Copyright © 2014 The Real Deal MeetUp Charles Blair, “The Mad Scientist” www.RealDealMeetup.com
Now find the “Category” field and drag it to the right. Name this field “What areas do you invest in?”
If you notice, this field has a field for you to create an option. Place your cursor in the field that says “Enter a category
option”.
Type in that field “Baltimore City”.
Hit “Enter” on your keyboard and another text field will pop up.
Type and create the following options. (Hit “Enter” on your keyboard after you type each option).
“Baltimore County” “Allegany County” “Anne Arundel County” “Frederick County” “Harford County”
“Howard County” “Montgomery County” “Prince George’s County” “Washington DC” “Other”
Your Screen should look like this when you fill in all of the options listed above.
Now that you know how to click and drag the fields over to the right and name them…do the following to create the rest of
the app (We will start at #6 because you already have 5 fields set up until this point. There are 8 fields in this app total):
6. Drag an “Category” field and name it “What type of property would you like us to send you?”, then create the
following options inside of the field:
“Single Family Detached” “Row Home / Townhouses” “Condos”
“Multi-Family” “Commercial Properties” “Land”
7. Drag a “Category” field and name it “What is your #1 source of funding?”, then create the following options inside
of the field:
“Cash” “Hard Money / Private Loans” “Traditional Loans (Conventional, FHA, etc)”
8. Drag another “Category” field and name it “What type of investor are you”, and create the following options inside
of the field:
“Rehabber” “Landlord” “Developer” “Other”
Next to each field that you created, there is an icon. Next to the icon, there is an drop-down arrow. If you click on that
arrow, a menu will drop down with more settings for that field.
Copyright © 2014 The Real Deal MeetUp Charles Blair, “The Mad Scientist” www.RealDealMeetup.com
Each field has different menus, however, all of the menus have the same “Required Field” option. You can make certain
fields a “Required Field” for you or your team members to complete in order to save their lead into your app that you just
created. Some fields can be left as they are (not requiring any info). Imortant fields such as “Buyers Name” or “Buyers
Phone” should be required fields. Scroll through your created fields then for each field listed below, click on the drop down
arrow and select “Required field”.
- Buyers Name
- Buyers Phone
- Buyers Email
- How many properties have you purchased in the last 12 months?
- What areas do you invest in?
- What is your #1 source of funding?
- What type of investor are you?
Click Done! Your Buyer Leads App is now set up and ready for you or a member of your team to input data from your leads.
Now that you set up an app, that app is now posted at the top of your Workspace. It shows the icon that you chose for the
app as well as the name that you named the app. You may modify or manage your created apps at any time. You can also
delete apps and create more by following the same process you just completed to set up the app. It is up to you to figure
out which fields you would like to be in your app, what title you want to name the fields, which fields should be required or
not, and what other options you may or may not want inside of your apps.
STEP 5.
Now lets test out the app that you just created in your Workspace. Lets create a scenerio. Lets say that you are on the
phone with a potential buyer and this is your first time speaking to them and you need to get some information from them
so that you will know if they fit the crieria of your next wholesale deal. All you have to do is pull up your app and ask the
questions that are in your app, then input the data into the app to capture the answers that you need.
To open up your app to add a new motivated seller, click on the green “+ Add Buyer Leads” button to the right of your
workspace.
This is your “Buyer Leads” app that you just created. While on the phone with your potential next buyer, you can put in the
info that you receive from the buyer into the app to save the info.
Copyright © 2014 The Real Deal MeetUp Charles Blair, “The Mad Scientist” www.RealDealMeetup.com
As you scroll down, you will see all the fields that you created…
If you notice, at the very bottom of the app, there is an extra space for “Files” and “Tags” This will be in every app that you
create.
With this app, you can keep track of your buyers info, when to follow up, what the buyer is looking for, where you found
the buyer, information about their criteria, etc. You can be completely organized and this will help you automate your
business. Anyone from your team that has Podio will be able to input a lead into your apps if you allow them to do so.
There are other ways to help your business using Podio. This is just one of many. Make sure to check other Podio tutorials
from the Mad Scientist by going to www.RealDealMeetup.com.
1.
2.
3.
4.
5.
6.
7.
8.
Copyright © 2014 The Real Deal MeetUp Charles Blair, “The Mad Scientist” www.RealDealMeetup.com
MAD SCIENTIST PODIO CHEAT SHEET
CLASSIFIED LEADS
In this cheat sheet, you will learn how to set up your Podio to automate and manage your Real Estate Business.
This sheet will explain how to set up your “Classified Leads” funnel.
STEP 1.
The first thing you will want to do if you have not already done so is to go to Podio and sign up for a free account. Go to
www.podio.com and set up your free account.
As you can see above. This is the home page where you can sign up and/or sign in. Once you have signed up for a free
account, now you will want to login if you are not already logged in.
Step 2.
Now it is time to set up your “Workspace” in Podio. If you have multiple teams or departments in your business, working
on lots of projects or in different locations, Workspaces allow you to organize your work accordingly. Inside of each
workspace, you will be able to create “Apps”. Think of Apps as templates for creating and structuring any kind of work
activity - meetings, projects, deliverables, contacts, etc. You can set up several workspaces. Podio automatically sets up 3
for you. You want to set up your own Workspaces. This is how…
When you first log in, you should be on this screen here:
This is your project management page. This is the first page you will see each time you login to Podio. Yours should be
empty just like this…however, when you create your workspaces and input data into them, this screen will show you and
your team’s data, activity, tasks, completions, etc. We want to create our custom workspace…
Click on the Menu at the very top left of the page:
A menu will drop down… Click on “Create a workspace”.
Then name the workspace. I named this one “Real Deal Example”.
Press “Create” to proceed.
Copyright © 2014 The Real Deal MeetUp Charles Blair, “The Mad Scientist” www.RealDealMeetup.com
After you name and create the workspace, you will be able to add members of your team to the workspace, but they will
need a Podio account also in order to be a part of your workspace where they can see updates and tasks in real time. You
can even assign tasks to specific members of your team to complete and you can see the progress of their task and when
the task is completed. You can add members of your team now or later. For now, save it for later…
STEP 3.
As you can see above, you are now at your workspace screen. Here you can do several things. Each time there is any kind
of activity in the workspace from any member, it will show up in your timeline. The first task of the workspace should be
you creating the workspace. When you add a member, it will be in the timeline. When you create a task, it will be in the
timeline. When you create an app, it will be in the timeline. Anything that you or a member that is a part of the workspace
will be logged in the timeline.
An “App” in Podio is a template that you will create that can be used in several ways. The app that we will be creating now
will be for “Classified Leads”. This app will allow you to capture and manage your leads. In my Podio, I have created this
app to log all of my leads which tracks where the lead came from, when I got the lead, contact info, etc. This is how you will
create an app…
Click “ADD APP” at the top of this page.
Click on the blue “Create App” Button to create your own app.
Name the app “Classified Ads”. Name the item “Classified Ads”. Choose an icon and then leave everything else as it is. You
can play with these setting when you start to create your own apps on your own. Click the green “Create App” button.
STEP 4.
Copyright © 2014 The Real Deal MeetUp Charles Blair, “The Mad Scientist” www.RealDealMeetup.com
To create your app. You will need to click and drag “Fields” over to the right side of the screen, and then give the field a
name. Each field has its own icon which lets you know what kind of field it is when you begin to build the app. For
example, the first field that is automatically placed in your app is a “Text Field”. When you slide this field over to the right,
it will be used to input text. Another field in your “Field” section is a “Category Field”. This field will allow you to make a
variety of categories to pick and choose. Another example is the “Date Field”. When you slide this field over to the right, it
will allow you to pick a date and time in your app.
The first field type that you will use to build your app is the “Text” field which is already placed to the right automatically for
you. Use your mouse and hover over the field that is already placed to your right and close it by clicking on the “X” in the
top right corner (We want to replace the first field with another type of field).
Next, find the “Date” field, then click and drag it to the right and place it directly where the “Text” field was before you
deleted it.
Highlight the text “Date” and replace it with “Date Added”. By doing this, you are naming the field.
Next, find the “Contact” Field then click and drag it over to the right under the field you just named “Date Added”. Name
this field “Added By”.
(When the app is completed, this will allow you to pick anyone from your team through a drop down menu. So whoever
found the add would pick their profile by finding it in the drop down as the person who added that lead.)
Now, find the “Category” field and drag it to the right. Name the Category Field “Classifieds Category”.
If you notice, this field has a field for you to create an option. Place your cursor in the field that says “Enter a category
option”.
Type in that field “For Rent”.
Hit “Enter” on your keyboard and another text field will pop up.
Copyright © 2014 The Real Deal MeetUp Charles Blair, “The Mad Scientist” www.RealDealMeetup.com
Type and create the following options. (Hit “Enter” on your keyboard after you type each option).
“For Sale” and “Real Estate Services”.
Your screen should look like this after entering the options listed above.
Now that you know how to click and drag the fields over to the right and name them…do the following to create the rest of
the app (We will start at # 4 because you already have 3 fields set up until this point. There are 8 fields in this app total):
4. Drag an “Category” field and name it “Classified Source”, then create the following options inside of the field:
“Backpage” “Craigslist” “Kijiji” “Meetup” “Postlets” “Zillow” “Trulia”
5. Drag a “Link” field and name it “Post Link”.
6. Drag a “Text” field and name it “Post Phone Number”.
7. Drag another “Category” field and name it “Posting Strategy”, then create then following options inside of the field:
“Call Ad” “Post Ad” “Reply” “SlyDial”
8. Drag another “Text” field and name it “Remarks”.
Next to each field that you’ve created, there is an icon. Next to the icon, there is a drop-down arrow. If you click on that
arrow, a menu will drop down with more settings for that field.
Each field has different menus, however, all of the menus have the same “Required Field” option. You can make certain
fields a “Required Field” for you or your team members to complete in order to save their lead into your app that you just
created. Some fields can be left as they are (not requiring any info). Imortant fields such as “Classified Category” or
“Posting Strategy” should be required fields. Scroll through your created fields then for each field listed below, click on the
drop down arrow and select “Required field”.
- Classified Category
- Classified Source
- Posting Strategy
Click Done! Your Classified Leads App is now set up and ready for you or a member of your team to input data from your
leads.
Now that you set up an app, that app is now posted at the top of your Workspace. It shows the icon that you chose for the
app as well as the name that you named the app. You may modify or manage your created apps at any time. You can also
Copyright © 2014 The Real Deal MeetUp Charles Blair, “The Mad Scientist” www.RealDealMeetup.com
delete apps and create more by following the same process you just completed to set up the app. It is up to you to figure
out which fields you would like to be in your app, what title you want to name the fields, which fields should be required or
not, and what other options you may or may not want inside of your apps.
STEP 5.
Now lets test out the app that you just created in your Workspace. Lets create a scenerio. Lets say that you are on the
Internet scrolling through Craigslist and you come across an add for someone looking for a Rent to Own Home. You open
the app and read that their post. You think that this is someone that fits your criteria for a Tenant. All you have to do now
is email them or leave them a voicemail and then open up your Classified App that you just created and input their info into
the app as a classified lead.
To open up your app to add a new lead, click on the green “+ Add Classified Leads” button to the right of your workspace.
This is your “Classified Leads” app that you just created. While surfing the web, you can put in the info that you receive
from the Classified Ads into the app to save the info.
As you scroll down, you will see all the fields that you created…
If you notice, at the very bottom of the app, there is an extra space for “Files” and “Tags” This will be in every app that you
create.
With this app, you can keep track of your Classified Ads that you have replied or responded to, when to follow up with
them, where you found the Ad, how you responded, information about their criteria, etc. You can be completely organized
and this will help you automate your business. Anyone from your team that has Podio will be able to input a lead into your
apps if you allow them to do so.
There are other ways to help your business using Podio. This is just one of many. Make sure to check other Podio tutorials
from the Mad Scientist by going to www.RealDealMeetup.com.
1.
2.
3.
4.
5.
6.
7.
8.
Copyright © 2014 The Real Deal MeetUp Charles Blair, “The Mad Scientist” www.RealDealMeetup.com
MAD SCIENTIST PODIO CHEAT SHEET
HARD MONEY LENDERS
In this cheat sheet, you will learn how to set up your Podio to automate and manage your Real Estate Business.
This sheet will explain how to set up your “Hard Money Lenders” funnel.
STEP 1.
The first thing you will want to do if you have not already done so is to go to Podio and sign up for a free account. Go to
www.podio.com and set up your free account.
As you can see above. This is the home page where you can sign up and/or sign in. Once you have signed up for a free
account, now you will want to login if you are not already logged in.
Step 2.
Now it is time to set up your “Workspace” in Podio. If you have multiple teams or departments in your business, working
on lots of projects or in different locations, Workspaces allow you to organize your work accordingly. Inside of each
workspace, you will be able to create “Apps”. Think of Apps as templates for creating and structuring any kind of work
activity - meetings, projects, deliverables, contacts, etc. You can set up several workspaces. Podio automatically sets up 3
for you. You want to set up your own Workspaces. This is how…
When you first log in, you should be on this screen here:
This is your project management page. This is the first page you will see each time you login to Podio. Yours should be
empty just like this…however, when you create your workspaces and input data into them, this screen will show you and
your team’s data, activity, tasks, completions, etc. We want to create our custom workspace…
Click on the Menu at the very top left of the page:
A menu will drop down… Click on “Create a workspace”.
Then name the workspace. I named this one “Real Deal Example”.
Press “Create” to proceed.
Copyright © 2014 The Real Deal MeetUp Charles Blair, “The Mad Scientist” www.RealDealMeetup.com
After you name and create the workspace, you will be able to add members of your team to the workspace, but they will
need a Podio account also in order to be a part of your workspace where they can see updates and tasks in real time. You
can even assign tasks to specific members of your team to complete and you can see the progress of their task and when
the task is completed. You can add members of your team now or later. For now, save it for later…
STEP 3.
As you can see above, you are now at your workspace screen. Here you can do several things. Each time there is any kind
of activity in the workspace from any member, it will show up in your timeline. The first task of the workspace should be
you creating the workspace. When you add a member, it will be in the timeline. When you create a task, it will be in the
timeline. When you create an app, it will be in the timeline. Anything that you or a member that is a part of the workspace
will be logged in the timeline.
An “App” in Podio is a template that you will create that can be used in several ways. The app that we will be creating now
will be for “Hard Money Lenders”. This app will allow you to capture and manage your leads. In my Podio, I have created
this app to log all of my leads which tracks where the lead came from, when I got the lead, contact info, etc. This is how
you will create an app…
Click “ADD APP” at the top of this page.
Click on the blue “Create App” Button to create your own app.
Name the app “Hard Money Lenders”. Name the item “Hard Money Lenders. Choose an icon and then leave everything
else as it is. You can play with these setting when you start to create your own apps on your own. Click the green “Create
App” button.
Copyright © 2014 The Real Deal MeetUp Charles Blair, “The Mad Scientist” www.RealDealMeetup.com
STEP 4.
To create your app. You will need to click and drag “Fields” over to the right side of the screen, then give the field a name.
Each field has its own icon which lets you know what kind of field it is when you begin to build the app. For example, the
first field that is automatically placed in your app is a “Text Field”. When you slide this field over to the right, it will be used
to input text. Another field in your “Field” section is a “Category Field”. This field will allow you to make a variety of
categories to pick and choose. Another example is the “Date Field”. When you slide this field over to the right, it will allow
you to pick a date and time in your app.
The first field type that you will use to build your app is the “Text” field which is already placed to the right automatically for
you. Name this field “Lenders Name”.
Next, find the “Text” field, then click and drag it to the right and place it directly under the field that you just named
“Lenders Name”.
Name this field “Lenders Address”.
This field will allow you to type in a lenders address.
Now, find the “Text” field again and drag it to the right. Name the Text Field “Lenders Phone”.
Drag another “Text” field to the right and name this one “Lenders Email”.
Copyright © 2014 The Real Deal MeetUp Charles Blair, “The Mad Scientist” www.RealDealMeetup.com
Now that you know how to click and drag the fields over to the right and name them…do the following to create the rest of
the app (We will start at #5 because you already have 4 fields set up until this point. There are 8 fields in this app total):
5. Drag a “Text” field and name it “Lenders Points”
6. Drag a “Text” field and name it “Lenders Interest Rates”
7. Drag another “Text” field and name it “Lenders Terms & Conditions”
8. Drag another “Text field and name it “Other”
Next to each field that you created, there is an icon. Next to the icon, there is an drop-down arrow. If you click on that
arrow, a menu will drop down with more settings for that field.
Each field has different menus, however, all of the menus have the same “Required Field” option. You can make certain
fields a “Required Field” for you or your team members to complete in order to save their lead into your app that you just
created. Some fields can be left as they are (not requiring any info). Imortant fields such as “Lenders Name” or “Lenders
Phone” should be required fields. Scroll through your created fields then for each field listed below, click on the drop down
arrow and select “Required field”.
- Lenders Name
- Lenders Address
- Lenders Phone
- Lenders Terms & Conditions
Click Done! Your Hard Money Lenders App is now set up and ready for you or a member of your team to input data from
your leads.
Now that you set up an app, that app is now posted at the top of your Workspace. It shows the icon that you chose for the
app as well as the name that you named the app. You may modify or manage your created apps at any time. You can also
delete apps and create more by following the same process you just completed to set up the app. It is up to you to figure
out which fields you would like to be in your app, what title you want to name the fields, which fields should be required or
not, and what other options you may or may not want inside of your apps.
STEP 5.
Now lets test out the app that you just created in your Workspace. Lets create a scenerio. Lets say that you are on the
phone with a potential lender and this is your first time speaking to them and you need to get some information from them
so that you will know if they fit the crieria of your next wholesale deal and that you meet their terms. All you have to do is
pull up your app and ask the questions that are in your app, then input the data into the app to capture the answers that
you need.
Copyright © 2014 The Real Deal MeetUp Charles Blair, “The Mad Scientist” www.RealDealMeetup.com
To open up your app to add a new motivated seller, click on the green “+ Add Hard Money Lenders” button to the right of
your workspace.
This is your “Hard Money Lenders” app that you just created. While on the phone with your potential next lender, you can
put in the info that you receive from the lender into the app to save the info.
If you notice, at the very bottom of the app, there is an extra space for “Files” and “Tags” This will be in every app that you
create.
1.
2.
3.
4.
5.
6.
7.
8.
With this app, you can keep track of your lenders info, when to follow up, what the lenders terms are, information about
their interest, etc. You can be completely organized and this will help you automate your business. Anyone from your
team that has Podio will be able to input a lead into your apps if you allow them to do so.
There are other ways to help your business using Podio. This is just one of many. Make sure to check other Podio tutorials
from the Mad Scientist by going to www.RealDealMeetup.com.

Weitere ähnliche Inhalte

Ähnlich wie The Mad Scientist - Top 4 Podio Hacks For Real Estate investing

Rapid applications development update12-06-14
Rapid applications development update12-06-14Rapid applications development update12-06-14
Rapid applications development update12-06-14LennartF
 
183201020 sales force-class-5
183201020 sales force-class-5183201020 sales force-class-5
183201020 sales force-class-5Amit Sharma
 
Sales force class-3
Sales force class-3Sales force class-3
Sales force class-3Amit Sharma
 
Sales force certification-lab-ii
Sales force certification-lab-iiSales force certification-lab-ii
Sales force certification-lab-iiAmit Sharma
 
Robo Form Power User Guide
Robo Form Power User GuideRobo Form Power User Guide
Robo Form Power User GuideGarrie Wilson
 
KP Salesforce PPT Part I.pptx
KP Salesforce PPT Part I.pptxKP Salesforce PPT Part I.pptx
KP Salesforce PPT Part I.pptxSarasJain8
 
Autoresponders... Your Web Site Automator, Organizer And Time Saver
Autoresponders... Your Web Site Automator, Organizer And Time SaverAutoresponders... Your Web Site Automator, Organizer And Time Saver
Autoresponders... Your Web Site Automator, Organizer And Time Saverwatch9minute
 
How to sell mobile applications to retailers
How to sell mobile applications to retailersHow to sell mobile applications to retailers
How to sell mobile applications to retailersTigerAppCreator
 
"Discover windows phone" 05. Application Bar
"Discover windows phone" 05. Application Bar"Discover windows phone" 05. Application Bar
"Discover windows phone" 05. Application BarYasmine Abdelhady
 
MLS Contacts and Prospects
MLS Contacts and Prospects MLS Contacts and Prospects
MLS Contacts and Prospects association2580
 
Force com getting_started_trial
Force com getting_started_trialForce com getting_started_trial
Force com getting_started_trialronmechling
 
Create yourfirstandroidapppdf
Create yourfirstandroidapppdfCreate yourfirstandroidapppdf
Create yourfirstandroidapppdfmurad3003
 
LU Communications Fillable Form Guide
LU Communications Fillable Form GuideLU Communications Fillable Form Guide
LU Communications Fillable Form GuideZachary Uhlmann
 
A360 - Guide to Getting Started
A360 - Guide to Getting StartedA360 - Guide to Getting Started
A360 - Guide to Getting StartedAutodesk A360
 

Ähnlich wie The Mad Scientist - Top 4 Podio Hacks For Real Estate investing (20)

Tutorial - Podio
Tutorial - PodioTutorial - Podio
Tutorial - Podio
 
Rapid applications development update12-06-14
Rapid applications development update12-06-14Rapid applications development update12-06-14
Rapid applications development update12-06-14
 
AXIS USER GUIDE
AXIS USER GUIDEAXIS USER GUIDE
AXIS USER GUIDE
 
183201020 sales force-class-5
183201020 sales force-class-5183201020 sales force-class-5
183201020 sales force-class-5
 
Sales force class-3
Sales force class-3Sales force class-3
Sales force class-3
 
Sales force certification-lab-ii
Sales force certification-lab-iiSales force certification-lab-ii
Sales force certification-lab-ii
 
Robo Form Power User Guide
Robo Form Power User GuideRobo Form Power User Guide
Robo Form Power User Guide
 
KP Salesforce PPT Part I.pptx
KP Salesforce PPT Part I.pptxKP Salesforce PPT Part I.pptx
KP Salesforce PPT Part I.pptx
 
Autoresponders... Your Web Site Automator, Organizer And Time Saver
Autoresponders... Your Web Site Automator, Organizer And Time SaverAutoresponders... Your Web Site Automator, Organizer And Time Saver
Autoresponders... Your Web Site Automator, Organizer And Time Saver
 
How to sell mobile applications to retailers
How to sell mobile applications to retailersHow to sell mobile applications to retailers
How to sell mobile applications to retailers
 
How to Plan for Successful App Launch
How to Plan for Successful App LaunchHow to Plan for Successful App Launch
How to Plan for Successful App Launch
 
"Discover windows phone" 05. Application Bar
"Discover windows phone" 05. Application Bar"Discover windows phone" 05. Application Bar
"Discover windows phone" 05. Application Bar
 
MLS Contacts and Prospects
MLS Contacts and Prospects MLS Contacts and Prospects
MLS Contacts and Prospects
 
Force com getting_started_trial
Force com getting_started_trialForce com getting_started_trial
Force com getting_started_trial
 
Create yourfirstandroidapppdf
Create yourfirstandroidapppdfCreate yourfirstandroidapppdf
Create yourfirstandroidapppdf
 
Android app development guide for freshers by ace web academy
Android app development guide for freshers  by ace web academyAndroid app development guide for freshers  by ace web academy
Android app development guide for freshers by ace web academy
 
LU Communications Fillable Form Guide
LU Communications Fillable Form GuideLU Communications Fillable Form Guide
LU Communications Fillable Form Guide
 
Vap2123
Vap2123Vap2123
Vap2123
 
A360 - Guide to Getting Started
A360 - Guide to Getting StartedA360 - Guide to Getting Started
A360 - Guide to Getting Started
 
Day 3
Day 3Day 3
Day 3
 

Mehr von Charles Blair

How To Find, Market, And Wholesale Your First Real Estate Deal In 30 Days Or ...
How To Find, Market, And Wholesale Your First Real Estate Deal In 30 Days Or ...How To Find, Market, And Wholesale Your First Real Estate Deal In 30 Days Or ...
How To Find, Market, And Wholesale Your First Real Estate Deal In 30 Days Or ...Charles Blair
 
How To Make BIG Profits With Short Term Rentals
How To Make BIG Profits With Short Term RentalsHow To Make BIG Profits With Short Term Rentals
How To Make BIG Profits With Short Term RentalsCharles Blair
 
Real Deal MeetUp Event | How To Have Success Automating Your Real Estate Busi...
Real Deal MeetUp Event | How To Have Success Automating Your Real Estate Busi...Real Deal MeetUp Event | How To Have Success Automating Your Real Estate Busi...
Real Deal MeetUp Event | How To Have Success Automating Your Real Estate Busi...Charles Blair
 
Direct Mail Marketing Domination For Real Estate Investors Part 1 of 4
Direct Mail Marketing Domination For Real Estate Investors Part 1 of 4Direct Mail Marketing Domination For Real Estate Investors Part 1 of 4
Direct Mail Marketing Domination For Real Estate Investors Part 1 of 4Charles Blair
 
How To Flip Your First Wholesale Deal
How To Flip Your First Wholesale DealHow To Flip Your First Wholesale Deal
How To Flip Your First Wholesale DealCharles Blair
 
7 ways to build a real estate buyers list
7 ways to build a real estate buyers list7 ways to build a real estate buyers list
7 ways to build a real estate buyers listCharles Blair
 
Mad Real Estate Investor Business Plan
Mad Real Estate Investor Business PlanMad Real Estate Investor Business Plan
Mad Real Estate Investor Business PlanCharles Blair
 

Mehr von Charles Blair (7)

How To Find, Market, And Wholesale Your First Real Estate Deal In 30 Days Or ...
How To Find, Market, And Wholesale Your First Real Estate Deal In 30 Days Or ...How To Find, Market, And Wholesale Your First Real Estate Deal In 30 Days Or ...
How To Find, Market, And Wholesale Your First Real Estate Deal In 30 Days Or ...
 
How To Make BIG Profits With Short Term Rentals
How To Make BIG Profits With Short Term RentalsHow To Make BIG Profits With Short Term Rentals
How To Make BIG Profits With Short Term Rentals
 
Real Deal MeetUp Event | How To Have Success Automating Your Real Estate Busi...
Real Deal MeetUp Event | How To Have Success Automating Your Real Estate Busi...Real Deal MeetUp Event | How To Have Success Automating Your Real Estate Busi...
Real Deal MeetUp Event | How To Have Success Automating Your Real Estate Busi...
 
Direct Mail Marketing Domination For Real Estate Investors Part 1 of 4
Direct Mail Marketing Domination For Real Estate Investors Part 1 of 4Direct Mail Marketing Domination For Real Estate Investors Part 1 of 4
Direct Mail Marketing Domination For Real Estate Investors Part 1 of 4
 
How To Flip Your First Wholesale Deal
How To Flip Your First Wholesale DealHow To Flip Your First Wholesale Deal
How To Flip Your First Wholesale Deal
 
7 ways to build a real estate buyers list
7 ways to build a real estate buyers list7 ways to build a real estate buyers list
7 ways to build a real estate buyers list
 
Mad Real Estate Investor Business Plan
Mad Real Estate Investor Business PlanMad Real Estate Investor Business Plan
Mad Real Estate Investor Business Plan
 

Kürzlich hochgeladen

Web & Social Media Analytics Previous Year Question Paper.pdf
Web & Social Media Analytics Previous Year Question Paper.pdfWeb & Social Media Analytics Previous Year Question Paper.pdf
Web & Social Media Analytics Previous Year Question Paper.pdfJayanti Pande
 
CARE OF CHILD IN INCUBATOR..........pptx
CARE OF CHILD IN INCUBATOR..........pptxCARE OF CHILD IN INCUBATOR..........pptx
CARE OF CHILD IN INCUBATOR..........pptxGaneshChakor2
 
Software Engineering Methodologies (overview)
Software Engineering Methodologies (overview)Software Engineering Methodologies (overview)
Software Engineering Methodologies (overview)eniolaolutunde
 
Call Girls in Dwarka Mor Delhi Contact Us 9654467111
Call Girls in Dwarka Mor Delhi Contact Us 9654467111Call Girls in Dwarka Mor Delhi Contact Us 9654467111
Call Girls in Dwarka Mor Delhi Contact Us 9654467111Sapana Sha
 
Student login on Anyboli platform.helpin
Student login on Anyboli platform.helpinStudent login on Anyboli platform.helpin
Student login on Anyboli platform.helpinRaunakKeshri1
 
microwave assisted reaction. General introduction
microwave assisted reaction. General introductionmicrowave assisted reaction. General introduction
microwave assisted reaction. General introductionMaksud Ahmed
 
Introduction to Nonprofit Accounting: The Basics
Introduction to Nonprofit Accounting: The BasicsIntroduction to Nonprofit Accounting: The Basics
Introduction to Nonprofit Accounting: The BasicsTechSoup
 
Interactive Powerpoint_How to Master effective communication
Interactive Powerpoint_How to Master effective communicationInteractive Powerpoint_How to Master effective communication
Interactive Powerpoint_How to Master effective communicationnomboosow
 
The Most Excellent Way | 1 Corinthians 13
The Most Excellent Way | 1 Corinthians 13The Most Excellent Way | 1 Corinthians 13
The Most Excellent Way | 1 Corinthians 13Steve Thomason
 
Q4-W6-Restating Informational Text Grade 3
Q4-W6-Restating Informational Text Grade 3Q4-W6-Restating Informational Text Grade 3
Q4-W6-Restating Informational Text Grade 3JemimahLaneBuaron
 
Advanced Views - Calendar View in Odoo 17
Advanced Views - Calendar View in Odoo 17Advanced Views - Calendar View in Odoo 17
Advanced Views - Calendar View in Odoo 17Celine George
 
BASLIQ CURRENT LOOKBOOK LOOKBOOK(1) (1).pdf
BASLIQ CURRENT LOOKBOOK  LOOKBOOK(1) (1).pdfBASLIQ CURRENT LOOKBOOK  LOOKBOOK(1) (1).pdf
BASLIQ CURRENT LOOKBOOK LOOKBOOK(1) (1).pdfSoniaTolstoy
 
Organic Name Reactions for the students and aspirants of Chemistry12th.pptx
Organic Name Reactions  for the students and aspirants of Chemistry12th.pptxOrganic Name Reactions  for the students and aspirants of Chemistry12th.pptx
Organic Name Reactions for the students and aspirants of Chemistry12th.pptxVS Mahajan Coaching Centre
 
Z Score,T Score, Percential Rank and Box Plot Graph
Z Score,T Score, Percential Rank and Box Plot GraphZ Score,T Score, Percential Rank and Box Plot Graph
Z Score,T Score, Percential Rank and Box Plot GraphThiyagu K
 
Sanyam Choudhary Chemistry practical.pdf
Sanyam Choudhary Chemistry practical.pdfSanyam Choudhary Chemistry practical.pdf
Sanyam Choudhary Chemistry practical.pdfsanyamsingh5019
 
Russian Call Girls in Andheri Airport Mumbai WhatsApp 9167673311 💞 Full Nigh...
Russian Call Girls in Andheri Airport Mumbai WhatsApp  9167673311 💞 Full Nigh...Russian Call Girls in Andheri Airport Mumbai WhatsApp  9167673311 💞 Full Nigh...
Russian Call Girls in Andheri Airport Mumbai WhatsApp 9167673311 💞 Full Nigh...Pooja Nehwal
 
Paris 2024 Olympic Geographies - an activity
Paris 2024 Olympic Geographies - an activityParis 2024 Olympic Geographies - an activity
Paris 2024 Olympic Geographies - an activityGeoBlogs
 
Measures of Central Tendency: Mean, Median and Mode
Measures of Central Tendency: Mean, Median and ModeMeasures of Central Tendency: Mean, Median and Mode
Measures of Central Tendency: Mean, Median and ModeThiyagu K
 

Kürzlich hochgeladen (20)

Web & Social Media Analytics Previous Year Question Paper.pdf
Web & Social Media Analytics Previous Year Question Paper.pdfWeb & Social Media Analytics Previous Year Question Paper.pdf
Web & Social Media Analytics Previous Year Question Paper.pdf
 
CARE OF CHILD IN INCUBATOR..........pptx
CARE OF CHILD IN INCUBATOR..........pptxCARE OF CHILD IN INCUBATOR..........pptx
CARE OF CHILD IN INCUBATOR..........pptx
 
Software Engineering Methodologies (overview)
Software Engineering Methodologies (overview)Software Engineering Methodologies (overview)
Software Engineering Methodologies (overview)
 
Call Girls in Dwarka Mor Delhi Contact Us 9654467111
Call Girls in Dwarka Mor Delhi Contact Us 9654467111Call Girls in Dwarka Mor Delhi Contact Us 9654467111
Call Girls in Dwarka Mor Delhi Contact Us 9654467111
 
Student login on Anyboli platform.helpin
Student login on Anyboli platform.helpinStudent login on Anyboli platform.helpin
Student login on Anyboli platform.helpin
 
microwave assisted reaction. General introduction
microwave assisted reaction. General introductionmicrowave assisted reaction. General introduction
microwave assisted reaction. General introduction
 
Introduction to Nonprofit Accounting: The Basics
Introduction to Nonprofit Accounting: The BasicsIntroduction to Nonprofit Accounting: The Basics
Introduction to Nonprofit Accounting: The Basics
 
Interactive Powerpoint_How to Master effective communication
Interactive Powerpoint_How to Master effective communicationInteractive Powerpoint_How to Master effective communication
Interactive Powerpoint_How to Master effective communication
 
The Most Excellent Way | 1 Corinthians 13
The Most Excellent Way | 1 Corinthians 13The Most Excellent Way | 1 Corinthians 13
The Most Excellent Way | 1 Corinthians 13
 
Q4-W6-Restating Informational Text Grade 3
Q4-W6-Restating Informational Text Grade 3Q4-W6-Restating Informational Text Grade 3
Q4-W6-Restating Informational Text Grade 3
 
Advanced Views - Calendar View in Odoo 17
Advanced Views - Calendar View in Odoo 17Advanced Views - Calendar View in Odoo 17
Advanced Views - Calendar View in Odoo 17
 
BASLIQ CURRENT LOOKBOOK LOOKBOOK(1) (1).pdf
BASLIQ CURRENT LOOKBOOK  LOOKBOOK(1) (1).pdfBASLIQ CURRENT LOOKBOOK  LOOKBOOK(1) (1).pdf
BASLIQ CURRENT LOOKBOOK LOOKBOOK(1) (1).pdf
 
Organic Name Reactions for the students and aspirants of Chemistry12th.pptx
Organic Name Reactions  for the students and aspirants of Chemistry12th.pptxOrganic Name Reactions  for the students and aspirants of Chemistry12th.pptx
Organic Name Reactions for the students and aspirants of Chemistry12th.pptx
 
Z Score,T Score, Percential Rank and Box Plot Graph
Z Score,T Score, Percential Rank and Box Plot GraphZ Score,T Score, Percential Rank and Box Plot Graph
Z Score,T Score, Percential Rank and Box Plot Graph
 
Sanyam Choudhary Chemistry practical.pdf
Sanyam Choudhary Chemistry practical.pdfSanyam Choudhary Chemistry practical.pdf
Sanyam Choudhary Chemistry practical.pdf
 
INDIA QUIZ 2024 RLAC DELHI UNIVERSITY.pptx
INDIA QUIZ 2024 RLAC DELHI UNIVERSITY.pptxINDIA QUIZ 2024 RLAC DELHI UNIVERSITY.pptx
INDIA QUIZ 2024 RLAC DELHI UNIVERSITY.pptx
 
Advance Mobile Application Development class 07
Advance Mobile Application Development class 07Advance Mobile Application Development class 07
Advance Mobile Application Development class 07
 
Russian Call Girls in Andheri Airport Mumbai WhatsApp 9167673311 💞 Full Nigh...
Russian Call Girls in Andheri Airport Mumbai WhatsApp  9167673311 💞 Full Nigh...Russian Call Girls in Andheri Airport Mumbai WhatsApp  9167673311 💞 Full Nigh...
Russian Call Girls in Andheri Airport Mumbai WhatsApp 9167673311 💞 Full Nigh...
 
Paris 2024 Olympic Geographies - an activity
Paris 2024 Olympic Geographies - an activityParis 2024 Olympic Geographies - an activity
Paris 2024 Olympic Geographies - an activity
 
Measures of Central Tendency: Mean, Median and Mode
Measures of Central Tendency: Mean, Median and ModeMeasures of Central Tendency: Mean, Median and Mode
Measures of Central Tendency: Mean, Median and Mode
 

The Mad Scientist - Top 4 Podio Hacks For Real Estate investing

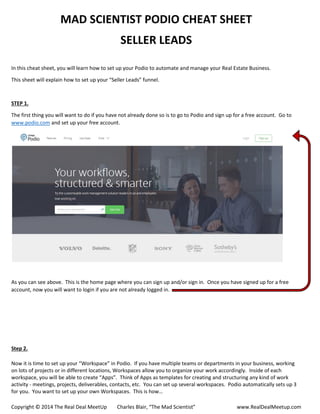
  • 1. Copyright © 2014 The Real Deal MeetUp Charles Blair, “The Mad Scientist” www.RealDealMeetup.com MAD SCIENTIST PODIO CHEAT SHEET SELLER LEADS In this cheat sheet, you will learn how to set up your Podio to automate and manage your Real Estate Business. This sheet will explain how to set up your “Seller Leads” funnel. STEP 1. The first thing you will want to do if you have not already done so is to go to Podio and sign up for a free account. Go to www.podio.com and set up your free account. As you can see above. This is the home page where you can sign up and/or sign in. Once you have signed up for a free account, now you will want to login if you are not already logged in. Step 2. Now it is time to set up your “Workspace” in Podio. If you have multiple teams or departments in your business, working on lots of projects or in different locations, Workspaces allow you to organize your work accordingly. Inside of each workspace, you will be able to create “Apps”. Think of Apps as templates for creating and structuring any kind of work activity - meetings, projects, deliverables, contacts, etc. You can set up several workspaces. Podio automatically sets up 3 for you. You want to set up your own Workspaces. This is how…
  • 2. When you first log in, you should be on this screen here: This is your project management page. This is the first page you will see each time you login to Podio. Yours should be empty just like this…however, when you create your workspaces and input data into them, this screen will show you and your team’s data, activity, tasks, completions, etc. We want to create our custom workspace… Click on the Menu at the very top left of the page: A menu will drop down… Click on “Create a workspace”. Then name the workspace. I named this one “Real Deal Example”. Press “Create” to proceed.
  • 3. Copyright © 2014 The Real Deal MeetUp Charles Blair, “The Mad Scientist” www.RealDealMeetup.com After you name and create the workspace, you will be able to add members of your team to the workspace, but they will need a Podio account also in order to be a part of your workspace where they can see updates and tasks in real time. You can even assign tasks to specific members of your team to complete and you can see the progress of their task and when the task is completed. You can add members of your team now or later. For now, save it for later… STEP 3. As you can see above, you are now at your workspace screen. Here you can do several things. Each time there is any kind of activity in the workspace from any member, it will show up in your timeline. The first task of the workspace should be you creating the workspace. When you add a member, it will be in the timeline. When you create a task, it will be in the timeline. When you create an app, it will be in the timeline. Anything that you or a member that is a part of the workspace will be logged in the timeline. An “App” in Podio is a template that you will create that can be used in several ways. The app that we will be creating now will be for “Seller Leads”. This app will allow you to capture and manage your leads. In my Podio, I have created this app to log all of my leads which tracks where the lead came from, when I got the lead, contact info, etc. This is how you will create an app… Click “ADD APP” at the top of this page.
  • 4. Click on the blue “Create App” Button to create your own app. Name the app “Seller Leads”. Name the item “Seller Leads. Choose an icon and then leave everything else as it is. You can play with these setting when you start to create your own apps on your own. Click the green “Create App” button.
  • 5. Copyright © 2014 The Real Deal MeetUp Charles Blair, “The Mad Scientist” www.RealDealMeetup.com STEP 4. To create your app. You will need to click and drag “Fields” over to the right side of the screen, then give the field a name. Each field has its own icon which lets you know what kind of field it is when you begin to build the app. For example, the first field that is automatically placed in your app is a “Text Field”. When you slide this field over to the right, it will be used to input text. Another field in your “Field” section is a “Category Field”. This field will allow you to make a variety of categories to pick and choose. Another example is the “Date Field”. When you slide this field over to the right, it will allow you to pick a date and time in your app. The first field type that you will use to build your app is the “Text” field which is already placed to the right automatically for you. Name this field “Property Address”. Next, find the “Map” field, then click and drag it to the right and place it directly under the field that you just named “Property Address”.
  • 6. Name this field “Property Address Map”. This field will allow you to see a map of the property when you type in the address after the app is built. Now, find the “Category” field and drag it to the right. Name the Category Field “Lead Next Action Status”. If you notice, this field has a field for you to create an option. Place your cursor in the field that says “Enter a category option”. Type in that field “Open Intake Form”. Hit “Enter” on your keyboard and another text field will pop up. Type and create the following options. (Hit “Enter” on your keyboard after you type each option). “Deal Under Review” “Go See Property” “Make Offer” No Deal” “Property Under Contract” “Initiate Closing Process” “Go To Closing”
  • 7. Copyright © 2014 The Real Deal MeetUp Charles Blair, “The Mad Scientist” www.RealDealMeetup.com Your Screen should look like this when you fill in all of the options listed above. Click and drag a “Date” field over to the right and name it “Next Action Due Date”. Now that you know how to click and drag the fields over to the right and name them…do the following to create the rest of the app (We will start at #5 because you already have 4 fields set up until this point. There are 33 fields in this app total): 5. Drag an “Image” field and name it “Property Photo” 6. Drag a “Date” field and name it “Lead Date” 7. Drag a “Contact” field and name it “Contact Person” 8. Drag a “Category” field and name it “Lead Source”, then create the following options inside the field: “Bandit Signs” “Bird Dog” “CraigsList” “Direct Mail” “Driving For Dollars” “Flyers” “Pay Per Click – PPC” “Pretty N Pinks” “Radio” “Referral” “TV” “Wholesaler” “Zillow” “Other” 9. Drag a “Category” field and name it “Sellers Motivation Level” and create the following options inside of the field: “Hot” “Warm” “Cold” 10. Drag a “Text” field and name it “Sellers Name” 11. Drag a “Text” field and name it “Sellers Address” 12. Drag a “Text” field and name it “Sellers Email” 13. Drag a “Text” field and name it “Sellers Phone” 14. Drag a “Date” field and name it “Duration from New Lead to Appointment Medeate” 15. Drag a “Progress” field and name it “From New Lead To Close” 16. Drag a “Category” field and name it “Property Type” and create the following options inside of the field: “Row House / Townhouse” “Detached Single Family” “Multi Family” “Condo” “Land” 17. Drag a “Category” field and name it “Bedrooms” and create the following options inside of the field: “1” “2” “3” “4” “5”
  • 8. 18. Drag a “Category” field and name it “Bathrooms” and create the following options inside of the field: “1” “1.5” “2” “3” 19. Drag a “Text” field and name it “What can you tell me about the property?” 20. Drag a “Text” field and name it “Does your property need any repairs?” 21. Drag a “Money” field and name it “Asking Price – How much do you need to sell your property?” 22. Drag a “Text” field and name it “If you don’t mind me asking, How did you come up with that number?” 23. Drag a “Money” field and name it “How much do you currently owe on the property?” 24. Drag a “Money” field and name it “What is your monthly payment on your loan?” 25. Drag a “Category” field and name it “Is your mortgage current?” and create the following options inside: “Yes” “No” 26. Drag a “Text” field and name it “If not current, how many months are you behind?” 27. Drag a “Text” field and name it “What do properties like yours normally sell for in this area?” 28. Drag a “Text” field and name it “If you don’t sell your property, what do you plan on doing?” 29. Drag a “Money” field and name it “After Repair Value” 30. Drag a “Number” field and name it “Loan To Value” 31. Drag a “Money” field and name it “Estimated Repairs Needed” 32. Drag a “Money” field and name it “Desired profit” 33. Drag a “Money” field and name it “Offer Price” Next to each field that you created, there is an icon. Next to the icon, there is an drop-down arrow. If you click on that arrow, a menu will drop down with more settings for that field. Each field has different menus, however, all of the menus have the same “Required Field” option. You can make certain fields a “Required Field” for you or your team members to complete in order to save their lead into your app that you just created. Some fields can be left as they are (not requiring any info). Imortant fields such as “Property Address” or “Sellers Name” should be required fields. Scroll through your created fields then for each field listed below, click on the drop down arrow and select “Required field”. - Property Address - Lead Next Action Status - Next Action Due Date - Lead Date
  • 9. Copyright © 2014 The Real Deal MeetUp Charles Blair, “The Mad Scientist” www.RealDealMeetup.com - Contact Person - Sellers Motivation Level - Sellers Name - Sellers Address - Sellers Email - Sellers Phone - Property Type Click Done! Your Seller Leads App is now set up and ready for you or a member of your team to input data from your leads. Now that you set up an app, that app is now posted at the top of your Workspace. It shows the icon that you chose for the app as well as the name that you named the app. You may modify or manage your created apps at any time. You can also delete apps and create more by following the same process you just completed to set up the app. It is up to you to figure out which fields you would like to be in your app, what title you want to name the fields, which fields should be required or not, and what other options you may or may not want inside of your apps. STEP 5. Now lets test out the app that you just created in your Workspace. Lets create a scenerio. Lets say that you are on the phone with a motivated seller and this is your first time speaking to them and you need to get some information from them in order to make a decision to invest in their property or not. All you have to do is pull up your app and ask the questions that are in your app, then input the data into the app to capture the answers that you need.
  • 10. To open up your app to add a new motivated seller, click on the green “+ Add Seller Leads” button to the right of your workspace. This is your “Seller Leads” app that you just created. While on the phone with your Motivated Seller, you can put in the info that you receive from the seller into the app to save the info. As you scroll down, you will see all the fields that you created… 1. 2. 3. 4. 5. 6. 7. 8. 9. 10. 11. 12. 13.
  • 11. Copyright © 2014 The Real Deal MeetUp Charles Blair, “The Mad Scientist” www.RealDealMeetup.com 14. 15. 16. 17. 18. 19. 20. 21. 22. 23. 24. 25. 26. 27. 28. 29. 30. 31.
  • 12. If you notice, at the very bottom of the app, there is an extra space for “Files” and “Tags” This will be in every app that you create. With this app, you can keep track of your photos of a property, the sellers info, when to follow up, how much the seller is asking, where you found the seller, information about the house, etc. You can be completely organized and this will help you automate your business. Anyone from your team that has Podio will be able to input a lead into your apps if you allow them to do so. There are other ways to help your business using Podio. This is just one of many. Make sure to check other Podio tutorials from the Mad Scientist by going to www.RealDealMeetup.com. 32. 33.
  • 13. Copyright © 2014 The Real Deal MeetUp Charles Blair, “The Mad Scientist” www.RealDealMeetup.com MAD SCIENTIST PODIO CHEAT SHEET BUYER LEADS In this cheat sheet, you will learn how to set up your Podio to automate and manage your Real Estate Business. This sheet will explain how to set up your “Buyer Leads” funnel. STEP 1. The first thing you will want to do if you have not already done so is to go to Podio and sign up for a free account. Go to www.podio.com and set up your free account. As you can see above. This is the home page where you can sign up and/or sign in. Once you have signed up for a free account, now you will want to login if you are not already logged in. Step 2. Now it is time to set up your “Workspace” in Podio. If you have multiple teams or departments in your business, working on lots of projects or in different locations, Workspaces allow you to organize your work accordingly. Inside of each workspace, you will be able to create “Apps”. Think of Apps as templates for creating and structuring any kind of work activity - meetings, projects, deliverables, contacts, etc. You can set up several workspaces. Podio automatically sets up 3 for you. You want to set up your own Workspaces. This is how…
  • 14. When you first log in, you should be on this screen here: This is your project management page. This is the first page you will see each time you login to Podio. Yours should be empty just like this…however, when you create your workspaces and input data into them, this screen will show you and your team’s data, activity, tasks, completions, etc. We want to create our custom workspace… Click on the Menu at the very top left of the page: A menu will drop down… Click on “Create a workspace”. Then name the workspace. I named this one “Real Deal Example”. Press “Create” to proceed.
  • 15. Copyright © 2014 The Real Deal MeetUp Charles Blair, “The Mad Scientist” www.RealDealMeetup.com After you name and create the workspace, you will be able to add members of your team to the workspace, but they will need a Podio account also in order to be a part of your workspace where they can see updates and tasks in real time. You can even assign tasks to specific members of your team to complete and you can see the progress of their task and when the task is completed. You can add members of your team now or later. For now, save it for later… STEP 3. As you can see above, you are now at your workspace screen. Here you can do several things. Each time there is any kind of activity in the workspace from any member, it will show up in your timeline. The first task of the workspace should be you creating the workspace. When you add a member, it will be in the timeline. When you create a task, it will be in the timeline. When you create an app, it will be in the timeline. Anything that you or a member that is a part of the workspace will be logged in the timeline. An “App” in Podio is a template that you will create that can be used in several ways. The app that we will be creating now will be for “Buyer Leads”. This app will allow you to capture and manage your leads. In my Podio, I have created this app to log all of my leads which tracks where the lead came from, when I got the lead, contact info, etc. This is how you will create an app… Click “ADD APP” at the top of this page.
  • 16. Click on the blue “Create App” Button to create your own app. Name the app “Buyer Leads”. Name the item “Buyer Lead. Choose an icon and then leave everything else as it is. You can play with these setting when you start to create your own apps on your own. Click the green “Create App” button.
  • 17. Copyright © 2014 The Real Deal MeetUp Charles Blair, “The Mad Scientist” www.RealDealMeetup.com STEP 4. To create your app. You will need to click and drag “Fields” over to the right side of the screen, and then give the field a name. Each field has its own icon which lets you know what kind of field it is when you begin to build the app. For example, the first field that is automatically placed in your app is a “Text Field”. When you slide this field over to the right, it will be used to input text. Another field in your “Field” section is a “Category Field”. This field will allow you to make a variety of categories to pick and choose. Another example is the “Date Field”. When you slide this field over to the right, it will allow you to pick a date and time in your app. The first field type that you will use to build your app is the “Text” field which is already placed to the right automatically for you. Name this field “Buyers Name”. Next, find the “Text” field, then click and drag it to the right and place it directly under the field that you just named “Buyers Name”.
  • 18. Name this field “Buyers Phone”. This field will allow you to type in one or more phone numbers for your buyer’s lead phone number. Now, find the “Text” field again and drag it to the right. Name the Text Field “Buyers Email”. Drag another “Text” field to the right and name this one “How many properties have you purchased in the past 12 months?”.
  • 19. Copyright © 2014 The Real Deal MeetUp Charles Blair, “The Mad Scientist” www.RealDealMeetup.com Now find the “Category” field and drag it to the right. Name this field “What areas do you invest in?” If you notice, this field has a field for you to create an option. Place your cursor in the field that says “Enter a category option”. Type in that field “Baltimore City”. Hit “Enter” on your keyboard and another text field will pop up. Type and create the following options. (Hit “Enter” on your keyboard after you type each option). “Baltimore County” “Allegany County” “Anne Arundel County” “Frederick County” “Harford County” “Howard County” “Montgomery County” “Prince George’s County” “Washington DC” “Other”
  • 20. Your Screen should look like this when you fill in all of the options listed above. Now that you know how to click and drag the fields over to the right and name them…do the following to create the rest of the app (We will start at #6 because you already have 5 fields set up until this point. There are 8 fields in this app total): 6. Drag an “Category” field and name it “What type of property would you like us to send you?”, then create the following options inside of the field: “Single Family Detached” “Row Home / Townhouses” “Condos” “Multi-Family” “Commercial Properties” “Land” 7. Drag a “Category” field and name it “What is your #1 source of funding?”, then create the following options inside of the field: “Cash” “Hard Money / Private Loans” “Traditional Loans (Conventional, FHA, etc)” 8. Drag another “Category” field and name it “What type of investor are you”, and create the following options inside of the field: “Rehabber” “Landlord” “Developer” “Other” Next to each field that you created, there is an icon. Next to the icon, there is an drop-down arrow. If you click on that arrow, a menu will drop down with more settings for that field.
  • 21. Copyright © 2014 The Real Deal MeetUp Charles Blair, “The Mad Scientist” www.RealDealMeetup.com Each field has different menus, however, all of the menus have the same “Required Field” option. You can make certain fields a “Required Field” for you or your team members to complete in order to save their lead into your app that you just created. Some fields can be left as they are (not requiring any info). Imortant fields such as “Buyers Name” or “Buyers Phone” should be required fields. Scroll through your created fields then for each field listed below, click on the drop down arrow and select “Required field”. - Buyers Name - Buyers Phone - Buyers Email - How many properties have you purchased in the last 12 months? - What areas do you invest in? - What is your #1 source of funding? - What type of investor are you? Click Done! Your Buyer Leads App is now set up and ready for you or a member of your team to input data from your leads. Now that you set up an app, that app is now posted at the top of your Workspace. It shows the icon that you chose for the app as well as the name that you named the app. You may modify or manage your created apps at any time. You can also delete apps and create more by following the same process you just completed to set up the app. It is up to you to figure
  • 22. out which fields you would like to be in your app, what title you want to name the fields, which fields should be required or not, and what other options you may or may not want inside of your apps. STEP 5. Now lets test out the app that you just created in your Workspace. Lets create a scenerio. Lets say that you are on the phone with a potential buyer and this is your first time speaking to them and you need to get some information from them so that you will know if they fit the crieria of your next wholesale deal. All you have to do is pull up your app and ask the questions that are in your app, then input the data into the app to capture the answers that you need. To open up your app to add a new motivated seller, click on the green “+ Add Buyer Leads” button to the right of your workspace. This is your “Buyer Leads” app that you just created. While on the phone with your potential next buyer, you can put in the info that you receive from the buyer into the app to save the info.
  • 23. Copyright © 2014 The Real Deal MeetUp Charles Blair, “The Mad Scientist” www.RealDealMeetup.com As you scroll down, you will see all the fields that you created… If you notice, at the very bottom of the app, there is an extra space for “Files” and “Tags” This will be in every app that you create. With this app, you can keep track of your buyers info, when to follow up, what the buyer is looking for, where you found the buyer, information about their criteria, etc. You can be completely organized and this will help you automate your business. Anyone from your team that has Podio will be able to input a lead into your apps if you allow them to do so. There are other ways to help your business using Podio. This is just one of many. Make sure to check other Podio tutorials from the Mad Scientist by going to www.RealDealMeetup.com. 1. 2. 3. 4. 5. 6. 7. 8.
  • 24. Copyright © 2014 The Real Deal MeetUp Charles Blair, “The Mad Scientist” www.RealDealMeetup.com MAD SCIENTIST PODIO CHEAT SHEET CLASSIFIED LEADS In this cheat sheet, you will learn how to set up your Podio to automate and manage your Real Estate Business. This sheet will explain how to set up your “Classified Leads” funnel. STEP 1. The first thing you will want to do if you have not already done so is to go to Podio and sign up for a free account. Go to www.podio.com and set up your free account. As you can see above. This is the home page where you can sign up and/or sign in. Once you have signed up for a free account, now you will want to login if you are not already logged in. Step 2. Now it is time to set up your “Workspace” in Podio. If you have multiple teams or departments in your business, working on lots of projects or in different locations, Workspaces allow you to organize your work accordingly. Inside of each workspace, you will be able to create “Apps”. Think of Apps as templates for creating and structuring any kind of work activity - meetings, projects, deliverables, contacts, etc. You can set up several workspaces. Podio automatically sets up 3 for you. You want to set up your own Workspaces. This is how… When you first log in, you should be on this screen here:
  • 25. This is your project management page. This is the first page you will see each time you login to Podio. Yours should be empty just like this…however, when you create your workspaces and input data into them, this screen will show you and your team’s data, activity, tasks, completions, etc. We want to create our custom workspace… Click on the Menu at the very top left of the page: A menu will drop down… Click on “Create a workspace”. Then name the workspace. I named this one “Real Deal Example”. Press “Create” to proceed.
  • 26. Copyright © 2014 The Real Deal MeetUp Charles Blair, “The Mad Scientist” www.RealDealMeetup.com After you name and create the workspace, you will be able to add members of your team to the workspace, but they will need a Podio account also in order to be a part of your workspace where they can see updates and tasks in real time. You can even assign tasks to specific members of your team to complete and you can see the progress of their task and when the task is completed. You can add members of your team now or later. For now, save it for later… STEP 3. As you can see above, you are now at your workspace screen. Here you can do several things. Each time there is any kind of activity in the workspace from any member, it will show up in your timeline. The first task of the workspace should be you creating the workspace. When you add a member, it will be in the timeline. When you create a task, it will be in the timeline. When you create an app, it will be in the timeline. Anything that you or a member that is a part of the workspace will be logged in the timeline. An “App” in Podio is a template that you will create that can be used in several ways. The app that we will be creating now will be for “Classified Leads”. This app will allow you to capture and manage your leads. In my Podio, I have created this app to log all of my leads which tracks where the lead came from, when I got the lead, contact info, etc. This is how you will create an app… Click “ADD APP” at the top of this page.
  • 27. Click on the blue “Create App” Button to create your own app. Name the app “Classified Ads”. Name the item “Classified Ads”. Choose an icon and then leave everything else as it is. You can play with these setting when you start to create your own apps on your own. Click the green “Create App” button. STEP 4.
  • 28. Copyright © 2014 The Real Deal MeetUp Charles Blair, “The Mad Scientist” www.RealDealMeetup.com To create your app. You will need to click and drag “Fields” over to the right side of the screen, and then give the field a name. Each field has its own icon which lets you know what kind of field it is when you begin to build the app. For example, the first field that is automatically placed in your app is a “Text Field”. When you slide this field over to the right, it will be used to input text. Another field in your “Field” section is a “Category Field”. This field will allow you to make a variety of categories to pick and choose. Another example is the “Date Field”. When you slide this field over to the right, it will allow you to pick a date and time in your app. The first field type that you will use to build your app is the “Text” field which is already placed to the right automatically for you. Use your mouse and hover over the field that is already placed to your right and close it by clicking on the “X” in the top right corner (We want to replace the first field with another type of field). Next, find the “Date” field, then click and drag it to the right and place it directly where the “Text” field was before you deleted it. Highlight the text “Date” and replace it with “Date Added”. By doing this, you are naming the field.
  • 29. Next, find the “Contact” Field then click and drag it over to the right under the field you just named “Date Added”. Name this field “Added By”. (When the app is completed, this will allow you to pick anyone from your team through a drop down menu. So whoever found the add would pick their profile by finding it in the drop down as the person who added that lead.) Now, find the “Category” field and drag it to the right. Name the Category Field “Classifieds Category”. If you notice, this field has a field for you to create an option. Place your cursor in the field that says “Enter a category option”. Type in that field “For Rent”. Hit “Enter” on your keyboard and another text field will pop up.
  • 30. Copyright © 2014 The Real Deal MeetUp Charles Blair, “The Mad Scientist” www.RealDealMeetup.com Type and create the following options. (Hit “Enter” on your keyboard after you type each option). “For Sale” and “Real Estate Services”. Your screen should look like this after entering the options listed above. Now that you know how to click and drag the fields over to the right and name them…do the following to create the rest of the app (We will start at # 4 because you already have 3 fields set up until this point. There are 8 fields in this app total): 4. Drag an “Category” field and name it “Classified Source”, then create the following options inside of the field: “Backpage” “Craigslist” “Kijiji” “Meetup” “Postlets” “Zillow” “Trulia” 5. Drag a “Link” field and name it “Post Link”. 6. Drag a “Text” field and name it “Post Phone Number”. 7. Drag another “Category” field and name it “Posting Strategy”, then create then following options inside of the field: “Call Ad” “Post Ad” “Reply” “SlyDial” 8. Drag another “Text” field and name it “Remarks”. Next to each field that you’ve created, there is an icon. Next to the icon, there is a drop-down arrow. If you click on that arrow, a menu will drop down with more settings for that field.
  • 31. Each field has different menus, however, all of the menus have the same “Required Field” option. You can make certain fields a “Required Field” for you or your team members to complete in order to save their lead into your app that you just created. Some fields can be left as they are (not requiring any info). Imortant fields such as “Classified Category” or “Posting Strategy” should be required fields. Scroll through your created fields then for each field listed below, click on the drop down arrow and select “Required field”. - Classified Category - Classified Source - Posting Strategy Click Done! Your Classified Leads App is now set up and ready for you or a member of your team to input data from your leads. Now that you set up an app, that app is now posted at the top of your Workspace. It shows the icon that you chose for the app as well as the name that you named the app. You may modify or manage your created apps at any time. You can also
  • 32. Copyright © 2014 The Real Deal MeetUp Charles Blair, “The Mad Scientist” www.RealDealMeetup.com delete apps and create more by following the same process you just completed to set up the app. It is up to you to figure out which fields you would like to be in your app, what title you want to name the fields, which fields should be required or not, and what other options you may or may not want inside of your apps. STEP 5. Now lets test out the app that you just created in your Workspace. Lets create a scenerio. Lets say that you are on the Internet scrolling through Craigslist and you come across an add for someone looking for a Rent to Own Home. You open the app and read that their post. You think that this is someone that fits your criteria for a Tenant. All you have to do now is email them or leave them a voicemail and then open up your Classified App that you just created and input their info into the app as a classified lead. To open up your app to add a new lead, click on the green “+ Add Classified Leads” button to the right of your workspace. This is your “Classified Leads” app that you just created. While surfing the web, you can put in the info that you receive from the Classified Ads into the app to save the info.
  • 33. As you scroll down, you will see all the fields that you created… If you notice, at the very bottom of the app, there is an extra space for “Files” and “Tags” This will be in every app that you create. With this app, you can keep track of your Classified Ads that you have replied or responded to, when to follow up with them, where you found the Ad, how you responded, information about their criteria, etc. You can be completely organized and this will help you automate your business. Anyone from your team that has Podio will be able to input a lead into your apps if you allow them to do so. There are other ways to help your business using Podio. This is just one of many. Make sure to check other Podio tutorials from the Mad Scientist by going to www.RealDealMeetup.com. 1. 2. 3. 4. 5. 6. 7. 8.
  • 34. Copyright © 2014 The Real Deal MeetUp Charles Blair, “The Mad Scientist” www.RealDealMeetup.com MAD SCIENTIST PODIO CHEAT SHEET HARD MONEY LENDERS In this cheat sheet, you will learn how to set up your Podio to automate and manage your Real Estate Business. This sheet will explain how to set up your “Hard Money Lenders” funnel. STEP 1. The first thing you will want to do if you have not already done so is to go to Podio and sign up for a free account. Go to www.podio.com and set up your free account. As you can see above. This is the home page where you can sign up and/or sign in. Once you have signed up for a free account, now you will want to login if you are not already logged in. Step 2. Now it is time to set up your “Workspace” in Podio. If you have multiple teams or departments in your business, working on lots of projects or in different locations, Workspaces allow you to organize your work accordingly. Inside of each workspace, you will be able to create “Apps”. Think of Apps as templates for creating and structuring any kind of work activity - meetings, projects, deliverables, contacts, etc. You can set up several workspaces. Podio automatically sets up 3 for you. You want to set up your own Workspaces. This is how…
  • 35. When you first log in, you should be on this screen here: This is your project management page. This is the first page you will see each time you login to Podio. Yours should be empty just like this…however, when you create your workspaces and input data into them, this screen will show you and your team’s data, activity, tasks, completions, etc. We want to create our custom workspace… Click on the Menu at the very top left of the page: A menu will drop down… Click on “Create a workspace”. Then name the workspace. I named this one “Real Deal Example”. Press “Create” to proceed.
  • 36. Copyright © 2014 The Real Deal MeetUp Charles Blair, “The Mad Scientist” www.RealDealMeetup.com After you name and create the workspace, you will be able to add members of your team to the workspace, but they will need a Podio account also in order to be a part of your workspace where they can see updates and tasks in real time. You can even assign tasks to specific members of your team to complete and you can see the progress of their task and when the task is completed. You can add members of your team now or later. For now, save it for later… STEP 3. As you can see above, you are now at your workspace screen. Here you can do several things. Each time there is any kind of activity in the workspace from any member, it will show up in your timeline. The first task of the workspace should be you creating the workspace. When you add a member, it will be in the timeline. When you create a task, it will be in the timeline. When you create an app, it will be in the timeline. Anything that you or a member that is a part of the workspace will be logged in the timeline. An “App” in Podio is a template that you will create that can be used in several ways. The app that we will be creating now will be for “Hard Money Lenders”. This app will allow you to capture and manage your leads. In my Podio, I have created this app to log all of my leads which tracks where the lead came from, when I got the lead, contact info, etc. This is how you will create an app… Click “ADD APP” at the top of this page.
  • 37. Click on the blue “Create App” Button to create your own app. Name the app “Hard Money Lenders”. Name the item “Hard Money Lenders. Choose an icon and then leave everything else as it is. You can play with these setting when you start to create your own apps on your own. Click the green “Create App” button.
  • 38. Copyright © 2014 The Real Deal MeetUp Charles Blair, “The Mad Scientist” www.RealDealMeetup.com STEP 4. To create your app. You will need to click and drag “Fields” over to the right side of the screen, then give the field a name. Each field has its own icon which lets you know what kind of field it is when you begin to build the app. For example, the first field that is automatically placed in your app is a “Text Field”. When you slide this field over to the right, it will be used to input text. Another field in your “Field” section is a “Category Field”. This field will allow you to make a variety of categories to pick and choose. Another example is the “Date Field”. When you slide this field over to the right, it will allow you to pick a date and time in your app. The first field type that you will use to build your app is the “Text” field which is already placed to the right automatically for you. Name this field “Lenders Name”. Next, find the “Text” field, then click and drag it to the right and place it directly under the field that you just named “Lenders Name”.
  • 39. Name this field “Lenders Address”. This field will allow you to type in a lenders address. Now, find the “Text” field again and drag it to the right. Name the Text Field “Lenders Phone”. Drag another “Text” field to the right and name this one “Lenders Email”.
  • 40. Copyright © 2014 The Real Deal MeetUp Charles Blair, “The Mad Scientist” www.RealDealMeetup.com Now that you know how to click and drag the fields over to the right and name them…do the following to create the rest of the app (We will start at #5 because you already have 4 fields set up until this point. There are 8 fields in this app total): 5. Drag a “Text” field and name it “Lenders Points” 6. Drag a “Text” field and name it “Lenders Interest Rates” 7. Drag another “Text” field and name it “Lenders Terms & Conditions” 8. Drag another “Text field and name it “Other” Next to each field that you created, there is an icon. Next to the icon, there is an drop-down arrow. If you click on that arrow, a menu will drop down with more settings for that field. Each field has different menus, however, all of the menus have the same “Required Field” option. You can make certain fields a “Required Field” for you or your team members to complete in order to save their lead into your app that you just created. Some fields can be left as they are (not requiring any info). Imortant fields such as “Lenders Name” or “Lenders Phone” should be required fields. Scroll through your created fields then for each field listed below, click on the drop down arrow and select “Required field”. - Lenders Name - Lenders Address - Lenders Phone - Lenders Terms & Conditions
  • 41. Click Done! Your Hard Money Lenders App is now set up and ready for you or a member of your team to input data from your leads. Now that you set up an app, that app is now posted at the top of your Workspace. It shows the icon that you chose for the app as well as the name that you named the app. You may modify or manage your created apps at any time. You can also delete apps and create more by following the same process you just completed to set up the app. It is up to you to figure out which fields you would like to be in your app, what title you want to name the fields, which fields should be required or not, and what other options you may or may not want inside of your apps. STEP 5. Now lets test out the app that you just created in your Workspace. Lets create a scenerio. Lets say that you are on the phone with a potential lender and this is your first time speaking to them and you need to get some information from them so that you will know if they fit the crieria of your next wholesale deal and that you meet their terms. All you have to do is pull up your app and ask the questions that are in your app, then input the data into the app to capture the answers that you need.
  • 42. Copyright © 2014 The Real Deal MeetUp Charles Blair, “The Mad Scientist” www.RealDealMeetup.com To open up your app to add a new motivated seller, click on the green “+ Add Hard Money Lenders” button to the right of your workspace. This is your “Hard Money Lenders” app that you just created. While on the phone with your potential next lender, you can put in the info that you receive from the lender into the app to save the info. If you notice, at the very bottom of the app, there is an extra space for “Files” and “Tags” This will be in every app that you create. 1. 2. 3. 4. 5. 6. 7. 8.
  • 43. With this app, you can keep track of your lenders info, when to follow up, what the lenders terms are, information about their interest, etc. You can be completely organized and this will help you automate your business. Anyone from your team that has Podio will be able to input a lead into your apps if you allow them to do so. There are other ways to help your business using Podio. This is just one of many. Make sure to check other Podio tutorials from the Mad Scientist by going to www.RealDealMeetup.com.