Growing New Youth Food Justice Leaders_Storytelling for Organizing
•
1 gefällt mir•603 views


Empfohlen
Empfohlen
Weitere ähnliche Inhalte
Andere mochten auch
Andere mochten auch (14)
Ähnlich wie Growing New Youth Food Justice Leaders_Storytelling for Organizing
Ähnlich wie Growing New Youth Food Justice Leaders_Storytelling for Organizing (20)
Mehr von Community Food Security Coalition
Mehr von Community Food Security Coalition (17)
Kürzlich hochgeladen
Kürzlich hochgeladen (15)
Growing New Youth Food Justice Leaders_Storytelling for Organizing
- 1. Community-Based Garden Design Manual By Brett Ramey
- 2. Background Communities throughout the world are working to restore local, culturally appropriate food systems. While there are similarities in how to approach visioning and building community-based food projects, many elements of the design can be developed with specific contexts in mind- both physical and cultural. The exercises in this booklet outline one example of how to determine what needs your garden will address, and how to work within existing physical and social parameters of your community to develop your site-specific garden design project. And most importantly, it provides tools to get to know your community better! Day 1: Get to know your * On our walk we neighborhood and the elders who learned about the history of segregation in live there! the Southside 1) Walk around the neighborhood talking to neighborhood, the re- neighbors, business owners, and anyone else you channelization and feel comfortable approaching. subsequent paving over of the Rio de Flag to 2) Learn as much of the physical, political, social make way for re- and cultural history of your neighborhood as development “north of possible (with more time you can also get more in- the tracks”, and the depth at your local library, historical society, “old- Basque shepherds and timer” breakfast spot, etc). * their families who inhabited the 3) Find neighborhood elders or their relatives so neighborhood you can incorporate their favorite plants into your (sometimes with their design. This is also a good way to learn about the sheep too) in the early local edible/medicinal uses of plants, and inevitably 1900’s. We also you will get other relevant wisdom too! ** addressed emerging concerns over 4) Take time at the end of the day to allow each gentrification of the participant to share what they learned (or neighborhood, and how something they already knew) about the the gardens and murals neighborhood. we’ve built over the last 5 years play into it. **We sought out the relatives of the curanderas who used to practice traditional medicine in the neighborhood, but were not successful. Getting to know your neighbors takes time!!! 2
- 3. Day 2: Walking Garden Tour *Our walking tour took us past 1) Identify a walkable route through the neighborhood that will container gardens, get you moving while also staying engaged with your community gardens surroundings. (bike tours are a good alternative, but can go too fast with individualized to catch much detail) plots, community 2) Plan a route that will take you past several different types gardens maintained of gardens and vacant lots.* collectively by a group of youth, a 3) Take photos/sketch your favorite elements of the different school garden, gardens you see. ** backyard gardens with chickens and 4) While your ideas are still fresh, do a collective brainstorm of rainwater harvesting all of the things you noticed during your walk (no need to limit cisterns, formal it to what you liked or didn’t like yet) landscape gardens, * For example; “ I noticed that there were a lot of edible plants lawns, backyard growing in the untended vacant lot”. Or “I noticed the plants home veggie gardens, growing in the recessed basins looked more happy than the same city maintained ones planted on a mounded hill”. xeriscape gardens, wild unkempt vacant 5) Begin locating your building materials. That way you can hit lots with edible the ground running when it’s time to start building! (ie rocks for “weeds”, and a retaining walls, flagstone for pathways, plants, mulch, tools, food riparian area with to keep everyone happy) wild edible berries. **Some things to consider are: 1) Aesthetic Beauty (Would we want to hang out there?), 2) Microclimates (Are there rocks that will help retain heat?) 3)Sun Orientation, (If the spot has full sun in July, will it still be in full sun in December?) 4) Functionality (Is it edible? Does it attract pollinators?), 5)Seating Areas (If we want to hang out here, is there anywhere to sit? Are there so many comfy sitting areas that we will never get any work done?) 6)Maintenance and Resources Required (Will we have time to maintain it? Is local rainfall compatible with the watering needs of those plants?) 3
- 4. Day 3: Design Day! 1) Begin the day by outlining any parameters, limitations, or specific needs for the site you will be working with.* 2) Return to the brainstorm from Day 1 to re- iterate the importance of the garden being site-specific socially as well as environmentally. 3) Return to the brainstorm of “noticings” from Day 2. This time allow participants to make marks next to the elements they liked most. Give gentle reminders to consider how their “likings” align with the 2 previous exercises as needed. 4) As a group, determine which elements you would like to incorporate into your design. 5) Working individually or in small groups, begin drawing the garden (as close to scale as possible) being sure to incorporate the elements that everyone decided on. Feel free to bring out sketches and photos from the previous days to provide more ideas. 6) Come back together and have each group do a report-back of their design. Encourage them to share why they chose each of the individual elements, and why they arranged them together the way they did 7) Extract common themes and design elements from each drawing that the group wants to incorporate into the final drawing. 8) Create one cohesive final drawing, this time to scale! In the interest of time, this part is best done by the project “leaders” (or at least a smaller group of individuals). * For our site at the CSA, we knew that the salon next door wanted a seating area for their clients, the property owner wanted it to be well maintained because of the high visibility, we had a south-facing exposure surrounded by pavement immediately on all three sides of the lot making it warmer than other areas, and there was a sewer pipe running from the building to the street two feet underground (always good to know where your sewer line is before digging). 4
- 5. Day 4: Finalize the Design and Start Building! 1) Present the final design to the group (and property owner and/or other stakeholders if appropriate) and get feedback. Depending on how much time you have, this part can be repeated several times if needed. 2) Identify the specific materials you will need (drawing * If you are from sources you identified on Day 2), and the order in which working in a you need them.* small space it is best to bring 3) Visit your local plant nursery materials on- and select specific plants (if you site gradually, haven’t done so already). By now otherwise piles your final design should include accumulate where trees, shrubs, herbaceous fast and your perennial plants and annual workspace can vegetable or flowers will go. Now you get cluttered. can get specific depending on what the nursery has in stock! 4) Begin installing your community-designed garden! Generally you will begin by installing hardscape (ie; irrigation system, rock walls and stone pathways), then planting perennial plants from biggest to smallest (ie; first trees then shrubs, then smaller herbaceous perennials, then seeds if you have them). Otherwise you will end up trampling your small plants during the construction process.** ** There are plenty of manuals and resources available to provide more specifics on how to build garden beds, plant fruit trees, etc. to help you with 5 those components! Check out www.thefoodproject.org/manuals
- 6. Day 5: Building continued… and Community Outreach 1) Begin organizing an “unveiling of the project”. This can occur after the project is complete (as much as gardens can be), during the building process, or a little bit of both! 2) Get the word out! While the primary purpose of your project may be to benefit your “immediate” community, it rarely hurts to include the larger community as well. Be proud of what you’ve accomplished together! You might even inspire others to do the same…* 3) Host a party! Invite neighborhood elders, youth, business owners, politicians, etc. Maybe even create space for a talking circle where people can share their own visions for the future of the community. Whatever makes sense to you and your community! * Writing good press releases is an art. The Center for Media Justice has a great “media-how-to” resource page with a good “press releases and pitching” section. (www.centerformediajustice.org) Partnering Organizations: www.nativemovement.org www.flagsca.com www.nativeplantandseed.com www.northlandfamily.org 6
- 7. Notes/Sketches 7
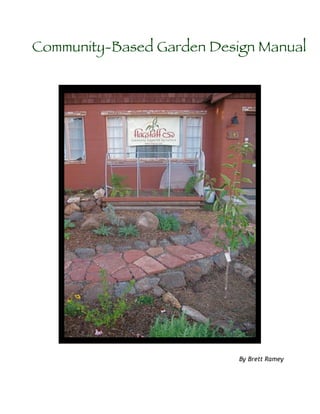
- 8. Community-Based Garden Design Manual Note: Each of these day-long exercises can be expanded to several days (or even weeks) to get a more in-depth study of the needs, possibilities, and visions of your community. Project Partners: Urban Lifeways Project (Native Movement), Flagstaff CSA (Community Supported Agriculture), Additional Support provided by: Flagstaff Native Plant and Seed, Northland Family Help Center, and Slow Food NAU (Northern Arizona University), Students for Sustainable Living and Urban Gardening (SSLUGG) Total Budget for 5-day workshop (included all materials, plants, lunch for participants): $150 Keeping the budget this low meant we had to know where the good free rock and mulch piles were. *This manual was adapted from a 5-day garden design workshop that took place in Flagstaff, Arizona in June 2010. You can visit the garden and CSA at 116 Cottage in the Southside Neighborhood, Downtown Flagstaff. This garden combined a formal garden aesthetic with native drought tolerant fruit trees, berry bushes, annual vegetable beds, and perennial medicine plants used frequently in traditional Navajo and Hopi medicine. The hardscape included local volcanic rock, flagstone, and a strawbale bench in the seating area. **This workshop and resulting manual is inspired by the work of Dave Loewenstein, a Lawrence, Kansas-based Muralist/ Community process facilitator www.davidloewenstein.com www.loewensteinmuraljournal.blogspot.com Copyright: Brett Ramey 2010 For more information or to request a copy: eatweeds@gmail.com