
Empfohlen
Weitere ähnliche Inhalte
Andere mochten auch
Andere mochten auch (20)
Ähnlich wie Self portrait packet
Ähnlich wie Self portrait packet (20)
Mehr von cdpenamtz
Mehr von cdpenamtz (13)
Kürzlich hochgeladen
Kürzlich hochgeladen (20)
Self portrait packet
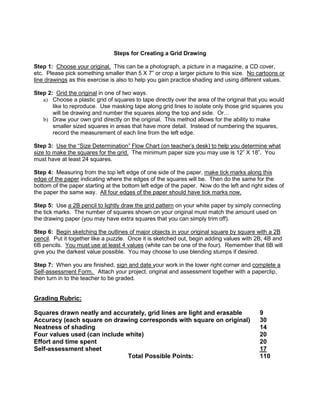
- 1. Steps for Creating a Grid Drawing Step 1: Choose your original. This can be a photograph, a picture in a magazine, a CD cover, etc. Please pick something smaller than 5 X 7” or crop a larger picture to this size. No cartoons or line drawings as this exercise is also to help you gain practice shading and using different values. Step 2: Grid the original in one of two ways. a) Choose a plastic grid of squares to tape directly over the area of the original that you would like to reproduce. Use masking tape along grid lines to isolate only those grid squares you will be drawing and number the squares along the top and side. Or… b) Draw your own grid directly on the original. This method allows for the ability to make smaller sized squares in areas that have more detail. Instead of numbering the squares, record the measurement of each line from the left edge. Step 3: Use the “Size Determination” Flow Chart (on teacher’s desk) to help you determine what size to make the squares for the grid. The minimum paper size you may use is 12” X 18”. You must have at least 24 squares. Step 4: Measuring from the top left edge of one side of the paper, make tick marks along this edge of the paper indicating where the edges of the squares will be. Then do the same for the bottom of the paper starting at the bottom left edge of the paper. Now do the left and right sides of the paper the same way. All four edges of the paper should have tick marks now. Step 5: Use a 2B pencil to lightly draw the grid pattern on your white paper by simply connecting the tick marks. The number of squares shown on your original must match the amount used on the drawing paper (you may have extra squares that you can simply trim off). Step 6: Begin sketching the outlines of major objects in your original square by square with a 2B pencil. Put it together like a puzzle. Once it is sketched out, begin adding values with 2B, 4B and 6B pencils. You must use at least 4 values (white can be one of the four). Remember that 6B will give you the darkest value possible. You may choose to use blending stumps if desired. Step 7: When you are finished, sign and date your work in the lower right corner and complete a Self-assessment Form. Attach your project, original and assessment together with a paperclip, then turn in to the teacher to be graded. Grading Rubric: Squares drawn neatly and accurately, grid lines are light and erasable 9 Accuracy (each square on drawing corresponds with square on original) 30 Neatness of shading 14 Four values used (can include white) 20 Effort and time spent 20 Self-assessment sheet 17 Total Possible Points: 110
- 2. Name__________________________________ Period________ Values Practice Activity Value: an element of art that deals with darkness or lightness. Value depends on how much light a surface reflects or if there are shadows that overlay the object. I would like you to create the largest range of values you possibly can in the set of squares below. Each box should be a different value going from darkest to lightest. Do this for each type of pencil: 2B, 4B and 6B. Your darkest value should be the leftmost box. Your lightest value (the color of the paper) should be the rightmost box. Values for the 2B pencil: Values for the 4B pencil: Values for the 6B pencil: Questions:
- 3. 1) Which pencil allows you to create the largest range of values? 2) Which pencil allows you to create the value closest to black? 3) If you needed part of your drawing to be the lightest gray you could make, which pencil would you choose?
- 4. Name_______________________________ Period_____ Measuring Activity Measure each numbered line below with your ruler. Round to the nearest 16th of an inch. 1. ___________________________________ _________ in. 2. _______________ _________ in. 3. ________ _________ in. 4. ________________________ _________ in. 5. ________________________________ _________ in. 6. ______________________ _________ in. 7. __________________________________________ _________ in. 8. ____________________________________________________ _________ in.
- 5. symmetrical frog.jpg (JPEG Image, 720 × 559 pixels) http://kozmicdreams.com/Teaching/Level 1/Graphite/symmetrical frog.jpg 1 of 1 10/2/2012 8:55 PM
- 6. Determining the size of grid boxes.jpg (JPEG Image, 580 × 720 pixels) http://www.kozmicdreams.com/Teaching/Level 1/Graphite/Determining t... 1 of 1 10/2/2012 8:59 PM