Using voice thread
•Als DOC, PDF herunterladen•
2 gefällt mir•520 views

A simple and quick VoiceThread tutorial.

Empfohlen
Weitere ähnliche Inhalte
Was ist angesagt?
Was ist angesagt? (20)
Ähnlich wie Using voice thread
Ähnlich wie Using voice thread (20)
Mehr von Desiree Caskey
Mehr von Desiree Caskey (20)
Kürzlich hochgeladen
Kürzlich hochgeladen (20)
Using voice thread
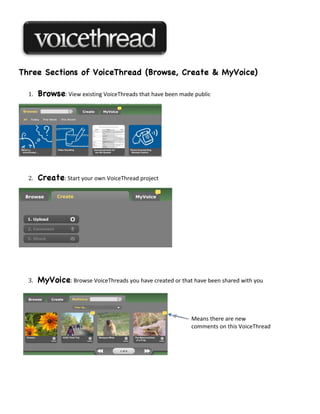
- 1. Three Sections of VoiceThread (Browse, Create & MyVoice) 1. Browse: View existing VoiceThreads that have been made public 2. Create: Start your own VoiceThread project 3. MyVoice: Browse VoiceThreads you have created or that have been shared with you Means there are new comments on this VoiceThread
- 2. Account Settings: Access Your Account Settings: Click on the triangle to the right of your email address 1. My Account Change your email address or password 2. My Identities Add identities to your account Perfect way to keep student comments separate in a classroom VoiceThread project 3. Groups & Contacts Add groups(Pro only) and Contacts 4. Sign Out Logs you out of your account
- 3. Create Your First VoiceThread: In order to create a VoiceThread, you must have an account created. • Log in with your account information • Click on the Create tab The Create environment looks like this before you put any content into it: Steps to Create: 1. Upload: You can upload images or videos from a variety of sources. • Your local hard drive or server • Your Facebook, or Flickr accounts • Other VoiceThreads you have created • A specific web address (ei: Google Images Search Results) *Once your images are uploaded, you can arrange them by dragging. *You can give your VoiceThread a name by clicking on the Title *You can name each image/video, rotate, replace, and delete as well. You can also add a web link. Just click on the image. And make changes.
- 4. Create Your First VoiceThread: 2. Comment: Clicking on the Comment button here allows you to create narration for the current VoiceThread. A. Select the image/video you want to narrate before clicking on the Comment button. NOTE: The project starts playing. You will need to click on the Pause button before you start commenting B. Click on the Comment button and choose your method of commenting o Call in o Use a webcam o Record your voice with a microphone o Type in a comment (not much room here) o Upload a pre-recorded audio file C. Move to the next screen by clicking on the Next button. D. Repeat this process for each screen in your VoiceThread 3. Share: Clicking on the Share button allows you to distribute your project a. Embed into a web site, like a blog or wiki b. Email to a friend c. Hyperlink – share the link to the project • You can create a list of contacts that will be stored in your account • You can set different access levels for each contact • You can create groups (Classroom & Pro versions only) Other Share Options: *Look through these options carefully for security and sharing features.
- 6. Editing an Existing VoiceThread Once you have created a VoiceThread, you can easily return to it and continue editing, adding comments, and sharing. Editing an Existing VoiceThread 1. Login – When you have logged back into your VoiceThread account, you will see your three tabs. (Browse, Create & MyVoice) 2. Click MyVoice – Think of MyVoice as My Documents on your computer…this is where all of your previously created VoiceThreads, or any VoiceThreads that have been shared with you will be stored. 3. Find Your Project - click on the cog in the lower right-hand corner 4. Click on Edit 5. Complete your Editing *There is no save button on your projects. They will automatically save as you work. To help you remember where to click when you go to VoiceThread, think CREATE: means create a new project MYVOICE: shows you the projects you have completed or are working on.
- 7. Tips & Tricks Adding an Identity If you are using the FREE educator version with students, you can create identities for each student under your account. You would need to log in with your email address and password, but each student could have their own identity. 1. Login and go to your account information at the top of the screen: Click on the triangle beside your name 2. Choose My Identities from the drop-down menu: 3. Click on Add An Identity 4. Type a name for your student and choose a picture for them. You can click on Select an image to upload their picture if you like. To change the identity when you are commenting, click on the icon for the person commenting. This pop-up window will appear: You will see all of the identities you created, or you can create another identity. Commenting on an existing VoiceThread
- 8. What makes VoiceThread so amazing is the addition of other thoughts and conversations. You do this through commenting. You can comment is several different ways: •Phone it in •Use a webcam to video your comment •Microphone •Type a limited amount of text •Upload your own file Embedding VoiceThread into a web-based tool
- 9. To embed your show into an existing website, you need to be in the Edit environment. You will see the three steps for creating a VoiceThread: Click on the Embed button at the bottom of your screen: