Call Girls Ludhiana Just Call 98765-12871 Top Class Call Girl Service Available
File 1366639180
1. Michael Miller Fabrics LLC.
www.makingitfun.blogspot.com
1
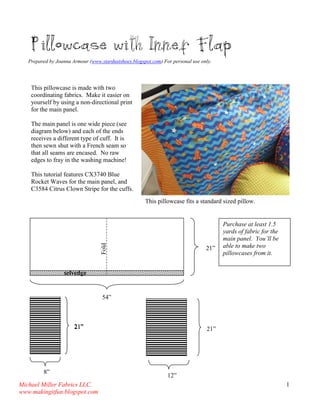
Pillowcase with Inner Flap
Prepared by Joanna Armour (www.stardustshoes.blogspot.com) For personal use only.
This pillowcase is made with two coordinating fabrics. Make it easier on yourself by using a non-directional print for the main panel.
The main panel is one wide piece (see diagram below) and each of the ends receives a different type of cuff. It is then sewn shut with a French seam so that all seams are encased. No raw edges to fray in the washing machine!
This tutorial features CX3740 Blue Rocket Waves for the main panel, and
C3584 Citrus Clown Stripe for the cuffs.
21”
54”
selvedge
21”
8”
21”
12”
Purchase at least 1.5 yards of fabric for the main panel. You’ll be able to make two pillowcases from it.
Fold
This pillowcase fits a standard sized pillow.
2. Michael Miller Fabrics LLC.
www.makingitfun.blogspot.com
2
Prepare the Cuff:
Take the cuff piece that measures 21” x 8”. Iron it in half lengthwise.
Unfold it, then iron down one side ¼” as shown.
Lay the piece right side down on top of the main panel (which is facing up). Align the raw edge and pin in place.
pin along here
3. Michael Miller Fabrics LLC.
www.makingitfun.blogspot.com
3
Sew the pieces together using a ¼” seam allowance. Iron the seam toward the panel.
Fold the cuff at the crease and align the ironed edge with the seam. Pin in place. Using the seam as a guide, sew the cuff in place.
From the front side of the pillowcase your topstitching will look neat and perfectly aligned with the seam.
4. Michael Miller Fabrics LLC.
www.makingitfun.blogspot.com
4
Prepare the other Cuff:
This is the cuff that has the inner flap.
Finish one of the edges by ironing down one edge ¼”.
Fold that same edge ¼” again and iron flat.
Take it to the machine and sew it down close to the edge.
5. Michael Miller Fabrics LLC.
www.makingitfun.blogspot.com
5
Lay the piece right side down on top of the main panel (which is facing up). Align the raw edge and pin in place. Sew the pieces together using a ¼” seam allowance. Iron the seam towards the cuff.
You will want to make sure that this cuff is the same size as the first one you created. Measure the first one, from the seam (mine was 3 ¾”). Measure that same distance out from the seam on this second cuff and using a straight edge and fabric marker or chalk, draw a line, as shown.
Fold the fabric on that line so that wrong sides are facing each other and right sides are facing out. Pin so that the fabric doesn’t shift. You’ll be creating the cuff by topstitching near the seam (on the cuff side).
6. Michael Miller Fabrics LLC.
www.makingitfun.blogspot.com
6
This is what it should look like on the inside of the pillowcase:
Finish the Edges using the French Seam:
Even up any untidy edges.
For this step, the pillowcase should be RIGHT SIDE OUT. Fold the pillowcase in half, lining up the cuffs. Pin in place along one side and sew from the cuff to the end using a ¼” seam allowance. Do the same with the other side. Backstitch to reinforce all seams.
Use a rotary cutter and straight edge to trim the seams to measure 1/8” wide.
Inner flap
cuff
stitching
7. Michael Miller Fabrics LLC.
www.makingitfun.blogspot.com
7
Turn the pillowcase inside out and iron the seams flat.
Start at the cuff side, once again, and stitch down the side using a ¼” seam allowance. Do this on both sides. Your seams are now enclosed, and your pillowcase has no raw edges.
Turn the pillowcase right side out and insert the pillow. ♦