Animal zentangles how to draw zentangles a step by step guide by bruce black
•Als PPTX, PDF herunterladen•
2 gefällt mir•3,295 views

Here is a fun Fall art project that is sure to be a hit this Halloween. It is great for kids and adults and will come out amazing every time! It also is a great middle school art project that will take about a week. You can even use it for your high school art students.

Empfohlen
Weitere ähnliche Inhalte
Mehr von Bruce Black Art
Mehr von Bruce Black Art (20)
Kürzlich hochgeladen
Kürzlich hochgeladen (20)
Animal zentangles how to draw zentangles a step by step guide by bruce black
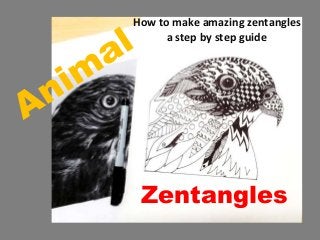
- 1. How to make amazing zentangles a step by step guide Zentangles
- 2. Supplies • Printout of an animal • Drawing paper • Ruler • Sharpie pen • Scissors • Glue stick • Black construction paper • Pencil • Eraser
- 3. First, choose a portrait of an animal. You will want a close up with details.
- 4. Using a graphite pencil, shade the back of the image you have chosen. You only need to shade the part that the image is on.
- 5. Next, place your chosen animal image over your drawing paper. Then, use your pencil to trace the outline and details of your animal. Press hard, so the graphite on the back will transfer to your drawing paper.
- 6. Your image should now be transferred to your drawing paper.
- 7. Now you will need to stylize your picture a bit. Try to create closed shapes that you can fill in with designs later. I added in these feather shapes
- 8. We are really making progress now! Using a Sharpie marker, go over your pencil lines and then erase any remaining pencil marks.
- 9. Now comes the fun part. Begin filling in the shapes with a variety of patterns and textures.
- 10. Cool Vocabulary Word! Horror Vacui a fear or dislike of leaving empty spaces, especially in an artistic composition. With zentangles, you are going to want to create the feeling of horror vacui, by filling in the empty spaces as intricately and densely as possible.
- 11. There is no need to have it all planned out. Just doodle in patterns as they come to you. Maybe consider which areas you want to have a darker patterns and which areas you want to be more open.
- 12. Keep up the great work!
- 14. That’s it! The final part is to cut out the image and paste it onto a piece of black construction paper.
- 15. End of Slide show Presented by Bruce Black Art.com Want to see more amazing artwork and art ideas? Visit: Bruce’s Blog