Free Online Graph and Chart Makers
•
2 gefällt mir•3,304 views

Kids Zone Make a Graph and Chart Go for basic free online graphs. For information about obtaining a PowerPoint format download of this presentation, go to the following page: http://passyworldofmathematics.com/pwerpoints/

Empfohlen
Weitere ähnliche Inhalte
Andere mochten auch
Andere mochten auch (11)
Mehr von Passy World
Mehr von Passy World (20)
Kürzlich hochgeladen
Kürzlich hochgeladen (20)
Free Online Graph and Chart Makers
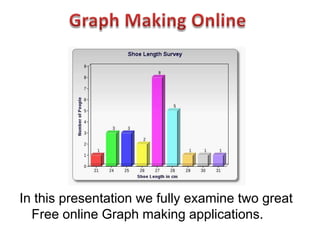
- 1. In this presentation we fully examine two great Free online Graph making applications.
- 3. Step 1: Click to choose the Graph Type
- 4. For our example, we will Shoe Length Nbr of People draw our “Shoe Length 21 cm 1 Survey” data as a Bar Graph. 24 cm 3 25 cm 3 26 cm 2 In this survey, each 27 cm 8 student measured the length of their shoe. 28 cm 5 29 cm 1 We then gathered 30 cm 1 together all the results 31 cm 1 into the frequency table shown on the left.
- 5. For our example, we are drawing the Shoe Length data from our class as a Bar Graph. First we set up the design for our bar chart graph on the “Design” Tab. We then work our way down through the other Tabs. (Continued next Slide)
- 6. It is important to set the “Grid Lines” to a number which will enable us later on to have a vertical scale in ones, rather than in lots of in between decimal values on the y-axis. For our nine items, the closest grid lines available in the drop down menu is 11.
- 7. Next we use the “Data” tab to enter the Graph Title, and the text labels for the horizontal x-axis, and the vertical y-axis. We then choose our bars colour, and enter in all of our data items. (Continued next slide).
- 8. Note that the maximum and minimum values we have set are 0 and 10, because we set eleven grid lines back on the Design screen tab. 0 to 10 is eleven values, (count them on your fingers), and this means with eleven grid lines we should get a vertical scale for our completed graph which goes in ones.
- 9. On the “Labels” tab we have set "show labels" to "No", which means there will not be any numbers place above individual bars saying how high they each are. If you like having each bar labeled at the top, with its height value, then set this "labels" option to "Yes".
- 10. We are now ready to check how our completed Graph will look, which we do by clicking on the "Preview" tab. If we need to go back and change anything, we simply go click on the tab(s) where we need to make changes. We then click the bottom of screen “Update” button, and try the “Preview” tab again.
- 11. Our Final Step is to Print or Save our completed Graph. We can even email our finished graph to our Instructor. Click on “Download” which takes us to the screen shown on the next slide.
- 12. There are several different ways to save our graph, which we access by clicking the drop down menu button. The size of our saved JPG picture was 600x453 pixels in size, and it was of very good image quality. After one save, we can also re-save into another format if we want to.
- 13. This is our completed and saved Bar Chart for the Shoe Length Survey.
- 15. We will now graph the “Shoe Shoe Length Nbr of People Length Survey” results using 21 cm 1 the “Chart Go” site at : 24 cm 3 25 cm 3 http://www.chartgo.com/ 26 cm 2 At this website, we receive an 27 cm 8 opening screen, where we can 28 cm 5 select our graph type and set 29 cm 1 up all of its data and labeling. 30 cm 1 31 cm 1 (See next slide for full details)
- 17. After we click the “Create Chart” button we get our graph. If we click on “Modify this Chart” we can go back and redo items on the data entry opening screen. If we right click with our mouse on the graph, we can do a “Save As” and save a picture of our graph.
- 18. This is our completed and saved Bar Chart for the Shoe Length Survey.
- 19. http://nces.ed.gov/nceskids/createagraph/default.aspx We can also make Pie Charts Car Colour Nbr of Cars and Line Graphs with the Red 8 "Create a Graph" Application. Silver 15 Black 24 Here is the frequency table for White 18 a Car Park Survey we carried Blue 6 out recently. (Graph on Next Slide)
- 20. We
- 21. http://www.chartgo.com We can also make Pie Charts and Line Graphs with the "Chart Go" free web online application. Here is the Car Park pie chart as made in “Chart Go”.