SlideShare ist ein Scribd-Unternehmen logo
1 von 68
Downloaden Sie, um offline zu lesen
1
Section A
Section B
Section C
These step by step tutorials were written with the assumption that you have some jewelry making experience and follow
all safety precautions. The tutorials do not show basic jewelry making skills or how to solder, rivet or use resin. Keep in
mind that metal edges, whether cut with shears or a blade, are very sharp so take care when working with the pieces.
2
SOUTHWEST 1 Templates
Directions:
Step 1: Copy the templates. BOOK
Step 2: Transfer the designs to your sheet metal. PAGE
Step 3: Cut the designs out.
Step 4: File any sharp edges.
A8
A1 A7 A6 A3 A4 A14 A15
A18
A13 A10
A5 A2
A17 A11 A9 A12 A16
B4 B1 B2
B7 B8
B5 B6 B3
B9 B11
B10 B12
C5 C4 C10
C1 C3
C2 C9 C8
C11 C6 C12 C7
Only one of the blue circles is used in a jewelry piece in this collection. Can you see the remaining two made into
flowers riveted to the Open Book cover, on the Squares Necklace, or in the center of the Southwest Cross, etc.?
How you utilize them is only limited by your imagination! E6000 can replace soldering on many of the pieces.
3
Contents
“A” Templates
Scribe Book Pendant----------------Page 16
Tiles Necklace-----------------------Page 20
Freeform Pendant------------------Page 24
Cab and Tab Pendant---------------Page 26
Sonoran Rose Pendant-------------Page 29
Life Bird Pendant-------------------Page 32
“B” Templates
Desert Flower Pendant-------------Page 36
Kachina Burst Earrings------------Page 41
Serape Earrings--------------------Page 45
Rain in the Desert Earrings-----Page 47
“C” Templates
Southwest Cross---------------------Page 50
Spirit Feathers-----------------------Page 55
Howl at the Moon Pendant--------Page 60
Landscape Pendant----------------Page 63
Eye of the Desert Link Bracelet---------------Page 66
4
Sticker Templates
Cutting perfectly matching shapes out of sheet metal can be a bit
tricky. But with a few tricks of your own, it will be a snap!
Solution 1: Use repositionable sticky notes to make your
templates.
Step 1: Draw your shapes on repositionable note paper, making
sure that as much of your design as possible is on the sticky
portion of the note.
Step 2: Cut the template out.
Step 3: Adhere the sticky note template to your clean sheet metal and cut around the shape.
Solution 2: Use a Xyron Sticker Maker with a Repositionable Sticker Cartridge to make repositionable
stickers to adhere to sheet metal and then just cut on the lines!
Step 1: There are two ways to do this.
If you are only making one or two of an item at a time:
A: Cardboard and paper can become
misshapen with use, so draw your
template shape on thin plastic and cut
it out. Hint: Save all your sticky note
and plastic templates. Keep notes
about the project on the template if
there is room. Place your template on
a piece of paper and trace around it.
You do not have to cut this paper
shape out exactly, just cut around it.
If you are making multiple sets or use the same shapes over and over:
B: Draw lines on a piece of typing paper so that you have strips
the width your Xyron uses, either 1.5”, 2.5”, 5” or 9”. Fill the
space between the lines with tracings of the desired shapes.
Save this sheet as your original. Make a copy of your original.
Cut the copied strips apart. Note: a 2.5” Xyron was used here.
5
Step 2: Run the cut out shapes from A or each paper strip from B
through your machine.
Step 3: Cut the sticker sheet apart. You do not have to cut each
piece out exactly, just cut around them. Adhere the stickers to
your clean metal sheet.
Step 4: Cut the metal shape out. Remove the sticker and you are
ready to use the blank in your project. Hint: Replace the sticker on
the paper backing as you may be able to use it several more times.
Hint: If you are careful when you remove the stickers from your
metal, you can save them to use again at a later date.
Removing Tarnish From Your Jewelry
Copper will tarnish (patina). Because of their copper content, Silver, Bronze and Brass will also tarnish.
To bring your jewelry piece back to the original finish, make a sloppy paste of Barkeepers Friend, a powdered
cleanser and polish found in the cleaning supplies section of stores, and water.
Pat the solution all over your jewelry piece, being careful not to rub it onto the piece or you will scratch the
metal and/or the stones. Rinse the piece in lukewarm water and dry thoroughly.
Store your newly cleaned and dry jewelry piece in an anti-tarnish jewelry box or an airtight plastic bag. Using
an anti tarnish paper strip in the bag can help. Save those small moisture absorbing silica packets that come
in a variety of items you purchase. They can be used to absorb moisture, which leads to tarnish, where you
store your jewelry. Be careful, though. Some of them can discolor metal if they come in contact with it.
6
6 Step Barrel Pliers
Round nose pliers are great, but sometimes it is
difficult to grasp the wire in exactly the same spot
on the jaws when you need to make the same sized
loop or curve. Once you use the 6 step barrel pliers,
they will be the most versatile tool in your
workshop. Whenever you need to make consistent
sized loops and curves, the 6 step barrel pliers
should be your go-to tool. Consistent sized loops are
not only important in making wire wrapped loops
and jump rings, but in many other jewelry designs
as well.
Knowing the sizes of the steps can be helpful when using tutorials that refer to metric or standard
measurements. The following measurements are the approximate diameters of each step of the barrel pliers.
Each step will make rings with the approximate ID (Interior Diameter) of the diameter of the barrel.
Step 1 2.33mm 3/32”
Step 2 3.25mm 1/8”
Step 3 4.5mm 3/16”
Step 4 6mm 1/4”
Step 5 8mm 5/16”
Step 6 8.75mm scant 3/8”
If you need to make a few jump rings, use this pliers to make the size coil you need. The 6 steps make the
sizes you will use the most often.
Using Your Hole Punch Pliers
When placing the cutting blade/tip on a marked spot and
closing your hole punch pliers, you will find that the hole made
is probably not directly cut on the marked spot. That is because
the cutting tip is angled to make cutting through the metal
easier.
Here is a way to cut the hole in the exact spot you want it. Turn
your hole punching pliers over so that the bottom jaw, the one
with the hole, is on top. Center the hole in the plier jaw over the
marked spot and punch. Viola! Your hole will be in exactly the
right spot every time!
7
French Hook Ear Wires
Make perfect ear wires every time with 6-Step Barrel Pliers. The back wire is a bit longer than the average
ear wire so you do not have to worry about it slipping off your ear.
Materials:
20 or 21 gauge half hard round wire
Hint: If you only have dead soft wire, just twist it to
harden it. Optional hammering (Step 7) will also
harden the wire.
Optional: Two 3mm round metal beads
Tools:
Flat nose pliers
6-Step barrel pliers
Flush cutter
Cup bur
Optional: Hammer and bench block
Note: For the purposes of this tutorial, the 6 plier steps have been labeled in
ascending order. These numbered steps will be referred to and where possible,
mandrel sizes will be given as well.
Directions: It is important to read through the directions before starting.
Step 1: Straighten and flush cut both ends of two pieces of 20 gauge half or full
hard round wire for each pair of earrings. No bead: 1-7/8”; Balled head pin or with bead: 2”.
Step 2: Make an eye on one end of
each wire using Step 1 (or 3/32”
mandrel) of the 6 step barrel pliers.
Skip to Step 5 if not using a bead.
Step 3: If adding a bead, shift the eye
around the pliers as shown so you can
bend the wire tail back to center the eye on
the wire end.
Step 4: Slide a bead on each
wire. Push the bead tightly to
the eye. Holding the tip of the
flat nose pliers tightly to the
bead, make a 70 degree bend
in each wire. Note: Decide if
you want the eye hole to thread from side to side (shown) or front to back and place it in the pliers accordingly.
8
Step 5: Pushing the bead, balled headpin, or loop tightly against the 6 step barrel pliers, grip one wire
between Step 3 and Step 4 (or ¼” mandrel). Push the wire up, over and down around Step 4 (or ¼” mandrel).
Step 6: Grip the earring tip between Step 5 and 6 of the 6 step barrel pliers. Make a slight bend in the tip
using Step 6 (or scant 3/8” mandrel).
Optional: Create a gentle curve to ear wire end using the largest barrel of the Wrap N Tap pliers.
A: Push the ear wire tail between the jaws until the eye touches the pliers. Squeeze the pliers.
B: Pull the ear wire out a bit and squeeze the pliers.
C: Pull the ear wire almost all the way out and squeeze the pliers again. Perfect curve every time!
Step 7: Use a cup bur to smooth the cut end of each earring.
Step 8: Optional: Lightly hammer the front of the earring curve. This is particularly
important if you made your own balled headpins as heating the wire to make the ball
makes the wire dead soft.
Step 9: If you did not use a gemstone on your ear wires, you can tumble them for a
shiny finish. This will also work harden them if you used half hard wire.
9
Rivet and Eyelet Tools
Your local hardware store has a large selection of tools that you can use
in your jewelry making.
If the face of your piece is not flat, such as when you attach a cupped piece to your design, you cannot set the
rivet by placing the piece on a flat surface.
Note: The tools shown in this section should be clamped in your vise to keep them stable
while using them.
You will need to use something like a Drive Pin Punch when setting a flat head rivet.
When choosing a Drive Pin Punch, shown to the left, make sure that the flat head of the
stem rivets you will be using will fit the flat top of the tool.
To set balled head rivets, you need a tool that will not flatten
the top of the ball during the riveting process. Shown to the
right are two 5/32” (4mm) woodworking Nail Sets. The one
on the right has a very shallow concave tip. It can be used to
stamp circles in metal, but is not a good tool to use with balled head rivets as the
top of the ball will become slightly flattened. You need a tool with a deep
indentation, like the nail set on the left, which will help to keep the balled head
round.
The balled head rivet shown here was made by balling the end of a piece of 16
gauge wire. It was then cut into a short piece, straightened so the wire came
straight out of the ball, pickled and tumbled.
Make a Rivet and Eyelet Tile
Rivets need to be cut a specific length after inserting through the pieces they will be riveted in. This
rivet/eyelet tile was made with tube rivets and eyelets as well as 16 gauge flat and balled head rivets in mind.
Step 1: Start with a piece of 22 gauge sheet metal. It can be cut in any shape. Here, a
¾” circle was punched from a piece of brass. Brass was used because it is harder than
copper. Since you will be filing across the top of the tile, it needs to be made from a
relatively hard metal.
Step 2: Using a 1.5mm hole punch, make the first hole. This hole will be used with 16
gauge flat and balled head rivets.
Note: Check the diameter of the shank of your tube rivets and eyelets to
know what size holes to punch in your tile. Tube rivets require 2 tiles.
Step 3: The next size hole was made with the 2.38mm or 3/32”
punch from a multi size hole punch, shown to the right. This hole will
fit 3.5mm x 3mm (as well as longer than 3.5mm) eyelets and domed
face tube rivets.
10
Step 4: The largest hole was made with the 3.16mm or 1/8” punch from a multi size hole punch. This hole
fits 5.5mm x 4mm eyelets.
Step 5: Use number stamps to show the approximate hole size.
Hint: For a tile to use in tight spaces, make a narrow rectangular tile with one hole at each end. Those holes
should be the ones you use most often.
Make a Tube Spreader Tool
Step 1: Find a few nails that are larger in diameter than the tube of
the rivets and eyelets you use most often. Many local lumberyards
sell nails, purchased by the pound, in bins. You should be able to
purchase a few for just pennies.
Step 2: File tips of the nails to a shallow sharp point and you will
have an instant tube rivet and eyelet setting tool. These were
ground down on an electric grindstone in the shop, but you could
use a file. It will just take longer. Note: You cannot use nails right out of the box. The tips are
not round and the point is too long.
How to Use the Tile to Cut 16 Gauge Rivets the Proper Length
There is a great video on using rivets and how to fasten them from Beaducation at:
https://www.youtube.com/watch?v=V6l5JXD5UiA It is a little over an hour long, but you will learn
everything you need to know about how to set rivets.
Step 1: Use a 1.5mm hole punch to
make a hole in the desired location on
the piece. If your metal is thicker than
22 gauge, you should use a drill with a
1.5mm bit for metal. Note: All the rivets
referred to here are 16 gauge.
Step 2: Place the flat or balled head rivet
through all the pieces, usually from the front side of your piece to the back.
Note: Sometimes it is not easy cut the rivet off and then move the pieces to be connected to the tool you need to
use to set the rivet without the whole thing falling apart. That is why you may find it easier to cut the rivet off
after you set it on the tool and put the tile on the assembly, as follows. A tiny little rivet can be hard to find on the
floor after it goes flying!
Step 3:
Flat Head Stem Rivets: Note: If the face of your piece is flat, then you can place your piece rivet side down on a
bench block.
11
A: If the face of your piece is not flat, then the head of your rivet needs to sit
on a drive pin punch clamped in a vise. Make sure that the rivet head is flat
on the drive pin punch.
B: Set the rivet tile over the rivet shank using
the appropriate hole. Use a flush cutter to cut
the rivet shank flush with the tile.
C: Remove the tile.
Balled Head Rivets: Note: If the face of your piece is flat, then you can place your piece rivet side down on a
magazine or notepad.
A: If the face of your piece is not flat, then the ball needs to sit in the well of the
nail set (described above) clamped in a vise.
B: Set the rivet tile over the rivet shank using the appropriate hole.
Make sure that the rivet shank follows a straight line up from the nail
set. Use a flush cutter to cut the rivet shank flush with the tile.
C: Remove the tile.
Step 4: Use the straight side or a cross pein hammer or a riveting hammer to mushroom out the top of the
rivet, being careful to not hammer your metal backplate. The narrower side of a Mini TruStrike Sharp
Designer Hammer may work, but the narrower the edge, the better. Lightly hammer in an “X” pattern, going
one way then the other, making sure the hammer blows are perpendicular to the post. Continue until the
post has flared enough that the assembly will not pull apart.
Step 5: Change to a flat faced hammer and finish flattening the post until it is flat to the back of the piece and
smooth to the touch.
12
How to Use The Tile and Nails On Tube Rivets and Eyelets
Step 1: Punch the appropriate size holes in the pieces you will be attaching your
rivets or eyelets to.
Step 2: You may want to make the hole a bit larger if your rivet or eyelet does not
fit. In this particular leftover fold formed piece, there was a hole caused when
dimpling pliers broke through the metal. A bead reamer was used to make the hole
large enough to fit a small brass 3mm eyelet or domed head rivet with a tube style
back.
Step 3: Place the tube rivet or eyelet through
the pieces you are securing it to. Then put two
tiles on the rivet using the hole that best fits.
Use a file the file off the excess tube until it is flush with, and not more
than a hair above, with the tile. Do not cut the tube with a flush cutter. It
will squash the sides together.
Note: In the following step, if you use a bench block under your piece when
using a hammer with your tool to spread out the tube on the back of your
piece, the face or your rivet or eyelet will be flattened out. The face of your
rivets and eyelets will not be as easily damaged or flattened if you use a
notepad or magazine instead of a bench block.
Step 4: Place the tip of the nail in the tube on the back of the rivet or eyelet. Gently hammer the nail until the
tube starts to spread out. Once the top of the tube is spread enough that it cannot be removed from the hole,
you can then use a domed face or ball hammer to finish spreading the tube out and flatten it.
Hint: A 1.8mm hole punch is not quite large enough for small diameter tube rivets and eyelets. Use a bead
reamer to make the hole slightly larger.
Hint: Rivet and eyelet setters are a good investment if you will
be using a lot of eyelets and tube rivets in your jewelry.
13
Homemade Pickle
Pickle is used to remove fire scale from metal pieces after heating them with a torch, as in annealing or
soldering. Not everyone has a dedicated pickle pot, or a need or desire to have one. If you will only need to
pickle a few items in the course of a year, maybe making your own pickle and using a glass jar or cup is the
right solution for you.
Bring ½ cup vinegar and ½ cup water to a boil. You can use more vinegar than water. Some people even use
just vinegar, no water.
Pour in a glass or ceramic coffee container. Hint: Make sure that the container you use for your pickle does not
get used for anything else after this.
Add 1 tsp salt.
Add your metal jewelry piece, making sure that it is covered with solution. You may need to turn the piece
over while it is soaking if the back of the piece sits directly on the bottom of the container. Note: Do not use
pickling solution on jewelry pieces with gemstones.
While the piece is soaking, mix 1 teaspoon of baking soda with 1 cup of warm water in another glass or
ceramic container.
When you see that the fire scale is gone, remove the piece from the pickling solution using a wooden pick or
copper tongs. Hint: If you have heavy fire scale, you may need to reheat the solution-without the jewelry piece
in it-and soak the piece again. You may even need to make new pickle solution and re-pickle.
Place the piece in the baking soda/water solution. This solution helps neutralize the acid in the vinegar that
ate away the fire scale.
Rinse and dry the piece.
Brushing the piece with a brass brush will polish the piece to a satin finish. Rubbing a burnisher across the
surface of the piece will polish and highlight the raised areas. Tumbling the piece with shot will polish the
whole piece.
Note: A half and half mixture of pickle and hydrogen peroxide is needed to remove the copper from the
surface of brass items that have been pickled.
Be Environmentally Conscious: Most communities have laws governing the disposal of what can be
considered hazardous waste. Since your pickle solution contains metal particles, it should be poured into a
labeled container, like an old bleach container, that you will eventually turn in to your hazardous waste
dump.
Lessen the Noise, Save Your Eardrums
Using a hammer to texture metal on a bench block can be quite loud. If you are
concerned about this, use a rubber block, a sand bag or a stack of magazines under your
bench block to help deaden the sound from your hammer blows. Wearing ear protective
devices may be a good idea if you do a lot of metal texturing.
14
Save Your Fingers
When you are texturing metal blanks, do you usually hold the pieces on
your bench block with your fingers? If you do, you have probably hit
your fingers more than a few times-ouch! There are several solutions to
this problem.
You could use painters tape to hold the
metal blank on your bench block.
However, you will have to reposition
the tape when you need to texture
under it. Also, vigorous hammering will
loosen the metal from under the tape
and the blank could go flying.
So what else could be used? Head to your garage, kitchen and laundry room to find great tools! Look for
items that will allow you to put the greatest surface area of the tool on the blank-the rounded end of craft
stick will touch the blank in a VERY small spot whereas a square ended stick touches a greater surface area.
Each square in the photo is one inch. Cut different angles on
each end of a dowel-45 and 60 degrees are shown. Use a
scissors to cut off the rounded end of a wide frozen treat
wooden stick. Sand the corners round, if desired. For a shorter
tool, take a clothespin apart.
You can find various sizes of flexible “gripper” style finger covers
at fabric/craft stores. Finger covers like these are sometimes
used by bank tellers when counting bills. Slip one on the end of
your chosen tool and it can hold your blank from moving
without the fear of scratching your metal.
Do you have an old rubber spatula with a wooden handle? Use
the handle to hold blanks down. If you cut around the outside
edge of the rubber sleeve, you will have a non-slip surface to
hold the blank down.
Clamps for Jewelry Making
These clamps were purchased at a dollar store. The pads on
the jaws are thick self-stick felt circles used on the bottom of
lamps, vases, etc. that were cut to fit the jaws of the clamps.
Use a small amount of glue when connecting pieces together.
Also, make sure that the glue does not seep out from under the
pieces as you cannot patina where there is glue.
15
Petal Forming On a Wood Block
Forming and shaping metal flowers to give them dimension is fun,
particularly when you do not have to spend a lot of money on expensive
shaping tools to do it. A good hammer and a piece of wood works just
fine!
Most lumberyards have scrap pieces of lumber around they will
probably give you that you can use for this “tool.” A scrap of 2x2 pine
makes a perfect petal forming tool. If you find a pallet that is being
thrown away, you will have more wood to cut up than you know what to
do with-probably enough to last you a lifetime!
Cut a short piece of wood, just big enough to easily handle. Since pine is so soft, a hammer easily compresses
rounded indentations on the ends, which will help in the forming of the petals.
I find that I can easily hold my flower shape while also holding my block, which is about 2.25” long. If you
have trouble doing this, cut it a bit longer and clamp it to your work surface or in your vise.
Hammer the center of the petal edge into the indentation. To curve the outer corners of the petal, hammer
them around the corner of the wood block. Continue shaping the petals until you are happy with the shape.
Hint: You may need to anneal your piece several times during the shaping as hammering and texturing work
hardens the metal.
16
Scribe Book Pendant
Soldering experience may be necessary to make this project.
Materials:
24 (preferred) or 26 gauge sheet metal
2” of 18 gauge dead soft square wire
Four 18 gauge 5mm round jump rings Note: The size of the jump rings
you used to connect the book covers and pages is determined by the number
and thickness of the pages in the book (see Steps 16-19 )
Three circles cut from 24 gauge sheet metal using the 3.97mm punch in the
multi size hole punch set or three decorative rivets to fit the space
Optional: Three 3.5x3.5mm eyelets
One purchased chain or leather cord
Tools and Other Supplies:
Tools for your preferred method of cutting out
sheet metal shapes
Tools and solder for your preferred method of
soldering Note: You can glue the decorative
elements in place but this is not a permanent
solution. The piece could fall apart with wear.
Mini TruStrike Embossing Hammers
Flat and chain nose pliers
Rubber, plastic or rawhide mallet
Bench block Hint: Use a rubber block or a sand
bag under your bench block to help deaden the
sound from your hammer blows.
1.5mm hole punch
Multi size hole punch set
Variety of files to smooth and refine metal edges
Optional: Variety of decorative stamps
Pickle and pickle pot
Liver of sulfur and 0000 steel wool
Tumbler and steel shot
Optional: e-6000 or other jewelry glue
Directions: Read through all the directions before beginning the project.
Step 1: Copy the templates A1, A2 How you embellish the book cover is up to you. In this version, the
triangular piece C11, from the Tabular Pendant, was used as a decorative element along with circles and a
spiral. It is reminiscent of wind and tumbleweeds and wind across the desert.
Step 2: Trace the templates on 24 or 26 gauge sheet metal.
Step 3: Cut the designs out using your preferred method for cutting sheet metal. If shears were used to cut
your pieces out, the edges of the cut pieces curve a bit and/or the pieces may become slightly bent. Flatten
each piece cut with shears on a bench block using a plastic, rubber or rawhide mallet.
Step 4: Mark line 3/32” in from the edge where you will
punch holes. Use a 1.5mm punch to create holes just
outside the line on the front cover. Hint: If you use the
smallest hole punch from the multi hole punch tool to
make the hole on the front and back covers, you can use
small 3.5x3.5mm eyelets in the holes for an added design
element. If you use this hole punch, you will have to punch
on the line instead of outside it.
17
Step 5: Match up the front and back cover. Using an ultra fine point
Sharpie, mark the back cover through the holes you punched in the front
cover. Use a 1.5mm punch to create holes on the marks on the back
cover.
Step 6: Now is the time to use your imagination to embellish the cover.
Use design stamps to personalize your book cover, use the extra circles
to make a flower to rivet on, or make what is shown here. Design to
your hearts’ content.
The following steps are showing how the “tumbleweeds” book cover was made.
Step 7: Use the larger side of the small Mini
TruStrike Embossing Hammer, left, or the smaller
side of the large Mini TruStrike Embossing
Hammer, right, to texture the C11 triangle corner
piece. Do not worry about the piece becoming
misshapen. It will curl a bit so it is important to
flatten it on a bench block using a plastic, rubber
or rawhide mallet.
Step 8: Use files to smooth the edge of the wavy edge of the C11 triangle.
Step 9: Place the triangle piece on the front book cover in the bottom
right corner. Because you textured the triangle, the outer edges of
the triangle will hang over the edges of the book cover. Do not worry
about this….see Step 13.
Step 10: Use the two 3.97mm sections of your multi size hole punch
to cut three circles from 24 or 26 gauge sheet metal. Position these in
place on the front book cover next to the triangular piece. Hint: You
can use a small decorative head rivets instead of a these circles.
Step 11: Use 2” of 18 gauge dead soft square wire to create a spiral
to fit the empty space.
Note: All metal needs to be clean for solder to work properly.
Step 12: Use easy solder to solder the pieces in place as shown. Note: You can glue the decorative elements in
place but this is not a permanent solution. The piece could fall apart with wear.
Step 13: File the outer edges of the triangle corner piece flush with the edges of the front cover. Round the
corners of the front and back book covers.
Step 14: Pickle the cover to remove fire scale. Pickling the back cover at the same time will remove any
tarnish that may be on the metal.
Step 15: Buffing with steel wool creates a satin finish on the metal so you may wish to tumble the pieces for
about 30 minutes to bring up a shine. Tumbling will not affect the patina.
18
Note: You will be cutting out pages for the book next. The backs of rivets can scratch or mar photos. It would be
a good idea to place a thin clear plastic page between the book cover and photos, if you are using them.
Step 16: Use the BOOK PAGE template on the Template page to
make the book pages. Do not punch the holes until you see if
the punched holes in your covers line up with the marked holes
on the template. If they do not, use your book cover to make
marks for the page holes.
Step 17: Make the holes in the pages with the 1.5mm hole punch. Hint:
If you are careful, you can punch a few at a time. Six pages of cardstock
were used in this book.
Step 18: 18 gauge 4mm ID jump rings were used to connect the covers
and pages in this book. The size of jump ring you need to use to connect
the covers and book pages is determined by the number and thickness of
the pages in your book.
Step 19: Line up the holes in the covers with the book pages. Put a jump
ring in the top holes, then in the bottom holes. The last jump ring goes in
the center.
Step 15: Attach an 18 gauge 4mm jump
ring in each hole. You may have to
change the size of the jump ring to
accommodate the size chain or cord you
are using.
Step 16: Slide the pendant on a chain or leather
cord.
19
BONUS:
The jump rings used to make the chain seen here on the Open Book
Pendant are:
22 gauge twisted square wire made into 4mm ID jump rings
Two 20 gauge interlocked 4mm ID jump rings
Connected with two 20 gauge 3mm ID jump rings
This chain was also used on the Feather and Cab and Tab Pendants.
20
Tiles
Necklace
Soldering experience
may be necessary to
make this project.
Materials:
22 or 24 gauge sheet metal
2” square of 30 gauge sheet metal
2” of 18 gauge dead soft square wire
Six 18 gauge 4.5mm ID round jump rings
Six 16 gauge 5mm ID round jump rings
18 gauge 3mm ID round jump rings-enough to
make a chain the length you desire. 140-150 will
make an 18” necklace with a 2” extender.
Optional: 18 3.5mm x 3.5mm eyelets See Step 4
Optional: 9-12 3mm x 3.5mm rivets See Step 11A
One 4mm round bead
One headpin
Clasp
Tools and Other Supplies:
Tools for your preferred method of cutting out
sheet metal shapes
Metal shears
Either: Tools and solder for your preferred
method of soldering
Or: Tools and supplies for riveting
Mini TruStrike Large and Small Embossing and
Sharp Texturing Hammers
Flat, round and chain nose pliers
Rubber, plastic or rawhide mallet
Bench block Hint: Use a rubber block or a sand
bag under your bench block to help deaden the
sound from your hammer blows.
1.5mm hole punch
1mm and 3mm dimpling pliers
Repositionable sticky notes
Optional: Variety of decorative stamps
Butane torch and fire brick
Variety of files to smooth and refine metal edges
Optional: Variety of decorative stamps
Pickle and pickle pot
Liver of sulfur and 0000 steel wool
Tumbler and steel shot
Optional: e-6000 or other jewelry glue
Pencil or ultra fine point marker
Optional: Multi hole punch tool
Directions: Read through all the directions before beginning the project
Step 1: Copy the templates A3, A4, A5
Step 2: Trace the templates on 22 or 24 gauge sheet metal. It is preferred to attach the fold formed pieces to
heavier sheet metal, but if you are concerned about the weight of the finished product, you can use lighter
metal.
Step 3: Cut the squares out using your preferred method for cutting sheet metal. If shears were used to cut
your pieces out, the edges of the cut pieces curve a bit and/or the pieces may become slightly bent. Flatten
each piece cut with shears on a bench block using a plastic, rubber or rawhide mallet.
21
Step 4: Mark line 3/32” in from the edges where you need
to punch holes. Use 1.5mm punch to create holes just
outside the line. Note: If you want to put 3.5 x 3.5mm eyelets
in the holes for an added design element, use the smallest hole
punch from the multi hole punch tool to make each hole in
the squares. If you use this hole punch, you must punch on the
line instead of outside it.
Step 5: Use files to smooth and refine the edges of each of
the pieces. Round the corners a bit.
There are many youtube videos on fold forming. In this fold forming video by Beaducation featuring Kim St.
Jean you will make a cuff bracelet:
https://www.youtube.com/watch?v=lNmZmK_iAnk
Stacy Louise Smith published an short and easy tutorial on foldforming on Love My Art Jewelry Blog:
http://lovemyartjewelry.blogspot.com/2016/05/inspiration-metal-and-little-fold.html
Step 6: Fold form a 2 inch square piece of 30 gauge sheet metal. The following photos show the steps used to
fold form, texture and embellish the 2” square.
A: Fold the sides in. Flatten well with a rubber
or plastic mallet. You can use a flat chasing
hammer if you wish.
B: Anneal the piece to soften the metal. If you cannot use
your fingernails, slip a small pocket knife blade under the
edge of the metal to open the piece up. Lightly flatten out.
C: Follow A and B above to make all the folds.
22
The piece should end up looking something like this.
D: Now it is time to embellish the piece. Use the Mini TruStrike Large and Small
Embossing Hammers to texture some of the flat areas between the folds. Use the
Mini TruStrike Sharp Texturing Hammer to texture the top edge of some of the fold lines.
E: Use the 1mm and 3mm dimpling pliers to create
raised bumps in some of the
areas. Sometimes the pressure
of creating the dimple will
break the metal. You can use
this as a design element-just
add a rivet or eyelet to the hole!
F: You can leave the piece you created as is if you polish it up a bit. Use
a bit of 0000 steel wool or very fine sandpaper to clean the fire scale off
the raised areas. Or pickle it to remove the fire scale. You do not have
to tumble it at this time.
Note: See the BONUS at the end of
this tutorial before going on.
Step 7: Using the sticky edge of a
repositionable sticky note, cut
three 5/8” squares.
Step 8: Place those squares in the desired location on your fold formed
piece. Trace around the sticky note squares with an ultra fine point
marker. Save the sticky squares for Step 10.
Step 9: Cut the squares from your fold formed piece using your
preferred method for cutting metal.
Step 10: Place the sticky square on the back of each metal piece.
Recut and refine the squares to match the size of the sticky notes.
23
Note: You can leave the fold formed squares as is or pickle to remove
the fire scale. The fire scale squares look very pretty against the
bright copper background.
Step 11: Attach the fold formed pieces to the background using
either method:
A: Rivet the pieces in place on each of the necklace squares. You
may find it helpful to glue the fold formed pieces in place before
riveting. If you do this, use only a small amount of glue to avoid glue
seepage. You cannot patina where there is glue. Let the glue dry
before you start placing your rivets and/or any other decorative elements.
B: Solder your fold formed pieces in place. You must pickle the fold formed pieces and solder in place. Note:
All metal needs to be clean for solder to work properly.
Step 12: Use 18 gauge 4.5mm ID jump rings to connect the side
squares to the center square.
Step 13: 18 gauge 3mm ID jump rings are used to make the chain
for this necklace. Attach three short pieces of chain to the holes in
each necklace side square as follows:
The shortest inner chain is made with five 3mm jump rings.
The center chain is made with six 3mm jump rings.
The longest outer chain is made with seven 3mm jump rings.
Step 14: Connect the three short chains on each side to a 16 gauge
5mm ID round jump ring.
Step 15: Add a chain made with eleven 18 gauge 3mm ID jump
rings to the large ring on each side of the necklace.
Step 16: Add a 16 gauge 5mm ID jump ring to the chain on each
side of the necklace.
Step 17: Add a chain made with eleven 18 gauge 3mm ID jump
rings to the large ring on each side of the necklace.
Step 18: Add a 16 gauge 5mm ID jump ring to the chain on each
side of the necklace.
Step 19: Add a chain made with thirty-one 18 gauge 3mm ID jump
rings to the large ring on each side of the necklace.
Step 20: Attach your closure to the end of the chain on the right side of the necklace, as you would wear it.
Step 21: Use the remaining 3mm jump rings to make an extender chain to attach to the left side of the
necklace, if you wish. Make a wire wrapped bead dangle with the 4mm bead and headpin. Attach to the end
of the extender chain.
24
Step 22: Tumble the necklace.
Step 23: You can leave your necklace bright and shiny.
Step 24: Or, use liver of sulfur to patina it. Buff with
0000 steel wool to bring out the dimension of your
texturing.
Step 25: Buffing with steel wool creates a satin finish on
the metal so you may wish to tumble the pendant for
about 30 minutes to bring up a shine. Tumbling will not
affect the patina.
Something to try: Separate and connect the squares with wire wrapped beads.
BONUS: If you are careful in your sticky note placement and cutting, you could end up with a substantial
fold formed piece left over. Why not turn it into a Freeform Pendant!
Freeform Pendant
You can create unique pieces of jewelry using leftover pieces of sheet
metal. In this instance, the leftover piece of 30 gauge fold formed
copper sheet metal from the necklace was trimmed up a bit and riveted
to a slightly larger piece of 24 gauge nickel silver sheet. 3.5x3.5mm
brass rivets and eyelets were used to attach the two pieces together and
to add color interest.
Step 1: In this particular leftover fold
formed piece, there was a hole caused when
dimpling pliers broke through the metal. A
bead reamer was used to make the hole large
enough to fit a small brass 3mm eyelet or
domed head rivet with a tube style back.
25
Step 2: Set the rivet.
Step 3: Trim the fold formed piece to a desired shape.
Step 4: Use files to smooth and refine the edges of the fold formed
piece.
Step 5: Use the smallest hole punch from the multi hole punch tool to
make holes in the desired locations on the fold formed piece.
Step 6: Cut a 24 gauge piece of sheet metal, nickel silver in this case,
larger than your fold formed piece. You will trim it to fit later, so do not
worry too much about size or shape.
Step 7: Using an ultra fine point Sharpie, mark ONE of the holes
through the fold formed piece onto the nickel silver backing.
Step 8: Use the smallest hole punch from the multi hole punch tool to
make a hole on the mark on the nickel silver.
Step 9: Place a brass domed head rivet or eyelet through both holes
and connect the fold formed piece to the nickel silver piece. Rivet in
place.
Step 10: Use the smallest hole punch from the multi hole punch tool to
make a hole in the nickel silver backing through another fold formed
hole.
Step 11: Place a brass domed head rivet or eyelet through both holes and connect the fold formed piece to
the nickel silver piece. Rivet in place.
Step 12: Repeat the process until the fold formed piece is securely
attached to the nickel silver backing.
Step 13: Decide where the top of the pendant will be. Punch a hole
there and add a brass eyelet. Add a jump ring to the hole.
Step 14: Trim the nickel silver backing the desired distance away
from the fold formed piece.
Step 15: Use files to smooth and refine the edges of the nickel
silver backing.
Step 16: You may wish to tumble the piece at this point to polish.
Step 17: Slide the pendant on a chain or leather cord.
26
Cab and Tab Pendant
Riveting and soldering experience is necessary to make this project.
Materials:
22, 24 and/or 26 gauge sheet metal
One 18x13mm oval cabochon
One 6mm daisy spacer
One 18 gauge balled head rivet
Two 16 gauge flat head rivets
Purchased chain or leather cord
Tools and Other Supplies:
Tools for your preferred method of cutting out
sheet metal shapes
Optional: Tools and solder for your preferred
method of soldering
Tools for riveting
Mini TruStrike Sharp Texturing Hammer
Hammer for stamping
5mm half sun metal punch design stamp
Small woodworking nail set
6-step
Rubber, plastic or rawhide mallet
Bench block Hint: Use a rubber block or a sand
bag under your bench block to help deaden the
sound from your hammer blows.
1.25mm and 1.5mm hole punches
Variety of files to smooth and refine metal edges
Dapping punch set
Pickle and pickle pot
Liver of sulfur and 0000 steel wool
Ultra fine point Sharpie marker
Tumbler and steel shot
Directions: Read through all the directions before beginning the project.
Step 1: Copy the templates: A6, A7, A8, A9, A10
Step 2: Trace the templates on sheet metal. The A6 backplate should be cut from 22 or 24 gauge sheet metal,
no thinner. The A7 tab oval should be cut from 24 gauge sheet metal, no thinner. The flowers and leaves can
be cut from 26 gauge if you have trouble cutting them from 24 gauge. Note: The heavier the sheet metal, the
deeper the texturing impression will be, resulting in more dimensionality in patinated pieces.
Step 3: Cut the A10 flower out using your preferred method for cutting sheet metal.
Use a 1.25mm punch to make holes at the bottom of each“V” in the small flower. Cut
the flower out. Use a 1.25 hole punch for the center hole.
Step 4: Cut the rest of the pieces out using your preferred method for cutting sheet
metal. If shears were used to cut your pieces out, the edges of the cut pieces curve a
bit and the pieces may also become slightly bent. Flatten each piece on a bench block using a plastic, rubber
or rawhide mallet.
Step 5: Even calibrated cabochons are not always exact in size.
Adjust the A7 tab oval size according to the size of your cab.
Step 6: Punch holes in the A7 tab oval with a 1.5mm hole punch.
27
Step 7: Use files to smooth the edges of each piece and refine the scallops on the
backplate.
Step 8: Using the 5mm half sun metal punch, stamp each scallop along the outer edge of
the backplate. If desired, use a small woodworking nail set to stamp the circles inside the
curve of each of the half sun stampings.
Step 9: Optional: Use the narrow side of a Mini TruStrike Sharp Texturing Hammer to
texture the edge of the sides of the bail.
Step 10: Stamping and texturing can make metal cup a bit. Flatten the rectangle on a
bench block using a plastic, rubber or rawhide mallet.
Step 11: Use the narrow side of a Mini TruStrike Sharp
Texturing Hammer to texture the edge of the flower petals.
Step 12: Use the same sharp texturing hammer to texture the
edges of the two leaves. Hint: Since the leaves are so small, you
may wish to tape them to your bench block and texture one side at
a time.
Step 13: Place the cab in position. Draw around the cab with
an ultra fine point marker. Place the tab oval in position on
the marked oval. Mark one of the holes in the tab backplate on
the scalloped piece. Use a 1.5mm hole punch to make the hole.
Step 14: Place a 16 gauge flat head rivet through the tab oval
and then the backplate. Rivet the tab oval in place on the
scalloped backplate.
Step 15: Making sure that the tab oval is still on the marked line, punch the other hole in the backplate using
the hole in the tab oval as a guide. Using a flat head rivet, connect the two pieces together as in Step 14.
Step 16: Place the cab on the tabbed backplate and bend the tabs straight up, tight
against the lower edge of the cabocon.
Step 17: Decide where the flower should be placed. You may need to bend the
flower petals up a bit to accommodate the cab. Use an ultra fine point Sharpie to
mark the place where you need to rivet it in place. Use a 1.25 hole punch to make the
hole. You are not securing the cab in place at this time, so carefully remove it and set
aside.
Step 18: Thread a small daisy spacer on an 18 gauge balled headpin. Slide the
headpin through the hole in the flower and pendant. Rivet in place.
28
(Note: All metal needs to be clean for solder to work properly.)
Step 19: Decide where you want to place the leaves. Solder them in place
using medium or hard solder.
Step 20: Pickle your pendant to remove fire scale.
Step 21: After texturing, the back of the bail may no longer be square. Use a
file to square it back up.
Step 21: Use step 5 on a 6 step pliers to form the bail. Use easy solder to
solder the bail closed. Note: It is not necessary to solder the bail closed, but it
does make it more secure.
Step 22: Pickle the piece again.
Step 23: Tumble the pendant.
Step 24: You can leave the pendant bright and shiny, in which case continue on to Step 27.
Step 25: Or, use liver of sulfur to patina your piece. Buff with 0000 steel wool to bring out the dimension of
your texturing.
Step 26: Buffing with steel wool creates a satin finish on the metal so
you may wish to tumble the pieces for about 30 minutes to bring up a
shine. Tumbling will not affect the patina.
Step 27: Place your cabochon in the tab oval. Press the top right and
the lower left tab in, and then the other two to secure the cabochon in
place.
Step 28: Slide the pendant on a chain or
leather cord.
Right: Kathi Nelson had some leather
working tools so used them to stamp the
pendant edge.
BONUS: The jump rings used to make
the chain seen here on the Cab and Tab Pendant are:
22 gauge twisted square wire made into 4mm ID jump rings
Two 20 gauge interlocked 4mm ID jump rings
Connected with two 20 gauge 3mm ID jump rings
This chain was also used on the Open Book and Feather Pendants.
29
Sonoran Rose Pendant
Soldering and/or riveting experience is necessary to make this project.
Materials:
22, 24 or 26 gauge sheet metal
Purchased chain or leather cord
Above, Left: One 8mm daisy spacer and one 16
gauge balled head rivet
Above, Center: One 16 gauge 5mm ID jump ring
and one 5mm cabochon
Tools and Other Supplies:
Tools for your preferred method of cutting out
sheet metal shapes
Optional: Tools and solder for your preferred
method of soldering (Note: All metal needs to
be clean for solder to work properly.)
Optional: Tools for riveting
Mini TruStrike Sharp Texturing Hammer
6-step and chain nose pliers
1mm dimpling pliers
Rubber, plastic or rawhide mallet
Bench block Hint: Use a rubber block or a sand
bag under your bench block to help deaden the
sound from your hammer blows.
Variety of files to smooth and refine metal edges
Dapping punch set
Pickle and pickle pot
Liver of sulfur and 0000 steel wool
Ultra fine point Sharpie marker
Tumbler and steel shot
Optional: e-6000 or other jewelry glue for the
cabochon
Directions: Read through all the directions before beginning the project.
Step 1: Copy the templates: A11, A12, A13 Note: The flower pieces of this pendant can be soldered or
riveted together. The bail was kept separate so the curve of the top back flower petal would show. It is not
necessary to have a separate bail. If you are not going to use solder, then incorporate the bail and back flower
section into one piece before Step 2.
Step 2: Trace the templates on 22, 24 or 26 gauge sheet metal. The heavier the sheet metal, the deeper the
texturing impression will be, resulting in more dimensionality in patinated pieces.
30
Step 3: Cut the designs out using your preferred method for cutting sheet metal. If shears were used to cut
your pieces out, the edges of the cut pieces curve a bit and the pieces may also become slightly bent. Flatten
each piece on a bench block using a plastic, rubber or rawhide mallet.
Step 4: Use files to smooth and refine the edges of each of each piece.
Step 5: Riveted version: Use a 1.5mm hole punch to make a hole in the center of both flowers
if riveting the pieces together. Soldered version: Mark the center of the TOP flower if you will
be soldering the pieces together.
Step 6: Use the narrower side of a Mini TruStrike Sharp Designer Hammer
to texture the top flower out from center.
Step 7: If you used shears to cut your pieces out, the edges curve a bit and
the pieces may become slightly bent. Texturing also distorts the shape a bit.
Flatten each piece on a bench block using a plastic, rubber or rawhide
mallet.
Step 8: Soldered version: Solder the bail in place on the back side of the
back flower using hard solder.
Step 9: Optional: Use the narrow side of a Mini TruStrike
Sharp Texturing Hammer to texture the edge of the edges of
the front side of the bail (not shown in finished pendant).
Step 10: Use an ultra fine point Sharpie to mark line down the center back of the bail.
Step 11: Use 1mm dimpling pliers to make dimples down the center of the bail.
Place the indented cup side of the dimpling pliers on the FRONT side of the
metal piece. When you close the jaws of the pliers, the hook portion should be
on the center line on the BACK side of the bail. To make each succeeding dimple
down the line, place the edge of the indented side of the 1mm dimpling pliers
jaw against the previous dimple.
Step 12: Cup the back flower in the largest indentation of your dapping block. Cup the front flower, textured
side facing up, at least two sizes smaller. When
the two flowers are connected, the curved petals
on the front flower should not be touching the
back flower. To preserve the texture when
forming the piece, consider placing a piece of felt
or leather between the dap and the disk.
Step 13: Use round nosed pliers to curve the petals toward the
back. How much you round them is up to you. Be careful to not
squeeze the pliers too hard as the jaws could mark the metal.
31
Step 14: After texturing, the back of the bail may no longer be square. Use a file to square it back up.
Step 15: Use step 4 of a 6-step pliers to form the bail. Bend the bail
forward using chain nose pliers. Make sure the bail is completely
closed. Soldered version: Use medium solder to solder the bail
closed. Note: It is not necessary to solder the bail closed, but it does
make it more secure.
Step 16: Place the textured flower on top of the plain one with the attached bail. Make
sure that the petals are offset as shown. Continue on with the version you are making.
Soldered version: Use easy solder to connect the flowers and jump ring.
Riveted versions: Version A: Thread a 16 gauge balled headpin rivet
through an 8mm daisy spacer, the top flower and then the bottom
flower. Rivet the flower pieces together, making sure to offset the petals
for a more natural look.
Version B: Use a flat head rivet to join the two flower sections together.
Rivet the flower pieces together, making sure to offset the petals for a
more natural look.
Step 17: Pickle your pendant to remove fire scale if you did any soldering.
Step 18: Tumble your pendant.
Step 19: You can leave the pendant bright and shiny, in which case continue on to Step 22.
Step 20: Use liver of sulfur to patina your pendant (and the 5mm jump ring if you are making the cabochon
version). Buff with 0000 steel wool to bring out the dimension of your texturing.
Step 21: Buffing with steel wool creates a satin finish on the metal so you may wish to tumble the pieces for
about 30 minutes to bring up a shine. Tumbling will not affect the patina.
Step 22: Riveted version with cabochon: Use e-6000 or other jewelry glue to secure
the 5mm ring and cabochon in the center of the pendant.
Soldered Version with cabochon: Use e-6000 or other jewelry glue to secure the
cabochon in the jump ring in the center of the pendant.
Step 23: Slide the pendant on a chain or leather cord.
32
Life Bird Pendant
Soldering and/or riveting experience may be necessary to make this
pendant.
Materials:
24 or 26 gauge sheet metal (see Step 12)
One 18 gauge 6mm ID jump ring
EITHER One 8mm daisy spacer and one 16 gauge balled head rivet
OR One 16 gauge 5mm ID round jump ring and one 5mm cabochon
Optional: 3.5x3.5mm eyelet
Purchased chain or leather cord or make your own
Tools and Other Supplies:
Tools for your preferred method of cutting out
sheet metal shapes Tools and solder for
your preferred method of soldering Note: You
can glue the pieces together but this is not a
permanent solution. The pendant could fall apart
with wear. Optional: Multi size hole
punch tool and tools for setting an eyelet
Mini TruStrike Sharp Designer and Embossing
Hammers
Flat and chain nose pliers
Rubber, plastic or rawhide mallet
Bench block Hint: Use a rubber block or a sand
bag under your bench block to help deaden the
sound from your hammer blows.
1.5mm hole punch
Variety of files to smooth and refine metal edges
Small right facing leaf stamp
Awl
Dapping punch set
Pickle and pickle pot
Liver of sulfur and 0000 steel wool
Tumbler and steel shot
Ultra fine point Sharpie marker
e-6000 or other jewelry glue for the cabochon
Optional: multi hole punch tool, one 3.5x3.5mm
eyelet and tools for setting the eyelet
Directions: Read through all the directions before beginning the project.
Step 1: Copy the templates: A14, A15, A16, A17, A18
Step 2: Trace templates A14, A15, A16 and A17 on 24 or 26 gauge sheet metal. Save the templates for the
squares. You will be using them in Steps 7 and 8. The bird body and wing will be cut in Step 12.
Step 3: Cut the designs out using your preferred method for cutting sheet metal. If shears were used to cut
your pieces, the edges of the cut pieces curve a bit and the pieces may also become slightly bent. Flatten each
piece on a bench block using a plastic, rubber or rawhide mallet. Do not punch holes in the squares at this
time.
Step 4: Use files to smooth and refine the edges and round the corners on the two rectangles.
Step 5: Use the sharper edge of the Mini TruStrike Sharp Designer
Hammer to create lines radiating out from the center of one square.
This square will be referred to as the bottom square.
33
Step 6: Use the larger side of Mini TruStrike Small Embossing hammer
to texture the other square. This square will be referred to as the top
square.
Step 7: Texturing changes the size and shape of the squares. Place the
original square templates on the textured squares, draw around them
with an ultra fine point marker. Mark the center hole.
Step 8: Cut out the squares. If riveting the squares in place, use a 1.5mm punch to make the center hole in
both squares. Note: If you are soldering or gluing the squares in place, you do not need the hole. Remember,
gluing pieces together is not a permanent solution. The pendant could fall apart with wear. However, if you
keep all the elements flat and clamp them when gluing, this should not be much of a
problem. Make sure that the glue does not seep out as you cannot patina areas where there
is glue.
Note: All metal needs to be clean for solder to work properly.
Step 9: Place the bottom of the larger piece 3/16” up from the bottom of the long
narrow piece. Use hard solder to solder the two pieces together. If you do not want to
solder the two pieces together, you can use e-6000 or other jewelry glue to connect
them.
Step 10: Place the bottom square on the center of the larger rectangle, orienting it in a
diamond position. If you are riveting the squares in place, use the hole in the square to
determine where to make a mark on the rectangle and use a 1.5mm punch to make the
hole.
If you keeping the squares flat and/or are gluing them in place, go on to Step 12.
Step 11: Use the largest well of the Dapping
Punch Set to cup the squares one at a time,
textured side facing up. To preserve the texture
when forming them, consider placing a piece of
felt or thin leather between the dap and the
squares.
Step 12: The bird body, A18, may be easier to cut out of 26 gauge sheet metal and the
wing out of 28 gauge. Trace the bird body template on your sheet metal and cut out.
Stamp a small right facing leaf on a scrap of sheet metal. Cut the “leaf” wing out. Hint:
You may find it easier to cut the bird and wing out if you hold the small pieces with flat
nosed pliers.
34
Step 13: Use an awl to stamp an “eye” for the bird.
Step 14: Place the rectangle section so the long narrow piece is on top. Use medium
solder for the wing and bird if soldering the bird in place where shown. Note: You could
use medium solder to solder the back two rectangles and the bird with wing all at the same
time.
Step 15: Place the dimpled top square as shown on
top of the diamond oriented bottom square.
Step 16—Connecting the squares to the rectangles:
A: Decide if you are using a 16 gauge balled head rivet
with an 8mm daisy spacer (left) or if you are going to
place a cabochon inside a 16 gauge 5mm
jump ring (right).
B: If riveting the pieces together, use
your preferred rivets to do this. In this
tutorial, the cupped squares were riveted
in place before the jump ring was soldered
in place.
C: If soldering the pieces together, use easy solder to
solder the squares in place, along with the 5mm
16gauge jump ring if you are adding a cabochon.
D: Or, glue the pieces together if squares are not cupped.
Step 17: Use a 1.5mm punch to make a hole at the top of
the pendant. Insert an 18 gauge jump ring of appropriate
size for the chain or cord you will hang the pendant on.
Optional: Use the 3/32” or 2.33 hole punch from the
multi hole punch tool to make the hole at the top of the
pendant. You can then put a small 3.5x3.5mm eyelet in
the hole for an added design element (shown, left). Here,
a bench block was used when spreading and flattening
the back of the eyelet. Doing that makes the front of the eyelet flattened, not rounded. If you want to keep the
eyelet top rounded, use a magazine or a paper notepad instead of a bench block when flattening out the back
of the eyelet.
Step 18: Attach an 18 gauge 6mm jump ring in the hole. You may have to change the size of the jump ring to
accommodate the size chain or cord you are using.
Step 19: If you used solder, pickle the piece to remove fire scale and then tumble it. If you glued the pieces
together, do not pickle or tumble as the pieces may pull apart.
Step 20: You can leave your piece bright and shiny, in which case continue on to Step 23.
35
Step 21: Or, use liver of sulfur to patina your piece. Buff with 0000 steel wool to bring
out the dimension of your texturing.
Step 22: Buffing with steel wool creates a satin finish on the metal so you may wish to
tumble the pendant for about 30 minutes to bring up a shine. Tumbling will not affect
the patina. As before, if you glued the pieces together, do not tumble as the pendant
pieces may pull apart.
Step 23: Use e-6000 or other jewelers glue to secure the cabochon in place.
Step 24: Slide the pendant on a chain or leather cord.
You do not have to use the templates called for in any of the directions. Mix
it up a bit for a look unique to you. Kathi Nelson used a patinated piece of
copper for A15, the long narrow rectangle. Then she used two of the larger
1” squares and put a 10mm cabochon and 16 gauge 10mmID ring in the
middle. The bird was cut a bit larger so it would fit better with a wing cut
from the A8 leaf template.
36
Desert Flower Pendant
Soldering and/or riveting experience is necessary to make
this project.
Materials:
22, 24 or 26 gauge sheet metal
One purchased chain or leather cord or make your own
18mm circular decorative element (or ¾” metal circle)
One 8mm daisy spacer
One 16 gauge balled head rivet
Purchased chain or leather cord
Tools and Other Supplies:
Tools for your preferred method of cutting out
sheet metal shapes
Tools and solder for your preferred method of
soldering (Note: All metal needs to be clean for
solder to work properly.)
Tools for riveting
Mini TruStrike Sharp Texturing Hammer
6-step and chain nose pliers
3mm dimpling pliers
Rubber, plastic or rawhide mallet
Bench block Hint: Use a rubber block or a sand
bag under your bench block to help deaden the
sound from your hammer blows.
5mm half sun metal punch design stamp
Small woodworking nail set
1.5mm hole punch
Variety of files to smooth and refine metal edges
Alcohol and cotton ball
Dapping punch set
Pickle and pickle pot
Liver of sulfur and 0000 steel wool
Ultra fine point Sharpie marker
Tumbler and steel shot
Directions: Read through all the directions before beginning the project.
Step 1: Copy the templates: B1, B2, B3, B4
Step 2: Trace the templates on 22, 24 or 26 gauge sheet metal. The B1 backplate should be cut from 22 or 24
gauge sheet metal, no thinner. The B2 “ice cream cone” can be cut from 24 or 26 gauge sheet metal. The B4
flower circle and B3 can be cut from 26 gauge sheet metal. Note: The heavier the sheet metal, the deeper the
texturing impression will be, resulting in more dimensionality in patinated pieces.
Step 3: Cut the designs out using your preferred method for cutting sheet metal. If shears were used to cut
your pieces out, the edges of the cut pieces curve a bit and the pieces may also become slightly bent. Flatten
each piece on a bench block using a plastic, rubber or rawhide mallet.
Step 4: Use files to smooth and refine the edges of each of the
pieces.
Step 5: Using an ultra fine point Sharpie, mark the center top
and center sides of the top section on the B2 “ice cream cone”
piece. Make a mark between those marks, for a total of 5.
Using the 5mm half sun metal punch, stamp the outer edge of
the piece as shown, using the marks as a guide for the
37
placement of the center of the punch. Use a small woodworking nail set to stamp the circles inside the curve
of each of the half sun stampings. You may need to use a rubber, plastic or rawhide mallet to flatten the piece
after you stamp it. Remove the marker line with an alcohol soaked cotton ball.
Step 6: Use a 1.5mm hole punch to make a hole in the center of the
circle if riveting in place. Use the narrower side of a Mini TruStrike
Sharp Designer Hammer to texture the circle out from center.
Step 7: Use metal shears to cut a wavy edge around the circle, making sure to not make
the circle too much smaller.
Step 8: Note: If you do not have a circular decorative element, cut and texture a ¾” metal
circle following Steps 6 and 7 above. Place the decorative flower disk on the “ice cream
cone” piece. Use an ultra fine point Sharpie to mark the hole where it will later be
riveted in place. Use a 1.5mm punch to make the hole in the “ice cream cone” piece.
Step 9: Use the Dapping Punch Set to cup the decorative flower disk, textured side
facing up. Do the same with the purchased flower disk. To preserve the texture when
forming the piece, consider placing a piece of felt or leather between the dap and the
disk. Make sure that the smaller wavy disk is cupped more than the flower disk. When
they are nestled together, the decorative flower disk should show as below, right.
Step 10: Use an ultra fine point Sharpie to mark line down the center back of B3, the long
shield shaped piece. Make a mark about 3/16” down from the curved edge.
Step 11: Use a 3mm dimpling pliers to make three dimples
down the marked center line. Place the indented cup side of
the dimpling pliers on the FRONT side of the metal piece.
When you close the jaws of the pliers, the hook portion
should be on the center line and on the mark on the BACK
side of the piece.
38
Step 12: To make each succeeding dimple along the line, place the edge of the indented side of the dimpling
pliers jaw against the previous dimple. Remove the marker line with an alcohol soaked cotton ball.
Step 13: Left: Place the “ice cream cone” piece on the
B1 backplate and use an ultra fine point marker to draw
around it.
Step 14: Right: Use the narrow side of a Mini TruStrike
Sharp Texturing Hammer to texture the edge of the
backplate, making sure the texture lines extend inside
the marked line just a bit. Texture the sides of the bail as
well. You may need to use a rubber, plastic or rawhide
mallet to flatten the piece after you texture it. Remove
the marker line with an alcohol soaked cotton ball.
Note: All metal needs to be clean for solder to work properly.
Step 15: Position the B2 “ice cream cone” piece and B3 “shield” on the backplate. Use
medium or hard solder to solder the “ice cream cone” and shield to the backplate.
Step 16: Use an ultra fine point Sharpie to mark a line down the center
back of the bail. Use a 3mm dimpling pliers to make dimples on the
marked center line, starting where the bail meets the pendant. Place the
indented cup side of the dimpling pliers on the FRONT side of the metal
piece. When you close the jaws of the pliers, the hook portion should be on
the center line on the BACK side of the piece. To make each succeeding
dimple along the line, place the edge of the indented side of the dimpling
pliers jaw against the previous dimple. Remove the marker line with an
alcohol soaked cotton ball.
39
Step 17: Use a 1.5mm punch to make the hole in the backplate through the hole
punched in the “ice cream cone” piece.
Step 18: Thread a 16 gauge balled headpin rivet through
an 8mm daisy spacer, the scalloped cupped disk, the cupped
flower disk and into the hole in the pendant. Rivet in place.
Step 19: The fire scale needs to be removed before you can get a good solder
join, so clean the area on the back of the pendant around where the bail meets
the body of the pendant. A bit of steel wool or fine sandpaper will work. You
could also just pickle the piece.
Step 20: After texturing, the back of the bail may no longer be square. Use a
file to square it back up. Use step 6 of 6-step pliers to form the bail.
Step 21: Bend the bail forward using chain nose pliers. Make
sure the bail is completely closed.
Step 22: Use easy solder to secure the bail closed. Note: It is not
necessary to solder the bail closed, but it does make it more secure.
Step 23: Pickle the pendant to remove fire scale and then tumble
the piece.
Step 24: You can leave your pendant bright and shiny.
Step 25: Or, use liver of sulfur to patina it. Buff with 0000 steel wool to bring out the
dimension of your texturing.
Step 26: Buffing with steel wool creates a satin finish on the metal so you may wish to
tumble the pendant for about 30 minutes to bring up a shine. Tumbling will not affect
the patina.
Step 27: Slide the pendant on a chain or leather cord.
40
BONUS: The byzantine chain used here with the Dessert Flower Pendant can be made using a tutorial
from the book Handcrafting Chain and Bead Jewelry by Scott David Plumlee.
He also has a free byzantine chain tutorial on his website: http://www.davidchain.com/
His step by step tutorial using different colors of rings for each step makes it very easy to understand how the
chain is constructed.
The jump rings used to make this chain were 18 gauge 3.5mm ID. This chain can also be used on the
Southwest Cross and Feather Pendants.
41
Kachina Burst Earrings
Soldering and/or riveting experience may be necessary to make these flower components.
Materials:
26 gauge sheet metal (see Step 2)
Two 18mm circular decorative elements (or
¾” metal circles)
Two 16 gauge 5mm ID round jump rings
Two 5mm cabochons
e-6000 or other jewelry glue
One set of ear wires
Optional (shown): Two 1¼” (1¾” if hanging
pieces upside down) pieces of fine chain and
four 20 gauge 2.5mm ID jump rings Hint:
Make your own chain with 20 gauge 2mm ID
jump rings.
Tools and Other Supplies:
Tools for your preferred method of cutting out
sheet metal shapes
Tools and solder for your preferred method of
soldering
Note: You can glue the decorative elements
together but this is not a permanent solution. The
earrings could fall apart with wear. Riveting the
pieces together would be acceptable.
Mini TruStrike Sharp Designer Hammer
Flat and chain nose pliers
Rubber, plastic or rawhide mallet
Bench block Hint: Use a rubber block or a sand
bag under your bench block to help deaden the
sound from your hammer blows.
1.25mm and 1.5mm hole punch
Rotary tool (see Step 10)
Variety of files to smooth and refine metal edges
Pickle and pickle pot
Tumbler and steel shot
Liver of sulfur and 0000 steel wool
Ultra fine point Sharpie marker
e-6000 or other jewelry glue for the cabochon
Directions: Read through all the directions before beginning the project.
Step 1: Copy the templates: B5, B6, B7, B8
Step 2: Trace the templates on 26 gauge sheet metal. Note: The heavier the sheet metal, the deeper the
texturing impressions will be, resulting in more visual dimensionality in patinated pieces. If you want to use 24
gauge sheet metal for the half circle backs, using 28 gauge sheet metal for the “sun” sections can help lighten the
weight a bit. Do not punch the holes in the half-circles yet. Save the template to do this in a later step. Cut a
¾” circle from 26 gauge sheet metal if not using a circular decorative element.
Step 3: Cut the designs out using your preferred method for cutting sheet metal. Do not punch holes now.
If shears were used to cut your pieces out, the edges of the cut pieces curve a bit and the pieces may also
become slightly bent. Flatten each piece on a bench block using a plastic, rubber or rawhide mallet.
Step 4: Use files to smooth and refine the edges of each of the pieces.
42
Step 5: Place a half “sun” on a half-circle. Use an ultra fine point Sharpie
to mark each inside “V” point. Use the marker to connect the dots.
Step 6: Use the narrower side of a Mini TruStrike Sharp Designer
Hammer to texture the edge of each half-circle, making sure the lines
extend inside the marked line just a bit.
Step 7: You will notice that the half-circle edges where you textured now curve
down because the metal expands when you texture it. If one piece does not
quite match the other, just texture a bit more along the shorter side to get the
curves to match. Remove the marker line with an alcohol soaked cotton ball.
Step 8: Use a rubber, plastic or rawhide mallet to flatten each piece after
you texture it. If you used a shears to cut out your pieces, they can
become a bit bent so flatten each half “sun” as well.
Step 9: Place a “sun” on the textured
half-circle, making sure the bottom
side edges of the “sun” meet the
bottom edge of the textured half-
circle. The bottom center of the sun
will extend beyond the bottom edge of
the circle.
(Note: All metal needs to be clean for solder to work properly.)
Step 10: Use medium or hard solder to connect the “sun” to the circle.
Note: You could glue these two pieces together, but this is not a permanent
solution. Make sure to clamp them together for a secure hold. Also, make
sure that the glue does not seep out from under the “sun” as you cannot
patina where there is glue.
43
Step 11: On each piece, use a rotary tool to grind off the excess “sun” to make the bottoms edges of the two
pieces match.
Step 12: File the corners to round them a bit.
Step 13: Pickle the pieces.
If you are using a ¾” metal circle instead of a decorative element:
A: Use the narrower side of a Mini TruStrike Sharp Designer Hammer to texture the
circle out from center. Use a 1.5mm hole punch to make a hole in the center of the
circle if riveting in place.
B: Use metal shears to cut a wavy edge around the circle,
making sure to not make the circle too much smaller. Use a rubber, plastic or
rawhide mallet to flatten the piece on a bench block after you texture and cut it.
Step 14: Position the circle or decorative element
so that it hangs a bit below the half “sun” and half-
circle bottom edge. Use easy solder to solder the
purchased flower or wavy circle and 5mm ring in
place. Or, mark the hole. Use a 1.5mm punch to
make the hole through the “sun” and half circle
and rivet the elements together. Then glue the 16
gauge 5mm ID jump ring in the center of the circle.
Step 15: Decide if you are going to add a chain using the two side holes (shown) or attach the piece to an ear
wire using the center hole.
Step 16: Place the template on the earring. Using an ultra fine point
Sharpie, mark the center hole or the two side holes (shown).
Step 17: Use a 1.25 punch to make the holes in each piece.
Hint: If you want to hang the pieces upside down (shown at right), make a
hole in each outer corner. You could also attach jump rings in the filigree
holes of the decorative circle element and attach to ear wires.
Step 18: If using chain: Cut two 2” pieces of chain, OR make a 17 link
(2¾” chain or 25 links if hanging pieces upside down) chain for each earring using 20 gauge 2mm jump rings.
Step 19: Attach a chain ends to each earring using a 20 gauge 2.5mm jump rings.
Step 20: Attach an ear wire to the center of each chain or in the top hole of the earring.
44
Step 21: Check the earring length. Since everyone has a different length neck, you may want the earrings to
hang longer or shorter. Adjust the chain length accordingly.
Step 22: If you used solder, pickle the pieces to remove fire scale and then tumble them. If you glued them,
do not pickle or tumble as the pieces may pull apart.
Step 23: You can leave your piece bright and shiny, in which case continue on to Step 26.
Step 24: Or, use liver of sulfur to patina your piece.
Buff with 0000 steel wool to bring out the dimension
of your texturing.
Step 25: Buffing with steel wool creates a satin finish
on the metal so you may wish to tumble the pieces for
about 30 minutes to bring up a shine. Tumbling will
not affect the patina. As before, if you glued the
pieces together, do not tumble as the pieces may pull
apart.
Step 26: Use jewelers glue to secure the cabochons in
place.
45
Serape Earrings
Materials:
Sheet metal-see Step 2
Twelve 3mm beads
Six 21 or 22 gauge headpins
One set of ear wires or ball posts
Tools and Other Supplies:
Tools for your preferred method of cutting out
sheet metal shapes
Vintaj Navajo Textiles DecoEmboss Folder
Sizzix Big Shot Embossing Machine
Flat, round and/or chain nose pliers
Rubber, plastic or rawhide mallet
Bench block Hint: Use a rubber block or a sand
bag under your bench block to help deaden the
sound from your hammer blows.
1.25mm hole punch
Variety of files to smooth and refine metal edges
Optional: multi hole punch tool, one 3.5x3.5mm
eyelet and tools for setting the eyelet
Directions: Read through all the directions before beginning the project.
Step 1: Copy the templates: B9, B10
Step 2: Trace the templates on 26 gauge sheet metal. Note: You can use 24 gauge copper if you anneal and
pickle it first. Otherwise, stick with 26 or 28 gauge sheet metal. The harder the metal is, the more likely
damage can occur to your embossing machine. 28 gauge nickel silver was used here.
Step 3: Cut the designs out using your preferred method for cutting sheet metal. If shears were used to cut
your pieces, the edges of the cut pieces curve a bit and the pieces may also become slightly bent. Flatten each
piece on a bench block using a plastic, rubber or rawhide mallet.
Step 4: Use a 1.25mm punch to make the holes. See Step 7 for the eyelet option,
which can not be done until after the pieces are textured.
Step 5: Use files to smooth and refine the edges and round the corners of each
piece.
Step 6: Decide where to place one earring piece for the
texture design you want. Close the folder and run it through the Sizzix Big Shot
Embossing Machine to achieve the background
texture. Repeat for the other earring for matching
pieces.
Step 7: Optional: Use the 3/32” or 2.33 hole punch
from the multi hole punch tool to make each hole. You can then put a small
3.5x3.5mm eyelet in the hole for an added design element.
46
Note: If you made the earrings with silver or copper, you can use liver of sulfur to patina
them. Buff with 0000 steel wool to bring out the dimension of your texturing.
Step 8: Tumble the pieces to brighten them up, if desired.
Repeat Steps 9-10 to start a total of 6 wire wrapped bead drops.
Step 9: Slide two 3mm beads on a plain or balled headpin.
Step 10: Start a wire wrapped loop.
Step 11: Before finishing the wrapped loop, slip the wire through one of the punched
holes. Finish the wrap. Trim off excess wire.
Step 12: Repeat with the other bead dangles.
Step 13: Use a jump ring to attach ball posts or attach ear wires.
47
Rain in the Desert Earrings
Materials:
24 or 26 gauge brass sheet metal (see Step 2)
Six 3.5mm beads
32” of 21 gauge half round wire
One set of ear wires or ball posts
Tools and Other Supplies:
Tools for your preferred method of cutting out
sheet metal shapes
Mini TruStrike Embossing Hammer-the larger of
the two
Flat and chain nose pliers
Awl
Flush cutter
Rubber, plastic or rawhide mallet
Bench block Hint: Use a rubber block or a sand
bag under your bench block to help deaden the
sound from your hammer blows.
1.25mm hole punch
Variety of files to smooth and refine metal edges
Optional: multi hole punch tool, one 3.5x3.5mm
eyelet and tools for setting the eyelet
Directions: Read through all the directions before beginning the project.
Step 1: Copy the templates: B11, B12
Step 2: Trace the templates on 24 or 26 gauge sheet metal. Note: The heavier the sheet metal, the deeper the
texturing impression will be, resulting in more dimensionality, especially if you use silver or copper sheet metal
and patina the pieces
Step 3: Cut the designs out using your preferred method for cutting sheet metal. If shears were used to cut
your pieces, the edges of the cut pieces curve a bit and the pieces may also become slightly bent. Flatten each
piece on a bench block using a plastic, rubber or rawhide mallet.
Step 4: Use a 1.25mm punch to make the holes. Optional: Use the 3/32” or 2.33 hole punch from the multi
hole punch tool to make each hole. You can then put a small 3.5x3.5mm eyelet in the hole for an added design
element.
48
Step 5: Use files to smooth and refine the edges of each piece.
Step 6: Use either side of the Mini TruStrike Embossing
Hammer to texture the pieces. Fade from heavy texturing
at the bottom to nothing at the very top.
Step 7: Use a rubber, plastic or rawhide mallet to flatten
each piece after you texture it.
Note: If you made the earrings with silver or copper, you
can use liver of sulfur to patina them. Buff with 0000 steel
wool to bring out the dimension of your texturing.
Step 8: Tumble the pieces to brighten them up, if desired.
Repeat Steps 9 through 12 to make the second earring.
Step 9: Center three 3.5mm beads on a 16” piece of 21 gauge half round wire. Bend the
wire at a 90 degree angle to the beads, with the flat side facing the beads.
Step 10: Determine where the beads fit fully across the metal piece. Start your wrap
there.
Step 11: Wrap the wire ends around the piece three times to show (three wraps showing on the front side)
on either side of the beads. Push the wrapped wires tightly against the beads. The wires can even be under
the beads a bit.
49
Step 12: Carefully push the wrapped wires with the beads towards the bottom
of the earring to tighten the wraps. Make sure that the wrapped beads on the
earrings are in the same place on each so they match.
Step 13: Pull one wire end under
the wrapped wires on one side of
the bead on the back of the piece.
You may need to use the tip of an
awl to lift the wires a bit so you
can slide the wire end under
them. Pull the wire tight. Trim off
the excess wire. Pull the other
wire under the remaining wrap
wires on the back of the piece.
Pull the wire tight. Trim off the
excess wire.
Step 14: Use a jump ring to attach ball posts or attach ear wires.
50
Southwest Cross
Soldering and/or riveting experience is necessary to make this project.
Materials:
22 or 24 gauge sheet metal
One 10mm round cabochon
Bezel cut from 3/8” ID pipe See Step 11
Circles cut from 24 gauge sheet metal using the 3.97mm punch in the multi
size hole punch set or decorative rivets to fit the space
Purchased chain or leather cord
Tools and Other Supplies:
Tools for your preferred method of cutting out
sheet metal shapes
Tools and solder for your preferred method of
soldering and/or Tools for riveting
6-step, bracelet bending and chain nose pliers
3mm dimpling pliers
Rubber, plastic or rawhide mallet
Bench block Hint: Use a rubber block or a sand
bag under your bench block to help deaden the
sound from your hammer blows.
Mini TruStrike Sharp Designer Hammer
Hammer to use with metal stamps
5mm half sun metal punch design stamp
Small woodworking nail set
Variety of files to smooth and refine metal edges
Multi size hole punch set
Pickle and pickle pot
Pipe cutter
Liver of sulfur and 0000 steel wool
Ultra fine point Sharpie marker
Tumbler and steel shot
Directions: Read through all the directions before beginning the project.
Step 1: Copy the templates: C1, C2
Step 2: Trace the templates on 22 or 24 gauge sheet metal. Note: The heavier the sheet metal, the deeper the
texturing impression will be, resulting in more dimensionality in patinated pieces.
Step 3: Cut the cross out using your preferred method for cutting sheet metal.
Option A: If you do not want to use a bezel, incorporate the tabs when cutting out the cross. These tabs can
be used to secure the cabochon in place.
Option B(shown): Remove the tabs if using a bezel or ring for the cabochon
or if you are using another form of decoration in place of the cabochon. To
make cutting the inner curves easier, use the 3.97mm punch from the multi
size hole punch set to punch holes in each inner corner of the cross. Save
the punched circles to use as decorative elements on the cross.
Option C: You do not need to use a pipe for a bezel. You could use a 14
gauge 10mm ID closed jump ring for a bezel instead, or purchase a designer
bezel.
51
Step 4: If shears were used, the edges of the cross will curve a bit and the cross may have also become
slightly bent. Flatten the cross on a bench block using a plastic, rubber or rawhide mallet.
Step 5: Use files to smooth and refine the edges of the cross.
Step 6: Design Decisions: Decide where you would like to put the punched pieces. You may even want to
punch a few more from your scrap or choose to leave these pieces off. .
Step 7: For the cross shown, cut a bezel from 3/8” ID pipe. File one side flat.
Step 8: Use an ultra fine point Sharpie to mark the center edge of each “arm.”
Step 9: Using a half sun metal punch design stamp, use the
guide marks to stamp the center of each arm first. Then
stamp the two outer corners. In the curve of each half sun,
use a small woodworking nail set to stamp the circle
design.
52
Step 10: Stamping can make metal cup a bit. Flatten the cross on a bench block using
a plastic, rubber or rawhide mallet.
Step 11: Option B: Use a pipe cutter to cut a very short piece of pipe for your bezel.
Let the thickness of your cabochon be your guide.
Step 12: Option A: Make a flower with the two blue template circles and rivet in
place.
Note: All metal needs to be clean for solder to work properly.
Options B and C: Use medium solder to solder the punched circles and pipe bezel (or a 14 gauge 10mm ID
ring or 10mm ID purchased bezel) in place
Step 13: Use the narrower side of a Mini TruStrike Sharp
Designer Hammer to texture the top edge of the pipe
bezel.
Step 14: Use the smaller side of the large Mini TruStrike Embossing
Hammer to texture the part of the bail that will be visible. Do not
texture the part that will soldered to the back of the cross.
Step 15: Use steel wool or sand paper to clean the fire scale off the back of the
cross where the bail will be attached. Do the same to the portion of the bail that will
be soldered. Solder the bail in place. Or, pickle the pieces to remove fire scale and
clean the surface.
Step 16: Solder the bail in place using easy solder.
53
Step 17: Use an ultra fine point
Sharpie to mark a line down the
center back of the bail. Use a 3mm
dimpling pliers to make dimples on
the marked center line, starting
where the bail meets the pendant.
Place the indented cup side of the
dimpling pliers on the FRONT side of the metal piece. When you close the jaws of the pliers, the hook portion
should be on the center line on the BACK side of the piece. To make each succeeding dimple along the line,
place the edge of the indented side of the dimpling pliers jaw against the previous dimple. Remove the
marker line with an alcohol soaked cotton ball.
Step 18: After texturing, the back
of the bail may no longer be square.
Use a file to square it back up. Use
medium bail making pliers or step 6
of 6-step pliers to form the bail.
Step 19: Use easy solder to secure
the bail closed. Note: It is not necessary to solder the bail closed,
but it does make it more secure.
Step 20: Pickle your pendant to remove fire scale.
Step 21: Tumble your pendant.
Step 22: You can leave your piece bright and shiny, in which case
continue on to Step 25.
Step 23: Or, use liver of sulfur
to patina your pendant. Buff
with 0000 steel wool to bring
out the dimension of your
texturing.
Step 24: Buffing with steel
wool creates a satin finish on
the metal so you may wish to
tumble the pieces for about 30 minutes to bring up a shine.
Tumbling will not affect the patina.
Step 25: Soldered Version with cabochon: Use e-6000 or other jewelry glue to secure the cabochon in the
bezel of the pendant. A 10mm cabochon, shown here, may fit if you raise it up a bit. To do this, fill the bezel
partially full with a leveled UV resin. Let it cure, then try the fit of the cabochon. Hint: Put several threads
across the bezel before pushing the cab into it. That way, you can pull on the threads to remove the cab if you
need to add more resin or glue.
Step 23: Slide the pendant on a chain or leather cord.
54
BONUS:
The byzantine chain shown here can be made using a tutorial from the book
Handcrafting Chain and Bead Jewelry by Scott David Plumlee.
He also has a free byzantine chain turoial on his website:
http://www.davidchain.com/
His step by step tutorial using different colors of rings for each step makes it
very easy to understand how the chain is constructed.
The jump rings used here were 18 gauge 3.5mm ID. If you are new to making
chains, you may find it easier to make the chain with 18 gauge 4mm ID jump
rings. This chain can also be used on the Desert Flower and Feather
Pendants.
55
Spirit Feathers
Soldering experience may be necessary to make this project.
Materials:
22, 24 or 26 gauge sheet metal (see Step 2)
One 4mm crystal rhinestone for pendant and two 3mm crystal
rhinestones for the earrings
One set of ear wires
Purchased chain or leather cord
Tools and Other Supplies:
Tools for your preferred method of cutting out sheet metal shapes
Optional: Tools and solder for your preferred method of soldering
Mini TruStrike Sharp Texturing Hammer
6-step and chain nose pliers
1mm, 3mm and 5mm dimpling pliers
1.25, 1.5 and 1.8mm hole punches
Rubber, plastic or rawhide mallet
Bench block Hint: Use a rubber block or a sand bag under your bench block to help deaden the sound from
your hammer blows.
5mm half sun metal punch design stamp
Small woodworking nail set
Variety of files to smooth and refine metal edges
Optional: Pickle and pickle pot
Liver of sulfur and 0000 steel wool
Ultra fine point Sharpie marker
Tumbler and steel shot
e-6000 or other jewelry glue
Alcohol and cotton ball
Directions: Read through all the directions before beginning the project.
Step 1: Copy the templates C3, C4, C5
Step 2: Trace the templates on 22, 24 or 26 gauge sheet metal. Note: The heavier the sheet metal, the deeper
the texturing impression will be, resulting in more dimensionality in patinated pieces. You may want to make
the earrings from a lighter weight sheet than the pendant so the weight does not pull on the ear.
Step 3: Cut the designs out using your preferred method for cutting sheet metal.
If shears were used to cut your pieces, the edges of the cut pieces curve a bit and
the pieces may also become slightly bent. Flatten each piece on a bench block
using a plastic, rubber or rawhide mallet. Make holes in the earrings, C4 and C5,
at the dots using a 1.25 hole punch.
Step 4: Use files to smooth and refine the edges of each of each piece.
Step 5: Use an ultra fine point Sharpie to mark a lengthwise center line on the
front and back of each feather. Mark texturing guidelines on the front of each
piece.
56
Step 6: Use a sharp texturing hammer to make the feather lines going out from center. Texturing a line down
the center will make the feather naturally fold a bit.
Step 7: Use a ball hammer to texture the bail.
Step 8: Use a file to round all the points and clean the edges of each piece.
Note: Since the metal has been work hardened when texturing, dimpling pliers may punch a hole instead of
creating a dimple. Therefore, you may wish to anneal each piece and pickle them before the next steps. You will
then need to redraw the lines down the center back of each piece.
Step 9: Use a 3mm dimpling pliers to make dimples on the marked center line, starting where the bail meets
the pendant. Place the indented cup side of the dimpling pliers on the FRONT side of the metal piece. When
you close the jaws of the pliers, the hook portion should be on the center line on the BACK side of the piece.
To make each succeeding dimple along the center line of the bail, place the edge of the indented side of the
dimpling pliers jaw against the previous dimple.
57
Step 10: Decide where you want to place the crystals.
Mark with ultra fine point Sharpie.
Step 11: Punch a hole on each mark to
accommodate the culet of the crystal:
1.8 mm for the large crystal on the
pendant and 1.5mm for the small
crystals on the earrings.
Step 12: Use dimpling pliers to create the well,
centered on the punched hole, for the crystal to sit
in: 3mm dimpling pliers for the crystals on the
earrings and 5mm for the crystal on the pendant.
Step 13: Pendant: On the line on the back of the pendant, mark
where you want the raised dimple to appear front. Use the 3mm
dimpling pliers to create the dimple on the pendant.
Step 14: Earrings: Following the line on center back of each piece, use the 1mm dimpling
pliers to create three dimples below the crystal setting on the earrings and three dimples
below the 3mm dimple on the pendant.
Step 15: Remove the marker lines with an alcohol soaked cotton ball.
Step 16: After texturing, the back of the bail may no longer be square. Use a file to square it
back up. Use step 6 of a 6-step pliers to create the pendant bail. Bend the bail forward using
chain nose pliers. Make sure the bail is completely closed.
58
Note: All metal needs to be clean for solder to work properly.
Step 17: Use easy solder to solder the bail closed on the pendant. Note: It
is not necessary to solder the bail closed, but it does make it more secure.
Step 18: Pickle the pendant.
Step 19: Tumble the earrings and pendant pieces.
Step 20: You can leave your piece bright and shiny, in which case, you can
glue the crystals in place now using e-6000 or other jewelry glue and
attach ear wires to the earrings.
Step 21: Or, use liver of sulfur to patina your piece. Buff with 0000 steel
wool to bring out the dimension of your texturing.
Step 21: Buffing with steel wool creates a satin finish on the metal so you
may wish to tumble the pieces for about 30 minutes to bring up a shine.
Tumbling will not affect the patina.
Step 22: Use jewelers glue to
secure the crystals in place.
Step 23: Slide the pendant on a
chain or leather cord.
BONUS: The jump rings used to
make the chain seen here on the
Feather Pendant are:
22 gauge twisted square wire made
into 4mm ID jump rings
Two 20 gauge interlocked 4mm ID
jump rings
Connected with two 20 gauge 3mm ID jump rings
This chain was also used on the Open Book and Cab and Tab Pendants.
59
This copper set by Kathi Nelson shows how just changing the number
and position of the dimples can change the look of the finished pieces.
60
Howl At The Moon Pendant
This piece was not soldered but totally glued together. Soldering nickel
silver can change its color and copper “rises to the surface” of brass when
pickling. Because of the layering, it could be difficult to polish the brass and
nickel silver to their original colors. So, a decision was made to glue all the
pieces together. If sterling or argentium sheet and gold sheet had been
used, the pieces would have been soldered together.
Since this design is a pendant, it will not get hard use. All the components
are flat and were clamped when glued so they are quite secure.
Materials:
24 and 26 gauge copper sheet metal (see Step 2)
24 gauge brass sheet metal
24 gauge nickel silver sheet metal
Two 18 gauge 6mm ID jump rings (see Step 15)
Purchased chain or leather cord
Tools and Other Supplies:
Tools for your preferred method of cutting out
sheet metal shapes
Mini TruStrike Embossing Hammer
5-6mm star metal punch design stamp
5mm half sun metal punch design stamp
Texture stamp for coyote tail
Awl or small woodworking nail set
Flat and chain nose pliers
Alcohol and cotton ball
Rubber, plastic or rawhide mallet
Bench block Hint: Use a rubber block or a sand
bag under your bench block to help deaden the
sound from your hammer blows.
1.5mm hole punch
Variety of files to smooth and refine metal edges
Liver of sulfur and 0000 steel wool
Ultra fine point Sharpie marker
e-6000 or other jewelry glue
Tumbler and steel shot
Optional: multi hole punch tool, two 3.5x3.5mm
eyelets and tools for setting the eyelets
Directions: Read through all the directions before beginning the project.
Step 1: Copy the templates: C6, C7, C8, C9
Step 2: Trace the templates on 24 gauge sheet metal. The coyote is a bit tricky to cut out using shears, so you
may want to use the lighter 26 gauge sheet metal for it.
Step 3: Cut the designs out using your preferred method for cutting sheet metal. If shears were used to cut
your pieces out, the edges of the cut pieces curve a bit and the pieces may also become slightly bent. Flatten
each piece on a bench block using a plastic, rubber or rawhide mallet.
Step 4: Use a 1.5mm punch to make holes in the two top corners of the pendant (shown). Hint: If you use the
smallest hole punch from the multi hole punch tool to make the holes, you can put a small 3.5mm x 3.5mm eyelet
in each hole for an added design element.
61
Step 5: Use files to smooth and refine the edges of each of the pieces. Use needle files for tight spaces.
Step 6: Use the smaller side of a Mini TruStrike
Embossing Hammer to texture the cactus. Texturing
the metal piece makes it curl a bit. Flatten it on a
bench block using a plastic, rubber or rawhide
mallet.
Step 7: Use an ultra fine point Sharpie to mark where you would like to add texture
to the coyote. Using a half sun metal punch design stamp, stamp the neck and hip of
the coyote. For the tail, A teardrop design stamp for leather was used. The eye was
punched with a small nail set used to set nail heads in woodworking, but the point of
an awl will work just fine. Remove the marker lines from the piece using an alcohol
soaked pad. Texturing the metal piece makes it curl a bit. Flatten it on a bench block
using a plastic, rubber or rawhide mallet. Hint: You can use the tip of a sharp awl to
scratch the metal to look like fur.
Step 8: Position the moon, cactus and coyote on the
rectangle so you can decide where the star stamps should be. Mark the spots
with an ultra fine point marker.
Step 9: When you are satisfied with you design placement, use a star design
stamp to make three stars in the “sky.” Stamping can make metal cup a bit.
Flatten the rectangle on a bench block using a plastic, rubber or rawhide
mallet.
Step 10: Now that the texturing and design work is done, you may wish to
tumble the pieces to soften the edges. If they become slightly bent during
tumbling, flatten each piece on a bench block using a plastic, rubber or rawhide
mallet.
Step 11: Note: Use only a small amount of glue when layering each
piece on the rectangle background to avoid glue seepage. You cannot
patina where there is glue. Starting with the moon, layer and glue the
pieces together. Clamp them together for a secure hold. Also, make
sure that the glue does not seep out from under the pieces as you
cannot patina where there is glue.
62
Step 12: You can leave your piece bright and shiny. Or, use liver of sulfur to patina your piece. Note: Brass
and nickel silver do not patina with LOS). Buff with 0000 steel wool to bring out the dimension of your
texturing.
Step 13: Attach an Attach an 18 gauge 6mm jump ring in each hole. You may have to change the size of the
jump rings to accommodate the size chain or cord you are using.
Step 14: String pendant on a chain or leather cord.
The links in the necklace chain shown above were made following the tutorial for the Triple Loop Link by
Cindy Wimmer in her fabulous book The Missing Link, using 20 gauge instead of 18 gauge wire. This book
would be a great purchase as there are so many ideas for great links to make stunning chains!
63
Landscape Pendant
Soldering and/or riveting experience is necessary to make this project.
Materials:
24 or 26 gauge sheet metal
1¼” of 18 gauge dead soft square wire
Two 18 gauge 6mm jump rings
One purchased chain, neckwire or leather cord
Design B option: 16 gauge 5mm closed jump ring and 5mm cabochon (see Step 6)
Optional: Two 3.5x3.5mm eyelets
Tools and Other Supplies:
Tools for your preferred method of cutting out
sheet metal shapes
Tools and solder for your preferred method of
soldering
Note: You can glue the decorative elements in place
but this is not a permanent solution. The piece
could fall apart with wear.
Mini TruStrike Embossing Hammers
Flat and chain nose pliers
Rubber, plastic or rawhide mallet
Bench block Hint: Use a rubber block or a sand
bag under your bench block to help deaden the
sound from your hammer blows.
1.5mm hole punch
Optional: Multi size hole punch set
Optional: Tools for setting an eyelet
Variety of files to smooth and refine metal edges
Pickle and pickle pot
Liver of sulfur and 0000 steel wool
Tumbler and steel shot
e-6000 or other jewelry glue for the cabochon
Directions: Read through all the directions before beginning the project.
Step 1: Copy the templates: C10, C11
Step 2: Trace the templates on 24 or 26 gauge sheet metal.
Step 3: Cut the designs out using your preferred method for cutting sheet metal. If shears were used to cut
your pieces out, the edges of the cut pieces curve a bit and/or the pieces may become slightly bent. Flatten
each piece on a bench block using a plastic, rubber or rawhide mallet.
Step 4: Use either of these two Mini TruStrike
Embossing Hammers to texture the triangle
corner piece. Do not worry about the piece
becoming misshapen. It will curl a bit so flatten it
on a bench block using a plastic, rubber or
rawhide mallet
Step 5: Use a 1.5mm punch to make holes in the
two top corners of the pendant. This is not shown having been done in the photos in Step 6 below, but this is
the best time to make your holes if you are not sure of your design. Hint: If you use the smallest hole punch
from the multi hole punch tool to make the hole, you can put a small 3.5x3.5mm eyelet in the hole for an added
design element.
Mega Collection of Southwest Inspired Metal Work Jewelry Tutorials

Weitere ähnliche Inhalte

Was ist angesagt?

Wire Wrapped Sweetheart Round Cabochon Pendant
Wire Wrapped Sweetheart Round Cabochon PendantWire Wrapped Sweetheart Round Cabochon Pendant
Wire Wrapped Sweetheart Round Cabochon PendantThe Beading Gem's Journal
 
Wire jewelry-free-ebook
Wire jewelry-free-ebookWire jewelry-free-ebook
Wire jewelry-free-ebookLUISA BLANES
 
Easy Wire and Bead Braided Bracelet Tutorial
Easy Wire and Bead Braided Bracelet TutorialEasy Wire and Bead Braided Bracelet Tutorial
Easy Wire and Bead Braided Bracelet TutorialThe Beading Gem's Journal
 
Imaginative Spring Butterfly Pendant Tutorial
Imaginative Spring Butterfly Pendant Tutorial Imaginative Spring Butterfly Pendant Tutorial
Imaginative Spring Butterfly Pendant Tutorial HouseofGems.com
 
Gorgeous Spring Rain Earring Tutorial
Gorgeous Spring Rain Earring TutorialGorgeous Spring Rain Earring Tutorial
Gorgeous Spring Rain Earring TutorialHouseofGems.com
 
How to Make Wire Wrapped Ammonite Jewelry DIY Jewelry Making Tutorial
How to Make Wire Wrapped Ammonite Jewelry DIY Jewelry Making TutorialHow to Make Wire Wrapped Ammonite Jewelry DIY Jewelry Making Tutorial
How to Make Wire Wrapped Ammonite Jewelry DIY Jewelry Making TutorialHouseofGems.com
 
Clever Blossom Earrings with Gold and Black Glass Pearls
Clever Blossom Earrings with Gold and Black Glass PearlsClever Blossom Earrings with Gold and Black Glass Pearls
Clever Blossom Earrings with Gold and Black Glass PearlsHouseofGems.com
 

Was ist angesagt? (20)

Bell Flower Earrings Tutorial
Bell Flower Earrings TutorialBell Flower Earrings Tutorial
Bell Flower Earrings Tutorial
 
Wire Wrapped Sweetheart Round Cabochon Pendant
Wire Wrapped Sweetheart Round Cabochon PendantWire Wrapped Sweetheart Round Cabochon Pendant
Wire Wrapped Sweetheart Round Cabochon Pendant
 
Sea Grass Woven Wire Pendant
Sea Grass Woven Wire PendantSea Grass Woven Wire Pendant
Sea Grass Woven Wire Pendant
 
How to Wire Wrap a Coin Pendant
How to Wire Wrap a Coin PendantHow to Wire Wrap a Coin Pendant
How to Wire Wrap a Coin Pendant
 
Double Wrap Wire Bangle Bracelet Tutorial
Double Wrap Wire Bangle Bracelet TutorialDouble Wrap Wire Bangle Bracelet Tutorial
Double Wrap Wire Bangle Bracelet Tutorial
 
Wire jewelry-free-ebook
Wire jewelry-free-ebookWire jewelry-free-ebook
Wire jewelry-free-ebook
 
Egyptian Coil Earrings Tutorial
Egyptian Coil Earrings TutorialEgyptian Coil Earrings Tutorial
Egyptian Coil Earrings Tutorial
 
Easy Beaded Bangle Tutorial
Easy Beaded Bangle TutorialEasy Beaded Bangle Tutorial
Easy Beaded Bangle Tutorial
 
Easy Wire and Bead Braided Bracelet Tutorial
Easy Wire and Bead Braided Bracelet TutorialEasy Wire and Bead Braided Bracelet Tutorial
Easy Wire and Bead Braided Bracelet Tutorial
 
How to Make Pearl Snap FastenerJewelry
How to Make Pearl Snap FastenerJewelryHow to Make Pearl Snap FastenerJewelry
How to Make Pearl Snap FastenerJewelry
 
How to Wire Wrap a Multi Gemstone Necklace
How to Wire Wrap a Multi Gemstone NecklaceHow to Wire Wrap a Multi Gemstone Necklace
How to Wire Wrap a Multi Gemstone Necklace
 
Twisted Wire Wrapped Cross Pendant Tutorial
Twisted Wire Wrapped Cross Pendant TutorialTwisted Wire Wrapped Cross Pendant Tutorial
Twisted Wire Wrapped Cross Pendant Tutorial
 
Imaginative Spring Butterfly Pendant Tutorial
Imaginative Spring Butterfly Pendant Tutorial Imaginative Spring Butterfly Pendant Tutorial
Imaginative Spring Butterfly Pendant Tutorial
 
Summer Fun Earrings Tutorial
Summer Fun Earrings TutorialSummer Fun Earrings Tutorial
Summer Fun Earrings Tutorial
 
Beaded Snowflake Necklace Tutorial
Beaded Snowflake Necklace Tutorial Beaded Snowflake Necklace Tutorial
Beaded Snowflake Necklace Tutorial
 
Gemstone Tassel Earrings tutorial
Gemstone Tassel Earrings tutorialGemstone Tassel Earrings tutorial
Gemstone Tassel Earrings tutorial
 
Gorgeous Spring Rain Earring Tutorial
Gorgeous Spring Rain Earring TutorialGorgeous Spring Rain Earring Tutorial
Gorgeous Spring Rain Earring Tutorial
 
How to Make Wire Wrapped Ammonite Jewelry DIY Jewelry Making Tutorial
How to Make Wire Wrapped Ammonite Jewelry DIY Jewelry Making TutorialHow to Make Wire Wrapped Ammonite Jewelry DIY Jewelry Making Tutorial
How to Make Wire Wrapped Ammonite Jewelry DIY Jewelry Making Tutorial
 
Beading daily-wire-wrapping
Beading daily-wire-wrappingBeading daily-wire-wrapping
Beading daily-wire-wrapping
 
Clever Blossom Earrings with Gold and Black Glass Pearls
Clever Blossom Earrings with Gold and Black Glass PearlsClever Blossom Earrings with Gold and Black Glass Pearls
Clever Blossom Earrings with Gold and Black Glass Pearls
 

Ähnlich wie Mega Collection of Southwest Inspired Metal Work Jewelry Tutorials

Ten tipstocustomizeyourreelkit
Ten tipstocustomizeyourreelkitTen tipstocustomizeyourreelkit
Ten tipstocustomizeyourreelkitAnibal Ruben Reyes
 
Planta pra "Cam Clamp" (grampo)
Planta pra "Cam Clamp" (grampo)Planta pra "Cam Clamp" (grampo)
Planta pra "Cam Clamp" (grampo)Gabriel Vandresen
 
Exquisite Copper Wire Earrings With Crystal Beads
Exquisite Copper Wire Earrings With Crystal BeadsExquisite Copper Wire Earrings With Crystal Beads
Exquisite Copper Wire Earrings With Crystal BeadsHouseofGems.com
 
400 proyectos de_mini_reloj[1]
400 proyectos de_mini_reloj[1]400 proyectos de_mini_reloj[1]
400 proyectos de_mini_reloj[1]ruper montes
 
F-F-Fiddle Assembly Instructions
F-F-Fiddle Assembly InstructionsF-F-Fiddle Assembly Instructions
F-F-Fiddle Assembly Instructionsdsp39
 
F-F-Fiddle Assembly Instructions
F-F-Fiddle Assembly InstructionsF-F-Fiddle Assembly Instructions
F-F-Fiddle Assembly Instructionsdsp39
 
Simple storage box
Simple storage boxSimple storage box
Simple storage boxjessica30251
 
Rough Draft Lanyard Instructions
Rough Draft Lanyard InstructionsRough Draft Lanyard Instructions
Rough Draft Lanyard InstructionsVickie Buenger
 
How to Make Sweet Spiral Ring DIY Jewelry Making Tutorial
How to Make Sweet Spiral Ring DIY Jewelry Making TutorialHow to Make Sweet Spiral Ring DIY Jewelry Making Tutorial
How to Make Sweet Spiral Ring DIY Jewelry Making TutorialHouseofGems.com
 
Tying Bass Poppers Tool box
Tying Bass Poppers Tool boxTying Bass Poppers Tool box
Tying Bass Poppers Tool boxFred Crisp
 
Make a quick box using box joints
Make a quick box using box jointsMake a quick box using box joints
Make a quick box using box jointsjessica30251
 
Philip Luty Expedient Homemade Ammo Handgun Firearms Reloading
Philip Luty Expedient Homemade Ammo Handgun Firearms ReloadingPhilip Luty Expedient Homemade Ammo Handgun Firearms Reloading
Philip Luty Expedient Homemade Ammo Handgun Firearms ReloadingEdgar Castelo
 

Ähnlich wie Mega Collection of Southwest Inspired Metal Work Jewelry Tutorials (20)

Hollow ring final
Hollow ring finalHollow ring final
Hollow ring final
 
Ten tipstocustomizeyourreelkit
Ten tipstocustomizeyourreelkitTen tipstocustomizeyourreelkit
Ten tipstocustomizeyourreelkit
 
Planta pra "Cam Clamp" (grampo)
Planta pra "Cam Clamp" (grampo)Planta pra "Cam Clamp" (grampo)
Planta pra "Cam Clamp" (grampo)
 
Build-It: Bicycle Hacksaw
Build-It: Bicycle HacksawBuild-It: Bicycle Hacksaw
Build-It: Bicycle Hacksaw
 
Exquisite Copper Wire Earrings With Crystal Beads
Exquisite Copper Wire Earrings With Crystal BeadsExquisite Copper Wire Earrings With Crystal Beads
Exquisite Copper Wire Earrings With Crystal Beads
 
Hollow ring final
Hollow ring finalHollow ring final
Hollow ring final
 
400 proyectos de_mini_reloj[1]
400 proyectos de_mini_reloj[1]400 proyectos de_mini_reloj[1]
400 proyectos de_mini_reloj[1]
 
Build-It: Charcoal press
Build-It: Charcoal pressBuild-It: Charcoal press
Build-It: Charcoal press
 
F-F-Fiddle Assembly Instructions
F-F-Fiddle Assembly InstructionsF-F-Fiddle Assembly Instructions
F-F-Fiddle Assembly Instructions
 
Measuring device
Measuring deviceMeasuring device
Measuring device
 
F-F-Fiddle Assembly Instructions
F-F-Fiddle Assembly InstructionsF-F-Fiddle Assembly Instructions
F-F-Fiddle Assembly Instructions
 
Break down bow
Break down bowBreak down bow
Break down bow
 
Simple storage box
Simple storage boxSimple storage box
Simple storage box
 
Repousse information
Repousse informationRepousse information
Repousse information
 
Rough Draft Lanyard Instructions
Rough Draft Lanyard InstructionsRough Draft Lanyard Instructions
Rough Draft Lanyard Instructions
 
How to Make Sweet Spiral Ring DIY Jewelry Making Tutorial
How to Make Sweet Spiral Ring DIY Jewelry Making TutorialHow to Make Sweet Spiral Ring DIY Jewelry Making Tutorial
How to Make Sweet Spiral Ring DIY Jewelry Making Tutorial
 
Build-It: Hand-held foam cutter
Build-It: Hand-held foam cutterBuild-It: Hand-held foam cutter
Build-It: Hand-held foam cutter
 
Tying Bass Poppers Tool box
Tying Bass Poppers Tool boxTying Bass Poppers Tool box
Tying Bass Poppers Tool box
 
Make a quick box using box joints
Make a quick box using box jointsMake a quick box using box joints
Make a quick box using box joints
 
Philip Luty Expedient Homemade Ammo Handgun Firearms Reloading
Philip Luty Expedient Homemade Ammo Handgun Firearms ReloadingPhilip Luty Expedient Homemade Ammo Handgun Firearms Reloading
Philip Luty Expedient Homemade Ammo Handgun Firearms Reloading
 

Kürzlich hochgeladen

Jordan_Amanda_DMBS202404_PB1_2024-04.pdf
Jordan_Amanda_DMBS202404_PB1_2024-04.pdfJordan_Amanda_DMBS202404_PB1_2024-04.pdf
Jordan_Amanda_DMBS202404_PB1_2024-04.pdfamanda2495
 
Hire 💕 8617697112 Meerut Call Girls Service Call Girls Agency
Hire 💕 8617697112 Meerut Call Girls Service Call Girls AgencyHire 💕 8617697112 Meerut Call Girls Service Call Girls Agency
Hire 💕 8617697112 Meerut Call Girls Service Call Girls AgencyNitya salvi
 
➥🔝 7737669865 🔝▻ dehradun Call-girls in Women Seeking Men 🔝dehradun🔝 Escor...
➥🔝 7737669865 🔝▻ dehradun Call-girls in Women Seeking Men  🔝dehradun🔝   Escor...➥🔝 7737669865 🔝▻ dehradun Call-girls in Women Seeking Men  🔝dehradun🔝   Escor...
➥🔝 7737669865 🔝▻ dehradun Call-girls in Women Seeking Men 🔝dehradun🔝 Escor...amitlee9823
 
Escorts Service Basapura ☎ 7737669865☎ Book Your One night Stand (Bangalore)
Escorts Service Basapura ☎ 7737669865☎ Book Your One night Stand (Bangalore)Escorts Service Basapura ☎ 7737669865☎ Book Your One night Stand (Bangalore)
Escorts Service Basapura ☎ 7737669865☎ Book Your One night Stand (Bangalore)amitlee9823
 
❤Personal Whatsapp Number 8617697112 Samba Call Girls 💦✅.
❤Personal Whatsapp Number 8617697112 Samba Call Girls 💦✅.❤Personal Whatsapp Number 8617697112 Samba Call Girls 💦✅.
❤Personal Whatsapp Number 8617697112 Samba Call Girls 💦✅.Nitya salvi
 
Q4-W4-SCIENCE-5 power point presentation
Q4-W4-SCIENCE-5 power point presentationQ4-W4-SCIENCE-5 power point presentation
Q4-W4-SCIENCE-5 power point presentationZenSeloveres
 
call girls in Vasundhra (Ghaziabad) 🔝 >༒8448380779 🔝 genuine Escort Service 🔝...
call girls in Vasundhra (Ghaziabad) 🔝 >༒8448380779 🔝 genuine Escort Service 🔝...call girls in Vasundhra (Ghaziabad) 🔝 >༒8448380779 🔝 genuine Escort Service 🔝...
call girls in Vasundhra (Ghaziabad) 🔝 >༒8448380779 🔝 genuine Escort Service 🔝...Delhi Call girls
 
Vip Mumbai Call Girls Borivali Call On 9920725232 With Body to body massage w...
Vip Mumbai Call Girls Borivali Call On 9920725232 With Body to body massage w...Vip Mumbai Call Girls Borivali Call On 9920725232 With Body to body massage w...
Vip Mumbai Call Girls Borivali Call On 9920725232 With Body to body massage w...amitlee9823
 
VIP Model Call Girls Kalyani Nagar ( Pune ) Call ON 8005736733 Starting From ...
VIP Model Call Girls Kalyani Nagar ( Pune ) Call ON 8005736733 Starting From ...VIP Model Call Girls Kalyani Nagar ( Pune ) Call ON 8005736733 Starting From ...
VIP Model Call Girls Kalyani Nagar ( Pune ) Call ON 8005736733 Starting From ...SUHANI PANDEY
 
Call Girls Basavanagudi Just Call 👗 7737669865 👗 Top Class Call Girl Service ...
Call Girls Basavanagudi Just Call 👗 7737669865 👗 Top Class Call Girl Service ...Call Girls Basavanagudi Just Call 👗 7737669865 👗 Top Class Call Girl Service ...
Call Girls Basavanagudi Just Call 👗 7737669865 👗 Top Class Call Girl Service ...amitlee9823
 
call girls in Dakshinpuri (DELHI) 🔝 >༒9953056974 🔝 genuine Escort Service 🔝✔️✔️
call girls in Dakshinpuri  (DELHI) 🔝 >༒9953056974 🔝 genuine Escort Service 🔝✔️✔️call girls in Dakshinpuri  (DELHI) 🔝 >༒9953056974 🔝 genuine Escort Service 🔝✔️✔️
call girls in Dakshinpuri (DELHI) 🔝 >༒9953056974 🔝 genuine Escort Service 🔝✔️✔️9953056974 Low Rate Call Girls In Saket, Delhi NCR
 
Sector 104, Noida Call girls :8448380779 Model Escorts | 100% verified
Sector 104, Noida Call girls :8448380779 Model Escorts | 100% verifiedSector 104, Noida Call girls :8448380779 Model Escorts | 100% verified
Sector 104, Noida Call girls :8448380779 Model Escorts | 100% verifiedDelhi Call girls
 
Vip Mumbai Call Girls Bandra West Call On 9920725232 With Body to body massag...
Vip Mumbai Call Girls Bandra West Call On 9920725232 With Body to body massag...Vip Mumbai Call Girls Bandra West Call On 9920725232 With Body to body massag...
Vip Mumbai Call Girls Bandra West Call On 9920725232 With Body to body massag...amitlee9823
 
Anamika Escorts Service Darbhanga ❣️ 7014168258 ❣️ High Cost Unlimited Hard ...
Anamika Escorts Service Darbhanga ❣️ 7014168258 ❣️ High Cost Unlimited Hard  ...Anamika Escorts Service Darbhanga ❣️ 7014168258 ❣️ High Cost Unlimited Hard  ...
Anamika Escorts Service Darbhanga ❣️ 7014168258 ❣️ High Cost Unlimited Hard ...nirzagarg
 
UI:UX Design and Empowerment Strategies for Underprivileged Transgender Indiv...
UI:UX Design and Empowerment Strategies for Underprivileged Transgender Indiv...UI:UX Design and Empowerment Strategies for Underprivileged Transgender Indiv...
UI:UX Design and Empowerment Strategies for Underprivileged Transgender Indiv...RitikaRoy32
 
Pooja 9892124323, Call girls Services and Mumbai Escort Service Near Hotel Hy...
Pooja 9892124323, Call girls Services and Mumbai Escort Service Near Hotel Hy...Pooja 9892124323, Call girls Services and Mumbai Escort Service Near Hotel Hy...
Pooja 9892124323, Call girls Services and Mumbai Escort Service Near Hotel Hy...Pooja Nehwal
 
Just Call Vip call girls Etawah Escorts ☎️9352988975 Two shot with one girl (...
Just Call Vip call girls Etawah Escorts ☎️9352988975 Two shot with one girl (...Just Call Vip call girls Etawah Escorts ☎️9352988975 Two shot with one girl (...
Just Call Vip call girls Etawah Escorts ☎️9352988975 Two shot with one girl (...gajnagarg
 
Nisha Yadav Escorts Service Ernakulam ❣️ 7014168258 ❣️ High Cost Unlimited Ha...
Nisha Yadav Escorts Service Ernakulam ❣️ 7014168258 ❣️ High Cost Unlimited Ha...Nisha Yadav Escorts Service Ernakulam ❣️ 7014168258 ❣️ High Cost Unlimited Ha...
Nisha Yadav Escorts Service Ernakulam ❣️ 7014168258 ❣️ High Cost Unlimited Ha...nirzagarg
 
Whitefield Call Girls Service: 🍓 7737669865 🍓 High Profile Model Escorts | Ba...
Whitefield Call Girls Service: 🍓 7737669865 🍓 High Profile Model Escorts | Ba...Whitefield Call Girls Service: 🍓 7737669865 🍓 High Profile Model Escorts | Ba...
Whitefield Call Girls Service: 🍓 7737669865 🍓 High Profile Model Escorts | Ba...amitlee9823
 
RT Nagar Call Girls Service: 🍓 7737669865 🍓 High Profile Model Escorts | Bang...
RT Nagar Call Girls Service: 🍓 7737669865 🍓 High Profile Model Escorts | Bang...RT Nagar Call Girls Service: 🍓 7737669865 🍓 High Profile Model Escorts | Bang...
RT Nagar Call Girls Service: 🍓 7737669865 🍓 High Profile Model Escorts | Bang...amitlee9823
 

Kürzlich hochgeladen (20)

Jordan_Amanda_DMBS202404_PB1_2024-04.pdf
Jordan_Amanda_DMBS202404_PB1_2024-04.pdfJordan_Amanda_DMBS202404_PB1_2024-04.pdf
Jordan_Amanda_DMBS202404_PB1_2024-04.pdf
 
Hire 💕 8617697112 Meerut Call Girls Service Call Girls Agency
Hire 💕 8617697112 Meerut Call Girls Service Call Girls AgencyHire 💕 8617697112 Meerut Call Girls Service Call Girls Agency
Hire 💕 8617697112 Meerut Call Girls Service Call Girls Agency
 
➥🔝 7737669865 🔝▻ dehradun Call-girls in Women Seeking Men 🔝dehradun🔝 Escor...
➥🔝 7737669865 🔝▻ dehradun Call-girls in Women Seeking Men  🔝dehradun🔝   Escor...➥🔝 7737669865 🔝▻ dehradun Call-girls in Women Seeking Men  🔝dehradun🔝   Escor...
➥🔝 7737669865 🔝▻ dehradun Call-girls in Women Seeking Men 🔝dehradun🔝 Escor...
 
Escorts Service Basapura ☎ 7737669865☎ Book Your One night Stand (Bangalore)
Escorts Service Basapura ☎ 7737669865☎ Book Your One night Stand (Bangalore)Escorts Service Basapura ☎ 7737669865☎ Book Your One night Stand (Bangalore)
Escorts Service Basapura ☎ 7737669865☎ Book Your One night Stand (Bangalore)
 
❤Personal Whatsapp Number 8617697112 Samba Call Girls 💦✅.
❤Personal Whatsapp Number 8617697112 Samba Call Girls 💦✅.❤Personal Whatsapp Number 8617697112 Samba Call Girls 💦✅.
❤Personal Whatsapp Number 8617697112 Samba Call Girls 💦✅.
 
Q4-W4-SCIENCE-5 power point presentation
Q4-W4-SCIENCE-5 power point presentationQ4-W4-SCIENCE-5 power point presentation
Q4-W4-SCIENCE-5 power point presentation
 
call girls in Vasundhra (Ghaziabad) 🔝 >༒8448380779 🔝 genuine Escort Service 🔝...
call girls in Vasundhra (Ghaziabad) 🔝 >༒8448380779 🔝 genuine Escort Service 🔝...call girls in Vasundhra (Ghaziabad) 🔝 >༒8448380779 🔝 genuine Escort Service 🔝...
call girls in Vasundhra (Ghaziabad) 🔝 >༒8448380779 🔝 genuine Escort Service 🔝...
 
Vip Mumbai Call Girls Borivali Call On 9920725232 With Body to body massage w...
Vip Mumbai Call Girls Borivali Call On 9920725232 With Body to body massage w...Vip Mumbai Call Girls Borivali Call On 9920725232 With Body to body massage w...
Vip Mumbai Call Girls Borivali Call On 9920725232 With Body to body massage w...
 
VIP Model Call Girls Kalyani Nagar ( Pune ) Call ON 8005736733 Starting From ...
VIP Model Call Girls Kalyani Nagar ( Pune ) Call ON 8005736733 Starting From ...VIP Model Call Girls Kalyani Nagar ( Pune ) Call ON 8005736733 Starting From ...
VIP Model Call Girls Kalyani Nagar ( Pune ) Call ON 8005736733 Starting From ...
 
Call Girls Basavanagudi Just Call 👗 7737669865 👗 Top Class Call Girl Service ...
Call Girls Basavanagudi Just Call 👗 7737669865 👗 Top Class Call Girl Service ...Call Girls Basavanagudi Just Call 👗 7737669865 👗 Top Class Call Girl Service ...
Call Girls Basavanagudi Just Call 👗 7737669865 👗 Top Class Call Girl Service ...
 
call girls in Dakshinpuri (DELHI) 🔝 >༒9953056974 🔝 genuine Escort Service 🔝✔️✔️
call girls in Dakshinpuri  (DELHI) 🔝 >༒9953056974 🔝 genuine Escort Service 🔝✔️✔️call girls in Dakshinpuri  (DELHI) 🔝 >༒9953056974 🔝 genuine Escort Service 🔝✔️✔️
call girls in Dakshinpuri (DELHI) 🔝 >༒9953056974 🔝 genuine Escort Service 🔝✔️✔️
 
Sector 104, Noida Call girls :8448380779 Model Escorts | 100% verified
Sector 104, Noida Call girls :8448380779 Model Escorts | 100% verifiedSector 104, Noida Call girls :8448380779 Model Escorts | 100% verified
Sector 104, Noida Call girls :8448380779 Model Escorts | 100% verified
 
Vip Mumbai Call Girls Bandra West Call On 9920725232 With Body to body massag...
Vip Mumbai Call Girls Bandra West Call On 9920725232 With Body to body massag...Vip Mumbai Call Girls Bandra West Call On 9920725232 With Body to body massag...
Vip Mumbai Call Girls Bandra West Call On 9920725232 With Body to body massag...
 
Anamika Escorts Service Darbhanga ❣️ 7014168258 ❣️ High Cost Unlimited Hard ...
Anamika Escorts Service Darbhanga ❣️ 7014168258 ❣️ High Cost Unlimited Hard  ...Anamika Escorts Service Darbhanga ❣️ 7014168258 ❣️ High Cost Unlimited Hard  ...
Anamika Escorts Service Darbhanga ❣️ 7014168258 ❣️ High Cost Unlimited Hard ...
 
UI:UX Design and Empowerment Strategies for Underprivileged Transgender Indiv...
UI:UX Design and Empowerment Strategies for Underprivileged Transgender Indiv...UI:UX Design and Empowerment Strategies for Underprivileged Transgender Indiv...
UI:UX Design and Empowerment Strategies for Underprivileged Transgender Indiv...
 
Pooja 9892124323, Call girls Services and Mumbai Escort Service Near Hotel Hy...
Pooja 9892124323, Call girls Services and Mumbai Escort Service Near Hotel Hy...Pooja 9892124323, Call girls Services and Mumbai Escort Service Near Hotel Hy...
Pooja 9892124323, Call girls Services and Mumbai Escort Service Near Hotel Hy...
 
Just Call Vip call girls Etawah Escorts ☎️9352988975 Two shot with one girl (...
Just Call Vip call girls Etawah Escorts ☎️9352988975 Two shot with one girl (...Just Call Vip call girls Etawah Escorts ☎️9352988975 Two shot with one girl (...
Just Call Vip call girls Etawah Escorts ☎️9352988975 Two shot with one girl (...
 
Nisha Yadav Escorts Service Ernakulam ❣️ 7014168258 ❣️ High Cost Unlimited Ha...
Nisha Yadav Escorts Service Ernakulam ❣️ 7014168258 ❣️ High Cost Unlimited Ha...Nisha Yadav Escorts Service Ernakulam ❣️ 7014168258 ❣️ High Cost Unlimited Ha...
Nisha Yadav Escorts Service Ernakulam ❣️ 7014168258 ❣️ High Cost Unlimited Ha...
 
Whitefield Call Girls Service: 🍓 7737669865 🍓 High Profile Model Escorts | Ba...
Whitefield Call Girls Service: 🍓 7737669865 🍓 High Profile Model Escorts | Ba...Whitefield Call Girls Service: 🍓 7737669865 🍓 High Profile Model Escorts | Ba...
Whitefield Call Girls Service: 🍓 7737669865 🍓 High Profile Model Escorts | Ba...
 
RT Nagar Call Girls Service: 🍓 7737669865 🍓 High Profile Model Escorts | Bang...
RT Nagar Call Girls Service: 🍓 7737669865 🍓 High Profile Model Escorts | Bang...RT Nagar Call Girls Service: 🍓 7737669865 🍓 High Profile Model Escorts | Bang...
RT Nagar Call Girls Service: 🍓 7737669865 🍓 High Profile Model Escorts | Bang...
 

Mega Collection of Southwest Inspired Metal Work Jewelry Tutorials

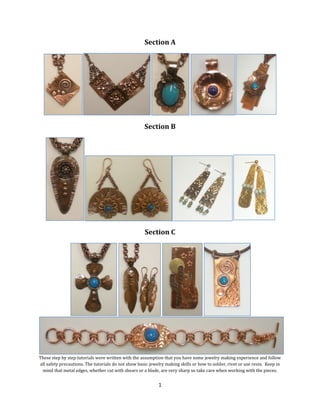
  • 1. 1 Section A Section B Section C These step by step tutorials were written with the assumption that you have some jewelry making experience and follow all safety precautions. The tutorials do not show basic jewelry making skills or how to solder, rivet or use resin. Keep in mind that metal edges, whether cut with shears or a blade, are very sharp so take care when working with the pieces.
  • 2. 2 SOUTHWEST 1 Templates Directions: Step 1: Copy the templates. BOOK Step 2: Transfer the designs to your sheet metal. PAGE Step 3: Cut the designs out. Step 4: File any sharp edges. A8 A1 A7 A6 A3 A4 A14 A15 A18 A13 A10 A5 A2 A17 A11 A9 A12 A16 B4 B1 B2 B7 B8 B5 B6 B3 B9 B11 B10 B12 C5 C4 C10 C1 C3 C2 C9 C8 C11 C6 C12 C7 Only one of the blue circles is used in a jewelry piece in this collection. Can you see the remaining two made into flowers riveted to the Open Book cover, on the Squares Necklace, or in the center of the Southwest Cross, etc.? How you utilize them is only limited by your imagination! E6000 can replace soldering on many of the pieces.
  • 3. 3 Contents “A” Templates Scribe Book Pendant----------------Page 16 Tiles Necklace-----------------------Page 20 Freeform Pendant------------------Page 24 Cab and Tab Pendant---------------Page 26 Sonoran Rose Pendant-------------Page 29 Life Bird Pendant-------------------Page 32 “B” Templates Desert Flower Pendant-------------Page 36 Kachina Burst Earrings------------Page 41 Serape Earrings--------------------Page 45 Rain in the Desert Earrings-----Page 47 “C” Templates Southwest Cross---------------------Page 50 Spirit Feathers-----------------------Page 55 Howl at the Moon Pendant--------Page 60 Landscape Pendant----------------Page 63 Eye of the Desert Link Bracelet---------------Page 66
  • 4. 4 Sticker Templates Cutting perfectly matching shapes out of sheet metal can be a bit tricky. But with a few tricks of your own, it will be a snap! Solution 1: Use repositionable sticky notes to make your templates. Step 1: Draw your shapes on repositionable note paper, making sure that as much of your design as possible is on the sticky portion of the note. Step 2: Cut the template out. Step 3: Adhere the sticky note template to your clean sheet metal and cut around the shape. Solution 2: Use a Xyron Sticker Maker with a Repositionable Sticker Cartridge to make repositionable stickers to adhere to sheet metal and then just cut on the lines! Step 1: There are two ways to do this. If you are only making one or two of an item at a time: A: Cardboard and paper can become misshapen with use, so draw your template shape on thin plastic and cut it out. Hint: Save all your sticky note and plastic templates. Keep notes about the project on the template if there is room. Place your template on a piece of paper and trace around it. You do not have to cut this paper shape out exactly, just cut around it. If you are making multiple sets or use the same shapes over and over: B: Draw lines on a piece of typing paper so that you have strips the width your Xyron uses, either 1.5”, 2.5”, 5” or 9”. Fill the space between the lines with tracings of the desired shapes. Save this sheet as your original. Make a copy of your original. Cut the copied strips apart. Note: a 2.5” Xyron was used here.
  • 5. 5 Step 2: Run the cut out shapes from A or each paper strip from B through your machine. Step 3: Cut the sticker sheet apart. You do not have to cut each piece out exactly, just cut around them. Adhere the stickers to your clean metal sheet. Step 4: Cut the metal shape out. Remove the sticker and you are ready to use the blank in your project. Hint: Replace the sticker on the paper backing as you may be able to use it several more times. Hint: If you are careful when you remove the stickers from your metal, you can save them to use again at a later date. Removing Tarnish From Your Jewelry Copper will tarnish (patina). Because of their copper content, Silver, Bronze and Brass will also tarnish. To bring your jewelry piece back to the original finish, make a sloppy paste of Barkeepers Friend, a powdered cleanser and polish found in the cleaning supplies section of stores, and water. Pat the solution all over your jewelry piece, being careful not to rub it onto the piece or you will scratch the metal and/or the stones. Rinse the piece in lukewarm water and dry thoroughly. Store your newly cleaned and dry jewelry piece in an anti-tarnish jewelry box or an airtight plastic bag. Using an anti tarnish paper strip in the bag can help. Save those small moisture absorbing silica packets that come in a variety of items you purchase. They can be used to absorb moisture, which leads to tarnish, where you store your jewelry. Be careful, though. Some of them can discolor metal if they come in contact with it.
  • 6. 6 6 Step Barrel Pliers Round nose pliers are great, but sometimes it is difficult to grasp the wire in exactly the same spot on the jaws when you need to make the same sized loop or curve. Once you use the 6 step barrel pliers, they will be the most versatile tool in your workshop. Whenever you need to make consistent sized loops and curves, the 6 step barrel pliers should be your go-to tool. Consistent sized loops are not only important in making wire wrapped loops and jump rings, but in many other jewelry designs as well. Knowing the sizes of the steps can be helpful when using tutorials that refer to metric or standard measurements. The following measurements are the approximate diameters of each step of the barrel pliers. Each step will make rings with the approximate ID (Interior Diameter) of the diameter of the barrel. Step 1 2.33mm 3/32” Step 2 3.25mm 1/8” Step 3 4.5mm 3/16” Step 4 6mm 1/4” Step 5 8mm 5/16” Step 6 8.75mm scant 3/8” If you need to make a few jump rings, use this pliers to make the size coil you need. The 6 steps make the sizes you will use the most often. Using Your Hole Punch Pliers When placing the cutting blade/tip on a marked spot and closing your hole punch pliers, you will find that the hole made is probably not directly cut on the marked spot. That is because the cutting tip is angled to make cutting through the metal easier. Here is a way to cut the hole in the exact spot you want it. Turn your hole punching pliers over so that the bottom jaw, the one with the hole, is on top. Center the hole in the plier jaw over the marked spot and punch. Viola! Your hole will be in exactly the right spot every time!
  • 7. 7 French Hook Ear Wires Make perfect ear wires every time with 6-Step Barrel Pliers. The back wire is a bit longer than the average ear wire so you do not have to worry about it slipping off your ear. Materials: 20 or 21 gauge half hard round wire Hint: If you only have dead soft wire, just twist it to harden it. Optional hammering (Step 7) will also harden the wire. Optional: Two 3mm round metal beads Tools: Flat nose pliers 6-Step barrel pliers Flush cutter Cup bur Optional: Hammer and bench block Note: For the purposes of this tutorial, the 6 plier steps have been labeled in ascending order. These numbered steps will be referred to and where possible, mandrel sizes will be given as well. Directions: It is important to read through the directions before starting. Step 1: Straighten and flush cut both ends of two pieces of 20 gauge half or full hard round wire for each pair of earrings. No bead: 1-7/8”; Balled head pin or with bead: 2”. Step 2: Make an eye on one end of each wire using Step 1 (or 3/32” mandrel) of the 6 step barrel pliers. Skip to Step 5 if not using a bead. Step 3: If adding a bead, shift the eye around the pliers as shown so you can bend the wire tail back to center the eye on the wire end. Step 4: Slide a bead on each wire. Push the bead tightly to the eye. Holding the tip of the flat nose pliers tightly to the bead, make a 70 degree bend in each wire. Note: Decide if you want the eye hole to thread from side to side (shown) or front to back and place it in the pliers accordingly.
  • 8. 8 Step 5: Pushing the bead, balled headpin, or loop tightly against the 6 step barrel pliers, grip one wire between Step 3 and Step 4 (or ¼” mandrel). Push the wire up, over and down around Step 4 (or ¼” mandrel). Step 6: Grip the earring tip between Step 5 and 6 of the 6 step barrel pliers. Make a slight bend in the tip using Step 6 (or scant 3/8” mandrel). Optional: Create a gentle curve to ear wire end using the largest barrel of the Wrap N Tap pliers. A: Push the ear wire tail between the jaws until the eye touches the pliers. Squeeze the pliers. B: Pull the ear wire out a bit and squeeze the pliers. C: Pull the ear wire almost all the way out and squeeze the pliers again. Perfect curve every time! Step 7: Use a cup bur to smooth the cut end of each earring. Step 8: Optional: Lightly hammer the front of the earring curve. This is particularly important if you made your own balled headpins as heating the wire to make the ball makes the wire dead soft. Step 9: If you did not use a gemstone on your ear wires, you can tumble them for a shiny finish. This will also work harden them if you used half hard wire.
  • 9. 9 Rivet and Eyelet Tools Your local hardware store has a large selection of tools that you can use in your jewelry making. If the face of your piece is not flat, such as when you attach a cupped piece to your design, you cannot set the rivet by placing the piece on a flat surface. Note: The tools shown in this section should be clamped in your vise to keep them stable while using them. You will need to use something like a Drive Pin Punch when setting a flat head rivet. When choosing a Drive Pin Punch, shown to the left, make sure that the flat head of the stem rivets you will be using will fit the flat top of the tool. To set balled head rivets, you need a tool that will not flatten the top of the ball during the riveting process. Shown to the right are two 5/32” (4mm) woodworking Nail Sets. The one on the right has a very shallow concave tip. It can be used to stamp circles in metal, but is not a good tool to use with balled head rivets as the top of the ball will become slightly flattened. You need a tool with a deep indentation, like the nail set on the left, which will help to keep the balled head round. The balled head rivet shown here was made by balling the end of a piece of 16 gauge wire. It was then cut into a short piece, straightened so the wire came straight out of the ball, pickled and tumbled. Make a Rivet and Eyelet Tile Rivets need to be cut a specific length after inserting through the pieces they will be riveted in. This rivet/eyelet tile was made with tube rivets and eyelets as well as 16 gauge flat and balled head rivets in mind. Step 1: Start with a piece of 22 gauge sheet metal. It can be cut in any shape. Here, a ¾” circle was punched from a piece of brass. Brass was used because it is harder than copper. Since you will be filing across the top of the tile, it needs to be made from a relatively hard metal. Step 2: Using a 1.5mm hole punch, make the first hole. This hole will be used with 16 gauge flat and balled head rivets. Note: Check the diameter of the shank of your tube rivets and eyelets to know what size holes to punch in your tile. Tube rivets require 2 tiles. Step 3: The next size hole was made with the 2.38mm or 3/32” punch from a multi size hole punch, shown to the right. This hole will fit 3.5mm x 3mm (as well as longer than 3.5mm) eyelets and domed face tube rivets.
  • 10. 10 Step 4: The largest hole was made with the 3.16mm or 1/8” punch from a multi size hole punch. This hole fits 5.5mm x 4mm eyelets. Step 5: Use number stamps to show the approximate hole size. Hint: For a tile to use in tight spaces, make a narrow rectangular tile with one hole at each end. Those holes should be the ones you use most often. Make a Tube Spreader Tool Step 1: Find a few nails that are larger in diameter than the tube of the rivets and eyelets you use most often. Many local lumberyards sell nails, purchased by the pound, in bins. You should be able to purchase a few for just pennies. Step 2: File tips of the nails to a shallow sharp point and you will have an instant tube rivet and eyelet setting tool. These were ground down on an electric grindstone in the shop, but you could use a file. It will just take longer. Note: You cannot use nails right out of the box. The tips are not round and the point is too long. How to Use the Tile to Cut 16 Gauge Rivets the Proper Length There is a great video on using rivets and how to fasten them from Beaducation at: https://www.youtube.com/watch?v=V6l5JXD5UiA It is a little over an hour long, but you will learn everything you need to know about how to set rivets. Step 1: Use a 1.5mm hole punch to make a hole in the desired location on the piece. If your metal is thicker than 22 gauge, you should use a drill with a 1.5mm bit for metal. Note: All the rivets referred to here are 16 gauge. Step 2: Place the flat or balled head rivet through all the pieces, usually from the front side of your piece to the back. Note: Sometimes it is not easy cut the rivet off and then move the pieces to be connected to the tool you need to use to set the rivet without the whole thing falling apart. That is why you may find it easier to cut the rivet off after you set it on the tool and put the tile on the assembly, as follows. A tiny little rivet can be hard to find on the floor after it goes flying! Step 3: Flat Head Stem Rivets: Note: If the face of your piece is flat, then you can place your piece rivet side down on a bench block.
  • 11. 11 A: If the face of your piece is not flat, then the head of your rivet needs to sit on a drive pin punch clamped in a vise. Make sure that the rivet head is flat on the drive pin punch. B: Set the rivet tile over the rivet shank using the appropriate hole. Use a flush cutter to cut the rivet shank flush with the tile. C: Remove the tile. Balled Head Rivets: Note: If the face of your piece is flat, then you can place your piece rivet side down on a magazine or notepad. A: If the face of your piece is not flat, then the ball needs to sit in the well of the nail set (described above) clamped in a vise. B: Set the rivet tile over the rivet shank using the appropriate hole. Make sure that the rivet shank follows a straight line up from the nail set. Use a flush cutter to cut the rivet shank flush with the tile. C: Remove the tile. Step 4: Use the straight side or a cross pein hammer or a riveting hammer to mushroom out the top of the rivet, being careful to not hammer your metal backplate. The narrower side of a Mini TruStrike Sharp Designer Hammer may work, but the narrower the edge, the better. Lightly hammer in an “X” pattern, going one way then the other, making sure the hammer blows are perpendicular to the post. Continue until the post has flared enough that the assembly will not pull apart. Step 5: Change to a flat faced hammer and finish flattening the post until it is flat to the back of the piece and smooth to the touch.
  • 12. 12 How to Use The Tile and Nails On Tube Rivets and Eyelets Step 1: Punch the appropriate size holes in the pieces you will be attaching your rivets or eyelets to. Step 2: You may want to make the hole a bit larger if your rivet or eyelet does not fit. In this particular leftover fold formed piece, there was a hole caused when dimpling pliers broke through the metal. A bead reamer was used to make the hole large enough to fit a small brass 3mm eyelet or domed head rivet with a tube style back. Step 3: Place the tube rivet or eyelet through the pieces you are securing it to. Then put two tiles on the rivet using the hole that best fits. Use a file the file off the excess tube until it is flush with, and not more than a hair above, with the tile. Do not cut the tube with a flush cutter. It will squash the sides together. Note: In the following step, if you use a bench block under your piece when using a hammer with your tool to spread out the tube on the back of your piece, the face or your rivet or eyelet will be flattened out. The face of your rivets and eyelets will not be as easily damaged or flattened if you use a notepad or magazine instead of a bench block. Step 4: Place the tip of the nail in the tube on the back of the rivet or eyelet. Gently hammer the nail until the tube starts to spread out. Once the top of the tube is spread enough that it cannot be removed from the hole, you can then use a domed face or ball hammer to finish spreading the tube out and flatten it. Hint: A 1.8mm hole punch is not quite large enough for small diameter tube rivets and eyelets. Use a bead reamer to make the hole slightly larger. Hint: Rivet and eyelet setters are a good investment if you will be using a lot of eyelets and tube rivets in your jewelry.
  • 13. 13 Homemade Pickle Pickle is used to remove fire scale from metal pieces after heating them with a torch, as in annealing or soldering. Not everyone has a dedicated pickle pot, or a need or desire to have one. If you will only need to pickle a few items in the course of a year, maybe making your own pickle and using a glass jar or cup is the right solution for you. Bring ½ cup vinegar and ½ cup water to a boil. You can use more vinegar than water. Some people even use just vinegar, no water. Pour in a glass or ceramic coffee container. Hint: Make sure that the container you use for your pickle does not get used for anything else after this. Add 1 tsp salt. Add your metal jewelry piece, making sure that it is covered with solution. You may need to turn the piece over while it is soaking if the back of the piece sits directly on the bottom of the container. Note: Do not use pickling solution on jewelry pieces with gemstones. While the piece is soaking, mix 1 teaspoon of baking soda with 1 cup of warm water in another glass or ceramic container. When you see that the fire scale is gone, remove the piece from the pickling solution using a wooden pick or copper tongs. Hint: If you have heavy fire scale, you may need to reheat the solution-without the jewelry piece in it-and soak the piece again. You may even need to make new pickle solution and re-pickle. Place the piece in the baking soda/water solution. This solution helps neutralize the acid in the vinegar that ate away the fire scale. Rinse and dry the piece. Brushing the piece with a brass brush will polish the piece to a satin finish. Rubbing a burnisher across the surface of the piece will polish and highlight the raised areas. Tumbling the piece with shot will polish the whole piece. Note: A half and half mixture of pickle and hydrogen peroxide is needed to remove the copper from the surface of brass items that have been pickled. Be Environmentally Conscious: Most communities have laws governing the disposal of what can be considered hazardous waste. Since your pickle solution contains metal particles, it should be poured into a labeled container, like an old bleach container, that you will eventually turn in to your hazardous waste dump. Lessen the Noise, Save Your Eardrums Using a hammer to texture metal on a bench block can be quite loud. If you are concerned about this, use a rubber block, a sand bag or a stack of magazines under your bench block to help deaden the sound from your hammer blows. Wearing ear protective devices may be a good idea if you do a lot of metal texturing.
  • 14. 14 Save Your Fingers When you are texturing metal blanks, do you usually hold the pieces on your bench block with your fingers? If you do, you have probably hit your fingers more than a few times-ouch! There are several solutions to this problem. You could use painters tape to hold the metal blank on your bench block. However, you will have to reposition the tape when you need to texture under it. Also, vigorous hammering will loosen the metal from under the tape and the blank could go flying. So what else could be used? Head to your garage, kitchen and laundry room to find great tools! Look for items that will allow you to put the greatest surface area of the tool on the blank-the rounded end of craft stick will touch the blank in a VERY small spot whereas a square ended stick touches a greater surface area. Each square in the photo is one inch. Cut different angles on each end of a dowel-45 and 60 degrees are shown. Use a scissors to cut off the rounded end of a wide frozen treat wooden stick. Sand the corners round, if desired. For a shorter tool, take a clothespin apart. You can find various sizes of flexible “gripper” style finger covers at fabric/craft stores. Finger covers like these are sometimes used by bank tellers when counting bills. Slip one on the end of your chosen tool and it can hold your blank from moving without the fear of scratching your metal. Do you have an old rubber spatula with a wooden handle? Use the handle to hold blanks down. If you cut around the outside edge of the rubber sleeve, you will have a non-slip surface to hold the blank down. Clamps for Jewelry Making These clamps were purchased at a dollar store. The pads on the jaws are thick self-stick felt circles used on the bottom of lamps, vases, etc. that were cut to fit the jaws of the clamps. Use a small amount of glue when connecting pieces together. Also, make sure that the glue does not seep out from under the pieces as you cannot patina where there is glue.
  • 15. 15 Petal Forming On a Wood Block Forming and shaping metal flowers to give them dimension is fun, particularly when you do not have to spend a lot of money on expensive shaping tools to do it. A good hammer and a piece of wood works just fine! Most lumberyards have scrap pieces of lumber around they will probably give you that you can use for this “tool.” A scrap of 2x2 pine makes a perfect petal forming tool. If you find a pallet that is being thrown away, you will have more wood to cut up than you know what to do with-probably enough to last you a lifetime! Cut a short piece of wood, just big enough to easily handle. Since pine is so soft, a hammer easily compresses rounded indentations on the ends, which will help in the forming of the petals. I find that I can easily hold my flower shape while also holding my block, which is about 2.25” long. If you have trouble doing this, cut it a bit longer and clamp it to your work surface or in your vise. Hammer the center of the petal edge into the indentation. To curve the outer corners of the petal, hammer them around the corner of the wood block. Continue shaping the petals until you are happy with the shape. Hint: You may need to anneal your piece several times during the shaping as hammering and texturing work hardens the metal.
  • 16. 16 Scribe Book Pendant Soldering experience may be necessary to make this project. Materials: 24 (preferred) or 26 gauge sheet metal 2” of 18 gauge dead soft square wire Four 18 gauge 5mm round jump rings Note: The size of the jump rings you used to connect the book covers and pages is determined by the number and thickness of the pages in the book (see Steps 16-19 ) Three circles cut from 24 gauge sheet metal using the 3.97mm punch in the multi size hole punch set or three decorative rivets to fit the space Optional: Three 3.5x3.5mm eyelets One purchased chain or leather cord Tools and Other Supplies: Tools for your preferred method of cutting out sheet metal shapes Tools and solder for your preferred method of soldering Note: You can glue the decorative elements in place but this is not a permanent solution. The piece could fall apart with wear. Mini TruStrike Embossing Hammers Flat and chain nose pliers Rubber, plastic or rawhide mallet Bench block Hint: Use a rubber block or a sand bag under your bench block to help deaden the sound from your hammer blows. 1.5mm hole punch Multi size hole punch set Variety of files to smooth and refine metal edges Optional: Variety of decorative stamps Pickle and pickle pot Liver of sulfur and 0000 steel wool Tumbler and steel shot Optional: e-6000 or other jewelry glue Directions: Read through all the directions before beginning the project. Step 1: Copy the templates A1, A2 How you embellish the book cover is up to you. In this version, the triangular piece C11, from the Tabular Pendant, was used as a decorative element along with circles and a spiral. It is reminiscent of wind and tumbleweeds and wind across the desert. Step 2: Trace the templates on 24 or 26 gauge sheet metal. Step 3: Cut the designs out using your preferred method for cutting sheet metal. If shears were used to cut your pieces out, the edges of the cut pieces curve a bit and/or the pieces may become slightly bent. Flatten each piece cut with shears on a bench block using a plastic, rubber or rawhide mallet. Step 4: Mark line 3/32” in from the edge where you will punch holes. Use a 1.5mm punch to create holes just outside the line on the front cover. Hint: If you use the smallest hole punch from the multi hole punch tool to make the hole on the front and back covers, you can use small 3.5x3.5mm eyelets in the holes for an added design element. If you use this hole punch, you will have to punch on the line instead of outside it.
  • 17. 17 Step 5: Match up the front and back cover. Using an ultra fine point Sharpie, mark the back cover through the holes you punched in the front cover. Use a 1.5mm punch to create holes on the marks on the back cover. Step 6: Now is the time to use your imagination to embellish the cover. Use design stamps to personalize your book cover, use the extra circles to make a flower to rivet on, or make what is shown here. Design to your hearts’ content. The following steps are showing how the “tumbleweeds” book cover was made. Step 7: Use the larger side of the small Mini TruStrike Embossing Hammer, left, or the smaller side of the large Mini TruStrike Embossing Hammer, right, to texture the C11 triangle corner piece. Do not worry about the piece becoming misshapen. It will curl a bit so it is important to flatten it on a bench block using a plastic, rubber or rawhide mallet. Step 8: Use files to smooth the edge of the wavy edge of the C11 triangle. Step 9: Place the triangle piece on the front book cover in the bottom right corner. Because you textured the triangle, the outer edges of the triangle will hang over the edges of the book cover. Do not worry about this….see Step 13. Step 10: Use the two 3.97mm sections of your multi size hole punch to cut three circles from 24 or 26 gauge sheet metal. Position these in place on the front book cover next to the triangular piece. Hint: You can use a small decorative head rivets instead of a these circles. Step 11: Use 2” of 18 gauge dead soft square wire to create a spiral to fit the empty space. Note: All metal needs to be clean for solder to work properly. Step 12: Use easy solder to solder the pieces in place as shown. Note: You can glue the decorative elements in place but this is not a permanent solution. The piece could fall apart with wear. Step 13: File the outer edges of the triangle corner piece flush with the edges of the front cover. Round the corners of the front and back book covers. Step 14: Pickle the cover to remove fire scale. Pickling the back cover at the same time will remove any tarnish that may be on the metal. Step 15: Buffing with steel wool creates a satin finish on the metal so you may wish to tumble the pieces for about 30 minutes to bring up a shine. Tumbling will not affect the patina.
  • 18. 18 Note: You will be cutting out pages for the book next. The backs of rivets can scratch or mar photos. It would be a good idea to place a thin clear plastic page between the book cover and photos, if you are using them. Step 16: Use the BOOK PAGE template on the Template page to make the book pages. Do not punch the holes until you see if the punched holes in your covers line up with the marked holes on the template. If they do not, use your book cover to make marks for the page holes. Step 17: Make the holes in the pages with the 1.5mm hole punch. Hint: If you are careful, you can punch a few at a time. Six pages of cardstock were used in this book. Step 18: 18 gauge 4mm ID jump rings were used to connect the covers and pages in this book. The size of jump ring you need to use to connect the covers and book pages is determined by the number and thickness of the pages in your book. Step 19: Line up the holes in the covers with the book pages. Put a jump ring in the top holes, then in the bottom holes. The last jump ring goes in the center. Step 15: Attach an 18 gauge 4mm jump ring in each hole. You may have to change the size of the jump ring to accommodate the size chain or cord you are using. Step 16: Slide the pendant on a chain or leather cord.
  • 19. 19 BONUS: The jump rings used to make the chain seen here on the Open Book Pendant are: 22 gauge twisted square wire made into 4mm ID jump rings Two 20 gauge interlocked 4mm ID jump rings Connected with two 20 gauge 3mm ID jump rings This chain was also used on the Feather and Cab and Tab Pendants.
  • 20. 20 Tiles Necklace Soldering experience may be necessary to make this project. Materials: 22 or 24 gauge sheet metal 2” square of 30 gauge sheet metal 2” of 18 gauge dead soft square wire Six 18 gauge 4.5mm ID round jump rings Six 16 gauge 5mm ID round jump rings 18 gauge 3mm ID round jump rings-enough to make a chain the length you desire. 140-150 will make an 18” necklace with a 2” extender. Optional: 18 3.5mm x 3.5mm eyelets See Step 4 Optional: 9-12 3mm x 3.5mm rivets See Step 11A One 4mm round bead One headpin Clasp Tools and Other Supplies: Tools for your preferred method of cutting out sheet metal shapes Metal shears Either: Tools and solder for your preferred method of soldering Or: Tools and supplies for riveting Mini TruStrike Large and Small Embossing and Sharp Texturing Hammers Flat, round and chain nose pliers Rubber, plastic or rawhide mallet Bench block Hint: Use a rubber block or a sand bag under your bench block to help deaden the sound from your hammer blows. 1.5mm hole punch 1mm and 3mm dimpling pliers Repositionable sticky notes Optional: Variety of decorative stamps Butane torch and fire brick Variety of files to smooth and refine metal edges Optional: Variety of decorative stamps Pickle and pickle pot Liver of sulfur and 0000 steel wool Tumbler and steel shot Optional: e-6000 or other jewelry glue Pencil or ultra fine point marker Optional: Multi hole punch tool Directions: Read through all the directions before beginning the project Step 1: Copy the templates A3, A4, A5 Step 2: Trace the templates on 22 or 24 gauge sheet metal. It is preferred to attach the fold formed pieces to heavier sheet metal, but if you are concerned about the weight of the finished product, you can use lighter metal. Step 3: Cut the squares out using your preferred method for cutting sheet metal. If shears were used to cut your pieces out, the edges of the cut pieces curve a bit and/or the pieces may become slightly bent. Flatten each piece cut with shears on a bench block using a plastic, rubber or rawhide mallet.
  • 21. 21 Step 4: Mark line 3/32” in from the edges where you need to punch holes. Use 1.5mm punch to create holes just outside the line. Note: If you want to put 3.5 x 3.5mm eyelets in the holes for an added design element, use the smallest hole punch from the multi hole punch tool to make each hole in the squares. If you use this hole punch, you must punch on the line instead of outside it. Step 5: Use files to smooth and refine the edges of each of the pieces. Round the corners a bit. There are many youtube videos on fold forming. In this fold forming video by Beaducation featuring Kim St. Jean you will make a cuff bracelet: https://www.youtube.com/watch?v=lNmZmK_iAnk Stacy Louise Smith published an short and easy tutorial on foldforming on Love My Art Jewelry Blog: http://lovemyartjewelry.blogspot.com/2016/05/inspiration-metal-and-little-fold.html Step 6: Fold form a 2 inch square piece of 30 gauge sheet metal. The following photos show the steps used to fold form, texture and embellish the 2” square. A: Fold the sides in. Flatten well with a rubber or plastic mallet. You can use a flat chasing hammer if you wish. B: Anneal the piece to soften the metal. If you cannot use your fingernails, slip a small pocket knife blade under the edge of the metal to open the piece up. Lightly flatten out. C: Follow A and B above to make all the folds.
  • 22. 22 The piece should end up looking something like this. D: Now it is time to embellish the piece. Use the Mini TruStrike Large and Small Embossing Hammers to texture some of the flat areas between the folds. Use the Mini TruStrike Sharp Texturing Hammer to texture the top edge of some of the fold lines. E: Use the 1mm and 3mm dimpling pliers to create raised bumps in some of the areas. Sometimes the pressure of creating the dimple will break the metal. You can use this as a design element-just add a rivet or eyelet to the hole! F: You can leave the piece you created as is if you polish it up a bit. Use a bit of 0000 steel wool or very fine sandpaper to clean the fire scale off the raised areas. Or pickle it to remove the fire scale. You do not have to tumble it at this time. Note: See the BONUS at the end of this tutorial before going on. Step 7: Using the sticky edge of a repositionable sticky note, cut three 5/8” squares. Step 8: Place those squares in the desired location on your fold formed piece. Trace around the sticky note squares with an ultra fine point marker. Save the sticky squares for Step 10. Step 9: Cut the squares from your fold formed piece using your preferred method for cutting metal. Step 10: Place the sticky square on the back of each metal piece. Recut and refine the squares to match the size of the sticky notes.
  • 23. 23 Note: You can leave the fold formed squares as is or pickle to remove the fire scale. The fire scale squares look very pretty against the bright copper background. Step 11: Attach the fold formed pieces to the background using either method: A: Rivet the pieces in place on each of the necklace squares. You may find it helpful to glue the fold formed pieces in place before riveting. If you do this, use only a small amount of glue to avoid glue seepage. You cannot patina where there is glue. Let the glue dry before you start placing your rivets and/or any other decorative elements. B: Solder your fold formed pieces in place. You must pickle the fold formed pieces and solder in place. Note: All metal needs to be clean for solder to work properly. Step 12: Use 18 gauge 4.5mm ID jump rings to connect the side squares to the center square. Step 13: 18 gauge 3mm ID jump rings are used to make the chain for this necklace. Attach three short pieces of chain to the holes in each necklace side square as follows: The shortest inner chain is made with five 3mm jump rings. The center chain is made with six 3mm jump rings. The longest outer chain is made with seven 3mm jump rings. Step 14: Connect the three short chains on each side to a 16 gauge 5mm ID round jump ring. Step 15: Add a chain made with eleven 18 gauge 3mm ID jump rings to the large ring on each side of the necklace. Step 16: Add a 16 gauge 5mm ID jump ring to the chain on each side of the necklace. Step 17: Add a chain made with eleven 18 gauge 3mm ID jump rings to the large ring on each side of the necklace. Step 18: Add a 16 gauge 5mm ID jump ring to the chain on each side of the necklace. Step 19: Add a chain made with thirty-one 18 gauge 3mm ID jump rings to the large ring on each side of the necklace. Step 20: Attach your closure to the end of the chain on the right side of the necklace, as you would wear it. Step 21: Use the remaining 3mm jump rings to make an extender chain to attach to the left side of the necklace, if you wish. Make a wire wrapped bead dangle with the 4mm bead and headpin. Attach to the end of the extender chain.
  • 24. 24 Step 22: Tumble the necklace. Step 23: You can leave your necklace bright and shiny. Step 24: Or, use liver of sulfur to patina it. Buff with 0000 steel wool to bring out the dimension of your texturing. Step 25: Buffing with steel wool creates a satin finish on the metal so you may wish to tumble the pendant for about 30 minutes to bring up a shine. Tumbling will not affect the patina. Something to try: Separate and connect the squares with wire wrapped beads. BONUS: If you are careful in your sticky note placement and cutting, you could end up with a substantial fold formed piece left over. Why not turn it into a Freeform Pendant! Freeform Pendant You can create unique pieces of jewelry using leftover pieces of sheet metal. In this instance, the leftover piece of 30 gauge fold formed copper sheet metal from the necklace was trimmed up a bit and riveted to a slightly larger piece of 24 gauge nickel silver sheet. 3.5x3.5mm brass rivets and eyelets were used to attach the two pieces together and to add color interest. Step 1: In this particular leftover fold formed piece, there was a hole caused when dimpling pliers broke through the metal. A bead reamer was used to make the hole large enough to fit a small brass 3mm eyelet or domed head rivet with a tube style back.
  • 25. 25 Step 2: Set the rivet. Step 3: Trim the fold formed piece to a desired shape. Step 4: Use files to smooth and refine the edges of the fold formed piece. Step 5: Use the smallest hole punch from the multi hole punch tool to make holes in the desired locations on the fold formed piece. Step 6: Cut a 24 gauge piece of sheet metal, nickel silver in this case, larger than your fold formed piece. You will trim it to fit later, so do not worry too much about size or shape. Step 7: Using an ultra fine point Sharpie, mark ONE of the holes through the fold formed piece onto the nickel silver backing. Step 8: Use the smallest hole punch from the multi hole punch tool to make a hole on the mark on the nickel silver. Step 9: Place a brass domed head rivet or eyelet through both holes and connect the fold formed piece to the nickel silver piece. Rivet in place. Step 10: Use the smallest hole punch from the multi hole punch tool to make a hole in the nickel silver backing through another fold formed hole. Step 11: Place a brass domed head rivet or eyelet through both holes and connect the fold formed piece to the nickel silver piece. Rivet in place. Step 12: Repeat the process until the fold formed piece is securely attached to the nickel silver backing. Step 13: Decide where the top of the pendant will be. Punch a hole there and add a brass eyelet. Add a jump ring to the hole. Step 14: Trim the nickel silver backing the desired distance away from the fold formed piece. Step 15: Use files to smooth and refine the edges of the nickel silver backing. Step 16: You may wish to tumble the piece at this point to polish. Step 17: Slide the pendant on a chain or leather cord.
  • 26. 26 Cab and Tab Pendant Riveting and soldering experience is necessary to make this project. Materials: 22, 24 and/or 26 gauge sheet metal One 18x13mm oval cabochon One 6mm daisy spacer One 18 gauge balled head rivet Two 16 gauge flat head rivets Purchased chain or leather cord Tools and Other Supplies: Tools for your preferred method of cutting out sheet metal shapes Optional: Tools and solder for your preferred method of soldering Tools for riveting Mini TruStrike Sharp Texturing Hammer Hammer for stamping 5mm half sun metal punch design stamp Small woodworking nail set 6-step Rubber, plastic or rawhide mallet Bench block Hint: Use a rubber block or a sand bag under your bench block to help deaden the sound from your hammer blows. 1.25mm and 1.5mm hole punches Variety of files to smooth and refine metal edges Dapping punch set Pickle and pickle pot Liver of sulfur and 0000 steel wool Ultra fine point Sharpie marker Tumbler and steel shot Directions: Read through all the directions before beginning the project. Step 1: Copy the templates: A6, A7, A8, A9, A10 Step 2: Trace the templates on sheet metal. The A6 backplate should be cut from 22 or 24 gauge sheet metal, no thinner. The A7 tab oval should be cut from 24 gauge sheet metal, no thinner. The flowers and leaves can be cut from 26 gauge if you have trouble cutting them from 24 gauge. Note: The heavier the sheet metal, the deeper the texturing impression will be, resulting in more dimensionality in patinated pieces. Step 3: Cut the A10 flower out using your preferred method for cutting sheet metal. Use a 1.25mm punch to make holes at the bottom of each“V” in the small flower. Cut the flower out. Use a 1.25 hole punch for the center hole. Step 4: Cut the rest of the pieces out using your preferred method for cutting sheet metal. If shears were used to cut your pieces out, the edges of the cut pieces curve a bit and the pieces may also become slightly bent. Flatten each piece on a bench block using a plastic, rubber or rawhide mallet. Step 5: Even calibrated cabochons are not always exact in size. Adjust the A7 tab oval size according to the size of your cab. Step 6: Punch holes in the A7 tab oval with a 1.5mm hole punch.
  • 27. 27 Step 7: Use files to smooth the edges of each piece and refine the scallops on the backplate. Step 8: Using the 5mm half sun metal punch, stamp each scallop along the outer edge of the backplate. If desired, use a small woodworking nail set to stamp the circles inside the curve of each of the half sun stampings. Step 9: Optional: Use the narrow side of a Mini TruStrike Sharp Texturing Hammer to texture the edge of the sides of the bail. Step 10: Stamping and texturing can make metal cup a bit. Flatten the rectangle on a bench block using a plastic, rubber or rawhide mallet. Step 11: Use the narrow side of a Mini TruStrike Sharp Texturing Hammer to texture the edge of the flower petals. Step 12: Use the same sharp texturing hammer to texture the edges of the two leaves. Hint: Since the leaves are so small, you may wish to tape them to your bench block and texture one side at a time. Step 13: Place the cab in position. Draw around the cab with an ultra fine point marker. Place the tab oval in position on the marked oval. Mark one of the holes in the tab backplate on the scalloped piece. Use a 1.5mm hole punch to make the hole. Step 14: Place a 16 gauge flat head rivet through the tab oval and then the backplate. Rivet the tab oval in place on the scalloped backplate. Step 15: Making sure that the tab oval is still on the marked line, punch the other hole in the backplate using the hole in the tab oval as a guide. Using a flat head rivet, connect the two pieces together as in Step 14. Step 16: Place the cab on the tabbed backplate and bend the tabs straight up, tight against the lower edge of the cabocon. Step 17: Decide where the flower should be placed. You may need to bend the flower petals up a bit to accommodate the cab. Use an ultra fine point Sharpie to mark the place where you need to rivet it in place. Use a 1.25 hole punch to make the hole. You are not securing the cab in place at this time, so carefully remove it and set aside. Step 18: Thread a small daisy spacer on an 18 gauge balled headpin. Slide the headpin through the hole in the flower and pendant. Rivet in place.
  • 28. 28 (Note: All metal needs to be clean for solder to work properly.) Step 19: Decide where you want to place the leaves. Solder them in place using medium or hard solder. Step 20: Pickle your pendant to remove fire scale. Step 21: After texturing, the back of the bail may no longer be square. Use a file to square it back up. Step 21: Use step 5 on a 6 step pliers to form the bail. Use easy solder to solder the bail closed. Note: It is not necessary to solder the bail closed, but it does make it more secure. Step 22: Pickle the piece again. Step 23: Tumble the pendant. Step 24: You can leave the pendant bright and shiny, in which case continue on to Step 27. Step 25: Or, use liver of sulfur to patina your piece. Buff with 0000 steel wool to bring out the dimension of your texturing. Step 26: Buffing with steel wool creates a satin finish on the metal so you may wish to tumble the pieces for about 30 minutes to bring up a shine. Tumbling will not affect the patina. Step 27: Place your cabochon in the tab oval. Press the top right and the lower left tab in, and then the other two to secure the cabochon in place. Step 28: Slide the pendant on a chain or leather cord. Right: Kathi Nelson had some leather working tools so used them to stamp the pendant edge. BONUS: The jump rings used to make the chain seen here on the Cab and Tab Pendant are: 22 gauge twisted square wire made into 4mm ID jump rings Two 20 gauge interlocked 4mm ID jump rings Connected with two 20 gauge 3mm ID jump rings This chain was also used on the Open Book and Feather Pendants.
  • 29. 29 Sonoran Rose Pendant Soldering and/or riveting experience is necessary to make this project. Materials: 22, 24 or 26 gauge sheet metal Purchased chain or leather cord Above, Left: One 8mm daisy spacer and one 16 gauge balled head rivet Above, Center: One 16 gauge 5mm ID jump ring and one 5mm cabochon Tools and Other Supplies: Tools for your preferred method of cutting out sheet metal shapes Optional: Tools and solder for your preferred method of soldering (Note: All metal needs to be clean for solder to work properly.) Optional: Tools for riveting Mini TruStrike Sharp Texturing Hammer 6-step and chain nose pliers 1mm dimpling pliers Rubber, plastic or rawhide mallet Bench block Hint: Use a rubber block or a sand bag under your bench block to help deaden the sound from your hammer blows. Variety of files to smooth and refine metal edges Dapping punch set Pickle and pickle pot Liver of sulfur and 0000 steel wool Ultra fine point Sharpie marker Tumbler and steel shot Optional: e-6000 or other jewelry glue for the cabochon Directions: Read through all the directions before beginning the project. Step 1: Copy the templates: A11, A12, A13 Note: The flower pieces of this pendant can be soldered or riveted together. The bail was kept separate so the curve of the top back flower petal would show. It is not necessary to have a separate bail. If you are not going to use solder, then incorporate the bail and back flower section into one piece before Step 2. Step 2: Trace the templates on 22, 24 or 26 gauge sheet metal. The heavier the sheet metal, the deeper the texturing impression will be, resulting in more dimensionality in patinated pieces.
  • 30. 30 Step 3: Cut the designs out using your preferred method for cutting sheet metal. If shears were used to cut your pieces out, the edges of the cut pieces curve a bit and the pieces may also become slightly bent. Flatten each piece on a bench block using a plastic, rubber or rawhide mallet. Step 4: Use files to smooth and refine the edges of each of each piece. Step 5: Riveted version: Use a 1.5mm hole punch to make a hole in the center of both flowers if riveting the pieces together. Soldered version: Mark the center of the TOP flower if you will be soldering the pieces together. Step 6: Use the narrower side of a Mini TruStrike Sharp Designer Hammer to texture the top flower out from center. Step 7: If you used shears to cut your pieces out, the edges curve a bit and the pieces may become slightly bent. Texturing also distorts the shape a bit. Flatten each piece on a bench block using a plastic, rubber or rawhide mallet. Step 8: Soldered version: Solder the bail in place on the back side of the back flower using hard solder. Step 9: Optional: Use the narrow side of a Mini TruStrike Sharp Texturing Hammer to texture the edge of the edges of the front side of the bail (not shown in finished pendant). Step 10: Use an ultra fine point Sharpie to mark line down the center back of the bail. Step 11: Use 1mm dimpling pliers to make dimples down the center of the bail. Place the indented cup side of the dimpling pliers on the FRONT side of the metal piece. When you close the jaws of the pliers, the hook portion should be on the center line on the BACK side of the bail. To make each succeeding dimple down the line, place the edge of the indented side of the 1mm dimpling pliers jaw against the previous dimple. Step 12: Cup the back flower in the largest indentation of your dapping block. Cup the front flower, textured side facing up, at least two sizes smaller. When the two flowers are connected, the curved petals on the front flower should not be touching the back flower. To preserve the texture when forming the piece, consider placing a piece of felt or leather between the dap and the disk. Step 13: Use round nosed pliers to curve the petals toward the back. How much you round them is up to you. Be careful to not squeeze the pliers too hard as the jaws could mark the metal.
  • 31. 31 Step 14: After texturing, the back of the bail may no longer be square. Use a file to square it back up. Step 15: Use step 4 of a 6-step pliers to form the bail. Bend the bail forward using chain nose pliers. Make sure the bail is completely closed. Soldered version: Use medium solder to solder the bail closed. Note: It is not necessary to solder the bail closed, but it does make it more secure. Step 16: Place the textured flower on top of the plain one with the attached bail. Make sure that the petals are offset as shown. Continue on with the version you are making. Soldered version: Use easy solder to connect the flowers and jump ring. Riveted versions: Version A: Thread a 16 gauge balled headpin rivet through an 8mm daisy spacer, the top flower and then the bottom flower. Rivet the flower pieces together, making sure to offset the petals for a more natural look. Version B: Use a flat head rivet to join the two flower sections together. Rivet the flower pieces together, making sure to offset the petals for a more natural look. Step 17: Pickle your pendant to remove fire scale if you did any soldering. Step 18: Tumble your pendant. Step 19: You can leave the pendant bright and shiny, in which case continue on to Step 22. Step 20: Use liver of sulfur to patina your pendant (and the 5mm jump ring if you are making the cabochon version). Buff with 0000 steel wool to bring out the dimension of your texturing. Step 21: Buffing with steel wool creates a satin finish on the metal so you may wish to tumble the pieces for about 30 minutes to bring up a shine. Tumbling will not affect the patina. Step 22: Riveted version with cabochon: Use e-6000 or other jewelry glue to secure the 5mm ring and cabochon in the center of the pendant. Soldered Version with cabochon: Use e-6000 or other jewelry glue to secure the cabochon in the jump ring in the center of the pendant. Step 23: Slide the pendant on a chain or leather cord.
  • 32. 32 Life Bird Pendant Soldering and/or riveting experience may be necessary to make this pendant. Materials: 24 or 26 gauge sheet metal (see Step 12) One 18 gauge 6mm ID jump ring EITHER One 8mm daisy spacer and one 16 gauge balled head rivet OR One 16 gauge 5mm ID round jump ring and one 5mm cabochon Optional: 3.5x3.5mm eyelet Purchased chain or leather cord or make your own Tools and Other Supplies: Tools for your preferred method of cutting out sheet metal shapes Tools and solder for your preferred method of soldering Note: You can glue the pieces together but this is not a permanent solution. The pendant could fall apart with wear. Optional: Multi size hole punch tool and tools for setting an eyelet Mini TruStrike Sharp Designer and Embossing Hammers Flat and chain nose pliers Rubber, plastic or rawhide mallet Bench block Hint: Use a rubber block or a sand bag under your bench block to help deaden the sound from your hammer blows. 1.5mm hole punch Variety of files to smooth and refine metal edges Small right facing leaf stamp Awl Dapping punch set Pickle and pickle pot Liver of sulfur and 0000 steel wool Tumbler and steel shot Ultra fine point Sharpie marker e-6000 or other jewelry glue for the cabochon Optional: multi hole punch tool, one 3.5x3.5mm eyelet and tools for setting the eyelet Directions: Read through all the directions before beginning the project. Step 1: Copy the templates: A14, A15, A16, A17, A18 Step 2: Trace templates A14, A15, A16 and A17 on 24 or 26 gauge sheet metal. Save the templates for the squares. You will be using them in Steps 7 and 8. The bird body and wing will be cut in Step 12. Step 3: Cut the designs out using your preferred method for cutting sheet metal. If shears were used to cut your pieces, the edges of the cut pieces curve a bit and the pieces may also become slightly bent. Flatten each piece on a bench block using a plastic, rubber or rawhide mallet. Do not punch holes in the squares at this time. Step 4: Use files to smooth and refine the edges and round the corners on the two rectangles. Step 5: Use the sharper edge of the Mini TruStrike Sharp Designer Hammer to create lines radiating out from the center of one square. This square will be referred to as the bottom square.
  • 33. 33 Step 6: Use the larger side of Mini TruStrike Small Embossing hammer to texture the other square. This square will be referred to as the top square. Step 7: Texturing changes the size and shape of the squares. Place the original square templates on the textured squares, draw around them with an ultra fine point marker. Mark the center hole. Step 8: Cut out the squares. If riveting the squares in place, use a 1.5mm punch to make the center hole in both squares. Note: If you are soldering or gluing the squares in place, you do not need the hole. Remember, gluing pieces together is not a permanent solution. The pendant could fall apart with wear. However, if you keep all the elements flat and clamp them when gluing, this should not be much of a problem. Make sure that the glue does not seep out as you cannot patina areas where there is glue. Note: All metal needs to be clean for solder to work properly. Step 9: Place the bottom of the larger piece 3/16” up from the bottom of the long narrow piece. Use hard solder to solder the two pieces together. If you do not want to solder the two pieces together, you can use e-6000 or other jewelry glue to connect them. Step 10: Place the bottom square on the center of the larger rectangle, orienting it in a diamond position. If you are riveting the squares in place, use the hole in the square to determine where to make a mark on the rectangle and use a 1.5mm punch to make the hole. If you keeping the squares flat and/or are gluing them in place, go on to Step 12. Step 11: Use the largest well of the Dapping Punch Set to cup the squares one at a time, textured side facing up. To preserve the texture when forming them, consider placing a piece of felt or thin leather between the dap and the squares. Step 12: The bird body, A18, may be easier to cut out of 26 gauge sheet metal and the wing out of 28 gauge. Trace the bird body template on your sheet metal and cut out. Stamp a small right facing leaf on a scrap of sheet metal. Cut the “leaf” wing out. Hint: You may find it easier to cut the bird and wing out if you hold the small pieces with flat nosed pliers.
  • 34. 34 Step 13: Use an awl to stamp an “eye” for the bird. Step 14: Place the rectangle section so the long narrow piece is on top. Use medium solder for the wing and bird if soldering the bird in place where shown. Note: You could use medium solder to solder the back two rectangles and the bird with wing all at the same time. Step 15: Place the dimpled top square as shown on top of the diamond oriented bottom square. Step 16—Connecting the squares to the rectangles: A: Decide if you are using a 16 gauge balled head rivet with an 8mm daisy spacer (left) or if you are going to place a cabochon inside a 16 gauge 5mm jump ring (right). B: If riveting the pieces together, use your preferred rivets to do this. In this tutorial, the cupped squares were riveted in place before the jump ring was soldered in place. C: If soldering the pieces together, use easy solder to solder the squares in place, along with the 5mm 16gauge jump ring if you are adding a cabochon. D: Or, glue the pieces together if squares are not cupped. Step 17: Use a 1.5mm punch to make a hole at the top of the pendant. Insert an 18 gauge jump ring of appropriate size for the chain or cord you will hang the pendant on. Optional: Use the 3/32” or 2.33 hole punch from the multi hole punch tool to make the hole at the top of the pendant. You can then put a small 3.5x3.5mm eyelet in the hole for an added design element (shown, left). Here, a bench block was used when spreading and flattening the back of the eyelet. Doing that makes the front of the eyelet flattened, not rounded. If you want to keep the eyelet top rounded, use a magazine or a paper notepad instead of a bench block when flattening out the back of the eyelet. Step 18: Attach an 18 gauge 6mm jump ring in the hole. You may have to change the size of the jump ring to accommodate the size chain or cord you are using. Step 19: If you used solder, pickle the piece to remove fire scale and then tumble it. If you glued the pieces together, do not pickle or tumble as the pieces may pull apart. Step 20: You can leave your piece bright and shiny, in which case continue on to Step 23.
  • 35. 35 Step 21: Or, use liver of sulfur to patina your piece. Buff with 0000 steel wool to bring out the dimension of your texturing. Step 22: Buffing with steel wool creates a satin finish on the metal so you may wish to tumble the pendant for about 30 minutes to bring up a shine. Tumbling will not affect the patina. As before, if you glued the pieces together, do not tumble as the pendant pieces may pull apart. Step 23: Use e-6000 or other jewelers glue to secure the cabochon in place. Step 24: Slide the pendant on a chain or leather cord. You do not have to use the templates called for in any of the directions. Mix it up a bit for a look unique to you. Kathi Nelson used a patinated piece of copper for A15, the long narrow rectangle. Then she used two of the larger 1” squares and put a 10mm cabochon and 16 gauge 10mmID ring in the middle. The bird was cut a bit larger so it would fit better with a wing cut from the A8 leaf template.
  • 36. 36 Desert Flower Pendant Soldering and/or riveting experience is necessary to make this project. Materials: 22, 24 or 26 gauge sheet metal One purchased chain or leather cord or make your own 18mm circular decorative element (or ¾” metal circle) One 8mm daisy spacer One 16 gauge balled head rivet Purchased chain or leather cord Tools and Other Supplies: Tools for your preferred method of cutting out sheet metal shapes Tools and solder for your preferred method of soldering (Note: All metal needs to be clean for solder to work properly.) Tools for riveting Mini TruStrike Sharp Texturing Hammer 6-step and chain nose pliers 3mm dimpling pliers Rubber, plastic or rawhide mallet Bench block Hint: Use a rubber block or a sand bag under your bench block to help deaden the sound from your hammer blows. 5mm half sun metal punch design stamp Small woodworking nail set 1.5mm hole punch Variety of files to smooth and refine metal edges Alcohol and cotton ball Dapping punch set Pickle and pickle pot Liver of sulfur and 0000 steel wool Ultra fine point Sharpie marker Tumbler and steel shot Directions: Read through all the directions before beginning the project. Step 1: Copy the templates: B1, B2, B3, B4 Step 2: Trace the templates on 22, 24 or 26 gauge sheet metal. The B1 backplate should be cut from 22 or 24 gauge sheet metal, no thinner. The B2 “ice cream cone” can be cut from 24 or 26 gauge sheet metal. The B4 flower circle and B3 can be cut from 26 gauge sheet metal. Note: The heavier the sheet metal, the deeper the texturing impression will be, resulting in more dimensionality in patinated pieces. Step 3: Cut the designs out using your preferred method for cutting sheet metal. If shears were used to cut your pieces out, the edges of the cut pieces curve a bit and the pieces may also become slightly bent. Flatten each piece on a bench block using a plastic, rubber or rawhide mallet. Step 4: Use files to smooth and refine the edges of each of the pieces. Step 5: Using an ultra fine point Sharpie, mark the center top and center sides of the top section on the B2 “ice cream cone” piece. Make a mark between those marks, for a total of 5. Using the 5mm half sun metal punch, stamp the outer edge of the piece as shown, using the marks as a guide for the
  • 37. 37 placement of the center of the punch. Use a small woodworking nail set to stamp the circles inside the curve of each of the half sun stampings. You may need to use a rubber, plastic or rawhide mallet to flatten the piece after you stamp it. Remove the marker line with an alcohol soaked cotton ball. Step 6: Use a 1.5mm hole punch to make a hole in the center of the circle if riveting in place. Use the narrower side of a Mini TruStrike Sharp Designer Hammer to texture the circle out from center. Step 7: Use metal shears to cut a wavy edge around the circle, making sure to not make the circle too much smaller. Step 8: Note: If you do not have a circular decorative element, cut and texture a ¾” metal circle following Steps 6 and 7 above. Place the decorative flower disk on the “ice cream cone” piece. Use an ultra fine point Sharpie to mark the hole where it will later be riveted in place. Use a 1.5mm punch to make the hole in the “ice cream cone” piece. Step 9: Use the Dapping Punch Set to cup the decorative flower disk, textured side facing up. Do the same with the purchased flower disk. To preserve the texture when forming the piece, consider placing a piece of felt or leather between the dap and the disk. Make sure that the smaller wavy disk is cupped more than the flower disk. When they are nestled together, the decorative flower disk should show as below, right. Step 10: Use an ultra fine point Sharpie to mark line down the center back of B3, the long shield shaped piece. Make a mark about 3/16” down from the curved edge. Step 11: Use a 3mm dimpling pliers to make three dimples down the marked center line. Place the indented cup side of the dimpling pliers on the FRONT side of the metal piece. When you close the jaws of the pliers, the hook portion should be on the center line and on the mark on the BACK side of the piece.
  • 38. 38 Step 12: To make each succeeding dimple along the line, place the edge of the indented side of the dimpling pliers jaw against the previous dimple. Remove the marker line with an alcohol soaked cotton ball. Step 13: Left: Place the “ice cream cone” piece on the B1 backplate and use an ultra fine point marker to draw around it. Step 14: Right: Use the narrow side of a Mini TruStrike Sharp Texturing Hammer to texture the edge of the backplate, making sure the texture lines extend inside the marked line just a bit. Texture the sides of the bail as well. You may need to use a rubber, plastic or rawhide mallet to flatten the piece after you texture it. Remove the marker line with an alcohol soaked cotton ball. Note: All metal needs to be clean for solder to work properly. Step 15: Position the B2 “ice cream cone” piece and B3 “shield” on the backplate. Use medium or hard solder to solder the “ice cream cone” and shield to the backplate. Step 16: Use an ultra fine point Sharpie to mark a line down the center back of the bail. Use a 3mm dimpling pliers to make dimples on the marked center line, starting where the bail meets the pendant. Place the indented cup side of the dimpling pliers on the FRONT side of the metal piece. When you close the jaws of the pliers, the hook portion should be on the center line on the BACK side of the piece. To make each succeeding dimple along the line, place the edge of the indented side of the dimpling pliers jaw against the previous dimple. Remove the marker line with an alcohol soaked cotton ball.
  • 39. 39 Step 17: Use a 1.5mm punch to make the hole in the backplate through the hole punched in the “ice cream cone” piece. Step 18: Thread a 16 gauge balled headpin rivet through an 8mm daisy spacer, the scalloped cupped disk, the cupped flower disk and into the hole in the pendant. Rivet in place. Step 19: The fire scale needs to be removed before you can get a good solder join, so clean the area on the back of the pendant around where the bail meets the body of the pendant. A bit of steel wool or fine sandpaper will work. You could also just pickle the piece. Step 20: After texturing, the back of the bail may no longer be square. Use a file to square it back up. Use step 6 of 6-step pliers to form the bail. Step 21: Bend the bail forward using chain nose pliers. Make sure the bail is completely closed. Step 22: Use easy solder to secure the bail closed. Note: It is not necessary to solder the bail closed, but it does make it more secure. Step 23: Pickle the pendant to remove fire scale and then tumble the piece. Step 24: You can leave your pendant bright and shiny. Step 25: Or, use liver of sulfur to patina it. Buff with 0000 steel wool to bring out the dimension of your texturing. Step 26: Buffing with steel wool creates a satin finish on the metal so you may wish to tumble the pendant for about 30 minutes to bring up a shine. Tumbling will not affect the patina. Step 27: Slide the pendant on a chain or leather cord.
  • 40. 40 BONUS: The byzantine chain used here with the Dessert Flower Pendant can be made using a tutorial from the book Handcrafting Chain and Bead Jewelry by Scott David Plumlee. He also has a free byzantine chain tutorial on his website: http://www.davidchain.com/ His step by step tutorial using different colors of rings for each step makes it very easy to understand how the chain is constructed. The jump rings used to make this chain were 18 gauge 3.5mm ID. This chain can also be used on the Southwest Cross and Feather Pendants.
  • 41. 41 Kachina Burst Earrings Soldering and/or riveting experience may be necessary to make these flower components. Materials: 26 gauge sheet metal (see Step 2) Two 18mm circular decorative elements (or ¾” metal circles) Two 16 gauge 5mm ID round jump rings Two 5mm cabochons e-6000 or other jewelry glue One set of ear wires Optional (shown): Two 1¼” (1¾” if hanging pieces upside down) pieces of fine chain and four 20 gauge 2.5mm ID jump rings Hint: Make your own chain with 20 gauge 2mm ID jump rings. Tools and Other Supplies: Tools for your preferred method of cutting out sheet metal shapes Tools and solder for your preferred method of soldering Note: You can glue the decorative elements together but this is not a permanent solution. The earrings could fall apart with wear. Riveting the pieces together would be acceptable. Mini TruStrike Sharp Designer Hammer Flat and chain nose pliers Rubber, plastic or rawhide mallet Bench block Hint: Use a rubber block or a sand bag under your bench block to help deaden the sound from your hammer blows. 1.25mm and 1.5mm hole punch Rotary tool (see Step 10) Variety of files to smooth and refine metal edges Pickle and pickle pot Tumbler and steel shot Liver of sulfur and 0000 steel wool Ultra fine point Sharpie marker e-6000 or other jewelry glue for the cabochon Directions: Read through all the directions before beginning the project. Step 1: Copy the templates: B5, B6, B7, B8 Step 2: Trace the templates on 26 gauge sheet metal. Note: The heavier the sheet metal, the deeper the texturing impressions will be, resulting in more visual dimensionality in patinated pieces. If you want to use 24 gauge sheet metal for the half circle backs, using 28 gauge sheet metal for the “sun” sections can help lighten the weight a bit. Do not punch the holes in the half-circles yet. Save the template to do this in a later step. Cut a ¾” circle from 26 gauge sheet metal if not using a circular decorative element. Step 3: Cut the designs out using your preferred method for cutting sheet metal. Do not punch holes now. If shears were used to cut your pieces out, the edges of the cut pieces curve a bit and the pieces may also become slightly bent. Flatten each piece on a bench block using a plastic, rubber or rawhide mallet. Step 4: Use files to smooth and refine the edges of each of the pieces.
  • 42. 42 Step 5: Place a half “sun” on a half-circle. Use an ultra fine point Sharpie to mark each inside “V” point. Use the marker to connect the dots. Step 6: Use the narrower side of a Mini TruStrike Sharp Designer Hammer to texture the edge of each half-circle, making sure the lines extend inside the marked line just a bit. Step 7: You will notice that the half-circle edges where you textured now curve down because the metal expands when you texture it. If one piece does not quite match the other, just texture a bit more along the shorter side to get the curves to match. Remove the marker line with an alcohol soaked cotton ball. Step 8: Use a rubber, plastic or rawhide mallet to flatten each piece after you texture it. If you used a shears to cut out your pieces, they can become a bit bent so flatten each half “sun” as well. Step 9: Place a “sun” on the textured half-circle, making sure the bottom side edges of the “sun” meet the bottom edge of the textured half- circle. The bottom center of the sun will extend beyond the bottom edge of the circle. (Note: All metal needs to be clean for solder to work properly.) Step 10: Use medium or hard solder to connect the “sun” to the circle. Note: You could glue these two pieces together, but this is not a permanent solution. Make sure to clamp them together for a secure hold. Also, make sure that the glue does not seep out from under the “sun” as you cannot patina where there is glue.
  • 43. 43 Step 11: On each piece, use a rotary tool to grind off the excess “sun” to make the bottoms edges of the two pieces match. Step 12: File the corners to round them a bit. Step 13: Pickle the pieces. If you are using a ¾” metal circle instead of a decorative element: A: Use the narrower side of a Mini TruStrike Sharp Designer Hammer to texture the circle out from center. Use a 1.5mm hole punch to make a hole in the center of the circle if riveting in place. B: Use metal shears to cut a wavy edge around the circle, making sure to not make the circle too much smaller. Use a rubber, plastic or rawhide mallet to flatten the piece on a bench block after you texture and cut it. Step 14: Position the circle or decorative element so that it hangs a bit below the half “sun” and half- circle bottom edge. Use easy solder to solder the purchased flower or wavy circle and 5mm ring in place. Or, mark the hole. Use a 1.5mm punch to make the hole through the “sun” and half circle and rivet the elements together. Then glue the 16 gauge 5mm ID jump ring in the center of the circle. Step 15: Decide if you are going to add a chain using the two side holes (shown) or attach the piece to an ear wire using the center hole. Step 16: Place the template on the earring. Using an ultra fine point Sharpie, mark the center hole or the two side holes (shown). Step 17: Use a 1.25 punch to make the holes in each piece. Hint: If you want to hang the pieces upside down (shown at right), make a hole in each outer corner. You could also attach jump rings in the filigree holes of the decorative circle element and attach to ear wires. Step 18: If using chain: Cut two 2” pieces of chain, OR make a 17 link (2¾” chain or 25 links if hanging pieces upside down) chain for each earring using 20 gauge 2mm jump rings. Step 19: Attach a chain ends to each earring using a 20 gauge 2.5mm jump rings. Step 20: Attach an ear wire to the center of each chain or in the top hole of the earring.
  • 44. 44 Step 21: Check the earring length. Since everyone has a different length neck, you may want the earrings to hang longer or shorter. Adjust the chain length accordingly. Step 22: If you used solder, pickle the pieces to remove fire scale and then tumble them. If you glued them, do not pickle or tumble as the pieces may pull apart. Step 23: You can leave your piece bright and shiny, in which case continue on to Step 26. Step 24: Or, use liver of sulfur to patina your piece. Buff with 0000 steel wool to bring out the dimension of your texturing. Step 25: Buffing with steel wool creates a satin finish on the metal so you may wish to tumble the pieces for about 30 minutes to bring up a shine. Tumbling will not affect the patina. As before, if you glued the pieces together, do not tumble as the pieces may pull apart. Step 26: Use jewelers glue to secure the cabochons in place.
  • 45. 45 Serape Earrings Materials: Sheet metal-see Step 2 Twelve 3mm beads Six 21 or 22 gauge headpins One set of ear wires or ball posts Tools and Other Supplies: Tools for your preferred method of cutting out sheet metal shapes Vintaj Navajo Textiles DecoEmboss Folder Sizzix Big Shot Embossing Machine Flat, round and/or chain nose pliers Rubber, plastic or rawhide mallet Bench block Hint: Use a rubber block or a sand bag under your bench block to help deaden the sound from your hammer blows. 1.25mm hole punch Variety of files to smooth and refine metal edges Optional: multi hole punch tool, one 3.5x3.5mm eyelet and tools for setting the eyelet Directions: Read through all the directions before beginning the project. Step 1: Copy the templates: B9, B10 Step 2: Trace the templates on 26 gauge sheet metal. Note: You can use 24 gauge copper if you anneal and pickle it first. Otherwise, stick with 26 or 28 gauge sheet metal. The harder the metal is, the more likely damage can occur to your embossing machine. 28 gauge nickel silver was used here. Step 3: Cut the designs out using your preferred method for cutting sheet metal. If shears were used to cut your pieces, the edges of the cut pieces curve a bit and the pieces may also become slightly bent. Flatten each piece on a bench block using a plastic, rubber or rawhide mallet. Step 4: Use a 1.25mm punch to make the holes. See Step 7 for the eyelet option, which can not be done until after the pieces are textured. Step 5: Use files to smooth and refine the edges and round the corners of each piece. Step 6: Decide where to place one earring piece for the texture design you want. Close the folder and run it through the Sizzix Big Shot Embossing Machine to achieve the background texture. Repeat for the other earring for matching pieces. Step 7: Optional: Use the 3/32” or 2.33 hole punch from the multi hole punch tool to make each hole. You can then put a small 3.5x3.5mm eyelet in the hole for an added design element.
  • 46. 46 Note: If you made the earrings with silver or copper, you can use liver of sulfur to patina them. Buff with 0000 steel wool to bring out the dimension of your texturing. Step 8: Tumble the pieces to brighten them up, if desired. Repeat Steps 9-10 to start a total of 6 wire wrapped bead drops. Step 9: Slide two 3mm beads on a plain or balled headpin. Step 10: Start a wire wrapped loop. Step 11: Before finishing the wrapped loop, slip the wire through one of the punched holes. Finish the wrap. Trim off excess wire. Step 12: Repeat with the other bead dangles. Step 13: Use a jump ring to attach ball posts or attach ear wires.
  • 47. 47 Rain in the Desert Earrings Materials: 24 or 26 gauge brass sheet metal (see Step 2) Six 3.5mm beads 32” of 21 gauge half round wire One set of ear wires or ball posts Tools and Other Supplies: Tools for your preferred method of cutting out sheet metal shapes Mini TruStrike Embossing Hammer-the larger of the two Flat and chain nose pliers Awl Flush cutter Rubber, plastic or rawhide mallet Bench block Hint: Use a rubber block or a sand bag under your bench block to help deaden the sound from your hammer blows. 1.25mm hole punch Variety of files to smooth and refine metal edges Optional: multi hole punch tool, one 3.5x3.5mm eyelet and tools for setting the eyelet Directions: Read through all the directions before beginning the project. Step 1: Copy the templates: B11, B12 Step 2: Trace the templates on 24 or 26 gauge sheet metal. Note: The heavier the sheet metal, the deeper the texturing impression will be, resulting in more dimensionality, especially if you use silver or copper sheet metal and patina the pieces Step 3: Cut the designs out using your preferred method for cutting sheet metal. If shears were used to cut your pieces, the edges of the cut pieces curve a bit and the pieces may also become slightly bent. Flatten each piece on a bench block using a plastic, rubber or rawhide mallet. Step 4: Use a 1.25mm punch to make the holes. Optional: Use the 3/32” or 2.33 hole punch from the multi hole punch tool to make each hole. You can then put a small 3.5x3.5mm eyelet in the hole for an added design element.
  • 48. 48 Step 5: Use files to smooth and refine the edges of each piece. Step 6: Use either side of the Mini TruStrike Embossing Hammer to texture the pieces. Fade from heavy texturing at the bottom to nothing at the very top. Step 7: Use a rubber, plastic or rawhide mallet to flatten each piece after you texture it. Note: If you made the earrings with silver or copper, you can use liver of sulfur to patina them. Buff with 0000 steel wool to bring out the dimension of your texturing. Step 8: Tumble the pieces to brighten them up, if desired. Repeat Steps 9 through 12 to make the second earring. Step 9: Center three 3.5mm beads on a 16” piece of 21 gauge half round wire. Bend the wire at a 90 degree angle to the beads, with the flat side facing the beads. Step 10: Determine where the beads fit fully across the metal piece. Start your wrap there. Step 11: Wrap the wire ends around the piece three times to show (three wraps showing on the front side) on either side of the beads. Push the wrapped wires tightly against the beads. The wires can even be under the beads a bit.
  • 49. 49 Step 12: Carefully push the wrapped wires with the beads towards the bottom of the earring to tighten the wraps. Make sure that the wrapped beads on the earrings are in the same place on each so they match. Step 13: Pull one wire end under the wrapped wires on one side of the bead on the back of the piece. You may need to use the tip of an awl to lift the wires a bit so you can slide the wire end under them. Pull the wire tight. Trim off the excess wire. Pull the other wire under the remaining wrap wires on the back of the piece. Pull the wire tight. Trim off the excess wire. Step 14: Use a jump ring to attach ball posts or attach ear wires.
  • 50. 50 Southwest Cross Soldering and/or riveting experience is necessary to make this project. Materials: 22 or 24 gauge sheet metal One 10mm round cabochon Bezel cut from 3/8” ID pipe See Step 11 Circles cut from 24 gauge sheet metal using the 3.97mm punch in the multi size hole punch set or decorative rivets to fit the space Purchased chain or leather cord Tools and Other Supplies: Tools for your preferred method of cutting out sheet metal shapes Tools and solder for your preferred method of soldering and/or Tools for riveting 6-step, bracelet bending and chain nose pliers 3mm dimpling pliers Rubber, plastic or rawhide mallet Bench block Hint: Use a rubber block or a sand bag under your bench block to help deaden the sound from your hammer blows. Mini TruStrike Sharp Designer Hammer Hammer to use with metal stamps 5mm half sun metal punch design stamp Small woodworking nail set Variety of files to smooth and refine metal edges Multi size hole punch set Pickle and pickle pot Pipe cutter Liver of sulfur and 0000 steel wool Ultra fine point Sharpie marker Tumbler and steel shot Directions: Read through all the directions before beginning the project. Step 1: Copy the templates: C1, C2 Step 2: Trace the templates on 22 or 24 gauge sheet metal. Note: The heavier the sheet metal, the deeper the texturing impression will be, resulting in more dimensionality in patinated pieces. Step 3: Cut the cross out using your preferred method for cutting sheet metal. Option A: If you do not want to use a bezel, incorporate the tabs when cutting out the cross. These tabs can be used to secure the cabochon in place. Option B(shown): Remove the tabs if using a bezel or ring for the cabochon or if you are using another form of decoration in place of the cabochon. To make cutting the inner curves easier, use the 3.97mm punch from the multi size hole punch set to punch holes in each inner corner of the cross. Save the punched circles to use as decorative elements on the cross. Option C: You do not need to use a pipe for a bezel. You could use a 14 gauge 10mm ID closed jump ring for a bezel instead, or purchase a designer bezel.
  • 51. 51 Step 4: If shears were used, the edges of the cross will curve a bit and the cross may have also become slightly bent. Flatten the cross on a bench block using a plastic, rubber or rawhide mallet. Step 5: Use files to smooth and refine the edges of the cross. Step 6: Design Decisions: Decide where you would like to put the punched pieces. You may even want to punch a few more from your scrap or choose to leave these pieces off. . Step 7: For the cross shown, cut a bezel from 3/8” ID pipe. File one side flat. Step 8: Use an ultra fine point Sharpie to mark the center edge of each “arm.” Step 9: Using a half sun metal punch design stamp, use the guide marks to stamp the center of each arm first. Then stamp the two outer corners. In the curve of each half sun, use a small woodworking nail set to stamp the circle design.
  • 52. 52 Step 10: Stamping can make metal cup a bit. Flatten the cross on a bench block using a plastic, rubber or rawhide mallet. Step 11: Option B: Use a pipe cutter to cut a very short piece of pipe for your bezel. Let the thickness of your cabochon be your guide. Step 12: Option A: Make a flower with the two blue template circles and rivet in place. Note: All metal needs to be clean for solder to work properly. Options B and C: Use medium solder to solder the punched circles and pipe bezel (or a 14 gauge 10mm ID ring or 10mm ID purchased bezel) in place Step 13: Use the narrower side of a Mini TruStrike Sharp Designer Hammer to texture the top edge of the pipe bezel. Step 14: Use the smaller side of the large Mini TruStrike Embossing Hammer to texture the part of the bail that will be visible. Do not texture the part that will soldered to the back of the cross. Step 15: Use steel wool or sand paper to clean the fire scale off the back of the cross where the bail will be attached. Do the same to the portion of the bail that will be soldered. Solder the bail in place. Or, pickle the pieces to remove fire scale and clean the surface. Step 16: Solder the bail in place using easy solder.
  • 53. 53 Step 17: Use an ultra fine point Sharpie to mark a line down the center back of the bail. Use a 3mm dimpling pliers to make dimples on the marked center line, starting where the bail meets the pendant. Place the indented cup side of the dimpling pliers on the FRONT side of the metal piece. When you close the jaws of the pliers, the hook portion should be on the center line on the BACK side of the piece. To make each succeeding dimple along the line, place the edge of the indented side of the dimpling pliers jaw against the previous dimple. Remove the marker line with an alcohol soaked cotton ball. Step 18: After texturing, the back of the bail may no longer be square. Use a file to square it back up. Use medium bail making pliers or step 6 of 6-step pliers to form the bail. Step 19: Use easy solder to secure the bail closed. Note: It is not necessary to solder the bail closed, but it does make it more secure. Step 20: Pickle your pendant to remove fire scale. Step 21: Tumble your pendant. Step 22: You can leave your piece bright and shiny, in which case continue on to Step 25. Step 23: Or, use liver of sulfur to patina your pendant. Buff with 0000 steel wool to bring out the dimension of your texturing. Step 24: Buffing with steel wool creates a satin finish on the metal so you may wish to tumble the pieces for about 30 minutes to bring up a shine. Tumbling will not affect the patina. Step 25: Soldered Version with cabochon: Use e-6000 or other jewelry glue to secure the cabochon in the bezel of the pendant. A 10mm cabochon, shown here, may fit if you raise it up a bit. To do this, fill the bezel partially full with a leveled UV resin. Let it cure, then try the fit of the cabochon. Hint: Put several threads across the bezel before pushing the cab into it. That way, you can pull on the threads to remove the cab if you need to add more resin or glue. Step 23: Slide the pendant on a chain or leather cord.
  • 54. 54 BONUS: The byzantine chain shown here can be made using a tutorial from the book Handcrafting Chain and Bead Jewelry by Scott David Plumlee. He also has a free byzantine chain turoial on his website: http://www.davidchain.com/ His step by step tutorial using different colors of rings for each step makes it very easy to understand how the chain is constructed. The jump rings used here were 18 gauge 3.5mm ID. If you are new to making chains, you may find it easier to make the chain with 18 gauge 4mm ID jump rings. This chain can also be used on the Desert Flower and Feather Pendants.
  • 55. 55 Spirit Feathers Soldering experience may be necessary to make this project. Materials: 22, 24 or 26 gauge sheet metal (see Step 2) One 4mm crystal rhinestone for pendant and two 3mm crystal rhinestones for the earrings One set of ear wires Purchased chain or leather cord Tools and Other Supplies: Tools for your preferred method of cutting out sheet metal shapes Optional: Tools and solder for your preferred method of soldering Mini TruStrike Sharp Texturing Hammer 6-step and chain nose pliers 1mm, 3mm and 5mm dimpling pliers 1.25, 1.5 and 1.8mm hole punches Rubber, plastic or rawhide mallet Bench block Hint: Use a rubber block or a sand bag under your bench block to help deaden the sound from your hammer blows. 5mm half sun metal punch design stamp Small woodworking nail set Variety of files to smooth and refine metal edges Optional: Pickle and pickle pot Liver of sulfur and 0000 steel wool Ultra fine point Sharpie marker Tumbler and steel shot e-6000 or other jewelry glue Alcohol and cotton ball Directions: Read through all the directions before beginning the project. Step 1: Copy the templates C3, C4, C5 Step 2: Trace the templates on 22, 24 or 26 gauge sheet metal. Note: The heavier the sheet metal, the deeper the texturing impression will be, resulting in more dimensionality in patinated pieces. You may want to make the earrings from a lighter weight sheet than the pendant so the weight does not pull on the ear. Step 3: Cut the designs out using your preferred method for cutting sheet metal. If shears were used to cut your pieces, the edges of the cut pieces curve a bit and the pieces may also become slightly bent. Flatten each piece on a bench block using a plastic, rubber or rawhide mallet. Make holes in the earrings, C4 and C5, at the dots using a 1.25 hole punch. Step 4: Use files to smooth and refine the edges of each of each piece. Step 5: Use an ultra fine point Sharpie to mark a lengthwise center line on the front and back of each feather. Mark texturing guidelines on the front of each piece.
  • 56. 56 Step 6: Use a sharp texturing hammer to make the feather lines going out from center. Texturing a line down the center will make the feather naturally fold a bit. Step 7: Use a ball hammer to texture the bail. Step 8: Use a file to round all the points and clean the edges of each piece. Note: Since the metal has been work hardened when texturing, dimpling pliers may punch a hole instead of creating a dimple. Therefore, you may wish to anneal each piece and pickle them before the next steps. You will then need to redraw the lines down the center back of each piece. Step 9: Use a 3mm dimpling pliers to make dimples on the marked center line, starting where the bail meets the pendant. Place the indented cup side of the dimpling pliers on the FRONT side of the metal piece. When you close the jaws of the pliers, the hook portion should be on the center line on the BACK side of the piece. To make each succeeding dimple along the center line of the bail, place the edge of the indented side of the dimpling pliers jaw against the previous dimple.
  • 57. 57 Step 10: Decide where you want to place the crystals. Mark with ultra fine point Sharpie. Step 11: Punch a hole on each mark to accommodate the culet of the crystal: 1.8 mm for the large crystal on the pendant and 1.5mm for the small crystals on the earrings. Step 12: Use dimpling pliers to create the well, centered on the punched hole, for the crystal to sit in: 3mm dimpling pliers for the crystals on the earrings and 5mm for the crystal on the pendant. Step 13: Pendant: On the line on the back of the pendant, mark where you want the raised dimple to appear front. Use the 3mm dimpling pliers to create the dimple on the pendant. Step 14: Earrings: Following the line on center back of each piece, use the 1mm dimpling pliers to create three dimples below the crystal setting on the earrings and three dimples below the 3mm dimple on the pendant. Step 15: Remove the marker lines with an alcohol soaked cotton ball. Step 16: After texturing, the back of the bail may no longer be square. Use a file to square it back up. Use step 6 of a 6-step pliers to create the pendant bail. Bend the bail forward using chain nose pliers. Make sure the bail is completely closed.
  • 58. 58 Note: All metal needs to be clean for solder to work properly. Step 17: Use easy solder to solder the bail closed on the pendant. Note: It is not necessary to solder the bail closed, but it does make it more secure. Step 18: Pickle the pendant. Step 19: Tumble the earrings and pendant pieces. Step 20: You can leave your piece bright and shiny, in which case, you can glue the crystals in place now using e-6000 or other jewelry glue and attach ear wires to the earrings. Step 21: Or, use liver of sulfur to patina your piece. Buff with 0000 steel wool to bring out the dimension of your texturing. Step 21: Buffing with steel wool creates a satin finish on the metal so you may wish to tumble the pieces for about 30 minutes to bring up a shine. Tumbling will not affect the patina. Step 22: Use jewelers glue to secure the crystals in place. Step 23: Slide the pendant on a chain or leather cord. BONUS: The jump rings used to make the chain seen here on the Feather Pendant are: 22 gauge twisted square wire made into 4mm ID jump rings Two 20 gauge interlocked 4mm ID jump rings Connected with two 20 gauge 3mm ID jump rings This chain was also used on the Open Book and Cab and Tab Pendants.
  • 59. 59 This copper set by Kathi Nelson shows how just changing the number and position of the dimples can change the look of the finished pieces.
  • 60. 60 Howl At The Moon Pendant This piece was not soldered but totally glued together. Soldering nickel silver can change its color and copper “rises to the surface” of brass when pickling. Because of the layering, it could be difficult to polish the brass and nickel silver to their original colors. So, a decision was made to glue all the pieces together. If sterling or argentium sheet and gold sheet had been used, the pieces would have been soldered together. Since this design is a pendant, it will not get hard use. All the components are flat and were clamped when glued so they are quite secure. Materials: 24 and 26 gauge copper sheet metal (see Step 2) 24 gauge brass sheet metal 24 gauge nickel silver sheet metal Two 18 gauge 6mm ID jump rings (see Step 15) Purchased chain or leather cord Tools and Other Supplies: Tools for your preferred method of cutting out sheet metal shapes Mini TruStrike Embossing Hammer 5-6mm star metal punch design stamp 5mm half sun metal punch design stamp Texture stamp for coyote tail Awl or small woodworking nail set Flat and chain nose pliers Alcohol and cotton ball Rubber, plastic or rawhide mallet Bench block Hint: Use a rubber block or a sand bag under your bench block to help deaden the sound from your hammer blows. 1.5mm hole punch Variety of files to smooth and refine metal edges Liver of sulfur and 0000 steel wool Ultra fine point Sharpie marker e-6000 or other jewelry glue Tumbler and steel shot Optional: multi hole punch tool, two 3.5x3.5mm eyelets and tools for setting the eyelets Directions: Read through all the directions before beginning the project. Step 1: Copy the templates: C6, C7, C8, C9 Step 2: Trace the templates on 24 gauge sheet metal. The coyote is a bit tricky to cut out using shears, so you may want to use the lighter 26 gauge sheet metal for it. Step 3: Cut the designs out using your preferred method for cutting sheet metal. If shears were used to cut your pieces out, the edges of the cut pieces curve a bit and the pieces may also become slightly bent. Flatten each piece on a bench block using a plastic, rubber or rawhide mallet. Step 4: Use a 1.5mm punch to make holes in the two top corners of the pendant (shown). Hint: If you use the smallest hole punch from the multi hole punch tool to make the holes, you can put a small 3.5mm x 3.5mm eyelet in each hole for an added design element.
  • 61. 61 Step 5: Use files to smooth and refine the edges of each of the pieces. Use needle files for tight spaces. Step 6: Use the smaller side of a Mini TruStrike Embossing Hammer to texture the cactus. Texturing the metal piece makes it curl a bit. Flatten it on a bench block using a plastic, rubber or rawhide mallet. Step 7: Use an ultra fine point Sharpie to mark where you would like to add texture to the coyote. Using a half sun metal punch design stamp, stamp the neck and hip of the coyote. For the tail, A teardrop design stamp for leather was used. The eye was punched with a small nail set used to set nail heads in woodworking, but the point of an awl will work just fine. Remove the marker lines from the piece using an alcohol soaked pad. Texturing the metal piece makes it curl a bit. Flatten it on a bench block using a plastic, rubber or rawhide mallet. Hint: You can use the tip of a sharp awl to scratch the metal to look like fur. Step 8: Position the moon, cactus and coyote on the rectangle so you can decide where the star stamps should be. Mark the spots with an ultra fine point marker. Step 9: When you are satisfied with you design placement, use a star design stamp to make three stars in the “sky.” Stamping can make metal cup a bit. Flatten the rectangle on a bench block using a plastic, rubber or rawhide mallet. Step 10: Now that the texturing and design work is done, you may wish to tumble the pieces to soften the edges. If they become slightly bent during tumbling, flatten each piece on a bench block using a plastic, rubber or rawhide mallet. Step 11: Note: Use only a small amount of glue when layering each piece on the rectangle background to avoid glue seepage. You cannot patina where there is glue. Starting with the moon, layer and glue the pieces together. Clamp them together for a secure hold. Also, make sure that the glue does not seep out from under the pieces as you cannot patina where there is glue.
  • 62. 62 Step 12: You can leave your piece bright and shiny. Or, use liver of sulfur to patina your piece. Note: Brass and nickel silver do not patina with LOS). Buff with 0000 steel wool to bring out the dimension of your texturing. Step 13: Attach an Attach an 18 gauge 6mm jump ring in each hole. You may have to change the size of the jump rings to accommodate the size chain or cord you are using. Step 14: String pendant on a chain or leather cord. The links in the necklace chain shown above were made following the tutorial for the Triple Loop Link by Cindy Wimmer in her fabulous book The Missing Link, using 20 gauge instead of 18 gauge wire. This book would be a great purchase as there are so many ideas for great links to make stunning chains!
  • 63. 63 Landscape Pendant Soldering and/or riveting experience is necessary to make this project. Materials: 24 or 26 gauge sheet metal 1¼” of 18 gauge dead soft square wire Two 18 gauge 6mm jump rings One purchased chain, neckwire or leather cord Design B option: 16 gauge 5mm closed jump ring and 5mm cabochon (see Step 6) Optional: Two 3.5x3.5mm eyelets Tools and Other Supplies: Tools for your preferred method of cutting out sheet metal shapes Tools and solder for your preferred method of soldering Note: You can glue the decorative elements in place but this is not a permanent solution. The piece could fall apart with wear. Mini TruStrike Embossing Hammers Flat and chain nose pliers Rubber, plastic or rawhide mallet Bench block Hint: Use a rubber block or a sand bag under your bench block to help deaden the sound from your hammer blows. 1.5mm hole punch Optional: Multi size hole punch set Optional: Tools for setting an eyelet Variety of files to smooth and refine metal edges Pickle and pickle pot Liver of sulfur and 0000 steel wool Tumbler and steel shot e-6000 or other jewelry glue for the cabochon Directions: Read through all the directions before beginning the project. Step 1: Copy the templates: C10, C11 Step 2: Trace the templates on 24 or 26 gauge sheet metal. Step 3: Cut the designs out using your preferred method for cutting sheet metal. If shears were used to cut your pieces out, the edges of the cut pieces curve a bit and/or the pieces may become slightly bent. Flatten each piece on a bench block using a plastic, rubber or rawhide mallet. Step 4: Use either of these two Mini TruStrike Embossing Hammers to texture the triangle corner piece. Do not worry about the piece becoming misshapen. It will curl a bit so flatten it on a bench block using a plastic, rubber or rawhide mallet Step 5: Use a 1.5mm punch to make holes in the two top corners of the pendant. This is not shown having been done in the photos in Step 6 below, but this is the best time to make your holes if you are not sure of your design. Hint: If you use the smallest hole punch from the multi hole punch tool to make the hole, you can put a small 3.5x3.5mm eyelet in the hole for an added design element.