Weitere ähnliche Inhalte
Kürzlich hochgeladen (20)
Qa beginners v3
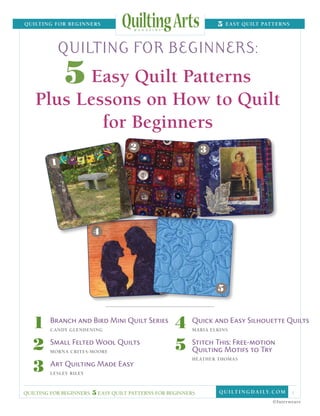
- 1. quilting for Beginners 5 easy Quilt patterns
quilting for beginners:
5 Easy Quilt Patterns
Plus Lessons on How to Quilt
for Beginners
2 3
1
4
5
1
Branch and Bird Mini Quilt Series
Candy Glendening
4
Quick and Easy Silhouette Quilts
Maria Elkins
2
Small Felted Wool Quilts
Morna Crites-Moore
5
Stitch This: Free-motion
Quilting Motifs to Try
3
Heather Thomas
Art Quilting Made Easy
Lesley Riley
quilting for beginners: 5 easy quilt patterns for beginners Q u i lt i n g D A ILY. c o m 1
©Interweave
- 2. quilting for Beginners 5 easy Quilt patterns
If you've wanted to learn how to quilt felted wool to make a patchwork design and
but didn't know where to begin or didn't sew it by hand. It’s a fun, low-stress way to
want to take on a big project, our new free learn to quilt.
downloadable
eBook, Quilting for
In “Art Quilting Made Easy,” Lesley Riley quilting
shows you how to make a simple quilt with
Beginners: 5 Easy
two easy quilt patterns and directions for
for beginners:
Quilt Patterns Plus
making it your own.
5 easy quilt patterns
Lessons on How to plus lessons on
Quilt for Beginners, Maria Elkins, famous for her portrait quilts,
how to quilt
is for you! shows how to make “Quick and Easy
Silhouette Quilts.” This easy quilt pattern
for beginners
The eBook offers
you basic quilting
is one that you can make and show off to Helen Gregory
Editorial director
family and friends with pride.
techniques and Cate Coulacos
editor
advice from Finally, you will learn to quilt pretty quilt Prato
some of the most experienced quilt artists stitching patterns from Heather Thomas in
and teachers around. Each of the projects “Stitch This: Free-motion Quilting Motifs to creative services
is small and manageable, just right for Try.” Larissa Davis
Division Art Director
beginning quilting, and the quilting how-to
With Quilting for Beginners: 5 Easy Quilt
Photographers Larry Stein
information is easy to follow. Korday Studio
Patterns Plus Lessons on How to Quilt for
In “Branch and Bird Mini Quilt Series,” Beginners, you don’t have to wait to quilt any Projects and information are for inspira-
Candy Glendening shows you how to make longer. It’s time to begin! tion and personal use only. Interweave
small, simple, yet adorable quiltlets. These Press LLC is not responsible for any li-
Warmly, ability arising from errors, omissions, or
easy quilts offer a perfect way to try your
mistakes contained in this eBook, and
hand at simple construction, composition,
readers should proceed cautiously, espe-
and free-motion stitching. cially with respect to technical information.
Vivika Hansen DeNegre Interweave grants permission to pho-
Morna Crites-Moore’s “Small Felted Wool
Editor, Quilting Arts Magazine tocopy any patterns published in this
Quilts” make an easy beginning quilting issue for personal use only.
texture
project because you use small scraps of
put
more
in your life
all about create
Quilting Arts Magazine® explores ideas, textiles, and techniques perfect
quilted
circles
related to embellished and contemporary art quilting. Inside,
with
Carol Taylor
5 color cloth
ways to
P. 52
you’ll find design inspiration, step-by-step directions, gorgeous
PAINT
photography, and motivation for developing your personal style, at PRINT
DYE
RUB
all skill levels. Be inspired to STENCIL
join our
signature
color challenge
quiltingarts.com 800.406.5283 (U.S. Canada)
760.291.1519 (International)
Quilting Arts Magazine®, P.O. Box 469087, Escondido, CA 92046-9350
quilting for beginners: 5 easy quilt patterns for beginners Q u i lt i n g D A ILY. c o m 2
©Interweave
- 3. quilting for Beginners 5 easy Quilt patterns
branch bird
mini quilt series
A s a quilter, I love taking
small units and joining them
together into larger compositions.
But sometimes deciding which
arrangement I like best can
become overwhelming. This is one
reason why I decided to create a
series of mini quilts depicting a
whole flock of wee birds sitting
on branches. Making many small
finished quilts allowed me to
focus on the composition of each
individual piece, and at the same
time create a larger work that
could be endlessly rearranged.
I worked on the whole series at the
same time, cutting out elements and
trying them in different combinations
before fusing them down. These mini
quilts have a layer of both batting and
stabilizer. The extra stiffness from
the stabilizer makes them easy to
hang, and it also gives an extra bit of
dimension to the quilting lines.
Whether you’d like to start working Directions Adapted from
International Quilt Festival: Quilt Scene
Winter 2011/2012
in a series, or you enjoy endless 1. Begin by selecting a group of
rearrangement, creating your own fabrics that work well together. I
batch of “Branch Bird” quilts is chose a series of jewel tones from
easy and will provide you with a fun my stash of hand-dyed fabrics.
exercise in creating compositions both These colors have plenty of
by C andy G lendening
small and large. value and hue contrast, and most
importantly, made my heart sing
when I looked at them all stacked
quilting for beginners: 5 easy quilt patterns for beginners Q u i lt i n g D A ILY. c o m 3
©Interweave
- 4. quilting for Beginners 5 easy Quilt patterns
up together. From these fabrics, interfacing, leaving the paper of the background squares. Cut
cut (10) 7 × 7 squares, 1 for each backing on the opposite side. several from different fabric
mini quilt background. After the layers cool, cut (10) colors and begin placing them on
5 × 5 squares, 1 for each mini the backgrounds. When you are
2. Following the manufacturer’s
quilt. happy with the layout and color
instructions, apply the fusible web
distribution of the branches, fuse
to the wrong side of the remaining 4. On each 7 × 7 background
them in place.
fabrics; these will be used for the fabric square, center an
appliqués and backing squares. interfacing/batting square 6. Remove the paper backing from
Use pinking shears to cut (10) (batting-side down). There should the fusible interfacing. Outline the
41⁄2 × 41⁄2 backing squares, 1 for be a 1 border of fabric extending branches with
each mini quilt; set these squares beyond the batting on all sides. free-motion machine sketching
aside. Carefully flip the layers over and (see “Free-motion machine
fuse-baste each fabric square in sketching”), stitching to the edges
note: Remove the fusible web’s paper
place with a small scrap of fusible of the background fabric.
backing before cutting the backing
web.
squares and appliqué shapes. 7. To finish the edges of a mini
5. For the branch appliqués, cut quilt, place it right-side down on
3. Using a lot of steam and little
arcs and simple forks long a pressing surface. Gently pull
pressure, fuse the batting to
enough to extend to the edges 1 corner of the extending fabric
the rough side of the fusible
quilting for beginners: 5 easy quilt patterns for beginners Q u i lt i n g D A ILY. c o m 4
©Interweave
- 5. quilting for Beginners 5 easy Quilt patterns
free-motion machine sketching
What I call free-motion machine sketching is very similar
to free-motion machine quilting: the feed dogs are down,
you use a darning foot, and the needle goes fast while
your hands move slowly. The difference is that when I‘m
sketching, I am purposefully retracing my steps and trying
to miss; this took some practice after years of trying to
follow lines exactly. What I’m trying to emphasize here
is that although I’m using a machine, the process is still
created by my hands. I love the beautiful imperfection of
a strong line that is created by drawing over and over—
it’s just that my pencil is an electric sewing machine.
varying 11. To finish the back of each mini
the fabric quilt, center and fuse a
colors. 41⁄2 × 41⁄2 backing square in
Move place, covering the fabric edges
them and thread ends. Use a needle
around and embroidery floss to stitch
the a hanging loop onto the back,
different being careful to catch some of
squares until the interfacing without stitching
you’ve created several squares that through to the quilt front.
to the back and tack it to the
each combine a few of the hues in
interfacing with your iron. Repeat 12. Display the mini quilts on your
your palette in a different way.
for the 3 remaining corners. wall in a long line or a grid. My
Wrap the sides to the back and 9. When you’re happy with the favorite way to hang these little
fuse them in place, being careful placement of the birds, fuse the guys is on some butcher’s twine
to avoid touching the iron to top only of each bird in place. with wee clothespins that you can
the exposed fusible glue of the Free-motion sketch the legs, find at any big craft store. They
interfacing. Turn the mini quilt beginning and ending under the look so cute hanging in a row,
right-side up and place it on the bottom of each bird. Fuse the rest and you can change their order
backing paper you removed from of the bird in place, then free- however many times you’d like!
the interfacing. Press the square, motion sketch an outline and eye
candiedfabrics.com
let it cool, and peel it off the for each bird.
backing paper.
10. Freehand cut a wing for each bird.
8. Now for the fun part—the birds! I It’s amazing how a small change
freehand cut all my birds; they’re in the angle of the wing can make
just 2 S-curved lines connected a sitting bird fly, so play around
at both ends. A small change in with the placement a bit before
the inflection point of the curve fusing. Fuse the wings in place.
can make a bird with an entirely Free-motion sketch an outline
different personality. Freehand cut around each wing.
1 or 2 birds for each mini quilt,
quilting for beginners: 5 easy quilt patterns for beginners Q u i lt i n g D A ILY. c o m 5
©Interweave
- 6. quilting for Beginners 5 easy Quilt patterns
small Adapted from
Quilting Arts Magazine
felted wool
June/July 2010
quilts recycling sweaters into
hand-stitched artwork
by M orna C rites -M oore
quilting for beginners: 5 easy quilt patterns for beginners Q u i lt i n g D A ILY. c o m 6
©Interweave
- 7. quilting for Beginners 5 easy Quilt patterns
Previous page: “Dreams of Spring” • 51⁄2 × 5
“This is the twelfth item in my ‘Pieces of
T
Dreams’ series. Its colors represent the
beginning blossoms of spring, the green grass, here is something about felted wool, made from old
and the blue sky.” sweaters and other discarded articles of clothing, that speaks to my
muse. Is it that the garments carry the stories of where they have been?
materia l s I don’t know. I only know that once I have felted these garments, they
• Wool sweaters in a variety of seem to speak to my hands; my mind disengages and I go with the flow.
colors
The process of making small quilts scraps with lovely buttons on top. It
• Washing machine and dryer
from felted wool pieces is very was time for more play, so I arranged
• Laundry detergent meditative. The first one I made came and rearranged these squares.
• Good quality shears about because I was playing with Eventually, I started sewing them to
• Material for the background, scraps left over from other projects. a backing. I decided to call
cut to about 2 larger than your
I kept finding little pieces in colors these small quilts “Pieces
finished piece, in a color that
complements your wool sweaters that particularly pleased me, so I set of Dreams” because
(I like to use a recycled sweater, them aside. Then I started playing that’s what creating
a single piece of fulled wool, with these scraps, without any idea of them feels like. This
or cotton fabric; use whatever what I was making. I just enjoyed the series is definitely
material you like.) process: the choosing, the stitching, guided by an
• Wool tapestry thread in multiple and the adorning. Soon I had quite a invisible
colors (I use Paternayan® Persian collection of little stacks force.
Wool Yarn.)
of wool
• Several tapestry needles
• Embellishments of your
choice: buttons, beads, jewels,
or anything else that is small
enough to stitch to the top of a 1
square
• A thin piece of wool or batting for
the middle layer
• Material for the backing
• Embroidery floss
• Hand-sewing thread
• A small piece of muslin for your
label
• A pen suitable for writing on
fabric
Optional
• Foam board or corrugated
cardboard
quilting for beginners: 5 easy quilt patterns for beginners Q u i lt i n g D A ILY. c o m 7
©Interweave
- 8. quilting for Beginners 5 easy Quilt patterns
Directions
1. Decide on a color scheme for your
project and start accumulating
wool sweaters to fulfill your
vision. The sweaters must be
predominantly wool and they
can’t be washable wool. They can,
however, contain other materials.
The more sweaters you collect,
the better; the variations in color
give these pieces much of their
movement and charm.
2. Turning the sweaters into felted
wool is a fairly simple process.
Before washing your sweaters, cut
them apart along the seam lines,
then wash them in very hot water
with laundry detergent, about
four or five at a time. Be careful
not to mix colors, because there
are always sweaters that bleed. I
Above: “Pale and Peaceful” • 7 × 7 • “I completed this piece a couple of years ago, but have
since dismantled it and plan to add stitching to the squares. I have always envisioned it as
being a perfect addition to a sweet baby’s room.”
collecting Below: “When designing my small felted pieces, I like to pin the squares on a piece of foam
the materials board or corrugated cardboard so I can easily fiddle with their placement until I find a
composition that I like.”
The most difficult aspect of making one
of these little quilts may be collecting the
raw materials. I get my old wool sweaters
from a variety of sources: thrift stores, yard
sales, friends, relatives, and the occasional
stranger who hears about what I do and
mails me a few sweaters that were destined
for the rubbish bin.
When I started making my felted wool
items about 15 years ago, I had a sizeable
collection of old buttons that I had been
amassing since childhood. I quickly realized
I needed to find another source. There
are stores that sell antique buttons, such
as the iconic Tender Buttons in New York
City. Flea markets are another good source.
I also attend the occasional button show,
where vendors sell antique buttons.
quilting for beginners: 5 easy quilt patterns for beginners Q u i lt i n g D A ILY. c o m 8
©Interweave
- 9. quilting for Beginners 5 easy Quilt patterns
“Sunset Dreams” • 6 × 6 • “This is the eleventh item in my ‘Pieces of Dreams’ series. While I stitched this little piece, I dreamed of the beautiful
sunsets I see from my kitchen window: reds, pinks, blues, purples—a collection of colors stitched upon the sky. This piece is made from recycled
sweaters, embellished with wool stitching and antique buttons, and has a silk border.”
leave my washing machine lid in before allowing the machine to it is called fulling. Technically, what
the open position, which causes it finish with rinsing and spinning. you will create is fulled wool; for the
to stop at the end of the agitation sake of expediency, I refer to it as felted
Note: The felting process happens
cycle. I then reset it to start all over wool, a term that is much more widely
when wool fibers are subjected to heat
again, usually putting the sweaters recognized and understood.
and agitation. When heat and agitation
through about four agitation cycles
are applied to knitted or woven wool,
quilting for beginners: 5 easy quilt patterns for beginners Q u i lt i n g D A ILY. c o m 9
©Interweave
- 10. quilting for Beginners 5 easy Quilt patterns
3. Dry the sweaters in the dryer, then 7. Next comes some fun with
press them with a steam iron. stitching—this is the part of the
process that I enjoy most. Using
4. Now you need to cut the squares,
wool thread, add as many stitches
some for the bases and some
as you like, sewing through both
that are slightly smaller. My base
squares and/or just the base square.
squares tend to be about 1, but
My earlier pieces had no decorative
you should choose whatever
stitches, and I think they are
size you prefer. To make “Sunset
beautiful, but lately I am enjoying
Dreams,” I cut 25 base squares and
adding more and more stitches.
25 slightly smaller squares. I don’t
use a template; I just eyeball it. 8. Once you have completed your
Figure 1
decorative stitching, turn the
5. Put a small square atop each
edges of the background material and background fabric, but be
base square, choosing color
under, leaving a small margin as hidden on the front. I stitch in a
combinations that please your eye,
the border. Add some decorative grid pattern so that the stitches are
and stitch them together with an
stitching to the border using hidden in the spaces between the
embellishment (a button, a bead,
embroidery floss; this stitching will squares.
etc.) on top.
also secure the folded edge.
11. Your little quilt is now finished.
6. Now it’s time to play with your
9. Turn the little quilt over so it is Add a signature label by writing
wooly squares. Arrange and
lying face down (Figure 1), and your name and date on a piece of
rearrange them until you have a
lay your chosen middle layer onto muslin and stitching it to the back
pattern that suits you. I usually
the back. Then place the backing of the piece.
do this on a piece of foam board
fabric, turning its edges under.
or corrugated cardboard (you can mornacrites-moore.com
also use a table or tray), so I can 10. Stitch around the edge of the
easily pin the squares in place. backing, securing it to the
Then I transfer the squares to background material, and then
my background material, one at add additional stitches using
a time. I sew the squares to the ordinary thread to hold the three
background with just a couple layers together. These stitches,
of stitches that I hide under the which add necessary substance to
button. This step is just to secure the piece, should go through the
everything in place. backing fabric, middle material,
quilting for beginners: 5 easy quilt patterns for beginners Q u i lt i n g D A ILY. c o m 10
©Interweave
- 11. quilting for Beginners 5 easy Quilt patterns
art quilting by L esley R iley
“Thinking Chair” • 7 × 12
Adapted from
Quilting Arts Magazine
Fall 2004
quilting for beginners: 5 easy quilt patterns for beginners Q u i lt i n g D A ILY. c o m 11
©Interweave
- 12. quilting for Beginners 5 easy Quilt patterns
S omething has kept you
from making an art quilt.
Maybe it’s the word “art” that has Don’t let a lack of
stopped you. Perhaps the endless
products and embellishments
seem overwhelming. Whatever
formal training hold you
the reason, there is only one
solution—just begin. With a few back. The most important
simple tools, a little fabric, and
a desire to play, you can create a
small art quilt of your own design.
quality that you can
An art quilt is an expression of your
own individuality. It can draw on
bring to your art quilt is
traditional patterns and techniques,
but the end result is a totally
new—unique to you—design. The
your own vision.
beads, paints, transfers and other
applications are there for your use
if the spirit moves you—if not, save important quality that you can bring 2. The quilt top is created by one of
them for another day. In fact, because to your art quilt is your own vision. three methods: piecing, appliqué,
art quilts are not meant for “use,” Good workmanship is important, but or whole cloth.
and therefore will not be washed, it should not inhibit your creativity,
3. The three layers are held together
you are free to experiment with non- especially when you are just starting
by stitching, tying, or fusing.
traditional methods and materials. out. Perfectionism should not be
There is no right or wrong. pursued at the expense of creativity, You do not need to own a sewing
learning, and enjoying yourself. I machine to make your first art quilt.
To get you started, I will lead you
like to tell my students, “If you’re not Just like our ancestors, you can sew
through the processes I used to make
having fun, you’re doing something your quilt entirely by hand. But unlike
two small and simple art quilts. When
wrong.” Confidence, certainty, and those women before us, you can
you are ready to move on to bigger,
expertise come from doing what you now create a quilt entirely by fusing.
more complex things, there are many
love over and over and over again. So Fusing is a term for joining fabric
excellent resources available. You
let’s begin. using an adhesive material that is
may even decide you want to take a
activated by heat from an iron. Quilt
class on design or learn about specific Art quilts generally follow the
fabrics backed with a sheet of fusible
quilting techniques that will enhance same construction techniques as a
webbing, such as Wonder Under, can
your new passion. But keep this in traditional quilt:
be fused together to create a no-sew
mind—many wonderful art quilts 1. The quilt is composed of three art quilt. Optional hand-stitching can
have been created by self-taught artists layers: top, batting, and backing, add depth and detail.
and quilters. Don’t let a lack of formal also known as a quilt “sandwich.”
training hold you back. The most
quilting for beginners: 5 easy quilt patterns for beginners Q u i lt i n g D A ILY. c o m 12
©Interweave
- 13. quilting for Beginners 5 easy Quilt patterns
Appliquéd quilt
1. I scanned and printed an old photo 5. I used a simple finishing method
materia l s onto fabric treated for ink-jet to create the outer border, one that
printers. also serves as the quilt backing and
• An assortment of fabrics in edge finish: Cut a piece of batting
coordinating colors 2. Using the photo as a starting
2.5 inches larger than finished
• Ink-jet printer fabric point, I chose a blue background
quilt top. Cut backing fabric 3
• Copyright-free image fabric as the base for my appliqué
larger on all sides than quilt top.
because blue is complimentary
• Scanner Place backing fabric right side
to the orange in the photo and it
• Ink-jet printer down, with batting on top. Fold
provided a good, strong contrast.
• Straight pins backing fabric to front, mitering
Three other fabrics in blue and
• Fabric scissors (Scissors that orange tones were layered behind
corners as if wrapping a package.
have been used to cut paper may Iron down. Place quilt top on top.
be too dull for fabric cutting) the photo to offset it from the
background, and the composition 6. I removed the paper backing from
• Wonder Under
was pinned in place. I tucked small the Wonder Undered strips and
• Batting (commercial batting,
flannel, or felt) pieces of my chosen border fabrics slid them under the quilt top edges
under the image to visually pull and on top of the folded-over
• Hand-sewing needle or sewing
machine the outside edges of the quilt in backing fabric to mimic a border.
• Embellishments towards the photo. To form the border, I sandwiched
the strips of fabric with Wonder
3. Using a straight stitch and my
Under on them between the quilt
sewing machine, I stitched down
Appliqué is a French word meaning top edges and the folded-over
all of the fabric layers to the
“to apply.” In an appliquéd quilt, small backing fabric, then ironed them
background fabric, starting with
pieces of fabric are applied to a larger, in place.
the image and working outward.
background fabric by sewing or fusing.
I started with the topmost layer, 7. I stitched the quilt top to the
Shapes can be recognizable, such as
and stitched the exposed edges of batting and backing with a straight
a door or tree, geometric, or simply
every layer. This secured all layers stitch going around the edges of
freeform shapes. Traditionally, any
underneath. This construction the quilt top and again around the
fabric that lies under another piece of
technique is similar to paper plaid borders.
fabric and is not seen is trimmed away
collage.
to reduce bulk when hand quilting. 8. To give the completed quilt a nice
With my appliqué method, I find that 4. To mimic a border, I ironed finished edge, I stitched around all
trimming is not necessary. To prevent Wonder Under to the back of four sides of the quilt 1/4 in from
layers of fabric from slipping, I use the plaid fabric (a commercial the finished edge, with a second
a walking foot attachment on my fabric consisting of already pieced line of stitching 1/4 inside of the
sewing machine. A walking foot is an plaids.) Cut four strips, each 1.5 first line of stitching.
attachment or a built-in feature on your wide by the length of each side of
9. I appliquéd a vintage leaf to the
sewing machine that feeds the fabric the quilt top plus an additional two
lower left corner of the image, with
layers evenly through the machine and inches in length to make sure they
the tip of the leaf directing the
prevents the layers from slipping. If you overlap at the corners.
eye towards the child’s face in the
do not have a walking foot, use more photo.
pins to prevent slipping or puckering, or
fuse all layers before machine stitching.
quilting for beginners: 5 easy quilt patterns for beginners Q u i lt i n g D A ILY. c o m 13
©Interweave
- 14. quilting for Beginners 5 easy Quilt patterns
Move Over Moon” • 9 × 14
quilting for beginners: 5 easy quilt patterns for beginners Q u i lt i n g D A ILY. c o m 14
©Interweave
- 15. quilting for Beginners 5 easy Quilt patterns
Whole cloth quilt
materia l s
• Cotton canvas or muslin
• Copyright-free image
• Scanner
• Ink-jet printer
• Transparency
• Golden Acrylic Matte Medium
• 1 foam brush
• Golden Quinacridone Gold Fluid
Acrylic
• Fabric scissors (Scissors that
have been used to cut paper may
be too dull for fabric cutting.)
• Backing and binding fabric
• Batting (commercial batting,
flannel, or felt)
• Wonder Under
• Hand-sewing needle and thread
• Buttons or embellishments
• Sewing machine (optional)
In a whole cloth quilt the emphasis is
on the surface design of the fabric and/
or the quilting stitches. Using paint,
stamps, screening or transfers, a plain
piece of fabric can be transformed into
a work of art. The addition of quilting
completes the overall design.
1. I scanned a favorite photo of mine
3. I chose to machine stitch a red 5. I layered the backing fabric,
into my computer and printed it line around the images to add batting, and quilt top to form the
onto an ink-jet transparency. definition. This could have been quilt sandwich.
2. The image was transferred to fabric hand-stitched or omitted.
6. I ironed Wonder Under onto the
by applying acrylic medium to 4. Using the fluid acrylic, I randomly binding fabric. Four strips were
the fabric, laying the inked side added color to the quilt top, cut the length of the quilt sides
of the transparency down on the leaving the paint concentrated plus 1. Before removing the paper
fabric and burnishing the image to in some areas and adding backing, the strips were folded in
transfer the ink to the fabric. water to thin it out to make it more half and ironed. The backing paper
subtle in others. was removed and the strips were
quilting for beginners: 5 easy quilt patterns for beginners Q u i lt i n g D A ILY. c o m 15
©Interweave
- 16. quilting for Beginners 5 easy Quilt patterns
no - sew
quiltmaking A Few Words About Quilting
Originally, small closely spaced than free-form or free-motion quilting
You can make an appliquéd quilting stitches were necessary to and adds dimension and definition to
art quilt without ever taking keep loose cotton batting from shifting your quilt top.
a stitch. Fusing is a method around between the quilt layers. Two very simple methods that are
that joins fabrics together Naturally these early quilters wanted perfect for anyone new to sewing or
their stitching to be as attractive someone who does not have a sewing
using a heat-activated bonding
as their piecing and appliqué were, machine are tying and button-quilting.
material. A paper-backed and they designed patterns for their Tying a quilt is as easy as tying your
fusible is ironed to the back of stitches to take. The care and attention shoe, but you do have to know how
fabric. You can draw designs on put into these stitches later became to thread a needle. A heavier thread,
the paper backing, or cut out the basis for judging workmanship and like Pearl cotton or embroidery floss,
free-form shapes. Remove the mastery of the craft. is usually used. Starting from the top
paper backing from the fabric Quilting stitches also added another put the needle and thread through the
dimension to what is basically a quilt top to the back leaving a 4 tail
and following manufacturer’s
two-dimensional surface and often of thread. Come back through to the
directions, iron to another piece complimented the design of the front, close to your original stitch, and
of fabric to fuse them together. piecing and appliqué. With today’s tie a double knot in the two thread
technology in manufacturing, batting tails. Using decorative thread, or
Fusible batting allows you to
no longer needs to be stitched at such thread in a contrasting color can add
adhere your quilt layers together close and regular intervals. Many another element to the overall quilt
simply by ironing. Strips of manufacturers now recommend design.
fusible-backed fabric can be stitching only every 6 to12 inches. To button-quilt your quilt, sew on
folded and ironed over the quilt Today’s quilters have the choice of buttons in a random or planned
edges to bind the quilt. Voila! using quilting stitches as an integral pattern, stitching through all three
You have created a quilt without part of their overall quilt design or layers of the quilt sandwich. You can
sewing a stitch. purely for functional purposes. If hide your knots under the buttons. The
you love to hand stitch, a small art color of the buttons can be subdued to
quilt can serve as a canvas for your blend in, or serve as an element of the
stitching. Perhaps you want to use a overall design as in the quilt opposite.
ironed to fuse the binding to the
machine, but are afraid of “ruining” And last, but not least, the easiest
quilt edges. Any additional fabric your quilt; you can use simple straight- and most portable method, called
at the corners was trimmed away. stitch quilting methods. Stitch-in-the- stippling, is to quilt by taking random
ditch hides your machine stitching stitches across the surface of the
7. I chose to quilt this whole cloth
in the ditch, or junction, where quilt with a matching, contrasting or
quilt by sewing on buttons (button- two fabrics are joined together. By decorative thread. These randomly
quilting.) This was a decision I had following these seam lines, you can scattered stitches are similar to the tied
made once the image transfer and add dimension to the quilt surface method, but without the loose hanging
painting was completed. I wanted and secure the quilt layers together. thread tails. Pieced quilts and appliqué
an additional dimension and more Stitching-in-the-ditch can also be can be enhanced by background
done by hand. stippling. Many close stitches tend to
visual interest for this simple quilt
top, plus more color. The buttons Another simple quilting method, called depress the background and cause
the outline method, is to stitch by unstitched shapes to puff up. While a
served all three purposes. Three
hand or machine, 1⁄4 from the ditch, few well placed stitches are sufficient
sizes of red buttons were sewn on or seam lines. Stitching can be done to hold your quilt together, you may
with the largest at the bottom to 1
⁄4 inside or outside of the pieced or find that you enjoy the relaxing rhythm
provide visual weight and lead the appliquéd edge. This method is easier of hand stitching.
eye upward.
lesleyriley.com
quilting for beginners: 5 easy quilt patterns for beginners Q u i lt i n g D A ILY. c o m 16
©Interweave
- 17. quilting for Beginners 5 easy Quilt patterns
quick easy
Adapted from
Quilting Arts Magazine
silhouette Quilts
June/July 2011
I ’ve always been drawn to portraiture. Silhouettes, in particular, hold
my interest. I find it amazing how much a silhouette can look like the
person portrayed even when all of the details have been removed.
face. Eliminate distractions by
having your subject stand in front
of a plain white wall or door.
Note: If you will be combining several
For my latest project, I wanted a fresh was looking to their left they were
people into a single project, hang a
twist on a traditional black silhouette, looking backwards, into the past,
gridded rotary-cutting mat on the wall
so I decided to try some fun prints perhaps reflecting or remembering.
and take individual photos. Make sure
and favorite colors. When designing
a silhouette, the direction the
person faces is a matter of personal
Directions each person stands the same distance
away from the gridded surface. Place
the camera on a tripod so it remains
preference. I’ve read historical C reatethe the same distance away from the wall,
references where it was thought that silhouette pattern too. This will make it easy to combine
if the subject was looking to their 1. Take a profile (side view) picture
right they were symbolically looking of a loved one. Hold your camera
forward, to the future. If the subject at the same height as your subject’s by M aria E lkins
quilting for beginners: 5 easy quilt patterns for beginners Q u i lt i n g D A ILY. c o m 17
©Interweave
- 18. quilting for Beginners 5 easy Quilt patterns
materia l s
• Digital camera
• Photo-editing software
• Computer and printer
• Red gel pen
• Fabric (two contrasting colors for
the quilt top)
• Fusible web (I use Lite Steam-A-
Seam 2®.)
• Small, sharp scissors
• Iron and ironing surface
• Thread
• Sewing machine
• Batting
• Fabric for the backing and
binding
Optional
• Gridded rotary-cutting mat
• Tripod
the pictures in a digital photo-editing
program, and it allows you to ensure
that each person’s silhouette will be the
correct size.
2. Open your photo in the
digital-editing program of your
choice. Mirror the image, and
size your picture as desired. Make
sure you leave margins around
the silhouette. If desired, you can
digitally erase some or all of the
background. (To combine multiple
“Dawning” • 20 × 14 • Cotton fabric (hand-painted background), cotton batting;
portraits, start with one image and fused appliqué, machine stitched.
paste the second image onto a new
layer. Reduce the opacity on the 4. To create your silhouette pattern your subject extend off the lower
second image to 50%. If needed, on the printout, outline your edge of your quilt or, if you want
adjust the size of the images until subject’s profile with a red gel pen. a vintage look, draw a gentle “S”
the grids match.) This is your chance to add subtle curve that echoes the curve of the
facelifts or stylized hair curls. You shoulder and flows down to the
3. Print out your picture to the
will also need to decide how to front of your subject’s chest.
desired size. (If you have multiple
deal with the neck and shoulders
portraits, it may be easier to print
area. For instance, you can have
each silhouette separately.)
quilting for beginners: 5 easy quilt patterns for beginners Q u i lt i n g D A ILY. c o m 18
©Interweave
- 19. quilting for Beginners 5 easy Quilt patterns
2. Cut a piece of fusible web slightly
larger than your silhouette pattern.
Remove one of the paper backings
and fuse the webbing to the wrong
side of the silhouette fabric. (If you
are using a third fabric to create an
outline, apply fusible web to the
back of that fabric too.
3. Remove the remaining paper
backing from the applied fusible
web. Using your hand, press the
paper printout (with the marked
red silhouette pattern) to the
wrong side of your silhouette
fabric. Do not iron.
Tip: Pay attention to where you position
the paper pattern on the fabric. You may
want to position the eyes/nose/mouth
area so it is not interrupted by specific
designs on your fabric.
4. Following the outer edge of your
silhouette pattern, cut out the
silhouette fabric. (If you are using
a third fabric, position the
cut-out silhouette fabric on the
third fabric. Remove the paper
pattern and fuse with a hot iron.
Create an outline by cutting the
third fabric 1⁄8 beyond the edge of
the silhouette fabric.)
“Stephanie” • 16 × 12 • Cotton fabric, cotton batting; fused appliqué, machine stitched.
F use and finish
1. Position your silhouette on the
background fabric. Fuse with a hot
S electand prepare the planned size of your finished
portrait quilt.
iron.
the fabrics 2. Prepare your quilt sandwich. Quilt
1. Choose two contrasting fabrics. Tip: If you choose background and and bind.
Typically, the darker color will foreground fabrics that have similar
mariaelkins.com
be the silhouette and the lighter colors that merge, choose a third fabric
color will be the background. Cut to create an outline that will visually
both fabrics about 3 larger than separate the similar colors and add
contrast.
quilting for beginners: 5 easy quilt patterns for beginners Q u i lt i n g D A ILY. c o m 19
©Interweave
- 20. quilting for Beginners 5 easy Quilt patterns
stitch this!
Adapted from
Quilting Arts Magazine
June/July 2011
free-motion quilting
motifs to try
B eing a life-long doodler is one of the things that
makes machine quilting so fun for me. Whether I’m
watching TV, talking on the phone, or resting with a cup of
coffee, I have a sketchbook and pencil in hand. We all have
our own doodles inside us. I like to draw trees, flowers,
hearts, and suns along with plenty of swirly designs. I’ve
even found evidence of my swirly-centered, five-petal
flowers on old schoolwork from high school.
Doodling has led me to new and having to knot off. In this
expanded designs that I can interpret third installment of my
into freestyle machine quilting. I column on free-motion
know that if I can draw a design as a stitching I invite you to Heart
continuous line without having to lift pick up your pencil, start
my pencil, then I can quilt it without doodling, and discover the designs
waiting to be released.
materia l s Beginner
• Sketchbook H earts to give them a try. Get comfortable
• Pencil Stitched hearts are a great design for with each design by doodling it first.
• Sewing machine with free- baby quilts and can add a feminine
motion capabilities touch to any project. Most of us can D ouble heart
• Free-motion or darning foot easily draw a heart. You may like The first stitched sample features
(I use an open-toe foot.) long, thin hearts or prefer thick, squat meandering double hearts. Each set of
• Fabric hearts, or maybe your favorite style of hearts is about 1 in size. Beginning
• Batting heart is somewhere in between. When near the center of the area you want
• Pins stitching hearts, draw from the tip to fill, stitch a small heart beginning at
• Thread (in various colors (point) up rather than from the center the pointed tip. Stitch up and around,
contrasting with your fabrics) cleft. Here are three variations of then down slightly to form the cleft
• Marking tool (I use a Hera™ heart-based fillers just waiting for you in the center of the heart. Then stitch
Marker.)
by H eather T homas
quilting for beginners: 5 easy quilt patterns for beginners Q u i lt i n g D A ILY. c o m 20
©Interweave
- 21. quilting for Beginners 5 easy Quilt patterns
Spiral heart
Double heart
Large heart
positioned to stitch a second echoed
heart. Continue stitching echoed
hearts, linking and surrounding them
with loop-d-loops, until you have
filled the space. Strive for equal-sized
hearts stitched at various angles as
well as equal-sized loops and balanced
back up and around and back down negative space.
to where you started to form the tip
of the heart. The first heart should be
L arge heart S piral heart
The second stitched sample features The final heart design features larger,
about 1/2 wide and a little taller.
the same echoed heart shape, but thicker hearts linked by spirals. Each
Next, echo the heart along the the hearts are larger (about 11/2–13/4 heart is about 11/2–2 in size and is
outside edge, stitching in the opposite in size), and instead of nestling the about as wide as it is tall. To keep the
direction and keeping the echo line echoed hearts into each other, the design looking neat and tidy, try to
about 1/4 away from the original echoed hearts are linked by make the spirals about half the size of
heart. Once the echo is complete, loop-d-loops. Begin by stitching a set the hearts.
stitch a second small heart in the same of echoed double hearts. Once you
manner and echo it. Keep stitching Beginning at the tip (point) of a heart,
have echoed the heart and are back at
sets of hearts, nestling new hearts stitch up one side forming a very
the tip, stitch away from the heart and
between previously sewn ones, and round peak and a deep cleft; then
form a loop that is about 1/4 in size.
angling them in different directions. stitch the second side of the heart. As
Stitch away from the loop and form
Strive to keep a similar distance for a you reach the bottom tip of the heart,
a second loop. Keep stitching small
neat and tidy fill. stitch a small spiral about the size of
loops around the heart until you are
quilting for beginners: 5 easy quilt patterns for beginners Q u i lt i n g D A ILY. c o m 21
©Interweave
- 22. quilting for Beginners 5 easy Quilt patterns
a nickel. Leave space in the spiral to
stitch back out again and complete the
spiral. Once you are out of the spiral,
stitch away and form another heart.
Keep stitching thick hearts and using
spirals to travel between them. Strive
to keep the hearts about the same
size with an equal amount of negative
space between them.
Basic flower
Intermediate
F lowers
The wonderful thing about flowers
is that they are organic and therefore
you don’t need to worry about each
one looking exactly like the other—a
misshaped petal is a natural thing. The
example shows a basic flower, with a
swirly center and five-pointed petals,
stitched out in four slightly different
ways. Doodle out each one before
you begin stitching.
B asic flower
To stitch out the basic flower, begin
in the center and stitch a swirl about
the size of a quarter. Once you have
completed the center swirl, stitch are behind the other petals. To achieve
this effect requires some backtracking.
the end of it into itself to close it Basic flower
up. Begin forming the first petal
by stitching out and away from the
A sterisk flower
Take note of the other flowers shown. An asterisk flower begins with an
center and toward the right about 1;
Each variation on the basic flower has asterisk-like center surrounded by
then begin angling toward the left,
a different type of center and different- elongated, round-ended petals. To
stitching another 1 and then stop.
shaped petals. The base of one flower form the center, stitch a short line,
Now stitch down and out to the back,
has small circles that are stitched so about 1/2; then double back to the
toward the center, to form the second
that they abut one another to form a starting point. Stitch another short
side of the petal. Strive to keep the
larger, circular center. The petals are line about 1/2 and a scant bit away
base of each petal about the same
long and narrow, with wavy edges, and from the first line; then stitch back
size (about 1⁄5 the circumference of
some of the petals are nestled in such to the starting point. Keep adding
the center). Stitch the remaining four
a way as to make them look as if they doubled-up lines that radiate out
petals in the same manner.
from the starting point until you have
quilting for beginners: 5 easy quilt patterns for beginners Q u i lt i n g D A ILY. c o m 22
©Interweave
- 23. quilting for Beginners 5 easy Quilt patterns
Asterisk flower
Variation on a basic flower
formed the asterisk’s center. The petals
that surround the center are about 2
long and about 1⁄4 wide at the base
and about 3⁄4 wide at the rounded
end.
Tip: You can doll up your flowers in so
many ways! Flowers can be used as an
allover design or as a focal point. In
the detail (opposite far left), I stitched
out loads of flowers and linked them
together with stems and leaves. The
design looks neat and tidy when the
leaves are much smaller than the petals
of the flowers.
heatherthomasblog.blogspot.com
quilting for beginners: 5 easy quilt patterns for beginners Q u i lt i n g D A ILY. c o m 23
©Interweave