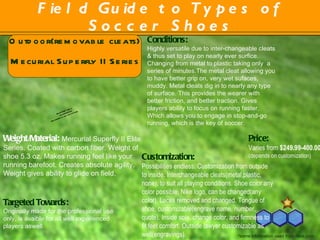
1. Field Guide to Types of Soccer Shoes Conditions: Highly versatile due to inter-changeable cleats & thus set to play on nearly ever surfice. Changing from metal to plastic taking only a series of minutes.The metal cleat allowing you to have better grip on, very wet sufaces, muddy. Metal cleats dig in to nearly any type of surface. This provides the wearer with better friction, and better traction. Gives players ability to focus on running faster. Which allows you to engage in stop-and-go running, which is the key of soccer. Weight/Material: M ercurial Superfly II Elite Series. Coated with carbon fiber. Weight of shoe 5.3 oz. Makes running feel like your running barefoot. Creates absolute agility. Weight gives ability to glide on field. Outdoor(removable cleats) Mecurial Superfly II Series Customization: Possibilities endless. Customization from outside to inside. Interchangeable cleats(metal,plastic, none), to suit all playing conditions. Shoe color any color possible, Nike logo, can be changed(any color). Laces removed and changed. Tongue of shoe, customizable(engrave name, number, quote). Inside sole, change color, and firmness to fit feet comfort. Outside lawyer customizable as well(engravings). Targeted Towards: Originally made for the professional use only, is avaible for all well experienced players aswell. Price: Varies from $249.99-400.00 (depends on customization) *some information used from Nike.com
2. Mercurial Superfly II History: Mercurila Superfly II, traced back to as early as 1998, debuted by Ronaldo(famous soccer star). Shoes originally released in black. In 1998 World Cup, a silver/blue/yellow version was released. All shoes made in Soft Ground and Firm Ground. Soft ground version with removable studs. The Mercurial’s became the first shoe series Nike ever made using synthetic materials. It was their first attempt to design the light weight shoe, to increase speed. My Experience: Owning two pairs, older version F50’s that I have worn as oppose to the the Mercurials, I can see the difference immensely. Having the Mecurial’s made with ultra-thin synthetic outer layer, enhances the preciseness of ball control with speed. It allows a better grip, and better accuracy for shooting. *some information used from Nike.com
3. Field Guide to Types of Soccer Shoes Weight/Material: 1800’s Soccer Boots, first cleats made out of work boots, with round metal plate at toe. Work boots had 6 metal studs or tacks hammered in. Boots with heavy weight leather. Weight Approximation 500g=17.6369 oz, a little over triple the amount of shoes today. Cleats going up past ankle for increased protection. Cleats doubled in weight when wet. These key elements transforming a work boot into a cleat. Conditions : Though these shoes could be used virtually in any condition, some were more ideal than others. Since boots doubled weight when wet, rainy weather not ideal. Since this soccer shoe was out in the 1800’s, the likely hood of there being an indoor facility, not likely. Assuming the most perfect condition would be a sunny day, on firm ground. Customization: Virtually None. Can change laces. Usual standard colors(black/white). Boots usually either a leather color, or black leather. Cleats either metal plates or tacks. Targeted Towards: Factory workers, royalty, anyone that enjoyed soccer as past time 1800’s Soccer Boot Price: N/A *some information used from footy-boots.com
4. 1800’s Soccer Boots History: King Henry VI, got his fist custom soccer shoes in 1526. This is the earliest dated back soccer cleat. Though there is no recorded data of the King Henry VI cleats, they do resemble cleats of 1800’s, the earliest recorded shoe. King Henry VI played soccer as a past time. Though King Henry did not in event soccer, he was known to be the first to own soccer cleats. My Experience: Having been born in the 90’s, I was not able to try this type of shoes. I could assume that this boot would not be a favorable shoe to me, being used to soccer cleats under 7oz. Tripling the amount would not work in my favor. Soccer shoes now, are not completely over the ankle. This design seems uncomfortable. *some information used from footy-boots.com
5. Field Guide to Types of Soccer Shoes Weight/Material: Weight=7.0 oz . Contain various raised patterns on the bottom in place of studs, Top layer synthetic leather. Synthetic leather making shoe light. Light shoe allows for easy movement. Bottom of shoe, tough rubber, various designs used. Conditions: Used on harder outdoor surfaces and on artificial turf, indoor fields. Great training shoes, often used during practice sessions. Many times used as back-up game pair for hard-surface conditions(incase of broken cleat during game). Targeted Towards: Shoe targeted to all audiences. Used by professional player to amateur beginners. Both male and female enjoy shoe. Long lasting shoe is often a great buy. Customization: Personal Customization Encouraged. Customization from outside to inside. Shoe color any color possible. Nike logo, can be changed(any color). “90” logo, change color if desired. Laces removed and changed(any color). Tongue of shoe, customizable(engrave name, number, quote). Inside sole, change color, and firmness to fit feet comfort. Outside lawyer customizable as well(engravings). , Nike Total 90 Shoot lii Turf Price: $29.90-50.00(price varies on custom levels) *some information used from Nike.com
6. Nike Total 90 Shoot lii Turf History: Nike Total 90 brand was introduced 2000. Shoes first designed for American Football and later transformed to fit soccer athletes. The Total 90 brand name, standing for the standard 90 minutes traditionally played in a soccer game. The player wearing the shoe representing the 'Total 90' persona. This persona being so important, reason for the “90” symbol in inside of shoe. The “90” is inside of you, its who you are. My Experience: Wore Nike Total 90 shoe, first year varsity soccer. One of most comfortable shoe, long lasting, immense grip, allowed for great shots. Customization allowed me to represent school colors. Shoe allowed me to go from practice to game, without troubles. Wore shoe almost everywhere. Shoe comfortable enough to wear as an everyday shoe. Overall great shoe. , *some information used from Nike.com
7. Field Guide to Types of Soccer Shoes Weight/Material: Weight=6.8 oz. Outer layer of Elastico Finale, is constructed from Nike's revolutionary Kanga-Lite material. Kanga-Lite is a water resistant synthetic leather, improving overall fit, comfort and performance. Partial side of shoe and bottom layer, cover with tacky dots, allowing for all around ball control, and increase passing pace. Conditions: For Indoor soccer surface. Not synthetic turf. Tacky dots gives right traction for indoor field surface. Targeted Towards: Used by professional players/advanced players. Co-ed shoe. Investment buy. Targeted towards players looking for increase speed, and fast touch. Made to give professional indoor players more varieties in indoor shoes. Customization: Many Options. Shoe color, any color possible. Nike logo, can be changed(any color). Laces changeable. Tongue of shoe, customizable(engrave name, number, quote). Tacky dots color can be changed. Inside sole, change color. Firmness can be adjusted to fit feet comfort. Outside lawyer customizable as well(engravings). , Nike5 Elastico Finale Price: $99.99-110.00 (depends on custom levels) *some information used from Nike.com
8. Nike5 Elastico Finale History: The 2010 Nike5 Collection inspired by street soccer quickness. Shoe designed for lightening speed, fast dribbling, accurate control, one touch passing, as seen in street soccer. Street soccer elements becoming the key element to the overall design. Creating this newly improved indoor soccer shoe. My Experience: Provided perfect grip. Allowed me to play the fast pace one touch pass and go game, I am a custom too. Tacky dots creates firm grip. A bare foot feeling. Laces discrete and out of the way. Shoe moldable to foot, moves with foot. Great for accurate traps, and juggling. Tacky sides gives all around trap control(never had experienced new feeling). Stickiness of tacky dots, needed to adjust to new feeling. *some information used from Nike.com
9. Field Guide to Types of Soccer Shoes Nike Kids Jr Tiempo Weight/Material: Weight.2oz. Shoe comes in different bottoms firm groun(outdoor),soft ground(indoor),etc. Bottom of the cleat made of carbon fiber to reduce weight. Outer layer made with Kangaroo Leather. Conditions: Used in outdoor or indoor fields. Outdoor shoes, can be used during rain or shine (kids soccer almost never allowed in rain). Targeted Towards: Beginning players. Children between ages 3-11(there is a professional player shoe design as well) Customization: Not Much. This boot comes in plain and original colors. Little personalization colors limited. Colors of shoes depends on carrier(place of purchase) Can either be indoor or outdoor shoes, sometimes come in turf. Price: $25.00-40.00 (price varies on distributor) *some information used from Nike.com
10. Nike Kids Jr Tiempo History: Release in 1994 and designed by Ronaldinhio, Brazilian soccer star. Shoes released for the 1994 World Cup, drew the attention of young aspiring amateur players. Inspired by professional soccer stars, this design became ideal for children. Making shoe heavier than professional soccer shoes, instills patients and creates strengths in the younger players, so they can obtain all key elements of soccer. My Experience: As a younger player, aspiring to be Mia Ham. All I used to determine what shoe I wore was the color and my parents budget(affordable buy). From seeing videos of my ball control as a child, I believe shoe allowed for easy ball control. Allowed me to learn, basic elements of soccer. Shoe often came in pink, and as a little girl that was a key factor, in the shoe I would chose. *some information used from Nike.com
Hinweis der Redaktion
This sample presentation consists of a map on a single slide that illustrates the use of the drawing tools in Microsoft PowerPoint. Additional slides focus on the AutoShapes and the lines you see on the map. For instructions on using the tools, see the notes page of each slide. To view the notes page, on the View menu, click Notes Page . To return to normal view, click Normal on the View menu. To see the map in greater detail, click Slide on the View menu. This slide uses the Bulleted List slide layout. To insert new slides, on the Formatting Palette , under Add Objects , click the Slides tab. Then click a slide layout that suits the content. We added a gold fill color to the title area and changed fonts, font sizes, and styles for the slide title. To change fills and fonts, on the Formatting Palette , under Borders and Shading , select a fill color. Under Font , select fonts, font sizes, and styles. We added a blue background to the slide. We selected the color by using the color wheel. To change the background color, on the Format menu, click Slide Background . Click the color box, and then click More Colors . Click a color type, and then select a color. We added the snowflake graphic, which you can see faintly on the slide. To add graphics in the background, on the Insert menu, point to Picture , and click From File. Locate and insert the picture file. On the Formatting Palette , under Image , adjust the Brightness and Contrast settings so that the graphic fades into the background.
Text boxes We used text boxes to create the gold banner at the top of the slide and the orange blocks of text describing the facilities. To create a text box, on the Insert menu, click Text Box . In the slide, drag to create the box. Then type the text. Select a font, color, and style from options listed under Font on the Formatting Palette . The label “Crooked River” is in a rotated text box. To rotate a text box, first display the Drawing toolbar: On the View menu, point to Toolbars and then click Drawing . Then, on the Drawing toolbar, click Free Rotate . Drag a handle to rotate the text box. Graphics We inserted the Alpine Ski House company logo as a graphic and then dragged it to the desired location. To insert a graphic, on the Insert menu, point to Picture, and then click From File . Once a graphic is in your document, it can be moved, resized, or reformatted.
We created all of the buildings, the building labels, and the pool and parking lot by using shapes on the Formatting Palette . We colored each shape purple and added a gradient and a white outline. Then we grouped the shapes so that they maintain their relationship with each other. The athletic club, for example, is composed of three shapes. To draw one side of the roof, do the following by using tools on the Formatting Palette . Under Add Objects , click the Lines tab, and then click Freeform . On the slide, click and move the mouse to draw straight lines. You can drag a selection handle to change the angles of the freeform. Under Size, Rotation, and Ordering , you can select a rotation option to change the orientation of the freeform. To color the freeform, under Colors, Weights, and Fills , click a fill color. To add a gradient to the fill, click the arrow next to Fill Color , and then click Fill Effects . To add a border around the shape, such as the white solid line we added, click options under Line . After completing one side of the roof, you can use it to create the other side of the roof. Select the freeform you created. On the Edit menu, click Copy and then Paste . Under Size, Rotation, and Ordering , click Rotation , and then click Flip Horizontal to reverse the angles and finish the roof. We drew the body of the building in the same way, by using the Rectangle shape on the AutoShapes tab. (continued on next slide)
(continued from previous slide) Once the shapes are created, do the following: Move the shape into place on the slide. Move the pointer over the shape and when you see the hand icon, drag the shape to the destination you want. If the shapes overlap, layer them the way you want. Select a shape. Under Size, Rotation, and Ordering , click Layering , and select an option. For example, we placed the parallelograms that compose the roof on top of the rectangle. When the shapes are arranged the way you want, group them into a single object so that they maintain their relationship to each other. To group objects: First select all the shapes (hold down the SHIFT key as you click on each shape). Under Size, Rotation, and Ordering , click Grouping , and then click Group . We created the labels you see on this slide by using the following formatting options on the Formatting Palette : To create the rounded rectangle shape, under Add Objects , click the AutoShapes tab, and then click Rounded Rectangle . On the slide, drag to create the shape. Click inside the shape and type the text. Under Font , select the font, font size, and font color. Add a white border and a gold fill to the shape by selecting options under Colors, Weights, and Fills .
We created the lines you see on the map, indicating paths and the river, by using a variety of line tools. To draw a line, under Add Objects on the Formatting Palette , click the Lines tab, and click a line type. On the slide, drag to draw the line. With the line selected, under Colors, Weights, and Fills, specify a line color, type, and weight. To draw the paths, river, and lake, use the following line tools: To draw the white dotted lines denoting paths, use the Curve tool. To draw the Crooked River, use the Curve tool. Layer two lines on top of each other. Draw a darker blue line with a weight of 8 points. Then copy and paste the line in the same position. With the second line selected, change the line style to a lighter blue with a weight of 6 points so that the wider dark blue line is visible behind the light blue line. To draw Snow Lake, use the Freeform tool. Use the same method of layering two shapes on top of each other as was used to draw the river. To draw the thin white line that separates the banner from the map area, use the Lines tool. One line we drew used a tool available on the Drawing toolbar. To draw the road leaving the parking lot and the dotted line on top of it, use the Arc tool. On the Drawing toolbar, click AutoShapes . Point to Basic Shapes , and then click Arc . To insert arrowheads at the end of an arc, double-click the arc to open the Format AutoShape dialog box. On the Colors and Lines tab, under Arrows, click the style and size arrowheads you want by using the pop-up menus. Photo credits are listed in the Office for Mac 2004 Read Me file.
We created the lines you see on the map, indicating paths and the river, by using a variety of line tools. To draw a line, under Add Objects on the Formatting Palette , click the Lines tab, and click a line type. On the slide, drag to draw the line. With the line selected, under Colors, Weights, and Fills, specify a line color, type, and weight. To draw the paths, river, and lake, use the following line tools: To draw the white dotted lines denoting paths, use the Curve tool. To draw the Crooked River, use the Curve tool. Layer two lines on top of each other. Draw a darker blue line with a weight of 8 points. Then copy and paste the line in the same position. With the second line selected, change the line style to a lighter blue with a weight of 6 points so that the wider dark blue line is visible behind the light blue line. To draw Snow Lake, use the Freeform tool. Use the same method of layering two shapes on top of each other as was used to draw the river. To draw the thin white line that separates the banner from the map area, use the Lines tool. One line we drew used a tool available on the Drawing toolbar. To draw the road leaving the parking lot and the dotted line on top of it, use the Arc tool. On the Drawing toolbar, click AutoShapes . Point to Basic Shapes , and then click Arc . To insert arrowheads at the end of an arc, double-click the arc to open the Format AutoShape dialog box. On the Colors and Lines tab, under Arrows, click the style and size arrowheads you want by using the pop-up menus. Photo credits are listed in the Office for Mac 2004 Read Me file.
We created the lines you see on the map, indicating paths and the river, by using a variety of line tools. To draw a line, under Add Objects on the Formatting Palette , click the Lines tab, and click a line type. On the slide, drag to draw the line. With the line selected, under Colors, Weights, and Fills, specify a line color, type, and weight. To draw the paths, river, and lake, use the following line tools: To draw the white dotted lines denoting paths, use the Curve tool. To draw the Crooked River, use the Curve tool. Layer two lines on top of each other. Draw a darker blue line with a weight of 8 points. Then copy and paste the line in the same position. With the second line selected, change the line style to a lighter blue with a weight of 6 points so that the wider dark blue line is visible behind the light blue line. To draw Snow Lake, use the Freeform tool. Use the same method of layering two shapes on top of each other as was used to draw the river. To draw the thin white line that separates the banner from the map area, use the Lines tool. One line we drew used a tool available on the Drawing toolbar. To draw the road leaving the parking lot and the dotted line on top of it, use the Arc tool. On the Drawing toolbar, click AutoShapes . Point to Basic Shapes , and then click Arc . To insert arrowheads at the end of an arc, double-click the arc to open the Format AutoShape dialog box. On the Colors and Lines tab, under Arrows, click the style and size arrowheads you want by using the pop-up menus. Photo credits are listed in the Office for Mac 2004 Read Me file.