SlideShare ist ein Scribd-Unternehmen logo
1 von 26
Downloaden Sie, um offline zu lesen
Extension is a Division of the Institute of Agriculture and Natural Resources at the University of Nebraska–Lincoln
cooperating with the Counties and the United States Department of Agriculture.
University of Nebraska–Lincoln Extension educational programs abide with the nondiscrimination policies
of the University of Nebraska–Lincoln and the United States Department of Agriculture.
Nebraska Extension in Lancaster County
444 Cherrycreek Road, Suite A, Lincoln, NE 68528
402-441-7180
http://food.unl.edu • ahenneman1@unl.edu
Alice Henneman
MS, RDN, Extension Educator
Copyright ©2017
Makeover Your
Leftovers
Old Fashioned Bread Pudding Roasted Vegetable PastaIt’s the Berries Yogurt Smoothie
Clean the Fridge Chopped SaladSandwiches Made With
Odds & Ends of Cheese Turkey Salsa Soup
PhotosbyAliceHenneman
About 90 billion pounds of edible
food goes uneaten each year in
the United States, an amount
equal to 123x the weight of the
Empire State Building. This costs
consumers $370 per person each
year:
 Grains: $22
 Fruits: $45
 Protein Foods*: $140
 Vegetables: $66
 Dairy: $60
 Added Fat &Sugar**: $37
You can reduce wasted food in
your home with simple shopping,
storage and cooking practices.
Also, you can give food to
organizations that accept food
donations to feed others.
Recycling or composting food is
another option.
Reducing food waste does more
than save money. It improves
access to food and helps protect
our natural resources. Resources
used to produce uneaten food
include: 30% of fertilizer, 31% of
cropland, 25% of total fresh water
consumption and 2% of total
energy consumption.
The Environmental Protection
Agency estimates food wastes at
almost 14% of the total municipal
solid wastes in the United States in
2010, with less than 3% recovered
and recycled. Food in landfills
decomposes to produce methane,
a potent greenhouse gas.
*Protein foods includes meat, poultry,
fish, eggs and nuts.
**Added fat & sugar refers to fat and
sugar used in the production of foods
in the other groups.
Food tossed is money lost. One way to add new life to still edible foods is to
re-purpose leftovers and reuse or “recycle” them in new ways and new
recipes. This booklet will get you started with simple tips and recipes. You’ll
find “recycled” can taste just as good — maybe even better—than the original
recipe.
Quick Tricks
Grains.……………………………………………………………………………..2
Fruits.………………………………………………………………………………2
Protein Foods.…………………………………………………………………….2
Vegetables.………………………………………………………………….…….2
Dairy………………………………………………………………….…………….3
Combinations of Foods…………………...…….………………………………..3
Other…………………………………………………...…………………………..3
Recipes
Old Fashioned Bread Pudding…………………………………………….…….4
Roasted Root Vegetables………………………………………………….…….5
Homemade Whole Grain Croutons………………………………………….….6
Roasted Vegetable Pasta…………………………………………………….….7
Clean the Fridge Chopped Salad…………………………………………….…8
Tasty Microwave Potato Chunks………………………………………………..9
Toasty Potato Chunks……………………………………………………………9
Mashed Cauliflower…………………………………………………..………….10
Roasted Cauliflower……………………………………….................………...10
Fantastic French Toast………………………………………………………….11
Bread Crumb Casserole Topping……………………………………………...12
It’s the Berries Yogurt Smoothie…………………………………………….....13
Turkey Mashed Potato Soup………………………………………………...…14
Turkey Salsa Soup…………………………………………...………………....14
Fiesta Rice Skillet....................………………………………………………....15
Kitchen Helpers
Reducing the Size of Recipes………………………………………………….16
Ingredient Substitutions………………………………………………………...17
How to Store & Prepare Fruits and Vegetables to Prevent Food Waste....20
Is This Food Still Safe to Eat?....………………………………………………22
Refrigerator and Freezer Storage Chart...............…………………………...24
MAKEOVER YOUR LEFTOVERS
TABLE OF CONTENTS
How to Freeze Milk and Cheese..........................…………………………....25
1
View a related "Makeover Your Leftovers slide show and/or download a
FREE PowerPoint at http://bit.ly/makeover-leftovers
(Image courtesy of USDA)
(Unless noted otherwise, all photos in this handout are by Alice Henneman)
QUICK TRICKS*
*Indicates tips for which a recipe is included in the recipe section.
1.
2.
3.
4. Freeze lemon or lime juice in ice cube trays.
Transfer to freezer bags. Pop into water for flavored
water. NOTE: It’s easier to remove frozen food from
silicone ice cube trays and muffin pans than plastic
trays or metal pans as silicon is more flexible.
5. Roll citrus fruits with your hand on a hard surface
before juicing to get more juice from them.
6. Refrigerate ripe
bananas to
make them last
a few days
longer. They
may be brown
on outside, but
still a good
color on the
inside.
7. Freeze lemon
slices in water
in cupcake
pans for large, flavored ice cubes.
8. Freeze washed, peeled, bite-size pieces of fruit for
smoothies. Place on baking sheet with sides and
cover with plastic wrap. Transfer frozen pieces to
freezer bags. Toss into smoothies.*
9. Use leftover
meat in flavorful
foods such as
barbecued meat
dishes, chili and
tacos to mask
any flavor of
“warmed over
meat.” Plus,
being covered
by a sauce or
liquid helps
prevent further flavor changes in the meat.
10. Freeze chopped mature onions by adding directly to
a freezer bag. Lay flat to freeze. To separate the onions
b before use, give bag a slight "whap" on kitchen counter.
11. Freeze extra
bell peppers in
shapes needed
for recipes.
Freeze for a few
hours on a
baking sheet
with sides until
hard. Transfer to
a freezer bag.
12. Purée extra vegetables in a blender or food
processor and heat with pasta sauce. Possible
vegetables include carrots, butternut squash, red
bell peppers and zucchini.
13. Freeze extra
tomato paste in
tablespoon-size
portions in an
ice cube tray.
Transfer to a
freezer bag.
Adding a
tablespoon or
two of tomato
paste to soups,
GRAINS
FRUITS
PROTEIN FOODS
VEGETABLES
Freezing bell peppers
Inside of a ripe banana that
was refrigerated
Use older
bread to make
croutons,*
bread crumbs,*
bread
pudding,*
stratas and
French toast.
Use leftover
rice in stir-fried Strata is a tasty use
rice, pudding and for older bread
rice bowls.
Heat leftover pasta in a pan over medium heat with
some olive oil. Sprinkle with Parmesan cheese. Add
a little extra pizazz by topping the pasta with fresh
herbs..
Removing the seeds from a
cucumber with a melon baller
Use leftover meat in chili
2
casseroles and pasta sauce enhances the flavor of
these foods with its concentrated, almost meaty
taste.
14. Easily remove just the membrane part from peppers
and the seeds from cucumbers and zucchini by
using a melon baller or measuring spoon when
preparing these foods to eat alone or use in
recipes.
15. Freeze
chopped fresh
herbs in olive
oil for a quick,
delicious
addition to
sauces and
pastas.
16. To revive
leftover
French fries, heat a small amount of oil in a heavy
skillet over medium heat. Spread fries in a single
layer, leaving plenty of space around the fries.
Otherwise, they’ll steam instead of sauté. Turn until
all sides are evenly heated and crisp. Place on a
paper towel to drain any extra fat.
17. Sauté chopped cabbage and onion (about 1/2 head
cabbage and 1/2 onion) in olive or canola oil in a
skillet over medium heat until tender. Season as
desired with salt and pepper.
…..
18. Freeze Parmesan rinds and add (frozen) to a soup
or stew for extra flavor.
19. Use up extra
odds and ends
of cheese by
shredding them
with a grater or
in a food
processor. Mix
in your choice of
ingredients, cut
or chopped into
small pieces
(i.e. olives,
pickles, pimientos, chives, walnuts, peppers, etc.).
Add enough mayonnaise (regular or low-fat) to bind
the ingredients together. Spread on your favorite
bread.
20. Use vanilla and fruit flavored yogurts as a dressing
for fruit salads.
24. Test baking powder for freshness by mixing
1 teaspoon baking powder with 1/3 cup hot water. If
it foams vigorously, it still has rising power. To test
baking soda: Place 1-1/2 teaspoons in a small
bowl. Add 1 tablespoon vinegar. If it fizzes, then it
will still help leaven a food. If it doesn’t fizz, use it as
an odor catcher in the refrigerator.
25. Fix lumpy gravy by pouring it through a sieve or
strainer.
26. Coat measuring
cups with
nonstick
cooking spray
before
measuring
sticky
ingredients like
honey and
syrups.
27. Add oil,
vinegar, herbs and spices to an almost-empty mayo,
jam or jelly jar. Shake and use for a quick salad
dressing. Use about 1 part vinegar to 3 parts oil.
28. Fix lumpy frosting by adding something lumpy to it,
such as chopped nuts or coconut.
DAIRY
COMBINATIONS OF FOODS
OTHER
21. Make a chopped salad with small amounts of extra
fruits, vegetables, nuts, cooked eggs, etc.*
22. Combine
leftover pasta
with foods
such as boiled
egg wedges
or slices, bite-
size chunks of
cheese,
chopped fresh
vegetables,
Pasta salad
cooked dry
beans. Mix with your favorite vinaigrette-type
dressing. Refrigerate about an hour before serving
to let the flavors blend.
23. Create a colorful parfait by layering cookie
crumbles, then pudding follow by fruit - such as
berries - in parfait or wine glasses. Alternate as
desired. Serve soon after preparation to prevent
crumbles from becoming soggy.
Sandwiches made with
odds & ends of cheese
Freezing herbs in olive oil
Coat measuring cups with nonstick spray
before measuring sticky ingredients
3
Servings: 6 1/2-cup servings
A serving of "Old Fashioned Bread Pudding" is a delicious way to add whole
grain breads to your meals and to use up bread that is beginning to dry out.
Spreading each slice of bread with margarine or butter and sprinkling it with
cinnamon before cutting it into cubes makes every bite especially tasty!
DIRECTIONS
1. Preheat oven to 350 degrees F.
2. Spread one side of bread with margarine or butter. Sprinkle with
cinnamon.
3. Cut bread into 1-inch cubes.
4. In a medium-sized bowl, combine bread cubes, sugar and raisins.
5. In another bowl, blend eggs, milk, salt and vanilla. Pour liquid over bread
mixture; lightly mix.
6. Transfer mixture to a casserole dish coated with oil or sprayed with a
nonstick spray.
7. Bake uncovered for 50 to 60 minutes or until the center of the pudding
reaches 160 degrees F when measured with a food thermometer. At this
temperature, a metal knife inserted near the center comes out clean.
8. Serve warm or cold. Do not let bread pudding set at room temperature
over 2 hours’ TOTAL time. Eat within 3 to 4 days.
Source: Adapted from Montana Extension Nutrition Education Program, Website
Recipes, Montana State University Extension Service
ALICE’S TIPS
Avoid overcooking eggs in custard-type dishes—such as this recipe—AND
assure safety by using a food thermometer. Overcooking may cause curdled
or weeping custard.
To determine doneness in egg dishes such as bread or rice pudding, quiche,
casseroles, strata’s, etc. the center of the mixture should reach 160 degrees F
when measured with a food thermometer. At this temperature, the very center
of a custard-type dish may still be slightly liquid; however, the heat retained in
the mixture will cause it to continue cooking and to set after removal from the
oven. You may need to insert the thermometer at an angle to assure enough
of thermometer reaches sufficiently into the food to measure the temperature.
A custard pie is done when the liquid area in the center is smaller than a
quarter. Therefore, you may see the recommendation to insert a metal knife
near the center of custard-type dishes to check if it comes out clean.
INGREDIENTS
 5 slices whole wheat bread
• 2 tablespoons margarine or
b butter
• 1/4 teaspoon cinnamon
• 1/3 cup sugar, white or brown
• 1/2 cup raisins
• 3 eggs
• 2 cups nonfat liquid milk
• 1/4 teaspoon salt
• 1 teaspoon vanilla extract
NOTES
OLD FASHIONED BREAD PUDDING
RECIPES
According to the U.S. Department of Agriculture, part of a healthy diet is limiting the amounts of added sugars, saturated
fats and sodium we consume. The following recipes have been chosen to help promote or give substitutions that support
these recommendations and at the same time provide important nutrients and taste good. While saturated fat is kept at a
minimum, to further reduce saturated fat in a recipe calling for a solid fat, substitute a soft (tub or squeeze) margarine.
4
Servings: 4 servings
Roasting root vegetables adds a delightful sweet taste and is a delicious way
to use up those last few vegetables lingering in your refrigerator or on your
counter top. Cut vegetables into chunks similar in size so they will finish
roasting at the same time.
DIRECTIONS
1. Preheat oven to 350 degrees F.
2. Cut vegetables into large chunks.
3. Place in a medium bowl and pour oil over top. Add seasonings and mix
well.
4. Spread an even layer on a baking sheet.
5. Bake for 1 hour or until tender. Check a few vegetables to see if they are
tender.
Source: Adapted from USDA “What’s Cooking? USDA Mixing Bowl” at
http://bit.ly/2dt9cYn and by Montana Extension Nutrition Education Program
Website Recipes, Montana State University Extension Service.
ALICE’S TIPS
1. Depending on the size of your vegetables, you may be able to use slightly
less oil. You might add one tablespoon of oil at a time until the vegetables
are coated.
2. I sprinkled a mixture of 1/4 teaspoon of dried thyme, 1/4 teaspoon dried
rosemary and 1/8 teaspoon black pepper on the vegetables. Another
possibility would be to substitute 1/2 teaspoon Italian seasoning for the
thyme and rosemary.
3. Start checking the vegetables for tenderness at about 45 minutes. I cut
mine into about 1-inch chunks and they baked in 50 minutes in my oven.
INGREDIENTS
 4 medium-sized root
vegetables (choose a variety
from potatoes, rutabagas,
turnips, parsnips, beets, sweet
potatoes)
 2 chopped carrots
 1 medium chopped onion
 1/4 cup vegetable oil
 Seasoning(s) of your choice
NOTES
ROASTED ROOT VEGETABLES
5
Servings: Allow the equivalent of about 1/2 to 1 slice of bread/person
Making your own croutons is a tasty way to use bread that has dried out
slightly. You’ll save money, too! Homemade croutons also are a terrific treat
for enjoying those last few slices of bread from the Farmers’ Market.
Making croutons from scratch is so easy and lets you control the type of
seasonings and amount of sodium. You may decide to switch to always
making your own croutons. Enjoy this recipe for either plain croutons or
croutons made with Italian seasoning.
Add homemade croutons to salads and soups just before serving. Toss them
on top of casseroles for added crunch.
DIRECTIONS
1. Preheat oven to 350 degrees F.
2. Lightly brush top side of bread with olive oil. If desired, sprinkle with Italian
seasoning after bread is coated with oil. Cut into about 1/2 to 3/4-inch
cubes. Leave the crust on — it adds to their wholesome, made-at-home
appearance!
Alternative method:
a. First, cut bread into 3/4-inch cubes leaving the crusts on. Transfer to a
bowl that allows enough room to stir the croutons.
b. Drizzle on a little olive oil — about 1 to 2 teaspoons per slice of bread,
stirring to distribute while you add the olive oil. A “spoonula” or spoon
spatula works especially well to help scrape any olive oil from the side
of the bowl and mix it throughout the croutons.
c. Next, if desired, sprinkle with Italian seasoning, while stirring the
croutons to distribute the seasoning among the crouton surfaces.
3. Spread bread cubes in a single layer on an ungreased baking sheet. Bake
on the middle shelf of the oven for 10 to 15 minutes or until lightly browned
and crisp. You don’t have to turn croutons while they’re baking.
4. Place pan on a cooling rack to cool croutons.
5. Enjoy! These croutons taste best if eaten the same day they're made; you
can store at room temperature in an airtight container for a couple of days.
Source: Recipe developed by Alice Henneman, MS, RDN
ALICE’S NOTES
1. If desired, use low sodium bread; check with your grocery store or local
health food stores for availability in your area.
2. Experiment with additional seasonings — for example, lightly sprinkle
croutons with garlic powder or dried herbs such as oregano or thyme.
INGREDIENTS
 Whole grain bread (1/2 to 1
slice/person, depending on size
of salad)
 Olive oil
 Italian seasoning (optional)
NOTES
HOMEMADE WHOLE GRAIN CROUTONS
6
Servings: 4 side dishes or 2 large main dish servings
Roasting adds an extra layer of flavor to vegetables. Try this recipe if you have
some of these vegetables in your kitchen you need to use up: Cherry
tomatoes, bell peppers (any color), zucchini, eggplant or asparagus.
Exact amounts aren’t needed in this recipe. Just keep the amount of
vegetables roasted at one time to an amount that can be spread in a single,
even layer on a pan in the oven.
DIRECTIONS
1. Preheat oven to 375 degrees F.
2. Mix together cherry tomatoes, bell pepper slices, zucchini and extra virgin
olive oil in a large roasting pan, a 9 x 13-inch baking pan or a baking sheet
with sides. Spread the vegetables spread in a single, even layer on the
pan. Use a larger pan or a couple of pans, if necessary, to prevent
stacking the vegetables.
3. Sprinkle the Italian seasoning over the vegetables.
4. Roast for 25 to 35 minutes, or until the tomatoes and zucchini are
softened and the pepper has started to brown.
5. Meanwhile, cook the pasta according package directions. Drain, reserving
about 1/2 cup of the pasta water.
6. Combine the roasted vegetables with the pasta in a large mixing bowl.
Season to taste with salt and pepper. if the pasta requires additional
moistening, add reserved cooking liquid by tablespoonful’s until you’ve
added enough liquid to moisten sufficiently. Transfer to a serving dish.
Serve and pass the grated Parmesan, if desired.
Source: Recipe developed by Alice Henneman, MS, RDN
ALICE’S TIPS
1. If you decide to use the recipe for 2 main dish servings, include the
cheese to add some protein to the meal. Or, you might quickly heat some
precooked shrimp per package directions and add to the pasta dish.
2. Vegetables you might substitute for those listed in this recipe include:
 A bunch of asparagus, cut into 2-inch pieces
 An eggplant cut into 3/4-inch pieces
INGREDIENTS
 2 to 4 cups cherry tomatoes,
left whole with skins
 One large bell pepper (any
color), cut into 1-inch pieces
 1 to 2 medium zucchinis, cut
into 1/4-inch slices
 3 tablespoons extra virgin olive
oil
 1 teaspoon Italian seasoning
 8 ounces uncooked pasta
(preferably whole grain), such
as rotini, farfalle (bow tie
shaped) or medium-sized shell
pasta
 Salt and pepper (preferably
fresh ground pepper) to taste
 Grated Parmesan cheese,
preferably freshly grated
(optional)
NOTES
ROASTED VEGETABLE PASTA
7
Servings: Varies on how much fridge cleaning you do in making this salad!
A chopped salad is known for containing small pieces of fresh produce,
usually vegetables. You’re limited only by your imagination. Possibilities
include onions, bell peppers, carrots, tomatoes, celery, lettuce, spinach,
cabbage, zucchini, cauliflower, broccoli, kale, peas, radishes, cucumbers,
cooked corn cut from the cob and zucchini. Chopped salads are a delicious
dish for cleaning out your refrigerator.
Additional foods tossed into a chopped salad, but not necessarily chopped,
include individual cooked shrimp; nuts; sunflower seeds; strips of grilled or
broiled steak; beans such as black or garbanzo beans; boiled egg slices or
wedges; cubed ham; bacon bits; cheese; olive slices; and fruits such as
mandarin orange wedges, blueberries and apple chunks. A chopped salad
is easier to eat from a bowl with sides.
DIRECTIONS
1. Prepare vegetables shortly before serving. Wash all vegetables, even if
you plan to remove the skin. Smaller-sized produce can be used “as is;”
larger vegetables, such as greens, carrots and so on are chopped into
smaller pieces. Mix together.
2. Mix in any additional meat, cheese, etc.
3. Toss with about 1 to 2 tablespoons of dressing per each 2 cups of
vegetables. Start with the smaller amount of dressing and add more if
needed. Serve.
Source: Recipe developed by Alice Henneman, MS, RDN
ALICE’S TIPS
A chopped salad may be easier to eat served from some type of dish with
sides.
INGREDIENTS
 An assortment of vegetables;
plan on enough to make about
a 1-1/2 to 2 cup salad per
person
 Additional cooked meat, eggs,
cheese, cooked dry beans,
lentils, nuts, seeds, etc. if
desired
 Salad dressing of your choice
 Salt and pepper to taste, if
desired
NOTES
CLEAN THE FRIDGE CHOPPED SALAD
8
Servings: 4 – 6
Try this quick potato dish that can be made in your microwave. If you have
leftovers, try the recipe following it for “Toasty Potato Chunks.”
DIRECTIONS
1. Place potato cubes in a mixing bowl and mix in the olive oil until potatoes
are thoroughly coated.
2. Sprinkle potatoes with your favorite seasoning(s) and stir to distribute. I
sprinkled in some dried oregano leaves and ground some black pepper
over the potatoes. You also might add a bit of salt now, or wait to salt “to
taste” after the potatoes are done … or just pass the salt if you’re feeding
anyone limiting sodium intake.
3. Place potatoes in a 1-1/2 to 2-quart microwave-safe dish. Cover with lid.
Microwave on high for about 10 minutes or until potatoes are tender when
pierced with a fork; stir once about half way through the time.
4. Transfer to a serving dish. Enjoy!
Got Leftovers?
Eat leftovers within 3 to 4 days for best quality and safety. Here’s a way to
“recycle” them into a new, flavorful dish, Toasty Potato Chunks.
Toasty Potato Chunks
a. Transfer potato chunks, including any remaining olive oil, to a
nonstick skillet at medium heat. Place in a single layer or the
potatoes will steam instead of brown. If necessary, cook in
batches. There should be enough oil left on the potatoes to flavor
them and help them brown. If needed, add a small amount of oil
until potatoes coated with oil.
b. Cook on one side until potatoes have turned brown; then, flip and
cook on the other sides.
c. Remove from skillet and serve hot.
Source: Recipes developed by Alice Henneman, MS, RDN
ALICE’S TIPS
1. To assure potatoes getting done at the same time, as much as possible
make chunk sizes a similar size.
2. Wash the potatoes under running water, scrubbing them with a clean
brush or with your hands; pat dry with a clean paper towel before dicing
them. Do not wash potatoes until you’re ready to use them.
INGREDIENTS
 4 cups diced new red potatoes
(leave skin on and cut into
1-inch cubes; amount need not
be exact)
 2 tablespoons extra virgin olive
oil
 Seasoning(s) of choice
NOTES
TASTY MICROWAVE POTATO CHUNKS
9
Servings: 2 generous servings
While the first half of a cauliflower often is eaten soon, sometimes the last half
remains until it finally gets tossed. Try making mashed cauliflower to give a
whole new personality to the other half of the cauliflower.
DIRECTIONS
1. In a large sauce pan (use a Dutch oven if cooking the entire cauliflower),
bring an inch of water to boil.
2. Add cauliflower; cover and cook for 5 to 10 minutes or until tender. (Test
by sticking a fork into the cauliflower.)
3. Drain the cauliflower and return to the pan. Add the milk, margarine or
butter, garlic, pepper and salt.
4. Mash with a potato masher until combined. OR, place the cauliflower and
other ingredients (except the cheese) in a mixing bowl and beat with an
electric mixer. (NOTE: I prefer to stop mixing while the mixture still
contains some small chunks of cauliflower than until it is perfectly smooth.
This is a matter of personal preference, however.)
5. Stir in the cheese.
Source: Recipe developed by Alice Henneman, MS, RDN
Servings: 8 servings
Roasting adds flavor to cauliflower and reduces the volume slightly. You may
be surprised by how much you and family members eat when you roast
cauliflower. (NOTE: Just halve the following ingredients if only using half a
head.)
DIRECTIONS
1. Preheat oven to 450 degrees F.
2. Remove outer leaves of cauliflower. Cut florets off the stem. Wash and
drain.
3. Combine oil, salt and pepper in a large bowl. Toss the cauliflower florets in
the oil mixture.
4. Spread cauliflower on a large rimmed baking sheet.
5. Roast in the oven at 450 degrees 15-20 minutes until the cauliflower starts
to soften and begins to brown.
6. Sprinkle with cheese. Continue to roast for 5-10 minutes.
Source: University of Maryland Extension. Food Supplement Nutrition
Education Program at USDA’s What’s Cooking.
INGREDIENTS
• 1/2 head cauliflower, washed
and cut into florets
• 1 tablespoon milk
• 1-1/2 tablespoons margarine or
butter
• 1 small clove garlic, minced OR
1/4 teaspoon garlic powder
• 1/4 teaspoon black pepper
• Salt (if desired), to taste
 1/4 cup grated cheese (you can
use any cheese)
NOTES
INGREDIENTS
 1 cauliflower head
 2 tablespoons olive oil
 1/4 teaspoon salt
 1/4 teaspoon pepper
 1/2 cup shredded Parmesan
cheese
NOTES
MASHED CAULIFLOWER
ROASTED CAULIFLOWER
10
Servings: 6 slices of French toast
Transform bread that is starting to dry out into tasty French toast.
DIRECTIONS
1. Beat together eggs, vanilla and cinnamon in a pie pan or shallow bowl
with a fork until well mixed. Stir in the milk.
2. Lightly grease a griddle or large skillet with a thin layer of oil. Heat over
medium heat.
3. Dip each side of bread, one slice at a time, in the egg mixture.
4. Cook on one side until golden brown. Turn the bread over to cook the
other side. It will take about 3 to 4 minutes on each side.
5. Serve with syrup, applesauce, fruit slices or jam.
ALICE’S TIPS
Using whole grain bread will provide the most fiber in this recipe.
…
INGREDIENTS
 2 large eggs
 1/2 teaspoon vanilla extract
 1/2 teaspoon cinnamon
 1/2 cup non-fat milk
 6 slices bread
 Syrup or other toppings
(optional)
FANTASTIC FRENCH TOAST
11
Servings: Makes about 1/2 cup of fine bread crumbs, enough for an 8- or 9-
inch square casserole dish.
Homemade bread crumbs make a tasty topping for casseroles.
DIRECTIONS
Use this topping on any casserole that is baked without a lid.
1. Toast bread at one of the higher settings on your toaster to brown it and
help dry it out. Let cool.
2. Tear off pieces of bread and add to food processor in small batches.
Process to about the size of grains of rice.
3. Add olive oil and pulse to blend. Then add Italian seasoning and continue
to pulse until mixed.
4. Add topping to casserole and bake per casserole directions.
ALICE’S TIPS
1. Using a whole grain bread gives the additional benefit of fiber and higher
amounts of some trace minerals.
2. This recipe is a great way to use up older bread.
3. You may be surprised at how good a homemade bread crumb topping
tastes. Plus, you control the type of ingredients used and save money.
4. One slice of bread yields about 1/4 cup of fine bread crumbs.
INGREDIENTS
• 2 slices bread
• 1 tablespoon extra-virgin olive oil
• 1/2 teaspoon Italian seasoning
NOTES
BREAD CRUMB CASSEROLE TOPPING
12
Photo credit: Pixabay.com
Servings: 1 smoothie
If you purchased a large carton of yogurt to save money, but it is becoming a
permanent fixture in your refrigerator, try this quick smoothie recipe.
DIRECTIONS
1. Add ingredients to a blender in this order: juice, yogurt, berries.
2. Blend all ingredients well and drink!
ALICE’S TIPS
1. Ingredients combine better in a blender if liquids are added before solids.
2. Using frozen fruit helps thicken beverages without diluting the flavor. To
freeze fruit, such as fresh berries, wash the fruit thoroughly under running
tap water, pat dry with clean paper towels and freeze in a single layer on a
rimmed cookie sheet. Transfer to a freezer bag when frozen. Pour out as
needed.
3. Use smaller pieces of fruit, such as berries or sliced pieces of larger fruits
or your blender may be unable to process them.
4. Whether using fresh or frozen fruit, use fruit at its peak of ripeness to
capture the most natural sweetness for smoothies and shakes.
5. Most smoothies and shakes should be consumed immediately. They may
change color if they stand for very long.
6. If you have a larger blender jar that is wide at the bottom, you may find it
harder to blend single-serving smoothies. A blender jar forces food up
against the blender walls where it is then redirected back on the blades
and blended until the desired consistency. A blender that is wider at the
bottom will send smaller volumes of food out toward the sides rather than
up and then down toward the center and the blades.
7. As a variation, make smaller
smoothies and serve them as a
dessert "drink." As an extra goodie,
pass a plate of small, luscious
chocolates as an accompaniment.
8. Consider doubling the size of this
recipe and freezing some of it as
ice pops.
INGREDIENTS
 3/4 cup orange juice, pineapple
juice, orange-tangerine juice, or
other 100% juices
 1/2 cup of vanilla or plain yogurt
(NOTE: if you use plain yogurt,
you may wish to add sugar or a
non-caloric sweetener to taste.
Add about 1 teaspoon at a time
until you have the flavor you
desire.)
 1 cup frozen berries (i.e.
raspberries, strawberries,
blueberries, mixed berries)
NOTES
IT’S THE BERRIES YOGURT SMOOTHIE
Ice pop made from smoothie recipe
13
Give new life to turkey leftovers with these turkey soup recipes. They start with the same basic ingredients of 1 quart
(4 cups) low sodium chicken broth and 2 cups of chopped, cooked turkey.
Servings: Recipes makes about 2 quarts or 4 2-cup servings. Source: Recipes developed by Alice Henneman, MS, RDN
This soup is a wonderful way to use both leftover turkey and mashed potatoes
from Thanksgiving. Don’t worry if you don’t have the exact amounts of
potatoes and turkey. Plus, it is so easy to make after all the food preparation
you did for Thanksgiving Day!
DIRECTIONS
1. In a large saucepan or Dutch oven, sauté over medium heat in olive oil,
onion and carrots until the onion is translucent and the carrots are tender-
crisp, about 5 minutes.
2. Add chicken broth, mashed potatoes and thyme. Continue cooking and
stir until broth is smooth.
3. Add turkey; continue cooking on medium heat until mixture starts to
simmer. Reduce heat to medium-low and continue to simmer, stirring
occasionally — for about 10 minute — until mixture is heated through.
4. Season to taste with salt and black pepper.
Just dump all the ingredients, together and heat … so easy. Season heated
product with salt and pepper to taste and top with grated cheese if desired.
DIRECTIONS
1. Combine salsa; corn; black beans or black soybeans; turkey; and chicken
broth in a large saucepan or Dutch oven.
2. Bring to a boil, then reduce heat and simmer for 5 minutes.
3. Season to taste with salt and black pepper.
4. If desired, top with grated cheddar cheese.
ALICE’S TIPS
The USDA Food Service and Inspection Service advises the following for
storing your turkey leftovers:
1. Discard any turkey, stuffing and gravy left out at room temperature longer
than 2 hours; 1 hour in temperatures above 90 °F.
2. Divide leftovers into smaller portions. Refrigerate or freeze in covered
shallow containers for quicker cooling.
3. Use refrigerated turkey, stuffing and gravy within 3 to 4 days.
4. If freezing leftovers, use within 2 to 6 months for best quality.
5. For best safety and quality, eat soup within 3 to 4 days or freeze it. And
avoid letting soup set at room temperature for more than 2 hours.
6. Reheat leftover soup until it is steaming hot throughout (165 degrees F.)
TURKEY MASHED POTATO SOUP
INGREDIENTS
 1 tablespoon extra-virgin olive
oil
 1 chopped yellow onion
 1 cup thinly sliced carrots
 1 quart (4 cups) low sodium
chicken broth
 3 cups mashed potatoes
 1 teaspoon dried thyme leaves
 2 cups chopped, cooked turkey
 Salt and pepper (preferably
freshly ground pepper
TURKEY SALSA SOUP
INGREDIENTS
 16 oz. (2 cups) mild, chunky
salsa
 2 cups frozen whole kernel corn
 2 (15 oz.) cans black soybeans
or black beans, rinsed and
drained
 2 cups chopped, cooked turkey
 1 quart (4 cups) low sodium
chicken broth
 Salt and pepper (preferably
freshly ground pepper
 Grated cheddar cheese
(optional)
NOTES
TURKEY MASHED POTATO SOUP
TURKEY SALSA SOUP
14
Servings: 6 servings Total Time: 30 minutes
Cheese adds nutrition and flavor to recipes, and when combined with whole
grains and vegetables, can help kids and adults eat more of these foods. Spice
up your weekly dinner plans with this quick and easy, cheesy dish using turkey,
rice and corn. Packing a decent dose of fiber, iron and calcium, this dinner is
sure to become a family favorite all year round.
DIRECTIONS
1. In a large skillet over medium-high heat add oil and cook onion until soft,
about 10 minutes. (If using raw ground turkey, cook with the onion until
browned. Drain excess fat while keeping in the skillet.)
2. Add turkey, rice, beans, corn, picante sauce and chili powder. Stir to mix
well.
3. Heat thoroughly. Remove from heat and sprinkle with cheese. Serve hot.
Nutritional Facts Per Serving
 Calories 140
 Total Fat 7g
 Cholesterol 10mg
 Sodium 330mg
 Carbohydrates 13g
 Dietary Fiber 2g
 Protein 7g (3.8g from dairy)
 Calcium 15% Daily Value
Source: Recipe and image courtesy of Midwest Dairy Association at
https://www.midwestdairy.com/recipe/fiesta-rice-skillet-dinner
developed by Susan Anglin, Triple A Farms, Arkansas
INGREDIENTS
 1 tablespoon canola oil
 1/2 cup diced onion
 2 -1/2 cups cooked turkey,
chopped (or 1 pound lean
ground turkey, raw*)
 2 cups cooked brown rice
 1 (15 ounce) can black beans,
drained, rinsed
 1 (15 ounce) can diced
tomatoes with green chilies,
drained
 1 cup frozen sweet corn kernels
 1 cup mild picante sauce
 1 teaspoon chili powder
 1 cup shredded Monterey Jack
cheese
*If using raw ground turkey, cook
with the onion until browned. Drain
excess fat while keeping in the
skillet.
Photo credit: Midwestdairy.com
NOTES
FIESTA RICE SKILLET DINNER
15
Many recipes can be cut
in half or thirds. Here are some
guidelines to help you adapt a larger
recipe to a smaller one.
❏✓ It may be easier to make the
entire recipe for baked goods
and freeze half.
Reducing the Size of Recipes
Alice Henneman, MS, RDN, Extension Educator
When the
recipe says:	Reduce to:
To Make 1/2 of a Recipe
1/4 cup	 2 tablespoons	
1/3 cup	 2 tablespoons + 2 teaspoons
1/2 cup	 1/4 cup	
2/3 cup 	 1/3 cup	
3/4 cup 	 6 tablespoons	
1 cup 	 1/2 cup 	
		
1 tablespoon	 1-1/2 teaspoon	
1 teaspoon 	 1/2 teaspoon	
1/2 teaspoon 	 1/4 teaspoon	
1/4 teaspoon	 1/8 teaspoons	
1/8 teaspoon	Dash	
To Make 1/3 of a Recipe
1/4 cup 	 1 tablespoon + 1 teaspoon
1/3 cup	 1 tablespoon + 2-1/3 teaspoons 	
(or round to 1 tablespoon + 2-1/4 teaspoons)
1/2 cup	 2 tablespoons + 2 teaspoons
2/3 cup	 3 tablespoons + 1-1/2 teaspoons
3/4 cup 	 1/4 cup	
1 cup	 1/3 cup 	
		
1 tablespoon	 1 teaspoon	
1 teaspoon	 Generous 1/4 teaspoon	
1/2 teaspoon	Scant 1/4 teaspoon	
1/4 teaspoon	Scant 1/8 teaspoon	
1/8 teaspoon 	Dash	
❏✓ When reducing recipes, you may
need to use smaller saucepans,
skillets and baking pans. The
time for baking smaller amounts
of food may be less.
❏✓ The standard size egg for recipes
is the large egg. To halve an egg,
break it, mix it together with
a fork and use 2 tablespoons.
Refrigerate the rest and use in an
omelet or scrambled eggs within
two days.
❏✓ A 9 x 2 x 13-inch pan holds 14 to
15 cups; when halving a recipe
use a square 8 x 8 x 2-inch pan
or a round 9 x 2-inch pan. When
using a different pan size, try and
keep the depth of food the same.
Reduce the oven temperature by
25o
F when substituting a glass
pan for a metal one.
❏✓ To help divide recipes, remember:
● 1 cup = 16 tablespoons
● 1 tablespoon = 3 teaspoons
● 1 cup = 8 fluid ounces
● 1 fluid ounce = 2 tablespoons
● 1 pound = 16 ounces (weight)
● 1 pint = 2 cups
● 2 pints = 1 quart
10/16
  
®
Extension is a Division of the Institute of Agriculture and Natural Resources at the University of Nebraska–Lincoln
cooperating with the Counties and the United States Department of Agriculture.
University of Nebraska–Lincoln Extension educational programs abide with the nondiscrimination policies
of the University of Nebraska–Lincoln and the United States Department of Agriculture. © 2016
16
Often for lack of an ingre-
dient, a recipe is ruined or an
extra trip to the store is required.
Sometimes, you need to buy a
large container of an ingredient
for just a teaspoon or two needed
in a recipe.
To the rescue: ingredient
substitutions! Your final product
made with the substituted ingre-
dient may differ slightly from
the original food, but still be
acceptable in flavor, texture and
appearance.
Ingredient Substitutions
Alice Henneman, MS, RDN, Extension Educator
1TIP: According to the National
Association of Margarine Manufacturers,
you can tell “if the product is regular
margarine by checking the Nutrition Facts:
a one tablespoon serving will have 100
calories.” Products that contain less than 80
percent fat often give the fat percentage on
the front of the package. If the margarine is
labeled “light,” “lower fat,” “reduced fat,”
“reduced calorie/diet” or “fat-free” or is
called a “vegetable oil spread,” you may be
less successful substituting it for butter OR
for regular margarine in baking and in some
cooking procedures. These products are
higher in water and lower in fat content and
won’t perform in the same way as regular
butter or margarine.
2TIP: There is no standard procedure
to substitute liquid oil for solid shortening
in cooking. Oil is 100 percent fat,
while butter, margarine and other solid
shortenings are lower in fat on a volume-
for-volume basis. Also, for some recipes,
solid shortening helps incorporate air into
the batter when it is whipped with other
ingredients such as sugar and eggs. If you
try to whip these ingredients with oil, your
baked product is likely to be more compact
and oily in texture. Your most successful
substitution occurs if your recipe calls for
MELTED butter, in which case you can
usually substitute an equal amount of oil.
ProducT	 AMOUNT	 SUBSTITUTE
Allspice	 1 teaspoon	 1/2 teaspoon cinnamon plus 1/2 teaspoon ground
cloves	
Apple Pie Spice	 1 teaspoon	 1/2 teaspoon cinnamon plus 1/4 teaspoon nutmeg
plus 1/8 teaspoon cardamom
Baking Powder, 1 teaspoon	 1/4 teaspoon baking soda plus 5/8 teaspoon cream
of tartar 	
Baking Soda	 There is NO substitute for baking soda
Butter1, 2
	 1 cup	 1 cup regular margarine;
or 1 cup vegetable shortening (for baking);
	 or an equal amount of oil can be substituted
for a similar portion of MELTED butter if the recipe
specifies using MELTED butter. 	
Buttermilk	 1 cup	 1 tablespoon lemon juice or vinegar plus enough
regular milk to make 1 cup (allow to stand 5 minutes)
Chili Sauce	 1 cup	 1 cup tomato sauce, 1/4 cup brown sugar, 2 table-
spoons vinegar, 1/4 teaspoon cinnamon, dash of
ground cloves and dash of allspice
Chocolate, 	 1 ounce	 3 tablespoons cocoa plus 1 tablespoon butter or
regular margarine or vegetable oil	
Double-Acting
Unsweetened
Extension is a Division of the Institute of Agriculture and Natural Resources at the University of Nebraska–Lincoln
cooperating with the Counties and the United States Department of Agriculture.
University of Nebraska–Lincoln Extension educational programs abide with the nondiscrimination policies
of the University of Nebraska–Lincoln and the United States Department of Agriculture. © 2016
17
ProducT	 AMOUNT	 SUBSTITUTE
Cornstarch3
	 1 tablespoon	 2 tablespoons flour
(for thickening)
Cream, Whipping	 1 cup unwhipped	 If you wish to use a commercial pre-whipped
whipped cream or whipped cream substitute
rather than whip your own cream, use the
guideline that 1 cup UNWHIPPED whipping cream
expands to 2 cups when WHIPPED. For example,
if your recipe called for 1 cup of cream to make
whipped cream, you could substitute 2 cups of an
already whipped product.
Egg4
	 1 whole egg	 1/4 cup egg substitute (examples include: Egg
Beaters, Second Nature, Scramblers); check label
for specific directions;	
	 or Reconstituted powdered eggs; follow
package directions; 	
	 or 2 tablespoons mayonnaise (suitable for
use in cake batter). NOTE: If you type “mayonnaise
cake recipe” into your favorite Internet search
engine, you’ll find several recipes for cakes made
with mayonnaise and NO eggs. This may help you
decide if this substitution will work for your cake. 	
	 or 1/2 teaspoon baking powder plus 1 table-
spoon vinegar plus 1 tablespoon liquid (for baking
use only)
Flour, All-Purpose 1 cup	 1/2 cup whole wheat flour plus 1/2 cup all-purpose
flour.
Flour, Cake	 1 cup	 1 cup minus 2 tablespoons all-purpose flour
Flour, Self-Rising	 1 cup	 1 cup minus 2 teaspoons all-purpose flour plus
1-1/2 teaspoons baking powder and 1/2 teaspoon
salt
Garlic	 1 small clove	 1/8 teaspoon garlic powder	
Herbs, Fresh	 1 tablespoon, 	 1 teaspoon dried leaf herbs
or 1/2 teaspoon ground dried herbs
Lemon Zest (fresh 	 1 teaspoon	 1/2 teaspoon lemon extract
Marshmallows, 1 cup	 10 large marshmallows
3TIP: Liquids thickened with
cornstarch will be somewhat translu-
cent while flour gives a more opaque
appearance. Cornstarch will thicken a
liquid almost immediately. A flour-based
sauce or gravy must be cooked longer
to thicken and will have a floury taste if
undercooked. Joy of Cooking cookbook
(Scribner, 1997) advises when using flour
as a substitution for cornstarch in sauces
and gravies, that you simmer it for about
White Flour5
finely cut
grated lemon peel)
Miniature
3 minutes AFTER it has thickened to
help avoid a raw taste of flour. Corn-
starch-thickened liquids are more likely
to thin if overheated or cooked too long.
Regardless of whether you use cornstarch
or flour, mix it with a little cold water or
other cold liquid, about two parts liquid
to one part thickener, before adding it to
the rest of the liquid. (Note: when you
mix flour with fat to make a roux for use
as a thickener, you would not dissolve it
in liquid first.)
4TIP: If you don’t use eggs very of-
ten, you may find it helpful to keep some
powdered eggs on hand.
5TIP: It’s generally recommended
that you replace no more than half the
all-purpose white flour with whole wheat
flour. Too much whole wheat flour in a
recipe calling for all-purpose flour might
result in a reduced volume and a heavier
product.	
18
ProducT	 AMOUNT	 SUBSTITUTE
Mayonnaise (for 	 1 cup	 1 cup sour cream
or 1 cup yogurt
or 1 cup cottage cheese pureed in a blender
or Use any of the above for part of the mayonnaise
Mustard, Dry (in 	 1 teaspoon	 1 tablespoon prepared mustard
Onion6
	 1 small or 1/4 cup 	 1 tablespoon instant minced onion	
Pasta (substituting 4 cups COOKED 	 The National Pasta Association suggests these
substitution ratios:	
	 8 ounces of UNCOOKED elbow macaroni,
medium shells, rotini, twists, spirals, wagon wheels,
bow ties, mostaccioli, penne, radiatore, rigatoni,
spaghetti, angel hair, linguine, vermicelli and
fettuccine all produce about 4 cups COOKED pasta
	 or Use about twice as much UNCOOKED
egg noodles to provide 4 cups COOKED pasta.
Approximately 8 ounces UNCOOKED egg noodles
equal 2-1/2 cups COOKED noodles.	
Pumpkin Pie Spice	 1 teaspoon	 1/2 teaspoon cinnamon plus 1/4 ground teaspoon
ginger plus 1/8 teaspoon ground allspice plus
1/8 teaspoon ground nutmeg
Rice	 Any amount	 Most rice products will substitute for each other on a
fairly equal basis in recipes; however, their cooking
times and the amount of liquid needed may vary.
If possible, choose a rice with a comparable grain
length for the closest match.
Rum	 any amount	 1 part rum extract plus 3 parts water. For example:
for 1/4 cup rum, substitute 1 tablespoon rum extract
plus 3 tablespoons water.	
Sugar, Confectioners’	 1 cup	 1 cup granulated sugar plus 1 tablespoon
cornstarch; process in a food processor using the
metal blade attachment until it’s well blended and
powdery.
Tomato Juice	 1 cup	 1/2 cup tomato sauce plus 1/2 cup water
Tomato Soup	 10-3/4 ounce can	 1 cup tomato sauce plus 1/4 cup water
Wine, Red	 Any	 The same amount of grape juice or cranberry juice
Wine, White	 Any	 The same amount of apple juice or white grape juice
Yeast, Compressed	 1 cake (3/5 ounce)	 1 package (1/4 ounce) active dry yeast
or Scant 2-1/2 teaspoons loose active dry yeast
use in salads and
salad dressings)
cooked mixtures)
9/2010
6TIP: Dried onion may be added di-
rectly to moist foods such as soups, gravies,
sauces and salad dressings. You may need
chopped, fresh onion	
one for another)
or Powdered
to rehydrate it with a little water before
adding it to drier foods. Check package
directions — one brand advises adding an
equal amount of water and letting the dried
onion stand 5 to 10 minutes. Drain off any
excess water after onion has rehydrated.	
19
This is a peer-reviewed publication
How to Store and Prepare Fresh
Fruits and Vegetables to Prevent Food Waste
Alice Henneman, MS, RDN • ahenneman@unl.edu • food.unl.edu
Nebraska Extension is a Division of the Institute of Agriculture and Natural Resources at the University of
Nebraska–Lincoln cooperating with the Counties and the United Sates Department of Agriculture.
Nebraska Extension educational programs abide with the nondiscrimination policies of the University of
Nebraska–Lincoln and the United States Department of Agriculture.
© 2017
About 90 billion pounds of edible food goes
uneaten each year in the United States, costing
consumers about $370 per person yearly. Tossed
fruits ($45) and vegetables ($66) account for about
30% of this amount. Proper storage and preparation
of fresh produce can help us save money and better
utilize the resources that go into producing food
(land, water, energy). Following are some methods
for prolonging the life of fresh produce.
Produce Stored Outside the Refrigerator
Different fruits
and vegetables
require different
temperature and
humidity levels for
proper storage.
Some produce
Keep bananas a couple
of days longer by storing
them in the refrigerator
after they have reached the
desired degree of ripeness
stored at room
temperature. The
outside will turn brown, but they will still be light-
colored on the inside.
Another option is to buy bananas in varying
degrees of ripeness so they don't all ripen at the same
time.
Ripening Produce on the Counter
Some produce can be ripened on the counter and
then stored in the refrigerator. Examples include:
avocados, kiwi, nectarines, peaches, pears and plums.
Avoid leaving produce in a sealed plastic bag on your
countertop. This slows ripening and may increase
odors and decay from the accumulation of carbon
dioxide and depletion of oxygen inside the bag.
To ripen these foods faster, place them in a
ripening bowl or a loosely closed paper (not plastic)
bag, such as a lunch bag, at room temperature.
How to Store Produce in the Refrigerator
Store fruits in a separate
refrigerator crisper drawer
from vegetables. Other than
those mentioned previously,
most other fresh fruits and
vegetables keep best stored
in a clean refrigerator at a
temperature of 40°F or
below. Use your
refrigerator crisper
drawer for whole
produce. Store fruits in a
separate refrigerator crisper drawer from vegetables.
Fruits give off ethylene gas, which can shorten the
storage life of vegetables. Some vegetables give off
odors that can be absorbed by fruits and affect their
quality.
that tastes best
stored at room
temperature include: bananas, garlic, onions, potatoes,
sweet potatoes, tomatoes and winter squash.
Store these fruits and vegetables in a clean, dry,
well-ventilated place, away from direct sunlight and
away from areas where meat is prepared. Protect
potatoes from light to avoid greening. If there is just
slight greening, cut away the green portions of the
skin before cooking and
eating.
Refrigerate ripened bananas
to keep them longer
Store fruits and vegetables in
separate refrigerator crisper
drawers.
20
Refrigerate fruits and vegetables in perforated
plastic bags to help maintain moisture yet provide
airflow. Unperforated plastic bags can lead to the
growth of mold or bacteria. If you don’t have access
to commercial, food-grade, perforated bags, poke
several holes in a food-grade plastic bag.
If fruits and vegetables are placed on refrigerator
shelves, store meats on pans or plates below the
produce to prevent meat juices — which may contain
harmful bacteria — from dripping on them.
Wash Produce Thoroughly
Wash produce before you use it, NOT when you
bring it home! Wash hands before working with
produce. Fresh produce has a natural protective
coating that helps keep in moisture and freshness.
Washing produce before storage causes it to spoil
faster. Remember those berries that turned moldy
after you washed and then stored them?
Remove and discard outer leaves. Rinse under
clean, running water just before preparing or eating.
Don’t use soap or detergent as it can get into produce
and make you sick. Rub briskly — scrubbing with a
clean brush or hands — to clean the surface. Dry with
a clean cloth or paper towel. Cut away bruised and
damaged areas.
Rinse fruits and
vegetables melons,
even if they have a peel,
which will be removed
(such as melons and
citrus fruit). Bacteria on
the outside of produce
can be transferred to the
inside when they are cut
or peeled.
Clean the Fridge Chopped Salad
A chopped salad is known for containing small
pieces of fresh produce, usually vegetables.
Possibilities include onions, bell peppers, carrots,
tomatoes, celery, lettuce, spinach, cabbage, zucchini,
cauliflower, broccoli, kale, peas, radishes,
cucumbers, corn and zucchini.
Chopped salads are a delicious dish for cleaning
out your refrigerator.
Additional foods
tossed into a chopped
salad, but not necessarily
chopped, include
individual cooked
shrimp; nuts; sunflower
seeds; strips of grilled or
broiled steak; beans such
as black or garbanzo
beans; boiled egg slices
or wedges; cubed ham;
bacon bits; cheese; olive slices; and fruits such as
mandarin orange wedges, blueberries and apple
chunks. Here is a sample basic recipe.
Basic Tossed Salad Recipe
Servings: Varies on how much fridge cleaning you do in
making this salad!
Ingredients
• An assortment of fruits and vegetables; plan on
enough to make about a 1-1/2 to 2 cups salad per
person
• Additional cooked meat, eggs, cheese, cooked dry
beans and lentils, nuts, seeds, etc. if desired
• Salad dressing of your choice
• Salt and pepper to taste, if desired
Directions
1. Prepare fruits and vegetables shortly before
serving. Wash all fruits and vegetables even if you
plan to remove the skin. Use smaller-sized
produce “as is;” chop larger vegetables into
smaller pieces. Mix together.
2. Mix in any additional meat, cheese, etc.
3. Toss with about 1 to 2 tablespoons of dressing per
each 2 cups of salad. Start with the smaller
amount of dressing and add more if needed. Serve.
Tip: A chopped salad may be easier to eat served from
some type of dish with sides.
Rinse produce even if they
have a peel which will be
removed, such as melons.
Use up extra fruits,
vegetables and other items in
a Chopped Salad
21
…….
Is this Food Still Safe to Eat?
Frequently Asked Questions
Alice Henneman, MS, RDN • ahenneman@unl.edu • food.unl.edu
Nebraska Extension is a Division of the Institute of Agriculture and Natural Resources at the University of
Nebraska–Lincoln cooperating with the Counties and the United Sates Department of Agriculture.
Nebraska Extension educational programs abide with the nondiscrimination policies of the University of
Nebraska–Lincoln and the United States Department of Agriculture.
© 2017
Is it safe to use food from dented cans?
If a can containing food has a small dent, but is
otherwise in good shape, the food should be safe to eat.
Discard deeply dented cans. A deep dent is one that you
can lay your finger into. Deep dents often have sharp
points. A sharp dent on either the top or side seam can
damage the seam and allow bacteria to enter the can.
Discard any can with a deep dent on any seam.
Source: USDA/FSIS.* Shelf-Stable Food Safety. Accessed
2/19/2017 at http://bit.ly/2lk1UvO
Is it safe to use food from rusted cans?
Discard heavily rusted cans. Cans that are heavily
rusted can have tiny holes in them, allowing bacteria to
enter. Surface rust that you can remove by rubbing with
your finger or a paper towel is not serious. You can keep
these canned foods. If you open the cans and there is any
rust inside, do not eat the food. Rust (oxidized iron) is not
safe to eat.
Source:USDA/FSIS.Shelf-Stable Food Safety. Accessed
2/19/2017 at http://bit.ly/2lk1UvO
How can you tell if food is safe after a power
outage?
Keep the freezer door closed to keep cold air
inside. Don't open the door any more than necessary. A
full freezer will stay at safe temperatures about 2 days; a
half-full freezer about 1 day. If your freezer is not full,
group packages so they form an "igloo" to protect each
other. If you think the power will be out for several days,
try to find some dry ice. Keep dry ice wrapped and do not
touch it with your bare hands. Use cubed ice or block ice
in the refrigerator.
Even if food has started to thaw, foods can be safely
kept in the freezer. The foods in your freezer that
partially or completely thaw before power is restored may
be safely refrozen if they still contain ice crystals or are
40°F or below. You will have to evaluate each item
separately. When in doubt, throw it out.
In general, refrigerated items should be safe up to 4
hours. Keep the door closed as much as possible. Discard
any perishable foods (such as meat, poultry, fish, eggs,
and leftovers) that have been above 40°F for 2 hours or
more. Also discard any other food that has an unusual
odor, color, or texture, or feels warm to the touch.
Keep an appliance thermometer in the refrigerator
and freezer at all times. This will remove the guesswork
of just how cold the unit is because it will give you the
exact temperature. The key to determining the safety of
foods in the refrigerator and freezer is knowing how cold
they are. The refrigerator temperature should be at 40°F or
below; the freezer, 0°F or lower.
More detailed information, along with a chart that tells
which foods may be saved and which should be thrown
out, may be found in Keeping Food Safe During an
Emergency at http://bit.ly/2mbriac
Source: USDA/FSIS Food Safety and Security: What Consumers
Need to Know. Accessed 2/22/2017 at http://bit.ly/2lMs5h3
*United States Department of Agriculture/Food Safety
and Inspection Service
If a can has a small dent but is otherwise in
good shape, the food should be safe to eat.
22
How are food product date labels related to food
safety?
In a new industry-wide effort to reduce consumer
confusion about product date labels, grocery
manufacturers and retailers have joined together to adopt
standard wording on packaging about the quality and
safety of products.
Currently, more than 10 different date labels on
packages – such as Sell By, Use By, Expires On, Best
Before, Better if Used By or Best By – can result in
confused consumers discarding a safe or usable product
after the date on the package.
The new voluntary initiative streamlines the myriad
date labels on consumer products packaging down to just
two standard phrases. “BEST If Used By” describes
product quality, where the product may not taste or
perform as expected but is safe to use or consume. “USE
By” applies to the few products that are highly perishable
and/or have a food safety concern over time; these
products should be consumed by the date listed on the
package – and disposed of after that date.
The new initiative for common phrasing is led by the
Food Marketing Institute (FMI) and the Grocery
Manufacturers Association (GMA), the two major trade
associations for retailers and consumer products
manufacturing.
Source: News Release, Grocery Manufacturers of America,
2/15/2017. Grocery Industry launches New Initiative to Reduce
Consumer Confusion on Product Date Labels. Accessed
2/23/2017 at http://bit.ly/2moQea
(NOTE: Manufacturers have until July 2018 to make the
change. As these standards are voluntary, there is no
guarantee that every company will adopt them. In some
states, there may be labeling regulations that preempt the
industry standards. Following are some current phrases
that are used and that will continue to appear until labels
have been switched over.)
Examples of (current) commonly used phrases:
 A "Best if Used By/Before" indicates when a
product will be of best flavor or quality. It is not a
purchase or safety date.
 A "Sell-By" date tells the store how long to
display the product for sale for inventory
management. It is not a safety date.
 A "Use-By" date is the last date recommended for
the use of the product while at peak quality. It is
not a safety date except for when used on infant
formula as described below.
Federal regulations require a "Use-By" date on the
product label of infant formula under inspection of the
U.S. Food and Drug Administration (FDA). Consumption
by this date ensures the formula contains not less than the
quantity of each nutrient as described on the label.
Formula must maintain an acceptable quality to pass
through an ordinary bottle nipple.
The "Use-By" date is selected by the manufacturer,
packer or distributor of the product on the basis of product
analysis throughout its shelf life, tests, or other
information. It is also based on the conditions of handling,
storage, preparation, and use printed on the label. Do not
buy or use baby formula after its "Use- By" date.
Source: USDA/FSIS Food Safety and Security: Food Product
Dating. Accessed 2/23/2017 at http://bit.ly/2l3GO3
How long can you store leftovers safely?
Leftovers can be kept in the refrigerator for 3 to 4 days
or frozen for 3 to 4 months. Although safe indefinitely,
frozen leftovers can lose moisture and flavor when stored
for longer times in the freezer.
Source: USDA/FSIS. Leftovers and Food Safety Accessed
2/23/2017 at http://bit.ly/2lf142k
Keep an appliance thermometer in the refrigerator and
freezer to help assure the safety of your food. The
refrigerator temperature should be at 40°F or below; the
freezer, 0°F or lower. Frozen food held at 00F will be safe
indefinitely but the quality will decrease. (Image courtesy of
USDA/FSIS image library)
"Best If Used By" labels refer to food quality, not safety.
23
REFRIGERATOR & FREEZER STORAGE CHART
Since product dates aren’t a guide for safe use of a product, consult this chart and follow these tips. These short but safe
time limits will help keep refrigerated food 40° F (4° C) from spoiling or becoming dangerous.
• Purchase the product before “sell-by” or expiration dates.
• Follow handling recommendations on product.
• Keep meat and poultry in its package until just before using.
• If freezing meat and poultry in its original package longer than 2 months, overwrap these packages
with airtight heavy-duty foil, plastic wrap, or freezer paper, or place the package inside a plastic bag.
Because freezing 0° F (-18° C) keeps food safe indefinitely, the following recommended storage times are for quality only.
Product Refrigerator Freezer
Eggs
Fresh, in shell 4 to 5 weeks Don’t freeze
Raw yolks, whites 2 to 4 days 1 year
Hard cooked 1 week Don’t freeze well
Liquid pasteurized eggs
or egg substitutes,
opened 3 days Don’t freeze
unopened 10 days 1 year
TV Dinners, Frozen Casseroles
Keep frozen until ready to heat 3 to 4 months
Deli & Vacuum-Packed Products
Store-prepared 3 to 5 days Don’t freeze well
(or homemade)
egg, chicken, tuna, ham,
macaroni salads
Pre-stuffed pork &
lamb chops, chicken
breasts stuffed w/dressing 1 day Don’t freeze well
Store-cooked convenience
meals 3 to 4 days Don’t freeze well
Commercial brand
vacuum-packed
dinners with USDA seal,
unopened 2 weeks Don’t freeze well
Raw Hamburger, Ground & Stew Meat
Hamburger & stew meats 1 to 2 days 3 to 4 months
Ground turkey, veal, pork,
lamb 1 to 2 days 3 to 4 months
Ham, Corned Beef
Corned beef in pouch 5 to 7 days Drained, 1 month
with pickling juices
Ham, canned, labeled
“Keep Refrigerated,”
unopened 6 to 9 months Don’t freeze
opened 3 to 5 days 1 to 2 months
Ham, fully cooked, whole 7 days 1 to 2 months
Ham, fully cooked, half 3 to 5 days 1 to 2 months
Ham, fully cooked, slices 3 to 4 days 1 to 2 months
Hot Dogs & Lunch Meats (in freezer wrap)
Hot dogs,
opened package 1 week 1 to 2 months
unopened package 2 weeks 1 to 2 months
Lunch meats,
opened package 3 to 5 days 1 to 2 months
unopened package 2 weeks 1 to 2 months
Product Refrigerator Freezer
Soups & Stews
Vegetable or meat-added
& mixtures of them 3 to 4 days 2 to 3 months
Bacon & Sausage
Bacon 7 days 1 month
Sausage, raw from pork,
beef, chicken or turkey 1 to 2 days 1 to 2 months
Smoked breakfast links,
patties 7 days 1 to 2 months
Fresh Meat (Beef, Veal, Lamb, & Pork)
Steaks 3 to 5 days 6 to 12 months
Chops 3 to 5 days 4 to 6 months
Roasts 3 to 5 days 4 to 12 months
Variety meats (tongue,
kidneys, liver, heart,
chitterlings) 1 to 2 days 3 to 4 months
Meat Leftovers
Cooked meat & meat dishes 3 to 4 days 2 to 3 months
Gravy & meat broth 1 to 2 days 2 to 3 months
Fresh Poultry
Chicken or turkey, whole 1 to 2 days 1 year
Chicken or turkey, parts 1 to 2 days 9 months
Giblets 1 to 2 days 3 to 4 months
Cooked Poultry, Leftover
Fried chicken 3 to 4 days 4 months
Cooked poultry dishes 3 to 4 days 4 to 6 months
Pieces, plain 3 to 4 days 4 months
Pieces covered with broth,
gravy 3 to 4 days 6 months
Chicken nuggets, patties 3 to 4 days 2 months
Fish & Shellfish
Lean fish 1 to 2 days 6 months
Fatty fish 1 to 2 days 2 to 3 months
Cooked fish 3 to 4 days 4 to 6 months
Smoked fish 14 days 2 months
Fresh shrimp, scallops,
crawfish, squid 1 to 2 days 3 to 6 months
Canned seafood after opening out of can
(Pantry, 5 years) 3 to 4 days 2 months
Source: U.S. Food and Drug Administration
24
How to Freeze Milk and Cheese
Alice Henneman, MS, RDN • ahenneman@unl.edu • food.unl.edu
Nebraska Extension is a Division of the Institute of Agriculture and Natural Resources at the University of
Nebraska–Lincoln cooperating with the Counties and the United Sates Department of Agriculture.
Nebraska Extension educational programs abide with the nondiscrimination policies of the University of
Nebraska–Lincoln and the United States Department of Agriculture.
© 2017
Milk and cheese are very affordable sources of
nutrition and make it easy to eat healthy. Milk and
cheese provide essential nutrients including calcium
to build strong bones and protein to support healthy
muscles. A frequently asked question is whether milk and
cheese can be frozen, such as when meal plans change or
there is an especially good sale. Here is how to freeze them.
Freezing Milk
While milk can be frozen; it may separate, or be
slightly grainy when thawed. Frozen milk works best for
cooking, but you may find it is still acceptable for
drinking. If you are thinking about freezing milk for
drinking, you might try freezing a small amount first to
see how you like it before freezing a larger batch.
Freeze milk in plastic freezer containers or special
freezer-proof glass jars. Leave some extra space at the top
since milk expands during freezing. If packaged in a wide-
mouth container, leave 1/2-inch headspace for pints and 1-
inch for quarts. If packaged in a narrow-mouth container
(such as jars), leave 1 1/2-inch headspace for either pints
or quarts.
Frozen milk will maintain best quality in the freezer for
about 3 months; but will remain safe after that if stored at
00
F. Thaw milk in the refrigerator. Stir well before using.
Plan to drink within two or three days.
Freezing Cheese
Hard or semi-hard cheese can be frozen if cut into
portions no larger than 1/2 pound blocks. Wrap in plastic
wrap and then put in freezer bags. After freezing, cheese
may become crumbly and mealy, but it will retain its
flavor. It works best for cooking.
Plan to use frozen cheese within 4 to 6 months for best
quality; however if stored at 00
F, it will remain safe after
that time. Thaw cheese in the refrigerator. Use soon after
thawing.
The cheeses that freeze best are:
 Brick
 Camembert
 Cheddar
 Edam
 Mozzarella………
 Muenster
 Parmesan
 Provolone
 Romano
 Swiss
Blue cheeses are more prone to becoming crumbly
but they will still taste good. Cream cheese and
cottage cheese do not freeze well.
.
Before freezing milk for drinking, freeze a small
amount first to see you like it.
Hard or semi-hard cheese freezes best.
25

Weitere ähnliche Inhalte

Was ist angesagt? (20)

Eating on a budget
Eating on a budgetEating on a budget
Eating on a budget
 
Final Brochure for Fall 2012
Final Brochure for Fall 2012Final Brochure for Fall 2012
Final Brochure for Fall 2012
 
Healthy eating on a budget pp (final-for print)
Healthy eating on a budget pp (final-for print)Healthy eating on a budget pp (final-for print)
Healthy eating on a budget pp (final-for print)
 
Presentation1
Presentation1Presentation1
Presentation1
 
Eating Healthy On A Budget
Eating Healthy On A BudgetEating Healthy On A Budget
Eating Healthy On A Budget
 
Is pumpkin a super food
Is pumpkin a super foodIs pumpkin a super food
Is pumpkin a super food
 
Watermelon Recipe Card
Watermelon Recipe Card Watermelon Recipe Card
Watermelon Recipe Card
 
The clean eating vegan guide
The clean eating vegan guideThe clean eating vegan guide
The clean eating vegan guide
 
Test Your Summer Food Safety Savvy (quiz)
Test Your Summer Food Safety Savvy (quiz)Test Your Summer Food Safety Savvy (quiz)
Test Your Summer Food Safety Savvy (quiz)
 
Packed meals
Packed mealsPacked meals
Packed meals
 
Peach Recipe Card 2
Peach Recipe Card 2Peach Recipe Card 2
Peach Recipe Card 2
 
Apple Recipe Card
Apple Recipe CardApple Recipe Card
Apple Recipe Card
 
Sweet Potato Recipe Card
Sweet Potato Recipe CardSweet Potato Recipe Card
Sweet Potato Recipe Card
 
Biggest loser-1-week-diet-plan
Biggest loser-1-week-diet-planBiggest loser-1-week-diet-plan
Biggest loser-1-week-diet-plan
 
TLE 9 Lesson 2
TLE 9 Lesson 2 TLE 9 Lesson 2
TLE 9 Lesson 2
 
Clean eating meal plans
Clean eating meal plansClean eating meal plans
Clean eating meal plans
 
One grain at a time 9 14-12 tv
One grain at a time 9 14-12 tvOne grain at a time 9 14-12 tv
One grain at a time 9 14-12 tv
 
Healthy lunch menu: Teens
Healthy lunch menu: TeensHealthy lunch menu: Teens
Healthy lunch menu: Teens
 
All Lesson Plans
All Lesson PlansAll Lesson Plans
All Lesson Plans
 
Slow Cooker Meals
Slow Cooker Meals Slow Cooker Meals
Slow Cooker Meals
 

Ähnlich wie Makeover Your Leftovers Tips and Recipes

Borosil Recipes & Tips
Borosil Recipes & TipsBorosil Recipes & Tips
Borosil Recipes & TipsSekhar Saha
 
Easy food to make at home for lunch: Quick and Delicious Meal Ideas
Easy food to make at home for lunch: Quick and Delicious Meal IdeasEasy food to make at home for lunch: Quick and Delicious Meal Ideas
Easy food to make at home for lunch: Quick and Delicious Meal IdeasDiechen
 
Dining with Dysphagia: A Cookbook
Dining with Dysphagia: A CookbookDining with Dysphagia: A Cookbook
Dining with Dysphagia: A CookbookNYU Speech Online
 
20 breakfast, lunch & dinner diabetes friendly recipes
20 breakfast, lunch & dinner diabetes friendly recipes20 breakfast, lunch & dinner diabetes friendly recipes
20 breakfast, lunch & dinner diabetes friendly recipesscottpearce33
 
Carroll_Magazine_April_May_2011
Carroll_Magazine_April_May_2011Carroll_Magazine_April_May_2011
Carroll_Magazine_April_May_2011Michael Vyskocil
 
Plant a Row for the Hungry - Cooking Recipes for Plant a Row Vegetables
Plant a Row for the Hungry - Cooking Recipes for Plant a Row VegetablesPlant a Row for the Hungry - Cooking Recipes for Plant a Row Vegetables
Plant a Row for the Hungry - Cooking Recipes for Plant a Row VegetablesFiraki958x
 
Methods of cooking vegetable dishes
Methods of cooking vegetable dishesMethods of cooking vegetable dishes
Methods of cooking vegetable dishesInstagram
 
Lose 10 pounds in 10 days
Lose 10 pounds in 10 daysLose 10 pounds in 10 days
Lose 10 pounds in 10 daysPurveshDesai
 
Dee's healthy eating on budget
Dee's healthy eating on budgetDee's healthy eating on budget
Dee's healthy eating on budgetDeesWholefoods
 
1.10 diabetes powerpoint
1.10   diabetes powerpoint1.10   diabetes powerpoint
1.10 diabetes powerpointmatthewsuter
 
61-Kitchen-Basics.ppt
61-Kitchen-Basics.ppt61-Kitchen-Basics.ppt
61-Kitchen-Basics.pptDinaMarcaida
 

Ähnlich wie Makeover Your Leftovers Tips and Recipes (20)

Vegetarian Recipe
Vegetarian RecipeVegetarian Recipe
Vegetarian Recipe
 
Borosil Recipes & Tips
Borosil Recipes & TipsBorosil Recipes & Tips
Borosil Recipes & Tips
 
Cookbook
CookbookCookbook
Cookbook
 
Easy food to make at home for lunch: Quick and Delicious Meal Ideas
Easy food to make at home for lunch: Quick and Delicious Meal IdeasEasy food to make at home for lunch: Quick and Delicious Meal Ideas
Easy food to make at home for lunch: Quick and Delicious Meal Ideas
 
NutritiousBytes_March2015
NutritiousBytes_March2015NutritiousBytes_March2015
NutritiousBytes_March2015
 
Vegetarian recipe
Vegetarian recipeVegetarian recipe
Vegetarian recipe
 
Dining with Dysphagia: A Cookbook
Dining with Dysphagia: A CookbookDining with Dysphagia: A Cookbook
Dining with Dysphagia: A Cookbook
 
20 breakfast, lunch & dinner diabetes friendly recipes
20 breakfast, lunch & dinner diabetes friendly recipes20 breakfast, lunch & dinner diabetes friendly recipes
20 breakfast, lunch & dinner diabetes friendly recipes
 
Party perfect
Party perfectParty perfect
Party perfect
 
Freezer Meals
Freezer MealsFreezer Meals
Freezer Meals
 
Carroll_Magazine_April_May_2011
Carroll_Magazine_April_May_2011Carroll_Magazine_April_May_2011
Carroll_Magazine_April_May_2011
 
Plant a Row for the Hungry - Cooking Recipes for Plant a Row Vegetables
Plant a Row for the Hungry - Cooking Recipes for Plant a Row VegetablesPlant a Row for the Hungry - Cooking Recipes for Plant a Row Vegetables
Plant a Row for the Hungry - Cooking Recipes for Plant a Row Vegetables
 
Methods of cooking vegetable dishes
Methods of cooking vegetable dishesMethods of cooking vegetable dishes
Methods of cooking vegetable dishes
 
Mpwr meal-prep-guide
Mpwr meal-prep-guideMpwr meal-prep-guide
Mpwr meal-prep-guide
 
Make the most of seasonal produce
Make the most of seasonal produce Make the most of seasonal produce
Make the most of seasonal produce
 
Lose 10 pounds in 10 days
Lose 10 pounds in 10 daysLose 10 pounds in 10 days
Lose 10 pounds in 10 days
 
Dee's healthy eating on budget
Dee's healthy eating on budgetDee's healthy eating on budget
Dee's healthy eating on budget
 
1.10 diabetes powerpoint
1.10   diabetes powerpoint1.10   diabetes powerpoint
1.10 diabetes powerpoint
 
RecipeBook
RecipeBookRecipeBook
RecipeBook
 
61-Kitchen-Basics.ppt
61-Kitchen-Basics.ppt61-Kitchen-Basics.ppt
61-Kitchen-Basics.ppt
 

Mehr von Alice Henneman

My Favorite Funny Food Quotes
My Favorite Funny Food Quotes My Favorite Funny Food Quotes
My Favorite Funny Food Quotes Alice Henneman
 
Funny Food Sayings and Quotes
Funny Food Sayings and Quotes Funny Food Sayings and Quotes
Funny Food Sayings and Quotes Alice Henneman
 
Makeover Your Leftovers
Makeover Your Leftovers Makeover Your Leftovers
Makeover Your Leftovers Alice Henneman
 
The Garden Grocery: Food Safety and Selection at Farmers' Markets
The Garden Grocery: Food Safety and Selection at Farmers' Markets The Garden Grocery: Food Safety and Selection at Farmers' Markets
The Garden Grocery: Food Safety and Selection at Farmers' Markets Alice Henneman
 
Emergency Office Munchies
Emergency Office MunchiesEmergency Office Munchies
Emergency Office MunchiesAlice Henneman
 
6 Ways to Workout While Cooking
6 Ways to Workout While Cooking 6 Ways to Workout While Cooking
6 Ways to Workout While Cooking Alice Henneman
 
14 Ways Consumers Can Reduce Food Waste
14 Ways Consumers Can Reduce Food Waste14 Ways Consumers Can Reduce Food Waste
14 Ways Consumers Can Reduce Food WasteAlice Henneman
 
Healthy Cooking with Fresh Herbs
Healthy Cooking with Fresh HerbsHealthy Cooking with Fresh Herbs
Healthy Cooking with Fresh HerbsAlice Henneman
 
Tiny Tastes Can Total BIG CALORIES over Winter Holidays
Tiny Tastes Can Total BIG CALORIES over Winter HolidaysTiny Tastes Can Total BIG CALORIES over Winter Holidays
Tiny Tastes Can Total BIG CALORIES over Winter HolidaysAlice Henneman
 
Homemade Holiday Beverage Mix Gifts
Homemade Holiday Beverage Mix Gifts Homemade Holiday Beverage Mix Gifts
Homemade Holiday Beverage Mix Gifts Alice Henneman
 
Cooking with Fresh Herbs
Cooking with Fresh HerbsCooking with Fresh Herbs
Cooking with Fresh HerbsAlice Henneman
 
Color Yourself Healthy with These Fruits & Vegetables
Color Yourself Healthy with These Fruits & VegetablesColor Yourself Healthy with These Fruits & Vegetables
Color Yourself Healthy with These Fruits & VegetablesAlice Henneman
 
30 MyPlate Steps to a Healthier You!
30 MyPlate Steps to a Healthier You!30 MyPlate Steps to a Healthier You!
30 MyPlate Steps to a Healthier You!Alice Henneman
 
Prevent Portion Distortion Handout
Prevent Portion Distortion HandoutPrevent Portion Distortion Handout
Prevent Portion Distortion HandoutAlice Henneman
 
How Should You Spend Your Calorie Salary?
How Should You Spend Your Calorie Salary?How Should You Spend Your Calorie Salary?
How Should You Spend Your Calorie Salary?Alice Henneman
 
How Should You Spend Your Calorie Salary?
How  Should You Spend Your Calorie Salary?How  Should You Spend Your Calorie Salary?
How Should You Spend Your Calorie Salary?Alice Henneman
 
Super Bowl Game Plan for Healthy Eating
Super Bowl Game Plan for Healthy EatingSuper Bowl Game Plan for Healthy Eating
Super Bowl Game Plan for Healthy EatingAlice Henneman
 

Mehr von Alice Henneman (20)

My Favorite Funny Food Quotes
My Favorite Funny Food Quotes My Favorite Funny Food Quotes
My Favorite Funny Food Quotes
 
Funny Food Sayings and Quotes
Funny Food Sayings and Quotes Funny Food Sayings and Quotes
Funny Food Sayings and Quotes
 
Makeover Your Leftovers
Makeover Your Leftovers Makeover Your Leftovers
Makeover Your Leftovers
 
The Garden Grocery: Food Safety and Selection at Farmers' Markets
The Garden Grocery: Food Safety and Selection at Farmers' Markets The Garden Grocery: Food Safety and Selection at Farmers' Markets
The Garden Grocery: Food Safety and Selection at Farmers' Markets
 
Emergency Office Munchies
Emergency Office MunchiesEmergency Office Munchies
Emergency Office Munchies
 
6 Ways to Workout While Cooking
6 Ways to Workout While Cooking 6 Ways to Workout While Cooking
6 Ways to Workout While Cooking
 
14 Ways Consumers Can Reduce Food Waste
14 Ways Consumers Can Reduce Food Waste14 Ways Consumers Can Reduce Food Waste
14 Ways Consumers Can Reduce Food Waste
 
Nuts for Nutrition
Nuts for NutritionNuts for Nutrition
Nuts for Nutrition
 
Healthy Cooking with Fresh Herbs
Healthy Cooking with Fresh HerbsHealthy Cooking with Fresh Herbs
Healthy Cooking with Fresh Herbs
 
Tiny Tastes Can Total BIG CALORIES over Winter Holidays
Tiny Tastes Can Total BIG CALORIES over Winter HolidaysTiny Tastes Can Total BIG CALORIES over Winter Holidays
Tiny Tastes Can Total BIG CALORIES over Winter Holidays
 
Homemade Holiday Beverage Mix Gifts
Homemade Holiday Beverage Mix Gifts Homemade Holiday Beverage Mix Gifts
Homemade Holiday Beverage Mix Gifts
 
Cooking with Fresh Herbs
Cooking with Fresh HerbsCooking with Fresh Herbs
Cooking with Fresh Herbs
 
Color Yourself Healthy with These Fruits & Vegetables
Color Yourself Healthy with These Fruits & VegetablesColor Yourself Healthy with These Fruits & Vegetables
Color Yourself Healthy with These Fruits & Vegetables
 
30 MyPlate Steps to a Healthier You!
30 MyPlate Steps to a Healthier You!30 MyPlate Steps to a Healthier You!
30 MyPlate Steps to a Healthier You!
 
Prevent Portion Distortion Handout
Prevent Portion Distortion HandoutPrevent Portion Distortion Handout
Prevent Portion Distortion Handout
 
Portion Distortion
Portion DistortionPortion Distortion
Portion Distortion
 
How Should You Spend Your Calorie Salary?
How Should You Spend Your Calorie Salary?How Should You Spend Your Calorie Salary?
How Should You Spend Your Calorie Salary?
 
How Should You Spend Your Calorie Salary?
How  Should You Spend Your Calorie Salary?How  Should You Spend Your Calorie Salary?
How Should You Spend Your Calorie Salary?
 
Cooking for 1 or 2
Cooking for 1 or 2Cooking for 1 or 2
Cooking for 1 or 2
 
Super Bowl Game Plan for Healthy Eating
Super Bowl Game Plan for Healthy EatingSuper Bowl Game Plan for Healthy Eating
Super Bowl Game Plan for Healthy Eating
 

Kürzlich hochgeladen

(MAYA) Baner Call Girls Just Call 7001035870 [ Cash on Delivery ] Pune Escorts
(MAYA) Baner Call Girls Just Call 7001035870 [ Cash on Delivery ] Pune Escorts(MAYA) Baner Call Girls Just Call 7001035870 [ Cash on Delivery ] Pune Escorts
(MAYA) Baner Call Girls Just Call 7001035870 [ Cash on Delivery ] Pune Escortsranjana rawat
 
(SUNAINA) Call Girls Alandi Road ( 7001035870 ) HI-Fi Pune Escorts Service
(SUNAINA) Call Girls Alandi Road ( 7001035870 ) HI-Fi Pune Escorts Service(SUNAINA) Call Girls Alandi Road ( 7001035870 ) HI-Fi Pune Escorts Service
(SUNAINA) Call Girls Alandi Road ( 7001035870 ) HI-Fi Pune Escorts Serviceranjana rawat
 
High Class Call Girls Nashik Priya 7001305949 Independent Escort Service Nashik
High Class Call Girls Nashik Priya 7001305949 Independent Escort Service NashikHigh Class Call Girls Nashik Priya 7001305949 Independent Escort Service Nashik
High Class Call Girls Nashik Priya 7001305949 Independent Escort Service Nashikranjana rawat
 
VVIP Pune Call Girls Viman Nagar (7001035870) Pune Escorts Nearby with Comple...
VVIP Pune Call Girls Viman Nagar (7001035870) Pune Escorts Nearby with Comple...VVIP Pune Call Girls Viman Nagar (7001035870) Pune Escorts Nearby with Comple...
VVIP Pune Call Girls Viman Nagar (7001035870) Pune Escorts Nearby with Comple...Call Girls in Nagpur High Profile
 
THE ARTISANAL SALT OF SAN VICENTE, ILOCOS SUR: A CASE STUDY
THE ARTISANAL SALT OF SAN VICENTE, ILOCOS SUR: A CASE STUDYTHE ARTISANAL SALT OF SAN VICENTE, ILOCOS SUR: A CASE STUDY
THE ARTISANAL SALT OF SAN VICENTE, ILOCOS SUR: A CASE STUDYHumphrey A Beña
 
VIP Russian Call Girls in Noida Deepika 8250192130 Independent Escort Service...
VIP Russian Call Girls in Noida Deepika 8250192130 Independent Escort Service...VIP Russian Call Girls in Noida Deepika 8250192130 Independent Escort Service...
VIP Russian Call Girls in Noida Deepika 8250192130 Independent Escort Service...Suhani Kapoor
 
Ho Sexy Call Girl in Mira Road Bhayandar | ₹,7500 With Free Delivery, Kashimi...
Ho Sexy Call Girl in Mira Road Bhayandar | ₹,7500 With Free Delivery, Kashimi...Ho Sexy Call Girl in Mira Road Bhayandar | ₹,7500 With Free Delivery, Kashimi...
Ho Sexy Call Girl in Mira Road Bhayandar | ₹,7500 With Free Delivery, Kashimi...Pooja Nehwal
 
Dubai Call Girls Drilled O525547819 Call Girls Dubai (Raphie)
Dubai Call Girls Drilled O525547819 Call Girls Dubai (Raphie)Dubai Call Girls Drilled O525547819 Call Girls Dubai (Raphie)
Dubai Call Girls Drilled O525547819 Call Girls Dubai (Raphie)kojalkojal131
 
NO1 Trending kala jadu karne wale ka contact number kala jadu karne wale baba...
NO1 Trending kala jadu karne wale ka contact number kala jadu karne wale baba...NO1 Trending kala jadu karne wale ka contact number kala jadu karne wale baba...
NO1 Trending kala jadu karne wale ka contact number kala jadu karne wale baba...Amil baba
 
Food & Nutrition Strategy Baseline (FNS.pdf)
Food & Nutrition Strategy Baseline (FNS.pdf)Food & Nutrition Strategy Baseline (FNS.pdf)
Food & Nutrition Strategy Baseline (FNS.pdf)Mohamed Miyir
 
VIP Russian Call Girls in Cuttack Deepika 8250192130 Independent Escort Servi...
VIP Russian Call Girls in Cuttack Deepika 8250192130 Independent Escort Servi...VIP Russian Call Girls in Cuttack Deepika 8250192130 Independent Escort Servi...
VIP Russian Call Girls in Cuttack Deepika 8250192130 Independent Escort Servi...Suhani Kapoor
 
(KRITIKA) Balaji Nagar Call Girls Just Call 7001035870 [ Cash on Delivery ] P...
(KRITIKA) Balaji Nagar Call Girls Just Call 7001035870 [ Cash on Delivery ] P...(KRITIKA) Balaji Nagar Call Girls Just Call 7001035870 [ Cash on Delivery ] P...
(KRITIKA) Balaji Nagar Call Girls Just Call 7001035870 [ Cash on Delivery ] P...ranjana rawat
 
Call Girls in Nashik Ila 7001305949 Independent Escort Service Nashik
Call Girls in Nashik Ila 7001305949 Independent Escort Service NashikCall Girls in Nashik Ila 7001305949 Independent Escort Service Nashik
Call Girls in Nashik Ila 7001305949 Independent Escort Service NashikCall Girls in Nagpur High Profile
 
(ISHITA) Call Girls Manchar ( 7001035870 ) HI-Fi Pune Escorts Service
(ISHITA) Call Girls Manchar ( 7001035870 ) HI-Fi Pune Escorts Service(ISHITA) Call Girls Manchar ( 7001035870 ) HI-Fi Pune Escorts Service
(ISHITA) Call Girls Manchar ( 7001035870 ) HI-Fi Pune Escorts Serviceranjana rawat
 
Let Me Relax Dubai Russian Call girls O56338O268 Dubai Call girls AgenCy
Let Me Relax Dubai Russian Call girls O56338O268 Dubai Call girls AgenCyLet Me Relax Dubai Russian Call girls O56338O268 Dubai Call girls AgenCy
Let Me Relax Dubai Russian Call girls O56338O268 Dubai Call girls AgenCystephieert
 
Russian Call Girls in Nagpur Devyani Call 7001035870 Meet With Nagpur Escorts
Russian Call Girls in Nagpur Devyani Call 7001035870 Meet With Nagpur EscortsRussian Call Girls in Nagpur Devyani Call 7001035870 Meet With Nagpur Escorts
Russian Call Girls in Nagpur Devyani Call 7001035870 Meet With Nagpur EscortsCall Girls in Nagpur High Profile
 
Call Girls Dubai &ubble O525547819 Call Girls In Dubai Blastcum
Call Girls Dubai &ubble O525547819 Call Girls In Dubai BlastcumCall Girls Dubai &ubble O525547819 Call Girls In Dubai Blastcum
Call Girls Dubai &ubble O525547819 Call Girls In Dubai Blastcumkojalkojal131
 
Call Girl Nashik Khushi 7001305949 Independent Escort Service Nashik
Call Girl Nashik Khushi 7001305949 Independent Escort Service NashikCall Girl Nashik Khushi 7001305949 Independent Escort Service Nashik
Call Girl Nashik Khushi 7001305949 Independent Escort Service Nashikranjana rawat
 

Kürzlich hochgeladen (20)

(MAYA) Baner Call Girls Just Call 7001035870 [ Cash on Delivery ] Pune Escorts
(MAYA) Baner Call Girls Just Call 7001035870 [ Cash on Delivery ] Pune Escorts(MAYA) Baner Call Girls Just Call 7001035870 [ Cash on Delivery ] Pune Escorts
(MAYA) Baner Call Girls Just Call 7001035870 [ Cash on Delivery ] Pune Escorts
 
(SUNAINA) Call Girls Alandi Road ( 7001035870 ) HI-Fi Pune Escorts Service
(SUNAINA) Call Girls Alandi Road ( 7001035870 ) HI-Fi Pune Escorts Service(SUNAINA) Call Girls Alandi Road ( 7001035870 ) HI-Fi Pune Escorts Service
(SUNAINA) Call Girls Alandi Road ( 7001035870 ) HI-Fi Pune Escorts Service
 
High Class Call Girls Nashik Priya 7001305949 Independent Escort Service Nashik
High Class Call Girls Nashik Priya 7001305949 Independent Escort Service NashikHigh Class Call Girls Nashik Priya 7001305949 Independent Escort Service Nashik
High Class Call Girls Nashik Priya 7001305949 Independent Escort Service Nashik
 
VVIP Pune Call Girls Viman Nagar (7001035870) Pune Escorts Nearby with Comple...
VVIP Pune Call Girls Viman Nagar (7001035870) Pune Escorts Nearby with Comple...VVIP Pune Call Girls Viman Nagar (7001035870) Pune Escorts Nearby with Comple...
VVIP Pune Call Girls Viman Nagar (7001035870) Pune Escorts Nearby with Comple...
 
THE ARTISANAL SALT OF SAN VICENTE, ILOCOS SUR: A CASE STUDY
THE ARTISANAL SALT OF SAN VICENTE, ILOCOS SUR: A CASE STUDYTHE ARTISANAL SALT OF SAN VICENTE, ILOCOS SUR: A CASE STUDY
THE ARTISANAL SALT OF SAN VICENTE, ILOCOS SUR: A CASE STUDY
 
VIP Russian Call Girls in Noida Deepika 8250192130 Independent Escort Service...
VIP Russian Call Girls in Noida Deepika 8250192130 Independent Escort Service...VIP Russian Call Girls in Noida Deepika 8250192130 Independent Escort Service...
VIP Russian Call Girls in Noida Deepika 8250192130 Independent Escort Service...
 
Ho Sexy Call Girl in Mira Road Bhayandar | ₹,7500 With Free Delivery, Kashimi...
Ho Sexy Call Girl in Mira Road Bhayandar | ₹,7500 With Free Delivery, Kashimi...Ho Sexy Call Girl in Mira Road Bhayandar | ₹,7500 With Free Delivery, Kashimi...
Ho Sexy Call Girl in Mira Road Bhayandar | ₹,7500 With Free Delivery, Kashimi...
 
Dubai Call Girls Drilled O525547819 Call Girls Dubai (Raphie)
Dubai Call Girls Drilled O525547819 Call Girls Dubai (Raphie)Dubai Call Girls Drilled O525547819 Call Girls Dubai (Raphie)
Dubai Call Girls Drilled O525547819 Call Girls Dubai (Raphie)
 
NO1 Trending kala jadu karne wale ka contact number kala jadu karne wale baba...
NO1 Trending kala jadu karne wale ka contact number kala jadu karne wale baba...NO1 Trending kala jadu karne wale ka contact number kala jadu karne wale baba...
NO1 Trending kala jadu karne wale ka contact number kala jadu karne wale baba...
 
Food & Nutrition Strategy Baseline (FNS.pdf)
Food & Nutrition Strategy Baseline (FNS.pdf)Food & Nutrition Strategy Baseline (FNS.pdf)
Food & Nutrition Strategy Baseline (FNS.pdf)
 
VIP Russian Call Girls in Cuttack Deepika 8250192130 Independent Escort Servi...
VIP Russian Call Girls in Cuttack Deepika 8250192130 Independent Escort Servi...VIP Russian Call Girls in Cuttack Deepika 8250192130 Independent Escort Servi...
VIP Russian Call Girls in Cuttack Deepika 8250192130 Independent Escort Servi...
 
(KRITIKA) Balaji Nagar Call Girls Just Call 7001035870 [ Cash on Delivery ] P...
(KRITIKA) Balaji Nagar Call Girls Just Call 7001035870 [ Cash on Delivery ] P...(KRITIKA) Balaji Nagar Call Girls Just Call 7001035870 [ Cash on Delivery ] P...
(KRITIKA) Balaji Nagar Call Girls Just Call 7001035870 [ Cash on Delivery ] P...
 
Call Girls in Nashik Ila 7001305949 Independent Escort Service Nashik
Call Girls in Nashik Ila 7001305949 Independent Escort Service NashikCall Girls in Nashik Ila 7001305949 Independent Escort Service Nashik
Call Girls in Nashik Ila 7001305949 Independent Escort Service Nashik
 
(ISHITA) Call Girls Manchar ( 7001035870 ) HI-Fi Pune Escorts Service
(ISHITA) Call Girls Manchar ( 7001035870 ) HI-Fi Pune Escorts Service(ISHITA) Call Girls Manchar ( 7001035870 ) HI-Fi Pune Escorts Service
(ISHITA) Call Girls Manchar ( 7001035870 ) HI-Fi Pune Escorts Service
 
Let Me Relax Dubai Russian Call girls O56338O268 Dubai Call girls AgenCy
Let Me Relax Dubai Russian Call girls O56338O268 Dubai Call girls AgenCyLet Me Relax Dubai Russian Call girls O56338O268 Dubai Call girls AgenCy
Let Me Relax Dubai Russian Call girls O56338O268 Dubai Call girls AgenCy
 
Russian Call Girls in Nagpur Devyani Call 7001035870 Meet With Nagpur Escorts
Russian Call Girls in Nagpur Devyani Call 7001035870 Meet With Nagpur EscortsRussian Call Girls in Nagpur Devyani Call 7001035870 Meet With Nagpur Escorts
Russian Call Girls in Nagpur Devyani Call 7001035870 Meet With Nagpur Escorts
 
Call Girls Dubai &ubble O525547819 Call Girls In Dubai Blastcum
Call Girls Dubai &ubble O525547819 Call Girls In Dubai BlastcumCall Girls Dubai &ubble O525547819 Call Girls In Dubai Blastcum
Call Girls Dubai &ubble O525547819 Call Girls In Dubai Blastcum
 
5th Annual International OMGD Grand Chapitre: A Spanish Wine Journey
5th Annual International OMGD Grand Chapitre: A Spanish Wine Journey5th Annual International OMGD Grand Chapitre: A Spanish Wine Journey
5th Annual International OMGD Grand Chapitre: A Spanish Wine Journey
 
Call Girl Nashik Khushi 7001305949 Independent Escort Service Nashik
Call Girl Nashik Khushi 7001305949 Independent Escort Service NashikCall Girl Nashik Khushi 7001305949 Independent Escort Service Nashik
Call Girl Nashik Khushi 7001305949 Independent Escort Service Nashik
 
Dwarka Sector 14 Call Girls Delhi 9999965857 @Sabina Saikh No Advance
Dwarka Sector 14 Call Girls Delhi 9999965857 @Sabina Saikh No AdvanceDwarka Sector 14 Call Girls Delhi 9999965857 @Sabina Saikh No Advance
Dwarka Sector 14 Call Girls Delhi 9999965857 @Sabina Saikh No Advance
 

Makeover Your Leftovers Tips and Recipes

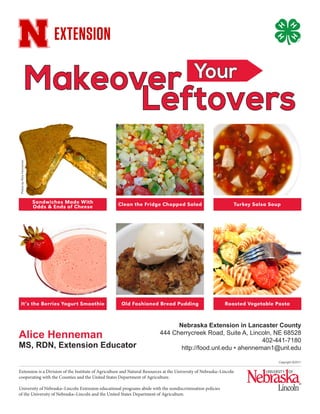
  • 1. Extension is a Division of the Institute of Agriculture and Natural Resources at the University of Nebraska–Lincoln cooperating with the Counties and the United States Department of Agriculture. University of Nebraska–Lincoln Extension educational programs abide with the nondiscrimination policies of the University of Nebraska–Lincoln and the United States Department of Agriculture. Nebraska Extension in Lancaster County 444 Cherrycreek Road, Suite A, Lincoln, NE 68528 402-441-7180 http://food.unl.edu • ahenneman1@unl.edu Alice Henneman MS, RDN, Extension Educator Copyright ©2017 Makeover Your Leftovers Old Fashioned Bread Pudding Roasted Vegetable PastaIt’s the Berries Yogurt Smoothie Clean the Fridge Chopped SaladSandwiches Made With Odds & Ends of Cheese Turkey Salsa Soup PhotosbyAliceHenneman
  • 2. About 90 billion pounds of edible food goes uneaten each year in the United States, an amount equal to 123x the weight of the Empire State Building. This costs consumers $370 per person each year:  Grains: $22  Fruits: $45  Protein Foods*: $140  Vegetables: $66  Dairy: $60  Added Fat &Sugar**: $37 You can reduce wasted food in your home with simple shopping, storage and cooking practices. Also, you can give food to organizations that accept food donations to feed others. Recycling or composting food is another option. Reducing food waste does more than save money. It improves access to food and helps protect our natural resources. Resources used to produce uneaten food include: 30% of fertilizer, 31% of cropland, 25% of total fresh water consumption and 2% of total energy consumption. The Environmental Protection Agency estimates food wastes at almost 14% of the total municipal solid wastes in the United States in 2010, with less than 3% recovered and recycled. Food in landfills decomposes to produce methane, a potent greenhouse gas. *Protein foods includes meat, poultry, fish, eggs and nuts. **Added fat & sugar refers to fat and sugar used in the production of foods in the other groups. Food tossed is money lost. One way to add new life to still edible foods is to re-purpose leftovers and reuse or “recycle” them in new ways and new recipes. This booklet will get you started with simple tips and recipes. You’ll find “recycled” can taste just as good — maybe even better—than the original recipe. Quick Tricks Grains.……………………………………………………………………………..2 Fruits.………………………………………………………………………………2 Protein Foods.…………………………………………………………………….2 Vegetables.………………………………………………………………….…….2 Dairy………………………………………………………………….…………….3 Combinations of Foods…………………...…….………………………………..3 Other…………………………………………………...…………………………..3 Recipes Old Fashioned Bread Pudding…………………………………………….…….4 Roasted Root Vegetables………………………………………………….…….5 Homemade Whole Grain Croutons………………………………………….….6 Roasted Vegetable Pasta…………………………………………………….….7 Clean the Fridge Chopped Salad…………………………………………….…8 Tasty Microwave Potato Chunks………………………………………………..9 Toasty Potato Chunks……………………………………………………………9 Mashed Cauliflower…………………………………………………..………….10 Roasted Cauliflower……………………………………….................………...10 Fantastic French Toast………………………………………………………….11 Bread Crumb Casserole Topping……………………………………………...12 It’s the Berries Yogurt Smoothie…………………………………………….....13 Turkey Mashed Potato Soup………………………………………………...…14 Turkey Salsa Soup…………………………………………...………………....14 Fiesta Rice Skillet....................………………………………………………....15 Kitchen Helpers Reducing the Size of Recipes………………………………………………….16 Ingredient Substitutions………………………………………………………...17 How to Store & Prepare Fruits and Vegetables to Prevent Food Waste....20 Is This Food Still Safe to Eat?....………………………………………………22 Refrigerator and Freezer Storage Chart...............…………………………...24 MAKEOVER YOUR LEFTOVERS TABLE OF CONTENTS How to Freeze Milk and Cheese..........................…………………………....25 1 View a related "Makeover Your Leftovers slide show and/or download a FREE PowerPoint at http://bit.ly/makeover-leftovers (Image courtesy of USDA) (Unless noted otherwise, all photos in this handout are by Alice Henneman)
  • 3. QUICK TRICKS* *Indicates tips for which a recipe is included in the recipe section. 1. 2. 3. 4. Freeze lemon or lime juice in ice cube trays. Transfer to freezer bags. Pop into water for flavored water. NOTE: It’s easier to remove frozen food from silicone ice cube trays and muffin pans than plastic trays or metal pans as silicon is more flexible. 5. Roll citrus fruits with your hand on a hard surface before juicing to get more juice from them. 6. Refrigerate ripe bananas to make them last a few days longer. They may be brown on outside, but still a good color on the inside. 7. Freeze lemon slices in water in cupcake pans for large, flavored ice cubes. 8. Freeze washed, peeled, bite-size pieces of fruit for smoothies. Place on baking sheet with sides and cover with plastic wrap. Transfer frozen pieces to freezer bags. Toss into smoothies.* 9. Use leftover meat in flavorful foods such as barbecued meat dishes, chili and tacos to mask any flavor of “warmed over meat.” Plus, being covered by a sauce or liquid helps prevent further flavor changes in the meat. 10. Freeze chopped mature onions by adding directly to a freezer bag. Lay flat to freeze. To separate the onions b before use, give bag a slight "whap" on kitchen counter. 11. Freeze extra bell peppers in shapes needed for recipes. Freeze for a few hours on a baking sheet with sides until hard. Transfer to a freezer bag. 12. Purée extra vegetables in a blender or food processor and heat with pasta sauce. Possible vegetables include carrots, butternut squash, red bell peppers and zucchini. 13. Freeze extra tomato paste in tablespoon-size portions in an ice cube tray. Transfer to a freezer bag. Adding a tablespoon or two of tomato paste to soups, GRAINS FRUITS PROTEIN FOODS VEGETABLES Freezing bell peppers Inside of a ripe banana that was refrigerated Use older bread to make croutons,* bread crumbs,* bread pudding,* stratas and French toast. Use leftover rice in stir-fried Strata is a tasty use rice, pudding and for older bread rice bowls. Heat leftover pasta in a pan over medium heat with some olive oil. Sprinkle with Parmesan cheese. Add a little extra pizazz by topping the pasta with fresh herbs.. Removing the seeds from a cucumber with a melon baller Use leftover meat in chili 2
  • 4. casseroles and pasta sauce enhances the flavor of these foods with its concentrated, almost meaty taste. 14. Easily remove just the membrane part from peppers and the seeds from cucumbers and zucchini by using a melon baller or measuring spoon when preparing these foods to eat alone or use in recipes. 15. Freeze chopped fresh herbs in olive oil for a quick, delicious addition to sauces and pastas. 16. To revive leftover French fries, heat a small amount of oil in a heavy skillet over medium heat. Spread fries in a single layer, leaving plenty of space around the fries. Otherwise, they’ll steam instead of sauté. Turn until all sides are evenly heated and crisp. Place on a paper towel to drain any extra fat. 17. Sauté chopped cabbage and onion (about 1/2 head cabbage and 1/2 onion) in olive or canola oil in a skillet over medium heat until tender. Season as desired with salt and pepper. ….. 18. Freeze Parmesan rinds and add (frozen) to a soup or stew for extra flavor. 19. Use up extra odds and ends of cheese by shredding them with a grater or in a food processor. Mix in your choice of ingredients, cut or chopped into small pieces (i.e. olives, pickles, pimientos, chives, walnuts, peppers, etc.). Add enough mayonnaise (regular or low-fat) to bind the ingredients together. Spread on your favorite bread. 20. Use vanilla and fruit flavored yogurts as a dressing for fruit salads. 24. Test baking powder for freshness by mixing 1 teaspoon baking powder with 1/3 cup hot water. If it foams vigorously, it still has rising power. To test baking soda: Place 1-1/2 teaspoons in a small bowl. Add 1 tablespoon vinegar. If it fizzes, then it will still help leaven a food. If it doesn’t fizz, use it as an odor catcher in the refrigerator. 25. Fix lumpy gravy by pouring it through a sieve or strainer. 26. Coat measuring cups with nonstick cooking spray before measuring sticky ingredients like honey and syrups. 27. Add oil, vinegar, herbs and spices to an almost-empty mayo, jam or jelly jar. Shake and use for a quick salad dressing. Use about 1 part vinegar to 3 parts oil. 28. Fix lumpy frosting by adding something lumpy to it, such as chopped nuts or coconut. DAIRY COMBINATIONS OF FOODS OTHER 21. Make a chopped salad with small amounts of extra fruits, vegetables, nuts, cooked eggs, etc.* 22. Combine leftover pasta with foods such as boiled egg wedges or slices, bite- size chunks of cheese, chopped fresh vegetables, Pasta salad cooked dry beans. Mix with your favorite vinaigrette-type dressing. Refrigerate about an hour before serving to let the flavors blend. 23. Create a colorful parfait by layering cookie crumbles, then pudding follow by fruit - such as berries - in parfait or wine glasses. Alternate as desired. Serve soon after preparation to prevent crumbles from becoming soggy. Sandwiches made with odds & ends of cheese Freezing herbs in olive oil Coat measuring cups with nonstick spray before measuring sticky ingredients 3
  • 5. Servings: 6 1/2-cup servings A serving of "Old Fashioned Bread Pudding" is a delicious way to add whole grain breads to your meals and to use up bread that is beginning to dry out. Spreading each slice of bread with margarine or butter and sprinkling it with cinnamon before cutting it into cubes makes every bite especially tasty! DIRECTIONS 1. Preheat oven to 350 degrees F. 2. Spread one side of bread with margarine or butter. Sprinkle with cinnamon. 3. Cut bread into 1-inch cubes. 4. In a medium-sized bowl, combine bread cubes, sugar and raisins. 5. In another bowl, blend eggs, milk, salt and vanilla. Pour liquid over bread mixture; lightly mix. 6. Transfer mixture to a casserole dish coated with oil or sprayed with a nonstick spray. 7. Bake uncovered for 50 to 60 minutes or until the center of the pudding reaches 160 degrees F when measured with a food thermometer. At this temperature, a metal knife inserted near the center comes out clean. 8. Serve warm or cold. Do not let bread pudding set at room temperature over 2 hours’ TOTAL time. Eat within 3 to 4 days. Source: Adapted from Montana Extension Nutrition Education Program, Website Recipes, Montana State University Extension Service ALICE’S TIPS Avoid overcooking eggs in custard-type dishes—such as this recipe—AND assure safety by using a food thermometer. Overcooking may cause curdled or weeping custard. To determine doneness in egg dishes such as bread or rice pudding, quiche, casseroles, strata’s, etc. the center of the mixture should reach 160 degrees F when measured with a food thermometer. At this temperature, the very center of a custard-type dish may still be slightly liquid; however, the heat retained in the mixture will cause it to continue cooking and to set after removal from the oven. You may need to insert the thermometer at an angle to assure enough of thermometer reaches sufficiently into the food to measure the temperature. A custard pie is done when the liquid area in the center is smaller than a quarter. Therefore, you may see the recommendation to insert a metal knife near the center of custard-type dishes to check if it comes out clean. INGREDIENTS  5 slices whole wheat bread • 2 tablespoons margarine or b butter • 1/4 teaspoon cinnamon • 1/3 cup sugar, white or brown • 1/2 cup raisins • 3 eggs • 2 cups nonfat liquid milk • 1/4 teaspoon salt • 1 teaspoon vanilla extract NOTES OLD FASHIONED BREAD PUDDING RECIPES According to the U.S. Department of Agriculture, part of a healthy diet is limiting the amounts of added sugars, saturated fats and sodium we consume. The following recipes have been chosen to help promote or give substitutions that support these recommendations and at the same time provide important nutrients and taste good. While saturated fat is kept at a minimum, to further reduce saturated fat in a recipe calling for a solid fat, substitute a soft (tub or squeeze) margarine. 4
  • 6. Servings: 4 servings Roasting root vegetables adds a delightful sweet taste and is a delicious way to use up those last few vegetables lingering in your refrigerator or on your counter top. Cut vegetables into chunks similar in size so they will finish roasting at the same time. DIRECTIONS 1. Preheat oven to 350 degrees F. 2. Cut vegetables into large chunks. 3. Place in a medium bowl and pour oil over top. Add seasonings and mix well. 4. Spread an even layer on a baking sheet. 5. Bake for 1 hour or until tender. Check a few vegetables to see if they are tender. Source: Adapted from USDA “What’s Cooking? USDA Mixing Bowl” at http://bit.ly/2dt9cYn and by Montana Extension Nutrition Education Program Website Recipes, Montana State University Extension Service. ALICE’S TIPS 1. Depending on the size of your vegetables, you may be able to use slightly less oil. You might add one tablespoon of oil at a time until the vegetables are coated. 2. I sprinkled a mixture of 1/4 teaspoon of dried thyme, 1/4 teaspoon dried rosemary and 1/8 teaspoon black pepper on the vegetables. Another possibility would be to substitute 1/2 teaspoon Italian seasoning for the thyme and rosemary. 3. Start checking the vegetables for tenderness at about 45 minutes. I cut mine into about 1-inch chunks and they baked in 50 minutes in my oven. INGREDIENTS  4 medium-sized root vegetables (choose a variety from potatoes, rutabagas, turnips, parsnips, beets, sweet potatoes)  2 chopped carrots  1 medium chopped onion  1/4 cup vegetable oil  Seasoning(s) of your choice NOTES ROASTED ROOT VEGETABLES 5
  • 7. Servings: Allow the equivalent of about 1/2 to 1 slice of bread/person Making your own croutons is a tasty way to use bread that has dried out slightly. You’ll save money, too! Homemade croutons also are a terrific treat for enjoying those last few slices of bread from the Farmers’ Market. Making croutons from scratch is so easy and lets you control the type of seasonings and amount of sodium. You may decide to switch to always making your own croutons. Enjoy this recipe for either plain croutons or croutons made with Italian seasoning. Add homemade croutons to salads and soups just before serving. Toss them on top of casseroles for added crunch. DIRECTIONS 1. Preheat oven to 350 degrees F. 2. Lightly brush top side of bread with olive oil. If desired, sprinkle with Italian seasoning after bread is coated with oil. Cut into about 1/2 to 3/4-inch cubes. Leave the crust on — it adds to their wholesome, made-at-home appearance! Alternative method: a. First, cut bread into 3/4-inch cubes leaving the crusts on. Transfer to a bowl that allows enough room to stir the croutons. b. Drizzle on a little olive oil — about 1 to 2 teaspoons per slice of bread, stirring to distribute while you add the olive oil. A “spoonula” or spoon spatula works especially well to help scrape any olive oil from the side of the bowl and mix it throughout the croutons. c. Next, if desired, sprinkle with Italian seasoning, while stirring the croutons to distribute the seasoning among the crouton surfaces. 3. Spread bread cubes in a single layer on an ungreased baking sheet. Bake on the middle shelf of the oven for 10 to 15 minutes or until lightly browned and crisp. You don’t have to turn croutons while they’re baking. 4. Place pan on a cooling rack to cool croutons. 5. Enjoy! These croutons taste best if eaten the same day they're made; you can store at room temperature in an airtight container for a couple of days. Source: Recipe developed by Alice Henneman, MS, RDN ALICE’S NOTES 1. If desired, use low sodium bread; check with your grocery store or local health food stores for availability in your area. 2. Experiment with additional seasonings — for example, lightly sprinkle croutons with garlic powder or dried herbs such as oregano or thyme. INGREDIENTS  Whole grain bread (1/2 to 1 slice/person, depending on size of salad)  Olive oil  Italian seasoning (optional) NOTES HOMEMADE WHOLE GRAIN CROUTONS 6
  • 8. Servings: 4 side dishes or 2 large main dish servings Roasting adds an extra layer of flavor to vegetables. Try this recipe if you have some of these vegetables in your kitchen you need to use up: Cherry tomatoes, bell peppers (any color), zucchini, eggplant or asparagus. Exact amounts aren’t needed in this recipe. Just keep the amount of vegetables roasted at one time to an amount that can be spread in a single, even layer on a pan in the oven. DIRECTIONS 1. Preheat oven to 375 degrees F. 2. Mix together cherry tomatoes, bell pepper slices, zucchini and extra virgin olive oil in a large roasting pan, a 9 x 13-inch baking pan or a baking sheet with sides. Spread the vegetables spread in a single, even layer on the pan. Use a larger pan or a couple of pans, if necessary, to prevent stacking the vegetables. 3. Sprinkle the Italian seasoning over the vegetables. 4. Roast for 25 to 35 minutes, or until the tomatoes and zucchini are softened and the pepper has started to brown. 5. Meanwhile, cook the pasta according package directions. Drain, reserving about 1/2 cup of the pasta water. 6. Combine the roasted vegetables with the pasta in a large mixing bowl. Season to taste with salt and pepper. if the pasta requires additional moistening, add reserved cooking liquid by tablespoonful’s until you’ve added enough liquid to moisten sufficiently. Transfer to a serving dish. Serve and pass the grated Parmesan, if desired. Source: Recipe developed by Alice Henneman, MS, RDN ALICE’S TIPS 1. If you decide to use the recipe for 2 main dish servings, include the cheese to add some protein to the meal. Or, you might quickly heat some precooked shrimp per package directions and add to the pasta dish. 2. Vegetables you might substitute for those listed in this recipe include:  A bunch of asparagus, cut into 2-inch pieces  An eggplant cut into 3/4-inch pieces INGREDIENTS  2 to 4 cups cherry tomatoes, left whole with skins  One large bell pepper (any color), cut into 1-inch pieces  1 to 2 medium zucchinis, cut into 1/4-inch slices  3 tablespoons extra virgin olive oil  1 teaspoon Italian seasoning  8 ounces uncooked pasta (preferably whole grain), such as rotini, farfalle (bow tie shaped) or medium-sized shell pasta  Salt and pepper (preferably fresh ground pepper) to taste  Grated Parmesan cheese, preferably freshly grated (optional) NOTES ROASTED VEGETABLE PASTA 7
  • 9. Servings: Varies on how much fridge cleaning you do in making this salad! A chopped salad is known for containing small pieces of fresh produce, usually vegetables. You’re limited only by your imagination. Possibilities include onions, bell peppers, carrots, tomatoes, celery, lettuce, spinach, cabbage, zucchini, cauliflower, broccoli, kale, peas, radishes, cucumbers, cooked corn cut from the cob and zucchini. Chopped salads are a delicious dish for cleaning out your refrigerator. Additional foods tossed into a chopped salad, but not necessarily chopped, include individual cooked shrimp; nuts; sunflower seeds; strips of grilled or broiled steak; beans such as black or garbanzo beans; boiled egg slices or wedges; cubed ham; bacon bits; cheese; olive slices; and fruits such as mandarin orange wedges, blueberries and apple chunks. A chopped salad is easier to eat from a bowl with sides. DIRECTIONS 1. Prepare vegetables shortly before serving. Wash all vegetables, even if you plan to remove the skin. Smaller-sized produce can be used “as is;” larger vegetables, such as greens, carrots and so on are chopped into smaller pieces. Mix together. 2. Mix in any additional meat, cheese, etc. 3. Toss with about 1 to 2 tablespoons of dressing per each 2 cups of vegetables. Start with the smaller amount of dressing and add more if needed. Serve. Source: Recipe developed by Alice Henneman, MS, RDN ALICE’S TIPS A chopped salad may be easier to eat served from some type of dish with sides. INGREDIENTS  An assortment of vegetables; plan on enough to make about a 1-1/2 to 2 cup salad per person  Additional cooked meat, eggs, cheese, cooked dry beans, lentils, nuts, seeds, etc. if desired  Salad dressing of your choice  Salt and pepper to taste, if desired NOTES CLEAN THE FRIDGE CHOPPED SALAD 8
  • 10. Servings: 4 – 6 Try this quick potato dish that can be made in your microwave. If you have leftovers, try the recipe following it for “Toasty Potato Chunks.” DIRECTIONS 1. Place potato cubes in a mixing bowl and mix in the olive oil until potatoes are thoroughly coated. 2. Sprinkle potatoes with your favorite seasoning(s) and stir to distribute. I sprinkled in some dried oregano leaves and ground some black pepper over the potatoes. You also might add a bit of salt now, or wait to salt “to taste” after the potatoes are done … or just pass the salt if you’re feeding anyone limiting sodium intake. 3. Place potatoes in a 1-1/2 to 2-quart microwave-safe dish. Cover with lid. Microwave on high for about 10 minutes or until potatoes are tender when pierced with a fork; stir once about half way through the time. 4. Transfer to a serving dish. Enjoy! Got Leftovers? Eat leftovers within 3 to 4 days for best quality and safety. Here’s a way to “recycle” them into a new, flavorful dish, Toasty Potato Chunks. Toasty Potato Chunks a. Transfer potato chunks, including any remaining olive oil, to a nonstick skillet at medium heat. Place in a single layer or the potatoes will steam instead of brown. If necessary, cook in batches. There should be enough oil left on the potatoes to flavor them and help them brown. If needed, add a small amount of oil until potatoes coated with oil. b. Cook on one side until potatoes have turned brown; then, flip and cook on the other sides. c. Remove from skillet and serve hot. Source: Recipes developed by Alice Henneman, MS, RDN ALICE’S TIPS 1. To assure potatoes getting done at the same time, as much as possible make chunk sizes a similar size. 2. Wash the potatoes under running water, scrubbing them with a clean brush or with your hands; pat dry with a clean paper towel before dicing them. Do not wash potatoes until you’re ready to use them. INGREDIENTS  4 cups diced new red potatoes (leave skin on and cut into 1-inch cubes; amount need not be exact)  2 tablespoons extra virgin olive oil  Seasoning(s) of choice NOTES TASTY MICROWAVE POTATO CHUNKS 9
  • 11. Servings: 2 generous servings While the first half of a cauliflower often is eaten soon, sometimes the last half remains until it finally gets tossed. Try making mashed cauliflower to give a whole new personality to the other half of the cauliflower. DIRECTIONS 1. In a large sauce pan (use a Dutch oven if cooking the entire cauliflower), bring an inch of water to boil. 2. Add cauliflower; cover and cook for 5 to 10 minutes or until tender. (Test by sticking a fork into the cauliflower.) 3. Drain the cauliflower and return to the pan. Add the milk, margarine or butter, garlic, pepper and salt. 4. Mash with a potato masher until combined. OR, place the cauliflower and other ingredients (except the cheese) in a mixing bowl and beat with an electric mixer. (NOTE: I prefer to stop mixing while the mixture still contains some small chunks of cauliflower than until it is perfectly smooth. This is a matter of personal preference, however.) 5. Stir in the cheese. Source: Recipe developed by Alice Henneman, MS, RDN Servings: 8 servings Roasting adds flavor to cauliflower and reduces the volume slightly. You may be surprised by how much you and family members eat when you roast cauliflower. (NOTE: Just halve the following ingredients if only using half a head.) DIRECTIONS 1. Preheat oven to 450 degrees F. 2. Remove outer leaves of cauliflower. Cut florets off the stem. Wash and drain. 3. Combine oil, salt and pepper in a large bowl. Toss the cauliflower florets in the oil mixture. 4. Spread cauliflower on a large rimmed baking sheet. 5. Roast in the oven at 450 degrees 15-20 minutes until the cauliflower starts to soften and begins to brown. 6. Sprinkle with cheese. Continue to roast for 5-10 minutes. Source: University of Maryland Extension. Food Supplement Nutrition Education Program at USDA’s What’s Cooking. INGREDIENTS • 1/2 head cauliflower, washed and cut into florets • 1 tablespoon milk • 1-1/2 tablespoons margarine or butter • 1 small clove garlic, minced OR 1/4 teaspoon garlic powder • 1/4 teaspoon black pepper • Salt (if desired), to taste  1/4 cup grated cheese (you can use any cheese) NOTES INGREDIENTS  1 cauliflower head  2 tablespoons olive oil  1/4 teaspoon salt  1/4 teaspoon pepper  1/2 cup shredded Parmesan cheese NOTES MASHED CAULIFLOWER ROASTED CAULIFLOWER 10
  • 12. Servings: 6 slices of French toast Transform bread that is starting to dry out into tasty French toast. DIRECTIONS 1. Beat together eggs, vanilla and cinnamon in a pie pan or shallow bowl with a fork until well mixed. Stir in the milk. 2. Lightly grease a griddle or large skillet with a thin layer of oil. Heat over medium heat. 3. Dip each side of bread, one slice at a time, in the egg mixture. 4. Cook on one side until golden brown. Turn the bread over to cook the other side. It will take about 3 to 4 minutes on each side. 5. Serve with syrup, applesauce, fruit slices or jam. ALICE’S TIPS Using whole grain bread will provide the most fiber in this recipe. … INGREDIENTS  2 large eggs  1/2 teaspoon vanilla extract  1/2 teaspoon cinnamon  1/2 cup non-fat milk  6 slices bread  Syrup or other toppings (optional) FANTASTIC FRENCH TOAST 11
  • 13. Servings: Makes about 1/2 cup of fine bread crumbs, enough for an 8- or 9- inch square casserole dish. Homemade bread crumbs make a tasty topping for casseroles. DIRECTIONS Use this topping on any casserole that is baked without a lid. 1. Toast bread at one of the higher settings on your toaster to brown it and help dry it out. Let cool. 2. Tear off pieces of bread and add to food processor in small batches. Process to about the size of grains of rice. 3. Add olive oil and pulse to blend. Then add Italian seasoning and continue to pulse until mixed. 4. Add topping to casserole and bake per casserole directions. ALICE’S TIPS 1. Using a whole grain bread gives the additional benefit of fiber and higher amounts of some trace minerals. 2. This recipe is a great way to use up older bread. 3. You may be surprised at how good a homemade bread crumb topping tastes. Plus, you control the type of ingredients used and save money. 4. One slice of bread yields about 1/4 cup of fine bread crumbs. INGREDIENTS • 2 slices bread • 1 tablespoon extra-virgin olive oil • 1/2 teaspoon Italian seasoning NOTES BREAD CRUMB CASSEROLE TOPPING 12 Photo credit: Pixabay.com
  • 14. Servings: 1 smoothie If you purchased a large carton of yogurt to save money, but it is becoming a permanent fixture in your refrigerator, try this quick smoothie recipe. DIRECTIONS 1. Add ingredients to a blender in this order: juice, yogurt, berries. 2. Blend all ingredients well and drink! ALICE’S TIPS 1. Ingredients combine better in a blender if liquids are added before solids. 2. Using frozen fruit helps thicken beverages without diluting the flavor. To freeze fruit, such as fresh berries, wash the fruit thoroughly under running tap water, pat dry with clean paper towels and freeze in a single layer on a rimmed cookie sheet. Transfer to a freezer bag when frozen. Pour out as needed. 3. Use smaller pieces of fruit, such as berries or sliced pieces of larger fruits or your blender may be unable to process them. 4. Whether using fresh or frozen fruit, use fruit at its peak of ripeness to capture the most natural sweetness for smoothies and shakes. 5. Most smoothies and shakes should be consumed immediately. They may change color if they stand for very long. 6. If you have a larger blender jar that is wide at the bottom, you may find it harder to blend single-serving smoothies. A blender jar forces food up against the blender walls where it is then redirected back on the blades and blended until the desired consistency. A blender that is wider at the bottom will send smaller volumes of food out toward the sides rather than up and then down toward the center and the blades. 7. As a variation, make smaller smoothies and serve them as a dessert "drink." As an extra goodie, pass a plate of small, luscious chocolates as an accompaniment. 8. Consider doubling the size of this recipe and freezing some of it as ice pops. INGREDIENTS  3/4 cup orange juice, pineapple juice, orange-tangerine juice, or other 100% juices  1/2 cup of vanilla or plain yogurt (NOTE: if you use plain yogurt, you may wish to add sugar or a non-caloric sweetener to taste. Add about 1 teaspoon at a time until you have the flavor you desire.)  1 cup frozen berries (i.e. raspberries, strawberries, blueberries, mixed berries) NOTES IT’S THE BERRIES YOGURT SMOOTHIE Ice pop made from smoothie recipe 13
  • 15. Give new life to turkey leftovers with these turkey soup recipes. They start with the same basic ingredients of 1 quart (4 cups) low sodium chicken broth and 2 cups of chopped, cooked turkey. Servings: Recipes makes about 2 quarts or 4 2-cup servings. Source: Recipes developed by Alice Henneman, MS, RDN This soup is a wonderful way to use both leftover turkey and mashed potatoes from Thanksgiving. Don’t worry if you don’t have the exact amounts of potatoes and turkey. Plus, it is so easy to make after all the food preparation you did for Thanksgiving Day! DIRECTIONS 1. In a large saucepan or Dutch oven, sauté over medium heat in olive oil, onion and carrots until the onion is translucent and the carrots are tender- crisp, about 5 minutes. 2. Add chicken broth, mashed potatoes and thyme. Continue cooking and stir until broth is smooth. 3. Add turkey; continue cooking on medium heat until mixture starts to simmer. Reduce heat to medium-low and continue to simmer, stirring occasionally — for about 10 minute — until mixture is heated through. 4. Season to taste with salt and black pepper. Just dump all the ingredients, together and heat … so easy. Season heated product with salt and pepper to taste and top with grated cheese if desired. DIRECTIONS 1. Combine salsa; corn; black beans or black soybeans; turkey; and chicken broth in a large saucepan or Dutch oven. 2. Bring to a boil, then reduce heat and simmer for 5 minutes. 3. Season to taste with salt and black pepper. 4. If desired, top with grated cheddar cheese. ALICE’S TIPS The USDA Food Service and Inspection Service advises the following for storing your turkey leftovers: 1. Discard any turkey, stuffing and gravy left out at room temperature longer than 2 hours; 1 hour in temperatures above 90 °F. 2. Divide leftovers into smaller portions. Refrigerate or freeze in covered shallow containers for quicker cooling. 3. Use refrigerated turkey, stuffing and gravy within 3 to 4 days. 4. If freezing leftovers, use within 2 to 6 months for best quality. 5. For best safety and quality, eat soup within 3 to 4 days or freeze it. And avoid letting soup set at room temperature for more than 2 hours. 6. Reheat leftover soup until it is steaming hot throughout (165 degrees F.) TURKEY MASHED POTATO SOUP INGREDIENTS  1 tablespoon extra-virgin olive oil  1 chopped yellow onion  1 cup thinly sliced carrots  1 quart (4 cups) low sodium chicken broth  3 cups mashed potatoes  1 teaspoon dried thyme leaves  2 cups chopped, cooked turkey  Salt and pepper (preferably freshly ground pepper TURKEY SALSA SOUP INGREDIENTS  16 oz. (2 cups) mild, chunky salsa  2 cups frozen whole kernel corn  2 (15 oz.) cans black soybeans or black beans, rinsed and drained  2 cups chopped, cooked turkey  1 quart (4 cups) low sodium chicken broth  Salt and pepper (preferably freshly ground pepper  Grated cheddar cheese (optional) NOTES TURKEY MASHED POTATO SOUP TURKEY SALSA SOUP 14
  • 16. Servings: 6 servings Total Time: 30 minutes Cheese adds nutrition and flavor to recipes, and when combined with whole grains and vegetables, can help kids and adults eat more of these foods. Spice up your weekly dinner plans with this quick and easy, cheesy dish using turkey, rice and corn. Packing a decent dose of fiber, iron and calcium, this dinner is sure to become a family favorite all year round. DIRECTIONS 1. In a large skillet over medium-high heat add oil and cook onion until soft, about 10 minutes. (If using raw ground turkey, cook with the onion until browned. Drain excess fat while keeping in the skillet.) 2. Add turkey, rice, beans, corn, picante sauce and chili powder. Stir to mix well. 3. Heat thoroughly. Remove from heat and sprinkle with cheese. Serve hot. Nutritional Facts Per Serving  Calories 140  Total Fat 7g  Cholesterol 10mg  Sodium 330mg  Carbohydrates 13g  Dietary Fiber 2g  Protein 7g (3.8g from dairy)  Calcium 15% Daily Value Source: Recipe and image courtesy of Midwest Dairy Association at https://www.midwestdairy.com/recipe/fiesta-rice-skillet-dinner developed by Susan Anglin, Triple A Farms, Arkansas INGREDIENTS  1 tablespoon canola oil  1/2 cup diced onion  2 -1/2 cups cooked turkey, chopped (or 1 pound lean ground turkey, raw*)  2 cups cooked brown rice  1 (15 ounce) can black beans, drained, rinsed  1 (15 ounce) can diced tomatoes with green chilies, drained  1 cup frozen sweet corn kernels  1 cup mild picante sauce  1 teaspoon chili powder  1 cup shredded Monterey Jack cheese *If using raw ground turkey, cook with the onion until browned. Drain excess fat while keeping in the skillet. Photo credit: Midwestdairy.com NOTES FIESTA RICE SKILLET DINNER 15
  • 17. Many recipes can be cut in half or thirds. Here are some guidelines to help you adapt a larger recipe to a smaller one. ❏✓ It may be easier to make the entire recipe for baked goods and freeze half. Reducing the Size of Recipes Alice Henneman, MS, RDN, Extension Educator When the recipe says: Reduce to: To Make 1/2 of a Recipe 1/4 cup 2 tablespoons 1/3 cup 2 tablespoons + 2 teaspoons 1/2 cup 1/4 cup 2/3 cup 1/3 cup 3/4 cup 6 tablespoons 1 cup 1/2 cup 1 tablespoon 1-1/2 teaspoon 1 teaspoon 1/2 teaspoon 1/2 teaspoon 1/4 teaspoon 1/4 teaspoon 1/8 teaspoons 1/8 teaspoon Dash To Make 1/3 of a Recipe 1/4 cup 1 tablespoon + 1 teaspoon 1/3 cup 1 tablespoon + 2-1/3 teaspoons (or round to 1 tablespoon + 2-1/4 teaspoons) 1/2 cup 2 tablespoons + 2 teaspoons 2/3 cup 3 tablespoons + 1-1/2 teaspoons 3/4 cup 1/4 cup 1 cup 1/3 cup 1 tablespoon 1 teaspoon 1 teaspoon Generous 1/4 teaspoon 1/2 teaspoon Scant 1/4 teaspoon 1/4 teaspoon Scant 1/8 teaspoon 1/8 teaspoon Dash ❏✓ When reducing recipes, you may need to use smaller saucepans, skillets and baking pans. The time for baking smaller amounts of food may be less. ❏✓ The standard size egg for recipes is the large egg. To halve an egg, break it, mix it together with a fork and use 2 tablespoons. Refrigerate the rest and use in an omelet or scrambled eggs within two days. ❏✓ A 9 x 2 x 13-inch pan holds 14 to 15 cups; when halving a recipe use a square 8 x 8 x 2-inch pan or a round 9 x 2-inch pan. When using a different pan size, try and keep the depth of food the same. Reduce the oven temperature by 25o F when substituting a glass pan for a metal one. ❏✓ To help divide recipes, remember: ● 1 cup = 16 tablespoons ● 1 tablespoon = 3 teaspoons ● 1 cup = 8 fluid ounces ● 1 fluid ounce = 2 tablespoons ● 1 pound = 16 ounces (weight) ● 1 pint = 2 cups ● 2 pints = 1 quart 10/16 ® Extension is a Division of the Institute of Agriculture and Natural Resources at the University of Nebraska–Lincoln cooperating with the Counties and the United States Department of Agriculture. University of Nebraska–Lincoln Extension educational programs abide with the nondiscrimination policies of the University of Nebraska–Lincoln and the United States Department of Agriculture. © 2016 16
  • 18. Often for lack of an ingre- dient, a recipe is ruined or an extra trip to the store is required. Sometimes, you need to buy a large container of an ingredient for just a teaspoon or two needed in a recipe. To the rescue: ingredient substitutions! Your final product made with the substituted ingre- dient may differ slightly from the original food, but still be acceptable in flavor, texture and appearance. Ingredient Substitutions Alice Henneman, MS, RDN, Extension Educator 1TIP: According to the National Association of Margarine Manufacturers, you can tell “if the product is regular margarine by checking the Nutrition Facts: a one tablespoon serving will have 100 calories.” Products that contain less than 80 percent fat often give the fat percentage on the front of the package. If the margarine is labeled “light,” “lower fat,” “reduced fat,” “reduced calorie/diet” or “fat-free” or is called a “vegetable oil spread,” you may be less successful substituting it for butter OR for regular margarine in baking and in some cooking procedures. These products are higher in water and lower in fat content and won’t perform in the same way as regular butter or margarine. 2TIP: There is no standard procedure to substitute liquid oil for solid shortening in cooking. Oil is 100 percent fat, while butter, margarine and other solid shortenings are lower in fat on a volume- for-volume basis. Also, for some recipes, solid shortening helps incorporate air into the batter when it is whipped with other ingredients such as sugar and eggs. If you try to whip these ingredients with oil, your baked product is likely to be more compact and oily in texture. Your most successful substitution occurs if your recipe calls for MELTED butter, in which case you can usually substitute an equal amount of oil. ProducT AMOUNT SUBSTITUTE Allspice 1 teaspoon 1/2 teaspoon cinnamon plus 1/2 teaspoon ground cloves Apple Pie Spice 1 teaspoon 1/2 teaspoon cinnamon plus 1/4 teaspoon nutmeg plus 1/8 teaspoon cardamom Baking Powder, 1 teaspoon 1/4 teaspoon baking soda plus 5/8 teaspoon cream of tartar Baking Soda There is NO substitute for baking soda Butter1, 2 1 cup 1 cup regular margarine; or 1 cup vegetable shortening (for baking); or an equal amount of oil can be substituted for a similar portion of MELTED butter if the recipe specifies using MELTED butter. Buttermilk 1 cup 1 tablespoon lemon juice or vinegar plus enough regular milk to make 1 cup (allow to stand 5 minutes) Chili Sauce 1 cup 1 cup tomato sauce, 1/4 cup brown sugar, 2 table- spoons vinegar, 1/4 teaspoon cinnamon, dash of ground cloves and dash of allspice Chocolate, 1 ounce 3 tablespoons cocoa plus 1 tablespoon butter or regular margarine or vegetable oil Double-Acting Unsweetened Extension is a Division of the Institute of Agriculture and Natural Resources at the University of Nebraska–Lincoln cooperating with the Counties and the United States Department of Agriculture. University of Nebraska–Lincoln Extension educational programs abide with the nondiscrimination policies of the University of Nebraska–Lincoln and the United States Department of Agriculture. © 2016 17
  • 19. ProducT AMOUNT SUBSTITUTE Cornstarch3 1 tablespoon 2 tablespoons flour (for thickening) Cream, Whipping 1 cup unwhipped If you wish to use a commercial pre-whipped whipped cream or whipped cream substitute rather than whip your own cream, use the guideline that 1 cup UNWHIPPED whipping cream expands to 2 cups when WHIPPED. For example, if your recipe called for 1 cup of cream to make whipped cream, you could substitute 2 cups of an already whipped product. Egg4 1 whole egg 1/4 cup egg substitute (examples include: Egg Beaters, Second Nature, Scramblers); check label for specific directions; or Reconstituted powdered eggs; follow package directions; or 2 tablespoons mayonnaise (suitable for use in cake batter). NOTE: If you type “mayonnaise cake recipe” into your favorite Internet search engine, you’ll find several recipes for cakes made with mayonnaise and NO eggs. This may help you decide if this substitution will work for your cake. or 1/2 teaspoon baking powder plus 1 table- spoon vinegar plus 1 tablespoon liquid (for baking use only) Flour, All-Purpose 1 cup 1/2 cup whole wheat flour plus 1/2 cup all-purpose flour. Flour, Cake 1 cup 1 cup minus 2 tablespoons all-purpose flour Flour, Self-Rising 1 cup 1 cup minus 2 teaspoons all-purpose flour plus 1-1/2 teaspoons baking powder and 1/2 teaspoon salt Garlic 1 small clove 1/8 teaspoon garlic powder Herbs, Fresh 1 tablespoon, 1 teaspoon dried leaf herbs or 1/2 teaspoon ground dried herbs Lemon Zest (fresh 1 teaspoon 1/2 teaspoon lemon extract Marshmallows, 1 cup 10 large marshmallows 3TIP: Liquids thickened with cornstarch will be somewhat translu- cent while flour gives a more opaque appearance. Cornstarch will thicken a liquid almost immediately. A flour-based sauce or gravy must be cooked longer to thicken and will have a floury taste if undercooked. Joy of Cooking cookbook (Scribner, 1997) advises when using flour as a substitution for cornstarch in sauces and gravies, that you simmer it for about White Flour5 finely cut grated lemon peel) Miniature 3 minutes AFTER it has thickened to help avoid a raw taste of flour. Corn- starch-thickened liquids are more likely to thin if overheated or cooked too long. Regardless of whether you use cornstarch or flour, mix it with a little cold water or other cold liquid, about two parts liquid to one part thickener, before adding it to the rest of the liquid. (Note: when you mix flour with fat to make a roux for use as a thickener, you would not dissolve it in liquid first.) 4TIP: If you don’t use eggs very of- ten, you may find it helpful to keep some powdered eggs on hand. 5TIP: It’s generally recommended that you replace no more than half the all-purpose white flour with whole wheat flour. Too much whole wheat flour in a recipe calling for all-purpose flour might result in a reduced volume and a heavier product. 18
  • 20. ProducT AMOUNT SUBSTITUTE Mayonnaise (for 1 cup 1 cup sour cream or 1 cup yogurt or 1 cup cottage cheese pureed in a blender or Use any of the above for part of the mayonnaise Mustard, Dry (in 1 teaspoon 1 tablespoon prepared mustard Onion6 1 small or 1/4 cup 1 tablespoon instant minced onion Pasta (substituting 4 cups COOKED The National Pasta Association suggests these substitution ratios: 8 ounces of UNCOOKED elbow macaroni, medium shells, rotini, twists, spirals, wagon wheels, bow ties, mostaccioli, penne, radiatore, rigatoni, spaghetti, angel hair, linguine, vermicelli and fettuccine all produce about 4 cups COOKED pasta or Use about twice as much UNCOOKED egg noodles to provide 4 cups COOKED pasta. Approximately 8 ounces UNCOOKED egg noodles equal 2-1/2 cups COOKED noodles. Pumpkin Pie Spice 1 teaspoon 1/2 teaspoon cinnamon plus 1/4 ground teaspoon ginger plus 1/8 teaspoon ground allspice plus 1/8 teaspoon ground nutmeg Rice Any amount Most rice products will substitute for each other on a fairly equal basis in recipes; however, their cooking times and the amount of liquid needed may vary. If possible, choose a rice with a comparable grain length for the closest match. Rum any amount 1 part rum extract plus 3 parts water. For example: for 1/4 cup rum, substitute 1 tablespoon rum extract plus 3 tablespoons water. Sugar, Confectioners’ 1 cup 1 cup granulated sugar plus 1 tablespoon cornstarch; process in a food processor using the metal blade attachment until it’s well blended and powdery. Tomato Juice 1 cup 1/2 cup tomato sauce plus 1/2 cup water Tomato Soup 10-3/4 ounce can 1 cup tomato sauce plus 1/4 cup water Wine, Red Any The same amount of grape juice or cranberry juice Wine, White Any The same amount of apple juice or white grape juice Yeast, Compressed 1 cake (3/5 ounce) 1 package (1/4 ounce) active dry yeast or Scant 2-1/2 teaspoons loose active dry yeast use in salads and salad dressings) cooked mixtures) 9/2010 6TIP: Dried onion may be added di- rectly to moist foods such as soups, gravies, sauces and salad dressings. You may need chopped, fresh onion one for another) or Powdered to rehydrate it with a little water before adding it to drier foods. Check package directions — one brand advises adding an equal amount of water and letting the dried onion stand 5 to 10 minutes. Drain off any excess water after onion has rehydrated. 19 This is a peer-reviewed publication
  • 21. How to Store and Prepare Fresh Fruits and Vegetables to Prevent Food Waste Alice Henneman, MS, RDN • ahenneman@unl.edu • food.unl.edu Nebraska Extension is a Division of the Institute of Agriculture and Natural Resources at the University of Nebraska–Lincoln cooperating with the Counties and the United Sates Department of Agriculture. Nebraska Extension educational programs abide with the nondiscrimination policies of the University of Nebraska–Lincoln and the United States Department of Agriculture. © 2017 About 90 billion pounds of edible food goes uneaten each year in the United States, costing consumers about $370 per person yearly. Tossed fruits ($45) and vegetables ($66) account for about 30% of this amount. Proper storage and preparation of fresh produce can help us save money and better utilize the resources that go into producing food (land, water, energy). Following are some methods for prolonging the life of fresh produce. Produce Stored Outside the Refrigerator Different fruits and vegetables require different temperature and humidity levels for proper storage. Some produce Keep bananas a couple of days longer by storing them in the refrigerator after they have reached the desired degree of ripeness stored at room temperature. The outside will turn brown, but they will still be light- colored on the inside. Another option is to buy bananas in varying degrees of ripeness so they don't all ripen at the same time. Ripening Produce on the Counter Some produce can be ripened on the counter and then stored in the refrigerator. Examples include: avocados, kiwi, nectarines, peaches, pears and plums. Avoid leaving produce in a sealed plastic bag on your countertop. This slows ripening and may increase odors and decay from the accumulation of carbon dioxide and depletion of oxygen inside the bag. To ripen these foods faster, place them in a ripening bowl or a loosely closed paper (not plastic) bag, such as a lunch bag, at room temperature. How to Store Produce in the Refrigerator Store fruits in a separate refrigerator crisper drawer from vegetables. Other than those mentioned previously, most other fresh fruits and vegetables keep best stored in a clean refrigerator at a temperature of 40°F or below. Use your refrigerator crisper drawer for whole produce. Store fruits in a separate refrigerator crisper drawer from vegetables. Fruits give off ethylene gas, which can shorten the storage life of vegetables. Some vegetables give off odors that can be absorbed by fruits and affect their quality. that tastes best stored at room temperature include: bananas, garlic, onions, potatoes, sweet potatoes, tomatoes and winter squash. Store these fruits and vegetables in a clean, dry, well-ventilated place, away from direct sunlight and away from areas where meat is prepared. Protect potatoes from light to avoid greening. If there is just slight greening, cut away the green portions of the skin before cooking and eating. Refrigerate ripened bananas to keep them longer Store fruits and vegetables in separate refrigerator crisper drawers. 20
  • 22. Refrigerate fruits and vegetables in perforated plastic bags to help maintain moisture yet provide airflow. Unperforated plastic bags can lead to the growth of mold or bacteria. If you don’t have access to commercial, food-grade, perforated bags, poke several holes in a food-grade plastic bag. If fruits and vegetables are placed on refrigerator shelves, store meats on pans or plates below the produce to prevent meat juices — which may contain harmful bacteria — from dripping on them. Wash Produce Thoroughly Wash produce before you use it, NOT when you bring it home! Wash hands before working with produce. Fresh produce has a natural protective coating that helps keep in moisture and freshness. Washing produce before storage causes it to spoil faster. Remember those berries that turned moldy after you washed and then stored them? Remove and discard outer leaves. Rinse under clean, running water just before preparing or eating. Don’t use soap or detergent as it can get into produce and make you sick. Rub briskly — scrubbing with a clean brush or hands — to clean the surface. Dry with a clean cloth or paper towel. Cut away bruised and damaged areas. Rinse fruits and vegetables melons, even if they have a peel, which will be removed (such as melons and citrus fruit). Bacteria on the outside of produce can be transferred to the inside when they are cut or peeled. Clean the Fridge Chopped Salad A chopped salad is known for containing small pieces of fresh produce, usually vegetables. Possibilities include onions, bell peppers, carrots, tomatoes, celery, lettuce, spinach, cabbage, zucchini, cauliflower, broccoli, kale, peas, radishes, cucumbers, corn and zucchini. Chopped salads are a delicious dish for cleaning out your refrigerator. Additional foods tossed into a chopped salad, but not necessarily chopped, include individual cooked shrimp; nuts; sunflower seeds; strips of grilled or broiled steak; beans such as black or garbanzo beans; boiled egg slices or wedges; cubed ham; bacon bits; cheese; olive slices; and fruits such as mandarin orange wedges, blueberries and apple chunks. Here is a sample basic recipe. Basic Tossed Salad Recipe Servings: Varies on how much fridge cleaning you do in making this salad! Ingredients • An assortment of fruits and vegetables; plan on enough to make about a 1-1/2 to 2 cups salad per person • Additional cooked meat, eggs, cheese, cooked dry beans and lentils, nuts, seeds, etc. if desired • Salad dressing of your choice • Salt and pepper to taste, if desired Directions 1. Prepare fruits and vegetables shortly before serving. Wash all fruits and vegetables even if you plan to remove the skin. Use smaller-sized produce “as is;” chop larger vegetables into smaller pieces. Mix together. 2. Mix in any additional meat, cheese, etc. 3. Toss with about 1 to 2 tablespoons of dressing per each 2 cups of salad. Start with the smaller amount of dressing and add more if needed. Serve. Tip: A chopped salad may be easier to eat served from some type of dish with sides. Rinse produce even if they have a peel which will be removed, such as melons. Use up extra fruits, vegetables and other items in a Chopped Salad 21
  • 23. ……. Is this Food Still Safe to Eat? Frequently Asked Questions Alice Henneman, MS, RDN • ahenneman@unl.edu • food.unl.edu Nebraska Extension is a Division of the Institute of Agriculture and Natural Resources at the University of Nebraska–Lincoln cooperating with the Counties and the United Sates Department of Agriculture. Nebraska Extension educational programs abide with the nondiscrimination policies of the University of Nebraska–Lincoln and the United States Department of Agriculture. © 2017 Is it safe to use food from dented cans? If a can containing food has a small dent, but is otherwise in good shape, the food should be safe to eat. Discard deeply dented cans. A deep dent is one that you can lay your finger into. Deep dents often have sharp points. A sharp dent on either the top or side seam can damage the seam and allow bacteria to enter the can. Discard any can with a deep dent on any seam. Source: USDA/FSIS.* Shelf-Stable Food Safety. Accessed 2/19/2017 at http://bit.ly/2lk1UvO Is it safe to use food from rusted cans? Discard heavily rusted cans. Cans that are heavily rusted can have tiny holes in them, allowing bacteria to enter. Surface rust that you can remove by rubbing with your finger or a paper towel is not serious. You can keep these canned foods. If you open the cans and there is any rust inside, do not eat the food. Rust (oxidized iron) is not safe to eat. Source:USDA/FSIS.Shelf-Stable Food Safety. Accessed 2/19/2017 at http://bit.ly/2lk1UvO How can you tell if food is safe after a power outage? Keep the freezer door closed to keep cold air inside. Don't open the door any more than necessary. A full freezer will stay at safe temperatures about 2 days; a half-full freezer about 1 day. If your freezer is not full, group packages so they form an "igloo" to protect each other. If you think the power will be out for several days, try to find some dry ice. Keep dry ice wrapped and do not touch it with your bare hands. Use cubed ice or block ice in the refrigerator. Even if food has started to thaw, foods can be safely kept in the freezer. The foods in your freezer that partially or completely thaw before power is restored may be safely refrozen if they still contain ice crystals or are 40°F or below. You will have to evaluate each item separately. When in doubt, throw it out. In general, refrigerated items should be safe up to 4 hours. Keep the door closed as much as possible. Discard any perishable foods (such as meat, poultry, fish, eggs, and leftovers) that have been above 40°F for 2 hours or more. Also discard any other food that has an unusual odor, color, or texture, or feels warm to the touch. Keep an appliance thermometer in the refrigerator and freezer at all times. This will remove the guesswork of just how cold the unit is because it will give you the exact temperature. The key to determining the safety of foods in the refrigerator and freezer is knowing how cold they are. The refrigerator temperature should be at 40°F or below; the freezer, 0°F or lower. More detailed information, along with a chart that tells which foods may be saved and which should be thrown out, may be found in Keeping Food Safe During an Emergency at http://bit.ly/2mbriac Source: USDA/FSIS Food Safety and Security: What Consumers Need to Know. Accessed 2/22/2017 at http://bit.ly/2lMs5h3 *United States Department of Agriculture/Food Safety and Inspection Service If a can has a small dent but is otherwise in good shape, the food should be safe to eat. 22
  • 24. How are food product date labels related to food safety? In a new industry-wide effort to reduce consumer confusion about product date labels, grocery manufacturers and retailers have joined together to adopt standard wording on packaging about the quality and safety of products. Currently, more than 10 different date labels on packages – such as Sell By, Use By, Expires On, Best Before, Better if Used By or Best By – can result in confused consumers discarding a safe or usable product after the date on the package. The new voluntary initiative streamlines the myriad date labels on consumer products packaging down to just two standard phrases. “BEST If Used By” describes product quality, where the product may not taste or perform as expected but is safe to use or consume. “USE By” applies to the few products that are highly perishable and/or have a food safety concern over time; these products should be consumed by the date listed on the package – and disposed of after that date. The new initiative for common phrasing is led by the Food Marketing Institute (FMI) and the Grocery Manufacturers Association (GMA), the two major trade associations for retailers and consumer products manufacturing. Source: News Release, Grocery Manufacturers of America, 2/15/2017. Grocery Industry launches New Initiative to Reduce Consumer Confusion on Product Date Labels. Accessed 2/23/2017 at http://bit.ly/2moQea (NOTE: Manufacturers have until July 2018 to make the change. As these standards are voluntary, there is no guarantee that every company will adopt them. In some states, there may be labeling regulations that preempt the industry standards. Following are some current phrases that are used and that will continue to appear until labels have been switched over.) Examples of (current) commonly used phrases:  A "Best if Used By/Before" indicates when a product will be of best flavor or quality. It is not a purchase or safety date.  A "Sell-By" date tells the store how long to display the product for sale for inventory management. It is not a safety date.  A "Use-By" date is the last date recommended for the use of the product while at peak quality. It is not a safety date except for when used on infant formula as described below. Federal regulations require a "Use-By" date on the product label of infant formula under inspection of the U.S. Food and Drug Administration (FDA). Consumption by this date ensures the formula contains not less than the quantity of each nutrient as described on the label. Formula must maintain an acceptable quality to pass through an ordinary bottle nipple. The "Use-By" date is selected by the manufacturer, packer or distributor of the product on the basis of product analysis throughout its shelf life, tests, or other information. It is also based on the conditions of handling, storage, preparation, and use printed on the label. Do not buy or use baby formula after its "Use- By" date. Source: USDA/FSIS Food Safety and Security: Food Product Dating. Accessed 2/23/2017 at http://bit.ly/2l3GO3 How long can you store leftovers safely? Leftovers can be kept in the refrigerator for 3 to 4 days or frozen for 3 to 4 months. Although safe indefinitely, frozen leftovers can lose moisture and flavor when stored for longer times in the freezer. Source: USDA/FSIS. Leftovers and Food Safety Accessed 2/23/2017 at http://bit.ly/2lf142k Keep an appliance thermometer in the refrigerator and freezer to help assure the safety of your food. The refrigerator temperature should be at 40°F or below; the freezer, 0°F or lower. Frozen food held at 00F will be safe indefinitely but the quality will decrease. (Image courtesy of USDA/FSIS image library) "Best If Used By" labels refer to food quality, not safety. 23
  • 25. REFRIGERATOR & FREEZER STORAGE CHART Since product dates aren’t a guide for safe use of a product, consult this chart and follow these tips. These short but safe time limits will help keep refrigerated food 40° F (4° C) from spoiling or becoming dangerous. • Purchase the product before “sell-by” or expiration dates. • Follow handling recommendations on product. • Keep meat and poultry in its package until just before using. • If freezing meat and poultry in its original package longer than 2 months, overwrap these packages with airtight heavy-duty foil, plastic wrap, or freezer paper, or place the package inside a plastic bag. Because freezing 0° F (-18° C) keeps food safe indefinitely, the following recommended storage times are for quality only. Product Refrigerator Freezer Eggs Fresh, in shell 4 to 5 weeks Don’t freeze Raw yolks, whites 2 to 4 days 1 year Hard cooked 1 week Don’t freeze well Liquid pasteurized eggs or egg substitutes, opened 3 days Don’t freeze unopened 10 days 1 year TV Dinners, Frozen Casseroles Keep frozen until ready to heat 3 to 4 months Deli & Vacuum-Packed Products Store-prepared 3 to 5 days Don’t freeze well (or homemade) egg, chicken, tuna, ham, macaroni salads Pre-stuffed pork & lamb chops, chicken breasts stuffed w/dressing 1 day Don’t freeze well Store-cooked convenience meals 3 to 4 days Don’t freeze well Commercial brand vacuum-packed dinners with USDA seal, unopened 2 weeks Don’t freeze well Raw Hamburger, Ground & Stew Meat Hamburger & stew meats 1 to 2 days 3 to 4 months Ground turkey, veal, pork, lamb 1 to 2 days 3 to 4 months Ham, Corned Beef Corned beef in pouch 5 to 7 days Drained, 1 month with pickling juices Ham, canned, labeled “Keep Refrigerated,” unopened 6 to 9 months Don’t freeze opened 3 to 5 days 1 to 2 months Ham, fully cooked, whole 7 days 1 to 2 months Ham, fully cooked, half 3 to 5 days 1 to 2 months Ham, fully cooked, slices 3 to 4 days 1 to 2 months Hot Dogs & Lunch Meats (in freezer wrap) Hot dogs, opened package 1 week 1 to 2 months unopened package 2 weeks 1 to 2 months Lunch meats, opened package 3 to 5 days 1 to 2 months unopened package 2 weeks 1 to 2 months Product Refrigerator Freezer Soups & Stews Vegetable or meat-added & mixtures of them 3 to 4 days 2 to 3 months Bacon & Sausage Bacon 7 days 1 month Sausage, raw from pork, beef, chicken or turkey 1 to 2 days 1 to 2 months Smoked breakfast links, patties 7 days 1 to 2 months Fresh Meat (Beef, Veal, Lamb, & Pork) Steaks 3 to 5 days 6 to 12 months Chops 3 to 5 days 4 to 6 months Roasts 3 to 5 days 4 to 12 months Variety meats (tongue, kidneys, liver, heart, chitterlings) 1 to 2 days 3 to 4 months Meat Leftovers Cooked meat & meat dishes 3 to 4 days 2 to 3 months Gravy & meat broth 1 to 2 days 2 to 3 months Fresh Poultry Chicken or turkey, whole 1 to 2 days 1 year Chicken or turkey, parts 1 to 2 days 9 months Giblets 1 to 2 days 3 to 4 months Cooked Poultry, Leftover Fried chicken 3 to 4 days 4 months Cooked poultry dishes 3 to 4 days 4 to 6 months Pieces, plain 3 to 4 days 4 months Pieces covered with broth, gravy 3 to 4 days 6 months Chicken nuggets, patties 3 to 4 days 2 months Fish & Shellfish Lean fish 1 to 2 days 6 months Fatty fish 1 to 2 days 2 to 3 months Cooked fish 3 to 4 days 4 to 6 months Smoked fish 14 days 2 months Fresh shrimp, scallops, crawfish, squid 1 to 2 days 3 to 6 months Canned seafood after opening out of can (Pantry, 5 years) 3 to 4 days 2 months Source: U.S. Food and Drug Administration 24
  • 26. How to Freeze Milk and Cheese Alice Henneman, MS, RDN • ahenneman@unl.edu • food.unl.edu Nebraska Extension is a Division of the Institute of Agriculture and Natural Resources at the University of Nebraska–Lincoln cooperating with the Counties and the United Sates Department of Agriculture. Nebraska Extension educational programs abide with the nondiscrimination policies of the University of Nebraska–Lincoln and the United States Department of Agriculture. © 2017 Milk and cheese are very affordable sources of nutrition and make it easy to eat healthy. Milk and cheese provide essential nutrients including calcium to build strong bones and protein to support healthy muscles. A frequently asked question is whether milk and cheese can be frozen, such as when meal plans change or there is an especially good sale. Here is how to freeze them. Freezing Milk While milk can be frozen; it may separate, or be slightly grainy when thawed. Frozen milk works best for cooking, but you may find it is still acceptable for drinking. If you are thinking about freezing milk for drinking, you might try freezing a small amount first to see how you like it before freezing a larger batch. Freeze milk in plastic freezer containers or special freezer-proof glass jars. Leave some extra space at the top since milk expands during freezing. If packaged in a wide- mouth container, leave 1/2-inch headspace for pints and 1- inch for quarts. If packaged in a narrow-mouth container (such as jars), leave 1 1/2-inch headspace for either pints or quarts. Frozen milk will maintain best quality in the freezer for about 3 months; but will remain safe after that if stored at 00 F. Thaw milk in the refrigerator. Stir well before using. Plan to drink within two or three days. Freezing Cheese Hard or semi-hard cheese can be frozen if cut into portions no larger than 1/2 pound blocks. Wrap in plastic wrap and then put in freezer bags. After freezing, cheese may become crumbly and mealy, but it will retain its flavor. It works best for cooking. Plan to use frozen cheese within 4 to 6 months for best quality; however if stored at 00 F, it will remain safe after that time. Thaw cheese in the refrigerator. Use soon after thawing. The cheeses that freeze best are:  Brick  Camembert  Cheddar  Edam  Mozzarella………  Muenster  Parmesan  Provolone  Romano  Swiss Blue cheeses are more prone to becoming crumbly but they will still taste good. Cream cheese and cottage cheese do not freeze well. . Before freezing milk for drinking, freeze a small amount first to see you like it. Hard or semi-hard cheese freezes best. 25