Candle Holder Design
•
9 gefällt mir•12,094 views

1. The document provides a design brief and specifications for designing and manufacturing a wooden candle holder using various techniques within a limited time frame. 2. Key requirements include that the design must be visually attractive and suitable for displaying a candle. A modular design, high quality finish, and powerpoint presentation are also specified. 3. Various manufacturing techniques like laminating, vacuum forming, and plug and yoke forming are listed that could be used to complete the project within the required timeline.

Empfohlen
Weitere ähnliche Inhalte
Was ist angesagt?
Was ist angesagt? (20)
Ähnlich wie Candle Holder Design
Ähnlich wie Candle Holder Design (20)
Kürzlich hochgeladen
Kürzlich hochgeladen (20)
Candle Holder Design
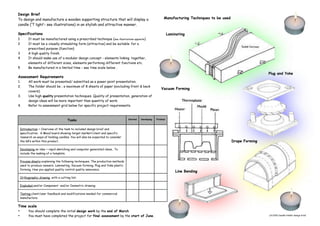
- 1. Specifications 1 It must be manufactured using a prescribed technique (see illustrations opposite) 2 It must be a visually stimulating form (attractive) and be suitable for a prescribed purpose (function) 3 A high quality finish. 4 It should make use of a modular design concept - elements linking together, elements of different sizes, elements performing different functions etc. 5 Be manufactured in a limited time - see time scale below . Design Brief To design and manufacture a wooden supporting structure that will display a candle (‘T light’- see illustrations) in an stylish and attractive manner. Assessment Requirements 1. All work must be presented/ submitted as a power point presentation. 2. The folder should be ; a maximum of 8 sheets of paper (excluding front & back covers). 3. Use high quality presentation techniques. Quality of presentation, generation of design ideas will be more important than quantity of work. 4. Refer to assessment grid below for specific project requirements. Tasks Started Developing Finished Introduction ~ Overview of the task to included design brief and specification. A Mood board showing target market/client and specific research on ways of holding candles. You will also be expected to consider the 6R’s within this product. Developing an idea ~ rapid sketching and computer generated ideas.. To include the making of a template. Process sheets explaining the following techniques, The production methods used to produce veneers. Laminating, Vacuum forming, Plug and Yoke plastic forming. How you applied quality control quality assurance. Orthographic drawing. with a cutting list. Exploded and/or Component and/or Isometric drawing Testing client/user feedback and modifications needed for commercial manufacture. Time scale • You should complete the initial design work by the end of March • You must have completed the project for final assessment by the start of June. Manufacturing Techniques to be used Laminating Vacuum Forming Drape Forming Line Bending Plug and Yoke LN 2012 Candle Holder design brief
- 4. Centre Number 12332 Year 10 Unit 3 Name Page 3 I will join all the pieces together using PVA glue. The material that is suitable is wood and laminated wood because laminated wood can be turn into shapes very easily. I think I have enough time to complete this project so I don’t need to simplify my design. The most efficient way to make this product if I have to make it more than one then use batch production system , make the product stage by stage to make sure it looks complete and eye catching for people to see. The best finish for each of the part is that I am going to varnish it. It is the best because it would look more professional and realistic. The reason and benefits of making prototype model is that it help us improve our final design and also it shows me the mistake I have made so I can develop my final design and Improve it. I think that I don’t need to make any further improvements to my design because I am well specified with my design and I can complete it in the specific amount of time. For this specific project I got the inspiration from architecture. I would try to relate my final product somehow related to architecture for example the structure. My group suggested that I should make my candle holder more stable and add another candle to make it look more interesting. The best size for each part of my candle holder is 220mm by 65mm.
- 5. Take the veneers and put them in to the hot water so its easier to bend. Check if the veneers are bendable. Then use PVA glue to stick the veneers together and leave it for 24 hours. Print your final design out and stick it to your mould. Then with your teachers help cut the deign into half using Band saw. when you cut the mould in half after that put gaffer tape on both side of the mould so the veneers can easily turn into the design. When the veneers are bendable, put them into the mould and clump them together using G- clamp. The veneers would automatically turn into your design. Use sanding paper to smooth the veneers afterwards. Used for cutting the mould in half. Used for sticking the veneers together. used for both side of the mould so the veneers can turn into the design easily. Used for clumping the mould together. Used for smoothing the veneers. Batch production is a technique used in manufacturing, in which the object is created stage by stage over a series of workstations. Laminated is a process in which the product composed of thin layers of wood, or veneers are glued together to make a stronger product.
- 7. When the plastic sheet has been heated so that it is flexible then it’s placed or draped over the plug. The yoke is then pressed down over the plug and is held in position by attaching g-cramps until the plastic sheet cools and 'freezes' in the newly formed shape. The plastic can then be removed and the edges can be trimmed and edge treated The acrylic or Perspex is heated in the oven until it is soft and flexible. The female part of the former, which is called the yoke, is pushed onto the male plug. It is essential that the two parts of the former are put together correctly. In order to ensure this two dowel rods called locating pins. These are fixed into holes drilled into the corners of the plug. The pins also fit into holes drilled into the yoke. The draw is the amount of plastic that is pulled down to form the sides of the plastic tray or plate. The size of the plastic sheet used needs to allow for the depth of the draw. Plug and yoke is a process in which you have to heat the plastic until it’s flexible so you can easily turn it into any shape you want to for example I used plug and yoke process to create a candle holder for my candle.
- 8. Centre Number 12332 Year 10 Unit 3 Name Review box Point 1 Point 2 Point 3 Point 4 Page 6
- 9. Centre Number 12332 Year 10 Unit 3 Name Review box Point 1 Point 2 Point 3 Point 4 Page 7 On this page I would expect to see; Final improvements. Bibliography
Hinweis der Redaktion
- Introduction sheet – for information only please delete this sheet prior to submitting your powerpoint for assessment.
- To be successful this page should include the following; Front Cover Your own front cover design and layout. Include an image/graphic drawing that hints at what you are going to make but must not show the finished idea! The title of the project. You can decide this yourself based upon the design task sheet given to you in class. Your name must be clearly displayed (but not as large as the title)
- To be successful this page should include the following; Introduction. You need to refer to your design sheet (given to you in class). This gives you the design brief and specification. You should copy this onto the page and add at least 3 further specification points ( think of ACCESSFM to help you). You may if you prefer write the design brief and specification in your own words. This would be expected of students hoping to achieve A/B grades. Research Find a selection of pictures/images of candle holders relating to different design periods ie traditional verse modern. You may if you wish also include other inspirational images that could form part of your design thinking. Planning Gannt Chart – consider the time available and plan your work to ensure you met your deadline. Finally complete a review of the page. Highlight what have learnt from completing this page – 1 or 2 bullet points. Suggest what you intend to do next with what you have learnt – 1-2 bullet points
- To be successful this page(s) should include the following; Design Development. Take an idea from your ‘first ideas’ page and start to improve it by; Considering the appearance of the overall design. Thinking about each of the major parts, up right laminate, base and candle holder. Try out different ways of developing your ideas – CAD, sketching, paper/card modeling. Show several different ways in which the separate parts could be joined together. Working out the actual size of individual parts. This often requires you measuring the specific objects that are going to be stored. Perhaps even draw parts full size or make actual size paper templates for marking out. . Consider the page layout and style. Remember the pen evaluation that you completed – how was the best work displayed. Use colour and rendering techniques to enhance the presentation. Modeling Models can be either/both 3D a card model or CAD drawing (sketchup) where you can see different angles. Include photographs or JPEG images of any modeling. Annotate the work showing in detail possible solutions or issues needing to be resolved. You can include any templates or jigs in this section of the design folder if needed. Final complete a review of the page. Highlight what have learnt from completing this page – 1 or 2 bullet points. Suggest what you intend to do next with what you have learnt – 1-2 bullet points
- To be successful this page should include the following; An explanation on how veneers are made. An explanation of laminating (bending wood) An explanation of vacuum forming An explanation of mechanical forming (plug and yoke) Final complete a review of the page. Highlight what have learnt from completing this page – 1 or 2 bullet points. Suggest what you intend to do next with what you have learnt – 1-2 bullet points
- To be successful this page should include the following; Orthographic Drawing Sometimes referred to as a working drawing as accurate measures or sizes are indicated. This would allow another person to make the product. 3 views, Front Elevation, End Elevation and the Plan must be included. All views must be laid out using the recognised conventions. Plan view directly above Front view. End view directly to the left of the front view. No colour is added to this type of drawing. Overall sizes should be indicated Isometric Drawing Drawn using a 30/60 set square (if drawn on paper by hand). Finished drawing shows 3 surfaces or plans Use either 2D design or Sketchup software if drawn using a computer. Finished drawing shows 3 surfaces or plans. Parts drawings Each part drawn separately.. All pieces would be shown either to a scale and dimensioned or drawn full size. Either a 2D or 3D representation could be used depending on the component. Cutting List This involves producing a table, listing all the materials used to produce the project. This should include materials used to make mould’s. Over all sizes should be given prior to any shaping Final complete a review of the page. Highlight what have learnt from completing this page – 1 or 2 bullet points. Suggest what you intend to do next with what you have learnt – 1-2 bullet points
- To be successful this page should include the following; Product Evaluation All original specification points should be considered when evaluating your final product. If other aspects have come up during the design and making stages then these should be covered as well (updated specification ref page 3). Try to be objective about your work (Point, Evidence, Explanation P.E.E) Consider both the strengths and weakness of your work. What Went Well – Even Better If. Examiners understand that work sometimes doesn’t go to plan. If you are honest, and discuss how your work could be improved you can often score more marks than the student who just makes out everything was fantastic.
- To be successful this page should include the following; Final Improvements. A range of sketches showing clearly how the project could be improved. What would you do if you were to make it again? Clear annotation to help explain improvements is essential. Use rendering techniques to improve communication and impact of the drawings. Bibliography You should list all web sites visited where you have sourced information from. Any books used to gain information from should be listed. Any assistance other than from your Class Teacher should also be declared. For example if your parent, classmate or Workshop technician has helped you in someway.