
Empfohlen
Weitere ähnliche Inhalte
Was ist angesagt?
Was ist angesagt? (19)
Andere mochten auch
Andere mochten auch (20)
Ähnlich wie Darken pictures and enhance shadows with the Burn tool
Ähnlich wie Darken pictures and enhance shadows with the Burn tool (20)
Darken pictures and enhance shadows with the Burn tool
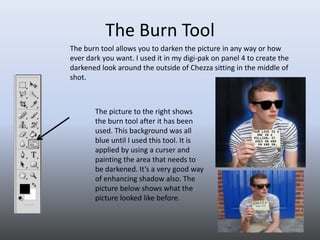
- 1. The Burn Tool The burn tool allows you to darken the picture in any way or how ever dark you want. I used it in my digi-pak on panel 4 to create the darkened look around the outside of Chezza sitting in the middle of shot. The picture to the right shows the burn tool after it has been used. This background was all blue until I used this tool. It is applied by using a curser and painting the area that needs to be darkened. It’s a very good way of enhancing shadow also. The picture below shows what the picture looked like before.
- 2. The Lasso and Magnetic Lasso Tools These are possibly the most important tools that are used in Photoshop. They allow you to cut out images or certain areas of pictures and extract them from they original backgrounds. The lasso tool pick out the change in colour and highlights the different areas straight away. The magnetic tool is very useful also because you just move the curser around an object and the image is cut out afterwards. I used the magnetic tool to cut the green background of the picture on the left so it could be used in the picture on the right.
- 3. Text Tool In a lot of my pictures there is text written in some part. This means that I needed to have the option of adding different text in different fonts, sizes and colours to fit the brand identity and the genre I was creating. Here are the examples of text I used; This is the back cover the text tool was used to write to song titles. Above the text was written on top the post-it note in a typewriter font. On the album poster, I used it to explain the contents of the Digi- Pak.
- 4. Filter This is a very important button that allows you to change the look and image of the picture of layer which you are working on. The different options allow you to change the style, texture, lighting levels and make the picture look like it is made by hand. I used these option on both of the panels below. The one on the right had ‘Brush Strokes’ and on the left ‘sketch’.