

Empfohlen
Weitere ähnliche Inhalte
Was ist angesagt?
Was ist angesagt? (20)
Andere mochten auch
Andere mochten auch (17)
Ähnlich wie Experiments
Ähnlich wie Experiments (20)
Mehr von Abbi Taylor
Kürzlich hochgeladen
Kürzlich hochgeladen (20)
Experiments
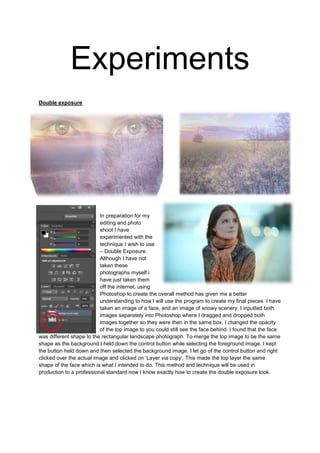
- 1. Experiments Double exposure In preparation for my editing and photo shoot I have experimented with the technique I wish to use – Double Exposure. Although I have not taken these photographs myself i have just taken them off the internet, using Photoshop to create the overall method has given me a better understanding to how I will use the program to create my final pieces. I have taken an image of a face, and an image of snowy scenery. I inputted both images separately into Photoshop where I dragged and dropped both images together so they were then in the same box. I changed the opacity of the top image to you could still see the face behind. I found that the face was different shape to the rectangular landscape photograph. To merge the top image to be the same shape as the background I held down the control button while selecting the foreground image. I kept the button held down and then selected the background image. I let go of the control button and right clicked over the actual image and clicked on ‘Layer via copy’. This made the top layer the same shape of the face which is what I intended to do. This method and technique will be used in production to a professional standard now I know exactly how to create the double exposure look.
- 2. I have created various different double exposures which I have used the program Photoshop for. Some were easier to create then others such as the photograph to the left was simply just two photographs on top of each other one with the opacity being less then the other. The one above with the woman and a sunset with trees that you can vaguely see on the person was a little bit more difficult. I had to use the lasso tool which allowed me to cut around the person. I did this with the background piece selected but hidden which cut the exact shape of the woman out. I then changed the opacity. I think this looks really effective and I will be using as much media and techniques as I can when I come to producing my own.