Installing symfony within netbeans and WAMP
•Als DOCX, PDF herunterladen•
1 gefällt mir•975 views

How to Install symfony within netbeans and WAMP

Empfohlen
Weitere ähnliche Inhalte
Was ist angesagt?
Was ist angesagt? (20)
Andere mochten auch
Ähnlich wie Installing symfony within netbeans and WAMP
Ähnlich wie Installing symfony within netbeans and WAMP (20)
Kürzlich hochgeladen
Kürzlich hochgeladen (20)
Installing symfony within netbeans and WAMP
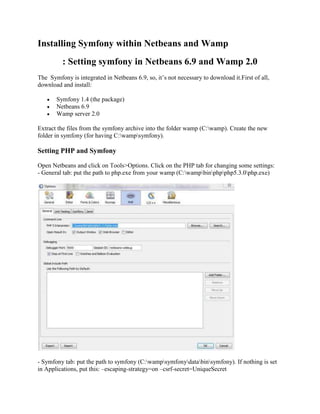
- 1. Installing Symfony within Netbeans and Wamp : Setting symfony in Netbeans 6.9 and Wamp 2.0 The Symfony is integrated in Netbeans 6.9, so, it’s not necessary to download it.First of all, download and install: Symfony 1.4 (the package) Netbeans 6.9 Wamp server 2.0 Extract the files from the symfony archive into the folder wamp (C:wamp). Create the new folder in symfony (for having C:wampsymfony). Setting PHP and Symfony Open Netbeans and click on Tools>Options. Click on the PHP tab for changing some settings: - General tab: put the path to php.exe from your wamp (C:wampbinphpphp5.3.0php.exe) - Symfony tab: put the path to symfony (C:wampsymfonydatabinsymfony). If nothing is set in Applications, put this: –escaping-strategy=on –csrf-secret=UniqueSecret
- 2. MYSQL Server Go on the Services Windows (next to Project and Files). If it’s not showing, click on Window>Service. Expand Databases, right-click on MYSQL and choose Properties. For the purpose of this test, we will not put a password for accessing the database.
- 3. If you have already MYSQL Workbench installed, you can click on Admin Properties et to put these paths in the adequate fields: Path to admin tool: it’s the path to what you’ll use to manage your database. So whether it’s phpMyAdmin, MYSQL Workbench or others, it’s there you need to put their path. Path to start command: it’s for starting the MYSQL service, so check in the bin folder from your Wamp Path to stop command: it’s for closing MYSQL, so if it’s MYSQL admin, don’t forget to put the following arguments: -u root stop (or instead of root, put the admin username). Normally, everything should be working for your database. Check it by right-clicking on MYSQL Server and choose Connect. When you expand this node, you should see the databases stored on it. You can create our database now if you want but I prefer to do it after setting our project. Time to set a project It’s time to click on File>New Project. Choose on the left column PHP and on the right one PHP Application.
- 4. Next, put a name on your project (games in our case) and change the Sources Folder for your www/games folder.
- 5. Configuration on localhost in the next step. Choose Symfony framework and generate the frontend and backend in the same time. Now you’re ready to use the framework… well once we have created our database physically (without tables).
- 6. Set the database So, what to do? Well, you can go back to Services, right-click on MYSQL Server, then choose Create and give life to our database. Check with phpMyAdmin by typing localhost in your browser without forgetting to start Wamp server. Come back to the Projects Window and right-click on Games. Choose Symfony>Run command for accessing to the framework’s commands. Choose configure:database and put as parameters the following line: "MYSQL:host=localhost;dbname=games" root Click on run and check the file databases.yml in games/config if everything is set well: all: doctrine: class: sfDoctrineDatabase param: dsn: 'MYSQL:host=localhost;dbname=games' username: root password: null Virtual Host Well, normally now, you can use the framework… but I lied, we have still one thing to do. We need to configure a virtual host on our Wamp. So go in C:wampbinapacheApache2.2.11confextra to find the file httpd-vhosts.conf. Edit it with your notepad and put the following code (you can change the number 9093 by 8080): # Be sure to only have this line once in your configuration NameVirtualHost 127.0.0.1:9093 # This is the configuration for Games Listen 127.0.0.1:9093 <VirtualHost 127.0.0.1:9093> ServerName project.localhost DocumentRoot "C:wampwwwgamesweb" DirectoryIndex index.php <Directory "C:wampwwwgamesweb"> AllowOverride All Allow from All </Directory> Alias /sf "C:wampsymfonydatawebsf" <Directory "C:wampsymfonydatawebsf"> AllowOverride All Allow from All </Directory> </VirtualHost>
- 7. How to understand that? - Well, as you can see I’ve already set a name for my virtual host that isn’t 8080. But it’s only because it was taken before (and mainly because the 8080 refused to work when I began to learn Symfony). - I’ve put a server name like it was recommended but I am not using it. So, you’ll see a lot of localhost:9093 in my URLs. - The first part of code concerns the folders that the browser can access. So, it will be there you’ll find css, js, images, etc.. - The alias is redirecting to the symfony framework and for default pages Note that all your symfony project is deployed on the www folder, which is not really a secure way to do. In reality, every folder apart web should be out of the www directory. But I’m still not at the point where I’m feeling at ease with moving these things out and make everything work. Just if you just want to understand the framework like me, let everything like that. Checking the new project And now , you’re settled for your first symfony project! If you have doubts about the success of what I’ve described: restart Wamp if it was already working and type localhost:9093/frontend_dev.php.