
Empfohlen
Weitere ähnliche Inhalte
Was ist angesagt?
Was ist angesagt? (20)
Andere mochten auch
Andere mochten auch (20)
Ähnlich wie Iartist video
Ähnlich wie Iartist video (20)
Iartist video
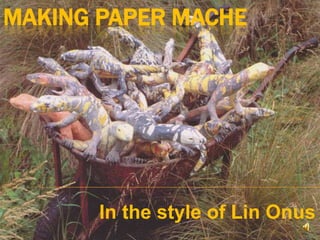
- 1. Making Paper Mache In the style of Lin Onus
- 2. Lin Onus Lin Onus sculpture ‘Goannas in Wheelbarrow’ represented humour in the face of unhappy experiences. “Aboriginal cultural strengths often include an ability to ‘laugh in the face of adversity’, and thus was something Onus appreciated as an essential element ‘ensuring the survival of an oppressed people’.” Leslie, D. (2008). Aboriginal Art Creativity and Assimilation. Melbourne: Macmillan Art Publishing. ‘Goannas in Wheelbarrow’ (1996) Leslie, D. (2008). Aboriginal Art Creativity and Assimilation. Melbourne: Macmillan Art Publishing.
- 3. Paper Mache activity Points for the students to think about: Times when they have been through difficulties at school, at home, in the community Give students ideas to help them think deeply about these times eg a death in the family, being bullied, a major issue they have experienced Activity geared at older year levels
- 5. Paper – plain and coloured.
- 6. Newspaper
- 7. PVA glue of can make own with flour and water
- 8. Paint
- 11. Making our artwork Start off by putting on about 3 or 4 layers for those children that overlap their newspaper lots recommend 2 layers as it will take to long to dry. Note: I have used a small plastic take away container to give definition for my turtles shell After letting the first layers dry continue with the 3 or 4 layer system till you get the thickness you want.
- 12. Making artwork Once your paper mache object is at your chosen thickness and fully dried you are now up to the decorating stage. You decorate your object in many different ways, using paint, paper, texts and any other materials you have in your classroom.
- 13. Making artwork For my turtle I have opted to decorate it with coloured paper and markers. Tip: if painting when doing the last layer use white paper it will save having to use so much paint.
- 14. Making Artwork Lastly get students to display their artworks around the classroom and as a follow up activity give them time to reflect and write about why they chose the that specific object for their artwork and why it has meaning for them. This will only be for the teachers eyes as some student might have personal reasons behind their artwork that they don’t want everyone to know.