SlideShare ist ein Scribd-Unternehmen logo
1 von 58
P a g e 1 | 58
Appium
Appium in windows to run native/web ios/android software automation tests using selenium
webdriver.
Below given steps will guide you to install appium in windows.
Step 1: Install the Java Development Kit (JDK)
Step 2: Set Up Java Environment Variable Path
Step 3: Install Android Studio on Windows
Step 4: Download and Install NodeJs
Step 5: Install Microsoft .net Framework
Step 6: Download And Install Appium Desktop Client
Step 7: Enabling Developer Mode Options on Android Phone or Tablet
Step 8: Install PdaNet to Connect with Android Device
Step 9: Install Eclipse IDE And Set up a Project
Step 10: Set Up Appium Project in Eclipse
Step 11: First Appium Test to Launch Amazon App
P a g e 2 | 58
Step 1: Install the Java Development Kit (JDK)
First of all you need to install JDK (Java development kit) in your system. The Java Software
Development Kit (Java SDK or JDK) is an application created by Sun Microsystems to create
and modify Java programs. So your next question will be “How to download Java or JDK”.
Install JDK
a. Visit the Java downloads page on Oracle’s website to find the JDK environment
download. Scroll down until you find Java SE Latest Version and download JDK.Click
on JDK download button as shown in below image.
P a g e 3 | 58
b. Select the radio button to “Accept License Agreement” and choose the JDK that
corresponds to Windows.
c. The File Download dialog box appears prompting you to Save the download file.
P a g e 4 | 58
d. To run the installer, click Run.
e. The installation process starts. Click the Next button to continue the installation.
P a g e 5 | 58
f. On the next screen you will encounter some options. Just leave these alone and
click Next unless you know what you are doing.
g. After the initial installation is done, a pop up asking you where your source java files
will be. You can choose to change where you want to keep your folder but it’s best to
stick with what you were given first. Click Next to continue.
P a g e 6 | 58
Note: Make a note of this location, as this location of JDK installation will be required
to Set up Java Environment Variable
h. Let the installation finish.
i. A few brief dialogs confirm the last steps of the installation process; click Close on the
last dialog. This will complete Java installation process.
P a g e 7 | 58
Step 2: Set Up Java Environment Variable Path
Environmental variables are used by the operating system to save settings (default values,
locations of resources) to be used by Windows or by processes launched by users.
There are two types of environmental variables:
 User Variables : Specific to a particular Windows user account
 System variables : For all the user of the machine
After you’ve installed the Java Environment Kit (JDK) in Windows, you must set
the JAVA_HOME environment variable to point to the JDK installation directory.
1) Open the Control Panel -> System or Security –> System; the same thing can be done
by right-clicking on ‘MyComputer’ and choosing Properties.
2) Choose ‘Advanced system settings‘.
P a g e 8 | 58
3) Under the Advanced tab Choose the ‘Environment Variable…‘ option.
4) Select New In the System variables.
P a g e 9 | 58
5) Define the Variable name as ‘JAVA_HOME‘ and Variable value as ‘C:Program
FilesJavajdk1.8.0_45‘ (for this example JDK version 1.8.0 was installed in
‘C:Program FilesJavajdk1.8.0_45‘ folder; if needed, modify this value to reflect the
real location).
Note: Look at the previous chapter ‘Install the Java Development Kit’ to check the location of
the JDK installation.
6) Now we need to specify the location in the PATH variable. For PATH, most probably it
will already exists in your machine. So just select it and choose the Edit option.
P a g e 10 | 58
7) In the editor add the value ‘;%JAVA_HOME%bin‘ or ‘;C:Program
FilesJavajdk1.8.0_45bin‘.
Note: The new values are separated by a semicolon from the existing ones and be careful and
do not make any changes in the existing string, as it is a very sensitive information.
8) Now go to Start and type cmd in the Run and hit Enter. It will launch the Command
Prompt. Type ‘java -version‘, it will display the following information.
P a g e 11 | 58
Step 3: Install Android Studio on Windows
Android Studio is Google's officially supported IDE for developing Android apps. Android
Studio is freely available under Apache License 2.0. The most recent stable version is 2.1.1 .
1. Navigate tothe Android Studio Download to download AndroidStudio. If youare new
to installingAndroidStudioonwindows, youwillfindafile,whichisnamedas android-studio-
bundle-143.3101438-windows.exe.Sojustdownloadandrunon windowsmachine according
to android studio wizard guideline.
2. Launch the downloaded Android Studio.exe
3. Once you launched Android Studio, its time to mention JDK7 path or
later version in android studio installer.
P a g e 12 | 58
4. Below the image initiating JDK to android SDK
5. Need to check the components, which are required to create
applications, below the image has selected Android Studio, Android
SDK, Android Virtual Machine and performance (Intel chip).
P a g e 13 | 58
6. Need to specify the location of local machine path for Android studio and
Android SDK
7. Need to specify the ram space for Android emulator by default it would
take 512MB of local machine RAM.
P a g e 14 | 58
8. At final stage, it would extract SDK packages into our local machine, it
would take a while time to finish the task and would take 2626MB of
Hard disk space.
9. After done all above steps perfectly, you must get finish button and it
gonna be open android studio project with Welcome to android studio
message as shown below
P a g e 15 | 58
Step 4: Download and Install NodeJs.
Appium is an HTTP server written in node.js which creates and handles multiple
WebDriver sessions for different platforms like iOS and Android. Automating hybrid
and native mobile applications for Android and iOS is a key function handled by
Appium, a node.js server. One of the core tenets of Appium is that test codes can be
written in any framework or language like Ruby on Rails, C# and Java without having
to modify the apps for automation purposes. The interaction between node.js server
and Selenium client libraries is what ultimately works together with the mobile
application.
I. Visit the Node.JS website to download Node.JS. Scroll down little bit to find
the correct installer for your OS version.
II. The File Download dialog box appears prompting you to Save the download file.
P a g e 16 | 58
III. Once the downloading is complete, double click the file to begin the
installation of Node.JS.
IV. To run the installer, click Run.
P a g e 17 | 58
V. The installation process starts. Click the Next button to continue the
installation.
VI. Select the radio button to “Accept the terms in the License Agreement”
and click on Next to proceed.
P a g e 18 | 58
VII. During the initial installation, window will ask you where you want to install
the files. You can choose to change where you want to keep your folder but
it’s best to stick with what you were given first. Click Next to continue.
VIII. On the next screen you will encounter some options. Just leave these alone
and click Next unless you know what you are doing.
P a g e 19 | 58
IX. Click on Next to start the main installation.
X. Let the installation finish and now take the last steps of the installation
process; click Close on the last dialog. This will complete Java installation
process.
P a g e 20 | 58
Step 5: Install Microsoft .net Framework
1) To Install Microsoft .net Framework, visit the Microsoft Download
Center website to find the .Net Framework download.
2) Ignore suggestions and click on ‘No Thanks and Continue‘.
3) The File Download dialog box appears prompting you to Save the
download file.
P a g e 21 | 58
4) Once the downloading is complete, double click the file to begin the
installation of .Net Framework.
5) To run the installer, click Run.
P a g e 22 | 58
6) Accepts the Licence terms and continue with the installation.
7) This will take few minutes to complete as per the speed of your
system. Once done, click on Finish.
P a g e 23 | 58
Step 6: Download And Install Appium Desktop Client
1) Visit the Appium Download page to install the Appium Desktop
client. Click on Appium.exe for Windows to download the ‘.exe‘ file
for Appium.
2) Go with the latest version of Appium.
Note: As of 6th June’15, the latest version is 1.4
P a g e 24 | 58
3) The File Download dialog box appears prompting you to Save the Zip file.
4) Unzip the Zip file and extract the Appium folder on the same location to
access the .exe file. Double click on the Appium folder.
5) Double click the Appium Installer to start the installation process. A pop
up window will display to select the appropriate language. Leave it as it is and
click on OK.
P a g e 25 | 58
6) The installation process starts. Click the Next button to continue the
installation.
After the initial installation is done, window will ask you where you want to install
the Appium. You can choose to change where you want to keep your folder but it’s
best to stick with what you were given first. Click Next to continue.
P a g e 26 | 58
7) Leave this as it is and click Next.
8) If you wish to have a shortcut desktop icon for Appium, select the option for
‘Create a desktop icon‘ and click Next.
P a g e 27 | 58
9) Click on Install to initiate the final installation.
10) Select the check box for Launch Appium and click on Finish.
P a g e 28 | 58
11) Appium will open up, once the installation is finished with the below
message.
Note: I will suggest you to restart you machine now, or wait for next installation of
Eclipse but make sure you restart your machine before the running the first test.
Step 7: Enabling Developer Mode Options on Android Phone or Tablet
Enabling DeveloperMode Options on Android Phone or Tablet
This is two step process , first step is to Enabling Developer Mode Options on
Android Phone or Tablet and second is to Switch On the USB Debugging of the
device. Let’s see how to do both of the activities in the below tutorial.
Enable Developer Options
1) Tap on the Main Menu icon.
P a g e 29 | 58
2) Go to the Settings.
3) Scroll down to ‘About phone‘ and tap on it.
P a g e 30 | 58
4) Scroll down to the bottom again, where you see ‘Build number’ (Your build
number may vary). Tap On Build number Seven (7) times. After the third tap,
you’ll see a playful dialog that says you’re four taps away from being a
developer. Keep on tapping, and *poof*, you’ve got the developer settings
options.
5) You can notice the Developer Options on your screen now.
P a g e 31 | 58
Switch On USB Debugging
1) Go to the Developer Options.
2) Tick the USB Debugging check box.
P a g e 32 | 58
3) It may display the Pop Up message, if Yes simply click OK.
4) And it’s done, you can see the USB Debugging is ON now.
P a g e 33 | 58
Step 8: Install PdaNet to Connect with Android Device
What is PdaNet+
PdaNet is a free app (available for iPhone, Android, BlackBerry, and other mobile platforms)
that you can use to turn your smartphone into a modem for your laptop or you can say that
it enables tethering. But we do not need this software to enable tethering but this application
will help us to connect our computer with the mobile devices using USB cables. To use
the PdaNet app for connecting your Android phone, you need to install the app on both your
Android phone and also install the software on the Windows computer (Windows XP, Vista,
Windows 7 — 32-bit and 64-bit versions available) or Mac OS.
How to Install PdaNet to Connect with Android Device
Read the simple step by step guide below to install the software on your computer and
hopefully this installation will automatically install the same app on your device as well. It
won’t get any simpler guide than this one for installing your Android drivers.
1) Download PdaNet from http://pdanet.co/a/.
2) Click on Save File button to save the ‘.exe‘ file on your computer.
P a g e 34 | 58
3) Double click the file you just downloaded to start the process if installation.
4) To run the installer, click Run.
P a g e 35 | 58
5) You may or may not receive this page from the Anti Virus program installed on
your system. Just allow this, as it is safe to use.
Note: If not the above window, A scary warning in red will appear saying that Windows
couldn’t verify the publisher of the software. Click on “Install this Driver Software
anyway“. This warning may appear multiple times, keep clicking on install drivers
anyway until it stops appearing.
6) Don’t connect your device until I say that!. The installation process starts. Click
the Next button to continue the installation.
P a g e 36 | 58
7) Select the ‘I accept the agreement‘ radio button and proceed with the
installation.
8) Click on Next >
P a g e 37 | 58
9) Just leave these alone and click Next.
10) Skip to the next step if this one doesn’t apply to you. If you already tried installing
some drivers, it will ask you if you want to uninstall currently installed drivers and
install them using pdanet. Click Yes there. Clearly put, if it asks you to overwrite
previous installation of drivers, or anything like that, you have to press Yes.
P a g e 38 | 58
11) I assume that your your device is not connected with the USB to your machine.
Select your device make and proceed by clicking OK button.
Note: All Indian Device manufacturers like Karbonn, Micromax, Spice, Lava and
every other brand not listed in the options that appear fall in the others category.
12) Now it will ask you to install Google USB Android Phone,
please click on Install.
P a g e 39 | 58
13) Once you get this window, Now you have to connect your device to your
PC/ Laptop using USB cable. After connecting your device with USB, give it some
time and this window will close automatically.
Note: Don’t enable any modes like: USB storage or tethering. Just let the driver
installation complete.
14) Check you device screen, you should get this screen on your device. Select the
‘Always all from this computer‘ check box and tap OK on your mobile device.
Note: You will notice that PdaNet is also installed on your device as well, you must
see the App icon on your screen.
P a g e 40 | 58
15) Installation is done on your computer and your device is also attached with your
computer. Happily click on Finish.
Steps to check that if the Device is connected correctly
There are two ways to check the connectivity of your device with your computer via
data cable:
 Through Command Prompt
 Through Device Manager
Command Prompt
1) Go to Run and type ‘cmd’ for opening the Command Prompt interface.
2) Type ‘adb devices‘ in the window.
This will display all the list of android devices attached to your computer. Don’t
worry about the name, as it displays the binary name of your device.
P a g e 41 | 58
Step 9: Install Eclipse IDE And Set up a Project
Steps to Download and Install Eclipse IDE
Go to http://www.eclipse.org/downloads.
2) For Windows users, you will have to know what type of version of your OS you
have. If your computer is a 64 bit Windows , select Windows 64 and if you have
a 32 bitWindows, select Windows 32 bit.
P a g e 42 | 58
3) Save the .zip file to your disk.
4) Once you have downloaded the Eclipse archive you will need to Extract the zip
file, which will create the unzipped Eclipse folder. You may want to Extract the archive
to the root of C: drive, thus creating the folder “C:eclipse”, or just moved the
extracted eclipse folder to the root of C: drive if you extracted it already.
5) Open the eclipse folder from the location where you have saved it. I have kept it
on C drive.
P a g e 43 | 58
6) Since Eclipse IDE does not have any installer, there will be a file inside the Eclipse
folder named eclipse.exe. You can double click on the file to run Eclipse.
Note: This step is not required, but it’s strongly recommended. Right-click the Eclipse
Icon and press “Send To” -> “Desktop (Create Shortcut).” Now you will be able to
launch Eclipse from your desktop.
Steps to Set Up First Eclipse Project
Create a “working directory” for all of your projects. Think of it like “My
Documents” in the Windows operating system. It’s a folder which contains a lot of
your documents, but there’s nothing to prevent you from creating another folder called
“My Other Documents” (for instance) to house other documents.
Typically you only need one workspace, and you can think of it as your “My
Documents” for Java code. If you wanted to, you could have more than one, but
chances are you won’t have a use for more. To keep it simple we will go with default
settings and once you are comfortable with Eclipse, You can change it later on from
‘Switch Workspace‘ under ‘File‘ menu of eclipse. After selecting workspace folder,
Eclipse will be open.
Step 1: Select WorkSpace on Eclipse start up
a) Create a workspace folder where you will contain all the program files you create.
You can choose whatever place you want for your workspace, but it’s easiest to just
use the default you’re given.
P a g e 44 | 58
b) You may see the window like this, this is the Welcome window for Eclipse. You
may close this window.
Step 2: Create a new Project
Projects: A collection of related code. Generally speaking, each project encompasses one
independent program. Each programming assignment you do will typically require its own
project.
Once you’ve established your workspace, you’ll want to create a project and begin writing
code. In Eclipse, projects are the next-smallest functional unit after workspaces, but where
you might have only one workspace, you will usually have several projects inside one
workspace.
a) Create new Java Project from File > New > Project.
P a g e 45 | 58
b) Give your Project name ‘AppiumTestProject‘ as shown in below given screenshot.
Click on Finish button.
b) In case you have selected Next instead of FInish in the previous step, you will
get this below window. Click on Finish this time and you are done with the
project creation.
P a g e 46 | 58
Note: You may or may not see this message but if in case you get any,
check Remember my decision and click on Yes.
Create a new Package
a) Right click on folder ‘src‘ and select New > Package.
a) Give your Package name ‘amazon‘ and click on Finish button.
P a g e 47 | 58
Create a new Class
Now that you have a project set up, you’re going to start writing some new classes.
a) Right click on Package ‘amazon‘ and select New > Class.
b) Give your Class name ‘StartApplication‘, check the option ‘public static void
main‘ and click on Finish button. This will bring up totally a sweet class
creation window.
Note: In case of not creating class for Main test case, please do not click ‘public static
void main’. We need to select it only in case of writing test cases which we are going
to execute and from where we call other classes. This will be our main method or a
starting point to test. For functional classes we don’t need this to be checked.
P a g e 48 | 58
b) Now your Eclipse window will looks like bellow.
Step 10: Set Up Appium Project in Eclipse
Following steps needs to be done to Set Up Appium Project in Eclipse and before
running first Appium Mobile Automation script:
 Download GSon jar files
 Download Selenium WebDriver Java Client
 Add Gson jars to Project
 Add Selenium Jars to project
 Add Java Client to project
Download GSon Jar file
1) Visit the GSon Download Website to download the GSon latest version.
P a g e 49 | 58
2) It may give you a warning message that GSon file has been deprecated, but
no worries just go ahead with this and Save it on your machine.
3) Click on OK to Save the zip file to your disk.
P a g e 50 | 58
4) Once you have downloaded the ZIp archive you will need to Extract the zip
file to add these Jars to the Eclipse Appium project.
Download Selenium WebDriver Java client
Selenium WebDriver supports many languages and each language has its own
client driver. Here we are configuring selenium 2 with java so we need ‘webdriver
Java client driver’.
1. Click here to go on WebDriver Java client driver download page for
WebDriver download file. On that page click on ‘Download‘ link of java client
driver as shown in the below image.
Note: As of 7th June’15, the latest version is 2.45
P a g e 51 | 58
2. Save the zip file to your disk.
3) Once you have downloaded the archive you will need to Extract the zip file, which
will create the unzipped Selenium Java folder.
P a g e 52 | 58
5) Once the extraction process is complete, Open the Selenium folder.
6) There will be ‘libs’ folder, 2 jar files and change log in unzipped folder as
shown in bellow figure. We will use all these files for configuring WebDriver in
Eclipse.
Add External Jars to Java build path
Now you need to add Selenium WebDriver’s & GSon jar files in to Java build
path.
P a g e 53 | 58
a) Right click on Project ‘AppiumTestProject‘ > Select Properties > Java
build path. Then navigate to Libraries tab and click Add External JARs.
b) Add GSon jars, you may add the source file too.
P a g e 54 | 58
c) Now again click on Add External JARs and Add Java Client jar.
d) Click on Add External JARs again to Add all the jars available in
the libs folder of Selenium-2.45.0 as well.
P a g e 55 | 58
e) Add Selenium Java jar, you may add the source file too.
f) Click OK.
P a g e 56 | 58
Step 11: First Appium Test to Launch Amazon App
Finally the times come, when we will write our First Appium Test to Launch Amazon
App. This will include following steps:
 Launch Appium Node server
 Create your first test script
 Execute your first test
Launch Appium Node Server
1) I am expecting that your Appium window is already opened on your machine.
If you have restarted your system then please start Appium by navigate
to Appium directory in your system and start Appium by double
clicking Appium.exe file.
1. Android Icon is for Configuration settings
2. Settings Icon is for General Settings
3. Play Icon is for Starting Node server
P a g e 57 | 58
2) Click on Android icon to open the configuration of the Appium run. There you
need to select the check box of ‘No Reset‘. This will ensure that the Appium will
not install or uninstall App on every run.
3) Click on General Setting icon and make sure that Server Address and Port is
populated.
Note: Do not alter the IP address or port number. Your Appium console start
at 127.0.0.1:4723 as shown in below.
P a g e 58 | 58
4) Now its time to start the Appium server, juct click on the Launch Appium
Node Server button on the top right corner of Appium window and wait for
few seconds.Appium server started and running on your system.

Weitere ähnliche Inhalte

Kürzlich hochgeladen

WSO2CON 2024 Slides - Unlocking Value with AI
WSO2CON 2024 Slides - Unlocking Value with AIWSO2CON 2024 Slides - Unlocking Value with AI
WSO2CON 2024 Slides - Unlocking Value with AIWSO2
 
Devoxx UK 2024 - Going serverless with Quarkus, GraalVM native images and AWS...
Devoxx UK 2024 - Going serverless with Quarkus, GraalVM native images and AWS...Devoxx UK 2024 - Going serverless with Quarkus, GraalVM native images and AWS...
Devoxx UK 2024 - Going serverless with Quarkus, GraalVM native images and AWS...Bert Jan Schrijver
 
Love witchcraft +27768521739 Binding love spell in Sandy Springs, GA |psychic...
Love witchcraft +27768521739 Binding love spell in Sandy Springs, GA |psychic...Love witchcraft +27768521739 Binding love spell in Sandy Springs, GA |psychic...
Love witchcraft +27768521739 Binding love spell in Sandy Springs, GA |psychic...chiefasafspells
 
WSO2Con2024 - WSO2's IAM Vision: Identity-Led Digital Transformation
WSO2Con2024 - WSO2's IAM Vision: Identity-Led Digital TransformationWSO2Con2024 - WSO2's IAM Vision: Identity-Led Digital Transformation
WSO2Con2024 - WSO2's IAM Vision: Identity-Led Digital TransformationWSO2
 
Direct Style Effect Systems - The Print[A] Example - A Comprehension Aid
Direct Style Effect Systems -The Print[A] Example- A Comprehension AidDirect Style Effect Systems -The Print[A] Example- A Comprehension Aid
Direct Style Effect Systems - The Print[A] Example - A Comprehension AidPhilip Schwarz
 
WSO2CON 2024 - WSO2's Digital Transformation Journey with Choreo: A Platforml...
WSO2CON 2024 - WSO2's Digital Transformation Journey with Choreo: A Platforml...WSO2CON 2024 - WSO2's Digital Transformation Journey with Choreo: A Platforml...
WSO2CON 2024 - WSO2's Digital Transformation Journey with Choreo: A Platforml...WSO2
 
AI & Machine Learning Presentation Template
AI & Machine Learning Presentation TemplateAI & Machine Learning Presentation Template
AI & Machine Learning Presentation TemplatePresentation.STUDIO
 
%in Rustenburg+277-882-255-28 abortion pills for sale in Rustenburg
%in Rustenburg+277-882-255-28 abortion pills for sale in Rustenburg%in Rustenburg+277-882-255-28 abortion pills for sale in Rustenburg
%in Rustenburg+277-882-255-28 abortion pills for sale in Rustenburgmasabamasaba
 
%in Bahrain+277-882-255-28 abortion pills for sale in Bahrain
%in Bahrain+277-882-255-28 abortion pills for sale in Bahrain%in Bahrain+277-882-255-28 abortion pills for sale in Bahrain
%in Bahrain+277-882-255-28 abortion pills for sale in Bahrainmasabamasaba
 
WSO2CON 2024 Slides - Open Source to SaaS
WSO2CON 2024 Slides - Open Source to SaaSWSO2CON 2024 Slides - Open Source to SaaS
WSO2CON 2024 Slides - Open Source to SaaSWSO2
 
%+27788225528 love spells in Colorado Springs Psychic Readings, Attraction sp...
%+27788225528 love spells in Colorado Springs Psychic Readings, Attraction sp...%+27788225528 love spells in Colorado Springs Psychic Readings, Attraction sp...
%+27788225528 love spells in Colorado Springs Psychic Readings, Attraction sp...masabamasaba
 
%in tembisa+277-882-255-28 abortion pills for sale in tembisa
%in tembisa+277-882-255-28 abortion pills for sale in tembisa%in tembisa+277-882-255-28 abortion pills for sale in tembisa
%in tembisa+277-882-255-28 abortion pills for sale in tembisamasabamasaba
 
%+27788225528 love spells in Toronto Psychic Readings, Attraction spells,Brin...
%+27788225528 love spells in Toronto Psychic Readings, Attraction spells,Brin...%+27788225528 love spells in Toronto Psychic Readings, Attraction spells,Brin...
%+27788225528 love spells in Toronto Psychic Readings, Attraction spells,Brin...masabamasaba
 
WSO2CON 2024 - Does Open Source Still Matter?
WSO2CON 2024 - Does Open Source Still Matter?WSO2CON 2024 - Does Open Source Still Matter?
WSO2CON 2024 - Does Open Source Still Matter?WSO2
 
%+27788225528 love spells in new york Psychic Readings, Attraction spells,Bri...
%+27788225528 love spells in new york Psychic Readings, Attraction spells,Bri...%+27788225528 love spells in new york Psychic Readings, Attraction spells,Bri...
%+27788225528 love spells in new york Psychic Readings, Attraction spells,Bri...masabamasaba
 
WSO2Con2024 - From Blueprint to Brilliance: WSO2's Guide to API-First Enginee...
WSO2Con2024 - From Blueprint to Brilliance: WSO2's Guide to API-First Enginee...WSO2Con2024 - From Blueprint to Brilliance: WSO2's Guide to API-First Enginee...
WSO2Con2024 - From Blueprint to Brilliance: WSO2's Guide to API-First Enginee...WSO2
 
WSO2CON2024 - It's time to go Platformless
WSO2CON2024 - It's time to go PlatformlessWSO2CON2024 - It's time to go Platformless
WSO2CON2024 - It's time to go PlatformlessWSO2
 
Artyushina_Guest lecture_YorkU CS May 2024.pptx
Artyushina_Guest lecture_YorkU CS May 2024.pptxArtyushina_Guest lecture_YorkU CS May 2024.pptx
Artyushina_Guest lecture_YorkU CS May 2024.pptxAnnaArtyushina1
 

Kürzlich hochgeladen (20)

WSO2CON 2024 Slides - Unlocking Value with AI
WSO2CON 2024 Slides - Unlocking Value with AIWSO2CON 2024 Slides - Unlocking Value with AI
WSO2CON 2024 Slides - Unlocking Value with AI
 
Devoxx UK 2024 - Going serverless with Quarkus, GraalVM native images and AWS...
Devoxx UK 2024 - Going serverless with Quarkus, GraalVM native images and AWS...Devoxx UK 2024 - Going serverless with Quarkus, GraalVM native images and AWS...
Devoxx UK 2024 - Going serverless with Quarkus, GraalVM native images and AWS...
 
Love witchcraft +27768521739 Binding love spell in Sandy Springs, GA |psychic...
Love witchcraft +27768521739 Binding love spell in Sandy Springs, GA |psychic...Love witchcraft +27768521739 Binding love spell in Sandy Springs, GA |psychic...
Love witchcraft +27768521739 Binding love spell in Sandy Springs, GA |psychic...
 
WSO2Con2024 - WSO2's IAM Vision: Identity-Led Digital Transformation
WSO2Con2024 - WSO2's IAM Vision: Identity-Led Digital TransformationWSO2Con2024 - WSO2's IAM Vision: Identity-Led Digital Transformation
WSO2Con2024 - WSO2's IAM Vision: Identity-Led Digital Transformation
 
Direct Style Effect Systems - The Print[A] Example - A Comprehension Aid
Direct Style Effect Systems -The Print[A] Example- A Comprehension AidDirect Style Effect Systems -The Print[A] Example- A Comprehension Aid
Direct Style Effect Systems - The Print[A] Example - A Comprehension Aid
 
Abortion Pill Prices Tembisa [(+27832195400*)] 🏥 Women's Abortion Clinic in T...
Abortion Pill Prices Tembisa [(+27832195400*)] 🏥 Women's Abortion Clinic in T...Abortion Pill Prices Tembisa [(+27832195400*)] 🏥 Women's Abortion Clinic in T...
Abortion Pill Prices Tembisa [(+27832195400*)] 🏥 Women's Abortion Clinic in T...
 
Abortion Pills In Pretoria ](+27832195400*)[ 🏥 Women's Abortion Clinic In Pre...
Abortion Pills In Pretoria ](+27832195400*)[ 🏥 Women's Abortion Clinic In Pre...Abortion Pills In Pretoria ](+27832195400*)[ 🏥 Women's Abortion Clinic In Pre...
Abortion Pills In Pretoria ](+27832195400*)[ 🏥 Women's Abortion Clinic In Pre...
 
WSO2CON 2024 - WSO2's Digital Transformation Journey with Choreo: A Platforml...
WSO2CON 2024 - WSO2's Digital Transformation Journey with Choreo: A Platforml...WSO2CON 2024 - WSO2's Digital Transformation Journey with Choreo: A Platforml...
WSO2CON 2024 - WSO2's Digital Transformation Journey with Choreo: A Platforml...
 
AI & Machine Learning Presentation Template
AI & Machine Learning Presentation TemplateAI & Machine Learning Presentation Template
AI & Machine Learning Presentation Template
 
%in Rustenburg+277-882-255-28 abortion pills for sale in Rustenburg
%in Rustenburg+277-882-255-28 abortion pills for sale in Rustenburg%in Rustenburg+277-882-255-28 abortion pills for sale in Rustenburg
%in Rustenburg+277-882-255-28 abortion pills for sale in Rustenburg
 
%in Bahrain+277-882-255-28 abortion pills for sale in Bahrain
%in Bahrain+277-882-255-28 abortion pills for sale in Bahrain%in Bahrain+277-882-255-28 abortion pills for sale in Bahrain
%in Bahrain+277-882-255-28 abortion pills for sale in Bahrain
 
WSO2CON 2024 Slides - Open Source to SaaS
WSO2CON 2024 Slides - Open Source to SaaSWSO2CON 2024 Slides - Open Source to SaaS
WSO2CON 2024 Slides - Open Source to SaaS
 
%+27788225528 love spells in Colorado Springs Psychic Readings, Attraction sp...
%+27788225528 love spells in Colorado Springs Psychic Readings, Attraction sp...%+27788225528 love spells in Colorado Springs Psychic Readings, Attraction sp...
%+27788225528 love spells in Colorado Springs Psychic Readings, Attraction sp...
 
%in tembisa+277-882-255-28 abortion pills for sale in tembisa
%in tembisa+277-882-255-28 abortion pills for sale in tembisa%in tembisa+277-882-255-28 abortion pills for sale in tembisa
%in tembisa+277-882-255-28 abortion pills for sale in tembisa
 
%+27788225528 love spells in Toronto Psychic Readings, Attraction spells,Brin...
%+27788225528 love spells in Toronto Psychic Readings, Attraction spells,Brin...%+27788225528 love spells in Toronto Psychic Readings, Attraction spells,Brin...
%+27788225528 love spells in Toronto Psychic Readings, Attraction spells,Brin...
 
WSO2CON 2024 - Does Open Source Still Matter?
WSO2CON 2024 - Does Open Source Still Matter?WSO2CON 2024 - Does Open Source Still Matter?
WSO2CON 2024 - Does Open Source Still Matter?
 
%+27788225528 love spells in new york Psychic Readings, Attraction spells,Bri...
%+27788225528 love spells in new york Psychic Readings, Attraction spells,Bri...%+27788225528 love spells in new york Psychic Readings, Attraction spells,Bri...
%+27788225528 love spells in new york Psychic Readings, Attraction spells,Bri...
 
WSO2Con2024 - From Blueprint to Brilliance: WSO2's Guide to API-First Enginee...
WSO2Con2024 - From Blueprint to Brilliance: WSO2's Guide to API-First Enginee...WSO2Con2024 - From Blueprint to Brilliance: WSO2's Guide to API-First Enginee...
WSO2Con2024 - From Blueprint to Brilliance: WSO2's Guide to API-First Enginee...
 
WSO2CON2024 - It's time to go Platformless
WSO2CON2024 - It's time to go PlatformlessWSO2CON2024 - It's time to go Platformless
WSO2CON2024 - It's time to go Platformless
 
Artyushina_Guest lecture_YorkU CS May 2024.pptx
Artyushina_Guest lecture_YorkU CS May 2024.pptxArtyushina_Guest lecture_YorkU CS May 2024.pptx
Artyushina_Guest lecture_YorkU CS May 2024.pptx
 

Empfohlen

2024 State of Marketing Report – by Hubspot
2024 State of Marketing Report – by Hubspot2024 State of Marketing Report – by Hubspot
2024 State of Marketing Report – by HubspotMarius Sescu
 
Everything You Need To Know About ChatGPT
Everything You Need To Know About ChatGPTEverything You Need To Know About ChatGPT
Everything You Need To Know About ChatGPTExpeed Software
 
Product Design Trends in 2024 | Teenage Engineerings
Product Design Trends in 2024 | Teenage EngineeringsProduct Design Trends in 2024 | Teenage Engineerings
Product Design Trends in 2024 | Teenage EngineeringsPixeldarts
 
How Race, Age and Gender Shape Attitudes Towards Mental Health
How Race, Age and Gender Shape Attitudes Towards Mental HealthHow Race, Age and Gender Shape Attitudes Towards Mental Health
How Race, Age and Gender Shape Attitudes Towards Mental HealthThinkNow
 
AI Trends in Creative Operations 2024 by Artwork Flow.pdf
AI Trends in Creative Operations 2024 by Artwork Flow.pdfAI Trends in Creative Operations 2024 by Artwork Flow.pdf
AI Trends in Creative Operations 2024 by Artwork Flow.pdfmarketingartwork
 
PEPSICO Presentation to CAGNY Conference Feb 2024
PEPSICO Presentation to CAGNY Conference Feb 2024PEPSICO Presentation to CAGNY Conference Feb 2024
PEPSICO Presentation to CAGNY Conference Feb 2024Neil Kimberley
 
Content Methodology: A Best Practices Report (Webinar)
Content Methodology: A Best Practices Report (Webinar)Content Methodology: A Best Practices Report (Webinar)
Content Methodology: A Best Practices Report (Webinar)contently
 
How to Prepare For a Successful Job Search for 2024
How to Prepare For a Successful Job Search for 2024How to Prepare For a Successful Job Search for 2024
How to Prepare For a Successful Job Search for 2024Albert Qian
 
Social Media Marketing Trends 2024 // The Global Indie Insights
Social Media Marketing Trends 2024 // The Global Indie InsightsSocial Media Marketing Trends 2024 // The Global Indie Insights
Social Media Marketing Trends 2024 // The Global Indie InsightsKurio // The Social Media Age(ncy)
 
Trends In Paid Search: Navigating The Digital Landscape In 2024
Trends In Paid Search: Navigating The Digital Landscape In 2024Trends In Paid Search: Navigating The Digital Landscape In 2024
Trends In Paid Search: Navigating The Digital Landscape In 2024Search Engine Journal
 
5 Public speaking tips from TED - Visualized summary
5 Public speaking tips from TED - Visualized summary5 Public speaking tips from TED - Visualized summary
5 Public speaking tips from TED - Visualized summarySpeakerHub
 
ChatGPT and the Future of Work - Clark Boyd
ChatGPT and the Future of Work - Clark Boyd ChatGPT and the Future of Work - Clark Boyd
ChatGPT and the Future of Work - Clark Boyd Clark Boyd
 
Getting into the tech field. what next
Getting into the tech field. what next Getting into the tech field. what next
Getting into the tech field. what next Tessa Mero
 
Google's Just Not That Into You: Understanding Core Updates & Search Intent
Google's Just Not That Into You: Understanding Core Updates & Search IntentGoogle's Just Not That Into You: Understanding Core Updates & Search Intent
Google's Just Not That Into You: Understanding Core Updates & Search IntentLily Ray
 
Time Management & Productivity - Best Practices
Time Management & Productivity -  Best PracticesTime Management & Productivity -  Best Practices
Time Management & Productivity - Best PracticesVit Horky
 
The six step guide to practical project management
The six step guide to practical project managementThe six step guide to practical project management
The six step guide to practical project managementMindGenius
 
Beginners Guide to TikTok for Search - Rachel Pearson - We are Tilt __ Bright...
Beginners Guide to TikTok for Search - Rachel Pearson - We are Tilt __ Bright...Beginners Guide to TikTok for Search - Rachel Pearson - We are Tilt __ Bright...
Beginners Guide to TikTok for Search - Rachel Pearson - We are Tilt __ Bright...RachelPearson36
 

Empfohlen (20)

2024 State of Marketing Report – by Hubspot
2024 State of Marketing Report – by Hubspot2024 State of Marketing Report – by Hubspot
2024 State of Marketing Report – by Hubspot
 
Everything You Need To Know About ChatGPT
Everything You Need To Know About ChatGPTEverything You Need To Know About ChatGPT
Everything You Need To Know About ChatGPT
 
Product Design Trends in 2024 | Teenage Engineerings
Product Design Trends in 2024 | Teenage EngineeringsProduct Design Trends in 2024 | Teenage Engineerings
Product Design Trends in 2024 | Teenage Engineerings
 
How Race, Age and Gender Shape Attitudes Towards Mental Health
How Race, Age and Gender Shape Attitudes Towards Mental HealthHow Race, Age and Gender Shape Attitudes Towards Mental Health
How Race, Age and Gender Shape Attitudes Towards Mental Health
 
AI Trends in Creative Operations 2024 by Artwork Flow.pdf
AI Trends in Creative Operations 2024 by Artwork Flow.pdfAI Trends in Creative Operations 2024 by Artwork Flow.pdf
AI Trends in Creative Operations 2024 by Artwork Flow.pdf
 
Skeleton Culture Code
Skeleton Culture CodeSkeleton Culture Code
Skeleton Culture Code
 
PEPSICO Presentation to CAGNY Conference Feb 2024
PEPSICO Presentation to CAGNY Conference Feb 2024PEPSICO Presentation to CAGNY Conference Feb 2024
PEPSICO Presentation to CAGNY Conference Feb 2024
 
Content Methodology: A Best Practices Report (Webinar)
Content Methodology: A Best Practices Report (Webinar)Content Methodology: A Best Practices Report (Webinar)
Content Methodology: A Best Practices Report (Webinar)
 
How to Prepare For a Successful Job Search for 2024
How to Prepare For a Successful Job Search for 2024How to Prepare For a Successful Job Search for 2024
How to Prepare For a Successful Job Search for 2024
 
Social Media Marketing Trends 2024 // The Global Indie Insights
Social Media Marketing Trends 2024 // The Global Indie InsightsSocial Media Marketing Trends 2024 // The Global Indie Insights
Social Media Marketing Trends 2024 // The Global Indie Insights
 
Trends In Paid Search: Navigating The Digital Landscape In 2024
Trends In Paid Search: Navigating The Digital Landscape In 2024Trends In Paid Search: Navigating The Digital Landscape In 2024
Trends In Paid Search: Navigating The Digital Landscape In 2024
 
5 Public speaking tips from TED - Visualized summary
5 Public speaking tips from TED - Visualized summary5 Public speaking tips from TED - Visualized summary
5 Public speaking tips from TED - Visualized summary
 
ChatGPT and the Future of Work - Clark Boyd
ChatGPT and the Future of Work - Clark Boyd ChatGPT and the Future of Work - Clark Boyd
ChatGPT and the Future of Work - Clark Boyd
 
Getting into the tech field. what next
Getting into the tech field. what next Getting into the tech field. what next
Getting into the tech field. what next
 
Google's Just Not That Into You: Understanding Core Updates & Search Intent
Google's Just Not That Into You: Understanding Core Updates & Search IntentGoogle's Just Not That Into You: Understanding Core Updates & Search Intent
Google's Just Not That Into You: Understanding Core Updates & Search Intent
 
How to have difficult conversations
How to have difficult conversations How to have difficult conversations
How to have difficult conversations
 
Introduction to Data Science
Introduction to Data ScienceIntroduction to Data Science
Introduction to Data Science
 
Time Management & Productivity - Best Practices
Time Management & Productivity -  Best PracticesTime Management & Productivity -  Best Practices
Time Management & Productivity - Best Practices
 
The six step guide to practical project management
The six step guide to practical project managementThe six step guide to practical project management
The six step guide to practical project management
 
Beginners Guide to TikTok for Search - Rachel Pearson - We are Tilt __ Bright...
Beginners Guide to TikTok for Search - Rachel Pearson - We are Tilt __ Bright...Beginners Guide to TikTok for Search - Rachel Pearson - We are Tilt __ Bright...
Beginners Guide to TikTok for Search - Rachel Pearson - We are Tilt __ Bright...
 

Appium installation document

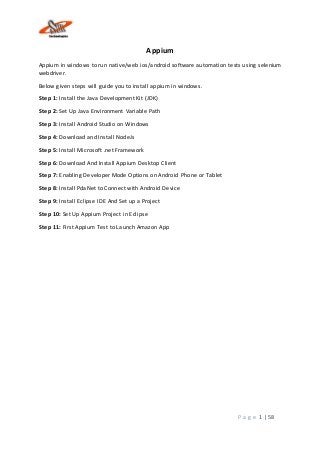
  • 1. P a g e 1 | 58 Appium Appium in windows to run native/web ios/android software automation tests using selenium webdriver. Below given steps will guide you to install appium in windows. Step 1: Install the Java Development Kit (JDK) Step 2: Set Up Java Environment Variable Path Step 3: Install Android Studio on Windows Step 4: Download and Install NodeJs Step 5: Install Microsoft .net Framework Step 6: Download And Install Appium Desktop Client Step 7: Enabling Developer Mode Options on Android Phone or Tablet Step 8: Install PdaNet to Connect with Android Device Step 9: Install Eclipse IDE And Set up a Project Step 10: Set Up Appium Project in Eclipse Step 11: First Appium Test to Launch Amazon App
  • 2. P a g e 2 | 58 Step 1: Install the Java Development Kit (JDK) First of all you need to install JDK (Java development kit) in your system. The Java Software Development Kit (Java SDK or JDK) is an application created by Sun Microsystems to create and modify Java programs. So your next question will be “How to download Java or JDK”. Install JDK a. Visit the Java downloads page on Oracle’s website to find the JDK environment download. Scroll down until you find Java SE Latest Version and download JDK.Click on JDK download button as shown in below image.
  • 3. P a g e 3 | 58 b. Select the radio button to “Accept License Agreement” and choose the JDK that corresponds to Windows. c. The File Download dialog box appears prompting you to Save the download file.
  • 4. P a g e 4 | 58 d. To run the installer, click Run. e. The installation process starts. Click the Next button to continue the installation.
  • 5. P a g e 5 | 58 f. On the next screen you will encounter some options. Just leave these alone and click Next unless you know what you are doing. g. After the initial installation is done, a pop up asking you where your source java files will be. You can choose to change where you want to keep your folder but it’s best to stick with what you were given first. Click Next to continue.
  • 6. P a g e 6 | 58 Note: Make a note of this location, as this location of JDK installation will be required to Set up Java Environment Variable h. Let the installation finish. i. A few brief dialogs confirm the last steps of the installation process; click Close on the last dialog. This will complete Java installation process.
  • 7. P a g e 7 | 58 Step 2: Set Up Java Environment Variable Path Environmental variables are used by the operating system to save settings (default values, locations of resources) to be used by Windows or by processes launched by users. There are two types of environmental variables:  User Variables : Specific to a particular Windows user account  System variables : For all the user of the machine After you’ve installed the Java Environment Kit (JDK) in Windows, you must set the JAVA_HOME environment variable to point to the JDK installation directory. 1) Open the Control Panel -> System or Security –> System; the same thing can be done by right-clicking on ‘MyComputer’ and choosing Properties. 2) Choose ‘Advanced system settings‘.
  • 8. P a g e 8 | 58 3) Under the Advanced tab Choose the ‘Environment Variable…‘ option. 4) Select New In the System variables.
  • 9. P a g e 9 | 58 5) Define the Variable name as ‘JAVA_HOME‘ and Variable value as ‘C:Program FilesJavajdk1.8.0_45‘ (for this example JDK version 1.8.0 was installed in ‘C:Program FilesJavajdk1.8.0_45‘ folder; if needed, modify this value to reflect the real location). Note: Look at the previous chapter ‘Install the Java Development Kit’ to check the location of the JDK installation. 6) Now we need to specify the location in the PATH variable. For PATH, most probably it will already exists in your machine. So just select it and choose the Edit option.
  • 10. P a g e 10 | 58 7) In the editor add the value ‘;%JAVA_HOME%bin‘ or ‘;C:Program FilesJavajdk1.8.0_45bin‘. Note: The new values are separated by a semicolon from the existing ones and be careful and do not make any changes in the existing string, as it is a very sensitive information. 8) Now go to Start and type cmd in the Run and hit Enter. It will launch the Command Prompt. Type ‘java -version‘, it will display the following information.
  • 11. P a g e 11 | 58 Step 3: Install Android Studio on Windows Android Studio is Google's officially supported IDE for developing Android apps. Android Studio is freely available under Apache License 2.0. The most recent stable version is 2.1.1 . 1. Navigate tothe Android Studio Download to download AndroidStudio. If youare new to installingAndroidStudioonwindows, youwillfindafile,whichisnamedas android-studio- bundle-143.3101438-windows.exe.Sojustdownloadandrunon windowsmachine according to android studio wizard guideline. 2. Launch the downloaded Android Studio.exe 3. Once you launched Android Studio, its time to mention JDK7 path or later version in android studio installer.
  • 12. P a g e 12 | 58 4. Below the image initiating JDK to android SDK 5. Need to check the components, which are required to create applications, below the image has selected Android Studio, Android SDK, Android Virtual Machine and performance (Intel chip).
  • 13. P a g e 13 | 58 6. Need to specify the location of local machine path for Android studio and Android SDK 7. Need to specify the ram space for Android emulator by default it would take 512MB of local machine RAM.
  • 14. P a g e 14 | 58 8. At final stage, it would extract SDK packages into our local machine, it would take a while time to finish the task and would take 2626MB of Hard disk space. 9. After done all above steps perfectly, you must get finish button and it gonna be open android studio project with Welcome to android studio message as shown below
  • 15. P a g e 15 | 58 Step 4: Download and Install NodeJs. Appium is an HTTP server written in node.js which creates and handles multiple WebDriver sessions for different platforms like iOS and Android. Automating hybrid and native mobile applications for Android and iOS is a key function handled by Appium, a node.js server. One of the core tenets of Appium is that test codes can be written in any framework or language like Ruby on Rails, C# and Java without having to modify the apps for automation purposes. The interaction between node.js server and Selenium client libraries is what ultimately works together with the mobile application. I. Visit the Node.JS website to download Node.JS. Scroll down little bit to find the correct installer for your OS version. II. The File Download dialog box appears prompting you to Save the download file.
  • 16. P a g e 16 | 58 III. Once the downloading is complete, double click the file to begin the installation of Node.JS. IV. To run the installer, click Run.
  • 17. P a g e 17 | 58 V. The installation process starts. Click the Next button to continue the installation. VI. Select the radio button to “Accept the terms in the License Agreement” and click on Next to proceed.
  • 18. P a g e 18 | 58 VII. During the initial installation, window will ask you where you want to install the files. You can choose to change where you want to keep your folder but it’s best to stick with what you were given first. Click Next to continue. VIII. On the next screen you will encounter some options. Just leave these alone and click Next unless you know what you are doing.
  • 19. P a g e 19 | 58 IX. Click on Next to start the main installation. X. Let the installation finish and now take the last steps of the installation process; click Close on the last dialog. This will complete Java installation process.
  • 20. P a g e 20 | 58 Step 5: Install Microsoft .net Framework 1) To Install Microsoft .net Framework, visit the Microsoft Download Center website to find the .Net Framework download. 2) Ignore suggestions and click on ‘No Thanks and Continue‘. 3) The File Download dialog box appears prompting you to Save the download file.
  • 21. P a g e 21 | 58 4) Once the downloading is complete, double click the file to begin the installation of .Net Framework. 5) To run the installer, click Run.
  • 22. P a g e 22 | 58 6) Accepts the Licence terms and continue with the installation. 7) This will take few minutes to complete as per the speed of your system. Once done, click on Finish.
  • 23. P a g e 23 | 58 Step 6: Download And Install Appium Desktop Client 1) Visit the Appium Download page to install the Appium Desktop client. Click on Appium.exe for Windows to download the ‘.exe‘ file for Appium. 2) Go with the latest version of Appium. Note: As of 6th June’15, the latest version is 1.4
  • 24. P a g e 24 | 58 3) The File Download dialog box appears prompting you to Save the Zip file. 4) Unzip the Zip file and extract the Appium folder on the same location to access the .exe file. Double click on the Appium folder. 5) Double click the Appium Installer to start the installation process. A pop up window will display to select the appropriate language. Leave it as it is and click on OK.
  • 25. P a g e 25 | 58 6) The installation process starts. Click the Next button to continue the installation. After the initial installation is done, window will ask you where you want to install the Appium. You can choose to change where you want to keep your folder but it’s best to stick with what you were given first. Click Next to continue.
  • 26. P a g e 26 | 58 7) Leave this as it is and click Next. 8) If you wish to have a shortcut desktop icon for Appium, select the option for ‘Create a desktop icon‘ and click Next.
  • 27. P a g e 27 | 58 9) Click on Install to initiate the final installation. 10) Select the check box for Launch Appium and click on Finish.
  • 28. P a g e 28 | 58 11) Appium will open up, once the installation is finished with the below message. Note: I will suggest you to restart you machine now, or wait for next installation of Eclipse but make sure you restart your machine before the running the first test. Step 7: Enabling Developer Mode Options on Android Phone or Tablet Enabling DeveloperMode Options on Android Phone or Tablet This is two step process , first step is to Enabling Developer Mode Options on Android Phone or Tablet and second is to Switch On the USB Debugging of the device. Let’s see how to do both of the activities in the below tutorial. Enable Developer Options 1) Tap on the Main Menu icon.
  • 29. P a g e 29 | 58 2) Go to the Settings. 3) Scroll down to ‘About phone‘ and tap on it.
  • 30. P a g e 30 | 58 4) Scroll down to the bottom again, where you see ‘Build number’ (Your build number may vary). Tap On Build number Seven (7) times. After the third tap, you’ll see a playful dialog that says you’re four taps away from being a developer. Keep on tapping, and *poof*, you’ve got the developer settings options. 5) You can notice the Developer Options on your screen now.
  • 31. P a g e 31 | 58 Switch On USB Debugging 1) Go to the Developer Options. 2) Tick the USB Debugging check box.
  • 32. P a g e 32 | 58 3) It may display the Pop Up message, if Yes simply click OK. 4) And it’s done, you can see the USB Debugging is ON now.
  • 33. P a g e 33 | 58 Step 8: Install PdaNet to Connect with Android Device What is PdaNet+ PdaNet is a free app (available for iPhone, Android, BlackBerry, and other mobile platforms) that you can use to turn your smartphone into a modem for your laptop or you can say that it enables tethering. But we do not need this software to enable tethering but this application will help us to connect our computer with the mobile devices using USB cables. To use the PdaNet app for connecting your Android phone, you need to install the app on both your Android phone and also install the software on the Windows computer (Windows XP, Vista, Windows 7 — 32-bit and 64-bit versions available) or Mac OS. How to Install PdaNet to Connect with Android Device Read the simple step by step guide below to install the software on your computer and hopefully this installation will automatically install the same app on your device as well. It won’t get any simpler guide than this one for installing your Android drivers. 1) Download PdaNet from http://pdanet.co/a/. 2) Click on Save File button to save the ‘.exe‘ file on your computer.
  • 34. P a g e 34 | 58 3) Double click the file you just downloaded to start the process if installation. 4) To run the installer, click Run.
  • 35. P a g e 35 | 58 5) You may or may not receive this page from the Anti Virus program installed on your system. Just allow this, as it is safe to use. Note: If not the above window, A scary warning in red will appear saying that Windows couldn’t verify the publisher of the software. Click on “Install this Driver Software anyway“. This warning may appear multiple times, keep clicking on install drivers anyway until it stops appearing. 6) Don’t connect your device until I say that!. The installation process starts. Click the Next button to continue the installation.
  • 36. P a g e 36 | 58 7) Select the ‘I accept the agreement‘ radio button and proceed with the installation. 8) Click on Next >
  • 37. P a g e 37 | 58 9) Just leave these alone and click Next. 10) Skip to the next step if this one doesn’t apply to you. If you already tried installing some drivers, it will ask you if you want to uninstall currently installed drivers and install them using pdanet. Click Yes there. Clearly put, if it asks you to overwrite previous installation of drivers, or anything like that, you have to press Yes.
  • 38. P a g e 38 | 58 11) I assume that your your device is not connected with the USB to your machine. Select your device make and proceed by clicking OK button. Note: All Indian Device manufacturers like Karbonn, Micromax, Spice, Lava and every other brand not listed in the options that appear fall in the others category. 12) Now it will ask you to install Google USB Android Phone, please click on Install.
  • 39. P a g e 39 | 58 13) Once you get this window, Now you have to connect your device to your PC/ Laptop using USB cable. After connecting your device with USB, give it some time and this window will close automatically. Note: Don’t enable any modes like: USB storage or tethering. Just let the driver installation complete. 14) Check you device screen, you should get this screen on your device. Select the ‘Always all from this computer‘ check box and tap OK on your mobile device. Note: You will notice that PdaNet is also installed on your device as well, you must see the App icon on your screen.
  • 40. P a g e 40 | 58 15) Installation is done on your computer and your device is also attached with your computer. Happily click on Finish. Steps to check that if the Device is connected correctly There are two ways to check the connectivity of your device with your computer via data cable:  Through Command Prompt  Through Device Manager Command Prompt 1) Go to Run and type ‘cmd’ for opening the Command Prompt interface. 2) Type ‘adb devices‘ in the window. This will display all the list of android devices attached to your computer. Don’t worry about the name, as it displays the binary name of your device.
  • 41. P a g e 41 | 58 Step 9: Install Eclipse IDE And Set up a Project Steps to Download and Install Eclipse IDE Go to http://www.eclipse.org/downloads. 2) For Windows users, you will have to know what type of version of your OS you have. If your computer is a 64 bit Windows , select Windows 64 and if you have a 32 bitWindows, select Windows 32 bit.
  • 42. P a g e 42 | 58 3) Save the .zip file to your disk. 4) Once you have downloaded the Eclipse archive you will need to Extract the zip file, which will create the unzipped Eclipse folder. You may want to Extract the archive to the root of C: drive, thus creating the folder “C:eclipse”, or just moved the extracted eclipse folder to the root of C: drive if you extracted it already. 5) Open the eclipse folder from the location where you have saved it. I have kept it on C drive.
  • 43. P a g e 43 | 58 6) Since Eclipse IDE does not have any installer, there will be a file inside the Eclipse folder named eclipse.exe. You can double click on the file to run Eclipse. Note: This step is not required, but it’s strongly recommended. Right-click the Eclipse Icon and press “Send To” -> “Desktop (Create Shortcut).” Now you will be able to launch Eclipse from your desktop. Steps to Set Up First Eclipse Project Create a “working directory” for all of your projects. Think of it like “My Documents” in the Windows operating system. It’s a folder which contains a lot of your documents, but there’s nothing to prevent you from creating another folder called “My Other Documents” (for instance) to house other documents. Typically you only need one workspace, and you can think of it as your “My Documents” for Java code. If you wanted to, you could have more than one, but chances are you won’t have a use for more. To keep it simple we will go with default settings and once you are comfortable with Eclipse, You can change it later on from ‘Switch Workspace‘ under ‘File‘ menu of eclipse. After selecting workspace folder, Eclipse will be open. Step 1: Select WorkSpace on Eclipse start up a) Create a workspace folder where you will contain all the program files you create. You can choose whatever place you want for your workspace, but it’s easiest to just use the default you’re given.
  • 44. P a g e 44 | 58 b) You may see the window like this, this is the Welcome window for Eclipse. You may close this window. Step 2: Create a new Project Projects: A collection of related code. Generally speaking, each project encompasses one independent program. Each programming assignment you do will typically require its own project. Once you’ve established your workspace, you’ll want to create a project and begin writing code. In Eclipse, projects are the next-smallest functional unit after workspaces, but where you might have only one workspace, you will usually have several projects inside one workspace. a) Create new Java Project from File > New > Project.
  • 45. P a g e 45 | 58 b) Give your Project name ‘AppiumTestProject‘ as shown in below given screenshot. Click on Finish button. b) In case you have selected Next instead of FInish in the previous step, you will get this below window. Click on Finish this time and you are done with the project creation.
  • 46. P a g e 46 | 58 Note: You may or may not see this message but if in case you get any, check Remember my decision and click on Yes. Create a new Package a) Right click on folder ‘src‘ and select New > Package. a) Give your Package name ‘amazon‘ and click on Finish button.
  • 47. P a g e 47 | 58 Create a new Class Now that you have a project set up, you’re going to start writing some new classes. a) Right click on Package ‘amazon‘ and select New > Class. b) Give your Class name ‘StartApplication‘, check the option ‘public static void main‘ and click on Finish button. This will bring up totally a sweet class creation window. Note: In case of not creating class for Main test case, please do not click ‘public static void main’. We need to select it only in case of writing test cases which we are going to execute and from where we call other classes. This will be our main method or a starting point to test. For functional classes we don’t need this to be checked.
  • 48. P a g e 48 | 58 b) Now your Eclipse window will looks like bellow. Step 10: Set Up Appium Project in Eclipse Following steps needs to be done to Set Up Appium Project in Eclipse and before running first Appium Mobile Automation script:  Download GSon jar files  Download Selenium WebDriver Java Client  Add Gson jars to Project  Add Selenium Jars to project  Add Java Client to project Download GSon Jar file 1) Visit the GSon Download Website to download the GSon latest version.
  • 49. P a g e 49 | 58 2) It may give you a warning message that GSon file has been deprecated, but no worries just go ahead with this and Save it on your machine. 3) Click on OK to Save the zip file to your disk.
  • 50. P a g e 50 | 58 4) Once you have downloaded the ZIp archive you will need to Extract the zip file to add these Jars to the Eclipse Appium project. Download Selenium WebDriver Java client Selenium WebDriver supports many languages and each language has its own client driver. Here we are configuring selenium 2 with java so we need ‘webdriver Java client driver’. 1. Click here to go on WebDriver Java client driver download page for WebDriver download file. On that page click on ‘Download‘ link of java client driver as shown in the below image. Note: As of 7th June’15, the latest version is 2.45
  • 51. P a g e 51 | 58 2. Save the zip file to your disk. 3) Once you have downloaded the archive you will need to Extract the zip file, which will create the unzipped Selenium Java folder.
  • 52. P a g e 52 | 58 5) Once the extraction process is complete, Open the Selenium folder. 6) There will be ‘libs’ folder, 2 jar files and change log in unzipped folder as shown in bellow figure. We will use all these files for configuring WebDriver in Eclipse. Add External Jars to Java build path Now you need to add Selenium WebDriver’s & GSon jar files in to Java build path.
  • 53. P a g e 53 | 58 a) Right click on Project ‘AppiumTestProject‘ > Select Properties > Java build path. Then navigate to Libraries tab and click Add External JARs. b) Add GSon jars, you may add the source file too.
  • 54. P a g e 54 | 58 c) Now again click on Add External JARs and Add Java Client jar. d) Click on Add External JARs again to Add all the jars available in the libs folder of Selenium-2.45.0 as well.
  • 55. P a g e 55 | 58 e) Add Selenium Java jar, you may add the source file too. f) Click OK.
  • 56. P a g e 56 | 58 Step 11: First Appium Test to Launch Amazon App Finally the times come, when we will write our First Appium Test to Launch Amazon App. This will include following steps:  Launch Appium Node server  Create your first test script  Execute your first test Launch Appium Node Server 1) I am expecting that your Appium window is already opened on your machine. If you have restarted your system then please start Appium by navigate to Appium directory in your system and start Appium by double clicking Appium.exe file. 1. Android Icon is for Configuration settings 2. Settings Icon is for General Settings 3. Play Icon is for Starting Node server
  • 57. P a g e 57 | 58 2) Click on Android icon to open the configuration of the Appium run. There you need to select the check box of ‘No Reset‘. This will ensure that the Appium will not install or uninstall App on every run. 3) Click on General Setting icon and make sure that Server Address and Port is populated. Note: Do not alter the IP address or port number. Your Appium console start at 127.0.0.1:4723 as shown in below.
  • 58. P a g e 58 | 58 4) Now its time to start the Appium server, juct click on the Launch Appium Node Server button on the top right corner of Appium window and wait for few seconds.Appium server started and running on your system.