SlideShare ist ein Scribd-Unternehmen logo
1 von 46
Bill Kuhl  http://www.scienceguy.org
Background In this project, besides demonstrating  principles of magnetism to create motion, I wanted to get across how I improve upon similar projects. To do this I looked at how other people have designed this simple electric motor, discovering possible weaknesses, and trying to improve on those weaknesses in my design. A motor of similar design appeared on the Beakman's World TV show and many people refer to this motor as Beakman's motor. This is not  a true electric motor in that electricity is just turned on and off,  the polarity is not switched within the coil as in more advanced motors .
Long span between support brackets can be a problem. Support Bracket Poor Battery Connection Possible Weaknesses in Design
A Couple of Definitions The straight and coiled segments of wire I will refer to as the “armature”. The bracket that holds up the armature and acts as a brush, I will refer to as a “support bracket”.
Contact Area is Too Small I found the contact area (brush) was too small with this design and the armature would often stop turning.  Reliable operation should be the goal in all of your projects. Possible Weaknesses in Design
This kit version of the Beakman motor worked pretty well but has a long span between the armature supports and the contact area is too small. Battery contact was good because the battery was pressed firmly against the contacts which were also the armature supports. Looking at Other Ways to Design This Motor
In a bottom view of this motor it can be seen that the D-cell battery snaps firmly in place against the bottom of the support brackets. Support Bracket
This is the first version of  a simple motor that I built.  Fastening the supports for armature with masking tape is not a good idea. It did run for a time and then would require adjustments.
This motor was in a kit of more inventions. The battery connection method was not the best but the armature shaft did not span a long distance un-supported.
First prototype of my version of the Beakman motor. The battery is clamped tight between the copper-coated clamp pieces and the armature supports are moved closer together. My Version of the Simple Motor
Tabs give more area for good contact. Kevin Guy, the hobby guy gave me the idea to bend  tabs over to give more area of contact, it works great!
I came up with the idea of gluing small beads on each end of the coil so the armature would not move horizontally.  The glue also firms up the armature portion of the wire coming from the coil.
Materials The following are pictures and descriptions of the materials I used to complete this project.  I made an effort to find materials that could be found in almost any city at a reasonable price.
Radio Shack also sells ceramic magnets in smaller quantaties. I found a real deal on ceramic magnets, 51 magnets for $6 at a store that sells mainly tools. Northern Tool + Equipment http://www.northerntool.com
This 100 count bag of sheet metal screws would supply enough screws for 25 motors. The large head on the screw holds the brackets down firmly and screws in easily to the pine wood once a starter hole is drilled.
I cut these copper plated tube straps in half to create the brackets used in the motor, two straps per motor needed.  At lumber supply store I saw the straps in 10 or 100 count bags.
Pine board 3 ½” wide by ¾” thick makes a good base for the electric motor.  The board will be displayed as 4” by 1”, I found these boards 4 feet long for under $1.
I used hook-up wire to connect battery brackets and motor brackets. The red insulation is to indicate positive and the black to indicate negative. Color coding not needed for this project but I feel it is good to develop a habit  of marking polarity.
Radio Shack sells 3-pack of enamel-coated magnet wire, I would suggest using the heaviest wire which is the 20 gauge.
I used craft beads to keep the armature (straight sections of the wire) from moving from side to side while running.
These “Mounting Squares” which are double-sided sticky tape provided and easy method to attach the magnet yet the magnet could be removed later with some effort. Magnets could be glued to wood base also but would be harder to remove later.
I found these bargain priced Phillips screwdrivers for .70 a piece. The quality seems fine for this project. Tin snips can probably be found for under $12 where tools are sold.
Wire Strippers can be found at Radio Shack  or other stores that sell tools.  Low temp hot glue guns are normally found where craft supplies are sold.
Saw to cut wood base File to file off sharp edges Sandpaper to remove enamel coating on wire
For each motor, cut two of the tube straps in half, this will make four brackets. Building the Motor
The curved portion of the tube strap halves are easily straightened in a vise.
If you do not have access to a vise, the material could probably be straightened with a pliers or a hammer.
(Left Picture) side view of two brackets that have been straightened. (Right picture) Back of two brackets that have been marked for two slits to be cut so tabs can be bent.
(Left Picture) Cutting one of two slits, stop at horizontal line. (Right picture) bending the tab back the same direction as the bottom part of bracket. ¾” to bend
(Left Picture) Tab has been bent over, now make sure the other two strips of the bracket are vertical. (Right Picture) Trim off some of the material, only about 1/8” needs to stick up above the tab.
It is easier to strip the insulation off the wire when you have something to hold on the other end. I strip insulation off on one end, and then cut the wire. The wire should be around 3 inches long, ½ inch of insulation stripped off on each end should be good.
Wrap the wire 15 times around 5/8” wood dowel, leave around 3” extra on each end of the wire.  The number of loops is something that can be experimented with, try a few more or less, then observe change in speed.
(Left Picture) in the middle of the loop one each side, wrap the wire around the bundle of wires a couple of times. (Right Picture) This is what the coil should look like now.
(Left Picture) Mark the block 3” from one end. (Right Picture) Cut across the wood.  Hand saw cut through the pine wood very quickly.
Mark where the bracket holes for the battery will go by using a D-cell battery as a guide. It will be a tight fit on the board. The holes in the bottom of the brackets are large enough that there is room to adjust the bracket some to get a tight fit to the ends of the battery.
(Left Picture) Drill the starter holes for the screws a little smaller than the screw and not all the way through the board.
(Left Picture) It is a good idea to file any sharp edges on the brackets.  (Right Picture) Screw in brackets so that they are tight to the battery.
(Left Picture) The straight section of wire on one side of the coil can be sanded completely around the wire. (Right Side) On the other side only sand off the coating on half of the wire.
Looking at Cross Section of Wire for Half Sanded Side  Enamel Coating Copper Wire
(Left Picture) Glue the bead being careful not to get glue on the outside edge of the bead where it makes contact. (Right Picture)  The completed assembly should look like this.
(Left Picture) the brackets that support the armature need to be positioned so the armature fits between with a tiny gap on the outside of each bead. Screw in one bracket, and mark the hole for the opposite bracket. (Right Picture) The battery connection wires are bent in a half loop and put under the screw head as you tighten it down. Un-insulated portion of the wire is placed under the screw head so that the half-loop tends to curve with the direction the screw as tightened.
(Left Picture) Place the sticky side of the double-sided tape on the wood base between brackets, then peel the backing off. (Right Picture) Place the magnet centered on the sticky tape.
Completed motor in action! You will probably need to give the coil a gentle shove with one finger to start it in motion.
Further Experimentation Once you have a project working, it is fun and educational to try new adjustments to try to improve performance.  Sometimes what you try might not work as well.  You might consider: ,[object Object],[object Object],[object Object]
If Your Motor Doesn’t Run Don’t get upset, troubleshoot the problem. You will probably learn more if your project does not work perfectly from the start. Make sure: ,[object Object],[object Object],[object Object]
Be sure to check out my website for more projects  http://www.scienceguy.org Also find ScienceGuyOrg on Facebook, Twitter and YouTube

Weitere ähnliche Inhalte

Was ist angesagt?

How electromagnets work
How electromagnets workHow electromagnets work
How electromagnets work
mith17
 

Was ist angesagt? (20)

Introducing Electricity
Introducing  ElectricityIntroducing  Electricity
Introducing Electricity
 
JOINTS IN ELECTRICAL CONDUCTORS.pptx
JOINTS IN ELECTRICAL CONDUCTORS.pptxJOINTS IN ELECTRICAL CONDUCTORS.pptx
JOINTS IN ELECTRICAL CONDUCTORS.pptx
 
Kirchhoff’s rules
Kirchhoff’s rulesKirchhoff’s rules
Kirchhoff’s rules
 
motors-and-generators.ppt
motors-and-generators.pptmotors-and-generators.ppt
motors-and-generators.ppt
 
Electromagnetism
ElectromagnetismElectromagnetism
Electromagnetism
 
Electricity
ElectricityElectricity
Electricity
 
Electricity
ElectricityElectricity
Electricity
 
Electricity
ElectricityElectricity
Electricity
 
Chapter 4
Chapter 4Chapter 4
Chapter 4
 
How electromagnets work
How electromagnets workHow electromagnets work
How electromagnets work
 
Electricity,electric charge,electric current and electric circuit
Electricity,electric charge,electric current and electric circuitElectricity,electric charge,electric current and electric circuit
Electricity,electric charge,electric current and electric circuit
 
Simple circuit diagram
Simple circuit diagramSimple circuit diagram
Simple circuit diagram
 
Basics Of Electricity
Basics Of ElectricityBasics Of Electricity
Basics Of Electricity
 
Electricity in our daily lives
Electricity in our daily livesElectricity in our daily lives
Electricity in our daily lives
 
F:\Ac Generator Ppt
F:\Ac Generator PptF:\Ac Generator Ppt
F:\Ac Generator Ppt
 
Magnetism and Electromagnetism
Magnetism and ElectromagnetismMagnetism and Electromagnetism
Magnetism and Electromagnetism
 
Electrical Energy
Electrical EnergyElectrical Energy
Electrical Energy
 
Basics of Electricity.pptx
Basics of Electricity.pptxBasics of Electricity.pptx
Basics of Electricity.pptx
 
Circuit components
Circuit componentsCircuit components
Circuit components
 
Types of cables
Types of cablesTypes of cables
Types of cables
 

Andere mochten auch

Simple Electric Motor
Simple Electric MotorSimple Electric Motor
Simple Electric Motor
Isaac Iniguez
 
Caste system 1011
Caste system 1011Caste system 1011
Caste system 1011
mloret
 
English_9: Rites of Passage
English_9: Rites of PassageEnglish_9: Rites of Passage
English_9: Rites of Passage
iTechhy
 

Andere mochten auch (20)

Simple Electric Motor
Simple Electric MotorSimple Electric Motor
Simple Electric Motor
 
Electric motors
Electric motorsElectric motors
Electric motors
 
The electric motor
The electric motor The electric motor
The electric motor
 
Electric motor and generator
Electric motor and generatorElectric motor and generator
Electric motor and generator
 
Electric motor bearings
Electric motor bearingsElectric motor bearings
Electric motor bearings
 
Electric motor thermal analysis trade study
Electric motor thermal analysis trade studyElectric motor thermal analysis trade study
Electric motor thermal analysis trade study
 
Electronic_Motors
Electronic_MotorsElectronic_Motors
Electronic_Motors
 
DC Motors
DC MotorsDC Motors
DC Motors
 
Elecctric Motors
Elecctric MotorsElecctric Motors
Elecctric Motors
 
thesis
thesisthesis
thesis
 
Caste system 1011
Caste system 1011Caste system 1011
Caste system 1011
 
General/Notes 10.1
General/Notes 10.1General/Notes 10.1
General/Notes 10.1
 
Hum1 ritual-f11-online
Hum1 ritual-f11-onlineHum1 ritual-f11-online
Hum1 ritual-f11-online
 
English_9: Rites of Passage
English_9: Rites of PassageEnglish_9: Rites of Passage
English_9: Rites of Passage
 
Rites of passage
Rites of passageRites of passage
Rites of passage
 
Non Sikh Genius views about Sikhism
Non Sikh Genius views about SikhismNon Sikh Genius views about Sikhism
Non Sikh Genius views about Sikhism
 
Fundamentals of sikhism
Fundamentals of sikhismFundamentals of sikhism
Fundamentals of sikhism
 
Electric Motor Systems: targeting and implementing efficiency improvements
Electric Motor Systems: targeting and implementing efficiency improvementsElectric Motor Systems: targeting and implementing efficiency improvements
Electric Motor Systems: targeting and implementing efficiency improvements
 
Hinduism
HinduismHinduism
Hinduism
 
Electrical dangers powerpoint
Electrical dangers powerpointElectrical dangers powerpoint
Electrical dangers powerpoint
 

Ähnlich wie Build a Simple Electric Motor

Ignition Coil Bracket.1
Ignition Coil Bracket.1Ignition Coil Bracket.1
Ignition Coil Bracket.1
Scott Chambers
 
Rostock V2 Mods
Rostock V2 ModsRostock V2 Mods
Rostock V2 Mods
Jon Chan
 
breadboards.pptxkjxdnflksdnfpaksfxckjvbxcv
breadboards.pptxkjxdnflksdnfpaksfxckjvbxcvbreadboards.pptxkjxdnflksdnfpaksfxckjvbxcv
breadboards.pptxkjxdnflksdnfpaksfxckjvbxcv
anshparashar5
 
Como adaptar brinquedos para utilização de um switch
Como adaptar brinquedos para utilização de um switchComo adaptar brinquedos para utilização de um switch
Como adaptar brinquedos para utilização de um switch
23palmela
 

Ähnlich wie Build a Simple Electric Motor (20)

07 dc motor
07 dc motor07 dc motor
07 dc motor
 
07 dc motor
07 dc motor07 dc motor
07 dc motor
 
Ignition Coil Bracket.1
Ignition Coil Bracket.1Ignition Coil Bracket.1
Ignition Coil Bracket.1
 
Mousetrap Car Construction
Mousetrap Car ConstructionMousetrap Car Construction
Mousetrap Car Construction
 
Insructables fm listening bug
Insructables   fm listening bugInsructables   fm listening bug
Insructables fm listening bug
 
Build your own wind turbine
Build your own wind turbineBuild your own wind turbine
Build your own wind turbine
 
How to cut in a multi-gang switch box final
How to cut in a multi-gang switch box finalHow to cut in a multi-gang switch box final
How to cut in a multi-gang switch box final
 
Rewinding a bldc motor
Rewinding a bldc motorRewinding a bldc motor
Rewinding a bldc motor
 
Rostock V2 Mods
Rostock V2 ModsRostock V2 Mods
Rostock V2 Mods
 
Rewinding a brushless motor
Rewinding a brushless motorRewinding a brushless motor
Rewinding a brushless motor
 
5 el 2 meter
5 el 2 meter5 el 2 meter
5 el 2 meter
 
Measuring device
Measuring deviceMeasuring device
Measuring device
 
BB_HowTo.pdf
BB_HowTo.pdfBB_HowTo.pdf
BB_HowTo.pdf
 
breadboards.pptxkjxdnflksdnfpaksfxckjvbxcv
breadboards.pptxkjxdnflksdnfpaksfxckjvbxcvbreadboards.pptxkjxdnflksdnfpaksfxckjvbxcv
breadboards.pptxkjxdnflksdnfpaksfxckjvbxcv
 
Breadboard
BreadboardBreadboard
Breadboard
 
Physics project class 12
Physics project class 12Physics project class 12
Physics project class 12
 
Como adaptar brinquedos para utilização de um switch
Como adaptar brinquedos para utilização de um switchComo adaptar brinquedos para utilização de um switch
Como adaptar brinquedos para utilização de um switch
 
How to Make an LED Microcope Light from a Flashlight
How to Make an LED Microcope Light from a FlashlightHow to Make an LED Microcope Light from a Flashlight
How to Make an LED Microcope Light from a Flashlight
 
Chapter15
Chapter15Chapter15
Chapter15
 
Roborobo 3 p arts definition
Roborobo  3 p arts definitionRoborobo  3 p arts definition
Roborobo 3 p arts definition
 

Mehr von Bill Kuhl

Mehr von Bill Kuhl (11)

Innovations in Transportation
Innovations in TransportationInnovations in Transportation
Innovations in Transportation
 
Waste & Recycling
Waste & RecyclingWaste & Recycling
Waste & Recycling
 
Air rockets
Air rocketsAir rockets
Air rockets
 
Mousetrap cars
Mousetrap carsMousetrap cars
Mousetrap cars
 
Solar Model Cars
Solar Model CarsSolar Model Cars
Solar Model Cars
 
Network Administrator Career
Network Administrator CareerNetwork Administrator Career
Network Administrator Career
 
Model Aviation an Educational Activity
Model Aviation an Educational ActivityModel Aviation an Educational Activity
Model Aviation an Educational Activity
 
Group Activites with the Squirrel Model Airplane
Group Activites with the Squirrel Model AirplaneGroup Activites with the Squirrel Model Airplane
Group Activites with the Squirrel Model Airplane
 
Radio Control Sailplanes Introduction
Radio Control Sailplanes IntroductionRadio Control Sailplanes Introduction
Radio Control Sailplanes Introduction
 
An Introduction to Water Rockets I
An Introduction to Water Rockets IAn Introduction to Water Rockets I
An Introduction to Water Rockets I
 
Modern Auto Mechanics
Modern Auto MechanicsModern Auto Mechanics
Modern Auto Mechanics
 

Kürzlich hochgeladen

Jual Obat Aborsi Hongkong ( Asli No.1 ) 085657271886 Obat Penggugur Kandungan...
Jual Obat Aborsi Hongkong ( Asli No.1 ) 085657271886 Obat Penggugur Kandungan...Jual Obat Aborsi Hongkong ( Asli No.1 ) 085657271886 Obat Penggugur Kandungan...
Jual Obat Aborsi Hongkong ( Asli No.1 ) 085657271886 Obat Penggugur Kandungan...
ZurliaSoop
 
The basics of sentences session 3pptx.pptx
The basics of sentences session 3pptx.pptxThe basics of sentences session 3pptx.pptx
The basics of sentences session 3pptx.pptx
heathfieldcps1
 

Kürzlich hochgeladen (20)

HMCS Max Bernays Pre-Deployment Brief (May 2024).pptx
HMCS Max Bernays Pre-Deployment Brief (May 2024).pptxHMCS Max Bernays Pre-Deployment Brief (May 2024).pptx
HMCS Max Bernays Pre-Deployment Brief (May 2024).pptx
 
Kodo Millet PPT made by Ghanshyam bairwa college of Agriculture kumher bhara...
Kodo Millet  PPT made by Ghanshyam bairwa college of Agriculture kumher bhara...Kodo Millet  PPT made by Ghanshyam bairwa college of Agriculture kumher bhara...
Kodo Millet PPT made by Ghanshyam bairwa college of Agriculture kumher bhara...
 
Making communications land - Are they received and understood as intended? we...
Making communications land - Are they received and understood as intended? we...Making communications land - Are they received and understood as intended? we...
Making communications land - Are they received and understood as intended? we...
 
Graduate Outcomes Presentation Slides - English
Graduate Outcomes Presentation Slides - EnglishGraduate Outcomes Presentation Slides - English
Graduate Outcomes Presentation Slides - English
 
TỔNG ÔN TẬP THI VÀO LỚP 10 MÔN TIẾNG ANH NĂM HỌC 2023 - 2024 CÓ ĐÁP ÁN (NGỮ Â...
TỔNG ÔN TẬP THI VÀO LỚP 10 MÔN TIẾNG ANH NĂM HỌC 2023 - 2024 CÓ ĐÁP ÁN (NGỮ Â...TỔNG ÔN TẬP THI VÀO LỚP 10 MÔN TIẾNG ANH NĂM HỌC 2023 - 2024 CÓ ĐÁP ÁN (NGỮ Â...
TỔNG ÔN TẬP THI VÀO LỚP 10 MÔN TIẾNG ANH NĂM HỌC 2023 - 2024 CÓ ĐÁP ÁN (NGỮ Â...
 
How to Manage Global Discount in Odoo 17 POS
How to Manage Global Discount in Odoo 17 POSHow to Manage Global Discount in Odoo 17 POS
How to Manage Global Discount in Odoo 17 POS
 
Micro-Scholarship, What it is, How can it help me.pdf
Micro-Scholarship, What it is, How can it help me.pdfMicro-Scholarship, What it is, How can it help me.pdf
Micro-Scholarship, What it is, How can it help me.pdf
 
Key note speaker Neum_Admir Softic_ENG.pdf
Key note speaker Neum_Admir Softic_ENG.pdfKey note speaker Neum_Admir Softic_ENG.pdf
Key note speaker Neum_Admir Softic_ENG.pdf
 
Sensory_Experience_and_Emotional_Resonance_in_Gabriel_Okaras_The_Piano_and_Th...
Sensory_Experience_and_Emotional_Resonance_in_Gabriel_Okaras_The_Piano_and_Th...Sensory_Experience_and_Emotional_Resonance_in_Gabriel_Okaras_The_Piano_and_Th...
Sensory_Experience_and_Emotional_Resonance_in_Gabriel_Okaras_The_Piano_and_Th...
 
2024-NATIONAL-LEARNING-CAMP-AND-OTHER.pptx
2024-NATIONAL-LEARNING-CAMP-AND-OTHER.pptx2024-NATIONAL-LEARNING-CAMP-AND-OTHER.pptx
2024-NATIONAL-LEARNING-CAMP-AND-OTHER.pptx
 
Google Gemini An AI Revolution in Education.pptx
Google Gemini An AI Revolution in Education.pptxGoogle Gemini An AI Revolution in Education.pptx
Google Gemini An AI Revolution in Education.pptx
 
SKILL OF INTRODUCING THE LESSON MICRO SKILLS.pptx
SKILL OF INTRODUCING THE LESSON MICRO SKILLS.pptxSKILL OF INTRODUCING THE LESSON MICRO SKILLS.pptx
SKILL OF INTRODUCING THE LESSON MICRO SKILLS.pptx
 
FSB Advising Checklist - Orientation 2024
FSB Advising Checklist - Orientation 2024FSB Advising Checklist - Orientation 2024
FSB Advising Checklist - Orientation 2024
 
General Principles of Intellectual Property: Concepts of Intellectual Proper...
General Principles of Intellectual Property: Concepts of Intellectual  Proper...General Principles of Intellectual Property: Concepts of Intellectual  Proper...
General Principles of Intellectual Property: Concepts of Intellectual Proper...
 
Beyond_Borders_Understanding_Anime_and_Manga_Fandom_A_Comprehensive_Audience_...
Beyond_Borders_Understanding_Anime_and_Manga_Fandom_A_Comprehensive_Audience_...Beyond_Borders_Understanding_Anime_and_Manga_Fandom_A_Comprehensive_Audience_...
Beyond_Borders_Understanding_Anime_and_Manga_Fandom_A_Comprehensive_Audience_...
 
Jamworks pilot and AI at Jisc (20/03/2024)
Jamworks pilot and AI at Jisc (20/03/2024)Jamworks pilot and AI at Jisc (20/03/2024)
Jamworks pilot and AI at Jisc (20/03/2024)
 
Jual Obat Aborsi Hongkong ( Asli No.1 ) 085657271886 Obat Penggugur Kandungan...
Jual Obat Aborsi Hongkong ( Asli No.1 ) 085657271886 Obat Penggugur Kandungan...Jual Obat Aborsi Hongkong ( Asli No.1 ) 085657271886 Obat Penggugur Kandungan...
Jual Obat Aborsi Hongkong ( Asli No.1 ) 085657271886 Obat Penggugur Kandungan...
 
Unit 3 Emotional Intelligence and Spiritual Intelligence.pdf
Unit 3 Emotional Intelligence and Spiritual Intelligence.pdfUnit 3 Emotional Intelligence and Spiritual Intelligence.pdf
Unit 3 Emotional Intelligence and Spiritual Intelligence.pdf
 
SOC 101 Demonstration of Learning Presentation
SOC 101 Demonstration of Learning PresentationSOC 101 Demonstration of Learning Presentation
SOC 101 Demonstration of Learning Presentation
 
The basics of sentences session 3pptx.pptx
The basics of sentences session 3pptx.pptxThe basics of sentences session 3pptx.pptx
The basics of sentences session 3pptx.pptx
 

Build a Simple Electric Motor

  • 1. Bill Kuhl http://www.scienceguy.org
  • 2. Background In this project, besides demonstrating principles of magnetism to create motion, I wanted to get across how I improve upon similar projects. To do this I looked at how other people have designed this simple electric motor, discovering possible weaknesses, and trying to improve on those weaknesses in my design. A motor of similar design appeared on the Beakman's World TV show and many people refer to this motor as Beakman's motor. This is not a true electric motor in that electricity is just turned on and off, the polarity is not switched within the coil as in more advanced motors .
  • 3. Long span between support brackets can be a problem. Support Bracket Poor Battery Connection Possible Weaknesses in Design
  • 4. A Couple of Definitions The straight and coiled segments of wire I will refer to as the “armature”. The bracket that holds up the armature and acts as a brush, I will refer to as a “support bracket”.
  • 5. Contact Area is Too Small I found the contact area (brush) was too small with this design and the armature would often stop turning. Reliable operation should be the goal in all of your projects. Possible Weaknesses in Design
  • 6. This kit version of the Beakman motor worked pretty well but has a long span between the armature supports and the contact area is too small. Battery contact was good because the battery was pressed firmly against the contacts which were also the armature supports. Looking at Other Ways to Design This Motor
  • 7. In a bottom view of this motor it can be seen that the D-cell battery snaps firmly in place against the bottom of the support brackets. Support Bracket
  • 8. This is the first version of a simple motor that I built. Fastening the supports for armature with masking tape is not a good idea. It did run for a time and then would require adjustments.
  • 9. This motor was in a kit of more inventions. The battery connection method was not the best but the armature shaft did not span a long distance un-supported.
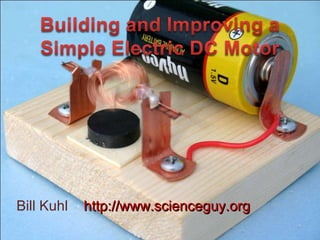
  • 10. First prototype of my version of the Beakman motor. The battery is clamped tight between the copper-coated clamp pieces and the armature supports are moved closer together. My Version of the Simple Motor
  • 11. Tabs give more area for good contact. Kevin Guy, the hobby guy gave me the idea to bend tabs over to give more area of contact, it works great!
  • 12. I came up with the idea of gluing small beads on each end of the coil so the armature would not move horizontally. The glue also firms up the armature portion of the wire coming from the coil.
  • 13. Materials The following are pictures and descriptions of the materials I used to complete this project. I made an effort to find materials that could be found in almost any city at a reasonable price.
  • 14. Radio Shack also sells ceramic magnets in smaller quantaties. I found a real deal on ceramic magnets, 51 magnets for $6 at a store that sells mainly tools. Northern Tool + Equipment http://www.northerntool.com
  • 15. This 100 count bag of sheet metal screws would supply enough screws for 25 motors. The large head on the screw holds the brackets down firmly and screws in easily to the pine wood once a starter hole is drilled.
  • 16. I cut these copper plated tube straps in half to create the brackets used in the motor, two straps per motor needed. At lumber supply store I saw the straps in 10 or 100 count bags.
  • 17. Pine board 3 ½” wide by ¾” thick makes a good base for the electric motor. The board will be displayed as 4” by 1”, I found these boards 4 feet long for under $1.
  • 18. I used hook-up wire to connect battery brackets and motor brackets. The red insulation is to indicate positive and the black to indicate negative. Color coding not needed for this project but I feel it is good to develop a habit of marking polarity.
  • 19. Radio Shack sells 3-pack of enamel-coated magnet wire, I would suggest using the heaviest wire which is the 20 gauge.
  • 20. I used craft beads to keep the armature (straight sections of the wire) from moving from side to side while running.
  • 21. These “Mounting Squares” which are double-sided sticky tape provided and easy method to attach the magnet yet the magnet could be removed later with some effort. Magnets could be glued to wood base also but would be harder to remove later.
  • 22. I found these bargain priced Phillips screwdrivers for .70 a piece. The quality seems fine for this project. Tin snips can probably be found for under $12 where tools are sold.
  • 23. Wire Strippers can be found at Radio Shack or other stores that sell tools. Low temp hot glue guns are normally found where craft supplies are sold.
  • 24. Saw to cut wood base File to file off sharp edges Sandpaper to remove enamel coating on wire
  • 25. For each motor, cut two of the tube straps in half, this will make four brackets. Building the Motor
  • 26. The curved portion of the tube strap halves are easily straightened in a vise.
  • 27. If you do not have access to a vise, the material could probably be straightened with a pliers or a hammer.
  • 28. (Left Picture) side view of two brackets that have been straightened. (Right picture) Back of two brackets that have been marked for two slits to be cut so tabs can be bent.
  • 29. (Left Picture) Cutting one of two slits, stop at horizontal line. (Right picture) bending the tab back the same direction as the bottom part of bracket. ¾” to bend
  • 30. (Left Picture) Tab has been bent over, now make sure the other two strips of the bracket are vertical. (Right Picture) Trim off some of the material, only about 1/8” needs to stick up above the tab.
  • 31. It is easier to strip the insulation off the wire when you have something to hold on the other end. I strip insulation off on one end, and then cut the wire. The wire should be around 3 inches long, ½ inch of insulation stripped off on each end should be good.
  • 32. Wrap the wire 15 times around 5/8” wood dowel, leave around 3” extra on each end of the wire. The number of loops is something that can be experimented with, try a few more or less, then observe change in speed.
  • 33. (Left Picture) in the middle of the loop one each side, wrap the wire around the bundle of wires a couple of times. (Right Picture) This is what the coil should look like now.
  • 34. (Left Picture) Mark the block 3” from one end. (Right Picture) Cut across the wood. Hand saw cut through the pine wood very quickly.
  • 35. Mark where the bracket holes for the battery will go by using a D-cell battery as a guide. It will be a tight fit on the board. The holes in the bottom of the brackets are large enough that there is room to adjust the bracket some to get a tight fit to the ends of the battery.
  • 36. (Left Picture) Drill the starter holes for the screws a little smaller than the screw and not all the way through the board.
  • 37. (Left Picture) It is a good idea to file any sharp edges on the brackets. (Right Picture) Screw in brackets so that they are tight to the battery.
  • 38. (Left Picture) The straight section of wire on one side of the coil can be sanded completely around the wire. (Right Side) On the other side only sand off the coating on half of the wire.
  • 39. Looking at Cross Section of Wire for Half Sanded Side Enamel Coating Copper Wire
  • 40. (Left Picture) Glue the bead being careful not to get glue on the outside edge of the bead where it makes contact. (Right Picture) The completed assembly should look like this.
  • 41. (Left Picture) the brackets that support the armature need to be positioned so the armature fits between with a tiny gap on the outside of each bead. Screw in one bracket, and mark the hole for the opposite bracket. (Right Picture) The battery connection wires are bent in a half loop and put under the screw head as you tighten it down. Un-insulated portion of the wire is placed under the screw head so that the half-loop tends to curve with the direction the screw as tightened.
  • 42. (Left Picture) Place the sticky side of the double-sided tape on the wood base between brackets, then peel the backing off. (Right Picture) Place the magnet centered on the sticky tape.
  • 43. Completed motor in action! You will probably need to give the coil a gentle shove with one finger to start it in motion.
  • 44.
  • 45.
  • 46. Be sure to check out my website for more projects http://www.scienceguy.org Also find ScienceGuyOrg on Facebook, Twitter and YouTube