SlideShare ist ein Scribd-Unternehmen logo
1 von 69
Cascading Style Sheets (CSS) is a style sheet language used for
describing the presentation of a document written in a markup
language such as HTML. CSS is a cornerstone technology of
the World Wide Web, alongside HTML and JavaScript.
Filename extension .css
Internet media type text/css
Uniform Type Identifier (UTI) public.css
Developed by World Wide Web
Consortium (W3C)
Initial release December 17, 1996; 23 years
ago
Latest release CSS 2.1 : Level 2 Revision 1
(April 12, 2016; 4 years ago)
Type of format Style sheet language
Container for Style rules for HTML
elements (tags)
Contained by HTML Documents
Open format? Yes
Website www.w3.org/TR/CSS2/
CSS Tutorial: Introduction to CSS | Web Development
Tutorials #13
CSS Tutorial- Introduction To CSS
So finally, after completing HTML, we are moving towards the
exciting part, i.e. CSS. CSS stands for Cascading Style Sheets and is
used to design the website to make it look attractive.
Let us first understand, what is CSS?
CSS gives style to raw HTML
It stands for Cascading Style Sheets
CSS is used to give style to our web pages
CSS is used to make websites responsive
CSS takes the responsibility of design in your websites
CSS includes all the things which can be used to design the raw
HTML from colouring the background and texts, to adjust the
borders, give padding, etc. Moreover, CSS helps in making
websites responsive. Responsive means that the site will behave
accordingly to the different screen sizes. For example, if you open
a website on a desktop and then on your mobile, you will find the
difference between their displays. All the components in a
navigation bar will move into a hamburger icon if you open the
website on mobile.
We can add styles in the HTML part itself, but I would rather
recommend making a new CSS file and then attach it to the HTML
part. It is so because it is a professional practice when different
developers are working on a single website to keep the skeleton
of a website in one file and the styling in another file.
Role of CSS
CSS is a style sheet language that is used to handle the
presentation of the web page containing HTML.
It makes our websites beautiful and modern looking.
CSS Syntax
The syntax of CSS is-
P { color: blue; }
P stands for the selector and it decides which part of the HTML
the CSS will be applied. It states where the CSS property is to be
applied.
Property is used to describe which property you want to change
or add. Whether you have to change colour, border, background,
width, all these come under property.
The last section is for defining the value. All the properties will be
changed according to the value we provide.
We can also target multiple properties at one time. The syntax is
as follows-
header, p.intro { background-color: red; border-radius: 3px, }
In the above example, we have changed the header tag and
the paragraph tag with a class intro to change the background
colour to red and border-radius to 3 pixels.
There are three ways to Add CSS-
1. Inline CSS- CSS is added to the elements directly using the style
attributes.
2. Internal CSS- CSS is kept inside the head tags in <style> tags
3. External CSS- CSS is kept separately inside a .CSS style sheet. It
involves two steps-
First, write the CSS in.CSS file.
Include that CSS file to Markup.
From the next tutorial, we will start doing the practical
implementation of applying CSS in the Visual Studio Code.
Code as described/written in the video
<!DOCTYPE html>
<html lang="en">
<head>
<meta charset="UTF-8">
<meta name="viewport" content="width=device-width, initial-
scale=1.0">
<meta http-equiv="X-UA-Compatible" content="ie=edge">
<title>CSS Tutorial</title>
<style>
p{
color:rgb(245, 184, 245);
background-color: seagreen !important;
}
</style>
<link rel="stylesheet" href="tut13.css">
</head>
<body>
<h3>This is CSS Tutorial</h3>
<!-- <p style="color: red; background-color: yellow;">This tutorial will
teach you everything you need to know about HTML/CSS</p> -->
<p>This tutorial will teach you everything you need to know about
HTML/CSS</p>
</body>
</html>
Code as described/written in the video
p{ color: greenyellow; background-color: hotpink; }
CSS Tutorial: Inline, Internal & External CSS | Web
Development Tutorials #14
CSS Tutorial- Inline, Internal, and External CSS
Welcome, everyone! As in the last tutorial, we have seen there are
three methods of writing CSS- Inline, Internal, and External. Here,
we will discuss all these three methods and do some real
implementations of CSS. To start this tutorial, first, we will make a
new file as tut13.html and add the boilerplate. For our
convenience, we will give the title as CSS Tutorial in the <title> tag.
Inline CSS allows you to apply a unique style to one HTML element
at a time. You can assign the Inline CSS to a specific HTML element
by using the style attribute with any CSS properties defined within
it. Let us try to understand this with an example.
<body>
<h1>This is CSS tutorial</h1>
<p style= “color: red;”>This tutorial will teach you
everything you need to know about CSS</p>
</body>
By writing the above code, we will see the changes as-
You must be thinking this is the best way to add CSS on the
website but I will let you know that it is not the best method to
style your HTML. If you add too much Inline CSS, then your HTML
will become too messy to understand for you.
Internal CSS is used to define a style tag for a single HTML page. It
is defined in the <head> section within a <style> element. Let us
understand the External CSS with the help of an example.
<head>
<style>
p{
color: purple;
}
<style>
<head>
By writing the above code, we will get the output as-
One important point to note here is, Inline CSS is given more
priority than Internal CSS.
External CSS is mostly used when you want to make changes on
multiple pages. It is an ideal condition because it facilitates you to
change the look of the entire website by changing just one file.
We will add the stylesheet in the <head> section using <link> tag.
<head>
<link rel= “stylesheet” href= “tut13.css”>
<head>
Then in tut13.css file, we can write our CSS-
p{
Color: greenyellow;
}
By writing this code, and linking it to the HTML file, you notice the
change-
The point here to remember is that whether it is the Internal CSS or
the External CSS, whichever is written after, gets the priority. But if
you want that first one should get priority, so you can
add important after it. The result will be, it will get the most
priority of all.
So I hope you must have understood all the three types of CSS used
to style our website. From the next tutorials, we will see some
more interesting properties about CSS. Till then stay with the
tutorials and keep practicing whatever is taught till now.
CSS Tutorial: Selectors in CSS | Web Development
Tutorials #15
In the last tutorial, we have discussed different methods to write
CSS. Here, we are going forward to learn different selectors in CSS.
CSS selectors are used to select any content you want to style.
These are the part of CSS ruleset. CSS selectors select HTML
elements according to its id, class, type, attribute, etc.
• CSS Selectors are used to target HTML elements.
• Selectors make it easy for us to easily target single/multiple HTML
elements in the markup.
We will see four types of CSS Selectors:
• CSS element Selector
• CSS id Selector
• CSS class Selector
• The CSS grouping Selector
As discussed in one of the previous videos, the basic syntax of
writing the CSS is-
p {color: blue;}
In the example above, ‘p’ is the selector. It will convert all the
paragraph into blue.
So let us now start by making a new file as tut14.html and as
usual, add an instant boilerplate Visual Studio Code. Give the title
as CSS Selectors in the <title> tag. In this example, we will be using
Internal CSS, not Inline CSS. However, you can also use External
CSS. I will be explaining using internal CSS as I want everything to
be within the page. Let us start with the simple example-
Element Selector
<h3>CSS Selectors</h3>
<p id="firstPara">This is a simple paragraph to
demonstrate css selectors</p>
<p id="secondPara" class="redElement bgBlue">This is a
another simple paragraph to demonstrate css selectors</p>
<div>
<p>This is yet another simple paragraph inside div to
demonstrate css selectors</p>
</div>
The above code will convert all the three paragraphs into red
colour as shown below-
Class Selector
If we want to select a paragraph and assign multiple properties to
it, then we can use Class Selector. Let us understand with an
example-
<style>
.redElement{
Color: red;
}
.bgBlue{
Background-color: blue;
}
</style>
<body>
<h3>CSS Selectors</h3>
<p>This is a simple paragraph to demonstrate css selectors</p>
<p id="secondPara" class="redElement bgBlue">This is a
another simple paragraph to demonstrate css selectors</p>
<div>
<p>This is yet another simple paragraph inside div to
demonstrate css selectors</p>
</div>
</body>
This will convert only the second paragraph with
class “redElement” and “bgBlue” as shown below-
ID Selector
If we want to select the only paragraph to show any change, then
we will be using ID selector. Let us understand with an example-
<style>
#firstPara{
color: green;
}
</style>
<body>
<h3>CSS Selectors</h3>
<p id="firstPara">This is a simple paragraph to demonstrate css
selectors</p>
<p>This is a another simple paragraph to demonstrate css
selectors</p>
<div>
<p>This is yet another simple paragraph inside div to
demonstrate css selectors</p>
</div>
</body>
By writing the above code we will see the changes as follows-
Grouping Selector
Grouping Selector is used when we have to make changes in more
than one element. Let us understand with an example. Suppose we
have two elements footer and span and we want the same changes
in both the elements. Then we can do the following-
<style>
footer, span{
Background-color: pink;
}
</style>
<body>
<h3>CSS Selectors</h3>
<p>This is a simple paragraph to demonstrate css selectors</p>
<p>This is a another simple paragraph to demonstrate css
selectors</p>
<div>
<p>This is yet another simple paragraph inside div to
demonstrate css selectors</p>
<span>this is span</span>
</div>
<footer>This is footer</footer>
</body>
So, I believe, you must have understood the basic concepts of CSS
Selectors. Till now, you must keep two points in your mind-
There are three ways of writing CSS- Inline, Internal, and External.
How to do the basic selections of CSS selectors.
Code as described/written in the video
<!DOCTYPE html>
<html lang="en">
<head>
<meta charset="UTF-8">
<meta name="viewport" content="width=device-width, initial-scale=1.0">
<meta http-equiv="X-UA-Compatible" content="ie=edge">
<title>CSS Selectors</title>
<style>
/* Element selector */
p{
border: 2px solid red;
}
/* Id selector */
#firstPara{
color: green;
}
/* Class selector */
.bgBlue{
color: yellow;
background-color: blue;
}
/* Grouping selector */
footer, span{
background-color: pink;
}
</style>
</head>
<body>
<h3>CSS Selectors</h3>
<p id="firstPara">This is a simple paragraph to demonstrate css selectors</p>
<p id="secondPara" class="redElement bgBlue">This is a another simple paragraph to
demonstrate css selectors</p>
<div>
<p>This is yet another simple paragraph inside div to demonstrate css selectors</p>
<span>this is span</span>
</div>
<footer>This is footer</footer>
</body>
</html>
CSS Tutorial: Using Chrome Developer Tools | Web
Development Tutorials #16
Till now in this web development series tutorial, we have seen a lot
of things. Here we are going to use the developer tools provide by
chrome. As a beginner, I would highly recommend using a Chrome
browser above all if there is not any specific reason.
Start by making a new file named tut16.html, and add the
boilerplate. Give the title as Developer Tools in the <title> tag. Let
us start by writing the simple code-
<style>
p{
color: purple;
font-style: italic;
background-color: rosybrown;
}
.bgPrimary{
background-color: #82c2ff;
}
</style>
</head>
<body>
<h4 class="bgPrimary">Developer tools tutorial</h4>
<p>This is a tutorial for Chrome developer tools</p>
</body>
After running your code, if you will right-click anywhere in the
browser then you will see an inspect element option. By clicking on
it you will be able to see the original code. From here you can make
some changes in the webpage and can observe it. However, it does
not change the original code on your server. Developer Tools are
used to make any changes into your code and see the instant effect
on your web page. This change is not a permanent.
But if you like any change made in the developer tools, you can do
the same in original file in VS code and refresh the page. That
particular change will now reflect back permanently. Inspect
Element allows us to make and view the changes in any of the
websites present all over the world
I have explained that how these changes are only reflecting on your
local server. When you will reload that page again, all the things will
set back to their default set up. In this way, you can use the
developer tools of chrome.
User Agent Stylesheet
By default, chrome sets some property for some elements and store
some default values in it. So the browser by default styles some
element according to it and that styling is particularly known as
user's agent style sheet. Basically it is showing the default value of
browser that previously what changes were there and what changes
you have made now on your page. There is also a console section
where you can write JavaScript code. Sources section contains all
the source codes that you have written. The most important thing in
this tutorial was elements that we have already discussed. We can
directly change our styles using CSS directly.
Some tips while defining a color class:-
Do not directly use the name of the color as the class name
instead use
 colorprimary
 colorsuccess
 Colorwarning
As writing these looks more professional and also helps in future
to maintain our codes.
So, I believe you must have learned something about Developer
Tools and how to use them. The more practicing and playing
around Inspect Elements will help you in learning faster.
Code as described/written in the video
<!DOCTYPE html>
<html lang="en">
<head>
<meta charset="UTF-8">
<meta name="viewport" content="width=device-width, initial-
scale=1.0">
<meta http-equiv="X-UA-Compatible" content="ie=edge">
<title>Developer tools</title>
<style>
p{
color: purple;
font-style: italic;
background-color: rosybrown;
}
.bgPrimary{
background-color: #82c2ff;
}
</style>
</head>
<body>
<h4 class="bgPrimary">Developer tools tutorial</h4>
<p>This is a tutorial for Chrome developer tools</p>
</body>
</html>
CSS Tutorial: Fonts In CSS | Web Development
Tutorials #17
CSS Tutorial: Fonts in CSS
In this tutorial, we are going to learn about different Fonts in CSS.
They act as a backbone of the whole CSS. The CSS font properties
define the font family, boldness, size, and the style of a text. As
always, let us start the tutorial by making a new file
named tut17.html and add an instant boilerplate. After this, give
the title as CSS Fonts under the <title> tags in the <head> section.
<body>
<h4>CSS Fonts</h4>
<p>Lets play with <span>fonts</span>. It is very exciting</p>
</body>
This is a very basic code as an example to start playing around
different fonts. In CSS, we have two types of fonts- web-safe
fonts and web fonts. Web saved fonts are the fonts that come pre-
installed with most of the operating systems, therefore, using these
fonts you will never encounter any error. But on the other hand,
some fonts are not shipped with the OS; so to use them, we need
to import them from the web.
We can also use the technique of font stack. A font stack is a list of
fonts that are listed in order of preference you would like them to
appear in case some fonts are not loading. The example of this is
shown below-
p {font-family:'Ubuntu', 'Franklin Gothic Medium', 'Arial
Narrow', Arial, sans-serif;}
This list will be iterated until the specified font is not available in
the system.
To see the whole list of web saved fonts, there is a very good
website called CSS Font Stack. It provides the complete list of web
saved fonts. Talking about web fonts, we can easily import them
from Google. To import the code, there is no website better
than Google Fonts. To use it, simply copy the style-sheet and add
it to your code and update the font stack with the specific font
you desire.
The next property is font size.
p { font-family: ‘Franklin Gothic Medium’, ‘Aerial Narrow’, Aerial,
sans-serif;
font-size: 33px;
}
Font Size is used to set the size of a font. In the above example,
we used our font size to be 33px. Pixel ‘px’ is the unit of the font
size and it is 1/96th of an inch.
The next property is line-height. Line-height is the spacing
between the fonts (current font and previous font).
p {font-family: ‘Franklin Gothic Medium’, ‘Aerial Narrow’, Aerial,
sans-serif;
font-size: 23px;
line-height: 1.8em;
}
Next property is font-weight. The font weight property sets how
thick or thin character in text should be displayed.
p{ font-family: ‘Franklin Gothic Medium’, ‘Aerial Narrow’, Aerial, sans-serif;
font-size: 23px;
line-height: 1.8em;
font-weight: bold;
}
There are various other font properties. Most of the important ones
are covered in this tutorial. You can now test different other font
properties as well. As a beginner, I would recommend not to learn
all the CSS properties until you learn to make a simple website. You
can take the help of references available anytime but for it, you
should know the basics.
Code as described/written in the video
<!DOCTYPE html>
<html lang="en">
<head>
<meta charset="UTF-8">
<meta name="viewport" content="width=device-width, initial-
scale=1.0">
<meta http-equiv="X-UA-Compatible" content="ie=edge">
<title>CSS Fonts</title>
<link
href="https://fonts.googleapis.com/css?family=Ubuntu&display=swap"
rel="stylesheet">
<style>
p{
font-family:'Ubuntu', 'Franklin Gothic Medium', 'Arial Narrow', Arial,
sans-serif;
font-size: 33px; /* 1/96th of an inch */
line-height: 1.3em;
}
span{
font-weight: bold;
font-style: italic;
}
</style>
</head>
<body>
<h4>CSS Fonts</h4>
<p>Lets play with <span>fonts</span>. It is very exciting</p>
</body>
</html>
CSS Tutorial: Colors In CSS | Web Development
Tutorials #18
CSS Tutorial: Colors in CSS
In this tutorial, we are going to learn wabout colours in CSS. Start by
making a new file as tut18.html and add an instant boilerplate
through Emmet abbreviation. Give the title as Colors in CSS in
<title> tag under the head section. The basic code for our example
is-
<body>
<h2>This is my first box</h2>
<p id="firstPara">This is a paragraph from first box</p>
<h2>This is my first box</h2>
<p id="secondPara">This is a paragraph from second box</p>
<h2>This is my first box</h2>
<p id="thirdPara">This is a paragraph from third box</p>
</body>
The first method of defining the colour in the CSS is directly writing the
particular colour name. Its example is
#firstPara{ color:blueviolet; /* Color by name */ }
Using the above code, we have changed the colour of our paragraph to blue-
violet.
. The second way of defining colour is with the help of ‘RGB,’ as
shown below. The RGB colour range varies from 0 to 255.
Here, we treat RGB as a function and pass the values in that
function for red, green and blue. As we give different values in the
function, it creates various combinations of different colours
combined with red, green, and blue.
3. The third way is by giving hex colours. However, it is very rarely
used.
#thirdPara{ color: white; background-color: #ff4532; /* Color by
hex value */ }
In the above code, we can see the “#” character. It is used to give
the hexadecimal value of any colour. You will find various
references on the Internet to generate the hexadecimal values of
different colours.
Let us now understand the working of hex colours. Hex colour is
also a kind of RGB. For example, let’s take one hex value
as ‘#60DCA4’, here 60 is red of RGB, DC is green of RGB, and A4 is
the blue of RGB. The same value in RGB for this colour would be
something (96, 220,164).
Colour picker is one of the most interesting things that you will find
in VS code by using any of the colour types. You can select any of
the colours from the colour picker, and the values will automatically
get set by the colour picker for that particular colour type.
The background colour also works the same way as the text colour
works, for example:
#secondPara{ background-color: rgb(0,0,0);
}
Wherever the colour property is used in CSS, you can apply any of
the above three methods. Certain more properties use colour, like
border property and background colour, which we will learn step by
step as we move ahead in building professional websites.
Code as described/written in the video
<!DOCTYPE html>
<html lang="en">
<head>
<meta charset="UTF-8">
<meta name="viewport" content="width=device-width, initial-
scale=1.0">
<meta http-equiv="X-UA-Compatible" content="ie=edge">
<title>Colors in CSS</title>
<style>
#firstPara{
color:blueviolet; /* Color by name */
}
#secondPara{
color: rgb(223, 130, 54); /* Color by rgb value */
}
#thirdPara{
color: white;
background-color: #ff4532; /* Color by hex value */
}
</style>
</head>
<body>
<h2>This is my first box</h2>
<p id="firstPara">This is a paragraph from first box</p>
<h2>This is my first box</h2>
<p id="secondPara">This is a paragraph from second box</p>
<h2>This is my first box</h2>
<p id="thirdPara">This is a paragraph from third box</p>
</body>
</html>
CSS Tutorial: Borders and Backgrounds | Web Development
Tutorials #19
Previously, we have seen about colors in CSS. In this tutorial, we are
going to understand some other CSS properties like height, width,
borders, and backgrounds.
Create a new file named tut19.html and add an instant boilerplate
as usual. Give the title as Height, width, borders and
backgrounds in the <title> tag under the head section.
Our basic HTML code goes like this-
<body>
<h3>This is heading</h3>
<p id="firstPara">This is a paragraph</p>
<h3>This is second heading</h3>
<p id="secondPara">This is my second paragraph</p>
<h3>This is third heading</h3>
<p id="thirdPara">This is my third paragraph</p>
</body>
Let us start by making some changes in the first paragraph. If we
write the code as-
#firstPara{
background-color: red;
height: 100px;
width:455px;
border: 4px solid green;
/* border-width: 4px;
border-color: green;
border-style: solid; */
border-radius: 11px;
}
We will see that the background of the text, will change to red with
a height of 100px. Talking about its width, it will also be increased
by 455px. Talking about border, we can decide its width, type, color.
In the above example we will see a 4px-solid and green color
border around the text. Border-radius is used to make the ends of
the border curvy. All the changes, you made till now, will look like
this-
Now if the condition arises that you want to give a border only at
one end, then what will you do. Let us understand with an
example-
#secondPara{
background-color: rgb(58, 243, 98);
height: 100px;
width:455px;
border-top: 2px solid rgb(231, 22, 231);
border-right: 2px solid rgb(18, 10, 133);
border-bottom: 2px solid rgba(9, 144, 27, 0.774);
border-left: 2px solid rgb(156, 42, 13);
border-top-left-radius: 4px;
border-top-right-radius: 14px;
border-bottom-left-radius: 8px;
border-bottom-right-radius: 24px;
}
If we want to change the properties of border on the top, it can be
done with border-top. Likewise, we can also change the other
dimensions with the help of border-right, border-
bottom, and border-left as shown in the example. In the same way,
we can modify different ends of border with different properties.
For example, we can write border-top-left-radius as 4px, border-top-
right-radius as 14px, border-bottom-left-radius as 8px, and border-
bottom-right-radius as 24px. All the changes made above, will be
shown as-
Now what if, if you want to add a background image behind the
text that you have written. Let us understand this with the code-
#thirdPara{
height: 500px;
width:455px;
background-image:
url('https://codewithharry.com/static/common/img/photo.png');
border: 2px solid red;
background-repeat: no-repeat; /* repeat-x and repeat-y will make
it repeat on x and y axis */
/* background-position: 192px 34px; */
background-position: center center;
/* background-position: bottom right; */
/* background-position: top center; */
}
There are two methods for adding a background image. Firstly, you
can add directly by adding an URL of the image from website.
Secondly, if you are having the files on your local computer, you can
directly copy the path of the image. Background position is used to
align the image at different positions as per the instructions given.
You can see the changes made below-
So, I believe you must understood the concepts of different other
properties related to borders and colors. You can try out different
other combinations of these properties to get better knowledge.
Code as described/written in the video
<!DOCTYPE html>
<html lang="en">
<head>
<meta charset="UTF-8">
<meta name="viewport" content="width=device-width, initial-
scale=1.0">
<meta http-equiv="X-UA-Compatible" content="ie=edge">
<title>Height, width, borders and backgrounds </title>
<style>
#firstPara{
background-color: red;
height: 100px;
width:455px;
border: 4px solid green;
/* border-width: 4px;
border-color: green;
border-style: solid; */
border-radius: 11px;
}
#secondPara{
background-color: rgb(58, 243, 98);
height: 100px;
width:455px;
border-top: 2px solid rgb(231, 22, 231);
border-right: 2px solid rgb(18, 10, 133);
border-bottom: 2px solid rgba(9, 144, 27, 0.774);
border-left: 2px solid rgb(156, 42, 13);
border-top-left-radius: 4px;
border-top-right-radius: 14px;
border-bottom-left-radius: 8px;
border-bottom-right-radius: 24px;
}
#thirdPara{
height: 500px;
width:455px;
background-image:
url('https://codewithharry.com/static/common/img/photo.png');
border: 2px solid red;
background-repeat: no-repeat; /* repeat-x and repeat-y will
make it repeat on x and y axis */
/* background-position: 192px 34px; */
background-position: center center;
/* background-position: bottom right; */
/* background-position: top center; */
}
</style>
</head>
<body>
<h3>This is heading</h3>
<p id="firstPara">This is a paragraph</p>
<h3>This is second heading</h3>
<p id="secondPara">This is my second paragraph</p>
<h3>This is third heading</h3>
<p id="thirdPara">This is my third paragraph</p>
</body>
</html>
CSS Tutorial: CSS Box Model, Margin and Padding
| Web Development Tutorials #20
In this tutorial, we are going to study the concept of the box
model in CSS. The box model is a very important topic of CSS and if
not understood properly, it can create a lot of confusion in the
future. It is the basic framework of web development whether you
are making a website using any other language such as Angular or
React. The box model helps us to define the padding, border,
and margin around an element. So from the above diagram we can
see where all these things lie around the element. The element is in
the center surrounded by padding, border and margin.
These parts can be explained as-
• Content- The content of the box, where text and images appear.
• Padding- It clears an area around the content. The padding is
transparent.
• Border- A border is one that covers the padding and content.
• Margin- It clears an area outside the border. The margin is also
transparent.
Let us understand more by writing CSS-
.container{
background-color: rgb(231, 230, 241);
border: 3px solid rgb(64, 6, 119);
/* We can set margin/padding for top, bottom, left and right like
this */
/* padding-top: 79px;
padding-bottom: 79px;
padding-left: 34px;
padding-right: 79px;*/
/* margin-top: 3px;
margin-bottom: 5px;
margin-left: 34px;
margin-right:5px ; */
/* margin = top right bottom left; */
/* padding = top right bottom left; */
/* padding: 23px 56px 6px 78px; */
/* margin: 23px 56px 6px 78px; */
/* padding: y(top/bottom) x(left/right); */
/* margin: y(top/bottom) x(left/right); */
padding: 34px 19px;
margin: 14px 19px;
border-radius: 23px;
width: 533px
}
There is padding or margin shorthand for all directions. The first
value is for top, 2nd value is for the bottom, 3rd value is for left and
4th value is for right.
padding: 23px 56px 6px 78px;
margin: 23px 56px 6px 78px;
There is another technique for using the shorthand technique if you
want to give the same values for left/right and top/bottom. The first
value is the same for both the top and bottom and the second value
is the same for both left and right. The two values can be
represented as x and y values.
padding: 23px 56px;
Border radius is used to apply an arc type shape in each corner of
the border and its code is written as below:
padding: 23px 56px;
Let us now understand a property called ‘Box sizing’. On giving
width to the element and after that applying padding in the
container, the width also changes. It is because in the actual width
of an element, margin is already been added into it. If you want this
not to happen then you can use the property of ‘box-sizing’.
box-sizing: border-box;
Now if you change the padding then it will adjust the width
according to the padding.
We can take the help of universal selector in the CSS to apply the
property of box-sizing in all the elements available. It is denoted
with a ‘*’.
• { box-sizing: border-box; margin: 0; padding: 0; }
So I believe the concept of CSS Box Model and Box Sizing is
understood to you. To understand more deeply, you can try to
change the values and see all the necessary changes.
Code as described/written in the video
<!DOCTYPE html>
<html lang="en">
<head>
<meta charset="UTF-8">
<meta name="viewport" content="width=device-width, initial-
scale=1.0">
<meta http-equiv="X-UA-Compatible" content="ie=edge">
<title>Box Model</title>
<style>
* {
box-sizing: border-box;
margin: 0;
padding: 0;
}
body{
background-color: #e6cbf8;
}
.container{
background-color: rgb(231, 230, 241);
border: 3px solid rgb(64, 6, 119);
/* We can set margin/padding for top, bottom, left and right
like this */
/* padding-top: 79px;
padding-bottom: 79px;
padding-left: 34px;
padding-right: 79px;*/
/* margin-top: 3px;
margin-bottom: 5px;
margin-left: 34px;
margin-right:5px ; */
/* margin = top right bottom left; */
/* padding = top right bottom left; */
/* padding: 23px 56px 6px 78px; */
/* margin: 23px 56px 6px 78px; */
/* padding: y(top/bottom) x(left/right); */
/* margin: y(top/bottom) x(left/right); */
padding: 34px 19px;
margin: 14px 19px;
border-radius: 23px;
width: 533px;
}
</style>
</head>
<body>
<div class="container">
<h3>This is my heading</h3>
<p id="first">Lorem ipsum dolor sit amet consectetur,
adipisicing elit. Incidunt harum quis, quibusdam, minima molestiae
tempore vel magni, repellendus doloribus debitis rerum tenetur
eveniet.</p>
</div>
<div class="container">
<h3>This is my heading</h3>
<p id="second">Lorem ipsum dolor sit amet consectetur,
adipisicing elit. Incidunt harum quis, quibusdam, minima molestiae
tempore vel magni, repellendus doloribus debitis rerum tenetur
eveniet.</p>
</div>
<div class="container">
<h3>This is my heading</h3>
<p id="third">Lorem ipsum dolor sit amet consectetur,
adipisicing elit. Incidunt harum quis, quibusdam, minima molestiae
tempore vel magni, repellendus doloribus debitis rerum tenetur
eveniet.</p>
</div>
</body>
</html>
CSS Tutorial: Float & Clear Explained | Web Development
Tutorials #21
In this tutorial, we are going to see about different types of
alignments available in CSS. We will start by making a new file
called tut21.html and add the boilerplate to get the basic HTML
code. Give the title as Alignment in the <title> tag.
The CSS float property specifies how an element should float. The
CSS clear property specifies what elements can float beside the
cleared element and on which side. The float property is used for
positioning and formatting content, for example, let an image float
left to the text in a container. The float property can have one of one
of the following values-
• Left- The elements floats to the left of its container.
• Right- The elements floats to the right of its container.
• None- The element does not float (it will be displayed just where
it occurs in the text). This is default.
• Inherit- The element inherits the float value of its parent.
Let us imagine that we are making a grocery store website and
accordingly sell the things.
For the CSS section, we will make different IDs and classes to specify
different properties to each item listed. Let us start by defining the
classes
.container {
width: 900px;
border: 3px solid purple;
background-color: rgb(250, 226, 205);
margin: 33px auto;
}
.item {
border: 3px solid grey;
margin: 12px 3px;
padding: 12px 3px;
background: rgb(248, 238, 238);
The auto property of margin allows to automatically adjust the
margin equally on the both the ends. The result will be as follows as
such-
To float the elements, right or left we can target them by their IDs.
Let us target all the elements as shown below-
#fruit {
float: right;
width: 48%;
}
#computer {
float: left;
width: 48%;
}
#stationary {
/* float: left; */
clear: both;
clear: left;
width: 100%;
}
Initially, if you set the width as 50% for all three, then the result
would be as follows-
If we add some more texts to fruit and computer and remove
the float: left option from stationary then we find that fruit and
computer will float on the right side of the container and overlaps
the stationary section as follows-
To avoid this, we use the property known as clear. If we write clear:
both, then both the other elements will not overlap the stationary
section.
For paragraphs, we have different alignments options like right, left,
center, and justify. The right alignment will move the texts to the
right, left alignment to the left side and so on.
p, h3 {
/* text-align: right;
text-align: left;
text-align: center; */
text-align: justify;
}
However, now we do not use the float and clear property much.
Instead, we use the properties like flexboxes. But then too the
concepts of float and clear should be known to you. In the
upcoming tutorials, we will see more different layouts like
navigation bars etc. Till then stay tuned with the tutorials.
Code as described/written in the video
<!DOCTYPE html>
<html lang="en">
<head>
<meta charset="UTF-8">
<meta name="viewport" content="width=device-width, initial-
scale=1.0">
<meta http-equiv="X-UA-Compatible" content="ie=edge">
<title>Alignment</title>
<link
href="https://fonts.googleapis.com/css?family=Ubuntu&display=s
wap" rel="stylesheet">
<style>
* {
box-sizing: border-box;
}
body {
font-family: 'Ubuntu', sans-serif;
}
.container {
width: 900px;
border: 3px solid purple;
background-color: rgb(250, 226, 205);
margin: 33px auto;
}
.item {
border: 3px solid grey;
margin: 12px 3px;
padding: 12px 3px;
background: rgb(248, 238, 238);
}
#fruit {
float: right;
width: 48%;
}
#computer {
float: left;
width: 48%;
}
#stationary {
/* float: left; */
clear: both;
clear: left;
width: 100%;
}
p, h3 {
/* text-align: right;
text-align: left;
text-align: center; */
text-align: justify;
}
h1 {
margin: 23px auto;
width: 455px;
}
</style>
</head>
<body>
<div class="container">
<h1> Welcome to my store </h1>
<div id="fruit" class="item">
<h3>Fruits</h3>
<p id="fruitpara" class="para">Lorem ipsum dolor sit, amet
consectetur adipisicing elit. Blanditiis
quibusdam explicabo, porro magnam quas sint enim
cumque minima odit cupiditate ex itaque, eaque
distinctio sed ipsam totam, nihil tenetur. Recusandae.
Lorem ipsum dolor, sit amet consectetur
adipisicing elit. Aspernatur fugiat iusto vel. Qui, veniam
nam, enim dolore deleniti dignissimos
veritatis tenetur animi sunt voluptatem laboriosam, nihil
inventore molestias totam. Quas ducimus
quibusdam quaerat necessitatibus.</p>
</div>
<div id="computer" class="item">
<h3>Computer</h3>
<p id="computerpara" class="para">Lorem ipsum dolor sit,
amet consectetur adipisicing elit. Blanditiis
quibusdam explicabo, porro magnam quas sint enim
cumque minima odit cupiditate ex itaque, eaque
distinctio sed ipsam totam, nihil tenetur. Recusandae.
Lorem ipsum dolor sit amet consectetur
adipisicing elit. Rerum commodi vitae exercitationem
necessitatibus laboriosam corporis dicta, eveniet
architecto reprehenderit eum id repudiandae deleniti
fugiat fugit inventore ea dolorum neque amet nulla
vero culpa. Accusamus.</p>
</div>
<div id="stationary" class="item">
<h3>Stationary</h3>
<p id="stationarypara" class="para">Lorem ipsum dolor sit,
amet consectetur adipisicing elit. Blanditiis
quibusdam explicabo, porro magnam quas sint enim
cumque minima odit cupiditate ex itaque, eaque
distinctio sed ipsam totam, nihil tenetur.
Recusandae.</p>
</div>
<div id="glasses" class="item">
<h3>Stationary</h3>
<p id="glassespara" class="para">Lorem ipsum dolor sit,
amet consectetur adipisicing elit. Blanditiis
quibusdam explicabo, porro magnam quas sint enim
cumque minima odit cupiditate ex itaque, eaque
distinctio sed ipsam totam, nihil tenetur. Recusandae.</p>
</div>
</div>
</body>
</html>
CSS Tutorial: Styling Links & Buttons | Web Development
Tutorials #22
In this tutorial, we are going to see how to style and design buttons
in CSS and what are pseudo-selectors. We will start by making a
new file as tut22.html and then adding the boilerplate to it. Give
the title as Pseudo selectors and more designing in the <title> tag.
Let us now add the basic CSS code to style the HTML part-
.container{
border: 2px solid red;
background-color: rgb(223, 245, 201);
padding: 34px;
margin: 34px auto;
width: 666px;
}
After writing it, you will observe the changes as follows-
We will now design two types of buttons. One will be a normal
button and another will be linking to some website. The codes of
both are as below-
<a href="https://yahoo.com" class="btn">Read more</a> <button
class="btn">Contact us</button>
You will observe that both the buttons will look different.
Therefore, to make it look little attractive, we will do some styling in
it with CSS.
.btn{
font-family: 'Segoe UI', Tahoma, Geneva, Verdana, sans-serif;
font-weight: bold;
background-color: crimson;
padding:6px;
border: none;
cursor:pointer;
font-size: 13px;
border-radius: 4px;
}
To remove the underline in the link part we have to style the anchor
tag as-
a{ text-decoration: none; color: black; }
Let us now see what Pseudo Selectors are. A pseudo class is used
to define a special state of an element.
Hover is used to change the color of text or background of a button
as soon as you hover that part. The code for this is as below.
a:hover{ color: rgb(5, 0, 0); background-color: rgb(221, 166, 38);
}Copy
The next Pseudo selector is Visited. As soon as you visit the anchor
tag button and click the link mentioned, it changes its color. To apply
this property, write the code as follows-
a:visited{ background-color: yellow; }Copy
The next selector is Active. If you visit any button, and click it, it
becomes active and showcases with different properties. The code
for this is-
a:active{ background-color:darkblue; }Copy
Similarly we can put pseudo selector in the ‘btn’ class as well. To
apply it write the code as follows-
.btn:hover{
color:darkgoldenrod;
background-color:rgb(223, 245, 201);
border: 2px solid black;
}
To learn more about different buttons and pseudo selectors you can
visit the website called Bootstrap. There you will find more buttons
and properties related to them. You can see and practice some of
the properties mentioned there and increase your skills. Till then
you can visit the previous tutorials and practice all the things taught
till now. In the upcoming tutorials, we are going to learn more and
more CSS properties and make a website look more attractive from
the scratch.
Code as described/written in the video
<!DOCTYPE html>
<html lang="en">
<head>
<meta charset="UTF-8">
<meta name="viewport" content="width=device-width, initial-
scale=1.0">
<meta http-equiv="X-UA-Compatible" content="ie=edge">
<title>Pseudo selectors & more designing</title>
<style>
.container{
border: 2px solid red;
background-color: rgb(223, 245, 201);
padding: 34px;
margin: 34px auto;
width: 666px;
}
a{
text-decoration: none;
color: black;
}
a:hover{
color: rgb(5, 0, 0);
background-color: rgb(221, 166, 38);
}
a:visited{
background-color: yellow;
}
a:active{
background-color:darkblue;
}
.btn{
font-family: 'Segoe UI', Tahoma, Geneva, Verdana, sans-
serif;
font-weight: bold;
background-color: crimson;
padding:6px;
border: none;
cursor:pointer;
font-size: 13px;
border-radius: 4px;
}
.btn:hover{
color:darkgoldenrod;
background-color:rgb(223, 245, 201);
border: 2px solid black;
}
</style>
</head>
<body>
<div class="container" id="cont1">
<h3>This is my heading</h3>
<p>Lorem ipsum dolor sit amet consectetur adipisicing elit.
Obcaecati, reprehenderit. Quam culpa eius aliquam id cumque
saepe, provident odio sed eos quia nihil modi error voluptate vero
autem quibusdam aperiam exercitationem! Quam, consequuntur
velit.</p>
<a href="https://yahoo.com" class="btn">Read more</a>
<button class="btn">Contact us</button>
</div>
</body>
</html>
CSS Tutorial: Creating a Navigation Menu | Web
Development Tutorials #23
We have discussed various things till now in the CSS from adjusting
the borders to styling the links. Here, we are going to see what
are Navigation Bars in a website and how to apply them.
We will start by making a new file called tut23.html and add the
boilerplate to obtain the basic HTML code. Give the title
as Navigation in the <title> tag under the head section.
A navigation bar is usually a list of links, so using the <ul> and <li>
elements can help in obtaining it. The code for the following will be
as follows-
<header>
<nav class="navbar">
<ul>
<li><a href="#">Home</a></li>
<li><a href="#">About</a></li>
<li><a href="#">Services</a></li>
<li><a href="#">Contact us</a></li>
<div class="search">
<input type="text" name="search" id="search"
placeholder="Search this website">
</div>
</ul>
</nav>
</header>
We will now target the navbar class and apply some CSS to make it
look more attractive.
First we will change the color of the navigation bar and make its
ends circular.
.navbar{
background-color: black;
border-radius: 30px;
}
In the next step, we will make all the nav elements come in single
horizontal line
.navbar li{
float:left;
list-style: none;
margin: 13px 20px;
}
The list-style property is used to remove all the bulleted points in
the navigation items.
After writing the above code, the background gets removed as it has
been overflown by the parent element. To avoid this, we have to
write-
.navbar ul{
overflow: auto; }
Now we will add padding to the all the elements present in the
navbar-
.navbar li a{
padding: 3px 3px;
text-decoration: none;
color: white;
}
We can also add the search bar in the navigation menu. To do this,
we have to write-
<div class="search">
<input type="text" name="search" id="search"
placeholder="Search this website">
</div>
This will create a search bar in the navigation menu. We can style
the search tag by-
.search{
float: right;
color: white;
padding: 12px 75px;
}
We can style the menu available in the navigation bar as-
.navbar input{
border: 2px solid black;
border-radius: 14px;
padding: 3px 17px;
width: 129px;
}
Within the ‘navbar’, for styling the input tag we can include the
border, border-radius, padding, and width as shown above. We can
also adjust the padding and other properties using the inspect
element on the web page as per your requirements.
We can also add the hover effect in all the li’s. It means whenever
we place the pointer on those elements it should change its color.
.navbar li a:hover{
color: red }
We have set the color to red and now when you hover over the
‘Home’, ‘About’, ‘Services’, ‘Contact-us’, it will change its color to
red. You can also add ‘padding-top’ to adjust the elements.
I hope you must have understood how to add the navigation bar
into the website and make it look according to yourself. To learn
more, stay with the tutorials and keep practicing the things taught
till now.
Code as described/written in the video
<!DOCTYPE html>
<html lang="en">
<head>
<meta charset="UTF-8">
<meta name="viewport" content="width=device-width, initial-
scale=1.0">
<meta http-equiv="X-UA-Compatible" content="ie=edge">
<title>Navigation</title>
<style>
.navbar{
background-color: black;
border-radius: 30px;
}
.navbar ul{
overflow: auto;
}
.navbar li{
float:left;
list-style: none;
margin: 13px 20px;
}
.navbar li a{
padding: 3px 3px;
text-decoration: none;
color: white;
}
.navbar li a:hover{
color: red
}
.search{
float: right;
color: white;
padding: 12px 75px;
}
.navbar input{
border: 2px solid black;
border-radius: 14px;
padding: 3px 17px;
width: 129px;
}
</style>
</head>
<body>
<header>
<nav class="navbar">
<ul>
<li><a href="#">Home</a></li>
<li><a href="#">About</a></li>
<li><a href="#">Services</a></li>
<li><a href="#">Contact us</a></li>
<div class="search">
<input type="text" name="search" id="search" placeholder="Search this
website">
</div>
</ul>
</nav>
</header>
</body>
</html>
CSS Tutorial: CSS Display Property | Web Development
Tutorials #24
In this tutorial, we are going to learn about CSS Display
Property. The display CSS property sets whether an element is
treated as a block or inline element and the layout used for its
children, such as flow layout, grid or flex.
We will start by making a new file as tut24.html and adding a
boilerplate as usual. Give the title as CSS Display Property in the
<title> tag. We will then add an image or logo and the h3 heading,
in the header section with the class as “top”.
Let us style the image and heading with some CSS-
img {
margin: auto;
display: block;
width: 34px;
}
h3 {
text-align: center;
font-family: 'Segoe UI', Tahoma, Geneva, Verdana, sans-serif;
margin: 0px;
}
By inspecting both the elements in the Chrome browser, we see
that the image is an inline element and the h3 heading is
the block element. Our objective is to bring all the elements to the
center of the webpage. We can achieve it by adjusting the width of
the block element i.e. the heading. The respective code of the
following is-
header {
border: 2px solid red;
margin: auto;
width: 1200px; }
The display of “img” is inline and therefore, to make it come to
center, we have to set the property display as block as follows-
img {
margin: auto;
display: block;
width: 34px;
}
The next problem which arises is that when we stretch the full width
of the page, the text in the heading moves towards left. So to move it
towards the center, we can set the property of text-alignment as
center.
Display inline means it will take the space according to the size of the
element. Display block means we can set its width and by margin
manually.
Now suppose we want to make an element inline as well as customize
its width too, then in that case we can use inline-block. To understand
it, first we will add three divs with some texts in it and then style it. To
appear those as a box, we can take the help of container and box
class. We can style the box element as
.box {
border: 4px solid black;
background-color: grey;
margin: 4px 0px;
padding: 23px; width: 33%;
box-sizing: border-box;
display: inline-block;
}
The inline-block property here allows us to change the width of
inline elements also. To ensure that all the three blocks come in a
single line, we can use the property box-sizing. It ensure that the
width we provide is not changed including padding and margin.
So I believe, you must have clearly understood the concept CSS
Display Property. Stay with the tutorials to build more attractive
websites in the future. Till then, keep practicing.
Code as described/written in the video
<!DOCTYPE html>
<html lang="en">
<head>
<meta charset="UTF-8">
<meta name="viewport" content="width=device-width, initial-
scale=1.0">
<meta http-equiv="X-UA-Compatible" content="ie=edge">
<title>CSS Display property</title>
<style>
*{
box-sizing: border-box;
}
header {
border: 2px solid red;
margin: auto;
width: 1200px;
}
img {
margin: auto;
display: block;
width: 34px;
}
h3 {
text-align: center;
font-family: 'Segoe UI', Tahoma, Geneva, Verdana, sans-
serif;
margin: 0px;
}
.box {
border: 4px solid black;
background-color: grey;
margin: 4px 0px;
padding: 23px;
width: 33%;
box-sizing: border-box;
display: inline-block;
}
.container{
margin: auto;
width: 1200px;
}
</style>
</head>
<body>
<header class="top">
<img
src="https://codewithharry.com/static/common/img/photo.png"
alt="">
<h3>Welcome to Harry's Blog</h3>
</header>
<div class="container">
<div class="box">
<h4 class="heading">Heading</h4>
<p>Lorem, ipsum dolor sit amet consectetur adipisicing elit.
Maiores, harum ipsam aliquid deleniti, vitae
labore cum laudantium a blanditiis est voluptates
dolorum consequuntur. Aliquam corporis, fuga
consectetur rerum molestias consequatur tempora natus
sed laborum recusandae fugit harum soluta
inventore enim. Aspernatur aperiam cum
reprehenderit!</p>
</div><div class="box">
<h4 class="heading">Heading</h4>
<p>Lorem, ipsum dolor sit amet consectetur adipisicing elit.
Maiores, harum ipsam aliquid deleniti, vitae
labore cum laudantium a blanditiis est voluptates
dolorum consequuntur. Aliquam corporis, fuga
consectetur rerum molestias consequatur tempora natus
sed laborum recusandae fugit harum soluta
inventore enim. Aspernatur aperiam cum
reprehenderit!</p>
</div>
</div>
</body>
</html>
CSS Tutorial: Position absolute, relative, fixed and
sticky in CSS | Web Development Tutorials #25
This tutorial begins where the #24 tutorial left off. In this tutorial, we
will discuss the position property of CSS. With the help of CSS, you
can put your HTML elements at the position of your choice. After
going through this tutorial, you will master the differences in the
positioning of the elements. So, without wasting any time, let's start
discussing the CSS positioning-related properties.
Types Of Position Property :
There are five types of position property :
• static
• relative
• absolute
• fixed
• sticky
position: static;
It is the default position of HTML elements.
position: relative;
• It is used when we need to position an HTML element relative to
its normal position.
• We can set the top, right, bottom, and left properties that will
cause the element to adjust away from the normal position.
Example: We have used the below CSS to design four boxes as shown
in the given image :
<!DOCTYPE html>
<html lang="en">
<head>
<meta charset="UTF-8">
<meta name="viewport" content="width=device-width, initial-
scale=1.0">
<title>CSS Position Tutorial</title>
<style>
.box{
border: 2px solid red;
display: inline-block;
width: 150px;
height: 150px;
margin: 2px;
}
</style>
</head>
<body>
<div class="box" id="box1"></div>
<div class="box" id="box2"></div>
<div class="box" id="box3"></div>
<div class="box" id="box4"></div>
</body>
</html>
The default position of all the boxes in the above image is static.
Now, we will change the position from static to relative of box 3.
Here is the CSS used :
<style>
.box {
border: 2px solid red;
display: inline-block;
width: 150px;
height: 150px;
margin: 2px;
}
#box3 {
position: relative;
top: 34px;
left: 34px;
}
</style>
You can see in the image given below that box3 has shifted 34px
away from the top and left side relative to its normal position.
position: absolute;
• An element with the absolute position will move according to
the position of its parent element.
• In the absence of any parent element, the HTML element will be
placed relative to the page.
Now, we have changed the position of box3 from relative to
absolute. Here is the CSS used :
<style>
.box {
border: 2px solid red;
display: inline-block;
width: 150px;
height: 150px;
margin: 2px;
}
#box3 {
position: absolute;
top: 34px;
left: 34px;
}
.container{
border: 2px solid black;
background-color: khaki;
height: 3444px;
}
</style>
You can see in the image given below that the box3 has moved to
the left side of the page.
position: fixed;
• An element with position:fixed; will remain stuck to a specific
position even after the page is scrolled.
• This position property is used when we want to keep an HTML
element at a fixed spot no matter where on the page the user is.
Notice the box fixed at the top right corner of the page in the image
given below. Here is the CSS used :
<!DOCTYPE html>
<html lang="en">
<head>
<meta charset="UTF-8">
<meta name="viewport" content="width=device-width, initial-
scale=1.0">
<title>Fixed Position In CSS</title>
<style>
.box{
border: 2px solid red;
display: inline-block;
width: 150px;
height: 150px;
margin: 2px;
}
#box3{
position: fixed;
right: 4px;
}
</style>
</head>
<body>
<div class="box" id="box1"></div>
<div class="box" id="box2"></div>
<div class="box" id="box3"></div>
<div class="box" id="box4"></div>
</body>
</html>
position: sticky;
• It is a hybrid of relative and fixed position.
• An HTML element with position:sticky; will just sit there until a
given position offset is met.
Use the CSS given below to get a better understanding of the sticky
element.
#box3 {
position: sticky;
top: 3px;
}
We have learnt various properties of CSS, and in the next tutorial,
we will design a gym website using the HTML and CSS we have learnt
so far. This tutorial ends here, and I will see you in the next tutorial.
Code as described/written in the video
<!DOCTYPE html>
<html lang="en">
<head>
<meta charset="UTF-8">
<meta name="viewport" content="width=device-width,
initial-scale=1.0">
<meta http-equiv="X-UA-Compatible" content="ie=edge">
<title>Document</title>
<style>
.container{
border: 2px solid black;
background-color: khaki;
height: 3444px;
}
/* CSS Position: static (default), relative, absolute, fixed, sticky */
.box{
display: inline-block;
border: 2px solid red;
width: 150px;
height: 150px;
margin: 2px;
}
#box3{
/* relative: Positions the element relative to its normal
positon and will leave a gap at its normal position*/
/* position: relative; */
/* absolute: Positions the element relative to the positon of
its first parent*/
/* position: absolute; */
/* top: 34px;
left: 134px; */
/* fixed: Positions the element relative to the browser
window; */
/* position: fixed;
right: 4px;
bottom: 2px */
/* sticky: Positions the element relative to the users scroll
position */
position: sticky;
top: 3px;
}
</style>
</head>
<body>
<div class="container">
<div class="box" id="box1">1</div>
<div class="box" id="box2">2</div>
<div class="box" id="box3">Chat with us</div>
<div class="box" id="box4">4</div>
</div>
</body>
</html>
INTRODUCTIONS OF CSS

Weitere ähnliche Inhalte

Was ist angesagt?

CSS Foundations, pt 2
CSS Foundations, pt 2CSS Foundations, pt 2
CSS Foundations, pt 2
Shawn Calvert
 

Was ist angesagt? (17)

HTML, CSS and Java Scripts Basics
HTML, CSS and Java Scripts BasicsHTML, CSS and Java Scripts Basics
HTML, CSS and Java Scripts Basics
 
Html & CSS
Html & CSSHtml & CSS
Html & CSS
 
CSS3 Introduction
CSS3 IntroductionCSS3 Introduction
CSS3 Introduction
 
Advanced Cascading Style Sheets
Advanced Cascading Style SheetsAdvanced Cascading Style Sheets
Advanced Cascading Style Sheets
 
Css training tutorial css3 &amp; css4 essentials
Css training tutorial css3 &amp; css4 essentialsCss training tutorial css3 &amp; css4 essentials
Css training tutorial css3 &amp; css4 essentials
 
html-css
html-csshtml-css
html-css
 
Web development using HTML and CSS
Web development using HTML and CSSWeb development using HTML and CSS
Web development using HTML and CSS
 
CSS
CSSCSS
CSS
 
Unit 2.1
Unit 2.1Unit 2.1
Unit 2.1
 
HTML CSS JS in Nut shell
HTML  CSS JS in Nut shellHTML  CSS JS in Nut shell
HTML CSS JS in Nut shell
 
HTML CSS | Computer Science
HTML CSS | Computer ScienceHTML CSS | Computer Science
HTML CSS | Computer Science
 
HTML email design and usability
HTML email design and usabilityHTML email design and usability
HTML email design and usability
 
css-tutorial
css-tutorialcss-tutorial
css-tutorial
 
CSS Foundations, pt 2
CSS Foundations, pt 2CSS Foundations, pt 2
CSS Foundations, pt 2
 
Full
FullFull
Full
 
Html css java script basics All about you need
Html css java script basics All about you needHtml css java script basics All about you need
Html css java script basics All about you need
 
Cascading Style Sheets - CSS - Tutorial
Cascading Style Sheets - CSS  -  TutorialCascading Style Sheets - CSS  -  Tutorial
Cascading Style Sheets - CSS - Tutorial
 

Ähnlich wie INTRODUCTIONS OF CSS

Teched Inetrgation ppt and lering in simple
Teched Inetrgation ppt  and lering in simpleTeched Inetrgation ppt  and lering in simple
Teched Inetrgation ppt and lering in simple
JagadishBabuParri
 
Css introduction
Css introductionCss introduction
Css introduction
Sridhar P
 

Ähnlich wie INTRODUCTIONS OF CSS (20)

Lecture-6.pptx
Lecture-6.pptxLecture-6.pptx
Lecture-6.pptx
 
Css
CssCss
Css
 
IP - Lecture 6, 7 Chapter-3 (3).ppt
IP - Lecture 6, 7 Chapter-3 (3).pptIP - Lecture 6, 7 Chapter-3 (3).ppt
IP - Lecture 6, 7 Chapter-3 (3).ppt
 
Introduction to css
Introduction to cssIntroduction to css
Introduction to css
 
HTML to CSS Basics Exer 2.pptx
HTML to CSS Basics Exer 2.pptxHTML to CSS Basics Exer 2.pptx
HTML to CSS Basics Exer 2.pptx
 
The CSS Handbook
The CSS HandbookThe CSS Handbook
The CSS Handbook
 
Introduction to css
Introduction to cssIntroduction to css
Introduction to css
 
Structuring your CSS for maintainability: rules and guile lines to write CSS
Structuring your CSS for maintainability: rules and guile lines to write CSSStructuring your CSS for maintainability: rules and guile lines to write CSS
Structuring your CSS for maintainability: rules and guile lines to write CSS
 
Css introduction
Css  introductionCss  introduction
Css introduction
 
cascading style sheet(css).pptx
cascading style sheet(css).pptxcascading style sheet(css).pptx
cascading style sheet(css).pptx
 
Pfnp slides
Pfnp slidesPfnp slides
Pfnp slides
 
Advanced Web Programming Chapter 8
Advanced Web Programming Chapter 8Advanced Web Programming Chapter 8
Advanced Web Programming Chapter 8
 
Teched Inetrgation ppt and lering in simple
Teched Inetrgation ppt  and lering in simpleTeched Inetrgation ppt  and lering in simple
Teched Inetrgation ppt and lering in simple
 
Css
CssCss
Css
 
Introduction to css
Introduction to cssIntroduction to css
Introduction to css
 
Introduction to CSS
Introduction to CSSIntroduction to CSS
Introduction to CSS
 
CSS.pptx
CSS.pptxCSS.pptx
CSS.pptx
 
Css introduction
Css introductionCss introduction
Css introduction
 
Cascading Style Sheets
Cascading Style SheetsCascading Style Sheets
Cascading Style Sheets
 
David Weliver
David WeliverDavid Weliver
David Weliver
 

Kürzlich hochgeladen

Artificial Intelligence: Facts and Myths
Artificial Intelligence: Facts and MythsArtificial Intelligence: Facts and Myths
Artificial Intelligence: Facts and Myths
Joaquim Jorge
 

Kürzlich hochgeladen (20)

Handwritten Text Recognition for manuscripts and early printed texts
Handwritten Text Recognition for manuscripts and early printed textsHandwritten Text Recognition for manuscripts and early printed texts
Handwritten Text Recognition for manuscripts and early printed texts
 
Apidays New York 2024 - The value of a flexible API Management solution for O...
Apidays New York 2024 - The value of a flexible API Management solution for O...Apidays New York 2024 - The value of a flexible API Management solution for O...
Apidays New York 2024 - The value of a flexible API Management solution for O...
 
Tata AIG General Insurance Company - Insurer Innovation Award 2024
Tata AIG General Insurance Company - Insurer Innovation Award 2024Tata AIG General Insurance Company - Insurer Innovation Award 2024
Tata AIG General Insurance Company - Insurer Innovation Award 2024
 
Strategies for Unlocking Knowledge Management in Microsoft 365 in the Copilot...
Strategies for Unlocking Knowledge Management in Microsoft 365 in the Copilot...Strategies for Unlocking Knowledge Management in Microsoft 365 in the Copilot...
Strategies for Unlocking Knowledge Management in Microsoft 365 in the Copilot...
 
From Event to Action: Accelerate Your Decision Making with Real-Time Automation
From Event to Action: Accelerate Your Decision Making with Real-Time AutomationFrom Event to Action: Accelerate Your Decision Making with Real-Time Automation
From Event to Action: Accelerate Your Decision Making with Real-Time Automation
 
GenCyber Cyber Security Day Presentation
GenCyber Cyber Security Day PresentationGenCyber Cyber Security Day Presentation
GenCyber Cyber Security Day Presentation
 
Boost PC performance: How more available memory can improve productivity
Boost PC performance: How more available memory can improve productivityBoost PC performance: How more available memory can improve productivity
Boost PC performance: How more available memory can improve productivity
 
How to Troubleshoot Apps for the Modern Connected Worker
How to Troubleshoot Apps for the Modern Connected WorkerHow to Troubleshoot Apps for the Modern Connected Worker
How to Troubleshoot Apps for the Modern Connected Worker
 
Boost Fertility New Invention Ups Success Rates.pdf
Boost Fertility New Invention Ups Success Rates.pdfBoost Fertility New Invention Ups Success Rates.pdf
Boost Fertility New Invention Ups Success Rates.pdf
 
🐬 The future of MySQL is Postgres 🐘
🐬  The future of MySQL is Postgres   🐘🐬  The future of MySQL is Postgres   🐘
🐬 The future of MySQL is Postgres 🐘
 
Apidays New York 2024 - Scaling API-first by Ian Reasor and Radu Cotescu, Adobe
Apidays New York 2024 - Scaling API-first by Ian Reasor and Radu Cotescu, AdobeApidays New York 2024 - Scaling API-first by Ian Reasor and Radu Cotescu, Adobe
Apidays New York 2024 - Scaling API-first by Ian Reasor and Radu Cotescu, Adobe
 
Developing An App To Navigate The Roads of Brazil
Developing An App To Navigate The Roads of BrazilDeveloping An App To Navigate The Roads of Brazil
Developing An App To Navigate The Roads of Brazil
 
GenAI Risks & Security Meetup 01052024.pdf
GenAI Risks & Security Meetup 01052024.pdfGenAI Risks & Security Meetup 01052024.pdf
GenAI Risks & Security Meetup 01052024.pdf
 
Advantages of Hiring UIUX Design Service Providers for Your Business
Advantages of Hiring UIUX Design Service Providers for Your BusinessAdvantages of Hiring UIUX Design Service Providers for Your Business
Advantages of Hiring UIUX Design Service Providers for Your Business
 
[2024]Digital Global Overview Report 2024 Meltwater.pdf
[2024]Digital Global Overview Report 2024 Meltwater.pdf[2024]Digital Global Overview Report 2024 Meltwater.pdf
[2024]Digital Global Overview Report 2024 Meltwater.pdf
 
A Year of the Servo Reboot: Where Are We Now?
A Year of the Servo Reboot: Where Are We Now?A Year of the Servo Reboot: Where Are We Now?
A Year of the Servo Reboot: Where Are We Now?
 
Connector Corner: Accelerate revenue generation using UiPath API-centric busi...
Connector Corner: Accelerate revenue generation using UiPath API-centric busi...Connector Corner: Accelerate revenue generation using UiPath API-centric busi...
Connector Corner: Accelerate revenue generation using UiPath API-centric busi...
 
The 7 Things I Know About Cyber Security After 25 Years | April 2024
The 7 Things I Know About Cyber Security After 25 Years | April 2024The 7 Things I Know About Cyber Security After 25 Years | April 2024
The 7 Things I Know About Cyber Security After 25 Years | April 2024
 
Artificial Intelligence: Facts and Myths
Artificial Intelligence: Facts and MythsArtificial Intelligence: Facts and Myths
Artificial Intelligence: Facts and Myths
 
AWS Community Day CPH - Three problems of Terraform
AWS Community Day CPH - Three problems of TerraformAWS Community Day CPH - Three problems of Terraform
AWS Community Day CPH - Three problems of Terraform
 

INTRODUCTIONS OF CSS

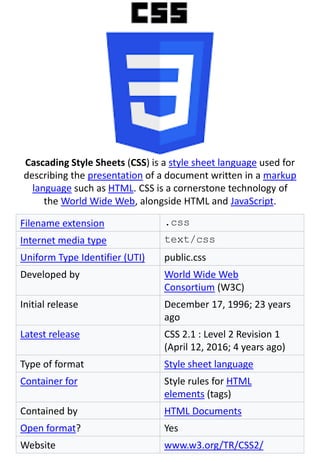
  • 1. Cascading Style Sheets (CSS) is a style sheet language used for describing the presentation of a document written in a markup language such as HTML. CSS is a cornerstone technology of the World Wide Web, alongside HTML and JavaScript. Filename extension .css Internet media type text/css Uniform Type Identifier (UTI) public.css Developed by World Wide Web Consortium (W3C) Initial release December 17, 1996; 23 years ago Latest release CSS 2.1 : Level 2 Revision 1 (April 12, 2016; 4 years ago) Type of format Style sheet language Container for Style rules for HTML elements (tags) Contained by HTML Documents Open format? Yes Website www.w3.org/TR/CSS2/
  • 2. CSS Tutorial: Introduction to CSS | Web Development Tutorials #13 CSS Tutorial- Introduction To CSS So finally, after completing HTML, we are moving towards the exciting part, i.e. CSS. CSS stands for Cascading Style Sheets and is used to design the website to make it look attractive. Let us first understand, what is CSS? CSS gives style to raw HTML It stands for Cascading Style Sheets CSS is used to give style to our web pages CSS is used to make websites responsive CSS takes the responsibility of design in your websites CSS includes all the things which can be used to design the raw HTML from colouring the background and texts, to adjust the borders, give padding, etc. Moreover, CSS helps in making websites responsive. Responsive means that the site will behave accordingly to the different screen sizes. For example, if you open a website on a desktop and then on your mobile, you will find the difference between their displays. All the components in a navigation bar will move into a hamburger icon if you open the website on mobile. We can add styles in the HTML part itself, but I would rather recommend making a new CSS file and then attach it to the HTML part. It is so because it is a professional practice when different developers are working on a single website to keep the skeleton of a website in one file and the styling in another file. Role of CSS CSS is a style sheet language that is used to handle the presentation of the web page containing HTML. It makes our websites beautiful and modern looking.
  • 3. CSS Syntax The syntax of CSS is- P { color: blue; } P stands for the selector and it decides which part of the HTML the CSS will be applied. It states where the CSS property is to be applied. Property is used to describe which property you want to change or add. Whether you have to change colour, border, background, width, all these come under property. The last section is for defining the value. All the properties will be changed according to the value we provide. We can also target multiple properties at one time. The syntax is as follows- header, p.intro { background-color: red; border-radius: 3px, }
  • 4. In the above example, we have changed the header tag and the paragraph tag with a class intro to change the background colour to red and border-radius to 3 pixels. There are three ways to Add CSS- 1. Inline CSS- CSS is added to the elements directly using the style attributes. 2. Internal CSS- CSS is kept inside the head tags in <style> tags 3. External CSS- CSS is kept separately inside a .CSS style sheet. It involves two steps- First, write the CSS in.CSS file. Include that CSS file to Markup. From the next tutorial, we will start doing the practical implementation of applying CSS in the Visual Studio Code.
  • 5. Code as described/written in the video <!DOCTYPE html> <html lang="en"> <head> <meta charset="UTF-8"> <meta name="viewport" content="width=device-width, initial- scale=1.0"> <meta http-equiv="X-UA-Compatible" content="ie=edge"> <title>CSS Tutorial</title> <style> p{ color:rgb(245, 184, 245); background-color: seagreen !important; } </style> <link rel="stylesheet" href="tut13.css"> </head> <body> <h3>This is CSS Tutorial</h3> <!-- <p style="color: red; background-color: yellow;">This tutorial will teach you everything you need to know about HTML/CSS</p> --> <p>This tutorial will teach you everything you need to know about HTML/CSS</p> </body> </html> Code as described/written in the video p{ color: greenyellow; background-color: hotpink; }
  • 6. CSS Tutorial: Inline, Internal & External CSS | Web Development Tutorials #14 CSS Tutorial- Inline, Internal, and External CSS Welcome, everyone! As in the last tutorial, we have seen there are three methods of writing CSS- Inline, Internal, and External. Here, we will discuss all these three methods and do some real implementations of CSS. To start this tutorial, first, we will make a new file as tut13.html and add the boilerplate. For our convenience, we will give the title as CSS Tutorial in the <title> tag. Inline CSS allows you to apply a unique style to one HTML element at a time. You can assign the Inline CSS to a specific HTML element by using the style attribute with any CSS properties defined within it. Let us try to understand this with an example. <body> <h1>This is CSS tutorial</h1> <p style= “color: red;”>This tutorial will teach you everything you need to know about CSS</p> </body> By writing the above code, we will see the changes as-
  • 7. You must be thinking this is the best way to add CSS on the website but I will let you know that it is not the best method to style your HTML. If you add too much Inline CSS, then your HTML will become too messy to understand for you. Internal CSS is used to define a style tag for a single HTML page. It is defined in the <head> section within a <style> element. Let us understand the External CSS with the help of an example. <head> <style> p{ color: purple; } <style> <head> By writing the above code, we will get the output as-
  • 8. One important point to note here is, Inline CSS is given more priority than Internal CSS. External CSS is mostly used when you want to make changes on multiple pages. It is an ideal condition because it facilitates you to change the look of the entire website by changing just one file. We will add the stylesheet in the <head> section using <link> tag. <head> <link rel= “stylesheet” href= “tut13.css”> <head> Then in tut13.css file, we can write our CSS- p{ Color: greenyellow; } By writing this code, and linking it to the HTML file, you notice the change-
  • 9. The point here to remember is that whether it is the Internal CSS or the External CSS, whichever is written after, gets the priority. But if you want that first one should get priority, so you can add important after it. The result will be, it will get the most priority of all. So I hope you must have understood all the three types of CSS used to style our website. From the next tutorials, we will see some more interesting properties about CSS. Till then stay with the tutorials and keep practicing whatever is taught till now. CSS Tutorial: Selectors in CSS | Web Development Tutorials #15 In the last tutorial, we have discussed different methods to write CSS. Here, we are going forward to learn different selectors in CSS. CSS selectors are used to select any content you want to style. These are the part of CSS ruleset. CSS selectors select HTML elements according to its id, class, type, attribute, etc. • CSS Selectors are used to target HTML elements. • Selectors make it easy for us to easily target single/multiple HTML elements in the markup. We will see four types of CSS Selectors: • CSS element Selector • CSS id Selector • CSS class Selector • The CSS grouping Selector As discussed in one of the previous videos, the basic syntax of writing the CSS is- p {color: blue;}
  • 10. In the example above, ‘p’ is the selector. It will convert all the paragraph into blue. So let us now start by making a new file as tut14.html and as usual, add an instant boilerplate Visual Studio Code. Give the title as CSS Selectors in the <title> tag. In this example, we will be using Internal CSS, not Inline CSS. However, you can also use External CSS. I will be explaining using internal CSS as I want everything to be within the page. Let us start with the simple example- Element Selector <h3>CSS Selectors</h3> <p id="firstPara">This is a simple paragraph to demonstrate css selectors</p> <p id="secondPara" class="redElement bgBlue">This is a another simple paragraph to demonstrate css selectors</p> <div> <p>This is yet another simple paragraph inside div to demonstrate css selectors</p> </div> The above code will convert all the three paragraphs into red colour as shown below-
  • 11. Class Selector If we want to select a paragraph and assign multiple properties to it, then we can use Class Selector. Let us understand with an example- <style> .redElement{ Color: red; } .bgBlue{ Background-color: blue; } </style> <body> <h3>CSS Selectors</h3> <p>This is a simple paragraph to demonstrate css selectors</p> <p id="secondPara" class="redElement bgBlue">This is a another simple paragraph to demonstrate css selectors</p> <div> <p>This is yet another simple paragraph inside div to demonstrate css selectors</p> </div> </body> This will convert only the second paragraph with class “redElement” and “bgBlue” as shown below-
  • 12. ID Selector If we want to select the only paragraph to show any change, then we will be using ID selector. Let us understand with an example- <style> #firstPara{ color: green; } </style> <body> <h3>CSS Selectors</h3> <p id="firstPara">This is a simple paragraph to demonstrate css selectors</p> <p>This is a another simple paragraph to demonstrate css selectors</p> <div> <p>This is yet another simple paragraph inside div to demonstrate css selectors</p> </div> </body> By writing the above code we will see the changes as follows-
  • 13. Grouping Selector Grouping Selector is used when we have to make changes in more than one element. Let us understand with an example. Suppose we have two elements footer and span and we want the same changes in both the elements. Then we can do the following- <style> footer, span{ Background-color: pink; } </style> <body> <h3>CSS Selectors</h3> <p>This is a simple paragraph to demonstrate css selectors</p> <p>This is a another simple paragraph to demonstrate css selectors</p> <div> <p>This is yet another simple paragraph inside div to demonstrate css selectors</p> <span>this is span</span> </div> <footer>This is footer</footer> </body> So, I believe, you must have understood the basic concepts of CSS Selectors. Till now, you must keep two points in your mind- There are three ways of writing CSS- Inline, Internal, and External. How to do the basic selections of CSS selectors.
  • 14. Code as described/written in the video <!DOCTYPE html> <html lang="en"> <head> <meta charset="UTF-8"> <meta name="viewport" content="width=device-width, initial-scale=1.0"> <meta http-equiv="X-UA-Compatible" content="ie=edge"> <title>CSS Selectors</title> <style> /* Element selector */ p{ border: 2px solid red; } /* Id selector */ #firstPara{ color: green; } /* Class selector */ .bgBlue{ color: yellow; background-color: blue; } /* Grouping selector */ footer, span{ background-color: pink; } </style> </head> <body> <h3>CSS Selectors</h3> <p id="firstPara">This is a simple paragraph to demonstrate css selectors</p> <p id="secondPara" class="redElement bgBlue">This is a another simple paragraph to demonstrate css selectors</p> <div> <p>This is yet another simple paragraph inside div to demonstrate css selectors</p> <span>this is span</span> </div> <footer>This is footer</footer> </body> </html>
  • 15. CSS Tutorial: Using Chrome Developer Tools | Web Development Tutorials #16 Till now in this web development series tutorial, we have seen a lot of things. Here we are going to use the developer tools provide by chrome. As a beginner, I would highly recommend using a Chrome browser above all if there is not any specific reason. Start by making a new file named tut16.html, and add the boilerplate. Give the title as Developer Tools in the <title> tag. Let us start by writing the simple code- <style> p{ color: purple; font-style: italic; background-color: rosybrown; } .bgPrimary{ background-color: #82c2ff; } </style> </head> <body> <h4 class="bgPrimary">Developer tools tutorial</h4> <p>This is a tutorial for Chrome developer tools</p> </body>
  • 16. After running your code, if you will right-click anywhere in the browser then you will see an inspect element option. By clicking on it you will be able to see the original code. From here you can make some changes in the webpage and can observe it. However, it does not change the original code on your server. Developer Tools are used to make any changes into your code and see the instant effect on your web page. This change is not a permanent. But if you like any change made in the developer tools, you can do the same in original file in VS code and refresh the page. That particular change will now reflect back permanently. Inspect Element allows us to make and view the changes in any of the websites present all over the world I have explained that how these changes are only reflecting on your local server. When you will reload that page again, all the things will set back to their default set up. In this way, you can use the developer tools of chrome. User Agent Stylesheet By default, chrome sets some property for some elements and store some default values in it. So the browser by default styles some element according to it and that styling is particularly known as user's agent style sheet. Basically it is showing the default value of browser that previously what changes were there and what changes you have made now on your page. There is also a console section where you can write JavaScript code. Sources section contains all the source codes that you have written. The most important thing in this tutorial was elements that we have already discussed. We can directly change our styles using CSS directly.
  • 17. Some tips while defining a color class:- Do not directly use the name of the color as the class name instead use  colorprimary  colorsuccess  Colorwarning As writing these looks more professional and also helps in future to maintain our codes. So, I believe you must have learned something about Developer Tools and how to use them. The more practicing and playing around Inspect Elements will help you in learning faster. Code as described/written in the video <!DOCTYPE html> <html lang="en"> <head> <meta charset="UTF-8"> <meta name="viewport" content="width=device-width, initial- scale=1.0"> <meta http-equiv="X-UA-Compatible" content="ie=edge"> <title>Developer tools</title> <style> p{ color: purple; font-style: italic; background-color: rosybrown; } .bgPrimary{ background-color: #82c2ff; } </style>
  • 18. </head> <body> <h4 class="bgPrimary">Developer tools tutorial</h4> <p>This is a tutorial for Chrome developer tools</p> </body> </html> CSS Tutorial: Fonts In CSS | Web Development Tutorials #17 CSS Tutorial: Fonts in CSS In this tutorial, we are going to learn about different Fonts in CSS. They act as a backbone of the whole CSS. The CSS font properties define the font family, boldness, size, and the style of a text. As always, let us start the tutorial by making a new file named tut17.html and add an instant boilerplate. After this, give the title as CSS Fonts under the <title> tags in the <head> section. <body> <h4>CSS Fonts</h4> <p>Lets play with <span>fonts</span>. It is very exciting</p> </body> This is a very basic code as an example to start playing around different fonts. In CSS, we have two types of fonts- web-safe fonts and web fonts. Web saved fonts are the fonts that come pre- installed with most of the operating systems, therefore, using these fonts you will never encounter any error. But on the other hand, some fonts are not shipped with the OS; so to use them, we need to import them from the web. We can also use the technique of font stack. A font stack is a list of fonts that are listed in order of preference you would like them to appear in case some fonts are not loading. The example of this is shown below-
  • 19. p {font-family:'Ubuntu', 'Franklin Gothic Medium', 'Arial Narrow', Arial, sans-serif;} This list will be iterated until the specified font is not available in the system. To see the whole list of web saved fonts, there is a very good website called CSS Font Stack. It provides the complete list of web saved fonts. Talking about web fonts, we can easily import them from Google. To import the code, there is no website better than Google Fonts. To use it, simply copy the style-sheet and add it to your code and update the font stack with the specific font you desire. The next property is font size. p { font-family: ‘Franklin Gothic Medium’, ‘Aerial Narrow’, Aerial, sans-serif; font-size: 33px; } Font Size is used to set the size of a font. In the above example, we used our font size to be 33px. Pixel ‘px’ is the unit of the font size and it is 1/96th of an inch. The next property is line-height. Line-height is the spacing between the fonts (current font and previous font). p {font-family: ‘Franklin Gothic Medium’, ‘Aerial Narrow’, Aerial, sans-serif; font-size: 23px; line-height: 1.8em; } Next property is font-weight. The font weight property sets how thick or thin character in text should be displayed. p{ font-family: ‘Franklin Gothic Medium’, ‘Aerial Narrow’, Aerial, sans-serif; font-size: 23px; line-height: 1.8em; font-weight: bold; }
  • 20. There are various other font properties. Most of the important ones are covered in this tutorial. You can now test different other font properties as well. As a beginner, I would recommend not to learn all the CSS properties until you learn to make a simple website. You can take the help of references available anytime but for it, you should know the basics. Code as described/written in the video <!DOCTYPE html> <html lang="en"> <head> <meta charset="UTF-8"> <meta name="viewport" content="width=device-width, initial- scale=1.0"> <meta http-equiv="X-UA-Compatible" content="ie=edge"> <title>CSS Fonts</title> <link href="https://fonts.googleapis.com/css?family=Ubuntu&display=swap" rel="stylesheet"> <style> p{ font-family:'Ubuntu', 'Franklin Gothic Medium', 'Arial Narrow', Arial, sans-serif; font-size: 33px; /* 1/96th of an inch */ line-height: 1.3em; } span{ font-weight: bold; font-style: italic; } </style> </head> <body> <h4>CSS Fonts</h4> <p>Lets play with <span>fonts</span>. It is very exciting</p> </body> </html>
  • 21. CSS Tutorial: Colors In CSS | Web Development Tutorials #18 CSS Tutorial: Colors in CSS In this tutorial, we are going to learn wabout colours in CSS. Start by making a new file as tut18.html and add an instant boilerplate through Emmet abbreviation. Give the title as Colors in CSS in <title> tag under the head section. The basic code for our example is- <body> <h2>This is my first box</h2> <p id="firstPara">This is a paragraph from first box</p> <h2>This is my first box</h2> <p id="secondPara">This is a paragraph from second box</p> <h2>This is my first box</h2> <p id="thirdPara">This is a paragraph from third box</p> </body> The first method of defining the colour in the CSS is directly writing the particular colour name. Its example is #firstPara{ color:blueviolet; /* Color by name */ } Using the above code, we have changed the colour of our paragraph to blue- violet.
  • 22. . The second way of defining colour is with the help of ‘RGB,’ as shown below. The RGB colour range varies from 0 to 255. Here, we treat RGB as a function and pass the values in that function for red, green and blue. As we give different values in the function, it creates various combinations of different colours combined with red, green, and blue. 3. The third way is by giving hex colours. However, it is very rarely used. #thirdPara{ color: white; background-color: #ff4532; /* Color by hex value */ }
  • 23. In the above code, we can see the “#” character. It is used to give the hexadecimal value of any colour. You will find various references on the Internet to generate the hexadecimal values of different colours. Let us now understand the working of hex colours. Hex colour is also a kind of RGB. For example, let’s take one hex value as ‘#60DCA4’, here 60 is red of RGB, DC is green of RGB, and A4 is the blue of RGB. The same value in RGB for this colour would be something (96, 220,164). Colour picker is one of the most interesting things that you will find in VS code by using any of the colour types. You can select any of the colours from the colour picker, and the values will automatically get set by the colour picker for that particular colour type. The background colour also works the same way as the text colour works, for example: #secondPara{ background-color: rgb(0,0,0); } Wherever the colour property is used in CSS, you can apply any of the above three methods. Certain more properties use colour, like border property and background colour, which we will learn step by step as we move ahead in building professional websites. Code as described/written in the video <!DOCTYPE html> <html lang="en"> <head> <meta charset="UTF-8"> <meta name="viewport" content="width=device-width, initial- scale=1.0"> <meta http-equiv="X-UA-Compatible" content="ie=edge"> <title>Colors in CSS</title>
  • 24. <style> #firstPara{ color:blueviolet; /* Color by name */ } #secondPara{ color: rgb(223, 130, 54); /* Color by rgb value */ } #thirdPara{ color: white; background-color: #ff4532; /* Color by hex value */ } </style> </head> <body> <h2>This is my first box</h2> <p id="firstPara">This is a paragraph from first box</p> <h2>This is my first box</h2> <p id="secondPara">This is a paragraph from second box</p> <h2>This is my first box</h2> <p id="thirdPara">This is a paragraph from third box</p> </body> </html>
  • 25. CSS Tutorial: Borders and Backgrounds | Web Development Tutorials #19 Previously, we have seen about colors in CSS. In this tutorial, we are going to understand some other CSS properties like height, width, borders, and backgrounds. Create a new file named tut19.html and add an instant boilerplate as usual. Give the title as Height, width, borders and backgrounds in the <title> tag under the head section. Our basic HTML code goes like this- <body> <h3>This is heading</h3> <p id="firstPara">This is a paragraph</p> <h3>This is second heading</h3> <p id="secondPara">This is my second paragraph</p> <h3>This is third heading</h3> <p id="thirdPara">This is my third paragraph</p> </body> Let us start by making some changes in the first paragraph. If we write the code as- #firstPara{ background-color: red; height: 100px; width:455px; border: 4px solid green; /* border-width: 4px; border-color: green; border-style: solid; */ border-radius: 11px; }
  • 26. We will see that the background of the text, will change to red with a height of 100px. Talking about its width, it will also be increased by 455px. Talking about border, we can decide its width, type, color. In the above example we will see a 4px-solid and green color border around the text. Border-radius is used to make the ends of the border curvy. All the changes, you made till now, will look like this- Now if the condition arises that you want to give a border only at one end, then what will you do. Let us understand with an example- #secondPara{ background-color: rgb(58, 243, 98); height: 100px; width:455px; border-top: 2px solid rgb(231, 22, 231); border-right: 2px solid rgb(18, 10, 133); border-bottom: 2px solid rgba(9, 144, 27, 0.774); border-left: 2px solid rgb(156, 42, 13); border-top-left-radius: 4px; border-top-right-radius: 14px; border-bottom-left-radius: 8px; border-bottom-right-radius: 24px; }
  • 27. If we want to change the properties of border on the top, it can be done with border-top. Likewise, we can also change the other dimensions with the help of border-right, border- bottom, and border-left as shown in the example. In the same way, we can modify different ends of border with different properties. For example, we can write border-top-left-radius as 4px, border-top- right-radius as 14px, border-bottom-left-radius as 8px, and border- bottom-right-radius as 24px. All the changes made above, will be shown as- Now what if, if you want to add a background image behind the text that you have written. Let us understand this with the code- #thirdPara{ height: 500px; width:455px; background-image: url('https://codewithharry.com/static/common/img/photo.png'); border: 2px solid red; background-repeat: no-repeat; /* repeat-x and repeat-y will make it repeat on x and y axis */ /* background-position: 192px 34px; */ background-position: center center; /* background-position: bottom right; */ /* background-position: top center; */ }
  • 28. There are two methods for adding a background image. Firstly, you can add directly by adding an URL of the image from website. Secondly, if you are having the files on your local computer, you can directly copy the path of the image. Background position is used to align the image at different positions as per the instructions given. You can see the changes made below- So, I believe you must understood the concepts of different other properties related to borders and colors. You can try out different other combinations of these properties to get better knowledge. Code as described/written in the video <!DOCTYPE html> <html lang="en"> <head> <meta charset="UTF-8"> <meta name="viewport" content="width=device-width, initial- scale=1.0"> <meta http-equiv="X-UA-Compatible" content="ie=edge"> <title>Height, width, borders and backgrounds </title>
  • 29. <style> #firstPara{ background-color: red; height: 100px; width:455px; border: 4px solid green; /* border-width: 4px; border-color: green; border-style: solid; */ border-radius: 11px; } #secondPara{ background-color: rgb(58, 243, 98); height: 100px; width:455px; border-top: 2px solid rgb(231, 22, 231); border-right: 2px solid rgb(18, 10, 133); border-bottom: 2px solid rgba(9, 144, 27, 0.774); border-left: 2px solid rgb(156, 42, 13); border-top-left-radius: 4px; border-top-right-radius: 14px; border-bottom-left-radius: 8px; border-bottom-right-radius: 24px; } #thirdPara{ height: 500px; width:455px; background-image: url('https://codewithharry.com/static/common/img/photo.png'); border: 2px solid red; background-repeat: no-repeat; /* repeat-x and repeat-y will
  • 30. make it repeat on x and y axis */ /* background-position: 192px 34px; */ background-position: center center; /* background-position: bottom right; */ /* background-position: top center; */ } </style> </head> <body> <h3>This is heading</h3> <p id="firstPara">This is a paragraph</p> <h3>This is second heading</h3> <p id="secondPara">This is my second paragraph</p> <h3>This is third heading</h3> <p id="thirdPara">This is my third paragraph</p> </body> </html> CSS Tutorial: CSS Box Model, Margin and Padding | Web Development Tutorials #20 In this tutorial, we are going to study the concept of the box model in CSS. The box model is a very important topic of CSS and if not understood properly, it can create a lot of confusion in the future. It is the basic framework of web development whether you are making a website using any other language such as Angular or React. The box model helps us to define the padding, border, and margin around an element. So from the above diagram we can see where all these things lie around the element. The element is in the center surrounded by padding, border and margin. These parts can be explained as-
  • 31. • Content- The content of the box, where text and images appear. • Padding- It clears an area around the content. The padding is transparent. • Border- A border is one that covers the padding and content. • Margin- It clears an area outside the border. The margin is also transparent. Let us understand more by writing CSS- .container{ background-color: rgb(231, 230, 241); border: 3px solid rgb(64, 6, 119); /* We can set margin/padding for top, bottom, left and right like this */ /* padding-top: 79px; padding-bottom: 79px; padding-left: 34px; padding-right: 79px;*/
  • 32. /* margin-top: 3px; margin-bottom: 5px; margin-left: 34px; margin-right:5px ; */ /* margin = top right bottom left; */ /* padding = top right bottom left; */ /* padding: 23px 56px 6px 78px; */ /* margin: 23px 56px 6px 78px; */ /* padding: y(top/bottom) x(left/right); */ /* margin: y(top/bottom) x(left/right); */ padding: 34px 19px; margin: 14px 19px; border-radius: 23px; width: 533px } There is padding or margin shorthand for all directions. The first value is for top, 2nd value is for the bottom, 3rd value is for left and 4th value is for right. padding: 23px 56px 6px 78px; margin: 23px 56px 6px 78px; There is another technique for using the shorthand technique if you want to give the same values for left/right and top/bottom. The first value is the same for both the top and bottom and the second value is the same for both left and right. The two values can be represented as x and y values. padding: 23px 56px;
  • 33. Border radius is used to apply an arc type shape in each corner of the border and its code is written as below: padding: 23px 56px; Let us now understand a property called ‘Box sizing’. On giving width to the element and after that applying padding in the container, the width also changes. It is because in the actual width of an element, margin is already been added into it. If you want this not to happen then you can use the property of ‘box-sizing’. box-sizing: border-box; Now if you change the padding then it will adjust the width according to the padding. We can take the help of universal selector in the CSS to apply the property of box-sizing in all the elements available. It is denoted with a ‘*’. • { box-sizing: border-box; margin: 0; padding: 0; } So I believe the concept of CSS Box Model and Box Sizing is understood to you. To understand more deeply, you can try to change the values and see all the necessary changes. Code as described/written in the video <!DOCTYPE html> <html lang="en"> <head> <meta charset="UTF-8"> <meta name="viewport" content="width=device-width, initial- scale=1.0"> <meta http-equiv="X-UA-Compatible" content="ie=edge"> <title>Box Model</title>
  • 34. <style> * { box-sizing: border-box; margin: 0; padding: 0; } body{ background-color: #e6cbf8; } .container{ background-color: rgb(231, 230, 241); border: 3px solid rgb(64, 6, 119); /* We can set margin/padding for top, bottom, left and right like this */ /* padding-top: 79px; padding-bottom: 79px; padding-left: 34px; padding-right: 79px;*/ /* margin-top: 3px; margin-bottom: 5px; margin-left: 34px; margin-right:5px ; */ /* margin = top right bottom left; */ /* padding = top right bottom left; */ /* padding: 23px 56px 6px 78px; */ /* margin: 23px 56px 6px 78px; */
  • 35. /* padding: y(top/bottom) x(left/right); */ /* margin: y(top/bottom) x(left/right); */ padding: 34px 19px; margin: 14px 19px; border-radius: 23px; width: 533px; } </style> </head> <body> <div class="container"> <h3>This is my heading</h3> <p id="first">Lorem ipsum dolor sit amet consectetur, adipisicing elit. Incidunt harum quis, quibusdam, minima molestiae tempore vel magni, repellendus doloribus debitis rerum tenetur eveniet.</p> </div> <div class="container"> <h3>This is my heading</h3> <p id="second">Lorem ipsum dolor sit amet consectetur, adipisicing elit. Incidunt harum quis, quibusdam, minima molestiae tempore vel magni, repellendus doloribus debitis rerum tenetur eveniet.</p> </div> <div class="container"> <h3>This is my heading</h3> <p id="third">Lorem ipsum dolor sit amet consectetur, adipisicing elit. Incidunt harum quis, quibusdam, minima molestiae tempore vel magni, repellendus doloribus debitis rerum tenetur eveniet.</p> </div> </body> </html>
  • 36. CSS Tutorial: Float & Clear Explained | Web Development Tutorials #21 In this tutorial, we are going to see about different types of alignments available in CSS. We will start by making a new file called tut21.html and add the boilerplate to get the basic HTML code. Give the title as Alignment in the <title> tag. The CSS float property specifies how an element should float. The CSS clear property specifies what elements can float beside the cleared element and on which side. The float property is used for positioning and formatting content, for example, let an image float left to the text in a container. The float property can have one of one of the following values- • Left- The elements floats to the left of its container. • Right- The elements floats to the right of its container. • None- The element does not float (it will be displayed just where it occurs in the text). This is default. • Inherit- The element inherits the float value of its parent. Let us imagine that we are making a grocery store website and accordingly sell the things. For the CSS section, we will make different IDs and classes to specify different properties to each item listed. Let us start by defining the classes .container { width: 900px; border: 3px solid purple; background-color: rgb(250, 226, 205); margin: 33px auto; } .item { border: 3px solid grey; margin: 12px 3px; padding: 12px 3px; background: rgb(248, 238, 238);
  • 37. The auto property of margin allows to automatically adjust the margin equally on the both the ends. The result will be as follows as such- To float the elements, right or left we can target them by their IDs. Let us target all the elements as shown below- #fruit { float: right; width: 48%; } #computer { float: left; width: 48%; } #stationary { /* float: left; */ clear: both; clear: left; width: 100%; }
  • 38. Initially, if you set the width as 50% for all three, then the result would be as follows- If we add some more texts to fruit and computer and remove the float: left option from stationary then we find that fruit and computer will float on the right side of the container and overlaps the stationary section as follows-
  • 39. To avoid this, we use the property known as clear. If we write clear: both, then both the other elements will not overlap the stationary section. For paragraphs, we have different alignments options like right, left, center, and justify. The right alignment will move the texts to the right, left alignment to the left side and so on. p, h3 { /* text-align: right; text-align: left; text-align: center; */ text-align: justify; } However, now we do not use the float and clear property much. Instead, we use the properties like flexboxes. But then too the concepts of float and clear should be known to you. In the upcoming tutorials, we will see more different layouts like navigation bars etc. Till then stay tuned with the tutorials. Code as described/written in the video <!DOCTYPE html> <html lang="en"> <head> <meta charset="UTF-8"> <meta name="viewport" content="width=device-width, initial- scale=1.0"> <meta http-equiv="X-UA-Compatible" content="ie=edge"> <title>Alignment</title> <link href="https://fonts.googleapis.com/css?family=Ubuntu&display=s wap" rel="stylesheet">
  • 40. <style> * { box-sizing: border-box; } body { font-family: 'Ubuntu', sans-serif; } .container { width: 900px; border: 3px solid purple; background-color: rgb(250, 226, 205); margin: 33px auto; } .item { border: 3px solid grey; margin: 12px 3px; padding: 12px 3px; background: rgb(248, 238, 238); } #fruit { float: right; width: 48%; } #computer { float: left; width: 48%; }
  • 41. #stationary { /* float: left; */ clear: both; clear: left; width: 100%; } p, h3 { /* text-align: right; text-align: left; text-align: center; */ text-align: justify; } h1 { margin: 23px auto; width: 455px; } </style> </head> <body> <div class="container"> <h1> Welcome to my store </h1> <div id="fruit" class="item"> <h3>Fruits</h3> <p id="fruitpara" class="para">Lorem ipsum dolor sit, amet consectetur adipisicing elit. Blanditiis quibusdam explicabo, porro magnam quas sint enim cumque minima odit cupiditate ex itaque, eaque distinctio sed ipsam totam, nihil tenetur. Recusandae. Lorem ipsum dolor, sit amet consectetur adipisicing elit. Aspernatur fugiat iusto vel. Qui, veniam nam, enim dolore deleniti dignissimos
  • 42. veritatis tenetur animi sunt voluptatem laboriosam, nihil inventore molestias totam. Quas ducimus quibusdam quaerat necessitatibus.</p> </div> <div id="computer" class="item"> <h3>Computer</h3> <p id="computerpara" class="para">Lorem ipsum dolor sit, amet consectetur adipisicing elit. Blanditiis quibusdam explicabo, porro magnam quas sint enim cumque minima odit cupiditate ex itaque, eaque distinctio sed ipsam totam, nihil tenetur. Recusandae. Lorem ipsum dolor sit amet consectetur adipisicing elit. Rerum commodi vitae exercitationem necessitatibus laboriosam corporis dicta, eveniet architecto reprehenderit eum id repudiandae deleniti fugiat fugit inventore ea dolorum neque amet nulla vero culpa. Accusamus.</p> </div> <div id="stationary" class="item"> <h3>Stationary</h3> <p id="stationarypara" class="para">Lorem ipsum dolor sit, amet consectetur adipisicing elit. Blanditiis quibusdam explicabo, porro magnam quas sint enim cumque minima odit cupiditate ex itaque, eaque distinctio sed ipsam totam, nihil tenetur. Recusandae.</p> </div> <div id="glasses" class="item"> <h3>Stationary</h3> <p id="glassespara" class="para">Lorem ipsum dolor sit, amet consectetur adipisicing elit. Blanditiis quibusdam explicabo, porro magnam quas sint enim cumque minima odit cupiditate ex itaque, eaque
  • 43. distinctio sed ipsam totam, nihil tenetur. Recusandae.</p> </div> </div> </body> </html> CSS Tutorial: Styling Links & Buttons | Web Development Tutorials #22 In this tutorial, we are going to see how to style and design buttons in CSS and what are pseudo-selectors. We will start by making a new file as tut22.html and then adding the boilerplate to it. Give the title as Pseudo selectors and more designing in the <title> tag. Let us now add the basic CSS code to style the HTML part- .container{ border: 2px solid red; background-color: rgb(223, 245, 201); padding: 34px; margin: 34px auto; width: 666px; } After writing it, you will observe the changes as follows-
  • 44. We will now design two types of buttons. One will be a normal button and another will be linking to some website. The codes of both are as below- <a href="https://yahoo.com" class="btn">Read more</a> <button class="btn">Contact us</button> You will observe that both the buttons will look different. Therefore, to make it look little attractive, we will do some styling in it with CSS. .btn{ font-family: 'Segoe UI', Tahoma, Geneva, Verdana, sans-serif; font-weight: bold; background-color: crimson; padding:6px; border: none; cursor:pointer; font-size: 13px; border-radius: 4px; } To remove the underline in the link part we have to style the anchor tag as- a{ text-decoration: none; color: black; } Let us now see what Pseudo Selectors are. A pseudo class is used to define a special state of an element. Hover is used to change the color of text or background of a button as soon as you hover that part. The code for this is as below.
  • 45. a:hover{ color: rgb(5, 0, 0); background-color: rgb(221, 166, 38); }Copy The next Pseudo selector is Visited. As soon as you visit the anchor tag button and click the link mentioned, it changes its color. To apply this property, write the code as follows- a:visited{ background-color: yellow; }Copy The next selector is Active. If you visit any button, and click it, it becomes active and showcases with different properties. The code for this is- a:active{ background-color:darkblue; }Copy Similarly we can put pseudo selector in the ‘btn’ class as well. To apply it write the code as follows- .btn:hover{ color:darkgoldenrod; background-color:rgb(223, 245, 201); border: 2px solid black; } To learn more about different buttons and pseudo selectors you can visit the website called Bootstrap. There you will find more buttons and properties related to them. You can see and practice some of the properties mentioned there and increase your skills. Till then you can visit the previous tutorials and practice all the things taught till now. In the upcoming tutorials, we are going to learn more and more CSS properties and make a website look more attractive from the scratch. Code as described/written in the video <!DOCTYPE html> <html lang="en"> <head> <meta charset="UTF-8"> <meta name="viewport" content="width=device-width, initial- scale=1.0">
  • 46. <meta http-equiv="X-UA-Compatible" content="ie=edge"> <title>Pseudo selectors & more designing</title> <style> .container{ border: 2px solid red; background-color: rgb(223, 245, 201); padding: 34px; margin: 34px auto; width: 666px; } a{ text-decoration: none; color: black; } a:hover{ color: rgb(5, 0, 0); background-color: rgb(221, 166, 38); } a:visited{ background-color: yellow; } a:active{ background-color:darkblue; } .btn{ font-family: 'Segoe UI', Tahoma, Geneva, Verdana, sans- serif; font-weight: bold; background-color: crimson; padding:6px; border: none; cursor:pointer; font-size: 13px; border-radius: 4px; }
  • 47. .btn:hover{ color:darkgoldenrod; background-color:rgb(223, 245, 201); border: 2px solid black; } </style> </head> <body> <div class="container" id="cont1"> <h3>This is my heading</h3> <p>Lorem ipsum dolor sit amet consectetur adipisicing elit. Obcaecati, reprehenderit. Quam culpa eius aliquam id cumque saepe, provident odio sed eos quia nihil modi error voluptate vero autem quibusdam aperiam exercitationem! Quam, consequuntur velit.</p> <a href="https://yahoo.com" class="btn">Read more</a> <button class="btn">Contact us</button> </div> </body> </html> CSS Tutorial: Creating a Navigation Menu | Web Development Tutorials #23 We have discussed various things till now in the CSS from adjusting the borders to styling the links. Here, we are going to see what are Navigation Bars in a website and how to apply them. We will start by making a new file called tut23.html and add the boilerplate to obtain the basic HTML code. Give the title as Navigation in the <title> tag under the head section. A navigation bar is usually a list of links, so using the <ul> and <li> elements can help in obtaining it. The code for the following will be as follows-
  • 48. <header> <nav class="navbar"> <ul> <li><a href="#">Home</a></li> <li><a href="#">About</a></li> <li><a href="#">Services</a></li> <li><a href="#">Contact us</a></li> <div class="search"> <input type="text" name="search" id="search" placeholder="Search this website"> </div> </ul> </nav> </header> We will now target the navbar class and apply some CSS to make it look more attractive. First we will change the color of the navigation bar and make its ends circular. .navbar{ background-color: black; border-radius: 30px; } In the next step, we will make all the nav elements come in single horizontal line .navbar li{ float:left; list-style: none; margin: 13px 20px; }
  • 49. The list-style property is used to remove all the bulleted points in the navigation items. After writing the above code, the background gets removed as it has been overflown by the parent element. To avoid this, we have to write- .navbar ul{ overflow: auto; } Now we will add padding to the all the elements present in the navbar- .navbar li a{ padding: 3px 3px; text-decoration: none; color: white; } We can also add the search bar in the navigation menu. To do this, we have to write- <div class="search"> <input type="text" name="search" id="search" placeholder="Search this website"> </div> This will create a search bar in the navigation menu. We can style the search tag by- .search{ float: right; color: white; padding: 12px 75px; }
  • 50. We can style the menu available in the navigation bar as- .navbar input{ border: 2px solid black; border-radius: 14px; padding: 3px 17px; width: 129px; } Within the ‘navbar’, for styling the input tag we can include the border, border-radius, padding, and width as shown above. We can also adjust the padding and other properties using the inspect element on the web page as per your requirements. We can also add the hover effect in all the li’s. It means whenever we place the pointer on those elements it should change its color. .navbar li a:hover{ color: red }
  • 51. We have set the color to red and now when you hover over the ‘Home’, ‘About’, ‘Services’, ‘Contact-us’, it will change its color to red. You can also add ‘padding-top’ to adjust the elements. I hope you must have understood how to add the navigation bar into the website and make it look according to yourself. To learn more, stay with the tutorials and keep practicing the things taught till now. Code as described/written in the video <!DOCTYPE html> <html lang="en"> <head> <meta charset="UTF-8"> <meta name="viewport" content="width=device-width, initial- scale=1.0"> <meta http-equiv="X-UA-Compatible" content="ie=edge"> <title>Navigation</title> <style> .navbar{ background-color: black; border-radius: 30px; } .navbar ul{ overflow: auto; } .navbar li{ float:left; list-style: none; margin: 13px 20px; }
  • 52. .navbar li a{ padding: 3px 3px; text-decoration: none; color: white; } .navbar li a:hover{ color: red } .search{ float: right; color: white; padding: 12px 75px; } .navbar input{ border: 2px solid black; border-radius: 14px; padding: 3px 17px; width: 129px; } </style> </head> <body> <header> <nav class="navbar"> <ul> <li><a href="#">Home</a></li> <li><a href="#">About</a></li> <li><a href="#">Services</a></li> <li><a href="#">Contact us</a></li> <div class="search"> <input type="text" name="search" id="search" placeholder="Search this website"> </div> </ul> </nav> </header> </body> </html>
  • 53. CSS Tutorial: CSS Display Property | Web Development Tutorials #24 In this tutorial, we are going to learn about CSS Display Property. The display CSS property sets whether an element is treated as a block or inline element and the layout used for its children, such as flow layout, grid or flex. We will start by making a new file as tut24.html and adding a boilerplate as usual. Give the title as CSS Display Property in the <title> tag. We will then add an image or logo and the h3 heading, in the header section with the class as “top”. Let us style the image and heading with some CSS- img { margin: auto; display: block; width: 34px; } h3 { text-align: center; font-family: 'Segoe UI', Tahoma, Geneva, Verdana, sans-serif; margin: 0px; } By inspecting both the elements in the Chrome browser, we see that the image is an inline element and the h3 heading is the block element. Our objective is to bring all the elements to the center of the webpage. We can achieve it by adjusting the width of the block element i.e. the heading. The respective code of the following is- header { border: 2px solid red; margin: auto; width: 1200px; }
  • 54. The display of “img” is inline and therefore, to make it come to center, we have to set the property display as block as follows- img { margin: auto; display: block; width: 34px; } The next problem which arises is that when we stretch the full width of the page, the text in the heading moves towards left. So to move it towards the center, we can set the property of text-alignment as center. Display inline means it will take the space according to the size of the element. Display block means we can set its width and by margin manually. Now suppose we want to make an element inline as well as customize its width too, then in that case we can use inline-block. To understand it, first we will add three divs with some texts in it and then style it. To appear those as a box, we can take the help of container and box class. We can style the box element as
  • 55. .box { border: 4px solid black; background-color: grey; margin: 4px 0px; padding: 23px; width: 33%; box-sizing: border-box; display: inline-block; } The inline-block property here allows us to change the width of inline elements also. To ensure that all the three blocks come in a single line, we can use the property box-sizing. It ensure that the width we provide is not changed including padding and margin. So I believe, you must have clearly understood the concept CSS Display Property. Stay with the tutorials to build more attractive websites in the future. Till then, keep practicing.
  • 56. Code as described/written in the video <!DOCTYPE html> <html lang="en"> <head> <meta charset="UTF-8"> <meta name="viewport" content="width=device-width, initial- scale=1.0"> <meta http-equiv="X-UA-Compatible" content="ie=edge"> <title>CSS Display property</title> <style> *{ box-sizing: border-box; } header { border: 2px solid red; margin: auto; width: 1200px; } img { margin: auto; display: block; width: 34px; } h3 { text-align: center; font-family: 'Segoe UI', Tahoma, Geneva, Verdana, sans- serif; margin: 0px; }
  • 57. .box { border: 4px solid black; background-color: grey; margin: 4px 0px; padding: 23px; width: 33%; box-sizing: border-box; display: inline-block; } .container{ margin: auto; width: 1200px; } </style> </head> <body> <header class="top"> <img src="https://codewithharry.com/static/common/img/photo.png" alt=""> <h3>Welcome to Harry's Blog</h3> </header> <div class="container"> <div class="box"> <h4 class="heading">Heading</h4> <p>Lorem, ipsum dolor sit amet consectetur adipisicing elit. Maiores, harum ipsam aliquid deleniti, vitae labore cum laudantium a blanditiis est voluptates dolorum consequuntur. Aliquam corporis, fuga consectetur rerum molestias consequatur tempora natus sed laborum recusandae fugit harum soluta inventore enim. Aspernatur aperiam cum reprehenderit!</p>
  • 58. </div><div class="box"> <h4 class="heading">Heading</h4> <p>Lorem, ipsum dolor sit amet consectetur adipisicing elit. Maiores, harum ipsam aliquid deleniti, vitae labore cum laudantium a blanditiis est voluptates dolorum consequuntur. Aliquam corporis, fuga consectetur rerum molestias consequatur tempora natus sed laborum recusandae fugit harum soluta inventore enim. Aspernatur aperiam cum reprehenderit!</p> </div><div class="box"> <h4 class="heading">Heading</h4> <p>Lorem, ipsum dolor sit amet consectetur adipisicing elit. Maiores, harum ipsam aliquid deleniti, vitae labore cum laudantium a blanditiis est voluptates dolorum consequuntur. Aliquam corporis, fuga consectetur rerum molestias consequatur tempora natus sed laborum recusandae fugit harum soluta inventore enim. Aspernatur aperiam cum reprehenderit!</p> </div> </div> </body> </html>
  • 59. CSS Tutorial: Position absolute, relative, fixed and sticky in CSS | Web Development Tutorials #25 This tutorial begins where the #24 tutorial left off. In this tutorial, we will discuss the position property of CSS. With the help of CSS, you can put your HTML elements at the position of your choice. After going through this tutorial, you will master the differences in the positioning of the elements. So, without wasting any time, let's start discussing the CSS positioning-related properties. Types Of Position Property : There are five types of position property : • static • relative • absolute • fixed • sticky position: static; It is the default position of HTML elements. position: relative; • It is used when we need to position an HTML element relative to its normal position. • We can set the top, right, bottom, and left properties that will cause the element to adjust away from the normal position. Example: We have used the below CSS to design four boxes as shown in the given image :
  • 60. <!DOCTYPE html> <html lang="en"> <head> <meta charset="UTF-8"> <meta name="viewport" content="width=device-width, initial- scale=1.0"> <title>CSS Position Tutorial</title> <style> .box{ border: 2px solid red; display: inline-block; width: 150px; height: 150px; margin: 2px; } </style> </head> <body> <div class="box" id="box1"></div> <div class="box" id="box2"></div> <div class="box" id="box3"></div> <div class="box" id="box4"></div> </body> </html>
  • 61. The default position of all the boxes in the above image is static. Now, we will change the position from static to relative of box 3. Here is the CSS used : <style> .box { border: 2px solid red; display: inline-block; width: 150px; height: 150px; margin: 2px; } #box3 { position: relative; top: 34px; left: 34px; } </style> You can see in the image given below that box3 has shifted 34px away from the top and left side relative to its normal position.
  • 62. position: absolute; • An element with the absolute position will move according to the position of its parent element. • In the absence of any parent element, the HTML element will be placed relative to the page. Now, we have changed the position of box3 from relative to absolute. Here is the CSS used : <style> .box { border: 2px solid red; display: inline-block; width: 150px; height: 150px; margin: 2px; } #box3 { position: absolute; top: 34px; left: 34px; } .container{ border: 2px solid black; background-color: khaki; height: 3444px; } </style> You can see in the image given below that the box3 has moved to the left side of the page.
  • 63. position: fixed; • An element with position:fixed; will remain stuck to a specific position even after the page is scrolled. • This position property is used when we want to keep an HTML element at a fixed spot no matter where on the page the user is. Notice the box fixed at the top right corner of the page in the image given below. Here is the CSS used : <!DOCTYPE html> <html lang="en"> <head> <meta charset="UTF-8"> <meta name="viewport" content="width=device-width, initial- scale=1.0"> <title>Fixed Position In CSS</title>
  • 64. <style> .box{ border: 2px solid red; display: inline-block; width: 150px; height: 150px; margin: 2px; } #box3{ position: fixed; right: 4px; } </style> </head> <body> <div class="box" id="box1"></div> <div class="box" id="box2"></div> <div class="box" id="box3"></div> <div class="box" id="box4"></div> </body> </html>
  • 65. position: sticky; • It is a hybrid of relative and fixed position. • An HTML element with position:sticky; will just sit there until a given position offset is met. Use the CSS given below to get a better understanding of the sticky element. #box3 { position: sticky; top: 3px; } We have learnt various properties of CSS, and in the next tutorial, we will design a gym website using the HTML and CSS we have learnt so far. This tutorial ends here, and I will see you in the next tutorial. Code as described/written in the video <!DOCTYPE html> <html lang="en"> <head> <meta charset="UTF-8"> <meta name="viewport" content="width=device-width, initial-scale=1.0"> <meta http-equiv="X-UA-Compatible" content="ie=edge"> <title>Document</title> <style> .container{ border: 2px solid black; background-color: khaki; height: 3444px; }
  • 66. /* CSS Position: static (default), relative, absolute, fixed, sticky */ .box{ display: inline-block; border: 2px solid red; width: 150px; height: 150px; margin: 2px; } #box3{ /* relative: Positions the element relative to its normal positon and will leave a gap at its normal position*/ /* position: relative; */ /* absolute: Positions the element relative to the positon of its first parent*/ /* position: absolute; */ /* top: 34px; left: 134px; */ /* fixed: Positions the element relative to the browser window; */ /* position: fixed; right: 4px; bottom: 2px */ /* sticky: Positions the element relative to the users scroll position */ position: sticky; top: 3px; }
  • 67. </style> </head> <body> <div class="container"> <div class="box" id="box1">1</div> <div class="box" id="box2">2</div> <div class="box" id="box3">Chat with us</div> <div class="box" id="box4">4</div> </div> </body> </html>