1. K.D Polytechnic, Patan Advance Java Programming
1
UNIT- 2 (ABSTRACT WINDOW TOOLKIT –AWT)
1. AWT Introduction:
AWT means Abstract Window Toolkit.
Java AWT is an API to develop GUI(Graphical User Interface) or window based application in
java.
Java AWT components are platform-dependent that means components are displayed
according to the view of operating system.
“Java AWT calls native platform (Operating systems) subroutine for creating components such
as textbox, checkbox, button etc. For example an AWT GUI having a button would have a
different look and feel across platforms like windows, Mac OS & Unix, this is because these
platforms have different look and feel for their native buttons and AWT directly calls their native
subroutine that creates the button. In simple, an application build on AWT would look like a
windows application when it runs on Windows, but the same application would look like a Mac
application when runs on Mac OS.”
AWT is heavyweight. Its components use the resources of system.
The java awt package provides classes for AWT API such as TextField , Label ,TextArea
,RadioButton, CheckBox, List etc
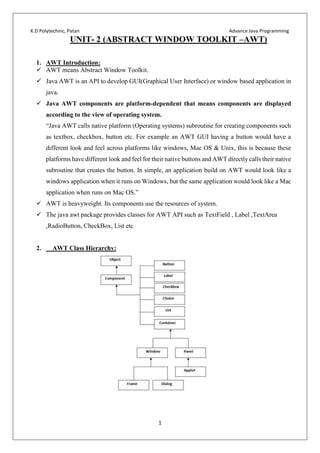
2. AWT Class Hierarchy:
2. K.D Polytechnic, Patan Advance Java Programming
2
3. Windows Fundamentals:
Component
Component is an object having a graphical representation that can be displayed on the screen
and that can interact with the user. For examples buttons, checkboxes, list and scrollbars of a
graphical user interface.
Container:
It is a subclass of component class.
It works as a container for other AWT components.
Container is responsible for laying out components that it contains.
The Container is a component in AWT that can contain another components like buttons,
textfields, labels etc.
The classes that extends Container class are known as container such as Frame, Dialog and
Panel.
Window:
•Window class is derived from Container class.
•It creates top level window that is not contained within other object.
•It sits directly on the desktop.
•Window is the container that has no borders and menu bars.
•It is a rectangular area which is displayed on the screen.
•A window that you want to create for your application is not directly created using window
class.
•You must use frame, dialog or another window for creating a window.
Panel
Panel class id derived from Container class.
Panel is the container that doesn't contain title bar and menu bars.
It can have other components like button, textfieldetc.
It is concrete subclass of Container.
It does not add any new methods in the Container class but it simply implements the
Container class.
It works as super class for Applet.
The default LayoutManager of Panel is Flow Layout.
Ex: Panel p1= new Panel();
p1.add(new Button());
Frame
3. K.D Polytechnic, Patan Advance Java Programming
3
Frame class is derived from Window class.
Frame is the container that has title bar, menu bar, borders, and resizing corners.
It is a top-level window & subclass of the Window class.
It can have other components like button, textfield etc.
Dialog
Dialog is a window that takes input from the user.
It is used to display message, list of options etc.
Component: Components are elementary GUI entities (suchasButton,Label,andTextField.)
Container:Containers(suchasFrame,PanelandApplet)are used to hold components in a specific
layout(such as flow or grid).A container can also hold sub-containers.
Each GUI program has atop-level container. The commonly-used top-level containers in
AWT are Frame,Dialog, Scrollpane and Applet:
4. Frame Windows
A window that you want to create for your application is not directly created using
window class, but it is created using a subclass of Window class known as Frame
A Frame provides the main window for the GUI application, which has title bar
(containing an icon, a title, minimize, maximize/restore down and close buttons), an
optional menu bar, and the content display area
When a frame object is created, by default it is invisible and it is of 0 X 0 Pixels
Then, you must set the size of the frame using setSize
You must call show() or setVisible method to make the frame appear on the screen
Frame Class Constructors:
4. K.D Polytechnic, Patan Advance Java Programming
4
1.Frame() : It creates a Frame window that does not have a Title.
2.Frame(String title) : It will create a Frame window with the title specified by title
parameter.
Frame Class Methods:
1. setSize(): It is used to specify the size of the Frame window.
Syntax : void setSize(int Width, int Height) ;
Frame f = new Frame();
f.setSize(200,200);
2. setTitle(): It is used to set title in the Title bar of the Frame window.
Syntax: void setTitle(String Title);
Frame f = new Frame();
f.setTitle(“My Frame”);
3. getTitle() : It is used to get title in the Title bar of the Frame window.
Syntax: String getTitle();
Frame f = new Frame(“My Frame”);
String title = f.getTitle();
4. setVisible(): It is used to specify whether the Frame window will be visible or
hidden. It accepts Boolean value as argument.
Syntax: void setVisible(booleanflag);
Frame f = new Frame(“My Frame”);
f.setVisible(true);
5. setBackground() : It is used to set background color of the Frame window.
Syntax: void setBackground(Color color)
Example:Frame f = new Frame(“My Frame”);
f.setbackground(Color.RED);
There are two ways to create a Frame. They are,
1. By Instantiating Frame class (Creating object of frame class)
2. By extending Frame class (Inheritance)
1. By Instantiating Frame class (Creating object of frame class)
import java.awt.*;
public class FrameDemo{
Frame f;
public FrameDemo() {
f=new Frame("frame demo");
f.setSize(300,300);
f.setLayout(null);
f.setVisible(true);
}
public static void main (String[] args) {
FrameDemof = new FrameDemo();
}
}
5. K.D Polytechnic, Patan Advance Java Programming
5
2. By extending Frame class (Inheritance)
import java.awt.*;
public class FrameDemoextends Frame {
public FrameDemo() {
setSize(300,300);
setVisible(true);
setLayout(null);
}
public static void main (String[] args) {
FrameDemof = new FrameDemo();
}
}
Creating Frame Window in Applet
import java.awt.*;
public class FrameApplet extends java.applet.Applet{
Frame f;
public void init() {
f = new Frame("Frame Window in Applet");
f.setSize(300,300);
f.setVisible(true);
}
public void paint(Graphics g) {
}
}
5. Canvas
• Canvas is not part of the hierarchy for applet or frame windows.
• Canvas component represents a rectangular area where application can draw something or
trap the input events.
• Drawing is not implemented on the canvas itself, but on the Graphics object provided by the
canvas
• The Canvas is a section of a window to draw graphics or display images
Constructors of Canvas
Name Description
Canvas() This constructor creates instance of a Canvas.
Canvas(GraphicsConfigurati
on config)
This constructor creates instance of a Canvas with
the given object of Graphics Configuration.
Methods of Canvas
Method Description
Paint(Graphics g) Paint the Canvas.
Update(Graphics g) Update the Canvas.
6. K.D Polytechnic, Patan Advance Java Programming
6
Ex:
import java.awt.*;
import java.awt.event.*;
import java.applet.*;
public class CanvasDemoextends Applet {
Canvas c;
public void init( ){
c=new Canvas( );
c.setBackground(Color.black);
c.setSize(50,90);
add(c);
}
}
Canvas in Frame
1) By creating the object of Canvas
import java.awt.*;
public class CanvasDemo{
public CanvasDemo() {
Frame f = new Frame("canvas demo");
Canvas c = new Canvas();
c.setSize(90,60);
c.setBackground(Color.pink);
f.add(c);
f.setLayout(null);
f.setSize(300,300);
f.setVisible(true);
}
public static void main (String[] args) {
new CanvasDemo();
}
}
2) By creating the child class of Canvas Class.
import java.awt.*;
public class FrameApplet1
{
public FrameApplet1()
{
Frame f= new Frame("Canvas Example");
MyCanvasc = new MyCanvas();
f.add(c);
f.setLayout(null);
f.setSize(400, 400);
f.setVisible(true);
}
public static void main(String args[]){
new FrameApplet1();
}
7. K.D Polytechnic, Patan Advance Java Programming
7
}
class MyCanvasextends Canvas {
public MyCanvas() {
setBackground(Color.GRAY);
setSize(300, 200);
}
public void paint(Graphics g){
g.setColor(Color.red);
g.fillOval(75, 75, 150, 75);
}
}
Canvas in Applet
import java.awt.*;
public class canvas extends java.applet.Applet{
public void init() {
canvasClsc=new canvasCls();
add(c);
}
}
class canvasClsextends Canvas {
public canvasCls() {
setBackground(Color.GRAY);
setSize(300, 200);
}
public void paint(Graphics g)
{
g.setColor(Color.red);
g.fillOval(75, 75, 150, 75);
}
}
6. Layout Managers
Layout means the arrangement of components within the container. In other way we can say
that placing the components at a particular position within the container. The task of layouting
the controls is done automatically by the Layout Manager.
It determines that how AWT components are dynamically arranged on the screen.
The Layout Mangers are used to arrange components in particular manner
Layout manager performs the task of arranging and positioning the controls on the window
Every container has default layout manager.
The layout manager set by the SetLayout () of container class. If we don’t use this method then
default layout manager is used.
Frame : border layout
Panel : frame layout
Applet : Frame layout
8. K.D Polytechnic, Patan Advance Java Programming
8
Methods of Layout Managers
1. setLayout() : This method allows you to set the layout for the container..
By default Layout Manager for panel used is FlowLayout. If you wish to change the
default layout then you can change it using this method.
Syntax: void setLayout(LayoutManager obj) –Here, obj is the LayoutManager object.
Example: setLayout(new GridLayout(3,1));
2. getLayout(): This method allows you to retrieve the current Layout.
Manager that is being set for the applet. It returns Layout Manager.
Layout Manager Classes
Some possible Layout Managers are listed in the table below:
Layout
Manager
Description Constants
BorderLayout Arranges components to the top,
bottom, left, right, and center of a
container.
NORTH, SOUTH, EAST,
WEST, CENTER–positions in the
container.
FlowLayout It is used to arrange the components in
a line, one after another (in a flow)
from left to right.
LEFT, CENTER, RIGHT-these
tell it how to align the components
in each row.
GridLayout Divide the container into equal–sized
rectangles and arrange each
component into one of these cells.
GridLayout(int rows,int columns)
To specify the number of rows and
columns in the grid.
CardLayout It manages the components in such a
way that only one component is visible
at atime.
CardLayout(int hgap, int
vgap):creates a card layout with
the given horizontal and vertical
gap.
Flow Layout
The FlowLayout is used to arrange the components in a line, one after another (in a flow)
It is the default layout of applet or panel
FlowLayout arranges component from left to right until there’s no more space available
Then it begins a new row below it and moves from left to right again
Constructor of FlowLayout
Constructor Description
FlowLayout() It is default constructor. It places all the controls as per central
alignment and a default 5 unit horizontal and vertical gap.
FlowLayout(int
align)
Create a flow layout with the given alignment and a default 5
unit horizontal and vertical gap.
It can have one of the following values:
0 : FlowLayout.LEFT
9. K.D Polytechnic, Patan Advance Java Programming
9
1 : FlowLayout.CENTER
2 : FlowLayout.RIGHT
FlowLayout(int
align, int hgap, int
vgap)
Create a flow layout with the given alignment and given
horizontal andvertical gap.
Example:
import java.applet.*;
import java.awt.*;
public class LayoutAppletextends Applet {
public void init(){
setLayout(new FlowLayout());
Label l1 = new Label("Label-1");
Label l2 = new Label("Label-2");
add(l1);
add(l2);
}
public void paint(Graphics g){
}
}
Border Layout
The BorderLayout is used to arrange the components in five regions: north, south, east, west
and center.
It is the default layout of frame or window.
The BorderLayout provides five constants for each region: NORTH, SOUTH, EAST,
WEST and CENTER.
These constants are used like BorderLayout.NORTH.
While adding the component these constants are used by using following form of add()
method.
add (Component compObj, Object region);
Constructors of BorderLayout
Constructor Description
BorderLayout() Creates a border layout with no
gaps between the components.
10. K.D Polytechnic, Patan Advance Java Programming
10
BorderLayout(int
hgap,int vgap)
Creates a border layout with the
given horizontal and vertical
gaps between the components.
Example:
import java.applet.*;
import java.awt.*;
public class LayoutAppletextends Applet {
public void init(){
setLayout(new BorderLayout());
Label l1 = new Label("North",Label.CENTER);
Label l2 = new Label("South",Label.CENTER);
Label l3 = new Label("West");
Label l4 = new Label("East");
Label l5 = new Label("Center",Label.CENTER);
add(l1,BorderLayout.NORTH);
add(l2,BorderLayout.SOUTH);
add(l3,BorderLayout.WEST);
add(l4,BorderLayout.EAST);
add(l5,BorderLayout.CENTER);
}
public void paint(Graphics g)
{ }
}
Grid Layout
The GridLayout is used to arrange the components in rectangular grid (in form of rows
and columns) inside the container.
You can specify the number of rows and number of columns to be created for the Layout
If not specified then it will create a grid with only one row and one column
One component is displayed in each rectangle/(cell)
Components in the GridLayout manager are arranged in order from left to right (added
row by row)
It means as you add components to the GridLayout they are first placed in the first row
If all the columns of the first row are filled then next components are added in the
second row and so on
11. K.D Polytechnic, Patan Advance Java Programming
11
Constructor Description
GridLayout() Creates a grid layout with one column per component in a
row.
GridLayout(int rows, int
columns)
Creates a grid layout with the given rows and columns but
no gaps between the components.
GridLayout(int rows, int
columns, int hgap, int vgap)
Creates a grid layout with the given rows and columns along
with given horizontal and vertical gaps.
Example:
import java.applet.*;
import java.awt.*;
public class LayoutAppletextends Applet
{
public void init(){
setLayout(new GridLayout(2,2));
Button b1 = new Button("ADD");
Button b2 = new Button("UPDATE");
Button b3 = new Button("DELETE");
Button b4 = new Button("SEARCH");
add(b1);
add(b2);
add(b3);
add(b4);
}
public void paint(Graphics g){ }
}
CardLayout
A CardLayout object is a layout manager for a container.
It treats each component in the container as a card.
Only one card is visible at a time, and the container acts as a stack of cards.
The first component added to a CardLayout object is the visible component when the container
is first displayed.
The ordering of cards is determined by the container's own internal ordering of its component
objects.
CardLayout defines a set of methods that allow an application to flip through these cards
sequentially, or to show a specified card.
Constructors of CardLayout
12. K.D Polytechnic, Patan Advance Java Programming
12
Methods of the CardLayout
Methods Description
void first(Container a) It is used to flip to the first card of the given container.
void last(Container a) It is used to flip to the last card of the given container.
void next(Container a) It is used to flip to the next card of the given container.
void previous(Container a) It is used to flip to the previous card of the given
container.
void show(Container a,
String cardName)
It is used to flip to the specified card with the given name.
Example
package org.me.hello;
import java.awt.*;
import java.awt.event.*;
public class CardEx extends Frame implements ActionListener {
CardLayout card;
Button b1,b2,b3;
Panel P1;
CardEx()
{
card=new CardLayout(40,30);
b1=new Button("Apple");
b2=new Button("Banana");
b3=new Button("Mango");
P1= new Panel();
P1.setLayout(card);
b1.addActionListener(this);
b2.addActionListener(this);
b3.addActionListener(this);
P1.add("a",b1);
P1.add("b",b2);
P1.add("c",b3);
add(P1);
setSize(300,300);
setVisible(true);
}
@Override
public void actionPerformed(ActionEvent e) {
card.next(P1);
Constructor Description
CardLayout() Creates a card layout with zero horizontal and
vertical gap.
CardLayout(int hgap, int vgap) Creates a card layout with the given horizontal
and vertical gap.
13. K.D Polytechnic, Patan Advance Java Programming
13
}
public static void main(String[] args){
CardEx c =new CardEx();
}
}
7. Graphics-AWT Controls
AWT provides many readymade and reusable GUI components.
All the AWT controls inherit from java.awt .*, where represents all class like label, button
etc..
The frequently used are: Button, TextField , Label, Checkbox, CheckboxGroup radio
buttons ), List , and Choice , as given below table
AWT controls are one type of components that allows user to interact with GUI based
applications in JAVA.
Adding components to a container
Declare the component with an identifier (name);
Construct the component by invoking an appropriate constructor via the new operator
Identify the container (such as Frame or Panel) designed to hold this component
The container can then add this component onto itself via Container add (Component)
method
Label lblInput; // Declare an Label instance called lblInput
•lblInput= new Label("Enter ID"); // Constructby invoking a constructor via the new operator
•add(lblInput); // Same as this.add(lblInput)
AWT Components:
AWT Components Description
Label It is used to display information that should not be modified by
users.
TextField It is useful for obtaining information from users. It considers only
single line input.
TextArea It is a text component that allows for the editing of a multiple lines
of text.
Button It creates a labeled button.
CheckBox It is a graphical component that can be in either an on(true)or
off(false) state.
CheckboxGroup It is used to group the set of checkbox.
List It presents the user with a scrolling list of text items.
Choice It is used to show drop-down menu of choices. Selected choice is
shown on the top of the menu.
ScrollBar A Scrollbar control represents a scroll bar component in order to
enable user to select from range of values.
Canvas It represents a rectangular area where application can draw
something or can receive inputs created by user.
Label
14. K.D Polytechnic, Patan Advance Java Programming
14
• A Label is a component that is used to display some information on the applet or frame
window.
• Normally Label component is used along with other component to direct the user which kind
of the information to be entered in that component.
• Label component is an object of type Label class. Following are the constructor of the Label
class
Constructor
Constructor Description
Label() Create an empty label.
Label(String) Create a new label with the specified string
of text, which is left justified.
Label(String, int) Create a label with specified text and
alignment indicated by the int Argument:
Label.Right, Label.Left, Label.Center
Methods of Label
Method Description
Int getAlignment() Gets the current alignment of the label.
String getText() Gets the text of the label.
void setAlignment(intalign) Set the alignment for the label to specified
alignment. Possible values are Label.LEFT,
Label.RIGHTand Label.CENTER.
void setText(String label) Sets the text for the label to the specified
text.
Syntax:
Label L1 = new Label(“UserName ”);
add(L1);
Label Example:
import java.applet
import java.awt
public class LabelApplet extends Applet{
public void init (){
Label l1 = new Label("This is
demonstration of the Label Control..");
l1.setAlignment(
Label.CENTER
add(l1);
}
public void paint(Graphics g){
}
}
TextField
Textfield component is used to accept single line text input from user.
TextField is an object of the class TextField which is a subclass of TextComponent class
Constructor of TextField
15. K.D Polytechnic, Patan Advance Java Programming
15
Constructor Description
TextField() Create a default text field.
TextField(int numChar) Create a new empty text field with the
specified number of character.
TextField(String text) Create a new text field initialized with the
specified text.
TextField(String text, intnumChar) Create a new text field initialized with the
specified text to be displayed, and wide
enough to hold the specified number
ofcolumns.
Method of TextField
Method Description
getText() Return the text this text field contains (as a
string).
setText(String) Puts the given text string into the field.
getColumns() Returns the width of this text field.
isEditable() Return true or false based on whether the
text is editable.
setEditable(boolean) True (the default) enables text to be edited,
False not editable.
setEchoChar(char Ch) Allows you to set Echo character for the
TextField, so that the text that you enter in
the TextField can not be read by user.
getEchoChar() Allows you to retrieve the Echo character
Syntax :
TextField t1 = new TextField (12);
add(T2)
Example:
import java.applet
import java.awt
public class TextFieldApplet extends Applet{
public void init (){
Label name = new Label("Username:");
TextField username = new TextField (15);
Label pass = new Label("Password:");
TextField password = new TextField (15);
add(name)
add(username)
add(pass)
add(password)
}
public void paint(Graphics g){
}
}
16. K.D Polytechnic, Patan Advance Java Programming
16
TextArea
• It is a text component that allows for the editing of a multiple lines of text
• We can set number of rows and columns of the TextArea
• The text in a TextArea appears left justified, and the justification is not customizable
Constructors
Constructor Description
TextArea() Creates an empty text area.
TextArea(int, int) Creates an empty text area with the given number of
rows and columns.
TextArea(String) Creates a text area displaying the given string.
TextArea(String, int, int) Creates a text area displaying the given string and
with the given number of rows and columns.
TextArea(String, int, int, int) Creates a new text area with the specified text, and
with the rows,columns, and scroll bar visibility as
specified. SCROLLBARS_BOTH,
SCROLLBARS_HORIZONTAL_ONLY,
SCROLLBARS_NONE and
SCROLLBARS_VERTICAL_ONLY.
Methods of TextArea
Method Description
getColumns() Returns the number of columns of the text
area.
setColumns(intcolumns) Sets the number of columns for the text
area.
getRows() Returns the number of rows in the text area.
setRows(int rows) Sets the number of rows for the text area.
insert(String text, int pos) Inserts the specified text at the specified
position in the text area.
append(String str) Appends the given text at the end of the text
area's current text.
replaceRange(String text,
int start, int end)
Replaces text between the indicated start
and end positions with thespecified
replacement text.
Syntax
TextArea T2 = new TextArea (10,20);
add(T2);
import java.awt
import java.applet
/*<applet code= TextAreaDemo.class width=200 height=150></applet>*/
public class TextAreaDemo extends Applet {
TextArea t1 = new TextArea ("Hello", 1,30);
TextArea t2 = new TextArea ("t2", 4,30);
public void init ()
{
add(t1);
add(t2);
}
17. K.D Polytechnic, Patan Advance Java Programming
17
}
Push Button
The Button component is rectangular button that has label and generate event when pressed.
Constructors of Button
Constructors Description
Button() Creates a button with an empty string for its label.
Button(String text) Creates a button with the given string as a label.
Methods of ButtonMethod Description
getLabel() Get the label of the Button.
setLabel(string text) Set the label of the Button with given text.
setEnable(boolean) Enable or disable this Button. Disabled Button cannot
be clicked.
Syntax
Button b = new Button (“Hello”);
Add(b);
Example:
Import java.awt.*;
Public class BtnDemo extends java.applet.Applet {
Button b1,b2,b3;
String title;
public void init (){
b1=new Button();
b2=new Button("submit");
b1.setLabel("Cancel");
2.setEnabled(false);
title=b1.getLabel();
add(b1);
add(b2);
}
public void paint(Graphics g) {
}
}
18. K.D Polytechnic, Patan Advance Java Programming
18
CheckBox
The Checkbox class is used to display checkbox controls
The Checkbox has a label to indicate its meaning Checkbox component is toggle box that can
be either selected or deselected indicating presence or absence of choice
If a Checkbox object is not in a CheckboxGroup object, it is implemented as a simple
checkbox
If a Checkbox object is with a CheckboxGroup object, it is implemented as a radio button
Constructors of CheckBox
Constructor Description
Checkbox() Creates a check box with an empty string for its
label.
Checkbox(String text) Creates a checkbox with the given string as a label.
Checkbox(String text, Boolean state) Creates a check box with the given string as a label
and sets thespecified state (Selected/Deselected by
True/False).
Checkbox(String text, CheckboxGroup
group, Boolean state)
Creates a check box with the given string as a label,
in the specified check box group, and set to the
specified state. Only radio button have groups.
Syntax:
Checkbox C = new Checkbox (“Java”);
add (C);
Example:
import java.awt.*;
public class CheckboxDemo extends java.applet.Applet {
Checkbox cb1,cb2,cb3;
public void init (){
cb1=new Checkbox();
cb2=new Checkbox("AJP");
cb3=new Checkbox("MCAD",true);
cb1.setLabel("NMA");
cb1.setState(cb3.getState);
add(cb1);
add(cb2);
add(cb3);
}
public void paint(Graphics g) {
}
}
CheckboxGroup
To create a group of checkboxes, you use the CheckboxGroup class
The CheckboxGroup class is used with the Checkbox class to implement radio buttons
19. K.D Polytechnic, Patan Advance Java Programming
19
All Checkbox that are associated with a CheckboxGroup are treated as a single of radio
button
It allows only one button in group to be set at a time
Constructors of CheckboxGroup
Constructor Description
CheckboxGroup() Creates a constructor of Checkbox Group.
Method of CheckboxGroup
Method Description
getSelectedCheckbox() Returns the current choice from the check box group.
setSelectedCheckbox(Checkbox) The method of Checkbox Group is used to make one of the
boxes selected among all the check boxes.
setCheckboxGroup() This method adds a checkbox to any checkbox group.
setCurrent() The method of Checkbox Group is used to make one of the
boxes the selected box.
Example:
Import java.awt.*;
public class CheckbxGrp extends java.applet.Applet {
Checkbox c1,c2,c3;
CheckboxGroup cbg = new CheckboxGroup();
public void init (){
c1=new Checkbox("Sem1",cbg,true);
c2=new Checkbox("Sem2");
c3=new Checkbox("Sem3");
c2.setCheckboxGroup(cbg);
c3.setCheckboxGroup(cbg);
add(c1); add(c2); add(c3);
}
public void paint(Graphics g) {
}
}
Choice
It is used to show dropdown list of choices.
Selected choice is shown on top of the menu.
From the list a single choice can be selected.
Syntax:
Choice c=new Choice();
c.add(“bhuj”);
c.add (“rajkot”);
c.add (“surat”);
add(c);
Methods:
20. K.D Polytechnic, Patan Advance Java Programming
20
Menu
Menus are very familiar to a programmer in windows environment.
A menu comes with a pull-down list of menu items from which user can select one at a time.
When a lot of options in different categories exist to be opted by the user, menus are the best choice
as they take less space on the frame.
A click on the MenuItem generates ActionEvent and is handled by ActionListener.
A menu bar can be created using MenuBar class.
A menu bar may contain one or multiple menus, and these menus are created using Menu class.
A menu may contain one of multiple menu items and these menu items are created using MenuItem
or CheckboxMenuItem class.
All these four classes are not AWT components as they are not subclasses of java.awt.Component
class. Infact, they are subclasses of java.awt.MenuComponent which is is no way connected in the
hierarchy with Component class.
21. K.D Polytechnic, Patan Advance Java Programming
21
a) MenuBar: MenuBar holds the menus. MenuBar is added to frame
with setMenuBar() method. Implicitly, the menu bar is added to the north (top) of the frame.
MenuBar cannot be added to other sides like south and west etc.
b) Menu: Menu holds the menu items. Menu is added to frame with add() method. A sub-menu
can be added to Menu.
c) MenuItem: MenuItem displays the actual option user can select.
Menu items are added to menu with method addMenuItem(). A dull-colored line can be
added in between menu items with addSeparator() method. The dull-colored line groups (or
separates from other) menu items with similar functionality like cut, copy and paste.
d) CheckboxMenuItem: It differs from MenuItem in that it appears along with a checkbox. The
selection can be done with checkbox selected.
Simple constructors of MenuBar, Menu and MenuItem
Constructor Description
public MenuBar() Creates a menu bar to which one or many menus are added.
public Menu(String title) Creates a menu with a title.
public MenuItem(String title) Creates a menu item with a title.
Steps of Creating Java AWT Menu
1) Create menu bar
2) Add menu bar to the frame
3) Create menus
4) Add menus to menu bar
5) Create menu items
6) Add menu items to menus
7) Event handling
CheckboxMenuItem
The CheckboxMenuItem class represents a check box which can be included in a menu.
Selecting the check box in the menu changes control's state from on to off or from off to on.
Class constructors
S.N. Constructor & Description
1
CheckboxMenuItem()
Create a check box menu item with an empty label.
2
CheckboxMenuItem(label)
Create a check box menu item with the specified label.
3
CheckboxMenuItem(label, boolean state)
Create a check box menu item with the specified label and state.
Example:
22. K.D Polytechnic, Patan Advance Java Programming
22
import java.awt.*;
import java.awt.event.*;
public class MenuEx1 implements ActionListener {
Frame frame;
MenuBar menuBar;
Menu menu1, menu2;
MenuItem mItem1, mItem2, mItem3, mItem4, mItem5, mItem6, mItem7;
Label lbl;
MenuEx1() {
frame = new Frame("MenuBar, Menu and MenuItems");
lbl = new Label();
frame.add(lbl);
//Creating a menu bar
menuBar = new MenuBar();
//Creating first menu
menu1 = new Menu("File");
mItem1 = new MenuItem("New");
mItem2 = new MenuItem("Open");
mItem3 = new MenuItem("Save");
//Adding menu items to the menu
menu1.add(mItem1);
menu1.addSeparator();
menu1.add(mItem2);
menu1.addSeparator();
menu1.add(mItem3);
menu1.addSeparator();
//Creating a second sub-menu
menu2 = new Menu("Save-as");
mItem5 = new MenuItem(".jpeg");
mItem6 = new MenuItem(".png");
mItem7 = new MenuItem(".pdf");
//Adding menu items to the sub-menu
menu2.add(mItem5);
menu2.add(mItem6);
menu2.add(mItem7);
//Adding the sub-menu to the first menu
menu1.add(menu2);
//Adding our menu to the menu bar
menuBar.add(menu1);
menu1.addActionListener(this);
menu2.addActionListener(this);
//Adding my menu bar to the frame by calling setMenuBar() method
frame.setMenuBar(menuBar);
frame.setSize(330, 250);
frame.setVisible(true);
}
23. K.D Polytechnic, Patan Advance Java Programming
23
public static void main(String[] args) {
new MenuEx1();
}
@Override
public void actionPerformed(ActionEvent e) {
String menuitem=e.getActionCommand();
lbl.setText(menuitem);
}
}
8. Event Classes
When the user interacts with a GUI application, an event is generated.
Example: Pressing a button, Entering a character in Textbox., selecting an item or closing a
window
The super class of all event classes is java.util.EventObject.
Events are supported by a number of Java packages, like java.util, java.awt and java.awt.event.
Java’s event handling mechanism is represented by event classes.
Event Handling(The Delegation Event Model):
The Delegation Event Model: Provides a standard mechanism for a source to generate an
event and send it to a set of listeners.
Event handling (Delegation Event Model )has three main components:
1. Event: It is an object that describes a state change in a source.
Each time a user interacts with a component an event is generated, e.g.:
1. A button is pressed
2. A menu item is selected
3. A window is resized
4. A key is pressed
An event informs the program about the action that must be performed
2. Event Source: Event source is an object that generates an event. It is an object whose state
changes. Event sources are user interface components, windows, and menus.
3. Event listener: A listener is an object that listens the event. It is an object that is notified
when an event occurs.
A listener must: Register with one or more sources for a specific type of event and
implement an interface to receive those events
A source generates an Event and sends it to one or more listeners registered with the
source.
Once event is received by the listener, they process the event and then return.
24. K.D Polytechnic, Patan Advance Java Programming
24
Event sources are user interface components, windows, and menus. The operating system notifies
an event source about interesting activities, such as mouse moves and keystrokes. The event source
describes the nature of the event in an event object. It also keeps a set of listeners’ objects that want
to be called when the event happens. The event source then calls the appropriate method of
the listener interface to deliver information about the event to the various listeners. The source does
this by passing the appropriate event object to the method in the listener class. The listener analyzes
the event object to find out more about the event.
How to Implement an Event Handler?
Every event handler requires three pieces of code:
1) declaration of the event handler class that implements a listener interface or extends a
class that implements a listener interface
public class MyClass implements ListenerInterfaceNanme {
2) registration of an instance of the event handler class as a listener with source.
someComponent.addListenerInterfacename(instanceOfMyClass);
3) providing code that implements the methods of the listener interface in the event handler
class
public void methodname(EventClass object) {
...//code that reacts to the action...
}
Events Source:
Event source is an object that generates an event. Event sources are user interface components,
windows, and menus.
Button Generates ActionEvent when button is pressed.
CheckBox Generates ItemEvent when checkbox is selected or deselected.
Choice Generates ItemEvent when choice is changed.
List Generates ActionEvent when an item is double-clicked,
generates ItemEvent when an item is selected or deselected.
MenuItem Generates ActionEvent when menu item is selected.
Scroll Bar Generates AdjustmentEvent when the scroll bar is
manipulated.
25. K.D Polytechnic, Patan Advance Java Programming
25
Text
Component
Generates TextEvent when the user enter a character.
Window Generates WindowEvent when a window is activated, closed,
deactivated, opened or quit.
Events:
1. Low-level Events
2. Semantic Events
1. Low-level Events: It represents low level input or window operation.
•Eg. Key press, mouse movement, or window opening.
ComponentEvent Hiding, moving, resizing, showing
ContainerEvent Adding/removing component
FocusEvent Getting/losing focus
KeyEvent Pressing, releasing, or typing (both) a key
MouseEvent Clicking, dragging, entering, exiting, moving,
pressing, or releasing
WindowEvent Iconifying, deiconifying, opening, closing, really
closed, activating, deactivating
2. Semantic Events: It represents interacting with GUI components.
•Eg. Selecting a button, or changing the text of text field.
ActionEvent Do the command
AdjustmentEvent Value adjusted
ItemEvent State changed
TextEvent Text changed
EventObject class
It is the root class from which all event state objects shall be derived.
java.util.EventObject
S.N. Method & Description
1 Public Object getSource()
The object on which the Event initially occurred.
26. K.D Polytechnic, Patan Advance Java Programming
26
2 Public int get ID()
It is used to determine the type of the event.
Various Event classes:
Event Classes Description
ActionEvent Generated when button is pressed, menu-item is selected,
list item is double clicked.
MouseEvent Generated when mouse is dragged, moved, clicked,
pressed or released also when the enters or exit a
component
WindowEvent Generated when window is activated, deactivated, opened
or closed.
ItemEvent Generated when check-box or list item is clicked.
KeyEvent Generated when input is received from keyboard.
MouseWheelEvent Generated when mouse wheel is moved.
ComponentEvent Generated when component is hidden, moved, resized or
set visible.
ContainerEvent Generated when component is added or removed from
container.
9. Event Listener Interfaces:
Event listeners are defined in java.util.EventListener.
Listener object is notified when event is occurred.
It has two major requirements:
1) It should be registered to one or more source object to receive event notification.
2) It must implement methods to receive and process those notifications.
The Event listener represents the interfaces responsible to handle events.
It is a main interface which every listener interface has to extend.
This class is defined in java.util package.
27. K.D Polytechnic, Patan Advance Java Programming
27
1) Action Event related class and Interface:
a)Action Event Class
This class is defined in java.awt.event package.
Constructor of ActionEvent:
Constructor Description
ActionEvent(Object source, int
type, String command)
Constructs an ActionEvent object
ActionEvent(Object source, int id,
String command, int modifiers)
Constructs an ActionEvent object with modifier
keys.
ActionEvent(Object source, intid, String
command, Long when, int modifiers)
Constructs an ActionEventobject with modifier
keys and when the event occurred.
Parameter Description
Source It reference to the object that generated
the event.
Type It reference to the typeof object.
Command Name or Label of the component that
generated the event.
Modifiers Indicates modifier keys like ALT, CTRL,
META, and/or SHIFT were pressed when
the event was generated.
When It specifies that when event was occurred.
Method of ActionEvent
Method Description
String
getActionCommand()
Returns the command string associated with this action. Eg.
When button is pressed, command name will be equal to label
of button
int getModifiers() To return a value that indicates which modifier keys were
pressed when event was generated.
Long getWhen() It returns the time at which event was generated. It is called
event’s timestamp.
b ) ActionListener Interface
The class which processes the ActionEvent should implement this interface.
This interface defines the actionPerformed() method that is invoked when an action event
occurs.
Method of ActionListener
Method Description
void actionPerformed(ActionEvent e) Invoked when an action event occurs.
28. K.D Polytechnic, Patan Advance Java Programming
28
<html>
<body bgcolor="000000">
<applet code= "ActionEventDemoApplet.class" width= "500" height= "300">
</applet>
</body>
</html>
2) Mouse Event related Class and Interface
a) MouseEvent Class
This event indicates a mouse action occurred in a component.
This low-level event is generated by any component object for Mouse Events and Mouse
motion events.
•a mouse button is pressed
•a mouse button is released
•a mouse button is clicked (pressed and released)
•a mouse cursor enters into the component
•a mouse cursor exits from the component
•a mouse is moved
•the mouse is dragged
Method of MouseEvent
29. K.D Polytechnic, Patan Advance Java Programming
29
Method Description
int getX() int getY() To obtain X and Y co-ordinates of the
mouse when an event occurred.
int getClickCount() To obtain the number of mouse click for
this event.
Point getPoint() The location where the event happened.
b) MouseListener Interface
The class which processes the MouseEvent should implement this interface.
The object of that class must be registered with a component.
The object can be registered using the addMouseListener() method.
Method of MouseListener
Method Description
void mouseClicked(MouseEvent e) Invoked when the mouse button has been clicked
(pressed andreleased) on a component.
void mouseEntered(MouseEvent e) Invoked when the mouse enters a component’s
coordinates space.
void mouseExited(MouseEvent e) Invoked when the mouse exits a component’s
coordinates space.
void mousePressed (MouseEvent e) Invoked when a mouse button has been pressed on a
component.
void mouseReleased(MouseEvent
e)
Invoked when a mouse button has been released on
a component.
c) MouseMotionListener Interface
Mouse-motion events notify when the user uses the mouse to mov’e the onscreen cursor.
The listener interface for receiving mouse motion events on a component.The class that is
interested in processing a mouse motion event should implements this interface
The listener object created from that class is then registered with a component using the
component's addMouseMotionListener method.
A mouse motion event is generated when the mouse is moved or dragged. (Many such events
will be generated). When a mouse motion event occurs, the relevant method in the listener
object is invoked, and the MouseEvent is passed to it.
The Java MouseMotionListener is notified whenever you move or drag mouse. It is notified
against MouseEvent. The MouseMotionListener interface is found in java.awt.event package.
It has two methods.
Methods of MouseMotionListener interface
Method Purpose
void
mouseDragged(MouseEvent)
Called in response to the user moving the mouse while holding a
mouse button down. This event is fired by the component that fired
the most recent mouse-pressed event, even if the cursor is no longer
over that component.
30. K.D Polytechnic, Patan Advance Java Programming
30
void
mouseMoved(MouseEvent)
Called in response to the user moving the mouse with no mouse
buttons pressed. This event is fired by the component that's currently
under the cursor.
Example:
import java.awt.*;
import java.awt.event.*;
public class MouseEventDemoextends Frame implements MouseListener{
Label l1,l2; int x,y;
public MouseEventDemo() {
setTitle("Mouse event demo");
setSize(500,500);
setLayout(new FlowLayout());
setVisible(true);
addMouseListener(this);
l1=new Label("Status");
add(l1);
l2=new Label();
l2.setSize(30,30);
add(l2);
}
public static void main (String[] args) {
new MouseEventDemo();
}
public void mouseClicked(MouseEventme){
x=me.getX();
y=me.getY();
l2.setText("Mouse clicked at : X->"+x+" Y-> "+y);
}
public void mouseExited(MouseEventme){ }
public void mouseEntered(MouseEventme){ }
public void mouseReleased(MouseEventme){ }
31. K.D Polytechnic, Patan Advance Java Programming
31
public void mousePressed(MouseEventme){ }
}
3) Window Event related class and Interfaces
This low-level event is generated by a Window object when it is opened, closed,
activated, deactivated, iconified, or deiconified, or when focus is transferred into or out
of the Window.
The object of this class represents the change in state of a window.
a) Window Event class
S.N. Method & Description
1 Int getNewState()
For WINDOW_STATE_CHANGED events returns the new state of the
window.
2 Int getOldState()
For WINDOW_STATE_CHANGED events returns the previous state of
the window.
3 Window getOppositeWindow()
Returns the other Window involved in this focus or activation change.
4 Window getWindow()
Returns the originat or of the event.
b) WindowListener Interface
The class which processes the WindowEvent should implement this interface.
The object of that class must be registered with acomponent.
The object can be registered using the addWindowListener()method.
Method Description
void windowActivated(WindowEvente) Invoked when the Window is activated.
void windowClosed(WindowEvent e) Invoked when a window has been closed.
void windowClosing(WindowEvent e) Invoked when the user attempts to close the
window from thewindow's system menu.
void windowDeactivated(WindowEvent e) Invoked when a Window is no longer the active
Window.
void windowOpened(WindowEvent e) Invoked the first time a window is opened.
void windowIconified(WindowEvent e) Invoked when a window is minimized.
void windowDeiconified(WindowEvente) Invoked when a window is changed from a
minimized to a normal state.
Example:
import java.awt.*;
import java.awt.event.WindowEvent;
import java.awt.event.WindowListener;
public class WindowExampleextends Frame implements WindowListener{
WindowExample(){
addWindowListener(this);
setSize(400,400);
setLayout(null);
setVisible(true);
}
32. K.D Polytechnic, Patan Advance Java Programming
32
public static void main(String[] args) {
new WindowExample();
}
public void windowActivated(WindowEventarg0) {
System.out.println("activated");
}
public void windowClosed(WindowEventarg0) {
System.out.println("closed");
}
public void windowClosing(WindowEventarg0) {
System.out.println("closing");
dispose();
}
public void windowDeactivated(WindowEventarg0) {
System.out.println("deactivated");
}
public void windowDeiconified(WindowEventarg0) {
System.out.println("deiconified");
}
public void windowIconified(WindowEventarg0) {
System.out.println("iconified");
}
public void windowOpened(WindowEventarg0) {
System.out.println("opened");
}
}
4) KeyEvent related class and Interface
a) KeyEvent class
A KeyEvent is generated when keyboard input occurs.
This low-level event is generated by a component object (such as a text field) when a key is
pressed, released, or typed.
The event is passed to every KeyListener object which registered to receive such events using
the component's addKeyListener method. (KeyAdapter objects implement
the KeyListener interface.)
Each such listener object gets this KeyEvent when the event occurs.
There are three types of key events which are represented by the integer constants. These key
events are following
–KEY_PRESSED
–KEY_RELASED
–KEY_TYPED
The first two events are generated when any key is pressed or released. The last event occurs
only when a character is generated. Remember, not all keypresses result in characters. For
example, pressing shift does not generate a character.
33. K.D Polytechnic, Patan Advance Java Programming
33
S.N. Method & Description
1 Char getKeyChar()
Returns the character associated with the key in this event.
2 Int getKeyCode()
Returns the integer keyCode associated with the key in this event.
3 Int getKeyLocation()
Returns the location of the key that originated this keyevent.
4 Static String getKeyText(intkeyCode)
Returns a String describing the keyCode,such as"HOME","F1"or"A".
5 Void setKeyChar(char keyChar)
Set the keyChar value to indicate logical character.
6 Void setKeyCode(int keyCode)
Set the keyCode value to indicate a physicalkey.
b) Key Listener Interface
The class which processes the KeyEvent should implement this interface.
The object of that class must be registered with a component.
The object can be registered using the addKeyListener()method.
KeyListenerclassMethod Description
void keyPressed(KeyEvente) Invoked when a key has been pressed.
void keyReleased(KeyEvent e) Invoked when a key has been released.
void keyTyped(KeyEvent e) Invoked when a key has been typed
(pressed or released).
Example:
import java.awt .*;
import java.awt.event .*;
public class KeyListenerExample extends Frame implements KeyListener {
Label l; TextField t1; TextArea area;
KeyListenerExample(){
l=new Label("Enter Data:");
l.setBounds (20,50,100,20);
add(l);
t1=new TextField ();
t1.setBounds(140,50,100,20);
add(t1);
t1.addKeyListener(this);
area=new TextArea ();
area.setBounds (20,80,300, 300);
add(area);
setSize(400,400);
setLayout (null);
setVisible (true);
}
34. K.D Polytechnic, Patan Advance Java Programming
34
public void keyPressed (KeyEvent e) {
area.append("Key Pressed e.getKeyChar n");
}
public void keyReleased (KeyEvent e) {
area.append("Key Released e.getKeyChar n");
}
public void keyTyped (KeyEvent e) {
area.append("Key Typed e.getKeyChar n");
}
public static void main(String[] args ) {
new KeyListenerExample ();
}
}
5) ItemEvent related class and Interface
a) ItemEvent Class
A semantic event which indicates that an item was selected or deselected.
This high-level event is generated by an ItemSelectable object (such as a List,Combobox and
checkbox ) when an item is selected or deselected by the user.
The event is passed to every ItemListener object which registered to receive such events
using the component's addItemListener method.
The object that implements the ItemListener interface gets this ItemEvent when the event
occurs. The listener is spared the details of processing individual mouse movements and
mouse clicks, and can instead process a "meaningful" (semantic) event like "item selected" or
"item deselected".
The stateChange of any ItemEvent instance takes one of the following values:
o ItemEvent.SELECTED
o ItemEvent.DESELECTED
o Assigning the value different from listed above will cause an unspecified behavior.
Methods
Return Type Method and Description
Object getItem()
Returns the item affected by the event.
ItemSelectable getItemSelectable()
Returns the originator of the event.
int getStateChange()
Returns the type of state change (selected or deselected).
String paramString()
Returns a parameter string identifying this item event.
b) ItemListener Interface
The Java ItemListener is notified whenever you click on the checkbox.
It is notified against ItemEvent.
The ItemListener interface is found in java.awt.event package.
It has only one method: itemStateChanged().
itemStateChanged() method:The itemStateChanged() method is invoked
automatically whenever you click or unclick on the registered checkbox
component.
35. K.D Polytechnic, Patan Advance Java Programming
35
Example:
import java.applet.Applet;
import java.awt.*;
import java.awt.event.*;
public class CheckEx extends Applet implements ItemListener{
Checkbox ch1;
Checkbox ch2;
Label lb;
@Override
public void init() {
ch1 =new Checkbox("AJP");
add(ch1);
ch2 =new Checkbox("PHP");
add(ch2);
lb = new Label();
add(lb);
ch1.addItemListener(this);
ch2.addItemListener(this);
// TODO start asynchronous download of heavy resources
}
// TODO overwrite start(), stop() and destroy() methods
@Override
public void itemStateChanged(ItemEvent e) {
if(e.getSource() ==ch1)
{
if(e.getStateChange()==1)
lb.setText("AJP checkbox is selected");
}
else
{
if(e.getStateChange()==1)
lb.setText("PHP checkbox is selected");
}
}
}
12. Developing Graphical User Interface using Swing:
• Swing is a collection of classes and interface that define the Java GUI.
• Package javax.swing.* is used. The javax swing package provides classes for java swing API
such as JButton ,JTextField JTextArea JRadioButton JCheckbox JMenu JColorChooser etc
36. K.D Polytechnic, Patan Advance Java Programming
36
• It is built upon the foundation of the AWT.
• Now, it is Part of the Oracle’s Java Foundation Classes (JFC)- an API for providing a GUI
for Java programs
• Offers a rich set of GUI components such as buttons, text- fields, scroll bars, check boxes and
so on.
• AWT is Java’s original set of classes for building GUIs
• AWT is implemented on top of the platform's native GUI toolkit.
• AWT is considered to be heavy-weight because its components are dependent on the
underlying Operating System. For instance, when we create an object
of java.awt.Checkbox class, its underlying Operating System will generate a checkbox
for us. This is also the reason, AWT components are platform dependent.
• Translates its visual components into their corresponding , platform specific
equivalents, or peers
• Not truly portable: looks different and layout inconsistently on different Oss .Due to
OS’s underlying display management system
• Limited in range
• Has lot of bugs
• Takes up lot of system resources.
• Each AWT component gets its own operating platform window.-slow performance
and great deal of memory.
• Swing is designed to solve AWT’s problems
• SWING features :
• Swing components are Platform independent: Swing component are independent of native
Operating System's API as Swing API controls are rendered mostly using pure JAVA code
instead of underlying operating system calls.
• The Swing components are 100% pure java. This means that they don’t depend on the
native window implementation to support them.
• It is lightweight.-Swing controls are simply drawn as images in their containers so uses
fewer system resources.
• Rich controls- It has more powerful components like tables, lists, scroll panes, color
chooser, tabbed pane etc.
• It follows MVC (Model View Controller) architecture.
• It has consistent look and feel across different operating system.
• It supports pluggable look and feel: look and feel can be changed at run time based on
available values.
37. K.D Polytechnic, Patan Advance Java Programming
37
• Swing provides programmer the facility to change the look and feel of components
being displayed on any system .This is called plaf (pluggable look and feel)
• Look refers to the appearance
• Feel represents how the user can interact with the component
• Three standard look - metal, Windows and Motif or create your own
• Highly Customizable-Swing controls can be customized in very easy way as visual
appearance is independent of internal representation.
Difference between Swing and AWT
SWING class hierarchy:
38. K.D Polytechnic, Patan Advance Java Programming
38
Swing components are implemented as subclass of the Jcomponent class.It is inherited from
the container class. Swing components whose names begin with "J" are descendants of the
JComponent class. For example, JButton, JScrollPane, JPanel, JTable etc. But, JFrame and
JDialog don't inherit JComponent class because they are the child of top-level containers.
Swing defines two types of containers:
1) Heavyweight containers: JFrame, JApplet, JWindow, and JDialog
- do not inherit JComponent class but inherit AWT classes(Component and
Container).
- Top-level containers are heavyweight
2) Lightweight containers: Jpanel
- do inherit JComponent class
- Lightweight containers are often used to organize and manage groups of
related components
13. SWING components:
1) JFrame:
Swing provides the JFrame class that is a part of the javax swing package
Swing frame is represented by the class JFrame that extends AWT class Frame
39. K.D Polytechnic, Patan Advance Java Programming
39
Like its parent Frame, swing frame is heavyweight container
2) JLabel :
JLabel is a single line label similar to java.awt.Label.
Additional functionalities to JLabel are,
o Add an Icon
o Set vertical and horizontal position of text relative to the Icon
o Set the relative position of contents within component
Constructor:
o JLabel(String text, int Alignment): creates a label with the specified text and
alignment.
o JLabel(String text, Icon, intAlignment): creates a label with specified text, icon and
the alignment of the text.
Icon icon = new ImageIcon("ledgreen.png");
JLabel label1 = new JLabel("Full Name :", icon, JLabel.LEFT);
40. K.D Polytechnic, Patan Advance Java Programming
40
3) JButton
• JButton extends Component, displays a string and delivers an ActionEvent for each mouse
click.
• It is same like java.awt.Button
• Normally buttons are displayed with a border
• In addition to text, JButtons can also display icons
4) JTextField
The object of a JTextField class is a text component that allows the editing of a single line
text. It inherits JTextComponent class.
JTextField class is used to create a textfield control, which allows a user to enter a single line
text and edit it. When an enter key is pressed in a JTextField, an ActionEvent is generated. In
order to handle such event, ActionListener interface should be implemented
41. K.D Polytechnic, Patan Advance Java Programming
41
Commonly used Constructors:
Constructor Description
JTextField() Creates a new TextField
JTextField(String text) Creates a new TextField initialized with the specified
text.
JTextField(String text, int
columns)
Creates a new TextField initialized with the specified
text and columns.
JTextField(int columns) Creates a new empty TextField with the specified
number of columns.
import javax.swing.*;
import java.awt.event.*;
public class TextFieldExample implements ActionListener{
JTextField tf1,tf2,tf3;
JButton b1,b2;
TextFieldExample(){
JFrame f= new JFrame();
tf1=new JTextField();
tf1.setBounds(50,50,150,20);
tf2=new JTextField();
tf2.setBounds(50,100,150,20);
tf3=new JTextField();
tf3.setBounds(50,150,150,20);
tf3.setEditable(false);
b1=new JButton("+");
b1.setBounds(50,200,50,50);
b2=new JButton("-");
b2.setBounds(120,200,50,50);
b1.addActionListener(this);
b2.addActionListener(this);
f.add(tf1);f.add(tf2);f.add(tf3);f.add(b1);f.add(b2);
f.setSize(300,300);
f.setLayout(null);
f.setVisible(true);
}
public void actionPerformed(ActionEvent e) {
String s1=tf1.getText();
42. K.D Polytechnic, Patan Advance Java Programming
42
String s2=tf2.getText();
int a=Integer.parseInt(s1);
int b=Integer.parseInt(s2);
int c=0;
if(e.getSource()==b1){
c=a+b;
}else if(e.getSource()==b2){
c=a-b;
}
String result=String.valueOf(c);
tf3.setText(result);
}
public static void main(String[] args) {
new TextFieldExample();
} }
5) JCheckBox
• JCheckBox class provides the functionality of a check box. It is same as AWT check box but without
checkbox group.
• Constructors:
– JCheckBox (): Creates an initially unselected checkbox button with no text and no icon
– JCheckBox (Icon icon ): Creates an initially unselected checkbox with an icon.
– JCheckBox (String text ): Creates an initially unselected checkbox with text.
– JCheckBox (String text, Icon icon ): Creates an initially unselected checkbox with the
specified text and icon.
– JCheckBox (Icon icon , boolean selected ): Creates a checkbox with an icon and specifies
whether or not it is initially selected.
– JCheckBox (String text, boolean selected ): Creates a checkbox with the text and specifies
whether or not it is initially selected.
– JCheckBox (String text, Icon icon , boolean selected ): Creates a checkbox with text and icon,
and specifies whether or not it is initially selected.
import javax.swing.*;
public class CheckBoxExample
{
43. K.D Polytechnic, Patan Advance Java Programming
43
CheckBoxExample(){
JFrame f= new JFrame("CheckBox Example");
JCheckBox checkBox1 = new JCheckBox("C++");
checkBox1.setBounds(100,100, 50,50);
JCheckBox checkBox2 = new JCheckBox("Java", true);
checkBox2.setBounds(100,150, 50,50);
f.add(checkBox1);
f.add(checkBox2);
f.setSize(400,400);
f.setLayout(null);
f.setVisible(true);
}
public static void main(String args[]) {
new CheckBoxExample();
}}
6) JRadioButton
• JRadioButton class is used to create a radio button.
• It is used to choose one option from multiple options.
• It should be added to Button group to select one radio button only.
• Constructors:
• JRadioButton (): creates an unselected radio button with no text.
• JRadioButton (String text): Creates a radio button with the
specified text.
• JRadioButton (String text, boolean selected ): Creates a radio
button with the specified text and selection state
•JRadioButton (String text, Icon icon , boolean selected ): Creates a radio button that has the
specified text, image, and selection state.
Each time the user clicks a radio button (even if it was already selected), the button fires an action
event. One or two item events also occur — one from the button that was just selected, and another
from the button that lost the selection (if any). Usually, you handle radio button clicks using an
action listener.
import javax.swing.*;
public class RadioButtonExample {
JFrame f;
RadioButtonExample(){
44. K.D Polytechnic, Patan Advance Java Programming
44
f=new JFrame();
JRadioButton r1=new JRadioButton("A) Male");
JRadioButton r2=new JRadioButton("B) Female");
r1.setBounds(75,50,100,30);
r2.setBounds(75,100,100,30);
ButtonGroup bg=new ButtonGroup();
bg.add(r1);bg.add(r2);
f.add(r1);f.add(r2);
f.setSize(300,300);
f.setLayout(null);
f.setVisible(true);
}
public static void main(String[] args) {
new RadioButtonExample();
}
7) JComboBox
JComboBoxclass is used to create the combo box (drop-down list).
At a time only one item can be selected from the item list.
The default form is the uneditable combo box,
The second form, called the editable combo box.
JComboBox(): Creates a JComboBox with a default data model.
JComboBox(Object[] items): Creates a JComboBoxthat contains the elements in the
specified array.
String[] petStrings = { "Bird", "Cat", "Dog", "Rabbit", "Pig" };
//Create the combo box, select item at index 4.
//Indices start at 0, so 4 specifies the pig.
45. K.D Polytechnic, Patan Advance Java Programming
45
JComboBox petList = new JComboBox(petStrings);
petList.setSelectedIndex(4);
petList.addActionListener(this);
Combo boxes also generate item events, which are fired when any of the items' selection state changes.
To make combobox editable:
JComboBox patternList = new JComboBox(patternExamples);
patternList.setEditable(true);
patternList.addActionListener(this);
import javax.swing.*;
public class ComboBoxExample {
JFrame f;
ComboBoxExample(){
f=new JFrame("ComboBox Example");
String country[]={"India","Aus","U.S.A","England","Newzealand"};
JComboBox cb=new JComboBox(country);
cb.setBounds(50, 50,90,20);
f.add(cb);
f.setLayout(null);
f.setSize(400,500);
f.setVisible(true);
}
public static void main(String[] args) {
new ComboBoxExample();
}
}
8) JMenu
• It is same like AWT menu.
• Key exceptions are:
• The menu classes like JMenuItem , JCheckBoxMenuItem , Jmenu and JMenuBar are all
subclasses of Jcomponents
• As a result of this, you can place a JMenuBar with in any container, including applet.
• You can associate an Icon object with any JMenuItem
JMenuBar(): Creates a new menu bar.
JMenu:
JMenu(): Constructs a new JMenuwith no text.
JMenu(String s): Constructs a new JMenuwith the supplied string as its text.
JMenu(String s, Boolean b): Constructs a new JMenuwith the supplied string
as its text and specified as a tear-off menu or not.
JMenuItem:
46. K.D Polytechnic, Patan Advance Java Programming
46
•The JMenuItemclass represents the actual item in a menu. All items in a menu should derive
from class JMenuItem
•JMenuItem(): Creates a JMenuItemwith no set text or icon.
•JMenuItem(Icon icon): Creates a JMenuItemwith the specified icon.
•JMenuItem(String text): Creates a JMenuItemwith the specified text.
•JMenuItem(String text, Icon icon): Creates a JMenuItemwith the specified text and
icon.
9) JApplet
The JApplet class extends the Applet class.
The javax.swing.JApplet class defines the core functionality of an applet.
As we prefer Swing to AWT. Now we can use JApplet that can have all the controls of
swing. The JApplet class extends the Applet class.
• import javax.swing.JApplet;
• import java.awt.*;
public class JustOneCircle extends JApplet
{
final int radius = 25;
public void paint ( Graphics gr )
{
gr.setColor( Color.white );
gr.fillRect( 0, 0, 150, 150 );
gr.setColor( Color.black );
gr.drawOval( (150/2 - radius), (150/2 - radius), radius*2,
radius*2 );
}
}