DIY Sourcing Tool: Build your own boolean link generator
•
4 gefällt mir•1,627 views

A step by step instruction manual for how to build your own spreadsheet that will generate custom boolean links on demand, from Arron Daniels.

Empfohlen
Empfohlen
Weitere ähnliche Inhalte
Was ist angesagt?
Was ist angesagt? (20)
Andere mochten auch
Andere mochten auch (20)
Ähnlich wie DIY Sourcing Tool: Build your own boolean link generator
Ähnlich wie DIY Sourcing Tool: Build your own boolean link generator (20)
Mehr von RecruitingDaily.com LLC
Mehr von RecruitingDaily.com LLC (20)
Kürzlich hochgeladen
Kürzlich hochgeladen (6)
DIY Sourcing Tool: Build your own boolean link generator
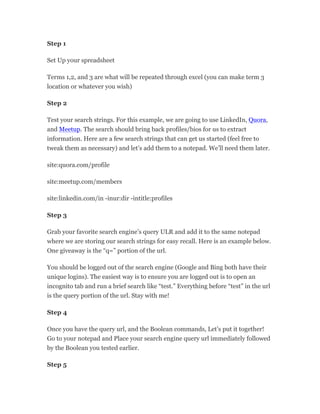
- 1. Step 1 Set Up your spreadsheet Terms 1,2, and 3 are what will be repeated through excel (you can make term 3 location or whatever you wish) Step 2 Test your search strings. For this example, we are going to use LinkedIn, Quora, and Meetup. The search should bring back profiles/bios for us to extract information. Here are a few search strings that can get us started (feel free to tweak them as necessary) and let’s add them to a notepad. We’ll need them later. site:quora.com/profile site:meetup.com/members site:linkedin.com/in -inur:dir -intitle:profiles Step 3 Grab your favorite search engine’s query ULR and add it to the same notepad where we are storing our search strings for easy recall. Here is an example below. One giveaway is the “q=” portion of the url. You should be logged out of the search engine (Google and Bing both have their unique logins). The easiest way is to ensure you are logged out is to open an incognito tab and run a brief search like “test.” Everything before “test” in the url is the query portion of the url. Stay with me! Step 4 Once you have the query url, and the Boolean commands, Let’s put it together! Go to your notepad and Place your search engine query url immediately followed by the Boolean you tested earlier. Step 5
- 2. Now let’s set up the automation magic. We want to just enter some keywords and let the spreadsheet do the work. Here is where the formulas come in handy. Go to your spreadsheet where you want your first search to be located. Let’s insert our first formula by pressing the italic fx button. Be sure to keep your notepad open to gather your queries: And let’s start by selecting CONCATENATE : You’ll notice it starts the formula for you, and displays a slightly different window, while on the spreadsheet, there is a set of parenthesis that appear. Before we start filling out the text information in our new dialogue box, remember: do not add any extra spaces where there should not be. This will mess up your formula. Text 1: Add your search query that is combined with your Boolean string. Text 2: Click in the box and press the space bar 1 time. You should see “ “ appear when you click to the next text item. This is you AND operator. Text 3: Click in the dialogue box and then select the cell on the spreadsheet or enter B3. Text 4: Click in the box and press the space bar 1 time. You should see “ “ appear just like before. Text 5: Click in the dialogue box and then select the cell on the spreadsheet or enter C3. Text 6: Click in the box and press the space bar 1 time. You should see “ “ appear just like before. Text 7: Click in the dialogue box and then select the cell on the spreadsheet or enter D3. Press OK. It should now look like this:
- 3. Let’s test it out! Add some key words (with or without Boolean logic) in cells B3, C3, and D,3. They should start automatically populating cell A4. To verify it’s done correctly, once you have added key words, select cell A4 copy it and paste it directly into your browser address bar NOT into Google. Make sure the Boolean populated correctly, the search results are accurate, and the search engine is correct. If it works… PRESTO! An auto Googler. The hard part is done. Go back to your spreadsheet, and copy A4, pasting it into A5 and A6. Replace the Quora with the LinkedIn and Meetup searches like so: Double click each formula to make sure the cells that are the correct destinations B3, C3, and D3. This is where we can adjust our search terms on the fly. Remember when I spoke about using two formulas? Let’s add =HYPERLINK to make quick click access. And while we’re at it, we can give it a “Friendly Name” so It doesn’t look like a hot mess. Go to your first search A4, and double click the cell and add the text in red below. =HYPERLINK(CONCATENATE("https://www.google.com/#q=site:quora.com/ profile"," ",B3," ",C3," ",D3), "Quora") We essentially just made all of that automagic in a nice clean hyperlink labeled accordingly. If done properly, it should look like this: Rinse and repeat for the other two and it won’t look so slapdash. Voila! Notice that I started the same section for Bing as it’s cool to see the different results and compare and contrast.