How to plant indoor plants in containers
•Als DOCX, PDF herunterladen•
2 gefällt mir•1,055 views

Planting method for indoor plants in a container,

Empfohlen
Empfohlen
Weitere ähnliche Inhalte
Was ist angesagt?
Was ist angesagt? (20)
Ähnlich wie How to plant indoor plants in containers
Ähnlich wie How to plant indoor plants in containers (20)
Mehr von Rachappa K Kore
Kürzlich hochgeladen
Kürzlich hochgeladen (20)
How to plant indoor plants in containers
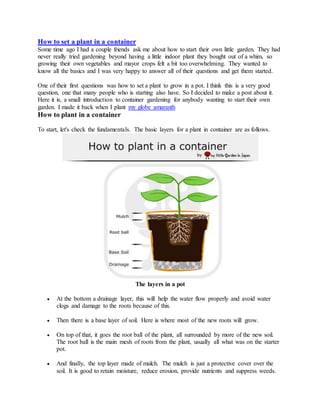
- 1. How to set a plant in a container Some time ago I had a couple friends ask me about how to start their own little garden. They had never really tried gardening beyond having a little indoor plant they bought out of a whim, so growing their own vegetables and mayor crops felt a bit too overwhelming. They wanted to know all the basics and I was very happy to answer all of their questions and get them started. One of their first questions was how to set a plant to grow in a pot. I think this is a very good question, one that many people who is starting also have. So I decided to make a post about it. Here it is, a small introduction to container gardening for anybody wanting to start their own garden. I made it back when I plant my globe amaranth How to plant in a container To start, let's check the fundamentals. The basic layers for a plant in container are as follows. The layers in a pot At the bottom a drainage layer, this will help the water flow properly and avoid water clogs and damage to the roots because of this. Then there is a base layer of soil. Here is where most of the new roots will grow. On top of that, it goes the root ball of the plant, all surrounded by more of the new soil. The root ball is the main mesh of roots from the plant, usually all what was on the starter pot. And finally, the top layer made of mulch. The mulch is just a protective cover over the soil. It is good to retain moisture, reduce erosion, provide nutrients and suppress weeds.
- 2. With this knowledge, we are ready to set our plants in their pots. What you will need A good pot and gravel for drainage Gravel or other material for drainage You can use broken pottery, washed seashells, packing peanuts and many others. A proper sized pot Not to big, not to small. Even if the plant will grow a lot, is best to repot several times in gradually bigger pots, than to put in a huge pot from the start. Good soil Depending on your plant different soils will be more recommended. However, black, rich in organic matter soil usually works well with most plants. Much Peanut shells, dried leafs, shredded or chipped bark, straw, etc.
- 3. Black, good soil is best Setting your plant in the container 1. First, If your plant just came home from a greenhouse or a garden center far away with a different climate, let it rest for a couple of days. This will help it adjust to its new environment. 2. Water one day before or in that morning to assure the plants have plenty of water and also because working with moist soil is much easier. Remember, the soil must be moist, not damp.
- 4. This hole was too big, so I got some wood sticks in to help 3. Rinse or scrub the container to get rid unwanted materials, then check to make sure it will have proper drainage. If the hole is to small, make a new one, if it is too big, put something to partially obstruct it. Good drainage is essential 4. Add a layer of drainage material. Between two to six centimeters should be enough, but adjust it depending on the size of your pot, and remember to make it even.
- 5. Add enough soil to have a good base 5. Add the soil, compost, or potting mix, to have the soil base. Put enough soil to assure the plant will be at the proper height. Some plants, like strawberries, have a depth they like to be. For those make sure the amount of base soil will not make the newly potted plant be deeper than it was in the original pot. Others, like tomato, prefer to be buried deeper than they were, so they can grow new roots from the stem. 6. If you are going to add some fertilizer you can add it in this layer. But make sure it is slow release fertilizer, to prevent it from burning the growing roots of the plant.
- 6. Hold the plant firmly, then carefully turn upside down 7. Now the tricky part, get the plant out of its old pot and into the new one. To remove the plant from its old pot, slip your hand over the top of the pot, holding the plant's stem between your fingers and the soil with your hand, then turn the pot upside down. Give the old pot a little pat and gently sake it and pull it up until the root ball is out .
- 7. Untangle the roots 8. At this point, you will be holding the root ball. If the roots encircle the plant, very gently try to loosen up some to untangle them a little. This will help the roots to spread out in their new pot and prevent many problems later on. If the roots are too tangled together you can snip a couple or slice about a centimeter of the outer layer of the ball.
- 8. Place the plant in the pot 9. Carefully place the plant on its new home, make sure is centered and leveled, then spread out the roots a bit more. Add soil around the roots and press to get rid of excess air 10. Then add the rest of the soil evening it out and pressing the soil against the plant, just enough to eliminate any large air pockets without compressing the soil.
- 9. Good soil will make its own mulch 11. Add a final layer of much if you want to, the plant with sure appreciate it, although is not completely necessarily. 12. Finally, water thoroughly, until water runs out the drain holes, to moisten the roots and to settle the soil. And there you have it, the plant is set.
- 10. Take good care and it will live happily Keep it in place with plenty of light but away from direct sunlight for a couple of days If you can. Also take extra care of it for some time to make sure your plant adjusts to its new house. And remember, plants should be moved into larger containers as they grow. So you might need to repot them later, maybe every couple of years or less depending on the plant.