2.
Step 6 Step 7 Step 8 Step 10 Step 9 Step 12 Step 11 Step 5 Step 13
5. Step 5 ‐Click on the Add button and all the fields will be blank for new input.
6. Step 6‐ Click the drop down button to select the category the new customer belongs
to. You will find pre‐create categories for you to choose
7. Step 7‐ key in the full names of your customer (NB, the customer account field
above it is out generated by the system and does not require any input )
8. Step 8‐ key in the customer address, phone numbers fax and town (NB The Town
field is a compulsory field and can only be selected from the drop down list that
shows pre‐created towns)
9. Step 9‐ This is a compulsory field that has a drop down list of credit categories to
choose from (Cash, Credit and Default) depending on credit terms
10. Step 10‐ This is a compulsory field that has a drop down list of pre‐created payment
terms to choose from (current for cash customer and other terms for credit
customers, select the most appropriate)
11. Step 11‐ Put the customer credit limit that is commensurate with the payment terms
12. Step 12‐Click on the Enforce payment terms to check the check box. This tool
basically helps compare between the payment term and the credit limit so that
whichever comes first the system can put check controls (i.e) If a customer has been
given x credit limit and he get to that limit the system cannot process any
transaction in the customer account unless the customer settles the account or a
temporary credit limit is assigned for the account.
Other functionalities
PharmasoftSQL Users manual Page 2
3.
ysd
Step 14 Step 13 Step 17 Step 16 Step 15 Step 18 Step 19
13. Step 13‐ Find, this button helps you find existing customers, a pop up list of
customer shows when you click the button (as shown below) Type in the customer
name u want to search then click the search button. Then go ahead and select by
clicking on the select button
PharmasoftSQL Users manual Page 3
4. 14. Step 14‐ Edit: After clicking on the Select button on the fig above, it will take you
back to the customer window with the customer you searched for displayed, the
edit button will activate the input boxes again and you can edit the information.
15. Step 15‐ Save: Click on the save button to help you save the edited customer
information
16. Step 16 –Delete: This helps delete an existing customer record, NB You can only
delete customers who don’t have transaction in their accounts, for customers who
have transactions tied to their account, try blocking
17. Step 17 – Block: This tools helps to temporarily suspend a customer account,
meaning that no kind of transaction/activity can happen in that account until its
unblocked. To unblock, click on the block button for a blocked account and the
system will need you to confirm unblocking the account.
NB If an account is blocked, the marked check box (In red on top of the window) will
appear checked; otherwise it will appear as it is now.
18. Step 18 – Navigation, The navigation button are used for moving from one record to
the next (in the case of those two marked with single arrows > <) or moving from
the first record to the last record (in the case of those two marked with double
arrows >> <<)
19. Step 19‐ Close: This is used for exiting the window. In case you were in the middle
of an activity like editing an account and you want to exit the window, you will be
required to cancel the transaction from the Cancel button which appear below the
find button any time you click on the add and edit buttons. When you click on the
cancel button, the transaction will be cancelled and the close button will be
activated.
PharmasoftSQL Users manual Page 4
5.
TRANSACTING WITH CUSTOMERS
Quotation
It’s mainly used for quoting prices and a discount of select products and it does not deduct
quantities quoted from the stocks. It can also be converted to a cash sale or sales invoice.
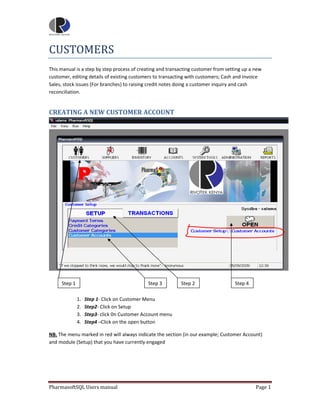
Step 1 Step 2 Step 3 Step 4
1. Step 1‐ Click on Customer Menu
2. Step2‐ Click on Transaction
3. Step3‐ click on Quotation menu
4. Step4 –Click on the open button
The quotation window opens as shown below
PharmasoftSQL Users manual Page 5
6.
Step 5 Step 8 Step 9 Step 7 Step 10 Step 11 Step 6
5. Step 5 ‐Click on the new button to activate step 6.
6. Step6 ‐When active; Click the button to select the Customer from the pop‐up
window of customers. Type in the customer name you wants to search for then click
the search button. Then go ahead and select by clicking on the select button
7. Step 7‐ Once you click on the select button (Step 6) the customer pop‐up window
disappear and the customer name appears on the input box, the fields on Step 7 are
PharmasoftSQL Users manual Page 6
7. auto‐filled for you, apart from the quotation expiry date which you should change
appropriately.
8. Step 8‐ Select your name as a sales rep. From the drop down pre‐created list. You
cannot save the quotation without selecting the sales rep name.
9. Step 9‐ This is where you start keying in the items. Type the first four syllables of the
item name. (E.g.) Zinn (for Zinnat) and press the enter key on your keyboard. A pop
up window with a list of all Zinnats, (Syrups and different strengths of tablets
shows) as shown below (Items listed are arranged in alphabetic order), Use the
arrow keys(Up and down)on your keyboard to move to the item you want to select
and press the enter key on the keyboard or the select button on the pop‐up.
In case the item you typed in the description box is not available on the list of items, an error
message telling you the item is not found pops up with a choice of adding the item or
moving the cursor to the closest match as shown below.
Click on the No button to go to the closest match on the window above. Otherwise, the yes
button will take you to the inventory section to create the item (Topic covered in the
inventory module manual)
NB The red circular marking on the above window show a different level of search. When
you click on the option box its checked then type in the active molecule of the item in the
only input box of the window and click on the search button next to it. (E.g.) The active
molecule of ‘Zentel’ the dewormer is albendazole. If you checked the option button and
then typed in the input box the word albendazole and clicked search, the system will display
all the items with albendazole as the molecule as shown below.
PharmasoftSQL Users manual Page 7
8.
After searching using the molecule ‘albendazole’ a list of all the items with the molecule are listed.
Note, Zentel is at the bottom of the list. To move to it, use the mouse to click on it or the down
arrow key on your keyboard then press the enter button on your keyboard or the select button.
The arrows show the special attributes that are pre‐set when creating the item while the edit button
is for editing those attributes (Covered in the Inventory Module manual)
10. Step 10‐ Then the input boxes that follow are keyed in with the relevant input starting
with quantity, bonus (when u want to give a free product), Tax (when on the tax input
box and you want to include tax in your item) hit the insert button on your keyboard and
a pop‐up with the different percentage tax show, use the 16% as shown below and click
on the OK button the unit price is automatically filled, input a discount and the figure is
taken as percentage. If u type 5 it means you are giving a 5% discount then press enter
11. Step 11‐ the Total is automatically worked out for you and it becomes inclusive if it
has taxes. Then press the entre key on the keyboard
PharmasoftSQL Users manual Page 8
9.
Step 12 Step 13 Step 15 Step 14 Step 16
12. Step 12 – The keyed in items populate the grid as show and can as well be edited
from the grid and fields that can be edited include; price, tax, Qty, and line discount
(e.g.) to edit the quantity of the first item, click the circled area and a pop –up
window (Shown below) will appear . Type in the new Qty on the initial Qty field and
click on the ok. Button. The new quantity and revised Net cost will appear on the
grid.
Initial Quantity field
Bonus quantity
Prescribe
Ok
The prescribe button is for preparing prescriptions for labelling the medicine (Covered in Sales Order
in this manual). Bonus Quantity is for adding bonus if you wish to give a free item, so, if you include
bonus, the total quantity will reflect initial qty and bonus qty.
13. Step 13 – Comment‐ You can add comments to the quotation and they will be
reflected when you print out the quotation.
PharmasoftSQL Users manual Page 9
10. 14. Step 14 – Delete; When you click the delete button a pop‐up menu appears; if you
want to delete the entire quotation, click on delete whole Quotation, otherwise
click on single item menu the pop up shown below will appear enter the row
number to deleted. Click on ok.
15. Step 15 – Save; the save button saves the quotation but it can still be edited and
more items added to it until it’s batched. Soon as it’s saved, it can be retrieved for
batching and printing. When you click on save a print window pop‐ups that would
allow you to preview the quotation before printing or print it directly without
previewing.
‐Click on the preview radial button and click on the send button to
open the report or click on the printer radial button and click sent
to print directly to the printer
‐Select the number of pages to print
16. Step 16‐ Click on the close button to close the window.
To retrieve the saved Quotation for adding more items, deleting, editing entries or batching, open a
new quotation window
PharmasoftSQL Users manual Page 10
11.
Click on the quotation number button and the following window appears
A list of all the quotations is displayed, click on the quotation you want to open and click on the
select button. The quotation is open with the batch button active.After making the relevant changes
onto it, click on the batch button.
Click on the yes button and you will not be able to edit the quotation again. Then click on the save
quotation pop‐up to confirm and print it out.
PharmasoftSQL Users manual Page 11
12.
SALES ORDER
This is the main window (The everyday window) that is used for raising cash sale, doing stock
issues and even raising invoices. To access it;
Step 1 Step 2 Step 3 Step 4
1. Step 1‐ Click on Customer Menu
2. Step2‐ Click on Transaction
3. Step3‐ click on Sales Order menu
4. Step4 –Click on the open button
PharmasoftSQL Users manual Page 12
13.
Step 7 Step 8
Step 5 Step 6
‐ When this window loads, by default, the customer will show Cash sale Customer and
transaction will be cash sale as marked in red above. So go straight to Step 5.
5. Step 5‐ Select your name as a sales rep. From the drop down pre‐created list. You
cannot save the cash sale transaction without selecting the sales rep name.
6. Step 6‐ This is where you start keying in the items. Type the first four syllables of the
item name. (e.g.) Zinn (for Zinnat) and press the enter key on your keyboard. A pop
up window with a list of all Zinnats, (Syrups and different strengths of tablets shows)
as shown below (Items listed are arranged in alphabetic order), Use the arrow keys
(Up and down)on your keyboard to move to the item you want to select and press
the enter key on the keyboard or the select button on the pop‐up.
PharmasoftSQL Users manual Page 13
14. In case the item you typed in the description box is not available on the list of items, (or
because of wrong spelling)an error message telling you the item is not found pops up with a
choice of adding the item or moving the cursor to the closest match as shown below.
Click on the No button to go to the closest match on the window above. Otherwise, the yes
button will take you to the inventory section to create the item (Topic covered in the
inventory module manual)
NB The red circular marking on the above window (detailed item search) show a different
level of search. When you click on the option box its checked then type in the active
molecule of the item in the only input box of the window and click on the search button
next to it. (e.g.) The active molecule of ‘Zentel’ is albendazole. If you checked the option
button and then typed in the input box the word albendazole and clicked search, the system
will display all the items with albendazole as the molecule as shown below.
After searching using the molecule ‘albendazole’ a list of all the items with the molecule are listed.
Note; Zentel is at the bottom of the list. To move to it, use the mouse to click on it or the down
arrow key on your keyboard then press the enter button on your keyboard or the select button.
The red arrows show the special attributes that are pre‐set when creating the item while the edit
button is for editing those attributes (Covered in the Inventory Module manual)
7. Step 7‐ Then the input boxes that follow are keyed in with the relevant input starting
with quantity, bonus (when u want to give a free product), Tax (when at the tax input
box and you want to include tax in your item) hit the insert button on your keyboard
and a pop‐up window with a drop down list of the different percentage tax show, use
the 16% as shown below and click on the OK button the unit price is automatically filled,
PharmasoftSQL Users manual Page 14
15. input a discount and the figure is taken as percentage. If u type 5 it means you are giving
a 5% discount then press enter
8. Step 8‐ the Exclusive is automatically worked deducting the percentage discount
and it becomes inclusive if it has taxes. Then press the entre key on the keyboard to
post the information onto grid on the display window
9. Step 9‐ the Exclusive is automatically worked out for you and it becomes inclusive if
it has taxes. Then press the entre key on the keyboard
Edited as illustrated below
Step 10 Step 14 Step 13 Step 12 Step 11
PharmasoftSQL Users manual Page 15
16.
10. Step 10 – The keyed in items populate the grid as show and can as well be edited
from the grid and fields that can be edited include; price, tax, Qty, and line discount
(e.g.) to edit the quantity of the first item, click the circled area and a pop –up
window (Shown below) will appear . Type in the new Qty on the initial Qty field and
click on the ok. Button. The new quantity and revised Net cost will appear on the
grid. Bonus Quantity is for adding bonus if you wish to give a free item, so, if you
include bonus, the total quantity will reflect initial qty and bonus qty.
Initial Quantity field
Bonus quantity
Prescribe
Ok
making a prescription
11. Step 11‐ The prescribe button is for preparing prescriptions for labelling the
medicine. NB. Before you start keying any inventory to populate the grid with the
cash sale items, click on the check box for Enter prescription then start from step 5
(page 13) the usual way of keying in cash sale items through to Step 9 (page 15),
when you press the enter button on your keyboard to populate the grid with the
keyed in inventory item, the following window appears
1. The window will give you an option of choosing whether you are making a
prescription for an adult or a child, choose appropriately.
2. Choose the form of your medicine, tablets capsules if its syrup, choose the
dosage from the drop down list.
3. The number of times field is populated by choosing one of the buttons on the
right according to the number of times the medicine is taken. Click
appropriately.
4. The period field can be in weeks (by default) or a specified number of days
which can be typed in manually then select the representation (whether weeks
or days) alongside it from the drop down list.
5. The quantity field will be updated from the the quantity you keyed when you
selected the inventory item.
6. The above steps will populate the additional comment window
7. Click on the update button so that that prescription information can be save for
another use without manually generating it.
8. Then click on select button to move to the next item
Repeat the above steps for all the items that you key in and after closing the sale, a prescription will
be printed for each item.
PharmasoftSQL Users manual Page 16
17.
5 8 1 2 6 4 7 3
12. Step 12 – Select the expiry date; this tool helps one determine what item to sell by
directly selecting the expiry date and batch number from your stock other than the
defined normal way where the system decides for you what to sell by the virtual of
FIFO (First In First Out). To achieve this. Click on the check box and start from step 5
(page 13) the usual way of keying in cash sale items through to Step 9 (page 15),
when you press the enter button on your keyboard to populate the grid with the
keyed in inventory item, the following window appears
1. Location, Specify the location of the item by selecting the drop down list for
those who run multiple stores
2. Quantity removing will be populated from the receiving, bonus and total fields
above
3. Select the item expiry date from the drop down date picker.
4. Type in the item batch number on the batch number field.
5. Click on the remove from location button, this will populate the grid as shown
below notice the quantity available field meaning you can countercheck your
stocks level at this point.
6. Click on the OK. button
PharmasoftSQL Users manual Page 17
18.
1 2 3 4 5 6
13. Step 13 – Delete; When you click the delete button a pop‐up menu appears; if you
want to delete the entire cash sale, click on delete whole sale order, otherwise click
on single line menu the pop up shown below will appear enter the row number to
deleted. Click on ok.
14. Step 14 – Save/Batch/F6; the save button saves the cash sale and out batches it
meaning that it cannot be edited again and the transaction is closed, a pop up
dialogue box appears asking u to confirm whether u want to save the cash sale, click
on the yes button
PharmasoftSQL Users manual Page 18
19. When you click on the yes button or press the enter key on your keyboard, the
following window appears
Select the payment mode; Enter amount paying Click on print or press enter
cash, cheque or credit card on the keyboard
Once you click on the print button or press the enter button on your keyboard, the
print pop up appears, if you don’t want to preview before printing, press the enter
button twice otherwise,
‐Click on the preview radial button and click on the send button to
open the report or click on the printer radial button and click sent
to print directly to the printer
‐Select the number of pages to print
Send
PharmasoftSQL Users manual Page 19
20.
NOTE
1. You can also raise an invoice from the sales order window, you just need to select the
invoice option and change the customer by clicking on the select button to select the
customer to invoice. BE SURE TO CHANGE THE DEFAULT CASH SALE CUSTOMER WHEN
RAISING AN INVOICE BECAUSE YOU ARE NOT SUPPOSED TO INVOICE CASH SALE
CUSTOMERS.
2. A stock issue is a stock transfer from one branch to the other (un‐interlinked branches).
Select the branch name from customer list as indicated in No. 1 above, if u select a customer
who is not authorised to get a stock issue, a pop‐up window will alert you
Otherwise you will need to put your log in password to confirm the transaction when you
click on the save button after raising the stock issue
3. Stock transfer is for directly interlinked branches, when you save the stock transfer from
the issuing branch, it populate the data in the receiving branch database without the need of
re‐typing the Goods received Note to increase the stock levels.
PharmasoftSQL Users manual Page 20
21.
Sales invoice
Step 1 Step 2 Step 3 Step 4
1. Step 1‐ Click on Customer Menu
2. Step2‐ Click on Transaction
3. Step3‐ click on SALES INVOICE menu
4. Step4 –Click on the open button
5. Step 5‐ Click on process Sales Invoice from Existing stocks Items Menu
6. Step6‐ Click on The next button
PharmasoftSQL Users manual Page 21
23. 7. Step 7‐ click on the find button to select the customer from a list of pre‐created
customers that pops‐up. Type in the customer name you wants to search for then
click on the search button. Then go ahead and select by clicking on the select button
Type the customer name here
After selecting the customer, the other fields below it will be populated with the customer details,
address, phone number, customer balance, credit limit, available amount, then on the right (Circled
in red) the physical address of the customer will be populated, u can also select the contact person.
NB: All the above information being populated has been generated from the customer set‐up
information window as discussed earlier in the chapter.
8. Step 8 –Click to select the sales person from the drop down list.
9. Step 9– Click to select the transporter from the drop down list
10. Step 10‐ This is where you start keying in the items. Type the first four syllables of
the item name. (e.g.) Zinn (for Zinnat) and press the enter key on your keyboard. A
pop up window with a list of all Zinnats, (Syrups and different strengths of tablets
shows) as shown below (Items listed are arranged in alphabetic order), Use the arrow
keys (Up and down)on your keyboard to move to the item you want to select and
press the enter key on the keyboard or the select button on the pop‐up.
PharmasoftSQL Users manual Page 23
24. In case the item you typed in the description box is not available on the list of items, (or
because of wrong spelling)an error message telling you the item is not found pops up with a
choice of adding the item or moving the cursor to the closest match as shown below.
Click on the No button to go to the closest match on the window above. Otherwise, the yes
button will take you to the inventory section to create the item (Topic covered in the
inventory module manual)
NB The red circular marking on the above window (detailed item search) show a different
level of search. When you click on the option box its checked then type in the active
molecule of the item in the only input box of the window and click on the search button
next to it. (e.g.) The active molecule of ‘Zentel’ is albendazole. If you checked the option
button and then typed in the input box the word albendazole and clicked search, the system
will display all the items with albendazole as the molecule as shown below.
After searching using the molecule ‘albendazole’ a list of all the items with the molecule are listed.
Note; Zentel is at the bottom of the list. To move to it, use the mouse to click on it or the down
arrow key on your keyboard then press the enter button on your keyboard or the select button.
The red arrows show the special attributes that are pre‐set when creating the item while the edit
button is for editing those attributes (Covered in the Inventory Module manual)
Then the input boxes that follow are keyed in with the relevant input starting with quantity, bonus
(when u want to give a free product), Tax (when at the tax input box and you want to include tax in
your item) hit the insert button on your keyboard and a pop‐up window with a drop down list of the
different percentage tax show, use the 16% as shown below and click on the OK button the unit
price is automatically filled, input a discount and the figure is taken as percentage. If u type 5 it
means you are giving a 5% discount then press enter
PharmasoftSQL Users manual Page 24
25.
The Exclusive is automatically worked deducting the percentage discount and it becomes inclusive if
it has taxes. Then press the entre key on the keyboard to post the information onto grid on the
display window
The Exclusive is automatically worked out for you and it becomes inclusive if it has taxes. Then press
the entre key on the keyboard
Note: TO MOVE FROM ONE INPUT BOX TO THE NEXT, USE THE ENTER KEY ON YOUR
KEYBOARD. (ENTER THE VALUE, PRESS ENTER,)
11. Step11‐ Click on The DELETE button Delete; When you click the delete button a pop‐
up menu appears; if you want to delete the entire cash sale, click on delete whole
sale order, otherwise click on single line menu the pop up shown below will appear
enter the row number to deleted. Click on ok.
12. Step 12 – Save/Batch/F5; the save button saves the sale INVOICE and out batches it
meaning that it cannot be edited again and the transaction is closed, a pop up
dialogue box appears asking u to confirm whether u want to save the cash sale, click
on the yes button
13.
PharmasoftSQL Users manual Page 25
26.
Then you can go ahead and print it out. Note that an invoice number has been generated
TO VIEW EXISTING INVOICES
Step 16 Step 18 Step 15
Step 14 Step 13 Step 17 Step 19
PharmasoftSQL Users manual Page 26
27. 14. Step 13 ‐ Click on existing sales invoice Menu
15. Step14 ‐ Click on drop down menu to select the search criteria
16. Step 15 – Type in the search value, that is in accordance with the search criteria
17. Step 16 ‐ Click on the search button, the grid is populated with the search results,
click on the invoice you want to open
18. Step17 –Click on the drop down list to select the sort criteria.**Not a must
19. Step 18‐ Click on the select invoice button, the details will be displayed on the fields
below the button, showing the invoice number invoice date and customer name.
20. Step19‐ Click on The next button
CREDIT NOTE
Step 1 Step 2 Step 4
Step 3
1. Step 1‐ Click on Customer Menu
2. Step2‐ Click on Transaction
3. Step3‐ click on CREDIT NOTE menu
4. Step4 –Click on the open button
PharmasoftSQL Users manual Page 27
28. Step 5 Step 6 Step 7 Step 8
Step 9
You can process credit notes from
5. Step 5 ‐ Click on From Existing Items menu then click on the next button Step 9. This
is not the ideal method because it involves typing the items to credit against an
existing cash or invoice and typing in the cash/Invoice number to be credited; this
method is prone to errors, in terms of specific inventory items and quantities used.
2
1 3 7 5 6 4
PharmasoftSQL Users manual Page 28
29. 1. Find the customer who was quoted on the Cash/Invoice so that the credit note will be
posted to the customer’s account, click on the find button to select the customer
from a list of pre‐created customers that pops‐up. Type in the customer name you
wants to search for then click on the search button. Then go ahead and select by
clicking on the select button
Type the customer name here
2. Type in the cash sale or Invoice number you are doing a credit note against.
3. Select the name of the sales person doing the credit note from the drop down list
4. Type in a comment, why you are raising a credit note. NB you cannot complete a
credit note without commenting.
5. This is where you start keying in the items. Type the first four syllables of the item
name. (e.g.) Zinn (for Zinnat) and press the enter key on your keyboard. A pop up
window with a list of all Zinnats, (Syrups and different strengths of tablets shows) as
shown below (Items listed are arranged in alphabetic order), Use the arrow keys (Up
and down) on your keyboard to move to the item you want to select and press the
enter key on the keyboard or the select button on the pop‐up.
PharmasoftSQL Users manual Page 29
30. In case the item you typed in the description box is not available on the list of items, (or
because of wrong spelling)an error message telling you the item is not found pops up with a
choice of adding the item or moving the cursor to the closest match as shown below.
Click on the No button to go to the closest match on the window above. Otherwise, the yes
button will take you to the inventory section to create the item (Topic covered in the
inventory module manual)
Then the input boxes that follow are keyed in with the relevant input starting with quantity,
bonus (when u want to credit a free product you had given), Tax (when at the tax input box
and you want to credit tax in your item) hit the insert button on your keyboard and a pop‐up
window with a drop down list of the different percentage tax show, use the 16% as shown
below and click on the OK button the unit price should reflect the one on the original sale,
input a discount if the original sale had discount and the figure is taken as percentage. If u
type 5 it means you are giving a 5% discount then press enter
Note: TO MOVE FROM ONE INPUT BOX TO THE NEXT, USE THE ENTER KEY ON YOUR
KEYBOARD. (ENTER THE VALUE, PRESS ENTER,)
PharmasoftSQL Users manual Page 30
31. Click on the add to location button and the quantity being credited will be displayed
under the marked(in red) receiving title as well as the grid populated with the data. Click
on the OK button.
6. Before keying in the password, make sure that the discount, taxes and total
matches with that of the original documents, if they are the same, key in your log in
password.
7. Click on the save button and the credit note number will automatically be batched
and a credit note auto generated.
6. Step 6 and step 7‐ Click on link to cash sale menu and click on the next button (step
9)
1
1. Click on the select button
2. On the pop up window that appears, use wide criteria to retrieve the cash sale to
credit. If you have the cash sale number you can type in the number (i.e.) for ease of
search use the last whole numbers (e.g.) if your cash sale number is CS00000680,
type 680 and press enter on your keyboard or click on the button alongside the value
input box, otherwise you can use other criteria to search for a cash sale to credit is
you are not sure of the number; you can also use, Date, Customer Account, Name or
customer reference.
3. The cash sale will be displayed on the grid, click on it to select.
4. Click on the select button.
PharmasoftSQL Users manual Page 31
32.
2 3 4
5 6
PharmasoftSQL Users manual Page 32
33. 5. When open, the entries in that cash sale will be listed and the column marked in red
will be unmarked, click on the items that need to be credited and an asterisk mark
(like the one shown in the first column will appear) NB Only items to be credited are
selected, otherwise don’t click to select an item.
6. Click on the next button.
7 11 10 9 8
When the above loads, it’s populated with data from the Cash/Invoice to credit so you don’t have to
fill in the fields of Customers, sales rep, sales code and the inventory items.
7. This field is compulsory, put remarks as to why you are raising the credit note.
8. The marked fields show the original sales quantities so that you can make your
decision as to the number of items to credit or whether to credit the indicated
quantity
9. Click on the Quantity field to put the quantity to credit and a pop up window (next
page)appears, fill it in accordingly and click on the OK button, if you try to credit
more than you had sold the system will give you an error message.
PharmasoftSQL Users manual Page 33
34.
Verify the location where the goods are going back to (If it is same as where they had
come from), reconfirm the quantity receiving expiry date and batch number from the
grid as shown below.
Then click on the OK button then confirm the discount, exclusive, tax and total fields to
see that they reflect accordingly.
10. Put in your log in password.
11. Click on the save button, a pop up will ask you to confirm whether you want to update
batch, click on the OK button. You can go ahead and print the credit note out.
PharmasoftSQL Users manual Page 34
35. 7. Step 8‐ click on EXISTING CREDIT NOTE menu to see all the credit notes raised earlier.
1 2 3
1. On the window that appears, use a wide criterion to retrieve the credit note you
are searching for. If you have the credit note number you can type in the number
(i.e.) for ease of search use the last numbers (e.g.) if your credit note number is
CCD00000080, type 80 and press enter on your keyboard or click on the button
alongside the value input box, otherwise you can use other criteria to search for a
credit note raised, if you are not sure of the number; you can also use, Date,
Customer Account, Name or customer reference.
2. Click on the select credit note button and the selected credit note will be
displayed on the fields below the button showing Credit note number, date and
customer name
3. Click on the next button, and the credit note window appears.
PharmasoftSQL Users manual Page 35
36.
PharmasoftSQL Users manual Page 36
37.
Table of Contents
CREATING A NEW CUSTOMER ACCOUNT ...............................................................................................1
Other functionalities ...........................................................................................................................2
TRANSACTING WITH CUSTOMERS ..........................................................................................................5
Quotation........................................................................................................................................5
SALES ORDER.................................................................................................................................12
Sales invoice..................................................................................................................................21
CREDIT NOTE.................................................................................................................................27
PharmasoftSQL Users manual Page 37