SlideShare ist ein Scribd-Unternehmen logo
1 von 47
Downloaden Sie, um offline zu lesen
JULY 2015
A PRINCIPLED TECHNOLOGIES TEST REPORT
Commissioned by Dell Inc.
COMPARING PERFORMANCE AND COST: DELL POWEREDGE VRTX WITH
ONE DELL POWEREDGE M830 SERVER VS. A LEGACY SOLUTION
0 SERVER NODES VS. A
LEGACY SOLUTION
Businesses using multiple outdated servers for email, database, and file and
print workloads stand to benefit greatly by consolidating these workloads onto a single
new server and running them in virtual machines. In tests in the Principled Technologies
datacenter, the Dell PowerEdge VRTX with a Dell PowerEdge M830 blade server,
powered by the Intel Xeon processor E5-4650 v3, was able to simultaneously run email,
database, and simulated file and print workloads in a VMware® vSphere® ™ virtual
environment. The VRTX performed the work of nine older servers—four database
servers, four file and print servers, and one Exchange server. It achieved similar or even
better performance while requiring less space and power than a legacy disparate
hardware solution,1
which translates to a lower five-year TCO. Combining servers,
networking, and shared storage into an all-in-one solution, the Dell PowerEdge VRTX
can deliver big performance and savings.
1 In June 2013, Principled Technologies conducted testing comparing the performance of (1) the Dell PowerEdge VRTX with a Dell PowerEdge M620
server and (2) a legacy hardware solution. The results for the legacy solution that we cite in this report are from that earlier study. For more details,
see the report for that study, available at www.principledtechnologies.com/Dell/VRTX_performance_TCO_0713.pdf.
A Principled Technologies test report 2Comparing performance and cost: Dell PowerEdge VRTX with
one Dell PowerEdge M830 server vs. a legacy solution
REPLACE NINE OLDER SERVERS WITH ONE DELL POWEREDGE VRTX
We compared the performance, power consumption, space, and cost of running
typical office applications (email, database, and file/print server) on the following
solutions:
 A Dell PowerEdge VRTX with a Dell PowerEdge M830 server powered by
the Intel Xeon processor E5-4650 v3, running VMware vSphere 5.5 with 10
Microsoft® Windows Server® 2012 R2 virtual machines (VMs) – four running
SQL Server® 2014, four acting as file/print servers, and two running a single
Exchange Server 2013 environment.
 A legacy disparate hardware solution consisting of older HP tower servers,
a NETGEAR® switch, and an HP storage appliance. The legacy tower servers
all ran bare metal instances of Windows Server 2012. One ran SQL Server
2012, another ran a dedicated file/print server, and the last ran Exchange
Server 2010. By virtualizing four of the SQL workloads and four of the
file/print simulated workloads, we extrapolated the consolidation to nine
legacy servers.
We ran three benchmarks simultaneously to exercise the email, database, and
file and print applications all at once. The performance of the legacy hardware solution
we discuss in this report is from a June 2013 Principled Technologies study (available at
www.principledtechnologies.com/Dell/VRTX_performance_TCO_0713.pdf).2
For this
study, we ran multiples of the SQL Server and simulated file/print servers to
demonstrate a consolidation scenario and show an even bigger savings.
We also measured the power consumption of the Dell PowerEdge VRTX and the
legacy solution while idle and during the simultaneous workloads. For detailed
configuration information about the solutions we tested, see Appendix A. For testing
details, including the increased workload parameters we used, see Appendix B. For
detailed test results, see Appendix C.
2 For our 2013 study, we tested only three servers: one running SQL Server 2012, one running as a dedicated file/print server, and one running
Exchange Server 2010.
A Principled Technologies test report 3Comparing performance and cost: Dell PowerEdge VRTX with
one Dell PowerEdge M830 server vs. a legacy solution
Dell PowerEdge VRTX with the Intel Xeon processor E5-4650 v3 optimized application
performance while reducing power consumption and providing headroom for future growth
Database performance
As Figure 1 shows, during our test running three workloads at the same time,
each of the four database VMs we ran on the Dell PowerEdge VRTX with the Intel Xeon
processor E5-4650 v3-powered Dell PowerEdge M830 server outperformed a single
database server in our legacy disparate hardware solution. This means the VRTX
solution would be able to replace the four legacy database servers and deliver even
more database orders per minute per VM. For this test, we upgraded from SQL Server
2012, which we ran on the legacy database servers, to SQL Server 2014 to reflect the
newer technology now available.
Figure 1: While running
simultaneous email, database,
and simulated file and print
workloads, each database VM
on the Dell PowerEdge VRTX
with an Intel processor-
powered Dell PowerEdge
M830 server delivered 8.0
percent greater database
performance than a single
server in the legacy disparate
hardware solution.
Figure 2 compares the performance of all four database VMs on the Dell
PowerEdge VRTX with an Intel processor-powered Dell PowerEdge M830 server to the
performance of the one legacy database server. As it shows, one Dell PowerEdge VRTX
with an Intel processor-powered Dell PowerEdge M830 server delivered 4.3 times as
many orders per minute as a single legacy server.
A Principled Technologies test report 4Comparing performance and cost: Dell PowerEdge VRTX with
one Dell PowerEdge M830 server vs. a legacy solution
Figure 2: While running
simultaneous email, database,
and simulated file and print
workloads, the four database
VMs on the Dell PowerEdge
VRTX with an Intel processor-
powered Dell PowerEdge
M830 server delivered total of
8,872 OPM, 4.3 times the
database performance of a
single server in the legacy
disparate hardware solution.
Simulated file and print performance
As Figure 3 shows, during our test running three workloads at the same time,
each of the four simulated file and print VMs we ran on the Dell PowerEdge VRTX with
the Intel Xeon processor E5-4650 v3-powered Dell PowerEdge M830 server
outperformed a single file and print server in our legacy disparate hardware solution.
This means the VRTX solution would be able to replace the four legacy file and print
servers and deliver even greater performance. Instead of pushing the systems to the
maximum, we ran the utility at a low level of targeted IOPs to simulate a typical
business.
Figure 3: While running
simultaneous email,
database, and simulated file
and print workloads, each
file and print VM on the Dell
PowerEdge VRTX with an
Intel processor-powered Dell
PowerEdge M830 server
delivered 17.9 percent
greater file and print
performance than a single
server in the legacy disparate
hardware solution.
A Principled Technologies test report 5Comparing performance and cost: Dell PowerEdge VRTX with
one Dell PowerEdge M830 server vs. a legacy solution
Exchange
For the email server we ran on the Dell PowerEdge VRTX, we upgraded from
Exchange 2010 to Exchange 2013 and from Microsoft Load Generator 2010 to LoadGen
2013. While we cannot directly compare the results from these two test scenarios due
to the differences between the two versions of Exchange, we compared the latency, or
response time, in milliseconds to learn about their relative performance. We found that
though latencies increased slightly—from 1.5 milliseconds on the legacy solution to 2.9
milliseconds on the new solution—they remained well within the average latency
threshold of 50 milliseconds that Microsoft sets. Increased load on the storage from the
additional workloads running simultaneously could account for the increase in latency.
However, such a small increase would not likely be noticeable to end users.
Power consumption
The compact Intel Xeon processor E5-4650 v3-powered Dell PowerEdge M830
with Dell PowerEdge VRTX not only supported more work than the legacy tower
solution with nine servers, it also used significantly less power while under heavier load
thanks to Dell’s performance-per-watt system power management policy. As Figure 4
shows, the Dell PowerEdge M830 server with Dell PowerEdge VRTX used 67.3 percent
less power while running our three simultaneous workloads than the legacy disparate
hardware solution did. This reduced consumption can translate directly to savings.
Figure 4: The Dell PowerEdge
VRTX with an Intel processor-
powered Dell PowerEdge
M830 server used less power
while running simultaneous
(and more robust) workloads
than the legacy disparate
hardware solution did.
In our tests, we used a Dell PowerEdge VRTX with only one server compared to
the simulated nine physical servers in the legacy hardware solution. Adding server
nodes and more or faster drives to the shared storage may achieve greater performance
gains, though the current configuration still had plenty of room for growth. Additionally,
adding new application VMs to your VMware vSphere environment may give the Intel
A Principled Technologies test report 6Comparing performance and cost: Dell PowerEdge VRTX with
one Dell PowerEdge M830 server vs. a legacy solution
Xeon processor E5-4650 v3-powered Dell PowerEdge VRTX solution scalability and room
to grow as the demands of your business continue to increase. With a legacy disparate
hardware solution, achieving similar results may require purchasing additional servers
that take up more space and consume more power.
Reduced space and physical complexity
In addition to the extra space that legacy disparate hardware solutions
encompass, they often have a great deal of complexity when it comes to hardware
pieces and cabling. If your business’ location has premium square footage value,
accommodating your legacy solution can mean sacrificing precious space. The Dell
PowerEdge VRTX is a compact all-in-one solution that fits easily under a desk and uses
minimal cabling because the solution resides in one chassis.
Though the solution is unlikely to be in a server rack in a small or remote office,
we looked at the rack-equivalent space each solution would occupy to make a universal
size comparison. We found that the Dell PowerEdge VRTX solution would fit into just 5U
of rack-equivalent space—an 88.6 percent reduction in the space that the legacy
solution would take up (a massive 44U).
For each U of rack-equivalent space, the Dell PowerEdge VRTX with one Intel
Xeon processor E5-4650 v3-powered Dell PowerEdge M830 server delivered a whopping
9.5 times the database performance, in orders per minute, than the four database
servers in the legacy disparate hardware solution (see Figure 5).
Figure 5: The compact form
factor of the Dell PowerEdge
VRTX means that, with one
Intel processor-powered Dell
PowerEdge M830 server, it
packs more performance into
less space than the legacy
disparate hardware solution.
As Figure 6 shows, regardless of the server configuration, the Dell PowerEdge
VRTX solution powered by the Intel Xeon processor E5 v3 family also used only 6 cables,
31 fewer than the legacy disparate hardware solution.
A Principled Technologies test report 7Comparing performance and cost: Dell PowerEdge VRTX with
one Dell PowerEdge M830 server vs. a legacy solution
Dell PowerEdge VRTX
Ethernet cables Power cables
Total by type 2 4
Total cables 6
Legacy disparate hardware solution
Ethernet cables Power cables
HP ProLiant ML310 G5 8 4
HP ProLiant ML370 G5 2 1
HP ProLiant ML110 G6 8 4
NETGEAR ProSAFE® Smart Switch 1 1
Storage 6 2
Total by type 25 12
Total cables 37
Figure 6: The Dell PowerEdge VRTX reduced cabling complexity compared to the legacy disparate hardware
solution.
Dell PowerEdge VRTX with one Dell PowerEdge M830 server offered more performance per
TCO dollar, lower five-year TCO, and a rapid ROI
Choosing to keep a legacy disparate hardware solution might seem convenient
and cost-effective. However, we found that purchasing and running the Dell PowerEdge
VRTX with the Intel Xeon processor E5-4650 v3-powered Dell PowerEdge M830 server
could deliver as much as a 48.5 percent lower five-year total cost of ownership (TCO)
than continuing to use the legacy solution (see Figure 7).
Figure 7: The Dell PowerEdge VRTX with one Dell PowerEdge M830 server could deliver a 48.5 percent
lower TCO over five years than continuing to use the legacy disparate hardware solution.
A Principled Technologies test report 8Comparing performance and cost: Dell PowerEdge VRTX with
one Dell PowerEdge M830 server vs. a legacy solution
Savings in licensing, management, and support offset the larger acquisition
costs of the Dell PowerEdge VRTX with an Intel Xeon processor E5-4650 v3-powered Dell
PowerEdge M830 server. After five years, the Dell PowerEdge VRTX solution is $97,895
less expensive, saving 48.5 percent (see Figure 8).
Dell PowerEdge VRTX with one Dell
PowerEdge M830 server
Legacy disparate hardware solution
Acquisition cost $67,471 $14,216
Year 1 costs $7,332 $37,562
Year 2 costs $7,332 $37,562
Year 3 costs $7,332 $37,562
Year 4 costs $7,332 $37,562
Year 5 costs $7,332 $37,562
Total $104,131 $202,026
Figure 8: The Dell PowerEdge VRTX with a Dell PowerEdge M830 server costs up to $97,895 less than the legacy solution after
five years. (Totals may not sum due to rounding.)
With the Dell PowerEdge VRTX with an Intel Xeon processor E5-4650 v3-
powered Dell PowerEdge M830 server, we found that a business could achieve payback,
or a return on investment (ROI), in as little as 22 months (see Figures 9 and 10).
Figure 9: The Dell PowerEdge
VRTX with an Intel processor-
powered Dell PowerEdge M830
server can deliver payback in as
little as 22 months.
Payback category
Dell PowerEdge VRTX with Dell
PowerEdge M830 server
Legacy disparate hardware
solution
Difference
One-time initial investment $67,471 $14,216 $53,255
Monthly cost $611 $3,130 $2,519
Payback period $53,255 ÷ $2,519 = 22 months
Figure 10: The Dell PowerEdge VRTX with one Dell PowerEdge M830 server can pay back your investment in 22 months, so by
the 22nd month, the return of investment is complete.
A Principled Technologies test report 9Comparing performance and cost: Dell PowerEdge VRTX with
one Dell PowerEdge M830 server vs. a legacy solution
Using the calculations from our TCO analysis, we found that the Dell PowerEdge
VRTX with an Intel Xeon processor E5-4650 v3-powered Dell PowerEdge M830 server
delivered 2.3 times as many database orders per minute per TCO dollar spent (see
Figure 11).
Figure 11: The Dell PowerEdge
VRTX with one Intel
processor-powered Dell
PowerEdge M830 server
delivered 8.4 times as many
OPM per TCO dollar. Higher
numbers are better.
For complete details and assumptions of our TCO analysis, see Appendix D.
ALL-IN-ONE SHARED INFRASTRUCTURE
The Dell PowerEdge VRTX solution with an M-series server is an all-in-one
solution designed to handle the performance needs of a small-to-medium business or
remote office. Here, we provide information about each of the components we used as
part of this solution.
About the Dell PowerEdge VRTX
The Dell PowerEdge VRTX is a compact, all-in-one solution in a 5U rack-able
tower chassis. Designed to be quiet under normal operating conditions, the Dell
PowerEdge VRTX can be stowed under a desk in a small office without disrupting
conversations. Its four bays house a variety of different compute nodes, providing a
space-saving alternative to four separate tower or rack servers. In addition to space
savings, the Dell PowerEdge VRTX provides administrators with a unified interface, the
Chassis Management Controller, for performing routine systems management tasks.
The Dell PowerEdge VRTX chassis supports up to 48 TB of shared internal storage that
is presentable as virtual drives to single or multiple compute nodes, and provides
optional pass-through and eight PCIe® slots for additional device connectivity. The
chassis-integrated storage can be configured with 25 bays for 2.5-inch drives, which we
tested in this report, or with 12 bays for 3.5-inch drives. The Dell PowerEdge VRTX
integrated switch contains multiple external network ports for easy expansion or
integration into any computing environment.
Dell
PowerEdge
VRTX with 12
3.5-inch drives
Dell
PowerEdge
VRTX with 25
2.5-inch drives
A Principled Technologies test report 10Comparing performance and cost: Dell PowerEdge VRTX with
one Dell PowerEdge M830 server vs. a legacy solution
For more information about the Dell PowerEdge VRTX, visit
www.dell.com/poweredge.
About the Dell PowerEdge M830 server
According to Dell, the PowerEdge M830 blade server “offers exceptional
flexibility, reliability and efficiency to run business-critical applications in data centers
yet to come.”
The M830 supports up to 72 Intel processor cores and 48 DIMMS of DDR4
memory, which offers tremendous computational horsepower for heavy-use workloads.
With the M830, you can power through compute-intensive workloads with 50 percent
more processing cores per socket than previous generation Intel processors.
For more information about the Dell PowerEdge M830 blade server, visit
www.dell.com/us/partner/p/poweredge-m830/pd.
About the Intel Xeon processor E5-4600 v3 product family
According to Intel, the Intel Xeon processor E5-4600 v3 product family provides
“high-density, energy-efficient compute resources to support larger workloads and high
virtual machine densities in your data center or cloud.” It also delivers benefits in
performance, power efficiency, virtualization, and security.
The E5-4600 v3 product family delivers up to 49 percent increased average
performance than processors from the previous generation. Other features include the
following:
 Intel Advanced Vector Extensions 2 (AVX2)
 Intel QuickAssist Technology for offloading cryptographic/data
compression
 Up to 18 cores and 36 threads per socket
 Up to 45 MB of last-level cache
 Next-generation DDR4 memory support
 Intel AES-NI data encryption/decryption
The Intel Xeon processor E5-4600 v3 product family also uses Intel Intelligent
Power technology and Per-core P states to maximize energy efficiency.
Learn more at
www.intel.com/content/dam/www/public/us/en/documents/product-briefs/xeon-e5-
4600-v3-brief.pdf.
A Principled Technologies test report 11Comparing performance and cost: Dell PowerEdge VRTX with
one Dell PowerEdge M830 server vs. a legacy solution
WHAT WE TESTED
Database testing
To create our real-world ecommerce workload, we used the DVD Store Version
2.1 benchmarking tool. DS2 models an online DVD store, where customers log in, search
for movies, and make purchases. DS2 reports these actions in orders per minute that
the system could handle, to show what kind of performance customers could expect.
The DS2 workload also performs other actions, such as adding new customers, to
exercise the wide range of database functions you would need to run your ecommerce
environment. For more details about the DS2 tool, see
www.delltechcenter.com/page/DVD+Store.
File and print testing
To test the file and print capabilities of the solutions, we simulated workloads
using the Iometer benchmark. Iometer measures IOPS on single and clustered systems.
Iometer performs I/O operations to stress a system, and then records the performance
of these I/O operations and the system stress they create. We used Iometer version 1.1
on each solution to simulate the same file and print workloads on the solutions. For
more details about Iometer, see www.iometer.org.
Mail testing
To test the solutions’ mail server performance, we used the Microsoft Load
Generator 2013 (LoadGen) benchmark, performing tasks to simulate a heavy user
generating mail activity. For our workloads, we used the following settings:
 Number of users: 500
 Mailbox Profile: 250MB
 Action Profile: Outlook_200
For more details about LoadGen, see
www.microsoft.com/downloads/details.aspx?FamilyId=DDEC1642-F6E3-4D66-A82F-
8D3062C6FA98&displaylang=en.
A Principled Technologies test report 12Comparing performance and cost: Dell PowerEdge VRTX with
one Dell PowerEdge M830 server vs. a legacy solution
IN CONCLUSION
Keeping a legacy disparate hardware solution composed of nine older servers
instead of choosing the new Dell PowerEdge VRTX powered by the Intel Xeon processor
E5-4650 v3 family may cost more than one would expect. We found that the Dell
PowerEdge VRTX with an Intel Xeon processor E5-4650 v3-powered Dell PowerEdge
M830 server could do the work of nine legacy servers running email, database, and
file/print server workloads. The VRTX ran all nine workloads in VMs, achieving a slight
performance boost on the database and file/print workloads while using much less
datacenter space and reducing power consumption by 38.4 percent.
The VRTX achieved these savings using 88.6 percent less rack-equivalent space
than the legacy disparate hardware solution and with one-third as many cables, to
reduce complexity and reduce the burden of space in small offices.
Despite a larger initial investment, the Dell PowerEdge VRTX with an Intel Xeon
processor E5-4650 v3-powered Dell PowerEdge M830 server could actually lower the
total cost of ownership over five years by as much as 48.5 percent, delivering a solid
return on investment in less than two years.
As our test results show, investing in the Dell PowerEdge VRTX solution
powered by the Intel Xeon processor E5-4600 v3 family could provide a compact
solution to optimize application performance and reduce complexity at a lower lifetime
cost than a legacy solution composed of nine older servers.
A Principled Technologies test report 13Comparing performance and cost: Dell PowerEdge VRTX with
one Dell PowerEdge M830 server vs. a legacy solution
APPENDIX A – SYSTEM CONFIGURATION INFORMATION
Figures 12 and 13 provide detailed configuration information for the test systems.
System Dell PowerEdge VRTX solution
Enclosure
Compute node enclosure Dell PowerEdge VRTX
General dimensions of compute node enclosure
Height (inches) 8
Width (inches) 19
Depth (inches) 29.5
U size in server rack equivalent (U) 5
Power supplies
Total number 4
Vendor and model number Dell 80 Plus Platinum E1100E-S0 (P/N 0YT39Y)
Wattage of each (W) 1,100
Cooling fans
Total number 6
Vendor and model number Delta Electronics, Inc.
Dimensions (h × w) of each 60 mm × 60 mm
Volts 12
Chassis RAID controller
Vendor and model number Dell SPERC8
Firmware version 23.11.46-0079
Cache size (GB) 1
Chassis shared hard drives
Hard drive #1
Vendor and model number Dell ST300MM0006
Number of drives 14
Size (GB) 300
RPM 10k
Type SAS 6.0 Gbps
Hard drive #2
Vendor and model number Dell C06VX
Number of drives 2
Size (TB) 400
RPM SSD
Type SAS 12.0 Gbps
Chassis USB ports
Number 2
Type 2.0
Platform
Vendor and model number Dell PowerEdge M830
Motherboard model number 0W4W8N
Motherboard chipset Intel C610
A Principled Technologies test report 14Comparing performance and cost: Dell PowerEdge VRTX with
one Dell PowerEdge M830 server vs. a legacy solution
System Dell PowerEdge VRTX solution
BIOS name and version Dell BIOS 1.0.6
BIOS settings Default
General
Number of processor packages 4
Number of cores per processor 12
Number of hardware threads per core 2
System power management policy Performance/watt
CPU
Vendor Intel
Name Xeon E5-4650 v3
Stepping C1
Socket type Socket 2011-3 LGA
Core frequency (GHz) 2.10
L1 cache 32 KB (per core)
L2 cache 256 KB (per core)
L3 cache 30 MB (shared)
Memory modules
Total RAM in system (GB) 128
Vendor and model number
Hynix Semiconductor
M393A1G43DB0-CPB
Type PC4-2133P
Speed (MHz) 2,133
Speed in the system currently running @ (MHz) 2,133
Timing/latency (tCL-tRCD-iRP-tRASmin) 13-13-13-33
Size (GB) 8
Number of RAM modules 16
Chip organization Double-sided
Rank Dual
RAID controller
Vendor and model number Dell PERC H730 Mini
Firmware version 25.2.2-0001
Cache size (GB) 1024 MB
Network adapter
Vendor and model number Broadcom® NetXtreme® II 10 Gb Ethernet BCM57810s
Type Integrated
Number of Network Adapters 2
USB ports
Number 2
Type 3.0
Figure 12: Detailed configuration information for the Dell PowerEdge VRTX solution.
A Principled Technologies test report 15Comparing performance and cost: Dell PowerEdge VRTX with
one Dell PowerEdge M830 server vs. a legacy solution
Server HP ProLiant ML110 G6 HP ProLiant ML310 G5 HP ProLiant ML370 G5
General dimensions of server
Height (inches) 14.4 17.0 17.5
Width (inches) 6.9 7.9 8.6
Depth (inches) 16.8 24.0 28.5
U size in server rack
equivalent (U)
4 5 5
Power supplies
Total number 1 1 1
Vendor and model number
Delta Electronics®
DPS300AB
Delta Electronics DPS-
410DB
HP Switching Power Supply
DPS-800GB A
Wattage of each (W) 300 410 850
Cooling fans
Total number 1 1 3
Vendor and model number HP 576930-001 HP 459188-001 Nidec Beta V35633-94
Dimensions (h × w) of each 92 mm × 25 mm 120 mm × 25 mm 130 mm × 125 mm
Volts 12 12 12
General
Motherboard model
number
576924-001 A61TR1 434719-001
Motherboard chipset Intel 3400 Chipset Intel 3210 Chipset Intel C600
BIOS name and version
HP System BIOS -
0270126_TAN
ProLiant System BIOS -
W05
ProLiant System BIOS P57
BIOS settings Performance Performance Performance
Number of processor
packages
1 1 2
Number of cores per
processor
4 4 4
Number of hardware
threads per core
2 1 1
System power
management policy
Static High Performance Static High Performance Static High Performance
CPU
Vendor Intel Intel Intel
Name Xeon X3460 Xeon X3370 Xeon E5450
Stepping B1 E0 E0
Socket type LGA 1156 LGA 775 LGA 771
Core frequency (GHz) 2.80 3.00 3.00
L1 cache 32 KB (per core) 32 KB (per core) 32 KB (per core)
L2 cache 256 KB (per core) 12 MB (shared) 12 MB (shared)
L3 cache (MB) 8 N/A N/A
Memory modules
Total RAM in system (GB) 4 4 8
Vendor and model number
Samsung® M391B5673EH1-
CH9
Micron®
MT18HTF25672AY-800E1
Samsung M395T5160QZ4
A Principled Technologies test report 16Comparing performance and cost: Dell PowerEdge VRTX with
one Dell PowerEdge M830 server vs. a legacy solution
Server HP ProLiant ML110 G6 HP ProLiant ML310 G5 HP ProLiant ML370 G5
Type PC3-10600E DDR3 PC2-6400E DDR2 DDR2-5300F
Speed (MHz) 1,333 800 666
Speed in the system
currently running @ (MHz)
1,333 800 666
Timing/latency (tCL-tRCD-
iRP-tRASmin)
9-9-9-24 6-6-6-18 5-5-5-15
Size (GB) 2 2 4
Number of RAM modules 4 2 8
Chip organization Double-Sided Double-sided Double-sided
RAID controller
Vendor and model number HP Smart Array B110i HP Smart Array E200 HP Smart Array P400
Cache size (MB) N/A 128 256
Hard drive #1
Vendor and model number
Hitachi®
HDS721032CLA362
HP DF0792A9844 HP EG0146FAWHU
Number of drives 1 2 2
Size (GB) 320 72 146
RPM 7.2K 15K 10K
Type SATA SAS SAS
Hard drive #2
Vendor and model number N/A ST500NM001 N/A
Number of drives N/A 2 N/A
Size (GB) N/A 500 N/A
RPM N/A 7.2 N/A
Type N/A SAS N/A
Network adapter
Vendor and model number
Intel Pro/1000 PT Dual Port
Server Adapter
Intel Pro/1000 PT Server
Adapter
Intel Pro/1000 PT Dual Port
Server Adapter
Type PCIe PCIe PCIe
Number of ports 2 1 2
Network adapter 2
Vendor and model number HP NC 107i PCIe Gigabit
Intel Pro/1000 PT Server
Adapter
N/A
Type Integrated PCIe N/A
Number of ports 1 1 N/A
USB ports
Number 6 2 4
Type 2.0 2.0 2.0
Figure 13: Detailed configuration information for the towers in the legacy hardware solution.
A Principled Technologies test report 17Comparing performance and cost: Dell PowerEdge VRTX with
one Dell PowerEdge M830 server vs. a legacy solution
APPENDIX B – HOW WE TESTED
Our test scenario used one PowerEdge M830 and a PowerEdge R710, which we used for our infrastructure
server and to host client VMs. Figure 14 presents the virtual machines in our test environment.
VM name vCPUs Memory OS OS drive Additional drive
ExchangeCAS
8 sockets,
each w/ 1
core
16 GB
Windows Server
2012 R2
Standard
100 GB stored
on VRTX HDDs
None
ExchangeMB
8 sockets,
each w/ 1
core
16 GB
Windows Server
2012 R2
Standard
100 GB stored
on VRTX HDDs
750 GB, Thick
Provisioned Eager
Zeroed, Stored on VRTX
HDDS
Iometer
4 sockets,
each w/ 1
core
8 GB
Windows Server
2012 R2
Standard
100 GB stored
on VRTX HDDs
50 GB, Thick Provisioned
Eager Zeroed, Stored on
VRTX SSDs
SQL
8 sockets,
each w/ 1
core
8 GB
Windows Server
2012 R2
Standard
100 GB stored
on VRTX HDDs
100 GB, Thick
Provisioned Eager
Zeroed, Stored on VRTX
SSDs
DVD Store
client
1 socket
w/ 4
cores
8 GB
Windows Server
2012 R2
Standard
100 GB stored
on R710 HDDs
None
Exchange
AD/DNS
1 socket
w/ 1 core
8 GB
Windows Server
2012 R2
Standard
100 GB stored
on R710 HDDs
None
LoadGen
client
1 socket
w/ 4
cores
8 GB
Windows Server
2008 R2
Enterprise
100 GB stored
on R710 HDDs
None
NAT
1 socket
w/ 4
cores
8 GB
Windows Server
2012 R2
Standard
100 GB stored
on R710 HDDs
None
VMware
vCenter
Server
2 sockets,
each w/ 1
core
8 GB
VMware vCenter
Server Appliance
5.5
25 GB stored
on R710 HDDs
100 GB, Thin
Provisioned, Stored on
the R710 disks
Figure 14: The virtual machines in our test environment.
We also followed the following guidelines:
1. All OS drives were thin provisioned.
2. All VMs hosted on the blade server were stored on the VRTX storage.
3. All VMs hosted by the infrastructure server were stored on the infrastructure’s drives.
4. On all OSes, we installed all Windows updates available up to 05/15/2015.
In addition to its first drive, ExchangeMB had a 100 GB, Thick Provisioned Eager Zeroed drive stored on the OS
storage volume used for storing backups.
A Principled Technologies test report 18Comparing performance and cost: Dell PowerEdge VRTX with
one Dell PowerEdge M830 server vs. a legacy solution
Installing and configuring the infrastructure server
We configured a Dell PowerEdge R710 server with VMware vSphere (ESXi) 5.5.0 with Dell Drivers to host the
Active Directory® VMs and the VMware vCenter VM.
Installing VMware vSphere 5.5 with Dell Drivers (ESXi) on the Dell PowerEdge R710
1. Insert the ESXi 5.5 disk, and select Boot from disk.
2. On the Welcome screen, press Enter.
3. On the End User License Agreement (EULA) screen, press F11.
4. On the Select a Disk to install or Upgrade Screen, select the relevant volume to install ESXi on, and press Enter.
5. On the Please Select a Keyboard Layout screen, press Enter.
6. On the Enter a Root Password screen, assign a root password, and confirm the password by entering it again.
Press Enter to continue.
7. On the Confirm Install Screen, press F11 to install.
8. On the Installation complete screen, press Enter to reboot.
Configuring ESXi after installation
1. On the ESXi 5.5 screen, press F2, enter the root password, and press Enter.
2. On the System Customization screen, select Troubleshooting Options, and press Enter.
3. On the Troubleshooting Mode Options screen, select enable ESXi Shell, and press Enter.
4. Select Enable SSH, press Enter, and press Esc.
5. On the System Customization screen, select Configure Management Network.
6. On the Configure Management Network screen, select IPv4 Configuration.
7. On the IPv4 Configuration screen, select Set static IP; enter an IP address, subnet mask, and default gateway;
and press Enter.
8. On the Configure Management Network screen, press Esc. When the installer asks if you want to apply the
changes, press Y.
9. Log in as root with the vSphere client.
10. Select the Configuration tab, and click Networking.
11. Click Add Networking…
12. Create a virtual machine network called PRIV-NET, and select the adapter with access to the private test
network.
13. Click OK.
14. Select the Configuration tab, and click DNS and routing.
15. Type a name, and select test.local for domain.
Setting up two VMs to host the Microsoft Windows® Active Directory server and the NAT
server
1. In your web browser, connect to the vSphere server, and browse to the ESXi host hosting the management VMs
(in our case, the PowerEdge R710).
2. Right-click the ESXi host, and choose New Virtual Machine.
A Principled Technologies test report 19Comparing performance and cost: Dell PowerEdge VRTX with
one Dell PowerEdge M830 server vs. a legacy solution
3. On the Create New Virtual Machine window, select custom, and click Next.
4. Assign a name to the virtual machine, and click Next.
5. Select the LUN for the storage, and click Next.
6. Select Virtual Machine Version 11, and click Next.
7. Choose Windows, select Microsoft Windows Server 2012, and click Next.
8. Choose the VM’s virtual hardware options, and click Next (see each VM’s section below for additional VM
configuration data).
 Select one virtual processor socket, and one core per virtual socket.
 Select 4GB RAM.
 Select the NIC interface with access to the private test network.
 Leave the default option for SCSI controller.
9. Choose to create a new virtual disk, and click Next.
10. Make the OS virtual disk size 100 GB, choose thin provisioned, specify external storage, and click Next.
11. Keep the default virtual device node (0:0), and click Next.
12. Click Finish.
13. Right-click the VM, and select Edit Settings.
14. Click the Resources tab, and click Memory.
15. Select Reserve all guest memory, and click OK.
16. Connect the VM virtual CD-ROM to the Microsoft Windows Server 2012 R2 installation disk.
17. Start the VM.
Installing Microsoft Windows Server 2012 R2 Standard Edition
1. Connect the installation media and power on the VM.
2. When the option appears, press F11 to enter the Boot Manager.
3. Select the connected boot media, and press Enter.
4. Press any key when prompted to boot from DVD.
5. When the installation screen appears, click My language is English.
6. Leave language, time/currency format and input method as default, and click Next.
7. Click Install now.
8. When the Windows Setup window appears, click No thanks when prompted to go online to install updates.
9. Select Windows Server 2012 R2 Standard (Server with a GUI), and click Next.
10. Check I accept the license terms, and click Next.
11. Click Custom: Install Windows only (advanced).
12. Press Alt+A to open advanced partition options. Delete any partitions until there is only Drive 0 Unallocated
Space.
13. Select Drive 0 Unallocated Space, and click Next, at which point Windows will begin installing, and will restart
automatically after completing.
14. When the Settings page appears, fill in the Password and Reenter Password fields with the same password.
15. Log in with the previously set up password.
A Principled Technologies test report 20Comparing performance and cost: Dell PowerEdge VRTX with
one Dell PowerEdge M830 server vs. a legacy solution
Configuring Windows Update
1. In the left pane of the Server Manager window, click Local Server.
2. In the main frame, next to Windows Update, click Not configured.
3. In the Windows Update window, in the main pane, click Let me choose my settings.
4. Under Important updates, select Never check for updates (not recommended), and then click OK.
5. In the left pane, click Check for updates, and install all available updates.
6. Close the Windows Update window.
Configuring Windows Firewall
1. In Server Manager, click ToolsWindows Firewall with Advanced Security.
2. In the Overview section, click Windows Firewall Properties.
3. In the Domain Profile tab, for Firewall state, click Off.
4. In the Private Profile tab, for Firewall state, click Off.
5. In the Public Profile tab, for Firewall state, click Off.
6. Click OK.
7. Close the Windows Firewall Properties window.
Setting up Remote Desktop
1. In the Local Server tab of the Server Manager window, next to Remote Desktop, click Disabled.
2. In the System Properties window that appears, in the Remote Desktop section, select the Allow remote
connections to this computer radio button, and click OK when the warning message appears.
3. Uncheck Allow connections only from computers running Remote Desktop with Network Level Authentication
(recommended), and click OK.
Disabling IE Enhanced Security Configuration
1. In the Local Server tab of the Server Manager window, next to IE Enhanced Security Configuration, click On.
2. In the Internet Explorer Enhanced Security Configuration window, select the Off radio buttons for both
Administrators and Users, and click OK.
Installing VMware Tools
1. Install VMware Tools. For more information, see
kb.vmware.com/selfservice/microsites/search.do?language=en_US&cmd=displayKC&externalId=340.
Repeat the virtual machine, OS installation, and OS configuration described above to create a VM for the NAT server.
Installing Active Directory and DNS services
1. Power on the Active Directory VM.
2. On the Active Directory server, open Windows PowerShell®.
3. Run the following command: Install-WindowsFeature RSAT-ADDS
4. When the installation is finished, close PowerShell.
5. On the VM, open Server Manager.
6. On the Welcome screen, click 2, and click Add roles and features.
7. At the initial Before you begin screen, click Next three times.
A Principled Technologies test report 21Comparing performance and cost: Dell PowerEdge VRTX with
one Dell PowerEdge M830 server vs. a legacy solution
8. At the Server Roles screen, select Active Directory Domain Services.
9. On the pop-up window, click Add Features.
10. Click Next three times.
11. Verify the desired role is being installed, and click Install.
12. Once installation has finished, close the Add roles and features wizard.
13. In Server Manager, click the flag at the top, and select the Promote this server to a domain controller link.
14. Select Add a new forest, enter a root domain name of test.local and click Next.
15. On the Domain Controller Options screen, enter a password, and click Next.
16. On the DNS Options screen, click Next.
17. On the Additional Options screen, click Next.
18. On the Paths screen, click Next.
19. On the Review Options screen, click Next.
20. On the Prerequisites screen, verify all prerequisites have passed, and click Install.
21. Once Active Directory Domain Services finishes installing, click Finish, and restart the system.
Installing the NAT on the NAT server
Before installing the network address translation (NAT) service, you will need to plug a second network cable
into the R710 server that has access to the internet and configure vSphere to make that connection available as a
second NIC for the NAT VM.
1. On the NAT server, open the Add Roles and Feature Wizard.
2. On the Before you Being screen, click Next.
3. On the Installation Type screen, click Next.
4. On the Server Selection screen, click Next.
5. On the Server Roles screen, select Remote Access, and click Next.
6. On the Features screen, click Next.
7. On the Remote Access screen, click Next.
8. On the Role Services screen, select Routing, click Add Features on the popup, and click Next.
9. On The Web Server Role (IIS) screen, click Next.
10. On the Role Services screen, click Next.
11. On the Confirmation screen, click Install.
12. Once the installation is complete, click Close.
13. From Administrative Tools, open Routing and Remote Access…
14. In the left panel, right-click the target server and select Configure and Enable Routing and Remote Access.
15. In the Routing and Remote Access Server Setup Wizard, click Next.
16. On the Configuration screen, select Network Address Translation (NAT).
17. On the NAT Internet Connection screen, select the Ethernet port that will provide internet connection and click
Next.
18. On the Completion screen, click Finish. When setting static IP address, the vCenter server’s IP can now be used
as the gateway on the isolated testing network.
A Principled Technologies test report 22Comparing performance and cost: Dell PowerEdge VRTX with
one Dell PowerEdge M830 server vs. a legacy solution
Configuring the VMware vSphere environment for the VRTX server
Installing and configuring vCenter Server
1. In the vSphere client, select File, then Deploy OVF Template.
2. In the Deploy OVF Template window, click Browse, then browse to the location of the vCenter Server Appliance
.ovf file, click Open, and click Next.
3. On the OVF Template Details screen, click Next.
4. In the Name and Location screen, enter vCenter Server for the name, and click Next.
5. In the Storage screen, select the appropriate datastore, and click Next.
6. In the Disk Format screen, select Thin Provision, and click Next.
7. In the Network Mapping screen, select the private test network.
8. In the Ready to Complete screen, check the Power on after deployment checkbox, and click Finish.
9. In the vSphere client, right-click the new vCenter, and select Open Console.
10. Note the instructions and the address to use for configuration.
11. Open a web browser to the address listed in the console.
12. Log in with root and the password vmware
13. In the vCenter Server Setup window, check the box to accept the license agreement, and click Next.
14. In the Configure Options screen, select the Configure with default settings, and click Next.
15. In the Review Configuration screen, click Start. Setup will complete, and a new database will be configured
automatically. When it is finished, click Close.
16. Click the Admin Tab.
a. In the current administrator password section, enter vmware
b. Enter a new password into both password fields.
Configuring the VRTX shared storage
1. Open a web browser, and enter the address listed for the CMC IP on the front LCD display.
2. Log in with the appropriate credentials.
3. Expand Storage.
4. Click Storage.
5. Click the Setup tab.
a. Under Assignment Mode, select the Multiple Assignment radio button, and click Apply.
b. To confirm the Operation Successful message box, click OK.
6. Configure virtual disks:
a. Click StorageVirtual Disks.
b. On the Virtual Disks tab, click Create.
i. For Media Type, select HDD.
ii. For Choose a virtual disk type, select RAID 10.
iii. Select the 10 available 300 GB hard disk drives.
iv. For the first volume (to be used for Microsoft Exchange), enter 850GB and click Create Virtual
Disk.
v. To confirm the message box indicating Operation Successful, click OK.
A Principled Technologies test report 23Comparing performance and cost: Dell PowerEdge VRTX with
one Dell PowerEdge M830 server vs. a legacy solution
vi. Repeat steps i through iv for the next external volume (to be used for system operating
systems), choosing 500GB.
vii. For Media Type select SDD.
viii. For Choose a virtual disk type, select RAID 1.
ix. Select the two available 400 GB SSDs.
x. For the first volume (to be used for Microsoft SQL Server), enter 120GB and click Create Virtual
Disk.
xi. To confirm the message box indicating Operation Successful, click OK.
xii. Repeat steps ix through for the next external volume (to be used for Iometer), choosing 100GB.
c. On the Virtual Disks tab, click Manage.
i. Select the Virtual Disks Action drop-down menu for Virtual Disk 0, and initialize the drives.
ii. Click Apply.
iii. To confirm the message box indicating Operation Successful, click OK.
iv. Repeat steps i through iii for the remaining virtual disks.
d. Allow shared LUN access to all slots. On the Virtual Disks tab, click Assign.
i. Use the drop-down menu for all virtual disks and SLOT-01, and select Full Access.
ii. Use the drop-down menu for all virtual disks and SLOT-02, and select Full Access.
iii. Use the drop-down menu for all virtual disks and SLOT-03, and select Full Access.
iv. Use the drop-down menu for all virtual disks and SLOT-04, and select Full Access.
v. Click Apply.
vi. To confirm the Operation Successful message box, click OK.
Configuring the VMware vSphere environment for the VRTX server
Configuring boot properties of the Dell PowerEdge M830 server
1. Open a web browser, and enter the address listed for the CMC IP on the front LCD display.
2. Log in with the appropriate credentials.
3. Expand Server Overview, and select Slot-01.
4. Click the Setup Tab. Perform the following steps in the iDRAC settings:
a. Check the Enable LAN checkbox.
b. Check the Enable IPv4 checkbox.
c. Check the DHCP checkbox.
d. Check the IPMI Over LAN checkbox.
e. Click Apply iDRAC Network Settings.
f. To confirm changes to the iDRAC network settings, click OK.
5. Power on the server.
a. Click the Power Tab.
b. Select Power On Server.
c. Click Apply.
d. To confirm server control action, click OK.
e. To confirm operation was successful, click OK.
6. Click the Properties tab.
7. Click Launch Remote Console.
A Principled Technologies test report 24Comparing performance and cost: Dell PowerEdge VRTX with
one Dell PowerEdge M830 server vs. a legacy solution
8. On new browser page, click Continue to website (not recommended) if prompted.
a. If a message appears indicating a pop-up was blocked, select Always allow pop-ups from this site.
b. Close the browser tab for the iDRAC.
c. Click Launch Remote Console.
d. If a message appears indicating the Web page wants to run an add-on called “Virtual Console from
Dell Inc.,” select Allow for all websites.
9. A new window appears showing the console for the server to configure. Select PowerReset System.
10. Change the boot disk order in System Setup.
a. When prompted during POST, press F2 to enter System Setup.
b. Click System BIOS.
c. Click Boot Settings.
d. Click BIOS Boot Settings.
e. Scroll down, and click Hard Disk Drive Sequence.
i. Highlight the SD card or USB drive entry, and move it to the top using the + key.
ii. Click OK.
f. Click Back twice.
g. Click Finish.
h. Click Yes.
i. Click Finish.
j. Click OK. The system will restart.
Installing VMware vSphere 5.5 (ESXi) on the Dell PowerEdge M830 server
1. Mount the ESXi 5.5 ISO via the iDRAC, and boot the M830 to that ISO.
2. On the Welcome screen, press Enter.
3. On the End User License Agreement (EULA) screen, press F11.
4. On the Select a Disk to install or Upgrade Screen, select the an SD card or USB drive to install ESXi on, and press
Enter.
5. On the Please Select a Keyboard Layout screen, press Enter.
6. On the Enter a Root Password Screen, assign a root password, and confirm the password by entering it again.
Press Enter to continue.
7. On the Confirm Install Screen, press F11 to install.
8. On the Installation complete screen, press Enter to reboot.
Configuring VMware vSphere (ESXi) embedded on the server
1. Complete configuration of ESXi host:
a. Press F2.
b. Enter the root account password, and press Enter.
c. Select Configure Management Network, and press Enter.
d. Select Network Adapters.
e. Select the adapter that connects your server to the private testing network.
f. Press Esc.
g. To restart networking, press Y.
A Principled Technologies test report 25Comparing performance and cost: Dell PowerEdge VRTX with
one Dell PowerEdge M830 server vs. a legacy solution
h. Select Troubleshooting Options.
i. Select Enable ESXi shell, and press Enter.
ii. Select Enable SSH, and press Enter.
iii. Press Esc.
i. To log out, press Esc.
Adding the M830 to the vCenter Server
1. In a web browser, navigate to the vCenter IP, click Log in to vSphere Web Client, and log in using root and your
password.
2. In the left panel, select vCenter, then Datacenters.
3. Right-click in the empty panel, and select New Datacenter.
4. In the New Datacenter window, give the Datacenter a name and click OK. We used VRTX-01
5. Select your test datacenter.
6. On the left panel, select Hosts, then click Add a host.
7. On the Name and Location screen, enter the IP address for the R710 client and click Next.
8. On the Connection settings screen, enter the User name and Password and click Next.
9. On the Host summary screen, click Next.
10. On the Assign license screen, click Next.
11. On the Lockdown mode screen, click Next.
12. On the VM location screen, click Next.
Configuring the external volumes
1. In the vSphere client, select the target host.
2. Click the Configuration tab.
3. Click Storage, and click Add Storage…
4. Choose Disk/LUN.
5. Select the disk, and click Next.
6. Accept the default of VMFS-5 for the file system.
7. Review the disk layout, and click Next.
8. Enter the datastore name, and click Next.
9. Accept the default of using maximum capacity, and click Next.
10. Click Finish.
11. Repeat for all volumes available through the Shared PERC 8 Mini.
Creating the first VM
1. Using the vSphere client, connect to the vCenter Server.
2. Right-click the cluster, and choose New Virtual Machine.
3. On the Configuration screen, choose Custom, and click Next.
4. On the Name and Location screen, add a name, select the datacenter, and click Next.
5. On the specific Host screen, choose the PowerEdge M830 blade and click Next.
6. On the Storage screen, select the OS datastore on the external storage, and click Next.
A Principled Technologies test report 26Comparing performance and cost: Dell PowerEdge VRTX with
one Dell PowerEdge M830 server vs. a legacy solution
7. On the Virtual Machine Version screen, choose Virtual Machine Version 8, and click Next.
8. On the Guest Operating System screen, choose Windows, select Microsoft Windows Server 2012 R2 (64-bit), and
click Next.
9. On the CPUs screen, choose 1 virtual socket, and 4 virtual processors per core, and click Next.
10. On the Memory screen, choose 8 GB RAM, and click Next.
11. On the Network screen, click 1 for the number of NICs, select the NIC connected to the isolated testing network,
and click Next.
12. On the SCSI Controller screen, leave the default virtual storage controller, and click Next.
13. On the Select a Disk screen, choose to create a new virtual disk, and click Next.
14. On the Create a Disk screen, make the OS virtual disk size 100 GB, and choose thin provisioned.
15. On the Advanced Options screen, leave the default virtual device node (0:0), and click Next.
16. On the Ready to Complete screen, click Finish.
17. Right-click the VM, select Upgrade Virtual Hardware, and click Yes.
18. Start the VM.
19. Attach the Windows Server 2012 R2 ISO image to the VM, and install Windows Server 2012 R2 on your VM.
Installing the operating system on the VMs
Repeat the sections above regarding the initial creation of the virtual machines and installation of Windows
Server 2012 R2 Standard.
Cloning the VM
1. Using the vSphere Client, right-click the first VM and select Template, then Clone to Template.
2. On the Name and Location screen, enter a Template Name.
3. On the Host / Cluster screen, select the management server.
4. On the Datastore screen, select a datastore, and click Next.
5. On the Ready to Complete screen, click Finish.
The template created will be used to clone out the rest of the VMs.
Installing and configuring Microsoft Exchange Servers
We installed Microsoft Exchange 2013 SP3 CAS server and mailbox server on two VMs residing on the Dell
PowerEdge M830.
Configuring the Exchange 2013 VMs on the VRTX
After cloning, modify the Exchange 2013 VMs to contain the following settings:
 Memory: 16 GB
 Virtual Processors: 8
 Additional virtual disks for the mailbox server.
o 1 × 750GB virtual disk for mailbox storage (Thick-provisioned, eager-zeroed)
o 1 × 100GB virtual disk for log storage (Thick-provisioned, eager-zeroed)
After adding the drives from the vSphere client, configure additional drives in Windows using the following steps.
1. In the taskbar, click the Server Manager icon.
2. In the left pane, expand Storage, and click Disk Management.
A Principled Technologies test report 27Comparing performance and cost: Dell PowerEdge VRTX with
one Dell PowerEdge M830 server vs. a legacy solution
3. Right-click the first volume, and choose Initialize Disk.
4. In the right pane, right-click the volume, and choose New Simple VoIume…
5. At the welcome window, click Next.
6. At the Specify Volume Size window, leave the default selection, and click Next.
7. At the Assign Drive Letter or Path window, choose a drive letter, and click Next.
8. At the Format Partition window, choose NTFS, and click Next.
9. At the Completing the New Simple Volume Wizard window, click Finish.
Testing overview
We used the RAID 10 consisting of 300GB hard drives on the VRTX shared storage to store the Exchange
mailbox. We added two virtual drives to the Exchange Mailbox: one for Exchange data and one for logs.
For our workloads, we used the following settings:
 Users: 750
 Mailbox Profile: 250MB mailboxes
 Action Profile: Outlook_200
 Client Type: Outlook 2007 Cached
Configuring the Active Directory server
Installing the Active Directory Domain Services role
Before completing this step, you will need to apply a static IP address for the server. In our case, we used
192.168.1.10.
1. Launch Server Manager, and select Add roles and features.
2. Click Next at the Add Roles and Features Wizard.
3. Select Role-based or feature-based installation, and click Next.
4. Select the AD server from the server pool, and click Next.
5. Select Active Directory Domain Services from the list of Roles, click the Add Features button to add features that
are required by Active Directory Domain Services, and click Next.
6. Accept the defaults selected by setup at the Select Features screen, and click Next.
7. Click Next at the AD DS screen.
8. Select Restart the destination server automatically if required at the confirmation screen, and click Install.
9. Click the yellow warning triangle in the server manager window.
10. Click Promote this server to a domain controller.
11. Select Add a new forest, type in the Root domain name (fqdn), and click Next. For our testing, we used
test.local
12. Type in and confirm the password, and click Next.
13. Click Next at the DNS Options screen.
14. Verify the NetBIOS name, and click Next.
15. Accept the default paths, and click Next.
16. Review the options, and click Next.
17. Verify the prerequisite check passes successfully, and click Install.
A Principled Technologies test report 28Comparing performance and cost: Dell PowerEdge VRTX with
one Dell PowerEdge M830 server vs. a legacy solution
Preparing AD for Exchange
1. Create a reverse lookup zone:
a. Click the start button, and type DNS in the search field.
b. Open the DNS manager by clicking on it in the results field.
c. Expand your Active Directory domain, and click on Reverse Lookup Zones.
d. Click ActionNew Zone.
e. Click Next on the Welcome screen.
f. Chose Primary Zone, and click Next.
g. Leave default replication scope, and click Next.
h. Choose IPv4, and click Next.
i. Enter the IP address of your domain (192.168.3 for our example).
j. Choose Allow both nonsecure and secure dynamic updates, and click Next.
k. Click Finish.
2. Insert the Exchange 2012 SP1 Installation ISO in the AD VM DVD drive.
3. In Windows Explorer, double-click the Exchange DVD icon.
4. In the Exchange installation folder, hold down shift, and right-click.
5. Choose Open a command window here.
6. Run the following command: Setup.exe /PrepareSchema
/IAcceptExchangeServerLicenseTerms
7. When the previous command completes, run the following command: Setup.exe /PrepareAD
/OrganizationName:”organization name” /IAcceptExchangeServerLicenseTerms
8. Close the command window when the setup finishes.
Installing Active Directory Certificate Services
1. Launch Server Manager, and select Add roles and features.
2. Click Next at the Add Roles and Features Wizard.
3. Select Role-based or feature-based installation, and click Next.
4. Choose Active Directory Certificate Services.
5. Click Add Features, if prompted, to install any required features.
6. Click Next.
7. Click Next.
8. Click Next.
9. Choose Certificate Authority and Certification Authority Web Enrollment.
10. Click Add Features, if prompted, to install any required features.
11. Click Next.
12. Leave defaults, and click Next.
13. Click Install.
14. Click Close when the install finishes.
A Principled Technologies test report 29Comparing performance and cost: Dell PowerEdge VRTX with
one Dell PowerEdge M830 server vs. a legacy solution
15. Click on the yellow warning symbol in the Server Manager, and click Configure Active Directory Certificate
Services
16. Leave defaults, and click Next.
17. Check both Certification Authority and Certification Authority Web Enrollment, and click Next.
18. Choose Enterprise CA, and click Next.
19. Choose Root CA, and click Next.
20. Choose Create a new private key, and click Next.
21. Leave defaults, and click Next.
22. Leave defaults, and click Next.
23. Leave 5 years, and click Next.
24. Leave default locations, and click Next.
25. Click Configure.
26. Close when the configuration finishes.
27. Open Internet Explorer and navigate to localhost/certsrv/Default.asp to verify that the installation
succeeded.
Installing Exchange Server 2013 SP1 Mailbox and Client Access Server roles
Using the template, clone two VMs: one for the Exchange Client Access Server, or CAS, and the other for the
Exchange Mailbox Server. Edit the hardware settings in each. The Mailbox server should have eight vCPUs (eight virtual
sockets each with one core) and 16 GB of memory. Using the Exchange datastore, add a 750 GB disk and a 100 GB disk
to the Mailbox server for the Exchange mailbox and Exchange logs respectively. Set static IPs on both VMs and join the
domain.
1. On the Exchange Mailbox Server, log into the server using domain administrator credentials.
2. Open Windows PowerShell and run the following command:
Install-WindowsFeature AS-HTTP-Activation, Desktop-Experience, NET-
Framework-45-Features, RPC-over-HTTP-proxy, RSAT-Clustering, RSAT-
Clustering-CmdInterface, RSAT-Clustering-Mgmt, RSAT-Clustering-
PowerShell, Web-Mgmt-Console, WAS-Process-Model, Web-Asp-Net45, Web-
Basic-Auth, Web-Client-Auth, Web-Digest-Auth, Web-Dir-Browsing, Web-Dyn-
Compression, Web-Http-Errors, Web-Http-Logging, Web-Http-Redirect, Web-
Http-Tracing, Web-ISAPI-Ext, Web-ISAPI-Filter, Web-Lgcy-Mgmt-Console,
Web-Metabase, Web-Mgmt-Console, Web-Mgmt-Service, Web-Net-Ext45, Web-
Request-Monitor, Web-Server, Web-Stat-Compression, Web-Static-Content,
Web-Windows-Auth, Web-WMI, Windows-Identity-Foundation
3. Restart the server.
4. Download the Microsoft Unified Communications Managed API 4.0, Core Runtime 64-bit
(go.microsoft.com/fwlink/p/?linkId=258269).
5. Run UcmaRuntimeSetup.exe.
6. When the installation completes, click Finish.
7. Navigate to the location of the Exchange installation media, and double-click Setup.exe.
8. At the Check for Updates? screen, check the Connect to the Internet and check for updates checkbox, and click
Next.
A Principled Technologies test report 30Comparing performance and cost: Dell PowerEdge VRTX with
one Dell PowerEdge M830 server vs. a legacy solution
9. When the updates complete, click Next.
10. At the Introduction screen, click Next.
11. At the License Agreement screen, check the box to accept the terms, and click Next.
12. At the Recommended Settings screen, check the Don’t use recommended settings checkbox, and click Next.
13. At the Server Role Selection, select Mailbox or Client Access role, and click Next.
14. At the Installation Space and Location screen, leave the default location for the installation, and click Next.
15. At the Malware Protection Settings, select Yes to disable, and click Next.
16. At the Readiness Checks screen, allow the verification to complete. If there are no failures, click Install.
17. When the installation completes, click Finish, and restart the server.
18. Repeat steps 1 –17 for the Exchange CAS server.
Configuring Exchange
1. On the CAS server, open the Exchange Admin Center by using a browser and navigating to
https://localhost/ecp
2. Enter the domain administrator credentials, and click Sign in.
3. If prompted, select the language and time zone, and click Save.
4. In the left pane, click Mail Flow, then click Send Connectors.
5. On the Send Connectors page, click the New icon.
6. In the New Send Connector wizard, specify SMTP as the name and select Internet as the type. Click Next.
7. In the Network settings screen, choose MX record associated with recipient domain, and click Next.
8. In the Address space screen, click the Add icon.
9. In the Add domain window, enter * in the Fully Qualified Domain Name (FQDN) field, and click Save.
10. Click Next.
11. In the Source Server screen, click the Add icon.
12. In the Select a Server window, select the mailbox server, click Add, and then click OK.
13. Click Finish.
14. In the left pane of the EAC, click servers, select the name of the CAS server, and click Edit.
15. Click Outlook Anywhere, and enter the appropriate FQDN of the Client Access Server for the external and
internal hostname field. For example, exchangeserver.test.local
16. Choose NTLM as the authentication method, and click Save.
17. Click Virtual Directories, and then click the Configure external access domain icon.
18. In the Select the Client Access servers to use with the external URL window, click the Add icon.
19. Select the CAS server, and click Add. Click OK.
20. Type the FQDN of the CAS server in the Enter the domain, and click Save.
21. Log into the Active Directory server using administrator credentials, and complete the following steps:
a. Open Server Manager, then click ToolsDNS.
b. In DNS Manager, expand the Active Directory server nameForward Lookup Zonestest.local in
the left pane.
c. In the right pane, verify or create the DNS records as presented in Figure 15.
A Principled Technologies test report 31Comparing performance and cost: Dell PowerEdge VRTX with
one Dell PowerEdge M830 server vs. a legacy solution
Type
Host or child
domain/alias name
FQDN
FQDN of mail
server
Mail Exchanger (MX) Leave blank domain.com casserver.domain.com
Alias (CNAME) Autodiscover Autodiscover.domain.com casserver.domain.com
Alias (CNAME) Owa Owa.domain.com casserver.domain.com
Figure 15: DNS records.
22. Log back into your CAS server.
23. In the Exchange Power Shell, run the following commands, replacing “$HostName” with the host name (not
FQDN) of your CAS server.
Set-EcpVirtualDirectory "$HostNameECP (Default Web Site)" -InternalUrl
((Get-EcpVirtualDirectory "$HostNameECP (Default Web
Site)").ExternalUrl)
Set-WebServicesVirtualDirectory "$HostNameEWS (Default Web Site)" -
InternalUrl ((get-WebServicesVirtualDirectory "$HostNameEWS (Default Web
Site)").ExternalUrl)
Set-ActiveSyncVirtualDirectory "$HostNameMicrosoft-Server-ActiveSync
(Default Web Site)" -InternalUrl ((Get-ActiveSyncVirtualDirectory
"$HostNameMicrosoft-Server-ActiveSync (Default Web Site)").ExternalUrl)
Set-OabVirtualDirectory "$HostNameOAB (Default Web Site)" -InternalUrl
((Get-OabVirtualDirectory "$HostNameOAB (Default Web
Site)").ExternalUrl)
Set-OwaVirtualDirectory "$HostNameOWA (Default Web Site)" -InternalUrl
((Get-OwaVirtualDirectory "$HostNameOWA (Default Web
Site)").ExternalUrl)
Set-PowerShellVirtualDirectory "$HostNamePowerShell (Default Web Site)"
-InternalUrl ((Get-PowerShellVirtualDirectory "$HostNamePowerShell
(Default Web Site)").ExternalUrl)
Get-OfflineAddressBook | Set-OfflineAddressBook -
GlobalWebDistributionEnabled $True -VirtualDirectories $Null
24. Create a folder at the root of C: on the CAS server, and share it to Everyone with read/write permissions.
25. Log back into the Exchange admin center, and navigate to Serverscertificates.
26. Choose the CAS server in the drop-down menu, and click the plus sign to create a new certificate.
27. Choose Create a request for a certificate from a certification authority, and click Next.
28. Name the certificate, and click Next.
29. Do not request a wildcard certificate, and click Next.
30. Click Browse, choose the CAS server, and click OK. Click Next.
31. Leave defaults, and click Next.
32. Leave defaults, and click Next.
A Principled Technologies test report 32Comparing performance and cost: Dell PowerEdge VRTX with
one Dell PowerEdge M830 server vs. a legacy solution
33. Enter your organization information, and click Next.
34. Enter the path to the share you created on the CAS server, and click Finish. Example:
cassharemyrequest.REQ
35. Log into the AD server, and open Internet Explorer.
36. Browse to localhost/CertSrv
37. Click Request a certificate.
38. Choose advanced certificate request.
39. Choose Submit a certificate request by using a base-64-endcoded CMC…
40. Open Windows Explorer and navigate to the share folder on the CAS server where the certificate request is
stored.
41. Open the certificate with notepad and copy the content between BEGIN NEW CERTIFICATE REQUEST and END
NEW CERTIFICATE REQUEST.
42. Paste the copied content into the Saved Request window.
43. Choose Web Server in the Certificate Template drop-down menu, and click Submit.
44. Choose Base 64 encoded, and download the certificate.
45. Copy the new certificate into the share folder on the CAS server.
46. Log back into the CAS server and open the Exchange Admin Center.
47. Go to ServersCertificates, and highlight the certificate you began before (should say Pending request in the
status column).
48. Click Complete on the right side.
49. Type the path to the certificate, including the certificate name, and click OK. Example:
cassharecertnew.CER
50. Verify that the status has changed to Valid.
51. Edit the new entry, and click Edit.
52. Go to services and check SMTP and IIS, click Save.
53. Click Yes on the warning message.
54. Run the following steps on the CAS and AD servers.
a. Click Start, and type MMC
b. Click FileAdd/Remove Snap-in
c. Choose Certificates, and click Add.
d. Choose Computer account, and click Next.
e. Choose Local computer, and click Finish.
f. Click OK.
g. Expand CertificatesTrusted Root Certificate AuthoritiesCertificates
h. Click ActionAll TasksImport
i. Click Next.
j. Browse to the share folder on the CAS server, and choose the new certificate you created. Click
Next.
k. Leave defaults, and click Next.
A Principled Technologies test report 33Comparing performance and cost: Dell PowerEdge VRTX with
one Dell PowerEdge M830 server vs. a legacy solution
l. Click Finish.
m. Click OK on the Import was successful message.
55. Log into the CAS server and open the Exchange admin center.
56. Navigate to ServersDatabases.
57. Restart the Microsoft Exchange Information Store service on the MB server.
58. Using the Edit button, disable the maintenance schedule and enable circular logging for each mailbox database.
59. Dismount and remount the databases.
60. Open the Exchange Management shell, and enter the following to move the paths of the default mailbox:
Move-Databasepath “DatabaseName” –EdbFilepath “E:NewlocationDBname.edb” –
LogFolderpath “F:Newlocation”
61. When prompted, type A and press Enter.
62. Open Exchange Management Shell, and enter the following:
Get-OutlookAnywhere |Set-OutlookAnywhere -ExternalHostname cas.domain.com -
DefaultAuthenticationMethod NTLM -ExternalClientsRequireSsl $true
Installing and configuring the Exchange 2013 mail test clients and completing LoadGen
configuration on the Exchange 2013
For our testing, we used one virtual client machine to run LoadGen 2013. To create the mail clients, we installed
several software components. We followed this process for each installation:
Installing Windows Server 2008 R2 SP1 Enterprise Edition
1. Insert the installation DVD for Windows Server 2008 R2 SP1 Enterprise into the DVD drive.
2. At the Language Selection Screen, click Next.
3. Click Install Now.
4. Select Windows Server 2008 R2 Enterprise (Full Installation), and click Next.
5. Click the I accept the license terms checkbox, and click Next.
6. Click Custom.
7. Click Next.
8. At the User’s password must be changed before logging on warning screen, click OK.
9. Enter the desired password for the administrator in both fields, and click the arrow to continue.
10. At the Your password has been changed screen, click OK.
11. Click Start, type change power-saving settings and press Enter.
12. Click Change plan settings.
13. Change the Turn off the display drop-down menu to Never.
14. Click Save changes, and close the Power Options, Screen Saver Settings, and Personalization screens.
To set up this server, we had to install several additional software components. The following subsections detail
the necessary installation processes.
Joining the domain
1. Set a static IP.
2. Select StartControl PanelNetwork ConnectionsLocal Area Connection.
A Principled Technologies test report 34Comparing performance and cost: Dell PowerEdge VRTX with
one Dell PowerEdge M830 server vs. a legacy solution
3. Click Properties.
4. Highlight Internet Protocol (TCP/IP), and click Properties.
5. Select the Use the following DNS server addresses radio button, and enter the IP of the DNS server in the
Preferred DNS server field. Click OK.
6. Right-click My Computer, and select Properties.
7. Under the Computer Name tab, click Change.
8. In the Computer Name Changes screen, under the Member of section, select the Domain radial box, and type
test.local
9. Select OK to start joining the domain.
10. When the screen appears asking for a person qualified on the domain, type Administrator as the username
and Password1 as the password.
11. At the Welcome pop-up window and the window warning that you must reset the computer for the changes to
take effect, click OK.
12. At the System Properties screen, click OK.
13. When a pop-up appears asking if you want to restart now, click Yes to restart your computer.
Installing Internet Information Services
1. Click StartAdministrative ToolsServer Manager.
2. On the left pane, click Roles.
3. Click Add Roles.
4. Click the Application Server checkbox.
5. When the Add features required for Application Server? screen appears, click Add Required Features.
6. Click Next.
7. Click Next.
8. At the Select Role Services page for Application Server, click the Web Server (IIS) Support checkbox.
9. Click Add Required Support Role Services.
10. Click Next.
11. Click Next.
12. At the Select Role Services page for Web Server (IIS), click IIS 6 Management Compatibility, ASP, and CGI
checkboxes; and click Next.
13. Click Install.
14. Click Close.
Installing Load Generator
Download and install Load Generator 2013 using all defaults.
Importing the certificate and editing the hosts file
1. Click Start, and type MMC
2. Click FileAdd/Remove Snap-in
3. Choose Certificates, and click Add.
4. Choose Computer account, and click Next.
A Principled Technologies test report 35Comparing performance and cost: Dell PowerEdge VRTX with
one Dell PowerEdge M830 server vs. a legacy solution
5. Choose Local computer, and click Finish.
6. Click OK.
7. Expand CertificatesTrusted Root Certificate AuthoritiesCertificates.
8. Click ActionAll TasksImport.
9. Click Next.
10. Browse to the share folder on the CAS server, and choose the new certificate you created. Click Next.
11. Leave defaults, and click Next.
12. Click Finish.
13. Click OK on the Import was successful message.
14. Open the Notepad program, and use FileOpen to open the hosts file stored at
C:WindowsSystem32driversetc
15. Add the IP and FQDN of the CAS server.
16. Save and close Notepad.
Preparing Load Generator
1. Log into the mail client.
2. Select StartAll ProgramsMicrosoft ExchangeExchange Load Generator 2013.
3. When the Load Generator screen appears, select Start a new test.
4. Select Create a new test configuration, and click Continue.
5. Change the total length of simulation to 1 hour.
6. In the Specify test settings screen, type Password1 as the Directory Access Password and Mailbox Account
Master Password, and click Continue with recipient management.
7. Create 750 users in the Mailbox Database, and click Continue.
8. To accept defaults for Advanced recipient settings, click Continue.
9. In the Specify test user groups screen, select the plus sign to add a user group.
10. Change the Client Type to Outlook 2007 Cached, the action profile to Outlook_200, and the Mailbox size to 250
MB, and click Continue.
11. In Remote configurations, check the checkbox to enable distributing the workload, enter the computer names of
all of the test clients, and click Continue.
12. Click Save the configuration file as, and name it testcfg.xml
13. Click Start the initialization phase (recommended before running the test).
14. Once you have initialized the database, create a backup copy of the Exchange mailbox databases.
Installing and configuring Microsoft SQL Server 2014
We installed Microsoft SQL Server 2014 on a VM residing on the second Dell PowerEdge M830.
Configuring the SQL Server VM (VRTX only)
1. After cloning, modify the SQL VM to contain the following settings:
o Memory: 16 GB
o Virtual Processors: 8
o Additional virtual disks:
A Principled Technologies test report 36Comparing performance and cost: Dell PowerEdge VRTX with
one Dell PowerEdge M830 server vs. a legacy solution
 1 × 100GB virtual disks for SQL database and log data (Thick provisioned, eager-zeroed)
Installing SQL Server 2014
1. Open the console for the VM or connect to the VM with RDP.
2. Mount the installation ISO to the VM.
3. Click Run SETUP.EXE. If Autoplay does not begin the installation, navigate to the SQL Server 2014 DVD, and
double-click.
4. If the installer prompts you with a .NET installation prompt, click Yes to enable the .NET Framework Core role.
5. In the left pane, click Installation.
6. On the Product Key screen, enter a product key for standard, and click Next.
7. At the Setup Support Rules screen, wait for the rule check to complete. If there are no failures or relevant
warnings, click OK.
8. Select the Specify a free edition and from the drop-down menu, select Evaluation. Click Next.
9. Click the checkbox to accept the license terms, and click Next.
10. If no failures are displayed after the setup support files are installed, click Next.
11. At the Setup Role screen, choose SQL Server Feature Installation.
12. At the Feature Selection screen, select Database Engine Services, Full-Text and Semantic Extractions for Search,
Client Tools Connectivity, Client Tools Backwards Compatibility, Management Tools – Basic, and Management
Tools – Complete. Click Next.
13. At the Installation Rules screen, click Next after the check completes.
14. At the Instance configuration screen, leave the default selection of default instance, and click Next.
15. At the Disk Space Requirements screen, click Next.
16. At the Server Configuration screen, check that NT AUTHORITYSYSTEM is selected for SQL Server Agent and SQL
Server Database Engine. Click Next.
17. Assuming there are no failures, click Next.
18. At the Database Engine Configuration screen, select Mixed Mode.
19. Enter and confirm a password for the system administrator account.
20. Click Add Current user. This may take several seconds.
21. Click Next.
22. At the Error and usage reporting screen, click Next.
23. At the Installation Configuration Rules screen, check that there are no failures or relevant warnings, and click
Next.
24. At the Ready to Install screen, click Install.
25. After installation completes, click Close.
26. Create a SQL Server login for the ds2user (see the Configuring the database (Data generation overview) section
for the specific script to use).
27. Copy the pre-created DVD Store backup to the specified backup volume.
28. Download and install any available updates for Microsoft SQL Server 2014. We installed SQL Server 2014 SP1
and CU5.
A Principled Technologies test report 37Comparing performance and cost: Dell PowerEdge VRTX with
one Dell PowerEdge M830 server vs. a legacy solution
Configuring the database workload client
For our testing, we used a single client machine for the Microsoft SQL Server client. To create this client, we
created a Windows Server 2013 R2 VM, assigned a static IP address, and installed .NET 3.5. We used this client to drive
the DVD Store benchmark we ran against the SQL database.
Configuring the database
Data generation overview
We generated the data using the Install.pl script included with DVD Store version 2.1 (DS2), providing the
parameters for our 10GB database size and the database platform on which we ran: Microsoft SQL Server. We ran the
Install.pl script on a utility system running Linux. The database schema was also generated by the Install.pl script.
After processing the data generation, we transferred the data files and schema creation files to a Windows-
based system running SQL Server 2014. We built the 10GB database in SQL Server 2014, and then performed a full
backup, storing the backup file on the C: drive for quick access. We used that backup file to restore the server between
test runs.
The only modification we made to the schema creation scripts were the specified file sizes for our database. We
explicitly set the file sizes higher than necessary to ensure that no file-growth activity would affect the outputs of the
test. Besides this file size modification, the database schema was created and loaded according to the DVD Store
documentation. Specifically, we followed the steps below:
1. We generated the data and created the database and file structure using database creation scripts in the DS2
download. We made size modifications specific to our 10GB database and the appropriate changes to drive
letters.
2. We transferred the files from our Linux data generation system to a Windows system running SQL Server.
3. We created database tables, stored procedures, and objects using the provided DVD Store scripts.
4. We set the database recovery model to bulk-logged to prevent excess logging.
5. We loaded the data we generated into the database. For data loading, we used the import wizard in SQL Server
Management Studio. Where necessary, we retained options from the original scripts, such as Enable Identity
Insert.
6. We created indices, full-text catalogs, primary keys, and foreign keys using the database-creation scripts.
7. We updated statistics on each table according to database-creation scripts, which sample 18 percent of the
table data.
8. On the SQL Server instance, we created a ds2user SQL Server login using the following Transact SQL (TSQL)
script:
USE [master]
GO
CREATE LOGIN [ds2user] WITH PASSWORD=N’’,
DEFAULT_DATABASE=[master],
DEFAULT_LANGUAGE=[us_english],
CHECK_EXPIRATION=OFF,
A Principled Technologies test report 38Comparing performance and cost: Dell PowerEdge VRTX with
one Dell PowerEdge M830 server vs. a legacy solution
CHECK_POLICY=OFF
GO
9. We set the database recovery model back to full.
10. We created the necessary full text index using SQL Server Management Studio.
11. We created a database user and mapped this user to the SQL Server login.
12. We then performed a full backup of the database. This backup allowed us to restore the databases to a pristine
state relatively quickly between tests.
Figure 16 shows our initial file size modifications.
Logical name Filegroup Initial size (MB)
Database files
primary PRIMARY 3.25
cust1 DS_CUST_FG 5,767
cust2 DS_CUST_FG 5,767
ind1 DS_IND_FG 2,621
ind2 DS_IND_FG 2,621
ds_misc DS_MISC_FG 2,621
orders1 DS_ORDERS 2,621
orders2 DS_ORDERS 2,621
Log files
ds_log Not Applicable 20,480
Figure 16: Our initial file size modifications.
Installing and configuring Iometer
We installed Iometer using all defaults on a VM residing on the second Dell PowerEdge M830.
Configuring the Iometer VM (VRTX only)
After cloning, modify the Iometer VM to contain the following settings:
o Memory: 8 GB
o Virtual Processors: 4
o Additional virtual disks:
 1 × 50GB virtual disk for Iometer target (Thick provisioned, eager-zeroed)
Installing and configuring Iometer on the VM
1. Download the Iometer 1.1 package for Windows from www.iometer.org/doc/downloads.html.
2. Double-click the installer, and click Run.
3. At the Welcome window, click Next.
4. At the License Agreement window, click I Agree.
5. At the Choose Components window, leave the defaults selected, and click Next.
6. At the Choose Install Location window, change the Destination Folder to C:Iometer 1.1, and click Install.
7. When the installation completes, click Finish.
A Principled Technologies test report 39Comparing performance and cost: Dell PowerEdge VRTX with
one Dell PowerEdge M830 server vs. a legacy solution
8. Copy the relevant access specification file to the VM.
Configuring the Iometer workloads (both legacy and VRTX)
We set up Iometer to deliver a light file/print server-like I/O load through the duration of the tests. Below we
review the specific configuration of our Iometer workload.
Iometer workload specifications
 50GB dataset, 1 Outstanding I/O per target (sectors)
 512KB transfer request size
 100ms transfer delay
 1 Burst I/O
 80% read, 100% random
 45 minute run time
 60 second ramp up time
 Cycling – normal
Running the test
Test start and run times
We ran all workloads concurrently in order to start and record all performance counters for this report. The
specific testing parameters we used for each benchmark are included in the setup sections, and specifics for launching
these tests are described below.
About running the LoadGen test
To run the test, we installed the LoadGen client and server components and simulated 750 Exchange users
targeting the Exchange VM using LoadGen’s Exchange_200 Workload profile. We ran the LoadGen benchmark for 45
minutes, and beginning at the 15-minute mark, we used a 30-minute measurement window for performance
monitoring.
For more details about LoadGen, see www.microsoft.com/download/en/details.aspx?displaylang=en&id=14060.
About running the DVD Store tests
We created a series of batch files, SQL scripts, and shell scripts to automate the complete test cycle. DVD Store
outputs an orders-per-minute metric, which is a running average calculated through the test. In this report, we report
the last OPM reported by each client/target pair.
Each complete test cycle consisted of the general steps listed below.
1. Clean up prior outputs from the target system and the client driver system.
2. Drop the database from the target.
3. Restore the database on the target.
4. Shut down the target.
5. Reboot the host and client system.
6. Wait for a ping response from the server under test (the hypervisor system), the client system, and the target.
7. Let the test server idle for 20 minutes.
8. Start the DVD Store driver on the client.
A Principled Technologies test report 40Comparing performance and cost: Dell PowerEdge VRTX with
one Dell PowerEdge M830 server vs. a legacy solution
We used the following DVD Store parameters for testing:
ds2sqlserverdriver.exe --target=<target_IP> --ramp_rate=10 --run_time=30 --
n_threads=12 --db_size=10GB --think_time=0.1 --detailed_view=Y --
warmup_time=15
About running the Iometer tests
1. Log into the Iometer machine.
2. Open the Iometer specification for the machine.
3. Click the start button.
4. After all access specifications finish running, remove the result files from the machine.
A Principled Technologies test report 41Comparing performance and cost: Dell PowerEdge VRTX with
one Dell PowerEdge M830 server vs. a legacy solution
APPENDIX C – DETAILED TEST RESULTS
Figure 17 shows the results of our database, mail, and file and print testing as well as power data for the Dell
PowerEdge VRTX with a Dell PowerEdge M830 server. The median run was determined by OPM.
Dell PowerEdge VRTX with
one Dell PowerEdge M830
server
Run 1 Run 2 Run 3 Median run
Power
Idle power (W) 390.9 389.4 390.3 389.4
Active power (W) 420.9 418.0 418.0 418.0
Database
Orders per minute 8,867 8,872 8,877 8,872
Mail
Average latency (ms) 2.9 2.9 3.0 2.9
File and print
IOPS 36.3 36.3 36.3 36.3
Figure 17: Detailed run results for the Dell PowerEdge VRTX with one Dell PowerEdge M830 server.
Figure 18 shows the results of our database, mail, and file and print testing as well as power data for the legacy
disparate hardware solution we tested. The median run was determined by OPM.
Legacy, disparate hardware Run 1 Run 2 Run 3 Median run
Power
Idle power (W) 660.2 671.4 662.9 671.4
Active power (W) 679.7 678.7 678.1 678.7
Database
Orders per minute 2,050 2,053 2,053 2,053
Mail
Average latency (ms) 1.22 1.4 1.5 1.4
File and print
IOPS 7.8 7.7 7.8 7.7
Figure 18: Detailed run results for the legacy disparate hardware solution from our testing.
A Principled Technologies test report 42Comparing performance and cost: Dell PowerEdge VRTX with
one Dell PowerEdge M830 server vs. a legacy solution
APPENDIX D – TCO CALCULATIONS
In this appendix, we estimate and compare five-year costs for the two solutions we tested in this report. Each
solution supports one SQL Server 2014 Standard Edition instance, one Microsoft Exchange 2013 Standard Edition
instance, and one instance for file/print—in three VMs on the Dell PowerEdge VRTX solution and on individual servers in
the legacy solution.
 Dell PowerEdge VRTX—we include acquisition costs and annual costs to run the Dell PowerEdge VRTX solution
we tested in this report.
 Legacy solution—we compared performance of the Dell PowerEdge VRTX to a set of three 4- to 5-year-old HP
servers, a shared HP storage array, and a switch. We estimate costs for this solution.
Assumptions
General
 We use current U.S. dollars for all calculations.
 We assume all tasks are executed by a system administrator earning in salary and benefits the equivalent of
$56.09 an hour.3
 For the Dell PowerEdge VRTX solution, we assume an existing VMware vCenter server that is not included in this
cost analysis.
 We consider only the costs that are platform specific. We thus omit staff costs for tasks that would be common
to the two solutions and would require equal or similar effort and cost for the two solutions. These include the
cost of setting up and maintaining the SQL Server and Exchange databases, updating the operating system
versions, and updating the SQL server versions as updates become available over the five-year TCO timeframe.
 We include only server licensing in this model and omit client access license costs and other client licensing.
 For the legacy solution, we assume the business would repurpose legacy equipment from other uses, so it would
need to purchase software for both the legacy and VRTX solutions.
 We include software license costs with acquisition costs and software support costs with annual costs.
 We do not include datacenter costs such as space or build costs because we assume the company would install
these solutions in the main office or a branch office, not in a centralized enterprise data center.
Acquisition costs
 Acquisition costs for both solutions include software licenses for Microsoft Windows Server, Microsoft SQL
Server, and Microsoft Exchange Server. Costs for the Dell PowerEdge M830 server also include VMware vSphere
license costs.
 Acquisition costs for the Dell PowerEdge VRTX solution include hardware and five-year hardware support,
software licenses, and setup costs.
 Acquisition costs for the Dell PowerEdge M830 server include the 29 percent discount available for this server
model in the Dell online store.
3
swz.salary.com/salarywizard/Systems-Administrator-II-Salary-
Details.aspx?hdcbxbonuse=off&isshowpiechart=true&isshowjobchart=false&isshowsalarydetailcharts=false&isshownextsteps=false
&isshowcompanyfct=false&isshowaboutyou=false
A Principled Technologies test report 43Comparing performance and cost: Dell PowerEdge VRTX with
one Dell PowerEdge M830 server vs. a legacy solution
Yearly costs
 Costs for both solutions include Microsoft Software Assurance costs, energy costs for power and cooling, and
hardware management costs.
 We include costs to power and cool the solutions using power utilization measurements we made during
testing. We estimate cooling costs equal to power costs.
 For the legacy solution, we assume the business purchases post-warranty hardware support each year from the
vendor for the servers and storage array. We include that in yearly costs, not acquisition costs.
 We also include estimates of the cost of additional downtime for the aging legacy servers. We estimate
negligible downtime for VRTX and 10 hours per server per year for the older legacy servers. We estimate the
cost of that downtime at $300 an hour assuming a number of users are affected each time one of the servers
becomes unavailable.
 Costs for the Dell PowerEdge VRTX solution also include staff costs for the Dell PowerEdge VRTX solution to
manage the VMware VSphere 5 virtualization.
Dell PowerEdge VRTX solution cost
Figure 19 shows the costs we calculated for the Dell PowerEdge VRTX solution.
Dell PowerEdge VRTX with
one Dell PowerEdge M830
server
Unit
Cost per
unit
Quantity description Quantity Total cost
Acquisition costs
Hardware
Dell PowerEdge VRTX
platform
Platform with
29% discount
$20,891 One VRTX 1 $20,891
Dell PowerEdge M820 blade
server
Server with 29%
discount
$28,089 One blade 1 $28,089
Software licenses
Windows Server 2012
Standard Edition (Software
Assurance)
Each server with
up to two
processors. Up to
two VMs per
license.
$883
One server with four
processors requires a
license pack for each
VM.
10 $8,830
Microsoft SQL Server 2014
Standard (Software
Assurance)
One license per
SQL VM
$898
One SQL Server VM
for each legacy SQL
server
4 $3,592
Microsoft Exchange Server
2013 (Software Assurance)
One license per
Exchange VM
$708
Two Exchange VMs
per legacy exchange
server
2 $1,416
VMware vSphere 5 Standard
Basic support
One per
processor
$995
Number of
processors
4 $3,980
Setup Cost per hour $56 Number of hours 12 $673
Total acquisition costs $44,000
A Principled Technologies test report 44Comparing performance and cost: Dell PowerEdge VRTX with
one Dell PowerEdge M830 server vs. a legacy solution
Dell PowerEdge VRTX with
one Dell PowerEdge M830
server
Unit
Cost per
unit
Quantity description Quantity Total cost
Annual costs
Software support
Windows Server 2012
Standard Edition (Software
Assurance)
Each server with
up to two
processors
$221
One server with four
processors requires a
license pack for each
VM.
10 $2,210
Microsoft SQL Server 2012
Standard (Software
Assurance)
One license per
SQL VM
$225
One SQL Server VM
for each legacy SQL
server
4 $898
Microsoft Exchange Server
2013 (Software Assurance)
One server $177
Two Exchange VMs
per legacy exchange
server
2 $354
VMware vSphere 5 Standard
Basic support
One per
processor per
year
$273
Number of
processors
4 $1,092
Energy cost for power and
cooling Platform $759
One VRTX 1 $759
Hardware management Cost per hour $56 Number hours 12 $673
VMware management Cost per hour $56 Number hours 24 $1,346
Total annual costs $7,332
Average cost per month $611
Figure 19: Cost analysis for the Dell PowerEdge VRTX with one Dell PowerEdge M830 server. (Totals may not sum due to
rounding.)
A Principled Technologies test report 45Comparing performance and cost: Dell PowerEdge VRTX with
one Dell PowerEdge M830 server vs. a legacy solution
Legacy solution costs
Figure 20 shows the costs we calculated for the legacy solution.
Legacy costs Unit
Cost per
unit
Quantity description Quantity Total cost
Acquisition costs
Software licenses
Windows Server 2012
Standard Edition (processor
licenses)
Each server with
up to two
processors. Up to
two VMs per
license.
$883
Servers with one or
two processors each
9 $7,947
Microsoft SQL Server 2012
Standard (processor licenses)
One server $898
Servers with SQL
installed
4 $3,592
Microsoft Exchange Server
2013 Standard (server
licenses)
One server $708
Servers with
Exchange
1 $708
Setup
Cost per hour $56 Number hours 36 $2,019
Total acquisition costs $14,266
Annual costs
Support
Windows Server 2012
Standard Edition (Software
Assurance)
Each server with
up to two
processors
$221
Servers with one or
two processors each
9 $1,989
Microsoft SQL Server 2012
Standard (Software
Assurance)
One server $225
Servers with SQL
installed
4 $898
Microsoft Exchange 2013
Standard (Software
Assurance)
One server $177
Server with Exchange
installed
1 $177
Hardware support - SQL
Server
HP extended
support
agreement with
one year term for
one server
$338 One year 4 $1,352
Hardware support -
Exchange server
HP extended
support
agreement with
one year term for
one server
$986 One year 1 $986
Hardware support - File
server
HP extended
support
agreement with
one year term for
one server
$214 One year 4 $856
A Principled Technologies test report 46Comparing performance and cost: Dell PowerEdge VRTX with
one Dell PowerEdge M830 server vs. a legacy solution
Legacy costs Unit
Cost per
unit
Quantity description Quantity Total cost
Hardware support - storage
array
HP extended
support
agreement with
one year term for
one server
$1,553 One year 1 $1,553
Energy cost for power and
cooling
Legacy
configuration
$2,401 One year 1 $2,401
Hardware management
Per solution $50
Estimate at two
hours a month per
server + one hour a
month for storage
array per year
228 $11,400
Downtime cost
Per hour
downtime cost
$300
Each server down for
multiple hours a year
54 $16,200
Legacy annual costs $37,812
Average cost per month $3,151
Figure 20: Cost analysis for the legacy solution. (Totals may not sum due to rounding.)
A Principled Technologies test report 47Comparing performance and cost: Dell PowerEdge VRTX with
one Dell PowerEdge M830 server vs. a legacy solution
ABOUT PRINCIPLED TECHNOLOGIES
Principled Technologies, Inc.
1007 Slater Road, Suite 300
Durham, NC, 27703
www.principledtechnologies.com
We provide industry-leading technology assessment and fact-based
marketing services. We bring to every assignment extensive experience
with and expertise in all aspects of technology testing and analysis, from
researching new technologies, to developing new methodologies, to
testing with existing and new tools.
When the assessment is complete, we know how to present the results to
a broad range of target audiences. We provide our clients with the
materials they need, from market-focused data to use in their own
collateral to custom sales aids, such as test reports, performance
assessments, and white papers. Every document reflects the results of
our trusted independent analysis.
We provide customized services that focus on our clients’ individual
requirements. Whether the technology involves hardware, software, Web
sites, or services, we offer the experience, expertise, and tools to help our
clients assess how it will fare against its competition, its performance, its
market readiness, and its quality and reliability.
Our founders, Mark L. Van Name and Bill Catchings, have worked
together in technology assessment for over 20 years. As journalists, they
published over a thousand articles on a wide array of technology subjects.
They created and led the Ziff-Davis Benchmark Operation, which
developed such industry-standard benchmarks as Ziff Davis Media’s
Winstone and WebBench. They founded and led eTesting Labs, and after
the acquisition of that company by Lionbridge Technologies were the
head and CTO of VeriTest.
Principled Technologies is a registered trademark of Principled Technologies, Inc.
All other product names are the trademarks of their respective owners.
Disclaimer of Warranties; Limitation of Liability:
PRINCIPLED TECHNOLOGIES, INC. HAS MADE REASONABLE EFFORTS TO ENSURE THE ACCURACY AND VALIDITY OF ITS TESTING, HOWEVER,
PRINCIPLED TECHNOLOGIES, INC. SPECIFICALLY DISCLAIMS ANY WARRANTY, EXPRESSED OR IMPLIED, RELATING TO THE TEST RESULTS AND
ANALYSIS, THEIR ACCURACY, COMPLETENESS OR QUALITY, INCLUDING ANY IMPLIED WARRANTY OF FITNESS FOR ANY PARTICULAR PURPOSE.
ALL PERSONS OR ENTITIES RELYING ON THE RESULTS OF ANY TESTING DO SO AT THEIR OWN RISK, AND AGREE THAT PRINCIPLED
TECHNOLOGIES, INC., ITS EMPLOYEES AND ITS SUBCONTRACTORS SHALL HAVE NO LIABILITY WHATSOEVER FROM ANY CLAIM OF LOSS OR
DAMAGE ON ACCOUNT OF ANY ALLEGED ERROR OR DEFECT IN ANY TESTING PROCEDURE OR RESULT.
IN NO EVENT SHALL PRINCIPLED TECHNOLOGIES, INC. BE LIABLE FOR INDIRECT, SPECIAL, INCIDENTAL, OR CONSEQUENTIAL DAMAGES IN
CONNECTION WITH ITS TESTING, EVEN IF ADVISED OF THE POSSIBILITY OF SUCH DAMAGES. IN NO EVENT SHALL PRINCIPLED TECHNOLOGIES,
INC.’S LIABILITY, INCLUDING FOR DIRECT DAMAGES, EXCEED THE AMOUNTS PAID IN CONNECTION WITH PRINCIPLED TECHNOLOGIES, INC.’S
TESTING. CUSTOMER’S SOLE AND EXCLUSIVE REMEDIES ARE AS SET FORTH HEREIN.

Weitere ähnliche Inhalte

Was ist angesagt?

VDI performance comparison: Dell PowerEdge FX2 and FC430 servers with VMware ...
VDI performance comparison: Dell PowerEdge FX2 and FC430 servers with VMware ...VDI performance comparison: Dell PowerEdge FX2 and FC430 servers with VMware ...
VDI performance comparison: Dell PowerEdge FX2 and FC430 servers with VMware ...Principled Technologies
 
Converged architecture advantages: Dell PowerEdge FX2s and FC830 servers vs. ...
Converged architecture advantages: Dell PowerEdge FX2s and FC830 servers vs. ...Converged architecture advantages: Dell PowerEdge FX2s and FC830 servers vs. ...
Converged architecture advantages: Dell PowerEdge FX2s and FC830 servers vs. ...Principled Technologies
 
Webinář: Provozujte datacentrum v kanceláři (Dell VRTX) / 5.9.2013
Webinář: Provozujte datacentrum v kanceláři (Dell VRTX) / 5.9.2013Webinář: Provozujte datacentrum v kanceláři (Dell VRTX) / 5.9.2013
Webinář: Provozujte datacentrum v kanceláři (Dell VRTX) / 5.9.2013Jaroslav Prodelal
 
Offer faster access to critical data and achieve greater inline data reductio...
Offer faster access to critical data and achieve greater inline data reductio...Offer faster access to critical data and achieve greater inline data reductio...
Offer faster access to critical data and achieve greater inline data reductio...Principled Technologies
 
Workstation heat and power usage: Lenovo ThinkStation P500 vs. HP Z440 Workst...
Workstation heat and power usage: Lenovo ThinkStation P500 vs. HP Z440 Workst...Workstation heat and power usage: Lenovo ThinkStation P500 vs. HP Z440 Workst...
Workstation heat and power usage: Lenovo ThinkStation P500 vs. HP Z440 Workst...Principled Technologies
 
Converged architecture advantages: Dell PowerEdge FX2s and FC830 servers vs. ...
Converged architecture advantages: Dell PowerEdge FX2s and FC830 servers vs. ...Converged architecture advantages: Dell PowerEdge FX2s and FC830 servers vs. ...
Converged architecture advantages: Dell PowerEdge FX2s and FC830 servers vs. ...Principled Technologies
 
Resource balancing comparison: VMware vSphere 6 vs. Red Hat Enterprise Virtua...
Resource balancing comparison: VMware vSphere 6 vs. Red Hat Enterprise Virtua...Resource balancing comparison: VMware vSphere 6 vs. Red Hat Enterprise Virtua...
Resource balancing comparison: VMware vSphere 6 vs. Red Hat Enterprise Virtua...Principled Technologies
 
Dell PowerEdge M820 blade storage solution: Software cost advantages with Mic...
Dell PowerEdge M820 blade storage solution: Software cost advantages with Mic...Dell PowerEdge M820 blade storage solution: Software cost advantages with Mic...
Dell PowerEdge M820 blade storage solution: Software cost advantages with Mic...Principled Technologies
 
VMmark virtualization performance of Micron Enterprise PCIe SSD-based SAN
VMmark virtualization performance of Micron Enterprise PCIe SSD-based SANVMmark virtualization performance of Micron Enterprise PCIe SSD-based SAN
VMmark virtualization performance of Micron Enterprise PCIe SSD-based SANPrincipled Technologies
 
Dell PowerEdge R920 and Microsoft SQL Server 2014 Migration and Benefits Guide
Dell PowerEdge R920 and Microsoft SQL Server 2014 Migration and Benefits GuideDell PowerEdge R920 and Microsoft SQL Server 2014 Migration and Benefits Guide
Dell PowerEdge R920 and Microsoft SQL Server 2014 Migration and Benefits GuidePrincipled Technologies
 
Increased database performance and reduced costs with Dell PowerEdge FX2 & VM...
Increased database performance and reduced costs with Dell PowerEdge FX2 & VM...Increased database performance and reduced costs with Dell PowerEdge FX2 & VM...
Increased database performance and reduced costs with Dell PowerEdge FX2 & VM...Principled Technologies
 
Upgrade to Dell EMC PowerEdge R940 servers with VMware vSphere 7.0 and gain g...
Upgrade to Dell EMC PowerEdge R940 servers with VMware vSphere 7.0 and gain g...Upgrade to Dell EMC PowerEdge R940 servers with VMware vSphere 7.0 and gain g...
Upgrade to Dell EMC PowerEdge R940 servers with VMware vSphere 7.0 and gain g...Principled Technologies
 
Increasing performance with the Dell PowerEdge FX2 and VMware Virtual SAN
Increasing performance with the Dell PowerEdge FX2 and VMware Virtual SANIncreasing performance with the Dell PowerEdge FX2 and VMware Virtual SAN
Increasing performance with the Dell PowerEdge FX2 and VMware Virtual SANPrincipled Technologies
 
Virtualize with Confidence
Virtualize with ConfidenceVirtualize with Confidence
Virtualize with ConfidenceNetWize
 
Consolidating Oracle database servers onto Dell PowerEdge R920 running Oracle VM
Consolidating Oracle database servers onto Dell PowerEdge R920 running Oracle VMConsolidating Oracle database servers onto Dell PowerEdge R920 running Oracle VM
Consolidating Oracle database servers onto Dell PowerEdge R920 running Oracle VMPrincipled Technologies
 
Database performance and memory capacity with the Intel Xeon processor E5-266...
Database performance and memory capacity with the Intel Xeon processor E5-266...Database performance and memory capacity with the Intel Xeon processor E5-266...
Database performance and memory capacity with the Intel Xeon processor E5-266...Principled Technologies
 
A single-socket Dell EMC PowerEdge R7515 solution delivered better value on a...
A single-socket Dell EMC PowerEdge R7515 solution delivered better value on a...A single-socket Dell EMC PowerEdge R7515 solution delivered better value on a...
A single-socket Dell EMC PowerEdge R7515 solution delivered better value on a...Principled Technologies
 
Managing clients with Dell Client Integration Pack 3.0 and Microsoft System C...
Managing clients with Dell Client Integration Pack 3.0 and Microsoft System C...Managing clients with Dell Client Integration Pack 3.0 and Microsoft System C...
Managing clients with Dell Client Integration Pack 3.0 and Microsoft System C...Principled Technologies
 
Dell Acceleration Appliance for Databases 2.0 and Microsoft SQL Server 2014: ...
Dell Acceleration Appliance for Databases 2.0 and Microsoft SQL Server 2014: ...Dell Acceleration Appliance for Databases 2.0 and Microsoft SQL Server 2014: ...
Dell Acceleration Appliance for Databases 2.0 and Microsoft SQL Server 2014: ...Principled Technologies
 

Was ist angesagt? (20)

VDI performance comparison: Dell PowerEdge FX2 and FC430 servers with VMware ...
VDI performance comparison: Dell PowerEdge FX2 and FC430 servers with VMware ...VDI performance comparison: Dell PowerEdge FX2 and FC430 servers with VMware ...
VDI performance comparison: Dell PowerEdge FX2 and FC430 servers with VMware ...
 
VDI performance comparison: Dell PowerEdge FX2 and FC430 servers with VMware ...
VDI performance comparison: Dell PowerEdge FX2 and FC430 servers with VMware ...VDI performance comparison: Dell PowerEdge FX2 and FC430 servers with VMware ...
VDI performance comparison: Dell PowerEdge FX2 and FC430 servers with VMware ...
 
Converged architecture advantages: Dell PowerEdge FX2s and FC830 servers vs. ...
Converged architecture advantages: Dell PowerEdge FX2s and FC830 servers vs. ...Converged architecture advantages: Dell PowerEdge FX2s and FC830 servers vs. ...
Converged architecture advantages: Dell PowerEdge FX2s and FC830 servers vs. ...
 
Webinář: Provozujte datacentrum v kanceláři (Dell VRTX) / 5.9.2013
Webinář: Provozujte datacentrum v kanceláři (Dell VRTX) / 5.9.2013Webinář: Provozujte datacentrum v kanceláři (Dell VRTX) / 5.9.2013
Webinář: Provozujte datacentrum v kanceláři (Dell VRTX) / 5.9.2013
 
Offer faster access to critical data and achieve greater inline data reductio...
Offer faster access to critical data and achieve greater inline data reductio...Offer faster access to critical data and achieve greater inline data reductio...
Offer faster access to critical data and achieve greater inline data reductio...
 
Workstation heat and power usage: Lenovo ThinkStation P500 vs. HP Z440 Workst...
Workstation heat and power usage: Lenovo ThinkStation P500 vs. HP Z440 Workst...Workstation heat and power usage: Lenovo ThinkStation P500 vs. HP Z440 Workst...
Workstation heat and power usage: Lenovo ThinkStation P500 vs. HP Z440 Workst...
 
Converged architecture advantages: Dell PowerEdge FX2s and FC830 servers vs. ...
Converged architecture advantages: Dell PowerEdge FX2s and FC830 servers vs. ...Converged architecture advantages: Dell PowerEdge FX2s and FC830 servers vs. ...
Converged architecture advantages: Dell PowerEdge FX2s and FC830 servers vs. ...
 
Resource balancing comparison: VMware vSphere 6 vs. Red Hat Enterprise Virtua...
Resource balancing comparison: VMware vSphere 6 vs. Red Hat Enterprise Virtua...Resource balancing comparison: VMware vSphere 6 vs. Red Hat Enterprise Virtua...
Resource balancing comparison: VMware vSphere 6 vs. Red Hat Enterprise Virtua...
 
Dell PowerEdge M820 blade storage solution: Software cost advantages with Mic...
Dell PowerEdge M820 blade storage solution: Software cost advantages with Mic...Dell PowerEdge M820 blade storage solution: Software cost advantages with Mic...
Dell PowerEdge M820 blade storage solution: Software cost advantages with Mic...
 
VMmark virtualization performance of Micron Enterprise PCIe SSD-based SAN
VMmark virtualization performance of Micron Enterprise PCIe SSD-based SANVMmark virtualization performance of Micron Enterprise PCIe SSD-based SAN
VMmark virtualization performance of Micron Enterprise PCIe SSD-based SAN
 
Dell PowerEdge R920 and Microsoft SQL Server 2014 Migration and Benefits Guide
Dell PowerEdge R920 and Microsoft SQL Server 2014 Migration and Benefits GuideDell PowerEdge R920 and Microsoft SQL Server 2014 Migration and Benefits Guide
Dell PowerEdge R920 and Microsoft SQL Server 2014 Migration and Benefits Guide
 
Increased database performance and reduced costs with Dell PowerEdge FX2 & VM...
Increased database performance and reduced costs with Dell PowerEdge FX2 & VM...Increased database performance and reduced costs with Dell PowerEdge FX2 & VM...
Increased database performance and reduced costs with Dell PowerEdge FX2 & VM...
 
Upgrade to Dell EMC PowerEdge R940 servers with VMware vSphere 7.0 and gain g...
Upgrade to Dell EMC PowerEdge R940 servers with VMware vSphere 7.0 and gain g...Upgrade to Dell EMC PowerEdge R940 servers with VMware vSphere 7.0 and gain g...
Upgrade to Dell EMC PowerEdge R940 servers with VMware vSphere 7.0 and gain g...
 
Increasing performance with the Dell PowerEdge FX2 and VMware Virtual SAN
Increasing performance with the Dell PowerEdge FX2 and VMware Virtual SANIncreasing performance with the Dell PowerEdge FX2 and VMware Virtual SAN
Increasing performance with the Dell PowerEdge FX2 and VMware Virtual SAN
 
Virtualize with Confidence
Virtualize with ConfidenceVirtualize with Confidence
Virtualize with Confidence
 
Consolidating Oracle database servers onto Dell PowerEdge R920 running Oracle VM
Consolidating Oracle database servers onto Dell PowerEdge R920 running Oracle VMConsolidating Oracle database servers onto Dell PowerEdge R920 running Oracle VM
Consolidating Oracle database servers onto Dell PowerEdge R920 running Oracle VM
 
Database performance and memory capacity with the Intel Xeon processor E5-266...
Database performance and memory capacity with the Intel Xeon processor E5-266...Database performance and memory capacity with the Intel Xeon processor E5-266...
Database performance and memory capacity with the Intel Xeon processor E5-266...
 
A single-socket Dell EMC PowerEdge R7515 solution delivered better value on a...
A single-socket Dell EMC PowerEdge R7515 solution delivered better value on a...A single-socket Dell EMC PowerEdge R7515 solution delivered better value on a...
A single-socket Dell EMC PowerEdge R7515 solution delivered better value on a...
 
Managing clients with Dell Client Integration Pack 3.0 and Microsoft System C...
Managing clients with Dell Client Integration Pack 3.0 and Microsoft System C...Managing clients with Dell Client Integration Pack 3.0 and Microsoft System C...
Managing clients with Dell Client Integration Pack 3.0 and Microsoft System C...
 
Dell Acceleration Appliance for Databases 2.0 and Microsoft SQL Server 2014: ...
Dell Acceleration Appliance for Databases 2.0 and Microsoft SQL Server 2014: ...Dell Acceleration Appliance for Databases 2.0 and Microsoft SQL Server 2014: ...
Dell Acceleration Appliance for Databases 2.0 and Microsoft SQL Server 2014: ...
 

Ähnlich wie Comparing performance and cost: Dell PowerEdge VRTX with one Dell PowerEdge M830 server vs. a legacy solution

Consolidating Oracle database servers on the Dell PowerEdge R930
Consolidating Oracle database servers on the Dell PowerEdge R930Consolidating Oracle database servers on the Dell PowerEdge R930
Consolidating Oracle database servers on the Dell PowerEdge R930Principled Technologies
 
Increase density and performance with upgrades from Intel and Dell
Increase density and performance with upgrades from Intel and DellIncrease density and performance with upgrades from Intel and Dell
Increase density and performance with upgrades from Intel and DellPrincipled Technologies
 
Consolidating Oracle database servers onto Dell PowerEdge R920 running Oracle...
Consolidating Oracle database servers onto Dell PowerEdge R920 running Oracle...Consolidating Oracle database servers onto Dell PowerEdge R920 running Oracle...
Consolidating Oracle database servers onto Dell PowerEdge R920 running Oracle...Principled Technologies
 
Dell PowerEdge M820 blades: Balancing performance, density, and high availabi...
Dell PowerEdge M820 blades: Balancing performance, density, and high availabi...Dell PowerEdge M820 blades: Balancing performance, density, and high availabi...
Dell PowerEdge M820 blades: Balancing performance, density, and high availabi...Principled Technologies
 
Hardware upgrades to improve database, SharePoint, Exchange, and file server ...
Hardware upgrades to improve database, SharePoint, Exchange, and file server ...Hardware upgrades to improve database, SharePoint, Exchange, and file server ...
Hardware upgrades to improve database, SharePoint, Exchange, and file server ...Principled Technologies
 
Component upgrades from Intel and Dell can increase VM density and boost perf...
Component upgrades from Intel and Dell can increase VM density and boost perf...Component upgrades from Intel and Dell can increase VM density and boost perf...
Component upgrades from Intel and Dell can increase VM density and boost perf...Principled Technologies
 
Run more applications without expanding your datacenter
Run more applications without expanding your datacenterRun more applications without expanding your datacenter
Run more applications without expanding your datacenterPrincipled Technologies
 
Consolidating Web servers with the Dell PowerEdge FX2 enclosure and PowerEdge...
Consolidating Web servers with the Dell PowerEdge FX2 enclosure and PowerEdge...Consolidating Web servers with the Dell PowerEdge FX2 enclosure and PowerEdge...
Consolidating Web servers with the Dell PowerEdge FX2 enclosure and PowerEdge...Principled Technologies
 
Database performance in blade environments: Dell PowerEdge M1000e vs. Cisco U...
Database performance in blade environments: Dell PowerEdge M1000e vs. Cisco U...Database performance in blade environments: Dell PowerEdge M1000e vs. Cisco U...
Database performance in blade environments: Dell PowerEdge M1000e vs. Cisco U...Principled Technologies
 
Consolidate SAS 9.4 workloads with Intel Xeon processor E7 v3 and Intel SSD t...
Consolidate SAS 9.4 workloads with Intel Xeon processor E7 v3 and Intel SSD t...Consolidate SAS 9.4 workloads with Intel Xeon processor E7 v3 and Intel SSD t...
Consolidate SAS 9.4 workloads with Intel Xeon processor E7 v3 and Intel SSD t...Principled Technologies
 
Ensure greater uptime and boost VMware vSAN cluster performance with the Del...
Ensure greater uptime and boost VMware vSAN cluster  performance with the Del...Ensure greater uptime and boost VMware vSAN cluster  performance with the Del...
Ensure greater uptime and boost VMware vSAN cluster performance with the Del...Principled Technologies
 
Server consolidation with the NEC Express5800/A2040b: Power and performance a...
Server consolidation with the NEC Express5800/A2040b: Power and performance a...Server consolidation with the NEC Express5800/A2040b: Power and performance a...
Server consolidation with the NEC Express5800/A2040b: Power and performance a...Principled Technologies
 
Consolidate and upgrade to save up to $172K: Dell PowerEdge R620 and Microso...
Consolidate and upgrade to save up to $172K:  Dell PowerEdge R620 and Microso...Consolidate and upgrade to save up to $172K:  Dell PowerEdge R620 and Microso...
Consolidate and upgrade to save up to $172K: Dell PowerEdge R620 and Microso...Principled Technologies
 
OLTP with Dell hybrid arrays: Comparing the EqualLogic PS6210XS with the Equa...
OLTP with Dell hybrid arrays: Comparing the EqualLogic PS6210XS with the Equa...OLTP with Dell hybrid arrays: Comparing the EqualLogic PS6210XS with the Equa...
OLTP with Dell hybrid arrays: Comparing the EqualLogic PS6210XS with the Equa...Principled Technologies
 
SQL Server 2016 database performance on the Dell PowerEdge R830 QLogic 16G Fi...
SQL Server 2016 database performance on the Dell PowerEdge R830 QLogic 16G Fi...SQL Server 2016 database performance on the Dell PowerEdge R830 QLogic 16G Fi...
SQL Server 2016 database performance on the Dell PowerEdge R830 QLogic 16G Fi...Principled Technologies
 
Upgrade to Dell EMC PowerEdge R6515 servers and gain better OLTP and VDI perf...
Upgrade to Dell EMC PowerEdge R6515 servers and gain better OLTP and VDI perf...Upgrade to Dell EMC PowerEdge R6515 servers and gain better OLTP and VDI perf...
Upgrade to Dell EMC PowerEdge R6515 servers and gain better OLTP and VDI perf...Principled Technologies
 
Elevate your e-commerce business by upgrading to the Dell EMC PowerEdge R740x...
Elevate your e-commerce business by upgrading to the Dell EMC PowerEdge R740x...Elevate your e-commerce business by upgrading to the Dell EMC PowerEdge R740x...
Elevate your e-commerce business by upgrading to the Dell EMC PowerEdge R740x...Principled Technologies
 
Get stronger SQL Server performance for less with Dell EMC PowerEdge R6515 cl...
Get stronger SQL Server performance for less with Dell EMC PowerEdge R6515 cl...Get stronger SQL Server performance for less with Dell EMC PowerEdge R6515 cl...
Get stronger SQL Server performance for less with Dell EMC PowerEdge R6515 cl...Principled Technologies
 
Enable greater data reduction, storage performance, and manageability with De...
Enable greater data reduction, storage performance, and manageability with De...Enable greater data reduction, storage performance, and manageability with De...
Enable greater data reduction, storage performance, and manageability with De...Principled Technologies
 

Ähnlich wie Comparing performance and cost: Dell PowerEdge VRTX with one Dell PowerEdge M830 server vs. a legacy solution (20)

Consolidating Oracle database servers on the Dell PowerEdge R930
Consolidating Oracle database servers on the Dell PowerEdge R930Consolidating Oracle database servers on the Dell PowerEdge R930
Consolidating Oracle database servers on the Dell PowerEdge R930
 
Increase density and performance with upgrades from Intel and Dell
Increase density and performance with upgrades from Intel and DellIncrease density and performance with upgrades from Intel and Dell
Increase density and performance with upgrades from Intel and Dell
 
Consolidating Oracle database servers onto Dell PowerEdge R920 running Oracle...
Consolidating Oracle database servers onto Dell PowerEdge R920 running Oracle...Consolidating Oracle database servers onto Dell PowerEdge R920 running Oracle...
Consolidating Oracle database servers onto Dell PowerEdge R920 running Oracle...
 
Dell PowerEdge M820 blades: Balancing performance, density, and high availabi...
Dell PowerEdge M820 blades: Balancing performance, density, and high availabi...Dell PowerEdge M820 blades: Balancing performance, density, and high availabi...
Dell PowerEdge M820 blades: Balancing performance, density, and high availabi...
 
Hardware upgrades to improve database, SharePoint, Exchange, and file server ...
Hardware upgrades to improve database, SharePoint, Exchange, and file server ...Hardware upgrades to improve database, SharePoint, Exchange, and file server ...
Hardware upgrades to improve database, SharePoint, Exchange, and file server ...
 
Component upgrades from Intel and Dell can increase VM density and boost perf...
Component upgrades from Intel and Dell can increase VM density and boost perf...Component upgrades from Intel and Dell can increase VM density and boost perf...
Component upgrades from Intel and Dell can increase VM density and boost perf...
 
Run more applications without expanding your datacenter
Run more applications without expanding your datacenterRun more applications without expanding your datacenter
Run more applications without expanding your datacenter
 
Consolidating Web servers with the Dell PowerEdge FX2 enclosure and PowerEdge...
Consolidating Web servers with the Dell PowerEdge FX2 enclosure and PowerEdge...Consolidating Web servers with the Dell PowerEdge FX2 enclosure and PowerEdge...
Consolidating Web servers with the Dell PowerEdge FX2 enclosure and PowerEdge...
 
Database performance in blade environments: Dell PowerEdge M1000e vs. Cisco U...
Database performance in blade environments: Dell PowerEdge M1000e vs. Cisco U...Database performance in blade environments: Dell PowerEdge M1000e vs. Cisco U...
Database performance in blade environments: Dell PowerEdge M1000e vs. Cisco U...
 
Consolidate SAS 9.4 workloads with Intel Xeon processor E7 v3 and Intel SSD t...
Consolidate SAS 9.4 workloads with Intel Xeon processor E7 v3 and Intel SSD t...Consolidate SAS 9.4 workloads with Intel Xeon processor E7 v3 and Intel SSD t...
Consolidate SAS 9.4 workloads with Intel Xeon processor E7 v3 and Intel SSD t...
 
Power edge mx7000_sds_performance_1018
Power edge mx7000_sds_performance_1018Power edge mx7000_sds_performance_1018
Power edge mx7000_sds_performance_1018
 
Ensure greater uptime and boost VMware vSAN cluster performance with the Del...
Ensure greater uptime and boost VMware vSAN cluster  performance with the Del...Ensure greater uptime and boost VMware vSAN cluster  performance with the Del...
Ensure greater uptime and boost VMware vSAN cluster performance with the Del...
 
Server consolidation with the NEC Express5800/A2040b: Power and performance a...
Server consolidation with the NEC Express5800/A2040b: Power and performance a...Server consolidation with the NEC Express5800/A2040b: Power and performance a...
Server consolidation with the NEC Express5800/A2040b: Power and performance a...
 
Consolidate and upgrade to save up to $172K: Dell PowerEdge R620 and Microso...
Consolidate and upgrade to save up to $172K:  Dell PowerEdge R620 and Microso...Consolidate and upgrade to save up to $172K:  Dell PowerEdge R620 and Microso...
Consolidate and upgrade to save up to $172K: Dell PowerEdge R620 and Microso...
 
OLTP with Dell hybrid arrays: Comparing the EqualLogic PS6210XS with the Equa...
OLTP with Dell hybrid arrays: Comparing the EqualLogic PS6210XS with the Equa...OLTP with Dell hybrid arrays: Comparing the EqualLogic PS6210XS with the Equa...
OLTP with Dell hybrid arrays: Comparing the EqualLogic PS6210XS with the Equa...
 
SQL Server 2016 database performance on the Dell PowerEdge R830 QLogic 16G Fi...
SQL Server 2016 database performance on the Dell PowerEdge R830 QLogic 16G Fi...SQL Server 2016 database performance on the Dell PowerEdge R830 QLogic 16G Fi...
SQL Server 2016 database performance on the Dell PowerEdge R830 QLogic 16G Fi...
 
Upgrade to Dell EMC PowerEdge R6515 servers and gain better OLTP and VDI perf...
Upgrade to Dell EMC PowerEdge R6515 servers and gain better OLTP and VDI perf...Upgrade to Dell EMC PowerEdge R6515 servers and gain better OLTP and VDI perf...
Upgrade to Dell EMC PowerEdge R6515 servers and gain better OLTP and VDI perf...
 
Elevate your e-commerce business by upgrading to the Dell EMC PowerEdge R740x...
Elevate your e-commerce business by upgrading to the Dell EMC PowerEdge R740x...Elevate your e-commerce business by upgrading to the Dell EMC PowerEdge R740x...
Elevate your e-commerce business by upgrading to the Dell EMC PowerEdge R740x...
 
Get stronger SQL Server performance for less with Dell EMC PowerEdge R6515 cl...
Get stronger SQL Server performance for less with Dell EMC PowerEdge R6515 cl...Get stronger SQL Server performance for less with Dell EMC PowerEdge R6515 cl...
Get stronger SQL Server performance for less with Dell EMC PowerEdge R6515 cl...
 
Enable greater data reduction, storage performance, and manageability with De...
Enable greater data reduction, storage performance, and manageability with De...Enable greater data reduction, storage performance, and manageability with De...
Enable greater data reduction, storage performance, and manageability with De...
 

Mehr von Principled Technologies

Boost PC performance: How more available memory can improve productivity
Boost PC performance: How more available memory can improve productivityBoost PC performance: How more available memory can improve productivity
Boost PC performance: How more available memory can improve productivityPrincipled Technologies
 
Deploy with confidence: VMware Cloud Foundation 5.1 on next gen Dell PowerEdg...
Deploy with confidence: VMware Cloud Foundation 5.1 on next gen Dell PowerEdg...Deploy with confidence: VMware Cloud Foundation 5.1 on next gen Dell PowerEdg...
Deploy with confidence: VMware Cloud Foundation 5.1 on next gen Dell PowerEdg...Principled Technologies
 
Realize 2.1X the performance with 20% less power with AMD EPYC processor-back...
Realize 2.1X the performance with 20% less power with AMD EPYC processor-back...Realize 2.1X the performance with 20% less power with AMD EPYC processor-back...
Realize 2.1X the performance with 20% less power with AMD EPYC processor-back...Principled Technologies
 
Upgrade your cloud infrastructure with Dell PowerEdge R760 servers and VMware...
Upgrade your cloud infrastructure with Dell PowerEdge R760 servers and VMware...Upgrade your cloud infrastructure with Dell PowerEdge R760 servers and VMware...
Upgrade your cloud infrastructure with Dell PowerEdge R760 servers and VMware...Principled Technologies
 
A comparison of security features in Dell, HP, and Lenovo PC systems
A comparison of security features in Dell, HP, and Lenovo PC systemsA comparison of security features in Dell, HP, and Lenovo PC systems
A comparison of security features in Dell, HP, and Lenovo PC systemsPrincipled Technologies
 
Increase security, sustainability, and efficiency with robust Dell server man...
Increase security, sustainability, and efficiency with robust Dell server man...Increase security, sustainability, and efficiency with robust Dell server man...
Increase security, sustainability, and efficiency with robust Dell server man...Principled Technologies
 
Scale up your storage with higher-performing Dell APEX Block Storage for AWS ...
Scale up your storage with higher-performing Dell APEX Block Storage for AWS ...Scale up your storage with higher-performing Dell APEX Block Storage for AWS ...
Scale up your storage with higher-performing Dell APEX Block Storage for AWS ...Principled Technologies
 
Scale up your storage with higher-performing Dell APEX Block Storage for AWS
Scale up your storage with higher-performing Dell APEX Block Storage for AWSScale up your storage with higher-performing Dell APEX Block Storage for AWS
Scale up your storage with higher-performing Dell APEX Block Storage for AWSPrincipled Technologies
 
Get in and stay in the productivity zone with the HP Z2 G9 Tower Workstation
Get in and stay in the productivity zone with the HP Z2 G9 Tower WorkstationGet in and stay in the productivity zone with the HP Z2 G9 Tower Workstation
Get in and stay in the productivity zone with the HP Z2 G9 Tower WorkstationPrincipled Technologies
 
Open up new possibilities with higher transactional database performance from...
Open up new possibilities with higher transactional database performance from...Open up new possibilities with higher transactional database performance from...
Open up new possibilities with higher transactional database performance from...Principled Technologies
 
Improving database performance and value with an easy migration to Azure Data...
Improving database performance and value with an easy migration to Azure Data...Improving database performance and value with an easy migration to Azure Data...
Improving database performance and value with an easy migration to Azure Data...Principled Technologies
 
Realize better value and performance migrating from Azure Database for Postgr...
Realize better value and performance migrating from Azure Database for Postgr...Realize better value and performance migrating from Azure Database for Postgr...
Realize better value and performance migrating from Azure Database for Postgr...Principled Technologies
 
Set up students and teachers to excel now and in the future with Intel proces...
Set up students and teachers to excel now and in the future with Intel proces...Set up students and teachers to excel now and in the future with Intel proces...
Set up students and teachers to excel now and in the future with Intel proces...Principled Technologies
 
Finding the path to AI success with the Dell AI portfolio - Summary
Finding the path to AI success with the Dell AI portfolio - SummaryFinding the path to AI success with the Dell AI portfolio - Summary
Finding the path to AI success with the Dell AI portfolio - SummaryPrincipled Technologies
 
Finding the path to AI success with the Dell AI portfolio
Finding the path to AI success with the Dell AI portfolioFinding the path to AI success with the Dell AI portfolio
Finding the path to AI success with the Dell AI portfolioPrincipled Technologies
 
Achieve strong performance and value on Azure SQL Database Hyperscale
Achieve strong performance and value on Azure SQL Database HyperscaleAchieve strong performance and value on Azure SQL Database Hyperscale
Achieve strong performance and value on Azure SQL Database HyperscalePrincipled Technologies
 
Improve backup and recovery outcomes by combining Dell APEX Data Storage Serv...
Improve backup and recovery outcomes by combining Dell APEX Data Storage Serv...Improve backup and recovery outcomes by combining Dell APEX Data Storage Serv...
Improve backup and recovery outcomes by combining Dell APEX Data Storage Serv...Principled Technologies
 

Mehr von Principled Technologies (20)

Boost PC performance: How more available memory can improve productivity
Boost PC performance: How more available memory can improve productivityBoost PC performance: How more available memory can improve productivity
Boost PC performance: How more available memory can improve productivity
 
Deploy with confidence: VMware Cloud Foundation 5.1 on next gen Dell PowerEdg...
Deploy with confidence: VMware Cloud Foundation 5.1 on next gen Dell PowerEdg...Deploy with confidence: VMware Cloud Foundation 5.1 on next gen Dell PowerEdg...
Deploy with confidence: VMware Cloud Foundation 5.1 on next gen Dell PowerEdg...
 
Realize 2.1X the performance with 20% less power with AMD EPYC processor-back...
Realize 2.1X the performance with 20% less power with AMD EPYC processor-back...Realize 2.1X the performance with 20% less power with AMD EPYC processor-back...
Realize 2.1X the performance with 20% less power with AMD EPYC processor-back...
 
Upgrade your cloud infrastructure with Dell PowerEdge R760 servers and VMware...
Upgrade your cloud infrastructure with Dell PowerEdge R760 servers and VMware...Upgrade your cloud infrastructure with Dell PowerEdge R760 servers and VMware...
Upgrade your cloud infrastructure with Dell PowerEdge R760 servers and VMware...
 
A comparison of security features in Dell, HP, and Lenovo PC systems
A comparison of security features in Dell, HP, and Lenovo PC systemsA comparison of security features in Dell, HP, and Lenovo PC systems
A comparison of security features in Dell, HP, and Lenovo PC systems
 
Increase security, sustainability, and efficiency with robust Dell server man...
Increase security, sustainability, and efficiency with robust Dell server man...Increase security, sustainability, and efficiency with robust Dell server man...
Increase security, sustainability, and efficiency with robust Dell server man...
 
Increase security, sustainability, and efficiency with robust Dell server man...
Increase security, sustainability, and efficiency with robust Dell server man...Increase security, sustainability, and efficiency with robust Dell server man...
Increase security, sustainability, and efficiency with robust Dell server man...
 
Scale up your storage with higher-performing Dell APEX Block Storage for AWS ...
Scale up your storage with higher-performing Dell APEX Block Storage for AWS ...Scale up your storage with higher-performing Dell APEX Block Storage for AWS ...
Scale up your storage with higher-performing Dell APEX Block Storage for AWS ...
 
Scale up your storage with higher-performing Dell APEX Block Storage for AWS
Scale up your storage with higher-performing Dell APEX Block Storage for AWSScale up your storage with higher-performing Dell APEX Block Storage for AWS
Scale up your storage with higher-performing Dell APEX Block Storage for AWS
 
Get in and stay in the productivity zone with the HP Z2 G9 Tower Workstation
Get in and stay in the productivity zone with the HP Z2 G9 Tower WorkstationGet in and stay in the productivity zone with the HP Z2 G9 Tower Workstation
Get in and stay in the productivity zone with the HP Z2 G9 Tower Workstation
 
Open up new possibilities with higher transactional database performance from...
Open up new possibilities with higher transactional database performance from...Open up new possibilities with higher transactional database performance from...
Open up new possibilities with higher transactional database performance from...
 
Improving database performance and value with an easy migration to Azure Data...
Improving database performance and value with an easy migration to Azure Data...Improving database performance and value with an easy migration to Azure Data...
Improving database performance and value with an easy migration to Azure Data...
 
Realize better value and performance migrating from Azure Database for Postgr...
Realize better value and performance migrating from Azure Database for Postgr...Realize better value and performance migrating from Azure Database for Postgr...
Realize better value and performance migrating from Azure Database for Postgr...
 
Realize better value and performance migrating from Azure Database for Postgr...
Realize better value and performance migrating from Azure Database for Postgr...Realize better value and performance migrating from Azure Database for Postgr...
Realize better value and performance migrating from Azure Database for Postgr...
 
Set up students and teachers to excel now and in the future with Intel proces...
Set up students and teachers to excel now and in the future with Intel proces...Set up students and teachers to excel now and in the future with Intel proces...
Set up students and teachers to excel now and in the future with Intel proces...
 
Finding the path to AI success with the Dell AI portfolio - Summary
Finding the path to AI success with the Dell AI portfolio - SummaryFinding the path to AI success with the Dell AI portfolio - Summary
Finding the path to AI success with the Dell AI portfolio - Summary
 
Finding the path to AI success with the Dell AI portfolio
Finding the path to AI success with the Dell AI portfolioFinding the path to AI success with the Dell AI portfolio
Finding the path to AI success with the Dell AI portfolio
 
Achieve strong performance and value on Azure SQL Database Hyperscale
Achieve strong performance and value on Azure SQL Database HyperscaleAchieve strong performance and value on Azure SQL Database Hyperscale
Achieve strong performance and value on Azure SQL Database Hyperscale
 
Improve backup and recovery outcomes by combining Dell APEX Data Storage Serv...
Improve backup and recovery outcomes by combining Dell APEX Data Storage Serv...Improve backup and recovery outcomes by combining Dell APEX Data Storage Serv...
Improve backup and recovery outcomes by combining Dell APEX Data Storage Serv...
 
Improve backup and recovery outcomes by combining Dell APEX Data Storage Serv...
Improve backup and recovery outcomes by combining Dell APEX Data Storage Serv...Improve backup and recovery outcomes by combining Dell APEX Data Storage Serv...
Improve backup and recovery outcomes by combining Dell APEX Data Storage Serv...
 

Kürzlich hochgeladen

Kalyanpur ) Call Girls in Lucknow Finest Escorts Service 🍸 8923113531 🎰 Avail...
Kalyanpur ) Call Girls in Lucknow Finest Escorts Service 🍸 8923113531 🎰 Avail...Kalyanpur ) Call Girls in Lucknow Finest Escorts Service 🍸 8923113531 🎰 Avail...
Kalyanpur ) Call Girls in Lucknow Finest Escorts Service 🍸 8923113531 🎰 Avail...gurkirankumar98700
 
CNv6 Instructor Chapter 6 Quality of Service
CNv6 Instructor Chapter 6 Quality of ServiceCNv6 Instructor Chapter 6 Quality of Service
CNv6 Instructor Chapter 6 Quality of Servicegiselly40
 
Tata AIG General Insurance Company - Insurer Innovation Award 2024
Tata AIG General Insurance Company - Insurer Innovation Award 2024Tata AIG General Insurance Company - Insurer Innovation Award 2024
Tata AIG General Insurance Company - Insurer Innovation Award 2024The Digital Insurer
 
The Role of Taxonomy and Ontology in Semantic Layers - Heather Hedden.pdf
The Role of Taxonomy and Ontology in Semantic Layers - Heather Hedden.pdfThe Role of Taxonomy and Ontology in Semantic Layers - Heather Hedden.pdf
The Role of Taxonomy and Ontology in Semantic Layers - Heather Hedden.pdfEnterprise Knowledge
 
Injustice - Developers Among Us (SciFiDevCon 2024)
Injustice - Developers Among Us (SciFiDevCon 2024)Injustice - Developers Among Us (SciFiDevCon 2024)
Injustice - Developers Among Us (SciFiDevCon 2024)Allon Mureinik
 
EIS-Webinar-Prompt-Knowledge-Eng-2024-04-08.pptx
EIS-Webinar-Prompt-Knowledge-Eng-2024-04-08.pptxEIS-Webinar-Prompt-Knowledge-Eng-2024-04-08.pptx
EIS-Webinar-Prompt-Knowledge-Eng-2024-04-08.pptxEarley Information Science
 
Developing An App To Navigate The Roads of Brazil
Developing An App To Navigate The Roads of BrazilDeveloping An App To Navigate The Roads of Brazil
Developing An App To Navigate The Roads of BrazilV3cube
 
TrustArc Webinar - Stay Ahead of US State Data Privacy Law Developments
TrustArc Webinar - Stay Ahead of US State Data Privacy Law DevelopmentsTrustArc Webinar - Stay Ahead of US State Data Privacy Law Developments
TrustArc Webinar - Stay Ahead of US State Data Privacy Law DevelopmentsTrustArc
 
The Codex of Business Writing Software for Real-World Solutions 2.pptx
The Codex of Business Writing Software for Real-World Solutions 2.pptxThe Codex of Business Writing Software for Real-World Solutions 2.pptx
The Codex of Business Writing Software for Real-World Solutions 2.pptxMalak Abu Hammad
 
Data Cloud, More than a CDP by Matt Robison
Data Cloud, More than a CDP by Matt RobisonData Cloud, More than a CDP by Matt Robison
Data Cloud, More than a CDP by Matt RobisonAnna Loughnan Colquhoun
 
Automating Google Workspace (GWS) & more with Apps Script
Automating Google Workspace (GWS) & more with Apps ScriptAutomating Google Workspace (GWS) & more with Apps Script
Automating Google Workspace (GWS) & more with Apps Scriptwesley chun
 
Mastering MySQL Database Architecture: Deep Dive into MySQL Shell and MySQL R...
Mastering MySQL Database Architecture: Deep Dive into MySQL Shell and MySQL R...Mastering MySQL Database Architecture: Deep Dive into MySQL Shell and MySQL R...
Mastering MySQL Database Architecture: Deep Dive into MySQL Shell and MySQL R...Miguel Araújo
 
Histor y of HAM Radio presentation slide
Histor y of HAM Radio presentation slideHistor y of HAM Radio presentation slide
Histor y of HAM Radio presentation slidevu2urc
 
WhatsApp 9892124323 ✓Call Girls In Kalyan ( Mumbai ) secure service
WhatsApp 9892124323 ✓Call Girls In Kalyan ( Mumbai ) secure serviceWhatsApp 9892124323 ✓Call Girls In Kalyan ( Mumbai ) secure service
WhatsApp 9892124323 ✓Call Girls In Kalyan ( Mumbai ) secure servicePooja Nehwal
 
Scaling API-first – The story of a global engineering organization
Scaling API-first – The story of a global engineering organizationScaling API-first – The story of a global engineering organization
Scaling API-first – The story of a global engineering organizationRadu Cotescu
 
From Event to Action: Accelerate Your Decision Making with Real-Time Automation
From Event to Action: Accelerate Your Decision Making with Real-Time AutomationFrom Event to Action: Accelerate Your Decision Making with Real-Time Automation
From Event to Action: Accelerate Your Decision Making with Real-Time AutomationSafe Software
 
A Call to Action for Generative AI in 2024
A Call to Action for Generative AI in 2024A Call to Action for Generative AI in 2024
A Call to Action for Generative AI in 2024Results
 
Workshop - Best of Both Worlds_ Combine KG and Vector search for enhanced R...
Workshop - Best of Both Worlds_ Combine  KG and Vector search for  enhanced R...Workshop - Best of Both Worlds_ Combine  KG and Vector search for  enhanced R...
Workshop - Best of Both Worlds_ Combine KG and Vector search for enhanced R...Neo4j
 
Neo4j - How KGs are shaping the future of Generative AI at AWS Summit London ...
Neo4j - How KGs are shaping the future of Generative AI at AWS Summit London ...Neo4j - How KGs are shaping the future of Generative AI at AWS Summit London ...
Neo4j - How KGs are shaping the future of Generative AI at AWS Summit London ...Neo4j
 
08448380779 Call Girls In Diplomatic Enclave Women Seeking Men
08448380779 Call Girls In Diplomatic Enclave Women Seeking Men08448380779 Call Girls In Diplomatic Enclave Women Seeking Men
08448380779 Call Girls In Diplomatic Enclave Women Seeking MenDelhi Call girls
 

Kürzlich hochgeladen (20)

Kalyanpur ) Call Girls in Lucknow Finest Escorts Service 🍸 8923113531 🎰 Avail...
Kalyanpur ) Call Girls in Lucknow Finest Escorts Service 🍸 8923113531 🎰 Avail...Kalyanpur ) Call Girls in Lucknow Finest Escorts Service 🍸 8923113531 🎰 Avail...
Kalyanpur ) Call Girls in Lucknow Finest Escorts Service 🍸 8923113531 🎰 Avail...
 
CNv6 Instructor Chapter 6 Quality of Service
CNv6 Instructor Chapter 6 Quality of ServiceCNv6 Instructor Chapter 6 Quality of Service
CNv6 Instructor Chapter 6 Quality of Service
 
Tata AIG General Insurance Company - Insurer Innovation Award 2024
Tata AIG General Insurance Company - Insurer Innovation Award 2024Tata AIG General Insurance Company - Insurer Innovation Award 2024
Tata AIG General Insurance Company - Insurer Innovation Award 2024
 
The Role of Taxonomy and Ontology in Semantic Layers - Heather Hedden.pdf
The Role of Taxonomy and Ontology in Semantic Layers - Heather Hedden.pdfThe Role of Taxonomy and Ontology in Semantic Layers - Heather Hedden.pdf
The Role of Taxonomy and Ontology in Semantic Layers - Heather Hedden.pdf
 
Injustice - Developers Among Us (SciFiDevCon 2024)
Injustice - Developers Among Us (SciFiDevCon 2024)Injustice - Developers Among Us (SciFiDevCon 2024)
Injustice - Developers Among Us (SciFiDevCon 2024)
 
EIS-Webinar-Prompt-Knowledge-Eng-2024-04-08.pptx
EIS-Webinar-Prompt-Knowledge-Eng-2024-04-08.pptxEIS-Webinar-Prompt-Knowledge-Eng-2024-04-08.pptx
EIS-Webinar-Prompt-Knowledge-Eng-2024-04-08.pptx
 
Developing An App To Navigate The Roads of Brazil
Developing An App To Navigate The Roads of BrazilDeveloping An App To Navigate The Roads of Brazil
Developing An App To Navigate The Roads of Brazil
 
TrustArc Webinar - Stay Ahead of US State Data Privacy Law Developments
TrustArc Webinar - Stay Ahead of US State Data Privacy Law DevelopmentsTrustArc Webinar - Stay Ahead of US State Data Privacy Law Developments
TrustArc Webinar - Stay Ahead of US State Data Privacy Law Developments
 
The Codex of Business Writing Software for Real-World Solutions 2.pptx
The Codex of Business Writing Software for Real-World Solutions 2.pptxThe Codex of Business Writing Software for Real-World Solutions 2.pptx
The Codex of Business Writing Software for Real-World Solutions 2.pptx
 
Data Cloud, More than a CDP by Matt Robison
Data Cloud, More than a CDP by Matt RobisonData Cloud, More than a CDP by Matt Robison
Data Cloud, More than a CDP by Matt Robison
 
Automating Google Workspace (GWS) & more with Apps Script
Automating Google Workspace (GWS) & more with Apps ScriptAutomating Google Workspace (GWS) & more with Apps Script
Automating Google Workspace (GWS) & more with Apps Script
 
Mastering MySQL Database Architecture: Deep Dive into MySQL Shell and MySQL R...
Mastering MySQL Database Architecture: Deep Dive into MySQL Shell and MySQL R...Mastering MySQL Database Architecture: Deep Dive into MySQL Shell and MySQL R...
Mastering MySQL Database Architecture: Deep Dive into MySQL Shell and MySQL R...
 
Histor y of HAM Radio presentation slide
Histor y of HAM Radio presentation slideHistor y of HAM Radio presentation slide
Histor y of HAM Radio presentation slide
 
WhatsApp 9892124323 ✓Call Girls In Kalyan ( Mumbai ) secure service
WhatsApp 9892124323 ✓Call Girls In Kalyan ( Mumbai ) secure serviceWhatsApp 9892124323 ✓Call Girls In Kalyan ( Mumbai ) secure service
WhatsApp 9892124323 ✓Call Girls In Kalyan ( Mumbai ) secure service
 
Scaling API-first – The story of a global engineering organization
Scaling API-first – The story of a global engineering organizationScaling API-first – The story of a global engineering organization
Scaling API-first – The story of a global engineering organization
 
From Event to Action: Accelerate Your Decision Making with Real-Time Automation
From Event to Action: Accelerate Your Decision Making with Real-Time AutomationFrom Event to Action: Accelerate Your Decision Making with Real-Time Automation
From Event to Action: Accelerate Your Decision Making with Real-Time Automation
 
A Call to Action for Generative AI in 2024
A Call to Action for Generative AI in 2024A Call to Action for Generative AI in 2024
A Call to Action for Generative AI in 2024
 
Workshop - Best of Both Worlds_ Combine KG and Vector search for enhanced R...
Workshop - Best of Both Worlds_ Combine  KG and Vector search for  enhanced R...Workshop - Best of Both Worlds_ Combine  KG and Vector search for  enhanced R...
Workshop - Best of Both Worlds_ Combine KG and Vector search for enhanced R...
 
Neo4j - How KGs are shaping the future of Generative AI at AWS Summit London ...
Neo4j - How KGs are shaping the future of Generative AI at AWS Summit London ...Neo4j - How KGs are shaping the future of Generative AI at AWS Summit London ...
Neo4j - How KGs are shaping the future of Generative AI at AWS Summit London ...
 
08448380779 Call Girls In Diplomatic Enclave Women Seeking Men
08448380779 Call Girls In Diplomatic Enclave Women Seeking Men08448380779 Call Girls In Diplomatic Enclave Women Seeking Men
08448380779 Call Girls In Diplomatic Enclave Women Seeking Men
 

Comparing performance and cost: Dell PowerEdge VRTX with one Dell PowerEdge M830 server vs. a legacy solution

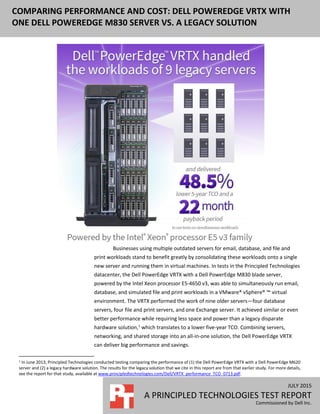
  • 1. JULY 2015 A PRINCIPLED TECHNOLOGIES TEST REPORT Commissioned by Dell Inc. COMPARING PERFORMANCE AND COST: DELL POWEREDGE VRTX WITH ONE DELL POWEREDGE M830 SERVER VS. A LEGACY SOLUTION 0 SERVER NODES VS. A LEGACY SOLUTION Businesses using multiple outdated servers for email, database, and file and print workloads stand to benefit greatly by consolidating these workloads onto a single new server and running them in virtual machines. In tests in the Principled Technologies datacenter, the Dell PowerEdge VRTX with a Dell PowerEdge M830 blade server, powered by the Intel Xeon processor E5-4650 v3, was able to simultaneously run email, database, and simulated file and print workloads in a VMware® vSphere® ™ virtual environment. The VRTX performed the work of nine older servers—four database servers, four file and print servers, and one Exchange server. It achieved similar or even better performance while requiring less space and power than a legacy disparate hardware solution,1 which translates to a lower five-year TCO. Combining servers, networking, and shared storage into an all-in-one solution, the Dell PowerEdge VRTX can deliver big performance and savings. 1 In June 2013, Principled Technologies conducted testing comparing the performance of (1) the Dell PowerEdge VRTX with a Dell PowerEdge M620 server and (2) a legacy hardware solution. The results for the legacy solution that we cite in this report are from that earlier study. For more details, see the report for that study, available at www.principledtechnologies.com/Dell/VRTX_performance_TCO_0713.pdf.
  • 2. A Principled Technologies test report 2Comparing performance and cost: Dell PowerEdge VRTX with one Dell PowerEdge M830 server vs. a legacy solution REPLACE NINE OLDER SERVERS WITH ONE DELL POWEREDGE VRTX We compared the performance, power consumption, space, and cost of running typical office applications (email, database, and file/print server) on the following solutions:  A Dell PowerEdge VRTX with a Dell PowerEdge M830 server powered by the Intel Xeon processor E5-4650 v3, running VMware vSphere 5.5 with 10 Microsoft® Windows Server® 2012 R2 virtual machines (VMs) – four running SQL Server® 2014, four acting as file/print servers, and two running a single Exchange Server 2013 environment.  A legacy disparate hardware solution consisting of older HP tower servers, a NETGEAR® switch, and an HP storage appliance. The legacy tower servers all ran bare metal instances of Windows Server 2012. One ran SQL Server 2012, another ran a dedicated file/print server, and the last ran Exchange Server 2010. By virtualizing four of the SQL workloads and four of the file/print simulated workloads, we extrapolated the consolidation to nine legacy servers. We ran three benchmarks simultaneously to exercise the email, database, and file and print applications all at once. The performance of the legacy hardware solution we discuss in this report is from a June 2013 Principled Technologies study (available at www.principledtechnologies.com/Dell/VRTX_performance_TCO_0713.pdf).2 For this study, we ran multiples of the SQL Server and simulated file/print servers to demonstrate a consolidation scenario and show an even bigger savings. We also measured the power consumption of the Dell PowerEdge VRTX and the legacy solution while idle and during the simultaneous workloads. For detailed configuration information about the solutions we tested, see Appendix A. For testing details, including the increased workload parameters we used, see Appendix B. For detailed test results, see Appendix C. 2 For our 2013 study, we tested only three servers: one running SQL Server 2012, one running as a dedicated file/print server, and one running Exchange Server 2010.
  • 3. A Principled Technologies test report 3Comparing performance and cost: Dell PowerEdge VRTX with one Dell PowerEdge M830 server vs. a legacy solution Dell PowerEdge VRTX with the Intel Xeon processor E5-4650 v3 optimized application performance while reducing power consumption and providing headroom for future growth Database performance As Figure 1 shows, during our test running three workloads at the same time, each of the four database VMs we ran on the Dell PowerEdge VRTX with the Intel Xeon processor E5-4650 v3-powered Dell PowerEdge M830 server outperformed a single database server in our legacy disparate hardware solution. This means the VRTX solution would be able to replace the four legacy database servers and deliver even more database orders per minute per VM. For this test, we upgraded from SQL Server 2012, which we ran on the legacy database servers, to SQL Server 2014 to reflect the newer technology now available. Figure 1: While running simultaneous email, database, and simulated file and print workloads, each database VM on the Dell PowerEdge VRTX with an Intel processor- powered Dell PowerEdge M830 server delivered 8.0 percent greater database performance than a single server in the legacy disparate hardware solution. Figure 2 compares the performance of all four database VMs on the Dell PowerEdge VRTX with an Intel processor-powered Dell PowerEdge M830 server to the performance of the one legacy database server. As it shows, one Dell PowerEdge VRTX with an Intel processor-powered Dell PowerEdge M830 server delivered 4.3 times as many orders per minute as a single legacy server.
  • 4. A Principled Technologies test report 4Comparing performance and cost: Dell PowerEdge VRTX with one Dell PowerEdge M830 server vs. a legacy solution Figure 2: While running simultaneous email, database, and simulated file and print workloads, the four database VMs on the Dell PowerEdge VRTX with an Intel processor- powered Dell PowerEdge M830 server delivered total of 8,872 OPM, 4.3 times the database performance of a single server in the legacy disparate hardware solution. Simulated file and print performance As Figure 3 shows, during our test running three workloads at the same time, each of the four simulated file and print VMs we ran on the Dell PowerEdge VRTX with the Intel Xeon processor E5-4650 v3-powered Dell PowerEdge M830 server outperformed a single file and print server in our legacy disparate hardware solution. This means the VRTX solution would be able to replace the four legacy file and print servers and deliver even greater performance. Instead of pushing the systems to the maximum, we ran the utility at a low level of targeted IOPs to simulate a typical business. Figure 3: While running simultaneous email, database, and simulated file and print workloads, each file and print VM on the Dell PowerEdge VRTX with an Intel processor-powered Dell PowerEdge M830 server delivered 17.9 percent greater file and print performance than a single server in the legacy disparate hardware solution.
  • 5. A Principled Technologies test report 5Comparing performance and cost: Dell PowerEdge VRTX with one Dell PowerEdge M830 server vs. a legacy solution Exchange For the email server we ran on the Dell PowerEdge VRTX, we upgraded from Exchange 2010 to Exchange 2013 and from Microsoft Load Generator 2010 to LoadGen 2013. While we cannot directly compare the results from these two test scenarios due to the differences between the two versions of Exchange, we compared the latency, or response time, in milliseconds to learn about their relative performance. We found that though latencies increased slightly—from 1.5 milliseconds on the legacy solution to 2.9 milliseconds on the new solution—they remained well within the average latency threshold of 50 milliseconds that Microsoft sets. Increased load on the storage from the additional workloads running simultaneously could account for the increase in latency. However, such a small increase would not likely be noticeable to end users. Power consumption The compact Intel Xeon processor E5-4650 v3-powered Dell PowerEdge M830 with Dell PowerEdge VRTX not only supported more work than the legacy tower solution with nine servers, it also used significantly less power while under heavier load thanks to Dell’s performance-per-watt system power management policy. As Figure 4 shows, the Dell PowerEdge M830 server with Dell PowerEdge VRTX used 67.3 percent less power while running our three simultaneous workloads than the legacy disparate hardware solution did. This reduced consumption can translate directly to savings. Figure 4: The Dell PowerEdge VRTX with an Intel processor- powered Dell PowerEdge M830 server used less power while running simultaneous (and more robust) workloads than the legacy disparate hardware solution did. In our tests, we used a Dell PowerEdge VRTX with only one server compared to the simulated nine physical servers in the legacy hardware solution. Adding server nodes and more or faster drives to the shared storage may achieve greater performance gains, though the current configuration still had plenty of room for growth. Additionally, adding new application VMs to your VMware vSphere environment may give the Intel
  • 6. A Principled Technologies test report 6Comparing performance and cost: Dell PowerEdge VRTX with one Dell PowerEdge M830 server vs. a legacy solution Xeon processor E5-4650 v3-powered Dell PowerEdge VRTX solution scalability and room to grow as the demands of your business continue to increase. With a legacy disparate hardware solution, achieving similar results may require purchasing additional servers that take up more space and consume more power. Reduced space and physical complexity In addition to the extra space that legacy disparate hardware solutions encompass, they often have a great deal of complexity when it comes to hardware pieces and cabling. If your business’ location has premium square footage value, accommodating your legacy solution can mean sacrificing precious space. The Dell PowerEdge VRTX is a compact all-in-one solution that fits easily under a desk and uses minimal cabling because the solution resides in one chassis. Though the solution is unlikely to be in a server rack in a small or remote office, we looked at the rack-equivalent space each solution would occupy to make a universal size comparison. We found that the Dell PowerEdge VRTX solution would fit into just 5U of rack-equivalent space—an 88.6 percent reduction in the space that the legacy solution would take up (a massive 44U). For each U of rack-equivalent space, the Dell PowerEdge VRTX with one Intel Xeon processor E5-4650 v3-powered Dell PowerEdge M830 server delivered a whopping 9.5 times the database performance, in orders per minute, than the four database servers in the legacy disparate hardware solution (see Figure 5). Figure 5: The compact form factor of the Dell PowerEdge VRTX means that, with one Intel processor-powered Dell PowerEdge M830 server, it packs more performance into less space than the legacy disparate hardware solution. As Figure 6 shows, regardless of the server configuration, the Dell PowerEdge VRTX solution powered by the Intel Xeon processor E5 v3 family also used only 6 cables, 31 fewer than the legacy disparate hardware solution.
  • 7. A Principled Technologies test report 7Comparing performance and cost: Dell PowerEdge VRTX with one Dell PowerEdge M830 server vs. a legacy solution Dell PowerEdge VRTX Ethernet cables Power cables Total by type 2 4 Total cables 6 Legacy disparate hardware solution Ethernet cables Power cables HP ProLiant ML310 G5 8 4 HP ProLiant ML370 G5 2 1 HP ProLiant ML110 G6 8 4 NETGEAR ProSAFE® Smart Switch 1 1 Storage 6 2 Total by type 25 12 Total cables 37 Figure 6: The Dell PowerEdge VRTX reduced cabling complexity compared to the legacy disparate hardware solution. Dell PowerEdge VRTX with one Dell PowerEdge M830 server offered more performance per TCO dollar, lower five-year TCO, and a rapid ROI Choosing to keep a legacy disparate hardware solution might seem convenient and cost-effective. However, we found that purchasing and running the Dell PowerEdge VRTX with the Intel Xeon processor E5-4650 v3-powered Dell PowerEdge M830 server could deliver as much as a 48.5 percent lower five-year total cost of ownership (TCO) than continuing to use the legacy solution (see Figure 7). Figure 7: The Dell PowerEdge VRTX with one Dell PowerEdge M830 server could deliver a 48.5 percent lower TCO over five years than continuing to use the legacy disparate hardware solution.
  • 8. A Principled Technologies test report 8Comparing performance and cost: Dell PowerEdge VRTX with one Dell PowerEdge M830 server vs. a legacy solution Savings in licensing, management, and support offset the larger acquisition costs of the Dell PowerEdge VRTX with an Intel Xeon processor E5-4650 v3-powered Dell PowerEdge M830 server. After five years, the Dell PowerEdge VRTX solution is $97,895 less expensive, saving 48.5 percent (see Figure 8). Dell PowerEdge VRTX with one Dell PowerEdge M830 server Legacy disparate hardware solution Acquisition cost $67,471 $14,216 Year 1 costs $7,332 $37,562 Year 2 costs $7,332 $37,562 Year 3 costs $7,332 $37,562 Year 4 costs $7,332 $37,562 Year 5 costs $7,332 $37,562 Total $104,131 $202,026 Figure 8: The Dell PowerEdge VRTX with a Dell PowerEdge M830 server costs up to $97,895 less than the legacy solution after five years. (Totals may not sum due to rounding.) With the Dell PowerEdge VRTX with an Intel Xeon processor E5-4650 v3- powered Dell PowerEdge M830 server, we found that a business could achieve payback, or a return on investment (ROI), in as little as 22 months (see Figures 9 and 10). Figure 9: The Dell PowerEdge VRTX with an Intel processor- powered Dell PowerEdge M830 server can deliver payback in as little as 22 months. Payback category Dell PowerEdge VRTX with Dell PowerEdge M830 server Legacy disparate hardware solution Difference One-time initial investment $67,471 $14,216 $53,255 Monthly cost $611 $3,130 $2,519 Payback period $53,255 ÷ $2,519 = 22 months Figure 10: The Dell PowerEdge VRTX with one Dell PowerEdge M830 server can pay back your investment in 22 months, so by the 22nd month, the return of investment is complete.
  • 9. A Principled Technologies test report 9Comparing performance and cost: Dell PowerEdge VRTX with one Dell PowerEdge M830 server vs. a legacy solution Using the calculations from our TCO analysis, we found that the Dell PowerEdge VRTX with an Intel Xeon processor E5-4650 v3-powered Dell PowerEdge M830 server delivered 2.3 times as many database orders per minute per TCO dollar spent (see Figure 11). Figure 11: The Dell PowerEdge VRTX with one Intel processor-powered Dell PowerEdge M830 server delivered 8.4 times as many OPM per TCO dollar. Higher numbers are better. For complete details and assumptions of our TCO analysis, see Appendix D. ALL-IN-ONE SHARED INFRASTRUCTURE The Dell PowerEdge VRTX solution with an M-series server is an all-in-one solution designed to handle the performance needs of a small-to-medium business or remote office. Here, we provide information about each of the components we used as part of this solution. About the Dell PowerEdge VRTX The Dell PowerEdge VRTX is a compact, all-in-one solution in a 5U rack-able tower chassis. Designed to be quiet under normal operating conditions, the Dell PowerEdge VRTX can be stowed under a desk in a small office without disrupting conversations. Its four bays house a variety of different compute nodes, providing a space-saving alternative to four separate tower or rack servers. In addition to space savings, the Dell PowerEdge VRTX provides administrators with a unified interface, the Chassis Management Controller, for performing routine systems management tasks. The Dell PowerEdge VRTX chassis supports up to 48 TB of shared internal storage that is presentable as virtual drives to single or multiple compute nodes, and provides optional pass-through and eight PCIe® slots for additional device connectivity. The chassis-integrated storage can be configured with 25 bays for 2.5-inch drives, which we tested in this report, or with 12 bays for 3.5-inch drives. The Dell PowerEdge VRTX integrated switch contains multiple external network ports for easy expansion or integration into any computing environment. Dell PowerEdge VRTX with 12 3.5-inch drives Dell PowerEdge VRTX with 25 2.5-inch drives
  • 10. A Principled Technologies test report 10Comparing performance and cost: Dell PowerEdge VRTX with one Dell PowerEdge M830 server vs. a legacy solution For more information about the Dell PowerEdge VRTX, visit www.dell.com/poweredge. About the Dell PowerEdge M830 server According to Dell, the PowerEdge M830 blade server “offers exceptional flexibility, reliability and efficiency to run business-critical applications in data centers yet to come.” The M830 supports up to 72 Intel processor cores and 48 DIMMS of DDR4 memory, which offers tremendous computational horsepower for heavy-use workloads. With the M830, you can power through compute-intensive workloads with 50 percent more processing cores per socket than previous generation Intel processors. For more information about the Dell PowerEdge M830 blade server, visit www.dell.com/us/partner/p/poweredge-m830/pd. About the Intel Xeon processor E5-4600 v3 product family According to Intel, the Intel Xeon processor E5-4600 v3 product family provides “high-density, energy-efficient compute resources to support larger workloads and high virtual machine densities in your data center or cloud.” It also delivers benefits in performance, power efficiency, virtualization, and security. The E5-4600 v3 product family delivers up to 49 percent increased average performance than processors from the previous generation. Other features include the following:  Intel Advanced Vector Extensions 2 (AVX2)  Intel QuickAssist Technology for offloading cryptographic/data compression  Up to 18 cores and 36 threads per socket  Up to 45 MB of last-level cache  Next-generation DDR4 memory support  Intel AES-NI data encryption/decryption The Intel Xeon processor E5-4600 v3 product family also uses Intel Intelligent Power technology and Per-core P states to maximize energy efficiency. Learn more at www.intel.com/content/dam/www/public/us/en/documents/product-briefs/xeon-e5- 4600-v3-brief.pdf.
  • 11. A Principled Technologies test report 11Comparing performance and cost: Dell PowerEdge VRTX with one Dell PowerEdge M830 server vs. a legacy solution WHAT WE TESTED Database testing To create our real-world ecommerce workload, we used the DVD Store Version 2.1 benchmarking tool. DS2 models an online DVD store, where customers log in, search for movies, and make purchases. DS2 reports these actions in orders per minute that the system could handle, to show what kind of performance customers could expect. The DS2 workload also performs other actions, such as adding new customers, to exercise the wide range of database functions you would need to run your ecommerce environment. For more details about the DS2 tool, see www.delltechcenter.com/page/DVD+Store. File and print testing To test the file and print capabilities of the solutions, we simulated workloads using the Iometer benchmark. Iometer measures IOPS on single and clustered systems. Iometer performs I/O operations to stress a system, and then records the performance of these I/O operations and the system stress they create. We used Iometer version 1.1 on each solution to simulate the same file and print workloads on the solutions. For more details about Iometer, see www.iometer.org. Mail testing To test the solutions’ mail server performance, we used the Microsoft Load Generator 2013 (LoadGen) benchmark, performing tasks to simulate a heavy user generating mail activity. For our workloads, we used the following settings:  Number of users: 500  Mailbox Profile: 250MB  Action Profile: Outlook_200 For more details about LoadGen, see www.microsoft.com/downloads/details.aspx?FamilyId=DDEC1642-F6E3-4D66-A82F- 8D3062C6FA98&displaylang=en.
  • 12. A Principled Technologies test report 12Comparing performance and cost: Dell PowerEdge VRTX with one Dell PowerEdge M830 server vs. a legacy solution IN CONCLUSION Keeping a legacy disparate hardware solution composed of nine older servers instead of choosing the new Dell PowerEdge VRTX powered by the Intel Xeon processor E5-4650 v3 family may cost more than one would expect. We found that the Dell PowerEdge VRTX with an Intel Xeon processor E5-4650 v3-powered Dell PowerEdge M830 server could do the work of nine legacy servers running email, database, and file/print server workloads. The VRTX ran all nine workloads in VMs, achieving a slight performance boost on the database and file/print workloads while using much less datacenter space and reducing power consumption by 38.4 percent. The VRTX achieved these savings using 88.6 percent less rack-equivalent space than the legacy disparate hardware solution and with one-third as many cables, to reduce complexity and reduce the burden of space in small offices. Despite a larger initial investment, the Dell PowerEdge VRTX with an Intel Xeon processor E5-4650 v3-powered Dell PowerEdge M830 server could actually lower the total cost of ownership over five years by as much as 48.5 percent, delivering a solid return on investment in less than two years. As our test results show, investing in the Dell PowerEdge VRTX solution powered by the Intel Xeon processor E5-4600 v3 family could provide a compact solution to optimize application performance and reduce complexity at a lower lifetime cost than a legacy solution composed of nine older servers.
  • 13. A Principled Technologies test report 13Comparing performance and cost: Dell PowerEdge VRTX with one Dell PowerEdge M830 server vs. a legacy solution APPENDIX A – SYSTEM CONFIGURATION INFORMATION Figures 12 and 13 provide detailed configuration information for the test systems. System Dell PowerEdge VRTX solution Enclosure Compute node enclosure Dell PowerEdge VRTX General dimensions of compute node enclosure Height (inches) 8 Width (inches) 19 Depth (inches) 29.5 U size in server rack equivalent (U) 5 Power supplies Total number 4 Vendor and model number Dell 80 Plus Platinum E1100E-S0 (P/N 0YT39Y) Wattage of each (W) 1,100 Cooling fans Total number 6 Vendor and model number Delta Electronics, Inc. Dimensions (h × w) of each 60 mm × 60 mm Volts 12 Chassis RAID controller Vendor and model number Dell SPERC8 Firmware version 23.11.46-0079 Cache size (GB) 1 Chassis shared hard drives Hard drive #1 Vendor and model number Dell ST300MM0006 Number of drives 14 Size (GB) 300 RPM 10k Type SAS 6.0 Gbps Hard drive #2 Vendor and model number Dell C06VX Number of drives 2 Size (TB) 400 RPM SSD Type SAS 12.0 Gbps Chassis USB ports Number 2 Type 2.0 Platform Vendor and model number Dell PowerEdge M830 Motherboard model number 0W4W8N Motherboard chipset Intel C610
  • 14. A Principled Technologies test report 14Comparing performance and cost: Dell PowerEdge VRTX with one Dell PowerEdge M830 server vs. a legacy solution System Dell PowerEdge VRTX solution BIOS name and version Dell BIOS 1.0.6 BIOS settings Default General Number of processor packages 4 Number of cores per processor 12 Number of hardware threads per core 2 System power management policy Performance/watt CPU Vendor Intel Name Xeon E5-4650 v3 Stepping C1 Socket type Socket 2011-3 LGA Core frequency (GHz) 2.10 L1 cache 32 KB (per core) L2 cache 256 KB (per core) L3 cache 30 MB (shared) Memory modules Total RAM in system (GB) 128 Vendor and model number Hynix Semiconductor M393A1G43DB0-CPB Type PC4-2133P Speed (MHz) 2,133 Speed in the system currently running @ (MHz) 2,133 Timing/latency (tCL-tRCD-iRP-tRASmin) 13-13-13-33 Size (GB) 8 Number of RAM modules 16 Chip organization Double-sided Rank Dual RAID controller Vendor and model number Dell PERC H730 Mini Firmware version 25.2.2-0001 Cache size (GB) 1024 MB Network adapter Vendor and model number Broadcom® NetXtreme® II 10 Gb Ethernet BCM57810s Type Integrated Number of Network Adapters 2 USB ports Number 2 Type 3.0 Figure 12: Detailed configuration information for the Dell PowerEdge VRTX solution.
  • 15. A Principled Technologies test report 15Comparing performance and cost: Dell PowerEdge VRTX with one Dell PowerEdge M830 server vs. a legacy solution Server HP ProLiant ML110 G6 HP ProLiant ML310 G5 HP ProLiant ML370 G5 General dimensions of server Height (inches) 14.4 17.0 17.5 Width (inches) 6.9 7.9 8.6 Depth (inches) 16.8 24.0 28.5 U size in server rack equivalent (U) 4 5 5 Power supplies Total number 1 1 1 Vendor and model number Delta Electronics® DPS300AB Delta Electronics DPS- 410DB HP Switching Power Supply DPS-800GB A Wattage of each (W) 300 410 850 Cooling fans Total number 1 1 3 Vendor and model number HP 576930-001 HP 459188-001 Nidec Beta V35633-94 Dimensions (h × w) of each 92 mm × 25 mm 120 mm × 25 mm 130 mm × 125 mm Volts 12 12 12 General Motherboard model number 576924-001 A61TR1 434719-001 Motherboard chipset Intel 3400 Chipset Intel 3210 Chipset Intel C600 BIOS name and version HP System BIOS - 0270126_TAN ProLiant System BIOS - W05 ProLiant System BIOS P57 BIOS settings Performance Performance Performance Number of processor packages 1 1 2 Number of cores per processor 4 4 4 Number of hardware threads per core 2 1 1 System power management policy Static High Performance Static High Performance Static High Performance CPU Vendor Intel Intel Intel Name Xeon X3460 Xeon X3370 Xeon E5450 Stepping B1 E0 E0 Socket type LGA 1156 LGA 775 LGA 771 Core frequency (GHz) 2.80 3.00 3.00 L1 cache 32 KB (per core) 32 KB (per core) 32 KB (per core) L2 cache 256 KB (per core) 12 MB (shared) 12 MB (shared) L3 cache (MB) 8 N/A N/A Memory modules Total RAM in system (GB) 4 4 8 Vendor and model number Samsung® M391B5673EH1- CH9 Micron® MT18HTF25672AY-800E1 Samsung M395T5160QZ4
  • 16. A Principled Technologies test report 16Comparing performance and cost: Dell PowerEdge VRTX with one Dell PowerEdge M830 server vs. a legacy solution Server HP ProLiant ML110 G6 HP ProLiant ML310 G5 HP ProLiant ML370 G5 Type PC3-10600E DDR3 PC2-6400E DDR2 DDR2-5300F Speed (MHz) 1,333 800 666 Speed in the system currently running @ (MHz) 1,333 800 666 Timing/latency (tCL-tRCD- iRP-tRASmin) 9-9-9-24 6-6-6-18 5-5-5-15 Size (GB) 2 2 4 Number of RAM modules 4 2 8 Chip organization Double-Sided Double-sided Double-sided RAID controller Vendor and model number HP Smart Array B110i HP Smart Array E200 HP Smart Array P400 Cache size (MB) N/A 128 256 Hard drive #1 Vendor and model number Hitachi® HDS721032CLA362 HP DF0792A9844 HP EG0146FAWHU Number of drives 1 2 2 Size (GB) 320 72 146 RPM 7.2K 15K 10K Type SATA SAS SAS Hard drive #2 Vendor and model number N/A ST500NM001 N/A Number of drives N/A 2 N/A Size (GB) N/A 500 N/A RPM N/A 7.2 N/A Type N/A SAS N/A Network adapter Vendor and model number Intel Pro/1000 PT Dual Port Server Adapter Intel Pro/1000 PT Server Adapter Intel Pro/1000 PT Dual Port Server Adapter Type PCIe PCIe PCIe Number of ports 2 1 2 Network adapter 2 Vendor and model number HP NC 107i PCIe Gigabit Intel Pro/1000 PT Server Adapter N/A Type Integrated PCIe N/A Number of ports 1 1 N/A USB ports Number 6 2 4 Type 2.0 2.0 2.0 Figure 13: Detailed configuration information for the towers in the legacy hardware solution.
  • 17. A Principled Technologies test report 17Comparing performance and cost: Dell PowerEdge VRTX with one Dell PowerEdge M830 server vs. a legacy solution APPENDIX B – HOW WE TESTED Our test scenario used one PowerEdge M830 and a PowerEdge R710, which we used for our infrastructure server and to host client VMs. Figure 14 presents the virtual machines in our test environment. VM name vCPUs Memory OS OS drive Additional drive ExchangeCAS 8 sockets, each w/ 1 core 16 GB Windows Server 2012 R2 Standard 100 GB stored on VRTX HDDs None ExchangeMB 8 sockets, each w/ 1 core 16 GB Windows Server 2012 R2 Standard 100 GB stored on VRTX HDDs 750 GB, Thick Provisioned Eager Zeroed, Stored on VRTX HDDS Iometer 4 sockets, each w/ 1 core 8 GB Windows Server 2012 R2 Standard 100 GB stored on VRTX HDDs 50 GB, Thick Provisioned Eager Zeroed, Stored on VRTX SSDs SQL 8 sockets, each w/ 1 core 8 GB Windows Server 2012 R2 Standard 100 GB stored on VRTX HDDs 100 GB, Thick Provisioned Eager Zeroed, Stored on VRTX SSDs DVD Store client 1 socket w/ 4 cores 8 GB Windows Server 2012 R2 Standard 100 GB stored on R710 HDDs None Exchange AD/DNS 1 socket w/ 1 core 8 GB Windows Server 2012 R2 Standard 100 GB stored on R710 HDDs None LoadGen client 1 socket w/ 4 cores 8 GB Windows Server 2008 R2 Enterprise 100 GB stored on R710 HDDs None NAT 1 socket w/ 4 cores 8 GB Windows Server 2012 R2 Standard 100 GB stored on R710 HDDs None VMware vCenter Server 2 sockets, each w/ 1 core 8 GB VMware vCenter Server Appliance 5.5 25 GB stored on R710 HDDs 100 GB, Thin Provisioned, Stored on the R710 disks Figure 14: The virtual machines in our test environment. We also followed the following guidelines: 1. All OS drives were thin provisioned. 2. All VMs hosted on the blade server were stored on the VRTX storage. 3. All VMs hosted by the infrastructure server were stored on the infrastructure’s drives. 4. On all OSes, we installed all Windows updates available up to 05/15/2015. In addition to its first drive, ExchangeMB had a 100 GB, Thick Provisioned Eager Zeroed drive stored on the OS storage volume used for storing backups.
  • 18. A Principled Technologies test report 18Comparing performance and cost: Dell PowerEdge VRTX with one Dell PowerEdge M830 server vs. a legacy solution Installing and configuring the infrastructure server We configured a Dell PowerEdge R710 server with VMware vSphere (ESXi) 5.5.0 with Dell Drivers to host the Active Directory® VMs and the VMware vCenter VM. Installing VMware vSphere 5.5 with Dell Drivers (ESXi) on the Dell PowerEdge R710 1. Insert the ESXi 5.5 disk, and select Boot from disk. 2. On the Welcome screen, press Enter. 3. On the End User License Agreement (EULA) screen, press F11. 4. On the Select a Disk to install or Upgrade Screen, select the relevant volume to install ESXi on, and press Enter. 5. On the Please Select a Keyboard Layout screen, press Enter. 6. On the Enter a Root Password screen, assign a root password, and confirm the password by entering it again. Press Enter to continue. 7. On the Confirm Install Screen, press F11 to install. 8. On the Installation complete screen, press Enter to reboot. Configuring ESXi after installation 1. On the ESXi 5.5 screen, press F2, enter the root password, and press Enter. 2. On the System Customization screen, select Troubleshooting Options, and press Enter. 3. On the Troubleshooting Mode Options screen, select enable ESXi Shell, and press Enter. 4. Select Enable SSH, press Enter, and press Esc. 5. On the System Customization screen, select Configure Management Network. 6. On the Configure Management Network screen, select IPv4 Configuration. 7. On the IPv4 Configuration screen, select Set static IP; enter an IP address, subnet mask, and default gateway; and press Enter. 8. On the Configure Management Network screen, press Esc. When the installer asks if you want to apply the changes, press Y. 9. Log in as root with the vSphere client. 10. Select the Configuration tab, and click Networking. 11. Click Add Networking… 12. Create a virtual machine network called PRIV-NET, and select the adapter with access to the private test network. 13. Click OK. 14. Select the Configuration tab, and click DNS and routing. 15. Type a name, and select test.local for domain. Setting up two VMs to host the Microsoft Windows® Active Directory server and the NAT server 1. In your web browser, connect to the vSphere server, and browse to the ESXi host hosting the management VMs (in our case, the PowerEdge R710). 2. Right-click the ESXi host, and choose New Virtual Machine.
  • 19. A Principled Technologies test report 19Comparing performance and cost: Dell PowerEdge VRTX with one Dell PowerEdge M830 server vs. a legacy solution 3. On the Create New Virtual Machine window, select custom, and click Next. 4. Assign a name to the virtual machine, and click Next. 5. Select the LUN for the storage, and click Next. 6. Select Virtual Machine Version 11, and click Next. 7. Choose Windows, select Microsoft Windows Server 2012, and click Next. 8. Choose the VM’s virtual hardware options, and click Next (see each VM’s section below for additional VM configuration data).  Select one virtual processor socket, and one core per virtual socket.  Select 4GB RAM.  Select the NIC interface with access to the private test network.  Leave the default option for SCSI controller. 9. Choose to create a new virtual disk, and click Next. 10. Make the OS virtual disk size 100 GB, choose thin provisioned, specify external storage, and click Next. 11. Keep the default virtual device node (0:0), and click Next. 12. Click Finish. 13. Right-click the VM, and select Edit Settings. 14. Click the Resources tab, and click Memory. 15. Select Reserve all guest memory, and click OK. 16. Connect the VM virtual CD-ROM to the Microsoft Windows Server 2012 R2 installation disk. 17. Start the VM. Installing Microsoft Windows Server 2012 R2 Standard Edition 1. Connect the installation media and power on the VM. 2. When the option appears, press F11 to enter the Boot Manager. 3. Select the connected boot media, and press Enter. 4. Press any key when prompted to boot from DVD. 5. When the installation screen appears, click My language is English. 6. Leave language, time/currency format and input method as default, and click Next. 7. Click Install now. 8. When the Windows Setup window appears, click No thanks when prompted to go online to install updates. 9. Select Windows Server 2012 R2 Standard (Server with a GUI), and click Next. 10. Check I accept the license terms, and click Next. 11. Click Custom: Install Windows only (advanced). 12. Press Alt+A to open advanced partition options. Delete any partitions until there is only Drive 0 Unallocated Space. 13. Select Drive 0 Unallocated Space, and click Next, at which point Windows will begin installing, and will restart automatically after completing. 14. When the Settings page appears, fill in the Password and Reenter Password fields with the same password. 15. Log in with the previously set up password.
  • 20. A Principled Technologies test report 20Comparing performance and cost: Dell PowerEdge VRTX with one Dell PowerEdge M830 server vs. a legacy solution Configuring Windows Update 1. In the left pane of the Server Manager window, click Local Server. 2. In the main frame, next to Windows Update, click Not configured. 3. In the Windows Update window, in the main pane, click Let me choose my settings. 4. Under Important updates, select Never check for updates (not recommended), and then click OK. 5. In the left pane, click Check for updates, and install all available updates. 6. Close the Windows Update window. Configuring Windows Firewall 1. In Server Manager, click ToolsWindows Firewall with Advanced Security. 2. In the Overview section, click Windows Firewall Properties. 3. In the Domain Profile tab, for Firewall state, click Off. 4. In the Private Profile tab, for Firewall state, click Off. 5. In the Public Profile tab, for Firewall state, click Off. 6. Click OK. 7. Close the Windows Firewall Properties window. Setting up Remote Desktop 1. In the Local Server tab of the Server Manager window, next to Remote Desktop, click Disabled. 2. In the System Properties window that appears, in the Remote Desktop section, select the Allow remote connections to this computer radio button, and click OK when the warning message appears. 3. Uncheck Allow connections only from computers running Remote Desktop with Network Level Authentication (recommended), and click OK. Disabling IE Enhanced Security Configuration 1. In the Local Server tab of the Server Manager window, next to IE Enhanced Security Configuration, click On. 2. In the Internet Explorer Enhanced Security Configuration window, select the Off radio buttons for both Administrators and Users, and click OK. Installing VMware Tools 1. Install VMware Tools. For more information, see kb.vmware.com/selfservice/microsites/search.do?language=en_US&cmd=displayKC&externalId=340. Repeat the virtual machine, OS installation, and OS configuration described above to create a VM for the NAT server. Installing Active Directory and DNS services 1. Power on the Active Directory VM. 2. On the Active Directory server, open Windows PowerShell®. 3. Run the following command: Install-WindowsFeature RSAT-ADDS 4. When the installation is finished, close PowerShell. 5. On the VM, open Server Manager. 6. On the Welcome screen, click 2, and click Add roles and features. 7. At the initial Before you begin screen, click Next three times.
  • 21. A Principled Technologies test report 21Comparing performance and cost: Dell PowerEdge VRTX with one Dell PowerEdge M830 server vs. a legacy solution 8. At the Server Roles screen, select Active Directory Domain Services. 9. On the pop-up window, click Add Features. 10. Click Next three times. 11. Verify the desired role is being installed, and click Install. 12. Once installation has finished, close the Add roles and features wizard. 13. In Server Manager, click the flag at the top, and select the Promote this server to a domain controller link. 14. Select Add a new forest, enter a root domain name of test.local and click Next. 15. On the Domain Controller Options screen, enter a password, and click Next. 16. On the DNS Options screen, click Next. 17. On the Additional Options screen, click Next. 18. On the Paths screen, click Next. 19. On the Review Options screen, click Next. 20. On the Prerequisites screen, verify all prerequisites have passed, and click Install. 21. Once Active Directory Domain Services finishes installing, click Finish, and restart the system. Installing the NAT on the NAT server Before installing the network address translation (NAT) service, you will need to plug a second network cable into the R710 server that has access to the internet and configure vSphere to make that connection available as a second NIC for the NAT VM. 1. On the NAT server, open the Add Roles and Feature Wizard. 2. On the Before you Being screen, click Next. 3. On the Installation Type screen, click Next. 4. On the Server Selection screen, click Next. 5. On the Server Roles screen, select Remote Access, and click Next. 6. On the Features screen, click Next. 7. On the Remote Access screen, click Next. 8. On the Role Services screen, select Routing, click Add Features on the popup, and click Next. 9. On The Web Server Role (IIS) screen, click Next. 10. On the Role Services screen, click Next. 11. On the Confirmation screen, click Install. 12. Once the installation is complete, click Close. 13. From Administrative Tools, open Routing and Remote Access… 14. In the left panel, right-click the target server and select Configure and Enable Routing and Remote Access. 15. In the Routing and Remote Access Server Setup Wizard, click Next. 16. On the Configuration screen, select Network Address Translation (NAT). 17. On the NAT Internet Connection screen, select the Ethernet port that will provide internet connection and click Next. 18. On the Completion screen, click Finish. When setting static IP address, the vCenter server’s IP can now be used as the gateway on the isolated testing network.
  • 22. A Principled Technologies test report 22Comparing performance and cost: Dell PowerEdge VRTX with one Dell PowerEdge M830 server vs. a legacy solution Configuring the VMware vSphere environment for the VRTX server Installing and configuring vCenter Server 1. In the vSphere client, select File, then Deploy OVF Template. 2. In the Deploy OVF Template window, click Browse, then browse to the location of the vCenter Server Appliance .ovf file, click Open, and click Next. 3. On the OVF Template Details screen, click Next. 4. In the Name and Location screen, enter vCenter Server for the name, and click Next. 5. In the Storage screen, select the appropriate datastore, and click Next. 6. In the Disk Format screen, select Thin Provision, and click Next. 7. In the Network Mapping screen, select the private test network. 8. In the Ready to Complete screen, check the Power on after deployment checkbox, and click Finish. 9. In the vSphere client, right-click the new vCenter, and select Open Console. 10. Note the instructions and the address to use for configuration. 11. Open a web browser to the address listed in the console. 12. Log in with root and the password vmware 13. In the vCenter Server Setup window, check the box to accept the license agreement, and click Next. 14. In the Configure Options screen, select the Configure with default settings, and click Next. 15. In the Review Configuration screen, click Start. Setup will complete, and a new database will be configured automatically. When it is finished, click Close. 16. Click the Admin Tab. a. In the current administrator password section, enter vmware b. Enter a new password into both password fields. Configuring the VRTX shared storage 1. Open a web browser, and enter the address listed for the CMC IP on the front LCD display. 2. Log in with the appropriate credentials. 3. Expand Storage. 4. Click Storage. 5. Click the Setup tab. a. Under Assignment Mode, select the Multiple Assignment radio button, and click Apply. b. To confirm the Operation Successful message box, click OK. 6. Configure virtual disks: a. Click StorageVirtual Disks. b. On the Virtual Disks tab, click Create. i. For Media Type, select HDD. ii. For Choose a virtual disk type, select RAID 10. iii. Select the 10 available 300 GB hard disk drives. iv. For the first volume (to be used for Microsoft Exchange), enter 850GB and click Create Virtual Disk. v. To confirm the message box indicating Operation Successful, click OK.
  • 23. A Principled Technologies test report 23Comparing performance and cost: Dell PowerEdge VRTX with one Dell PowerEdge M830 server vs. a legacy solution vi. Repeat steps i through iv for the next external volume (to be used for system operating systems), choosing 500GB. vii. For Media Type select SDD. viii. For Choose a virtual disk type, select RAID 1. ix. Select the two available 400 GB SSDs. x. For the first volume (to be used for Microsoft SQL Server), enter 120GB and click Create Virtual Disk. xi. To confirm the message box indicating Operation Successful, click OK. xii. Repeat steps ix through for the next external volume (to be used for Iometer), choosing 100GB. c. On the Virtual Disks tab, click Manage. i. Select the Virtual Disks Action drop-down menu for Virtual Disk 0, and initialize the drives. ii. Click Apply. iii. To confirm the message box indicating Operation Successful, click OK. iv. Repeat steps i through iii for the remaining virtual disks. d. Allow shared LUN access to all slots. On the Virtual Disks tab, click Assign. i. Use the drop-down menu for all virtual disks and SLOT-01, and select Full Access. ii. Use the drop-down menu for all virtual disks and SLOT-02, and select Full Access. iii. Use the drop-down menu for all virtual disks and SLOT-03, and select Full Access. iv. Use the drop-down menu for all virtual disks and SLOT-04, and select Full Access. v. Click Apply. vi. To confirm the Operation Successful message box, click OK. Configuring the VMware vSphere environment for the VRTX server Configuring boot properties of the Dell PowerEdge M830 server 1. Open a web browser, and enter the address listed for the CMC IP on the front LCD display. 2. Log in with the appropriate credentials. 3. Expand Server Overview, and select Slot-01. 4. Click the Setup Tab. Perform the following steps in the iDRAC settings: a. Check the Enable LAN checkbox. b. Check the Enable IPv4 checkbox. c. Check the DHCP checkbox. d. Check the IPMI Over LAN checkbox. e. Click Apply iDRAC Network Settings. f. To confirm changes to the iDRAC network settings, click OK. 5. Power on the server. a. Click the Power Tab. b. Select Power On Server. c. Click Apply. d. To confirm server control action, click OK. e. To confirm operation was successful, click OK. 6. Click the Properties tab. 7. Click Launch Remote Console.
  • 24. A Principled Technologies test report 24Comparing performance and cost: Dell PowerEdge VRTX with one Dell PowerEdge M830 server vs. a legacy solution 8. On new browser page, click Continue to website (not recommended) if prompted. a. If a message appears indicating a pop-up was blocked, select Always allow pop-ups from this site. b. Close the browser tab for the iDRAC. c. Click Launch Remote Console. d. If a message appears indicating the Web page wants to run an add-on called “Virtual Console from Dell Inc.,” select Allow for all websites. 9. A new window appears showing the console for the server to configure. Select PowerReset System. 10. Change the boot disk order in System Setup. a. When prompted during POST, press F2 to enter System Setup. b. Click System BIOS. c. Click Boot Settings. d. Click BIOS Boot Settings. e. Scroll down, and click Hard Disk Drive Sequence. i. Highlight the SD card or USB drive entry, and move it to the top using the + key. ii. Click OK. f. Click Back twice. g. Click Finish. h. Click Yes. i. Click Finish. j. Click OK. The system will restart. Installing VMware vSphere 5.5 (ESXi) on the Dell PowerEdge M830 server 1. Mount the ESXi 5.5 ISO via the iDRAC, and boot the M830 to that ISO. 2. On the Welcome screen, press Enter. 3. On the End User License Agreement (EULA) screen, press F11. 4. On the Select a Disk to install or Upgrade Screen, select the an SD card or USB drive to install ESXi on, and press Enter. 5. On the Please Select a Keyboard Layout screen, press Enter. 6. On the Enter a Root Password Screen, assign a root password, and confirm the password by entering it again. Press Enter to continue. 7. On the Confirm Install Screen, press F11 to install. 8. On the Installation complete screen, press Enter to reboot. Configuring VMware vSphere (ESXi) embedded on the server 1. Complete configuration of ESXi host: a. Press F2. b. Enter the root account password, and press Enter. c. Select Configure Management Network, and press Enter. d. Select Network Adapters. e. Select the adapter that connects your server to the private testing network. f. Press Esc. g. To restart networking, press Y.
  • 25. A Principled Technologies test report 25Comparing performance and cost: Dell PowerEdge VRTX with one Dell PowerEdge M830 server vs. a legacy solution h. Select Troubleshooting Options. i. Select Enable ESXi shell, and press Enter. ii. Select Enable SSH, and press Enter. iii. Press Esc. i. To log out, press Esc. Adding the M830 to the vCenter Server 1. In a web browser, navigate to the vCenter IP, click Log in to vSphere Web Client, and log in using root and your password. 2. In the left panel, select vCenter, then Datacenters. 3. Right-click in the empty panel, and select New Datacenter. 4. In the New Datacenter window, give the Datacenter a name and click OK. We used VRTX-01 5. Select your test datacenter. 6. On the left panel, select Hosts, then click Add a host. 7. On the Name and Location screen, enter the IP address for the R710 client and click Next. 8. On the Connection settings screen, enter the User name and Password and click Next. 9. On the Host summary screen, click Next. 10. On the Assign license screen, click Next. 11. On the Lockdown mode screen, click Next. 12. On the VM location screen, click Next. Configuring the external volumes 1. In the vSphere client, select the target host. 2. Click the Configuration tab. 3. Click Storage, and click Add Storage… 4. Choose Disk/LUN. 5. Select the disk, and click Next. 6. Accept the default of VMFS-5 for the file system. 7. Review the disk layout, and click Next. 8. Enter the datastore name, and click Next. 9. Accept the default of using maximum capacity, and click Next. 10. Click Finish. 11. Repeat for all volumes available through the Shared PERC 8 Mini. Creating the first VM 1. Using the vSphere client, connect to the vCenter Server. 2. Right-click the cluster, and choose New Virtual Machine. 3. On the Configuration screen, choose Custom, and click Next. 4. On the Name and Location screen, add a name, select the datacenter, and click Next. 5. On the specific Host screen, choose the PowerEdge M830 blade and click Next. 6. On the Storage screen, select the OS datastore on the external storage, and click Next.
  • 26. A Principled Technologies test report 26Comparing performance and cost: Dell PowerEdge VRTX with one Dell PowerEdge M830 server vs. a legacy solution 7. On the Virtual Machine Version screen, choose Virtual Machine Version 8, and click Next. 8. On the Guest Operating System screen, choose Windows, select Microsoft Windows Server 2012 R2 (64-bit), and click Next. 9. On the CPUs screen, choose 1 virtual socket, and 4 virtual processors per core, and click Next. 10. On the Memory screen, choose 8 GB RAM, and click Next. 11. On the Network screen, click 1 for the number of NICs, select the NIC connected to the isolated testing network, and click Next. 12. On the SCSI Controller screen, leave the default virtual storage controller, and click Next. 13. On the Select a Disk screen, choose to create a new virtual disk, and click Next. 14. On the Create a Disk screen, make the OS virtual disk size 100 GB, and choose thin provisioned. 15. On the Advanced Options screen, leave the default virtual device node (0:0), and click Next. 16. On the Ready to Complete screen, click Finish. 17. Right-click the VM, select Upgrade Virtual Hardware, and click Yes. 18. Start the VM. 19. Attach the Windows Server 2012 R2 ISO image to the VM, and install Windows Server 2012 R2 on your VM. Installing the operating system on the VMs Repeat the sections above regarding the initial creation of the virtual machines and installation of Windows Server 2012 R2 Standard. Cloning the VM 1. Using the vSphere Client, right-click the first VM and select Template, then Clone to Template. 2. On the Name and Location screen, enter a Template Name. 3. On the Host / Cluster screen, select the management server. 4. On the Datastore screen, select a datastore, and click Next. 5. On the Ready to Complete screen, click Finish. The template created will be used to clone out the rest of the VMs. Installing and configuring Microsoft Exchange Servers We installed Microsoft Exchange 2013 SP3 CAS server and mailbox server on two VMs residing on the Dell PowerEdge M830. Configuring the Exchange 2013 VMs on the VRTX After cloning, modify the Exchange 2013 VMs to contain the following settings:  Memory: 16 GB  Virtual Processors: 8  Additional virtual disks for the mailbox server. o 1 × 750GB virtual disk for mailbox storage (Thick-provisioned, eager-zeroed) o 1 × 100GB virtual disk for log storage (Thick-provisioned, eager-zeroed) After adding the drives from the vSphere client, configure additional drives in Windows using the following steps. 1. In the taskbar, click the Server Manager icon. 2. In the left pane, expand Storage, and click Disk Management.
  • 27. A Principled Technologies test report 27Comparing performance and cost: Dell PowerEdge VRTX with one Dell PowerEdge M830 server vs. a legacy solution 3. Right-click the first volume, and choose Initialize Disk. 4. In the right pane, right-click the volume, and choose New Simple VoIume… 5. At the welcome window, click Next. 6. At the Specify Volume Size window, leave the default selection, and click Next. 7. At the Assign Drive Letter or Path window, choose a drive letter, and click Next. 8. At the Format Partition window, choose NTFS, and click Next. 9. At the Completing the New Simple Volume Wizard window, click Finish. Testing overview We used the RAID 10 consisting of 300GB hard drives on the VRTX shared storage to store the Exchange mailbox. We added two virtual drives to the Exchange Mailbox: one for Exchange data and one for logs. For our workloads, we used the following settings:  Users: 750  Mailbox Profile: 250MB mailboxes  Action Profile: Outlook_200  Client Type: Outlook 2007 Cached Configuring the Active Directory server Installing the Active Directory Domain Services role Before completing this step, you will need to apply a static IP address for the server. In our case, we used 192.168.1.10. 1. Launch Server Manager, and select Add roles and features. 2. Click Next at the Add Roles and Features Wizard. 3. Select Role-based or feature-based installation, and click Next. 4. Select the AD server from the server pool, and click Next. 5. Select Active Directory Domain Services from the list of Roles, click the Add Features button to add features that are required by Active Directory Domain Services, and click Next. 6. Accept the defaults selected by setup at the Select Features screen, and click Next. 7. Click Next at the AD DS screen. 8. Select Restart the destination server automatically if required at the confirmation screen, and click Install. 9. Click the yellow warning triangle in the server manager window. 10. Click Promote this server to a domain controller. 11. Select Add a new forest, type in the Root domain name (fqdn), and click Next. For our testing, we used test.local 12. Type in and confirm the password, and click Next. 13. Click Next at the DNS Options screen. 14. Verify the NetBIOS name, and click Next. 15. Accept the default paths, and click Next. 16. Review the options, and click Next. 17. Verify the prerequisite check passes successfully, and click Install.
  • 28. A Principled Technologies test report 28Comparing performance and cost: Dell PowerEdge VRTX with one Dell PowerEdge M830 server vs. a legacy solution Preparing AD for Exchange 1. Create a reverse lookup zone: a. Click the start button, and type DNS in the search field. b. Open the DNS manager by clicking on it in the results field. c. Expand your Active Directory domain, and click on Reverse Lookup Zones. d. Click ActionNew Zone. e. Click Next on the Welcome screen. f. Chose Primary Zone, and click Next. g. Leave default replication scope, and click Next. h. Choose IPv4, and click Next. i. Enter the IP address of your domain (192.168.3 for our example). j. Choose Allow both nonsecure and secure dynamic updates, and click Next. k. Click Finish. 2. Insert the Exchange 2012 SP1 Installation ISO in the AD VM DVD drive. 3. In Windows Explorer, double-click the Exchange DVD icon. 4. In the Exchange installation folder, hold down shift, and right-click. 5. Choose Open a command window here. 6. Run the following command: Setup.exe /PrepareSchema /IAcceptExchangeServerLicenseTerms 7. When the previous command completes, run the following command: Setup.exe /PrepareAD /OrganizationName:”organization name” /IAcceptExchangeServerLicenseTerms 8. Close the command window when the setup finishes. Installing Active Directory Certificate Services 1. Launch Server Manager, and select Add roles and features. 2. Click Next at the Add Roles and Features Wizard. 3. Select Role-based or feature-based installation, and click Next. 4. Choose Active Directory Certificate Services. 5. Click Add Features, if prompted, to install any required features. 6. Click Next. 7. Click Next. 8. Click Next. 9. Choose Certificate Authority and Certification Authority Web Enrollment. 10. Click Add Features, if prompted, to install any required features. 11. Click Next. 12. Leave defaults, and click Next. 13. Click Install. 14. Click Close when the install finishes.
  • 29. A Principled Technologies test report 29Comparing performance and cost: Dell PowerEdge VRTX with one Dell PowerEdge M830 server vs. a legacy solution 15. Click on the yellow warning symbol in the Server Manager, and click Configure Active Directory Certificate Services 16. Leave defaults, and click Next. 17. Check both Certification Authority and Certification Authority Web Enrollment, and click Next. 18. Choose Enterprise CA, and click Next. 19. Choose Root CA, and click Next. 20. Choose Create a new private key, and click Next. 21. Leave defaults, and click Next. 22. Leave defaults, and click Next. 23. Leave 5 years, and click Next. 24. Leave default locations, and click Next. 25. Click Configure. 26. Close when the configuration finishes. 27. Open Internet Explorer and navigate to localhost/certsrv/Default.asp to verify that the installation succeeded. Installing Exchange Server 2013 SP1 Mailbox and Client Access Server roles Using the template, clone two VMs: one for the Exchange Client Access Server, or CAS, and the other for the Exchange Mailbox Server. Edit the hardware settings in each. The Mailbox server should have eight vCPUs (eight virtual sockets each with one core) and 16 GB of memory. Using the Exchange datastore, add a 750 GB disk and a 100 GB disk to the Mailbox server for the Exchange mailbox and Exchange logs respectively. Set static IPs on both VMs and join the domain. 1. On the Exchange Mailbox Server, log into the server using domain administrator credentials. 2. Open Windows PowerShell and run the following command: Install-WindowsFeature AS-HTTP-Activation, Desktop-Experience, NET- Framework-45-Features, RPC-over-HTTP-proxy, RSAT-Clustering, RSAT- Clustering-CmdInterface, RSAT-Clustering-Mgmt, RSAT-Clustering- PowerShell, Web-Mgmt-Console, WAS-Process-Model, Web-Asp-Net45, Web- Basic-Auth, Web-Client-Auth, Web-Digest-Auth, Web-Dir-Browsing, Web-Dyn- Compression, Web-Http-Errors, Web-Http-Logging, Web-Http-Redirect, Web- Http-Tracing, Web-ISAPI-Ext, Web-ISAPI-Filter, Web-Lgcy-Mgmt-Console, Web-Metabase, Web-Mgmt-Console, Web-Mgmt-Service, Web-Net-Ext45, Web- Request-Monitor, Web-Server, Web-Stat-Compression, Web-Static-Content, Web-Windows-Auth, Web-WMI, Windows-Identity-Foundation 3. Restart the server. 4. Download the Microsoft Unified Communications Managed API 4.0, Core Runtime 64-bit (go.microsoft.com/fwlink/p/?linkId=258269). 5. Run UcmaRuntimeSetup.exe. 6. When the installation completes, click Finish. 7. Navigate to the location of the Exchange installation media, and double-click Setup.exe. 8. At the Check for Updates? screen, check the Connect to the Internet and check for updates checkbox, and click Next.
  • 30. A Principled Technologies test report 30Comparing performance and cost: Dell PowerEdge VRTX with one Dell PowerEdge M830 server vs. a legacy solution 9. When the updates complete, click Next. 10. At the Introduction screen, click Next. 11. At the License Agreement screen, check the box to accept the terms, and click Next. 12. At the Recommended Settings screen, check the Don’t use recommended settings checkbox, and click Next. 13. At the Server Role Selection, select Mailbox or Client Access role, and click Next. 14. At the Installation Space and Location screen, leave the default location for the installation, and click Next. 15. At the Malware Protection Settings, select Yes to disable, and click Next. 16. At the Readiness Checks screen, allow the verification to complete. If there are no failures, click Install. 17. When the installation completes, click Finish, and restart the server. 18. Repeat steps 1 –17 for the Exchange CAS server. Configuring Exchange 1. On the CAS server, open the Exchange Admin Center by using a browser and navigating to https://localhost/ecp 2. Enter the domain administrator credentials, and click Sign in. 3. If prompted, select the language and time zone, and click Save. 4. In the left pane, click Mail Flow, then click Send Connectors. 5. On the Send Connectors page, click the New icon. 6. In the New Send Connector wizard, specify SMTP as the name and select Internet as the type. Click Next. 7. In the Network settings screen, choose MX record associated with recipient domain, and click Next. 8. In the Address space screen, click the Add icon. 9. In the Add domain window, enter * in the Fully Qualified Domain Name (FQDN) field, and click Save. 10. Click Next. 11. In the Source Server screen, click the Add icon. 12. In the Select a Server window, select the mailbox server, click Add, and then click OK. 13. Click Finish. 14. In the left pane of the EAC, click servers, select the name of the CAS server, and click Edit. 15. Click Outlook Anywhere, and enter the appropriate FQDN of the Client Access Server for the external and internal hostname field. For example, exchangeserver.test.local 16. Choose NTLM as the authentication method, and click Save. 17. Click Virtual Directories, and then click the Configure external access domain icon. 18. In the Select the Client Access servers to use with the external URL window, click the Add icon. 19. Select the CAS server, and click Add. Click OK. 20. Type the FQDN of the CAS server in the Enter the domain, and click Save. 21. Log into the Active Directory server using administrator credentials, and complete the following steps: a. Open Server Manager, then click ToolsDNS. b. In DNS Manager, expand the Active Directory server nameForward Lookup Zonestest.local in the left pane. c. In the right pane, verify or create the DNS records as presented in Figure 15.
  • 31. A Principled Technologies test report 31Comparing performance and cost: Dell PowerEdge VRTX with one Dell PowerEdge M830 server vs. a legacy solution Type Host or child domain/alias name FQDN FQDN of mail server Mail Exchanger (MX) Leave blank domain.com casserver.domain.com Alias (CNAME) Autodiscover Autodiscover.domain.com casserver.domain.com Alias (CNAME) Owa Owa.domain.com casserver.domain.com Figure 15: DNS records. 22. Log back into your CAS server. 23. In the Exchange Power Shell, run the following commands, replacing “$HostName” with the host name (not FQDN) of your CAS server. Set-EcpVirtualDirectory "$HostNameECP (Default Web Site)" -InternalUrl ((Get-EcpVirtualDirectory "$HostNameECP (Default Web Site)").ExternalUrl) Set-WebServicesVirtualDirectory "$HostNameEWS (Default Web Site)" - InternalUrl ((get-WebServicesVirtualDirectory "$HostNameEWS (Default Web Site)").ExternalUrl) Set-ActiveSyncVirtualDirectory "$HostNameMicrosoft-Server-ActiveSync (Default Web Site)" -InternalUrl ((Get-ActiveSyncVirtualDirectory "$HostNameMicrosoft-Server-ActiveSync (Default Web Site)").ExternalUrl) Set-OabVirtualDirectory "$HostNameOAB (Default Web Site)" -InternalUrl ((Get-OabVirtualDirectory "$HostNameOAB (Default Web Site)").ExternalUrl) Set-OwaVirtualDirectory "$HostNameOWA (Default Web Site)" -InternalUrl ((Get-OwaVirtualDirectory "$HostNameOWA (Default Web Site)").ExternalUrl) Set-PowerShellVirtualDirectory "$HostNamePowerShell (Default Web Site)" -InternalUrl ((Get-PowerShellVirtualDirectory "$HostNamePowerShell (Default Web Site)").ExternalUrl) Get-OfflineAddressBook | Set-OfflineAddressBook - GlobalWebDistributionEnabled $True -VirtualDirectories $Null 24. Create a folder at the root of C: on the CAS server, and share it to Everyone with read/write permissions. 25. Log back into the Exchange admin center, and navigate to Serverscertificates. 26. Choose the CAS server in the drop-down menu, and click the plus sign to create a new certificate. 27. Choose Create a request for a certificate from a certification authority, and click Next. 28. Name the certificate, and click Next. 29. Do not request a wildcard certificate, and click Next. 30. Click Browse, choose the CAS server, and click OK. Click Next. 31. Leave defaults, and click Next. 32. Leave defaults, and click Next.
  • 32. A Principled Technologies test report 32Comparing performance and cost: Dell PowerEdge VRTX with one Dell PowerEdge M830 server vs. a legacy solution 33. Enter your organization information, and click Next. 34. Enter the path to the share you created on the CAS server, and click Finish. Example: cassharemyrequest.REQ 35. Log into the AD server, and open Internet Explorer. 36. Browse to localhost/CertSrv 37. Click Request a certificate. 38. Choose advanced certificate request. 39. Choose Submit a certificate request by using a base-64-endcoded CMC… 40. Open Windows Explorer and navigate to the share folder on the CAS server where the certificate request is stored. 41. Open the certificate with notepad and copy the content between BEGIN NEW CERTIFICATE REQUEST and END NEW CERTIFICATE REQUEST. 42. Paste the copied content into the Saved Request window. 43. Choose Web Server in the Certificate Template drop-down menu, and click Submit. 44. Choose Base 64 encoded, and download the certificate. 45. Copy the new certificate into the share folder on the CAS server. 46. Log back into the CAS server and open the Exchange Admin Center. 47. Go to ServersCertificates, and highlight the certificate you began before (should say Pending request in the status column). 48. Click Complete on the right side. 49. Type the path to the certificate, including the certificate name, and click OK. Example: cassharecertnew.CER 50. Verify that the status has changed to Valid. 51. Edit the new entry, and click Edit. 52. Go to services and check SMTP and IIS, click Save. 53. Click Yes on the warning message. 54. Run the following steps on the CAS and AD servers. a. Click Start, and type MMC b. Click FileAdd/Remove Snap-in c. Choose Certificates, and click Add. d. Choose Computer account, and click Next. e. Choose Local computer, and click Finish. f. Click OK. g. Expand CertificatesTrusted Root Certificate AuthoritiesCertificates h. Click ActionAll TasksImport i. Click Next. j. Browse to the share folder on the CAS server, and choose the new certificate you created. Click Next. k. Leave defaults, and click Next.
  • 33. A Principled Technologies test report 33Comparing performance and cost: Dell PowerEdge VRTX with one Dell PowerEdge M830 server vs. a legacy solution l. Click Finish. m. Click OK on the Import was successful message. 55. Log into the CAS server and open the Exchange admin center. 56. Navigate to ServersDatabases. 57. Restart the Microsoft Exchange Information Store service on the MB server. 58. Using the Edit button, disable the maintenance schedule and enable circular logging for each mailbox database. 59. Dismount and remount the databases. 60. Open the Exchange Management shell, and enter the following to move the paths of the default mailbox: Move-Databasepath “DatabaseName” –EdbFilepath “E:NewlocationDBname.edb” – LogFolderpath “F:Newlocation” 61. When prompted, type A and press Enter. 62. Open Exchange Management Shell, and enter the following: Get-OutlookAnywhere |Set-OutlookAnywhere -ExternalHostname cas.domain.com - DefaultAuthenticationMethod NTLM -ExternalClientsRequireSsl $true Installing and configuring the Exchange 2013 mail test clients and completing LoadGen configuration on the Exchange 2013 For our testing, we used one virtual client machine to run LoadGen 2013. To create the mail clients, we installed several software components. We followed this process for each installation: Installing Windows Server 2008 R2 SP1 Enterprise Edition 1. Insert the installation DVD for Windows Server 2008 R2 SP1 Enterprise into the DVD drive. 2. At the Language Selection Screen, click Next. 3. Click Install Now. 4. Select Windows Server 2008 R2 Enterprise (Full Installation), and click Next. 5. Click the I accept the license terms checkbox, and click Next. 6. Click Custom. 7. Click Next. 8. At the User’s password must be changed before logging on warning screen, click OK. 9. Enter the desired password for the administrator in both fields, and click the arrow to continue. 10. At the Your password has been changed screen, click OK. 11. Click Start, type change power-saving settings and press Enter. 12. Click Change plan settings. 13. Change the Turn off the display drop-down menu to Never. 14. Click Save changes, and close the Power Options, Screen Saver Settings, and Personalization screens. To set up this server, we had to install several additional software components. The following subsections detail the necessary installation processes. Joining the domain 1. Set a static IP. 2. Select StartControl PanelNetwork ConnectionsLocal Area Connection.
  • 34. A Principled Technologies test report 34Comparing performance and cost: Dell PowerEdge VRTX with one Dell PowerEdge M830 server vs. a legacy solution 3. Click Properties. 4. Highlight Internet Protocol (TCP/IP), and click Properties. 5. Select the Use the following DNS server addresses radio button, and enter the IP of the DNS server in the Preferred DNS server field. Click OK. 6. Right-click My Computer, and select Properties. 7. Under the Computer Name tab, click Change. 8. In the Computer Name Changes screen, under the Member of section, select the Domain radial box, and type test.local 9. Select OK to start joining the domain. 10. When the screen appears asking for a person qualified on the domain, type Administrator as the username and Password1 as the password. 11. At the Welcome pop-up window and the window warning that you must reset the computer for the changes to take effect, click OK. 12. At the System Properties screen, click OK. 13. When a pop-up appears asking if you want to restart now, click Yes to restart your computer. Installing Internet Information Services 1. Click StartAdministrative ToolsServer Manager. 2. On the left pane, click Roles. 3. Click Add Roles. 4. Click the Application Server checkbox. 5. When the Add features required for Application Server? screen appears, click Add Required Features. 6. Click Next. 7. Click Next. 8. At the Select Role Services page for Application Server, click the Web Server (IIS) Support checkbox. 9. Click Add Required Support Role Services. 10. Click Next. 11. Click Next. 12. At the Select Role Services page for Web Server (IIS), click IIS 6 Management Compatibility, ASP, and CGI checkboxes; and click Next. 13. Click Install. 14. Click Close. Installing Load Generator Download and install Load Generator 2013 using all defaults. Importing the certificate and editing the hosts file 1. Click Start, and type MMC 2. Click FileAdd/Remove Snap-in 3. Choose Certificates, and click Add. 4. Choose Computer account, and click Next.
  • 35. A Principled Technologies test report 35Comparing performance and cost: Dell PowerEdge VRTX with one Dell PowerEdge M830 server vs. a legacy solution 5. Choose Local computer, and click Finish. 6. Click OK. 7. Expand CertificatesTrusted Root Certificate AuthoritiesCertificates. 8. Click ActionAll TasksImport. 9. Click Next. 10. Browse to the share folder on the CAS server, and choose the new certificate you created. Click Next. 11. Leave defaults, and click Next. 12. Click Finish. 13. Click OK on the Import was successful message. 14. Open the Notepad program, and use FileOpen to open the hosts file stored at C:WindowsSystem32driversetc 15. Add the IP and FQDN of the CAS server. 16. Save and close Notepad. Preparing Load Generator 1. Log into the mail client. 2. Select StartAll ProgramsMicrosoft ExchangeExchange Load Generator 2013. 3. When the Load Generator screen appears, select Start a new test. 4. Select Create a new test configuration, and click Continue. 5. Change the total length of simulation to 1 hour. 6. In the Specify test settings screen, type Password1 as the Directory Access Password and Mailbox Account Master Password, and click Continue with recipient management. 7. Create 750 users in the Mailbox Database, and click Continue. 8. To accept defaults for Advanced recipient settings, click Continue. 9. In the Specify test user groups screen, select the plus sign to add a user group. 10. Change the Client Type to Outlook 2007 Cached, the action profile to Outlook_200, and the Mailbox size to 250 MB, and click Continue. 11. In Remote configurations, check the checkbox to enable distributing the workload, enter the computer names of all of the test clients, and click Continue. 12. Click Save the configuration file as, and name it testcfg.xml 13. Click Start the initialization phase (recommended before running the test). 14. Once you have initialized the database, create a backup copy of the Exchange mailbox databases. Installing and configuring Microsoft SQL Server 2014 We installed Microsoft SQL Server 2014 on a VM residing on the second Dell PowerEdge M830. Configuring the SQL Server VM (VRTX only) 1. After cloning, modify the SQL VM to contain the following settings: o Memory: 16 GB o Virtual Processors: 8 o Additional virtual disks:
  • 36. A Principled Technologies test report 36Comparing performance and cost: Dell PowerEdge VRTX with one Dell PowerEdge M830 server vs. a legacy solution  1 × 100GB virtual disks for SQL database and log data (Thick provisioned, eager-zeroed) Installing SQL Server 2014 1. Open the console for the VM or connect to the VM with RDP. 2. Mount the installation ISO to the VM. 3. Click Run SETUP.EXE. If Autoplay does not begin the installation, navigate to the SQL Server 2014 DVD, and double-click. 4. If the installer prompts you with a .NET installation prompt, click Yes to enable the .NET Framework Core role. 5. In the left pane, click Installation. 6. On the Product Key screen, enter a product key for standard, and click Next. 7. At the Setup Support Rules screen, wait for the rule check to complete. If there are no failures or relevant warnings, click OK. 8. Select the Specify a free edition and from the drop-down menu, select Evaluation. Click Next. 9. Click the checkbox to accept the license terms, and click Next. 10. If no failures are displayed after the setup support files are installed, click Next. 11. At the Setup Role screen, choose SQL Server Feature Installation. 12. At the Feature Selection screen, select Database Engine Services, Full-Text and Semantic Extractions for Search, Client Tools Connectivity, Client Tools Backwards Compatibility, Management Tools – Basic, and Management Tools – Complete. Click Next. 13. At the Installation Rules screen, click Next after the check completes. 14. At the Instance configuration screen, leave the default selection of default instance, and click Next. 15. At the Disk Space Requirements screen, click Next. 16. At the Server Configuration screen, check that NT AUTHORITYSYSTEM is selected for SQL Server Agent and SQL Server Database Engine. Click Next. 17. Assuming there are no failures, click Next. 18. At the Database Engine Configuration screen, select Mixed Mode. 19. Enter and confirm a password for the system administrator account. 20. Click Add Current user. This may take several seconds. 21. Click Next. 22. At the Error and usage reporting screen, click Next. 23. At the Installation Configuration Rules screen, check that there are no failures or relevant warnings, and click Next. 24. At the Ready to Install screen, click Install. 25. After installation completes, click Close. 26. Create a SQL Server login for the ds2user (see the Configuring the database (Data generation overview) section for the specific script to use). 27. Copy the pre-created DVD Store backup to the specified backup volume. 28. Download and install any available updates for Microsoft SQL Server 2014. We installed SQL Server 2014 SP1 and CU5.
  • 37. A Principled Technologies test report 37Comparing performance and cost: Dell PowerEdge VRTX with one Dell PowerEdge M830 server vs. a legacy solution Configuring the database workload client For our testing, we used a single client machine for the Microsoft SQL Server client. To create this client, we created a Windows Server 2013 R2 VM, assigned a static IP address, and installed .NET 3.5. We used this client to drive the DVD Store benchmark we ran against the SQL database. Configuring the database Data generation overview We generated the data using the Install.pl script included with DVD Store version 2.1 (DS2), providing the parameters for our 10GB database size and the database platform on which we ran: Microsoft SQL Server. We ran the Install.pl script on a utility system running Linux. The database schema was also generated by the Install.pl script. After processing the data generation, we transferred the data files and schema creation files to a Windows- based system running SQL Server 2014. We built the 10GB database in SQL Server 2014, and then performed a full backup, storing the backup file on the C: drive for quick access. We used that backup file to restore the server between test runs. The only modification we made to the schema creation scripts were the specified file sizes for our database. We explicitly set the file sizes higher than necessary to ensure that no file-growth activity would affect the outputs of the test. Besides this file size modification, the database schema was created and loaded according to the DVD Store documentation. Specifically, we followed the steps below: 1. We generated the data and created the database and file structure using database creation scripts in the DS2 download. We made size modifications specific to our 10GB database and the appropriate changes to drive letters. 2. We transferred the files from our Linux data generation system to a Windows system running SQL Server. 3. We created database tables, stored procedures, and objects using the provided DVD Store scripts. 4. We set the database recovery model to bulk-logged to prevent excess logging. 5. We loaded the data we generated into the database. For data loading, we used the import wizard in SQL Server Management Studio. Where necessary, we retained options from the original scripts, such as Enable Identity Insert. 6. We created indices, full-text catalogs, primary keys, and foreign keys using the database-creation scripts. 7. We updated statistics on each table according to database-creation scripts, which sample 18 percent of the table data. 8. On the SQL Server instance, we created a ds2user SQL Server login using the following Transact SQL (TSQL) script: USE [master] GO CREATE LOGIN [ds2user] WITH PASSWORD=N’’, DEFAULT_DATABASE=[master], DEFAULT_LANGUAGE=[us_english], CHECK_EXPIRATION=OFF,
  • 38. A Principled Technologies test report 38Comparing performance and cost: Dell PowerEdge VRTX with one Dell PowerEdge M830 server vs. a legacy solution CHECK_POLICY=OFF GO 9. We set the database recovery model back to full. 10. We created the necessary full text index using SQL Server Management Studio. 11. We created a database user and mapped this user to the SQL Server login. 12. We then performed a full backup of the database. This backup allowed us to restore the databases to a pristine state relatively quickly between tests. Figure 16 shows our initial file size modifications. Logical name Filegroup Initial size (MB) Database files primary PRIMARY 3.25 cust1 DS_CUST_FG 5,767 cust2 DS_CUST_FG 5,767 ind1 DS_IND_FG 2,621 ind2 DS_IND_FG 2,621 ds_misc DS_MISC_FG 2,621 orders1 DS_ORDERS 2,621 orders2 DS_ORDERS 2,621 Log files ds_log Not Applicable 20,480 Figure 16: Our initial file size modifications. Installing and configuring Iometer We installed Iometer using all defaults on a VM residing on the second Dell PowerEdge M830. Configuring the Iometer VM (VRTX only) After cloning, modify the Iometer VM to contain the following settings: o Memory: 8 GB o Virtual Processors: 4 o Additional virtual disks:  1 × 50GB virtual disk for Iometer target (Thick provisioned, eager-zeroed) Installing and configuring Iometer on the VM 1. Download the Iometer 1.1 package for Windows from www.iometer.org/doc/downloads.html. 2. Double-click the installer, and click Run. 3. At the Welcome window, click Next. 4. At the License Agreement window, click I Agree. 5. At the Choose Components window, leave the defaults selected, and click Next. 6. At the Choose Install Location window, change the Destination Folder to C:Iometer 1.1, and click Install. 7. When the installation completes, click Finish.
  • 39. A Principled Technologies test report 39Comparing performance and cost: Dell PowerEdge VRTX with one Dell PowerEdge M830 server vs. a legacy solution 8. Copy the relevant access specification file to the VM. Configuring the Iometer workloads (both legacy and VRTX) We set up Iometer to deliver a light file/print server-like I/O load through the duration of the tests. Below we review the specific configuration of our Iometer workload. Iometer workload specifications  50GB dataset, 1 Outstanding I/O per target (sectors)  512KB transfer request size  100ms transfer delay  1 Burst I/O  80% read, 100% random  45 minute run time  60 second ramp up time  Cycling – normal Running the test Test start and run times We ran all workloads concurrently in order to start and record all performance counters for this report. The specific testing parameters we used for each benchmark are included in the setup sections, and specifics for launching these tests are described below. About running the LoadGen test To run the test, we installed the LoadGen client and server components and simulated 750 Exchange users targeting the Exchange VM using LoadGen’s Exchange_200 Workload profile. We ran the LoadGen benchmark for 45 minutes, and beginning at the 15-minute mark, we used a 30-minute measurement window for performance monitoring. For more details about LoadGen, see www.microsoft.com/download/en/details.aspx?displaylang=en&id=14060. About running the DVD Store tests We created a series of batch files, SQL scripts, and shell scripts to automate the complete test cycle. DVD Store outputs an orders-per-minute metric, which is a running average calculated through the test. In this report, we report the last OPM reported by each client/target pair. Each complete test cycle consisted of the general steps listed below. 1. Clean up prior outputs from the target system and the client driver system. 2. Drop the database from the target. 3. Restore the database on the target. 4. Shut down the target. 5. Reboot the host and client system. 6. Wait for a ping response from the server under test (the hypervisor system), the client system, and the target. 7. Let the test server idle for 20 minutes. 8. Start the DVD Store driver on the client.
  • 40. A Principled Technologies test report 40Comparing performance and cost: Dell PowerEdge VRTX with one Dell PowerEdge M830 server vs. a legacy solution We used the following DVD Store parameters for testing: ds2sqlserverdriver.exe --target=<target_IP> --ramp_rate=10 --run_time=30 -- n_threads=12 --db_size=10GB --think_time=0.1 --detailed_view=Y -- warmup_time=15 About running the Iometer tests 1. Log into the Iometer machine. 2. Open the Iometer specification for the machine. 3. Click the start button. 4. After all access specifications finish running, remove the result files from the machine.
  • 41. A Principled Technologies test report 41Comparing performance and cost: Dell PowerEdge VRTX with one Dell PowerEdge M830 server vs. a legacy solution APPENDIX C – DETAILED TEST RESULTS Figure 17 shows the results of our database, mail, and file and print testing as well as power data for the Dell PowerEdge VRTX with a Dell PowerEdge M830 server. The median run was determined by OPM. Dell PowerEdge VRTX with one Dell PowerEdge M830 server Run 1 Run 2 Run 3 Median run Power Idle power (W) 390.9 389.4 390.3 389.4 Active power (W) 420.9 418.0 418.0 418.0 Database Orders per minute 8,867 8,872 8,877 8,872 Mail Average latency (ms) 2.9 2.9 3.0 2.9 File and print IOPS 36.3 36.3 36.3 36.3 Figure 17: Detailed run results for the Dell PowerEdge VRTX with one Dell PowerEdge M830 server. Figure 18 shows the results of our database, mail, and file and print testing as well as power data for the legacy disparate hardware solution we tested. The median run was determined by OPM. Legacy, disparate hardware Run 1 Run 2 Run 3 Median run Power Idle power (W) 660.2 671.4 662.9 671.4 Active power (W) 679.7 678.7 678.1 678.7 Database Orders per minute 2,050 2,053 2,053 2,053 Mail Average latency (ms) 1.22 1.4 1.5 1.4 File and print IOPS 7.8 7.7 7.8 7.7 Figure 18: Detailed run results for the legacy disparate hardware solution from our testing.
  • 42. A Principled Technologies test report 42Comparing performance and cost: Dell PowerEdge VRTX with one Dell PowerEdge M830 server vs. a legacy solution APPENDIX D – TCO CALCULATIONS In this appendix, we estimate and compare five-year costs for the two solutions we tested in this report. Each solution supports one SQL Server 2014 Standard Edition instance, one Microsoft Exchange 2013 Standard Edition instance, and one instance for file/print—in three VMs on the Dell PowerEdge VRTX solution and on individual servers in the legacy solution.  Dell PowerEdge VRTX—we include acquisition costs and annual costs to run the Dell PowerEdge VRTX solution we tested in this report.  Legacy solution—we compared performance of the Dell PowerEdge VRTX to a set of three 4- to 5-year-old HP servers, a shared HP storage array, and a switch. We estimate costs for this solution. Assumptions General  We use current U.S. dollars for all calculations.  We assume all tasks are executed by a system administrator earning in salary and benefits the equivalent of $56.09 an hour.3  For the Dell PowerEdge VRTX solution, we assume an existing VMware vCenter server that is not included in this cost analysis.  We consider only the costs that are platform specific. We thus omit staff costs for tasks that would be common to the two solutions and would require equal or similar effort and cost for the two solutions. These include the cost of setting up and maintaining the SQL Server and Exchange databases, updating the operating system versions, and updating the SQL server versions as updates become available over the five-year TCO timeframe.  We include only server licensing in this model and omit client access license costs and other client licensing.  For the legacy solution, we assume the business would repurpose legacy equipment from other uses, so it would need to purchase software for both the legacy and VRTX solutions.  We include software license costs with acquisition costs and software support costs with annual costs.  We do not include datacenter costs such as space or build costs because we assume the company would install these solutions in the main office or a branch office, not in a centralized enterprise data center. Acquisition costs  Acquisition costs for both solutions include software licenses for Microsoft Windows Server, Microsoft SQL Server, and Microsoft Exchange Server. Costs for the Dell PowerEdge M830 server also include VMware vSphere license costs.  Acquisition costs for the Dell PowerEdge VRTX solution include hardware and five-year hardware support, software licenses, and setup costs.  Acquisition costs for the Dell PowerEdge M830 server include the 29 percent discount available for this server model in the Dell online store. 3 swz.salary.com/salarywizard/Systems-Administrator-II-Salary- Details.aspx?hdcbxbonuse=off&isshowpiechart=true&isshowjobchart=false&isshowsalarydetailcharts=false&isshownextsteps=false &isshowcompanyfct=false&isshowaboutyou=false
  • 43. A Principled Technologies test report 43Comparing performance and cost: Dell PowerEdge VRTX with one Dell PowerEdge M830 server vs. a legacy solution Yearly costs  Costs for both solutions include Microsoft Software Assurance costs, energy costs for power and cooling, and hardware management costs.  We include costs to power and cool the solutions using power utilization measurements we made during testing. We estimate cooling costs equal to power costs.  For the legacy solution, we assume the business purchases post-warranty hardware support each year from the vendor for the servers and storage array. We include that in yearly costs, not acquisition costs.  We also include estimates of the cost of additional downtime for the aging legacy servers. We estimate negligible downtime for VRTX and 10 hours per server per year for the older legacy servers. We estimate the cost of that downtime at $300 an hour assuming a number of users are affected each time one of the servers becomes unavailable.  Costs for the Dell PowerEdge VRTX solution also include staff costs for the Dell PowerEdge VRTX solution to manage the VMware VSphere 5 virtualization. Dell PowerEdge VRTX solution cost Figure 19 shows the costs we calculated for the Dell PowerEdge VRTX solution. Dell PowerEdge VRTX with one Dell PowerEdge M830 server Unit Cost per unit Quantity description Quantity Total cost Acquisition costs Hardware Dell PowerEdge VRTX platform Platform with 29% discount $20,891 One VRTX 1 $20,891 Dell PowerEdge M820 blade server Server with 29% discount $28,089 One blade 1 $28,089 Software licenses Windows Server 2012 Standard Edition (Software Assurance) Each server with up to two processors. Up to two VMs per license. $883 One server with four processors requires a license pack for each VM. 10 $8,830 Microsoft SQL Server 2014 Standard (Software Assurance) One license per SQL VM $898 One SQL Server VM for each legacy SQL server 4 $3,592 Microsoft Exchange Server 2013 (Software Assurance) One license per Exchange VM $708 Two Exchange VMs per legacy exchange server 2 $1,416 VMware vSphere 5 Standard Basic support One per processor $995 Number of processors 4 $3,980 Setup Cost per hour $56 Number of hours 12 $673 Total acquisition costs $44,000
  • 44. A Principled Technologies test report 44Comparing performance and cost: Dell PowerEdge VRTX with one Dell PowerEdge M830 server vs. a legacy solution Dell PowerEdge VRTX with one Dell PowerEdge M830 server Unit Cost per unit Quantity description Quantity Total cost Annual costs Software support Windows Server 2012 Standard Edition (Software Assurance) Each server with up to two processors $221 One server with four processors requires a license pack for each VM. 10 $2,210 Microsoft SQL Server 2012 Standard (Software Assurance) One license per SQL VM $225 One SQL Server VM for each legacy SQL server 4 $898 Microsoft Exchange Server 2013 (Software Assurance) One server $177 Two Exchange VMs per legacy exchange server 2 $354 VMware vSphere 5 Standard Basic support One per processor per year $273 Number of processors 4 $1,092 Energy cost for power and cooling Platform $759 One VRTX 1 $759 Hardware management Cost per hour $56 Number hours 12 $673 VMware management Cost per hour $56 Number hours 24 $1,346 Total annual costs $7,332 Average cost per month $611 Figure 19: Cost analysis for the Dell PowerEdge VRTX with one Dell PowerEdge M830 server. (Totals may not sum due to rounding.)
  • 45. A Principled Technologies test report 45Comparing performance and cost: Dell PowerEdge VRTX with one Dell PowerEdge M830 server vs. a legacy solution Legacy solution costs Figure 20 shows the costs we calculated for the legacy solution. Legacy costs Unit Cost per unit Quantity description Quantity Total cost Acquisition costs Software licenses Windows Server 2012 Standard Edition (processor licenses) Each server with up to two processors. Up to two VMs per license. $883 Servers with one or two processors each 9 $7,947 Microsoft SQL Server 2012 Standard (processor licenses) One server $898 Servers with SQL installed 4 $3,592 Microsoft Exchange Server 2013 Standard (server licenses) One server $708 Servers with Exchange 1 $708 Setup Cost per hour $56 Number hours 36 $2,019 Total acquisition costs $14,266 Annual costs Support Windows Server 2012 Standard Edition (Software Assurance) Each server with up to two processors $221 Servers with one or two processors each 9 $1,989 Microsoft SQL Server 2012 Standard (Software Assurance) One server $225 Servers with SQL installed 4 $898 Microsoft Exchange 2013 Standard (Software Assurance) One server $177 Server with Exchange installed 1 $177 Hardware support - SQL Server HP extended support agreement with one year term for one server $338 One year 4 $1,352 Hardware support - Exchange server HP extended support agreement with one year term for one server $986 One year 1 $986 Hardware support - File server HP extended support agreement with one year term for one server $214 One year 4 $856
  • 46. A Principled Technologies test report 46Comparing performance and cost: Dell PowerEdge VRTX with one Dell PowerEdge M830 server vs. a legacy solution Legacy costs Unit Cost per unit Quantity description Quantity Total cost Hardware support - storage array HP extended support agreement with one year term for one server $1,553 One year 1 $1,553 Energy cost for power and cooling Legacy configuration $2,401 One year 1 $2,401 Hardware management Per solution $50 Estimate at two hours a month per server + one hour a month for storage array per year 228 $11,400 Downtime cost Per hour downtime cost $300 Each server down for multiple hours a year 54 $16,200 Legacy annual costs $37,812 Average cost per month $3,151 Figure 20: Cost analysis for the legacy solution. (Totals may not sum due to rounding.)
  • 47. A Principled Technologies test report 47Comparing performance and cost: Dell PowerEdge VRTX with one Dell PowerEdge M830 server vs. a legacy solution ABOUT PRINCIPLED TECHNOLOGIES Principled Technologies, Inc. 1007 Slater Road, Suite 300 Durham, NC, 27703 www.principledtechnologies.com We provide industry-leading technology assessment and fact-based marketing services. We bring to every assignment extensive experience with and expertise in all aspects of technology testing and analysis, from researching new technologies, to developing new methodologies, to testing with existing and new tools. When the assessment is complete, we know how to present the results to a broad range of target audiences. We provide our clients with the materials they need, from market-focused data to use in their own collateral to custom sales aids, such as test reports, performance assessments, and white papers. Every document reflects the results of our trusted independent analysis. We provide customized services that focus on our clients’ individual requirements. Whether the technology involves hardware, software, Web sites, or services, we offer the experience, expertise, and tools to help our clients assess how it will fare against its competition, its performance, its market readiness, and its quality and reliability. Our founders, Mark L. Van Name and Bill Catchings, have worked together in technology assessment for over 20 years. As journalists, they published over a thousand articles on a wide array of technology subjects. They created and led the Ziff-Davis Benchmark Operation, which developed such industry-standard benchmarks as Ziff Davis Media’s Winstone and WebBench. They founded and led eTesting Labs, and after the acquisition of that company by Lionbridge Technologies were the head and CTO of VeriTest. Principled Technologies is a registered trademark of Principled Technologies, Inc. All other product names are the trademarks of their respective owners. Disclaimer of Warranties; Limitation of Liability: PRINCIPLED TECHNOLOGIES, INC. HAS MADE REASONABLE EFFORTS TO ENSURE THE ACCURACY AND VALIDITY OF ITS TESTING, HOWEVER, PRINCIPLED TECHNOLOGIES, INC. SPECIFICALLY DISCLAIMS ANY WARRANTY, EXPRESSED OR IMPLIED, RELATING TO THE TEST RESULTS AND ANALYSIS, THEIR ACCURACY, COMPLETENESS OR QUALITY, INCLUDING ANY IMPLIED WARRANTY OF FITNESS FOR ANY PARTICULAR PURPOSE. ALL PERSONS OR ENTITIES RELYING ON THE RESULTS OF ANY TESTING DO SO AT THEIR OWN RISK, AND AGREE THAT PRINCIPLED TECHNOLOGIES, INC., ITS EMPLOYEES AND ITS SUBCONTRACTORS SHALL HAVE NO LIABILITY WHATSOEVER FROM ANY CLAIM OF LOSS OR DAMAGE ON ACCOUNT OF ANY ALLEGED ERROR OR DEFECT IN ANY TESTING PROCEDURE OR RESULT. IN NO EVENT SHALL PRINCIPLED TECHNOLOGIES, INC. BE LIABLE FOR INDIRECT, SPECIAL, INCIDENTAL, OR CONSEQUENTIAL DAMAGES IN CONNECTION WITH ITS TESTING, EVEN IF ADVISED OF THE POSSIBILITY OF SUCH DAMAGES. IN NO EVENT SHALL PRINCIPLED TECHNOLOGIES, INC.’S LIABILITY, INCLUDING FOR DIRECT DAMAGES, EXCEED THE AMOUNTS PAID IN CONNECTION WITH PRINCIPLED TECHNOLOGIES, INC.’S TESTING. CUSTOMER’S SOLE AND EXCLUSIVE REMEDIES ARE AS SET FORTH HEREIN.