Precautions and Safety Tips for Snorkelling in Andaman
KiteboardingTrainingDocument
1. Kiteboarding 101
Kiteboarding (also known as kitesurfing) is one of the fastest growing sports on the planet. With
rapid development in technology, this extreme sport has become accessible to practically
anyone. Some describe it as a cross between paragliding and surfing; other say it mixes sports
such as wakeboarding and sailing. Regardless, combining such sports is a recipe for record
speeds (up to 64 mph!), and jumping to astonishing heights (up to 66 ft!) - at the rider's
discretion of course. As much as the media portrays kiteboarding as an extreme sport, it tends
to have a very low intensity learning progression if learned with the proper instruction.
Kiteboarding was born in the warm waters of Maui, Hawaii in the late 90’s by extreme
windsurfers and surfers looking for a new kick. The sport has grown in popularity exponentially
world-wide, as well as exponentially with regards to its safety with rapid improvements in
technology.
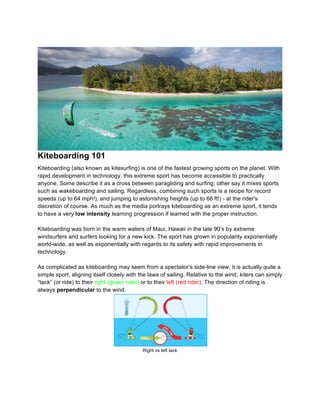
As complicated as kiteboarding may seem from a spectator’s side-line view, it is actually quite a
simple sport, aligning itself closely with the laws of sailing. Relative to the wind, kiters can simply
“tack” (or ride) to their right (green rider) or to their left (red rider). The direction of riding is
always perpendicular to the wind.
Right vs left tack
2. The “Kite” Learning Progression
The kiteboarding progression generally takes about 3 consecutive days of instruction to reach a
point of self-sufficiency. Learning both the “kite” elements and the “board” elements can be quite
overwhelming, therefore these skills tend to be taught in isolation of each other for the most
rapid progression.
Day 1 tends to be a “dry” day learning kite control, kite safety, and gear setup on a beach.
Day 2, we learn how to “body-drag” in the water using our kite to pull us as well as some
isolated board skills behind a boat.
Day 3, we finally put the kite and board together and achieve our first actual kiteboarding
experience - all the while focusing on self-sufficiency.
Learning progressions can drastically accelerate or decelerate from person to person. As long
as the student is learning in a safe, confident manner, it is considered a successful progression.
As much focus as we put on board riding in the kite progression, the most important goal is self
sufficiency. Once a participant reaches this point, they will no longer require boat support and
will be able to continue their progression on their own, if desired. The 4 “skill pillars” of self
sufficiency are:
1. Launching and landing
2. Water relaunch
3. Upwind body dragging (/board retrieval)
4. Self rescue
With all 4 of these skills in place, a kiteboarder can safely go out on a session/downwinder, not
lose their board, and make it back into shore as long as the winds are blowing Side Shore or
Cross-onshore (see below for wind directions)
Kiteboarding, requiring a lot of supervision initially, tends to be taught with a one to one ratio
(student to instructor). In unique cases, kiteboarding can be taught in a 2:1 ratio if students are a
similar weights and experience levels.
Kite clinics are a great option for groups of people to experience the beginnings of the sport
but they are simply beach sessions covering kite setup, basic flying, and safety.
Misconception: I have to be extremely strong to do this sport.
This is not the case! Kiteboarders wear harnesses which reroute the pull of the kite into your
core and legs. Kids as small as 80 lbs can learn how to kiteboard! Kiteboarding is a finesse
sport more than a strength sport.
The learning curve of kiteboarding may feel slow after day 1 or 2, but tends to have a rapid
increase once self-sufficiency is reached. For example: jumping big airs and inverted backrolls
are seen as intermediate skills in kiteboarding!
3. Kiteboarding’s accelerated learning curve
Types of Kiteboarding
A kite is just a tool to pull you. It can pull you across many different mediums. For this reason,
the sport has a lot of diversity! Kiteboarding is usually done on water. Popular riding styles on
water include “big air” jumps, freestyle (similar to wakeboarding), and racing. “Kitesurfing” is
done in the ocean on surfboards and is similar to “tow-in” surfing. Kiting can also be done on
grassy fields with all-terrain boards and buggies. Another popular option is “snow kiting” done
on skis or snowboards on open fields.
Kiteboarding and The Olympics
Kiteboarding is on the fast track to the big stage. Although it was denied a place in the 2016
Olympic games, it has landed itself a spot in the 2018 Youth Olympic Games and hopefully will
be included soon after in the 2020 Olympic Games.
Kiteboarding and Great Guana Cay
4. Great Guana Cay is a kiteboarding mecca! The strong winter breezes and the warm water make
it a fantastic place to learn to kiteboard. It has
spacious, beautiful beaches to learn the land
components as well as a protected body of water
called the Sea of Abaco to learn the rest. All
lessons take place on the Sea of Abaco as flatter
water makes the sport easier to learn. Due to this
reason, all lessons are taught with boat support,
to allow for immediate feedback as well as a sense
of safety.
Although the windiest season spans from
September through March, we still tend to see kitable days throughout the year. For maximum
comfort while learning in the winter months, a neoprene top or springsuit wetsuit is
recommended.
Since Great Guana Cay is so narrow, we can easily access both the Sea of Abaco, and Atlantic
sides no matter what the wind direction might be (wind direction is covered below). The Atlantic
side tends to be for advanced riders only.
Great Guana Cay has many neighbouring cays that offer superb kiteboarding as well. Day trips
to these places are highly recommended:
Green Turtle Cay:
With the correct wind direction, this location is a kiteboarder’s dream
spot. It is a beautiful wide-open bay with ample shallow water which
really tends to boost confidence levels.
Fowl Cay:
This tiny island is short enough that the wind can blow right over it
uninterrupted. This creates a flat water section on the lee side of the
island called a “slick”.
5. The Kite Community
Kiteboarding is a “team” sport. As much as it might seem like participants are alone when riding,
the sport tends to attract a community to certain beaches. Kiteboarders usually require aid from
others when launching and landing one’s kite. For this reason, kiteboarders tend to flock to the
same beaches to rider together and help each other out. It is a very friendly community, so
whenever heading out at your local spot, ask the other kiters for help, about unmarked
obstacles, and wind conditions to make your experience on the water the safest it can be.
The Wind
Knowledge of the wind is the most important piece of the puzzle. Before departing on a kiting
excursion, you should be well aware of the wind speed, wind direction, as well as your
desired sailing path.
Wind speed can be determined by using a weather application such as “wind finder”. Wind
tends to be read in mph. Kiting starts to become possible around 12 mph and begins to become
dangerous for a beginner around 25 mph. You can also use your senses to approximate wind
speed. Leaves on trees tend to start “ruffling” around 5 mph, and we will start to see white caps
form on the water around 12 mph. Sand will start blowing on the beach around 25 mph. It is
very easy to asses these conditions if the wind is blowing onshore, but if the wind is blowing
away from the land, the water may seem unusually calm. Wind direction may make the wind
appear different than it actually is.
6. Whitecaps
Wind direction can also be determined using a wind/weather application. An easier way to
determine wind direction is to stand in an open area and turn in a circle until you can feel the
wind blowing equally on both ears. We tend to name wind by the direction it is blowing from.
Below is an example or Cardinal wind direction. (Ie. North, East, South, West)
Cardinal wind direction
For simplicity sake, we will use relative wind direction. We can name a wind either onshore,
cross-onshore, cross-shore, or offshore. (See diagram below for explanation) The safest two
directions are in GREEN, whilst the more dangerous directions are in RED. Offshore conditions
are dangerous due to the fact that you cannot feel the full power of the wind from the shore, as
well, if anything should go wrong on your session, you will drift away from land. Beginners
should only pursue a session in cross-onshore wind and cross-shore wind directions.
7. Relative wind direction (to the shoreline)
The diagram below signifies how offshore winds can become turbulent as they cross past
obstacles. This is the main reason you cannot feel the full strength of an offshore wind. Kites
have a hard time continuously flying in turbulent wind.
Turbulent / offshore winds
Desired sailing path can be determined by finding perpendicular angles to the wind direction.
Simply by realigning your face into the wind once more and sticking your arms out to either side
of your body, each of your hands will be pointing in a desired sailing path (relative to the wind).
In the diagram below, the “beam reach” is the easiest sailing direction to take. Keep in mind,
these directions will change as the wind changes directions. You must reevaluate your desired
sailing path everyday. This law of sailing is common to kiteboarding as well.
8. Potential sailing paths
Everyone’s goal in kiteboarding is to “stay upwind”, meaning coming back to where you started
from on the beach. In order to do so, you must be kiting on a “beam reach” at the very least, but
preferably a “close reach”. Beginners tend to sail downwind when learning, which is a “broad
reach”.
The Kite
There are two types of kiteboarding kites:
a) Foil Kites: These kites inflate themselves as they fly with open cells that
catch the wind. We tend to see foil kites used as trainer kites or land kites as once
they touch the water, they lose their shape.
b) LEI Inflatable Kites: (Leading Edge Inflatable) These kites are most
commonly seen in kiteboarding. They require a hand pump to inflate them prior
to flying them. These are completely relaunchable once they crash in the water.
The construction of a kite is quite simple. Their canopies are made of “rip-stop”
nylon, which are sewn into an inflatable latex bladder. A bridle system is usually used to connect
the kite to the bar and lines. The inflatable portions of a kite include the leading edge as well as
the struts which give the kite its unique shape.
9. Kite anatomy
Kites tend to have numbers on their wingtips which tell other users what size of kite is being
flown. Kites are measured in m2
. The larger the kite, the more power it generates. Naturally, as
it gets winder, we tend to size-down our kites. Kites can range anywhere from 5m2
to 20m2
. The
kite in the above picture is a 12m2
kite.
Reasons kiteboarding has grown so popular is do to kite characteristics such as:
- re-launchability - effortless relaunching of your kite from the water
- depower / large power range - less kites required in your kite quiver
- portability - they pack down to the size of a backpack
- efficient safety releases - one easy switch to “kill your kite” instantly
Spectrum of kites
Kites tend to fit somewhere on the above spectrum. Bow kites, being beginner friendly, easy to
relaunch, with a lot of depower are one end of the spectrum, while a “C” kite which tends to be
more high performance, faster turning, with more aggressive pull, is at the other end. Most kites
today tend to be a “hybrid” or somewhere in the centre of the spectrum.
The charts below can be used to help understand which kite sizes are to be used in which wind
speeds. Please note that these are slightly different for everybody.
10. The Bar / Lines
A control bar is made up of 4 lines that connect into the bar. The outside two lines are the
“steering lines” - by changing their tension, you can steer the kite right vs left. In order for a bar
to steer correctly, make sure the red side is always on the left (port side) or make sure the logo
is facing up.
The centre two lines are your “power lines”. By sliding the control bar up and down these lines,
you can power up your kite and depower it, much like a throttle.
We hook our harness’ spreader bar into the “chicken loop”, which is then secured in place with
the safety pin.
**Caution: always make sure your safety leash is connected into the “flag line” before attempting
to fly a kite. This engages all of the kites safety systems.
11. Control bar anatomy
Bars tend to have a cleat either above the bar or below the bar that allow for additional depower
if need be (turning your 12m kite into a 10m kite temporarily).
The Harness
All LEI kites require a harness to be worn when being flown. Most people wear “waist
harnesses” that Velcro around the midriff of your body, slightly above the belly button. If a waist
harness is uncomfortable, others may choose to wear a “seat harness” with leg straps. Below is
a sizing chart:
12. The Board
Boards tend to range from 130 cm to 160 cm in length. We change board sizes depending on
wind speed, kite size, and body weight. The larger the board, the easier it will be to float, plane,
and ride the board. These are great options for beginners and light wind scenarios (See the
board on the right in the diagram below). Smaller boarders tend to be more responsive and
higher performance.
Spectrum of boards
As well as length, rocker line is also very important. The flatter the board, the less wind you will
need to ride it but the easier it will be to catch an edge. The more curvature a board has, the
more high performance it will be, but it will tend to ride slower.
Different amounts of “rocker”
General Safety
It is important to remember that kites have the potential to seriously injure participants and
bystanders around them. Before attempting to fly a kite, one should always assess their riding
location, every time. Make sure you have assessed the wind and deem it safe to fly a kite in (not
too windy, not too gusty, onshore). Make sure you have at least 3 “line lengths” between you
and any obstacles that may be “downwind” of you. This includes other people and families on
the beach. Be sure to use someone to assist you in your launch. Since we tend to go downwind
13. in this sport, make sure you have an exit strategy in case you do not stay upwind on the water -
a large open beach.
If this is your first time solo flying a kite since your last lesson, take a step back before you step
forward. Fly the kite on the beach, body drag in the water, and make sure you are completely
confident before attempting to ride a board. Also practice “upwind body dragging” to retrieve
your board. Making sure your “4 Pillars of Self Sufficiency” are up to par is far more important
than actually riding a board for a safe experience.
Although most kiteboarders tend not to wear a life jacket or helmet, it is always safest to use
these tools, especially when first beginning. Once you become proficient with the “self rescue”,
your kite will become your personal floatations device and a life jack may lose some purpose.
Also, it may seem tempting to use a board leash when first learning, but board leashes tend to
be highly dangerous and are not recommended. Instead, take the time to learn a proficient
“upwind body drag”.
Finally, this sport can be very dangerous if it is not learned properly. A kiteboarding lesson is
highly recommended to learn safe ways to utilize kite equipment. Don’t risk your life, take a
lesson.
Kite Rigging
Kite rigging: the “downwind” method
The final product should look like the diagram above. There are two components to “rigging” a
kite: the kite and the bar/lines. They can be rigged in either order.
The Kite:
14. Lay the kite on its back, facing into the wind. The kite must be inflated up to approximately 8-9
PSI. This tends to be when the kite becomes very rigid, and it is very difficult to make an
impression in the leading edge. Simply hook up your pump to the inflation valve in the centre of
the kite, make sure the deflate valve is sealed shut, and begin pumping. The kite will take shape
and lift off the ground as it inflates, so make sure your pump leash is also connected to the kite,
so that you can use both hands for pumping.
Attaching the hose and pump leash to the kite
Once inflated, seal the inflate valve, unhook your pump leash, and flip your kite over one of its
wing tips so that the leading edge is facing the ground. The leading edge should always be
facing into the wind to prevent the canopy from catching wind.
From “carrying” position to “park” position
Wind direction relative to kite position
15. The Bar/Lines:
Unsecure the line endings from the bar. While holding the bar with an open palm, help the 4
lines off the bar as you walk them out. (The diagrams below show us “running our lines”
downwind of the kite, but here at Bakers we tend to teach this upwind of the kite. Both methods
work). We tend to always wrap and unwrap our lines in a figure-eight pattern to prevent twists
and tangles in the lines.
Unwinding lines off of control bar
Once all the lines are laid out downwind of the kite, we want to make sure our bar is logo down
(or red on right - backward to how we normally fly the kite). Next we will separate all four lines
and walk back towards the kite. Our feet separate the outside lines from the inside lines, and a
fingers can be used to separate the two inside lines.
Separating and “running” lines
Adding some additional tension further up the lines can aid in separating the lines. This can be
done by having a friend add tension, or by using our second hand to add tension.
16. Utilizing second hard to add tension to lines
Everything is colour coordinated in kite rigging. Make sure like-colours attach the lines to the
bridles on the kite.
Attaching the lines to the kite, we use a “Lark’s Head knot”. See the diagram below.
“Lark’s Head” knot
17. The Wind Window
The wind window is where the kite can physically fly relative to where the operator is standing.
Exploring the wind window is the premise of any beginner kiteboarding lesson. Please refer to
the diagram above. Kites can only fly “downwind” of the operator - therefore standing “upwind”
of the operator is a safe place to spectate.
There are two components of the wind window: the neutral zone, and the power zone.
We tend to name locations in the neutral zone with a clock face, 12 o’clock being directly
overhead. 1, 2, and 3 o’clock are on the right side of the wind window, while 11, 10 and 9
o’clock are on the left side of the wind window.
18. The Wind Window: neutral positions
While the kite is flying in these positions, the kite is considered “neutral”. Wind can pass over
and under the canopy without the canopy catching the wind. The example below shows a
neutral kite at 12 o’clock with wind passing by it.
12 o’clock position: a neutral kite
The operator can steer the kite left or right by adding pressure to one of the two outside lines.
Levelling out the lines will cause the kite to stop steering and park in whichever direction the
operator has pointed it (at whichever neutral position). Imagine a bar between the two line
endings in the diagram below.
19. How to steer a kite
Slower steering keeps the kite in the neutral zone.
The power zone is accessed by aggressively pulling on one outside line until the kite “dives”
downward into the wind window. We always start every power dive at 12 o’clock and dive it
straight downward. Remember to always bring the kite back up to 12 o’clock after each power
dive by pulling your opposite hand.
Diving a kite into the “power zone”
The deeper the kite dives into the wind window, the more power is generated. In diagram below,
the first position shows a neutral kite and the next three positions shows a level 1, 2, and 3
power dive respectively.
20. Kite position vs kite power
Kite Controls
Once we understand the steering of the kite (pulling on the left or right side of the bar to steer
the kite in each direction) the only other control we have over the kite is the “sheeting”. When
we are hooked into a 4-line kite with a harness, we gain the ability to pull the bar in (sheet in -
powering the kite) or push the bar outward (sheet out - depowering the kite).The sheeting acts
as more than just a throttle; sheeting-in the bar increases turning speed of the kite but tends to
stall the kite out, while sheeting-out the bar slows the turning speed of the kite and generates a
more natural flying shape for the kite.
Kiteboarding rule of thumb: “When in doubt, sheet out!”
Launching and Re-launching a Kite
Kites should always be launched along the green neutral zone to prevent injury (see diagram
below). Whenever on land, always use another person to hold your kite to “assist your launch”.
Your launch position will either be your 3 o’clock position or 9 o’clock position, depending
whichever one is pointed towards the water.
21. Launching a kite in the neutral zone
Keeping a sheeted-out bar, the kite will naturally want to fly up the edge of the wind window. By
just using an outside line (as seen in the picture below) the kite stays sheeted-out automatically.
A sheeted out bar position during relaunch
A very similar relaunch can be done if the kite is crashed the water.
22. Board Riding
Using a quick, steep power dive of the kite, we can pop up on our board and begin riding toward
our left (port tack) or right (starboard tack). Once the board has enough power to “plane” on top
of the water, the kite can simply be parked at our 10 o’clock (port tack) or 2 o’clock (starboard
tack) to continue riding. All riding is done on our “heel edge” initially. To stop, simply raise the
kite back up to 12 o’clock.
Ideal kite position during port (10) and starboard (2) tacks
The diagram below shows potential paths one could take when kiteboarding. Although we tend
to ride downwind when first learning (orange), the ideal riding paths are highlighted in green and
yellow.
Close reach, beam reach, and broad reach tacks
23. Kiteboarding Right of Way
The Self Rescue
This is arguably the most underrated and most important skill in kiteboarding. When things do
go wrong, which they will, this is how we get ourselves back to shore safely, with minimum
effort. As long as you are in onshore, cross-onshore, or side shore winds, this technique works
100% of the time.
Whether the wind dies, picks up, or your gear breaks on the water, your self-rescue begins by
pulling your safety release and flagging your kite out on one line. Now that your kite is
powerless, we can manipulate it.
24. Our kite is our personal flotation device, so getting back to it without tangling ourselves in our
slacked lines is imperative. As we climb up our flag line towards our kite, keeping our lines
downwind of us will prevent us getting wrapped up in our lines. Once we get to our kite, it is
important to wrap up your lines as best as you can to prevent tangles in your lines.
Now that our lines are wrapped and we are holding onto the leading edge (inflatable portion) of
our kite, it is easy to be picked up by a boat or swim our rig back in. You can also prop your kite
up into a “C” shape (see picture above) to have the wind help pull you back in to shore. You
should never deflate your kite on the water unless you have an alternate option to get
back to shore!
Below is an example of what a self rescue might look like in real time:
Cleaning and Gear Maintenance
To prolong the life of our Baker’s Bay kiteboarding gear, it is important clean it regularly. Items
such as harnesses, foot straps, metal screws, and control bars should be rinsed with freshwater
after every use in saltwater.
Kites should always be completely dry before being stored. This will reduce mould and mildew
formation which cause nylon deterioration. Kites should be rinsed with freshwater at least once
a month.
Kite pumps should have lubricant added to them whenever deemed appropriate.
25. Board/ding repair should be completed by those who have an understanding of resin and
fibreglass repair. Kite bladder and canopy repair must also be done by a knowledgeable person.
Gear List
Our current kiteboarding quiver at Baker’s Bay:
Kites:
17m Slingshot Turbine
15m Slingshot Turbine
12m Slingshot Rally
10m Slingshot Rally
8m Slingshot Rally
6m Slingshot Rally
3m Slingshot Trainer Kite
Control Bars/Lines:
(2) 23” Slingshot Bar w/ 27m lines
(2) 20” Slingshot Bar w/ 23m lines
(2) 17” Slingshot Bar w/ 20m lines
Boards:
152cm Core Fusion 2
144cm Core Fusion 2
137cm Core Fusion 2
133cm Core Fusion 2
(2) Liquid Force Foil/Fish surfboard
Pumps:
(4) Slingshot Pumps
Harnesses:
XS Ion Ripper (Children's harness)
XS Dakine Pyro
S Dakine Pyro
M Dakine Pyro
L Dakine Pyro
XL Dakine Pyro
XL Dakine Fusion (Seat Harness)
26. Training Locations
The majority of kiteboarding lessons will take place on the Sea of Abaco where the waters are
more protected. Flatter water allows for accelerated progression. South winds allow for initiating
lessons right off of Biscotti Point, while North winds will require a boat launch or an offshore
launch. Both wind directions require boat supervision to ensure client safety.
Beach/Ground Control lessons should take place at Biscotti Point on a South wind and Healy
Point on a North wind.
Downwinders
These are an excellent riding option for “mostly self sufficient” kiteboarders as well as more
experienced riders that want to adventure. Essentially, riders ride with the wind, eventually
ending up downwind relative to where they began - similar to a chairlift and ski run. They require
parking a cart at either end of downwinder and riding from point A to point B. The diagram below
shows a planned downwinder with a start point, an endpoint, and all the obstacles in between.
It is important to research the route before hand so that you do not end up in a dangerous
position or missing your endpoint altogether. Always chat with a local before attempting a new
downwinder.
Kite Excursions
These are also something we offer at Bakers Bay. By simply taking a boat trip to one of the
many kite Meccas we have near Guana Cay, riders can experience new terrain, flatter water,
and a sense of adventure. These are catered toward self sufficient riders who can stay upwind
when riding. Our most popular excursion is to Green Turtle Cay, which is a mile-long, knee deep
bay - every Kiteboarder’s dream.
27. What Sets Us Apart
The Baker’s Bay kiteboarding experience is like none other. Due to climate and coaching
experience, members can learn with 5 star instruction from the comfort of their backyards. At
Baker’s Bay, member satisfaction comes first. Keeping the member safe and fostering a sense
of confidence can go a long way in overall positive experience.
Services such as pre-rigging members’ kites allow members to simply show up and ride.
Supplying members with a stocked cooler of water and Gatorade makes for a much more
enjoyable experience for the member. We also record video footage which not only makes for a
great keepsake, but is an excellent method of instruction - teaching through video. Finally, all
lessons are taught with boat support to maximize the amount of time members will spend flying
their kite; this leads to an accelerated kiteboarding progression.