
Empfohlen
Weitere ähnliche Inhalte
Andere mochten auch
Ähnlich wie 6 stages for reflection + unit of work
Ähnlich wie 6 stages for reflection + unit of work (20)
Mehr von Patricia Garces
Kürzlich hochgeladen
Kürzlich hochgeladen (20)
6 stages for reflection + unit of work
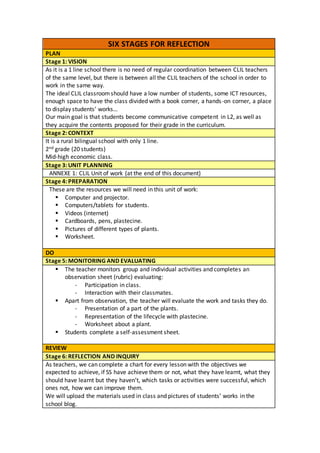
- 1. SIX STAGES FOR REFLECTION PLAN Stage 1: VISION As it is a 1 line school there is no need of regular coordination between CLIL teachers of the same level, but there is between all the CLIL teachers of the school in order to work in the same way. The ideal CLIL classroomshould have a low number of students, some ICT resources, enough space to have the class divided with a book corner, a hands-on corner, a place to display students’ works… Our main goal is that students become communicative competent in L2, as well as they acquire the contents proposed for their grade in the curriculum. Stage 2: CONTEXT It is a rural bilingual school with only 1 line. 2nd grade (20 students) Mid-high economic class. Stage 3: UNIT PLANNING ANNEXE 1: CLIL Unit of work (at the end of this document) Stage 4: PREPARATION These are the resources we will need in this unit of work: Computer and projector. Computers/tablets for students. Videos (internet) Cardboards, pens, plastecine. Pictures of different types of plants. Worksheet. DO Stage 5: MONITORING AND EVALUATING The teacher monitors group and individual activities and completes an observation sheet (rubric) evaluating: - Participation in class. - Interaction with their classmates. Apart from observation, the teacher will evaluate the work and tasks they do. - Presentation of a part of the plants. - Representation of the lifecycle with plastecine. - Worksheet about a plant. Students complete a self-assessment sheet. REVIEW Stage 6: REFLECTION AND INQUIRY As teachers, we can complete a chart for every lesson with the objectives we expected to achieve, if SS have achieve them or not, what they have learnt, what they should have learnt but they haven’t, which tasks or activities were successful, which ones not, how we can improve them. We will upload the materials used in class and pictures of students’ works in the school blog.
- 2. ANNEXE CLIL Unit of Work Global Goal: GET TO KNOW PLANTS DEEPLY. UNIT 3: PLANTS LEVEL 2nd grade TIMING 6 lessons Aims To present the content of the unit. To introduce the main characteristics and parts of the plants. To help students understand why plants are living things. To make students aware of how important plants are in our lives. To make students collaborate with other classmates to do some tasks. Criteria for assessment Teacher, peer and self-assessment processes will be used to assess how well learners: Recognize plants as living things. Understand what plants need to grow and how they obtain food. Distinguish between the main parts of a plant and explain their functions. Identify the roots, stem, leaves, flowers and fruits of plants. Know the classification of plants as trees, bushes and grasses. Identify the type of plant according to its stem and main characteristics. Interpret the phases of the lifecycle of a plant. Learn to respect the plants. TEACHING OBJECTIVES Content Characteristics of plants. Parts of the plants and their functions. Types of plants. Phases of the lifecycle of a plant. Cognition Understanding why plants are living things. Identifying the parts of the plants with different examples and understanding their functions. Analysing the phases of the lifecycle of a plant and inferring its process. Comparing characteristics of trees, bushes and herbs. Classifying plants according to their characteristics. Explaining some information of a plant when completing their plant’s worksheet. Culture Recognize plants as living things. Become aware of the importance of plants in our lives and world. Understand they have to take care of and respect the environment.
- 3. ANNEXE Communication Language OF learning Key vocabulary: Plants, living things, water, light, soil, roots, stem, leaves, flowers, fruits, seeds, branches, to absorb, lifecycle, germinate, sprout, trees, bushes, herbs… Language FOR learning I can see… (living things in the forest picture) The parts of the plant are… The functions of the __(part of the plant)__ are… Analysing the lifecycle: The seed is on the soil, the seed is germinating, the plant is growing, the plant has flowers, the flowers become fruits, the fruits have seeds, the seeds are moved to a different place... Comparing types of plants: trees are bigger than bushes, herbs has a flexible stem… Other: What does ________ mean?, How do you say ________ in English?, How do you spell ________?... Language THROUGH learning Record, predict and learn new words which arise from activities. Make use of peer explanations. Retain language revised by both the teacher and learners. LEARNER OUTCOMES By the end of the unit learners will be able to: Recognize plants as living things. Understand what plants need to grow and how they obtain food. Distinguish between the main parts of a plant and explain their functions. Identify the roots, stem, leaves, flowers and fruits of plants. Know the classification of plants as trees, bushes and grasses. Identify the type of plant according to its stem and main characteristics. Interpret the phases of the lifecycle of a plant. Respect plants and worry about the environment. TEACHING/LEARNING ACTIVITIES Lesson 1 1. Observe a picture of a forest and explain what they see. Identify living things in the picture. 2. Brainstorming of what they know about plants. 3. Say if the affirmations are true or false. 4. Watch a video about how important plants are in our lives and world. Lesson 2 1. Watch a video to introduce the parts of the plants. https://youtu.be/uUH8iAanREY 2. Divide the class in five groups. Each group is going to investigate and prepare a mini-presentation of a part (roots, stem, leaves, flowers and fruits) including their functions and pictures that support the presentation. The final result will be a poster of each part.
- 4. ANNEXE Lesson 3 1. Finish the preparation of the poster and present their works. Display the posters on the class’ wall. Lesson 4 1. Present 5 pictures of the different phases in the lifecycle of a plant. SS have to analyse what is happening in each stage. 2. In small groups, they decide what the order of these phases is. 3. We expect they realize it is not a process with a beginning and an ending, but a cyclic process. 4. Watch the video https://youtu.be/zXzOi7-nx_w?list=PL_J- AyLJZjWCV8hONkunXn6RdvQfVX65N 5. Every student will make the life cycle of a plant with plasticine in an A4 cardboard divided into 5 spaces, writing a short sentence that explains each phase. Lesson 5 1. Show a picture of a tree, a bush and an herb. 2. Say characteristics of each type of plant according to its stem, leaves, colour, size… 3. In pairs, they will classify some pictures with their names in trees, bushes or herbs. 4. Take a virtual tour in the webpage of the US botanic garden: https://www.aoc.gov/virtual-tours/botanicgarden/tourfiles/index.html Lesson 6 1. As a final task, SS will complete a worksheet with the information of a specific plant. For this, they will have looked for a picture of the plant at home. They will have to write about: the name of the plant, what parts they can see, what the leaves and the stem look like, what type of plant it is, and any other interesting information. 2. They complete a self-assessment sheet. INSTRUMENTS FOR ASSESSMENT The teacher monitors group and individual activities and completes an observation sheet (rubric). Students’ participation in class. Students’ interaction with their classmates. Students’ presentation of a part of the plants. Students represent the lifecycle with plastecine. Students complete a worksheet about a plant. Students complete a self-assessment sheet. SCAFFOLDING TIPS Sit down. Let’s start. Who remember what we did last day? Let’s look at the picture/s What can you see in the picture/s? What do you know about…? Can you tell me…?
- 5. ANNEXE Is it clear? Do you understand? Good job! Excellent! Try again. You’ve done really well today. RESOURCES Computer and projector. Computers/tablets for students. Videos (internet) Cardboards, pens, plastecine. Pictures of different types of plants. Worksheet.