Hatchery Management
•Als PPTX, PDF herunterladen•
13 gefällt mir•22,913 views

This document provides information on proper incubation factors for bird eggs, including temperature, humidity, ventilation, and egg turning. It lists the ideal values for these factors for different bird species. Maintaining proper temperature and humidity is essential for hatching success, as improper control can interfere with embryo growth and development. Factors like ventilation, turning, and sanitation must also be controlled correctly.

Empfohlen
Weitere ähnliche Inhalte
Was ist angesagt?
Was ist angesagt? (20)
Andere mochten auch
Andere mochten auch (18)
Ähnlich wie Hatchery Management
Ähnlich wie Hatchery Management (20)
Mehr von Osama Zahid
Mehr von Osama Zahid (20)
Kürzlich hochgeladen
Kürzlich hochgeladen (20)
Hatchery Management
- 6. Important Incubation Factors • When incubating any bird egg it is important to control the same factors of temperature, humidity, ventilation, and egg turning. • The chart shown below lists the major incubation factors and the values of each that produces the best incubation conditions for the species of birds shown.
- 7. Important Incubation Factors • Poor results are most commonly produced with improper control of temperature and/or humidity. Improper control means that the temperature or humidity is too high or too low for a sufficient length of time that it interferes with the normal growth and development of the embryo. • Poor results also occur from improper ventilation, egg turning and sanitation of the machines or eggs.
- 8. Incubation Temperature • Obtain the best hatch by keeping the temperature at 100º F. throughout the entire incubation period when using a forced-air incubator. • Minor fluctuations (less than ½ degree) above or below 100 degrees are tolerated, but do not let the temperatures vary more than a total of 1 degree.
- 9. Incubation Temperature • Prolonged periods of high or low temperatures will alter hatching success. High temperatures are especially serious. • A forced-air incubator that is too warm tends to produce early hatches. • One that runs consistently cooler tends to produce late hatches. • In both cases the total chicks hatched will be reduced.
- 10. Incubation Temperature • Maintain a still-air incubator at 102 degrees F to compensate for the temperature layering within the incubator. • Obtain the proper temperature reading by elevating the bulb of the thermometer to the same height as the top of the eggs when the eggs are laying horizontal.
- 11. Incubation Temperature • If the eggs are positioned in a vertical position, elevate the thermometer bulb to a point just below the top of the egg. • The temperature is measured at the level where the embryos develop (at the top of the egg). Do not allow the thermometer's bulb to touch the eggs or incubator. Incorrect readings will result.
- 12. HUMIDITY • Humidity is carefully controlled to prevent unnecessary loss of egg moisture. • The relative humidity in the incubator between setting and 3 days prior to hatching should remain at 58-60 percent or 84-86º F., wet-bulb. • When hatching, the humidity is increased to 65 percent relative humidity or more.
- 13. HUMIDITY • Frequently there is confusion as to how the measurement of humidity is expressed. Most persons in the incubator industry refer to the level of humidity in terms of degrees F., (wetbulb) rather than percent relative humidity. • The two terms are inter convertible and actual humidity depends upon the temperature (F.) as measured with a dry-bulb thermometer. • Conversion between the two humidity measurements can be made using a psychro metric table
- 14. HUMIDITY • Rarely is the humidity too high in properly ventilated still-air incubators. • The water pan area should be equivalent to onehalf the floor surface area or more. • Increased ventilation during the last few days of incubation and hatching may necessitate the addition of another pan of water or a wet sponge. • Humidity is maintained by increasing the exposed water surface area.
- 15. Ventilation • Ventilation is very important during the incubation process. • While the embryo is developing, oxygen enters the egg through the shell and carbon dioxide escapes in the same manner. • As the chicks hatch, they require an increased supply of fresh oxygen.
- 16. Ventilation • As embryos grow, the air vent openings are gradually opened to satisfy increased embryonic oxygen demand. • Care must be taken to maintain humidity during the hatching period. • Unobstructed ventilation holes, both above and below the eggs, are essential for proper air exchange.
- 17. Turning of Eggs • Eggs must be turned at least 4-6 times daily during the incubation period. • Do not turn eggs during the last 3 days before hatching. The embryos are moving into hatching position and need no turning. • Keep the incubator closed during hatching to maintain proper temperature and humidity.
- 18. Egg Setting • The air vents should be almost fully open during the latter stages of hatching. • The eggs are initially set in the incubator with the large end up or horizontally with the large end slightly elevated. This enables the embryo to remain oriented in a proper position for hatching. • Never set eggs with the small end upward.
- 19. Hand Turning • In a still-air incubator, where the eggs are turned by hand, it may be helpful to place an "X" on one side of each egg and an "O" on the other side, using a pencil. • This serves as an aide to determine whether all eggs are turned.
- 20. Hand Turning • When turning, be sure your hands are free of all greasy or dusty substances. • Eggs soiled with oils suffer from reduced hatchability. • Take extra precautions when turning eggs during the first week of incubation. • The developing embryos have delicate blood.
- 21. Mating Ratio Species Species Incubation period (days) Mating ratio (females vs male) Chickens Light breeds 21 12 -15 Heavy breeds 21 08 -12 Ducks Light breed 28 06-08 Turkeys 28 10-12 Guinea fowl 26-28 08-09 Pheasants 23-28 07-10 Quail 16-18 01-05 Partridge 24 04 Pigeon 17 01
- 22. Incubation Species Incub. Period (days) Temp (F.)¹ Humidity (F.)² Temp(F) Poultry 21 100 85-87 90 F 18th day Turkey 28 99 84-86 90 F 25th day Duck 28 100 85-86 90 F 25th day Guinea Fowl 28 100 85-87 90 F 24th day Quail 17 100 84-87 90 F 20th day Pigeon 17 100 85-87 90 F 15th day Pheasant 23-28 100 86-88 92 F 21st day
- 23. Handling Eggs • For disease prevention and health reasons, it’s best to get all the eggs from one source. • If you get your eggs locally but cannot get the number you want in one day, the eggs can be held for up to 7 - 10 days before they are set in the incubator. • Longer storage periods are possible but require further measures to keep the eggs viable.
- 24. Handling Eggs • Until they are incubated, hatching eggs should be stored carefully at approximatly 70° Fahrenheit. If you need more time to collect the number of eggs you need, start putting three- to seven-day-old eggs in a cooler (60°F) room. • It is important to clean eggs gently by scrubbing the dirt of with a knife. Do not use water or cleaning products because you will take off the natural protective coating.
- 25. Handling Eggs • If the eggs are stored over three days, rotate them once a day. Mail order eggs should be set as soon as they arrive. Select only the best eggs for incubation, and discard any which have thin shells or fine hairline cracks. • Eggs must be turned while collecting as well as in the incubator to prevent the embryo from sticking to the shell. • If your incubator is not equipped with the optional mechanical turner, mark each egg with an X on one side and an O on the opposite side. When the eggs are turned, all the Xs or all the Os should be face-up at the same time.
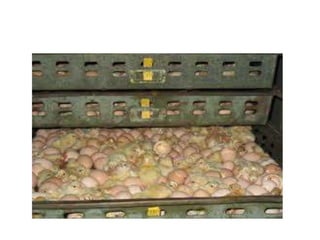
- 26. Egg Collection & Storage • Collect eggs at least three times daily. When daily high temperatures exceed 85 degrees F. increase egg collection to five times daily. Collect two or three times in the morning and one or two times in the afternoon. • Slightly soiled eggs can be used for hatching purposes without causing hatching problems, but dirty eggs should not be saved. Do not wash dirty eggs. • Store eggs in a cool-humid storage area. Ideal storage conditions include a 55 degree F. temperature and 75% relative humidity. Store the eggs with the small end pointed downward
- 27. Egg Setting • Alter egg position periodically if not incubating within 4-6 days. Turn the eggs to a new position once daily until placing in the incubator. • Hatchability holds reasonably well up to seven days, but declines rapidly afterward. Therefore, do not store eggs more than 7 days before incubating. After 3 weeks of storage, hatchability drops to almost zero. Plan ahead and have a regular hatching schedule to avoid storage problems and reduced hatches. • Allow cool eggs to warm slowly to room temperature before placing in the incubator. Abrupt warming from 55 degrees to 100 degrees causes moisture condensation on the egg shell that leads to disease and reduced hatches.
- 28. Egg Quality • For every breed of chickens there is a guideline for the weight of the egg. Eggs lower than the minimum and larger than the maximum must not be uses as an breeding egg. Also look at the shape of the eggs; round eggs where it’s difficult to find the blunt side (where the air room should be) often give issues while hatching. Other issues like lime bulbs, rings and non symmetric eggs will product chickens which are not healthy and are a threat to the stock you have. • Do not use eggs with brushes, dents or holes. True the candling process it’s possible to see if the air room is in the right place in the dump part of the egg. Eggs with an air room in another location than the dump part of the egg should not be used as breeding eggs. This also counts for airrooms which move around in the egg.
- 29. Fertilization • The rooster and hens you select have to be from good quality; even if you just have chickens for some eggs it’s important that the parents are very fit. They have to look good; nice feathers, good tail, good cam and more. This is because: - There is a big change that aberrances of the parent chickens will by inheritance to the baby chickens - If the parents are not fit this can result in issues like large amount of non fertile eggs, dead embryos, weak chickens and more. • If you breed for shows I advise to use 2 roosters with 2 or 4 hens. Large amount of hens will only lead to large amount of chickens which are not up to the standard you require.
- 30. Fertilization • Last thing we want to mentions is inbreed; this is (if you use it well) no problem. Be sure the elderly chickens are in good condition; well proportioned and healthy. Only then inbreed is no problem even if you use the brother/sister concept. Other thing you can do is get new chickens but the issue with that is that you have a big change of creating new problems in your stock; not only in the properties of the chick but also think about deceases.
- 31. Set up Incubator • Before you start to incubate, be sure that the incubator is working properly and you know hot to operate it. • Place warm water in the humidity plan and adjust the heat source until the incubator temperature stays between 99° and 102° F. Check the thermometer frequently for at least 24 hours before you incubate to be sure it will stay at the correct temperature. • Heat sources having a thermostat are most reliable. Light bulb units without a thermostat can be difficult to control unless the room temperature is relatively constant. • Occasionally, people attempt to incubate eggs in ovens or other unconventional facilities. They are nearly always disappointed because temperature and humidity requirements are within a quite narrow range.
- 32. Set up Incubator • Even with good equipment, incubation is not always successful, so make every attempt to provide the proper environment—using a reliable incubator. • When eggs are placed into an incubator operating at the proper temperature, the temperature will drop. Do not adjust the thermostat upward during this warmup period. The time that the temperature in the unit will remain below normal depends upon the temperature of the eggs and the capacity of the heating unit. This temperature lag period can be reduced by warming the eggs to room temperature before they are placed into the incubator.
- 33. Incubators • After testing the incubator it's important to keep the chicken eggs in a controlled environment for 21 days to be sure of an healthy hatch. The temperatur, humidity and ventilation have to be stricktly controlled. • The eggs need to be turned twice a day every 12 hours; this is to help the chick embryo to develop into a healthy chick during the incubation period. To control the environment keep the incubator in a room free from drafts and where the room temperature remains as constant as possible. Placing the incubator near an window, heater or vent could cause to fluctionsions inside the incubator.
- 34. Incubators • Setup the incubator up to a working temperature of 102°F. The water reservoir should be filled with warm water and the thermometer set in place. Once the temperature has stabilized, allow any stored eggs to warm gradually to room temperature before putting them in the incubator. Eggs sweat if warmed too rapidly, providing another chance for bacteria to enter the shell.