eTwinning New Twinspace - How To Add Web Content Page
•Als DOC, PDF herunterladen•
0 gefällt mir•822 views

To add web content to Twinspace, follow 9 steps: 1) Log in, 2) Click Activities, 3) Click Manage Pages, 4) Create a new page by naming it and clicking Add, 5) The new page is created, hover over your name and click Add Application, 6) Click Content Management and then Web Content Display and Add, 7) Click the notepad icon with a plus sign to add text, 8) Name the page and type text in the box, then Save, 9) Others can now add to the page by clicking the notepad icon.

Empfohlen
Empfohlen
Weitere ähnliche Inhalte
Was ist angesagt?
Was ist angesagt? (20)
Ähnlich wie eTwinning New Twinspace - How To Add Web Content Page
Ähnlich wie eTwinning New Twinspace - How To Add Web Content Page (20)
Mehr von Owain Wright
Mehr von Owain Wright (12)
Kürzlich hochgeladen
Kürzlich hochgeladen (20)
eTwinning New Twinspace - How To Add Web Content Page
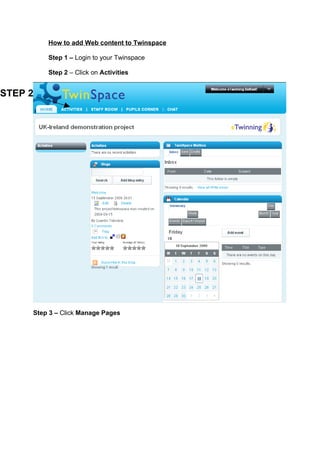
- 1. How to add Web content to Twinspace Step 1 – Login to your Twinspace Step 2 – Click on Activities STEP 2 Step 3 – Click Manage Pages
- 2. STEP 3 Step 4 – Type in the name of the page that you are creating i.e. ‘School Addresses’ and click Add STEP 4 Step 5 – Now your new ‘School Addresses’ page is created you need to add the content. Hover you mouse over the icon at the top right of your screen which says ‘Welcome ******’ and then click Add Application.
- 3. STEP 5 STEP 6 STEP 7 Step 6 – Click Content Management and then where is says Web Content Display click Add Step 7 – Now click on the little notepad icon with the green plus sign STEP 8 Step 8 – Now you can start adding text to your page. Firstly, give the page a name ‘Our School Addresses’ in this case and then type the text you want into the box in the middle of the screen. Once you have done that click Save.
- 4. STEP 9 Step 9 – Now your text is part of your new Twinspace page. If you or any of your partners want to add text and information to this section you simply click on the little notepad icon with the green plus sign and add accordingly.