SlideShare ist ein Scribd-Unternehmen logo
1 von 191
Downloaden Sie, um offline zu lesen
2007-09 HVAC
Climate Control - MDX
COMPONENT LOCATION INDEX
Fig. 1: Identifying Climate Control Component Location (1 Of 3)
Courtesy of AMERICAN HONDA MOTOR CO., INC.
2008 Acura MDX
2007-09 HVAC Climate Control - MDX
2008 Acura MDX
2007-09 HVAC Climate Control - MDX
Microsoft
Saturday, May 22, 2010 11:20:29 AM Page 1 © 2006 Mitchell Repair Information Company, LLC.
Microsoft
Saturday, May 22, 2010 11:20:50 AM Page 1 © 2006 Mitchell Repair Information Company, LLC.
Fig. 2: Identifying Climate Control Component Location (2 Of 3)
Courtesy of AMERICAN HONDA MOTOR CO., INC.
2008 Acura MDX
2007-09 HVAC Climate Control - MDX
Microsoft
Saturday, May 22, 2010 11:20:29 AM Page 2 © 2006 Mitchell Repair Information Company, LLC.
Fig. 3: Identifying Climate Control Component Location (3 Of 3)
Courtesy of AMERICAN HONDA MOTOR CO., INC.
A/C SERVICE TIPS AND PRECAUTIONS
WARNING:  Compressed air mixed with the R-134a forms a combustible vapor.
 The vapor can burn or explode causing serious injury.
 Never use compressed air to pressure test R-134a service
equipment or vehicle air conditioning systems.
CAUTION:  Air conditioning refrigerant or lubricant vapor can irritate your eyes,
nose, or throat.
 Be careful when connecting service equipment.
 Do not breathe refrigerant or vapor.
2008 Acura MDX
2007-09 HVAC Climate Control - MDX
Microsoft
Saturday, May 22, 2010 11:20:29 AM Page 3 © 2006 Mitchell Repair Information Company, LLC.
The air conditioning system uses HFC-134a (R-134a) refrigerant and polyalkyleneglycol (PAG) refrigerant oil,
which are not compatible with CFC-12 (R-12) refrigerant and mineral oil. Do not use R-12 refrigerant or
mineral oil in this system, and do not attempt to use R-12 servicing equipment; damage to the air conditioning
system or your servicing equipment will result. Use only service equipment that is U.L-listed and is certified to
meet the requirements of SAE J2210 to remove R-134a from the air conditioning system.
If accidental system discharge occurs, ventilate the work area before resuming service.
R-134a service equipment or vehicle air conditioning systems should not be pressure tested or leak tested with
compressed air.
Additional health and safety information may be obtained from the refrigerant and lubricant manufacturers.
 Always disconnect the negative cable from the battery whenever replacing air conditioning parts.
 Keep moisture and dirt out of the system. When disconnecting any lines, plug or cap the fittings
immediately; don't remove the caps or plugs until just before you reconnect each line.
 Before connecting any hose or line, apply a few drops of refrigerant oil to the O-ring.
 When tightening or loosening a fitting, use a second wrench to support the matching fitting.
 When discharging the system, use an R-134a refrigerant recovery/recycling/charging station; don't release
refrigerant into the atmosphere.
A/C REFRIGERANT OIL REPLACEMENT
Recommended PAG oil: DENSO ND-OIL 8
 P/N 38897-PR7-A01AH: 120 mL (4 fl.oz)
 P/N 38899-PR7-A01: 40 mL (1 1/3 fl.oz)
Add the recommended refrigerant oil in the amount listed if you replace any of the following parts.
 To avoid contamination, do not return the oil to the container once dispensed, and never mix it with other
refrigerant oils.
 Immediately after using the oil, reinstall the cap on the container, and seal it to avoid moisture absorption.
 Do not spill the refrigerant oil on the vehicle; it may damage the paint; if it gets on the paint, wash it off
immediately.
A/C condenser (including Dryer Desiccant) 50 mL (1 2/3 fl.oz)
Front Evaporator 40 mL (1 1/3 fl.oz)
Rear Evaporator 30 mL (1 fl.oz)
Line or hose 10 mL (1/3 fl.oz)
Receiver/Dryer Desiccant 10 mL (1/3 fl.oz)
Leakage repair 25 mL (5/7 fl.oz)
A/C compressor For A/C compressor replacement, subtract the
volume of oil drained from the removed A/C
2008 Acura MDX
2007-09 HVAC Climate Control - MDX
Microsoft
Saturday, May 22, 2010 11:20:29 AM Page 4 © 2006 Mitchell Repair Information Company, LLC.
Fig. 4: Identifying Refrigerant Oil Level
Courtesy of AMERICAN HONDA MOTOR CO., INC.
FRONT A/C LINE REPLACEMENT
compressor from 125 mL (4 2/9 fl.oz), and drain the
calculated volumne of oil from the new A/C
compressor: 135 mL (4 2/9 fl.oz) - Volume of
removed A/C compressor = Volume to drain from
new A/C commpressor.
NOTE: Even if no oil is drained from the removed A/C compressor, don't drain more
than 50 mL (1 2/3 fl.oz) from the new A/C compressor.
2008 Acura MDX
2007-09 HVAC Climate Control - MDX
Microsoft
Saturday, May 22, 2010 11:20:29 AM Page 5 © 2006 Mitchell Repair Information Company, LLC.
Fig. 5: Identifying Front A/C Line
Courtesy of AMERICAN HONDA MOTOR CO., INC.
A/C SYSTEM INSPECTION
Before troubleshooting any problem with the air conditioning system, do the following:
2008 Acura MDX
2007-09 HVAC Climate Control - MDX
Microsoft
Saturday, May 22, 2010 11:20:29 AM Page 6 © 2006 Mitchell Repair Information Company, LLC.
1. With the ignition switch in the LOCK (0), inspect the A/C components, pressure lines and hoses for stains
that may indicate a refrigerant or a compressor oil leak.
Fig. 6: Identifying Compressor Oil Leak
Courtesy of AMERICAN HONDA MOTOR CO., INC.
2. Check the condenser for material clogging the fins or for damage to the fins:
 Carefully clean any material from the condenser fins with water and detergent.
 Be sure to dry the condenser completely.
Fig. 7: Identifying Condenser
Courtesy of AMERICAN HONDA MOTOR CO., INC.
3. Inspect the drive belt (see DRIVE BELT INSPECTION ).
4. Make sure no material is blocking the airflow to the condenser.
5. Check the dust and pollen filter, and replace it if it is clogged (see DUST AND POLLEN FILTER
REPLACEMENT ).
6. Check the operation of the heater valve. Make sure the cable is adjusted properly (see HEATER VALVE
CABLE ADJUSTMENT ).
7. Start the engine, turn the air conditioning system on, and allow it to normalize for a few minutes.
8. Check that the A/C operates at each position of the blower fan switch (except OFF).
9. Check that the compressor clutch is engaged. The pressure plate should be rotating at the same speed as
the pulley.
2008 Acura MDX
2007-09 HVAC Climate Control - MDX
Microsoft
Saturday, May 22, 2010 11:20:29 AM Page 7 © 2006 Mitchell Repair Information Company, LLC.
10. Check that the cooling fans operate when the compressor clutch is engaged.
11. Check that the engine idle speed is correctly maintained when the A/C is switched on and off when the
compressor clutch is engaged and disengaged.
Fig. 8: Identifying Radiator Fan, A/C Condenser Fan And A/C Compressor
Courtesy of AMERICAN HONDA MOTOR CO., INC.
GENERAL TROUBLESHOOTING INFORMATION
HOW TO CHECK FOR DTCS WITH THE HDS
1. Make sure the ignition switch is LOCK (0).
2. Connect the HDS to the data link connector (DLC) (A) located under the driver's side of the dashboard.
2008 Acura MDX
2007-09 HVAC Climate Control - MDX
Microsoft
Saturday, May 22, 2010 11:20:29 AM Page 8 © 2006 Mitchell Repair Information Company, LLC.
Fig. 9: Connecting HDS To DLC
Courtesy of AMERICAN HONDA MOTOR CO., INC.
3. Turn the ignition switch to ON (II).
4. Make sure the HDS communicates with the vehicle and the climate control unit. If it doesn't, troubleshoot
the DLC circuit (see DLC CIRCUIT TROUBLESHOOTING ).
5. Select HVAC/CLIMATE CONTROL in the BODY ELECTRICAL menu.
6. Select DTCs in the HVAC/CLIMATE CONTROL menu.
7. Check for DTCs. If any DTCs are indicated, write down the DTCs, then go to the indicated DTC
troubleshooting. If no DTCs are indicated, refer to symptom troubleshooting.
HOW TO USE THE SELF-DIAGNOSTIC FUNCTION WITH THE HDS
1. Make sure the ignition switch is LOCK (0).
2. Connect the HDS to the data link connector (DLC).
3. Turn the ignition switch to ON (II).
4. Make sure the HDS communicates with the vehicle and the climate control unit. If it doesn't, troubleshoot
the DLC circuit (see DLC CIRCUIT TROUBLESHOOTING ).
5. Select HVAC/CLIMATE CONTROL in the BODY ELECTRICAL menu.
6. Select INSPECTION in the HVAC/CLIMATE CONTROL menu.
NOTE:  After troubleshooting, clear the DTCs with the HDS.
 For specific operations, refer to the user's manual that came with the
HDS.
2008 Acura MDX
2007-09 HVAC Climate Control - MDX
Microsoft
Saturday, May 22, 2010 11:20:29 AM Page 9 © 2006 Mitchell Repair Information Company, LLC.
7. Select CLIMATE CONTROL SELF TEST in the INSPECTION menu.
8. Check for DTCs. If any DTCs are indicated, write down the DTCs, then go to the indicated DTC
troubleshooting.
HOW TO USE THE SELF-DIAGNOSTIC FUNCTION WITHOUT THE HDS
The climate control unit has a self-diagnostic function. To run the self-diagnostic function, do the following:
1. Turn the ignition switch to LOCK (0), and then ON (II).
2. Press and hold the OFF button, then press the RECIRCULATION CONTROL button five times within
10 seconds. Release the OFF and RECIRCULATION CONTROL buttons; then the self-diagnostic
begins.
Canceling the Self-diagnostic Function
NOTE:  After troubleshooting, clear the DTCs with the HDS.
 For specific operations, refer to the user's manual that came with the
HDS.
NOTE:  The blower motor will run at various speeds regardless of what the
panel is displaying.
 If there is any problem in the system, the system flashes "88 AUTO
WINDSHIELD DEFROST" or alternately flashes "88 AUTO WINDSHIELD
DEFROST" and one or more of the 14 segments (A through P). Refer to
CHECKING FOR DTCS.
 If there are no problems detected, the segments will not illuminate, and
the system will appear to be turned off.
Fig. 10: Identifying Auto Button, Driver Temperature Indicator And Rear
Window Defogger
Courtesy of AMERICAN HONDA MOTOR CO., INC.
2008 Acura MDX
2007-09 HVAC Climate Control - MDX
Microsoft
Saturday, May 22, 2010 11:20:29 AM Page 10 © 2006 Mitchell Repair Information Company, LLC.
3. Turn the ignition switch to LOCK (0), to cancel the self-diagnostic function. After completing the repair
work, run the self-diagnostic function again to make sure that there are no other DTCs.
CHECKING FOR DTCS
The temperature display indicates single or multiple DTCs. If indicator segments A, B, C, E, G, J, M, N,
AUTO, and WINDSHIELD DEFROST are on at the same time, there may be an open in the common ground
wire. If no DTCs are present, the indicator remains blank.
Fig. 11: Identifying A/C Control Panel
Courtesy of AMERICAN HONDA MOTOR CO., INC.
DTC (DRIVER'S TEMPERATURE INDICATOR SEGMENT, AUTO, AND WINDSHIELD DEFROST
INDICATOR) CHART
DTC (Driver's
Temperature Indicator
Segment, AUTO, and
WINDSHIELD
DEFROST Indicator)
Detection Item
A and AUTO
An open in the in-car temperature sensor circuit (see DTC B1225 or DTC
indicator A and AUTO: An Open in the In-car Temperature Sensor
Circuit )
B and AUTO
A short in the in-car temperature sensor circuit (see DTC B1226 or DTC
indicator B and AUTO: A Short in the In-car Temperature Sensor
Circuit )
C and AUTO
An open in the outside air temperature sensor circuit (see DTC B1227 or
DTC indicator C and AUTO: An Open in the Outside Air Temperature
Sensor Circuit )
D and AUTO
A short in the outside air temperature sensor circuit (see DTC B1228 or
DTC indicator D and AUTO: A Short in the Outside Air Temperature
Sensor Circuit )
E and AUTO
An open in the sunlight sensor circuit (see DTC B1229 or DTC indicator
E and AUTO: An Open in the Sunlight Sensor Circuit )
F and AUTO
A short in the sunlight sensor circuit (see DTC B1230 or DTC indicator F
and AUTO: A Short in the Sunlight Sensor Circuit )
2008 Acura MDX
2007-09 HVAC Climate Control - MDX
Microsoft
Saturday, May 22, 2010 11:20:29 AM Page 11 © 2006 Mitchell Repair Information Company, LLC.
G and AUTO
An open in the front evaporator temperature sensor circuit (see DTC B1231
or DTC indicator G and AUTO: An Open in the Front Evaporator
Temperature Sensor Circuit )
Hand AUTO
A short in the front evaporator temperature sensor circuit (see DTC B1232
or DTC indicator H and AUTO: A Short in the Front Evaporator
Temperature Sensor Circuit )
J and AUTO
An open in the driver's air mix control motor circuit (see DTC B1233 or
DTC indicator J and AUTO: An Open in the Driver's Air Mix Control
Motor Circuit )
K and AUTO
A short in the driver's air mix control motor circuit (see DTC B1234 or
DTC indicator K and AUTO: A Short in the Driver's Air Mix Control
Motor Circuit )
L and AUTO
A problem in the driver's air mix control linkage, door, or motor circuit (see
DTC B1235 or DTC indicator L and AUTO: A Problem in the Driver's
Air Mix Control Linkage, Door, or Motor Circuit )
M and AUTO
An open in the passenger's air mix control motor circuit (see DTC B1236 or
DTC indicator M and AUTO: An Open in the Passenger's Air Mix
Control Motor Circuit )
N and AUTO
A short in the passenger's air mix control motor circuit (see DTC B1237 or
DTC indicator N and AUTO: A Short in the Passenger's Air Mix
Control Motor Circuit )
P and AUTO
A problem in the passenger's air mix control linkage, door, or motor circuit
(see DTC B1238 or DTC indicator P and AUTO: A Problem in the
Passenger's Air Mix Control Linkage, Door, or Motor Circuit )
AUTO
Climate control unit lost communication with gauge control module (ECT
message) (see DTC B1205: Climate Control Unit Lost Communication
with Gauge Control Module (VSP/NE message); DTC B1206 or DTC
indicator AUTO: Climate Control Unit Lost Communication with
Gauge Control Module (ECT message); DTC B1207: Climate Control
Unit Lost Communication with Gauge Control Module (ILLUMI
message) )
A
An open or short in the front mode control motor circuit (see DTC B1239
or DTC indicator A: An Open or Short in the Front Mode Control
Motor Circuit )
B
A problem in the front mode control linkage, doors, or motor circuit (see
DTC B1240 or DTC indicator B: A Problem in the Front Mode Control
Linkage, Doors, or Motor Circuit )
C
A problem in the front blower motor circuit (see DTC B1241 or DTC
indicator C: A Problem in the Front Blower Motor Circuit )
F
An open in the rear air mix control motor circuit (see DTC B1244 or DTC
indicator F: An Open in the Rear Air Mix Control Motor Circuit )
G
A short in the rear air mix control motor circuit (see DTC B1245 or DTC
indicator G: A Short in the Rear Air Mix Control Motor Circuit )
H A problem in the rear air mix control linkage, door, or motor circuit (see
DTC B1246 or DTC indicator H: A Problem in the Rear Air Mix
2008 Acura MDX
2007-09 HVAC Climate Control - MDX
Microsoft
Saturday, May 22, 2010 11:20:29 AM Page 12 © 2006 Mitchell Repair Information Company, LLC.
DISPLAYING SENSOR INPUTS AT THE CLIMATE CONTROL UNIT
The climate control unit has a mode that displays sensor inputs it receives. This mode shows you what the
climate control unit is receiving from each of the sensors, one at a time, and it can help you determine if a
sensor is faulty.
CHECK THESE ITEMS BEFORE USING THE SENSOR INPUT DISPLAY MODE
1. Turn the ignition switch to ON (II), and check the recirculation door function; press the recirculation
button to switch from FRESH to RECIRC. The air volume and sound should change slightly.
2. Set the temperature control knob to the desired test temperature. When selecting the test temperature, note
these items:
 "Lo" temperature setting will default to MAX COOL, VENT, and RECIRC.
 "Hi" temperature setting will default to MAX HOT, FLOOR, and FRESH.
 58 through 86°F settings will use the automatic climate control logic.
3. Turn the ignition switch to LOCK (0).
TO RUN THE SENSOR INPUT DISPLAY MODE, FOLLOW THESE STEPS
Control Linkage, Door, or Motor Circuit )
J
An open or short in the recirculation control motor circuit (see DTC B1215
or DTC indicator J: An Open or Short in the Recirculation Control
Motor Circuit )
K
A problem in the recirculation control linkage, door, or motor circuit (see
DTC B2983 or DTC indicator K: A problem in the Recirculation
Control Linkage, Door, or Motor Circuit )
M
A problem in the rear blower motor circuit (see DTC B1223 or DTC
indicator M: A Problem in the Rear Blower Motor Circuit )
N
An open in the rear evaporator temperature sensor circuit (see DTC B1213
or DTC indicator N: An Open in the Rear Evaporator Temperature
Sensor Circuit )
P
A short in the rear evaporator temperature sensor circuit (see DTC B1214
or DTC indicator P: A Short in the Rear Evaporator Temperature
Sensor Circuit )
A and WINDSHIELD
DEFROST
An open in the humidity sensor circuit (see DTC B2967 or DTC indicator
A and WINDSHIELD DEFROST: An Open in the Humidity Sensor
Circuit ), a short in the humidity sensor circuit (see DTC B2968 or DTC
indicator A and WINDSHIELD DEFROST: A Short in the Humidity
Sensor Circuit )
Band WINDSHIELD
DEFROST
An open in the A/C pressure sensor circuit (see DTC B2979 or DTC
indicator B and WINDSHIELD DEFROST: An Open in the A/C
Pressure Sensor Circuit ), a short in the A/C pressure sensor circuit (see
DTC B2980 or DTC indicator B and WINDSHIELD DEFROST: A
short in the A/C Pressure Sensor Circuit )
2008 Acura MDX
2007-09 HVAC Climate Control - MDX
Microsoft
Saturday, May 22, 2010 11:20:29 AM Page 13 © 2006 Mitchell Repair Information Company, LLC.
1. Turn the ignition switch to LOCK (0).
2. Press and hold both the AUTO and RECIRCULATION CONTROL buttons, then start the engine.
3. After the engine starts, release both buttons. The display panel control unit will flash the sensor number
and then the value for that sensor. Record the value displayed.
4. To advance to the next sensor, press the REAR WINDOW DEFOGGER button.
SENSOR DISPLAYED CHART
5. To cancel the sensor input display mode, press the AUTO button or turn the ignition switch to LOCK (0).
Celsius to Fahrenheit Conversion Table
Sensor Item
Displayed
Value
1 In-car Temperature °C
2 Outside Air Temperature °C
3
Solar Radiation Sensor Value: Dark = 00, Flashlight = 04, Cloudy = 10, Sunny =
65 kcal/m2 .h
4 Front Evaporator Outlet Air Temperature °C
5
Driver's and Passenger's Air Mix Opening (Low value indicates cooler air
distribution, higher value indicates warmer air distribution)
% of opening
6 Vent Temperature Air Out (TAO) °C
7 Vehicle Speed (Vehicle must be driven to display speed) km/h
8 A/C Pressure 10 kPa
9 Rear Air Mix Opening % of opening
A Rear Vent Temperature Air Out (TAO) °C
B Rear Evaporator Outlet Air Temperature °C
C Humidity Sensor Value %rh
D Fog Margin °C
E Solar Radiation azimuth (With navigation system) 10°
F Solar Radiation angle of elevation (With navigation system) 10°
NOTE:  The sensor values will be displayed in degrees Celsius (°C) or an
alphanumeric code. Use the chart to convert the value to degrees
Fahrenheit (°F).
 If the sensor value displays "Er" this indicates there is an open or
short in the circuit or sensor. Check for DTCs using the HDS, or refer
to CHECKING DTCS by DTC indication.
 If necessary, compare the sensor input display to a known-good
vehicle under the same test conditions.
 If the sensor is out of the normal range, refer to the sensor test or
substitute a known-good sensor, and recheck.
2008 Acura MDX
2007-09 HVAC Climate Control - MDX
Microsoft
Saturday, May 22, 2010 11:20:29 AM Page 14 © 2006 Mitchell Repair Information Company, LLC.
CELSIUS TO FAHRENHEIT CONVERSION CHART
Alphanumeric Conversion Table
ALPHANUMERIC CONVERSION CHART
DTC TROUBLESHOOTING INDEX
Checking the DTCs by HDS
DTC TROUBLESHOOTING CHART
°C °F °C °F °C °F °C °F °C °F
0 32 10 50 20 68 30 86 40 104
1 34 11 52 21 70 31 88 41 106
2 36 12 54 22 72 32 90 42 108
3 37 13 55 23 73 33 91 43 109
4 39 14 57 24 75 34 93 44 111
5 41 15 59 25 77 35 95 45 113
6 43 16 61 26 79 36 97 46 115
7 45 17 63 27 81 37 99 47 117
8 46 18 64 28 82 38 100 48 118
9 48 19 66 29 84 39 102 49 120
°C °F °C °F °C °F °C °F °C °F
50 122 60 140 70 158 80 176 90 194
51 124 61 142 71 160 81 178 91 196
52 126 62 144 72 162 82 180 92 198
53 127 63 145 73 163 83 181 93 199
54 128 64 147 74 165 84 183 94 201
55 131 65 149 75 167 85 185 95 203
56 133 66 151 76 169 86 187 96 205
57 135 67 152 77 170 87 188 97 207
58 136 68 154 78 172 88 190 98 208
59 139 69 158 79 174 89 192 99 210
Display Reading (Alphanumeric) °C °F %
A1 thru A9 - 1 thru -9 30 thru 16 - 1 thru -9
B0 thru B9 - 10 thru -19 14 thru -2 -10 thru -19
C0 thru C9 -20 thru -29 -4 thru -20 -20 thru -29
D0 thru D9 -30 thru -39 -22 thru -38 -30 thru -39
E0 thru E9 -40 thru -49 -40 thru -58 -40 thru -49
F0 thru F9 -- -- +100 thru +109
2008 Acura MDX
2007-09 HVAC Climate Control - MDX
Microsoft
Saturday, May 22, 2010 11:20:29 AM Page 15 © 2006 Mitchell Repair Information Company, LLC.
DTC
Detection Item or
Symptom ECU DTC type
B1200 Communication bus line
error (bus-off)
Climate control unit Loss of communication
B1202 Climate control unit
internal error
Climate control unit Internal error
B1205 Climate control unit lost
communication with
gauge control module
(VSP/NE message)
Climate control unit Loss of communication
B1206 Climate control unit lost
communication with
gauge control module
(ECT message)
Climate control unit Loss of communication
B1207 Climate control unit lost
communication with
gauge control module
(ILLUMI message)
Climate control unit Loss of communication
B1213 An open in the rear
evaporator temperature
sensor circuit
Climate control unit Signal error
B1214 A short in the rear
evaporator temperature
sensor circuit
Climate control unit Signal error
B1215 An open or short in the
recirculation control
motor circuit
Climate control unit Signal error
B1223 A problem in the rear
blower motor circuit
Climate control unit Signal error
B1225 An open in the in-car
temperature sensor circuit
Climate control unit Signal error
B1226 A short in the in-car
temperature sensor circuit
Climate control unit Signal error
B1227 An open in the outside air
temperature sensor circuit
Climate control unit Signal error
B1228 A short in the outside air
temperature sensor circuit
Climate control unit Signal error
B1229 An open in the sunlight
sensor circuit
Climate control unit Signal error
B1230 A short in the sunlight
sensor circuit
Climate control unit Signal error
B1231 An open in the front
evaporator temperature
sensor circuit
Climate control unit Signal error
B1232 A short in the front Climate control unit Signal error
2008 Acura MDX
2007-09 HVAC Climate Control - MDX
Microsoft
Saturday, May 22, 2010 11:20:29 AM Page 16 © 2006 Mitchell Repair Information Company, LLC.
evaporator temperature
sensor circuit
B1233 An open in the driver's air
mix control motor circuit
Climate control unit Signal error
B1234 A short in the driver's air
mix control motor circuit
Climate control unit Signal error
B1235 A problem in the driver's
air mix control linkage,
door, or motor circuit
Climate control unit Signal error
B1236 An open in the passenger's
air mix control motor
circuit
Climate control unit Signal error
B1237 A short in the passenger's
air mix control motor
circuit
Climate control unit Signal error
B1238 A problem in the
passenger's air mix control
linkage, door, or motor
circuit
Climate control unit Signal error
B1239 An open or short in the
front mode control motor
circuit
Climate control unit Signal error
B1240 A problem in the front
mode control linkage,
doors, or motor circuit
Climate control unit Signal error
B1241 A problem in the front
blower motor circuit
Climate control unit Signal error
B1244 An open in the rear air
mix control motor circuit
Climate control unit Signal error
B1245 A short in the rear air mix
control motor circuit
Climate control unit Signal error
B1246 A problem in the rear air
mix control linkage, door,
or motor circuit
Climate control unit Signal error
B2965 Climate control unit lost
communication with rear
climate control panel
Climate control unit Loss of communication
B2967 An open in the humidity
sensor circuit
Climate control unit Signal error
B2968 A short in the humidity
sensor circuit
Climate control unit Signal error
B2969 Climate control unit lost
communication with
combination switch
control unit (WIPSW
Climate control unit Loss of communication
2008 Acura MDX
2007-09 HVAC Climate Control - MDX
Microsoft
Saturday, May 22, 2010 11:20:29 AM Page 17 © 2006 Mitchell Repair Information Company, LLC.
SYMPTOM TROUBLESHOOTING INDEX
SYMPTOM TROUBLESHOOTING CHART
message)
B2970 Climate control unit lost
communication with relay
control module (RM
message)
Climate control unit Loss of communication
B2979 An open in the A/C
pressure sensor circuit
Climate control unit Signal error
B2980 A short in the A/C
pressure sensor circuit
Climate control unit Signal error
B2981 Climate control unit lost
communication with
navigation unit
Climate control unit Loss of communication
B2983 A problem in the
recirculation control
linkage, door, or motor
circuit
Climate control unit Signal error
B2991 Climate control unit lost
communication with audio
unit
Climate control unit Loss of communication
Symptom Diagnostic procedure Also check for
Rear mode control
doors do not change
between ceiling vents
(cool) and floor vents
(hot)
Rear mode control motor circuit
troubleshooting (see REAR MODE
CONTROL MOTOR CIRCUIT
TROUBLESHOOTING )
 HVAC DTCs (see GENERAL
TROUBLESHOOTING
INFORMATION )
 Blown fuse No. 30 (10 A) in
the under-dash fuse/relay box
 Cleanliness and tightness of all
terminals
Blower, heater
controls, and A/C do
not work
Climate control unit troubleshooting (see
CLIMATE CONTROL UNIT
TROUBLESHOOTING )
 HVAC DTCs (see GENERAL
TROUBLESHOOTING
INFORMATION )
 Blown fuse No. 30 (10 A) in
the under-dash fuse/relay box
 Poor ground at G506 (see
GROUND TO
COMPONENTS INDEX )
 Cleanliness and tightness of all
terminals
 HVAC DTCs (see GENERAL
TROUBLESHOOTING
2008 Acura MDX
2007-09 HVAC Climate Control - MDX
Microsoft
Saturday, May 22, 2010 11:20:29 AM Page 18 © 2006 Mitchell Repair Information Company, LLC.
Both fans do not run at
low speed with the
A/C on (but the A/C
compressor runs with
the A/C on)
Radiator and A/C condenser fan low speed
circuit troubleshooting (see RADIATOR
AND A/C CONDENSER FAN LOW
SPEED CIRCUIT
TROUBLESHOOTING )
INFORMATION )
 Blown fuse No. 15 (30 A) in
the relay block, and No. 30 (10
A) in the under-dash fuse/
relay box
 Poor ground at G301 (see
GROUND TO
COMPONENTS INDEX )
 Cleanliness and tightness of all
terminals
The A/C condenser fan
does not run at high
speed (but both fans
run at low speed and
the A/C compressor
operates with the A/C
on)
A/C condenser fan high speed circuit
troubleshooting (see A/C CONDENSER
FAN HIGH SPEED CIRCUIT
TROUBLESHOOTING )
 HVAC DTCs (see GENERAL
TROUBLESHOOTING
INFORMATION )
 Cleanliness and tightness of all
terminals
Both fans do not run at
high speed with the
A/C on (but both fans
run at low speed and
the A/C compressor
operates with the A/C
on)
ECT troubleshooting: ECT sensor 2 circuit
low voltage (see DTC P2184: ECT
SENSOR 2 CIRCUIT LOW
VOLTAGE ), ECT sensor 2 circuit high
voltage (see DTC P2185: ECT SENSOR
2 CIRCUIT HIGH VOLTAGE )
 Powertrain DTCs (see
GENERAL
TROUBLESHOOTING
INFORMATION )
 Cleanliness and tightness of all
terminals
The A/C compressor
clutch does not engage
(but both fans run with
the A/C on)
A/C compressor clutch circuit
troubleshooting (see A/C COMPRESSOR
CLUTCH CIRCUIT
TROUBLESHOOTING )
 HVAC DTCs (see GENERAL
TROUBLESHOOTING
INFORMATION )
 Blown fuse No. 17 (7.5 A) in
the relay block, and No. 30 (10
A) in the under-dash fuse/
relay box
 Blower motor operation
 Cleanliness and tightness of all
terminals
Blower fan(s) runs
slower than expected
in cold weather
ECT troubleshooting: ECT sensor 2 circuit
low voltage (see DTC P2184: ECT
SENSOR 2 CIRCUIT LOW
VOLTAGE ), ECT sensor 2 circuit high
voltage (see DTC P2185: ECT SENSOR
2 CIRCUIT HIGH VOLTAGE )
NOTE:
It is normal for the blower(s) to run
slowly until the engine coolant
temperature begins to rise. If the blower
 Powertrain DTCs (see
GENERAL
TROUBLESHOOTING
INFORMATION )
 Blower motor operation
2008 Acura MDX
2007-09 HVAC Climate Control - MDX
Microsoft
Saturday, May 22, 2010 11:20:29 AM Page 19 © 2006 Mitchell Repair Information Company, LLC.
SYSTEM DESCRIPTION
The air conditioning system removes heat from the passenger compartment by transferring heat from the
ambient air to the evaporator. The evaporator cools the air with the refrigerant that is circulating through the
evaporator. The refrigerant expands in the evaporator, and the evaporator becomes very cold and absorbs the
heat from the ambient air. The blower fan pushes air across the evaporator where the heat is absorbed, and then
it blows the cool air into the passenger compartment.
continues to run slowly for an abnormal
length of time, continue to troubleshoot
the problem.
HDS does not
communicate with the
climate control unit or
the vehicle
Troubleshoot the DLC circuit (see DLC
CIRCUIT TROUBLESHOOTING )
Insufficient heating
1. Check the coolant level (see
COOLANT CHECK )
2. Check the radiator cap (see
RADIATOR CAP TEST )
3. Check the operation of the air mix
control motor and door (see
DRIVER'S AIR MIX CONTROL
MOTOR TEST )
4. Check the coolant temperature
5. Check the operation of the heater
valve (see HEATER VALVE
CABLE ADJUSTMENT )
6. Check the blower motor unit for
obstructions
7. Check for air leaks around the ducts
and vents
8. Check the inlet hose temperature
 If it is COLD, check for
restrictions in the hose, a
damaged or leaking
thermostat, and a damaged or
leaking water pump.
 If it is HOT, check for
restrictions in the heater core.
Back flush the heater core
using standard commercially
available equipment, or
replace the heater core.
Damaged cylinder head gasket
2008 Acura MDX
2007-09 HVAC Climate Control - MDX
Microsoft
Saturday, May 22, 2010 11:20:29 AM Page 20 © 2006 Mitchell Repair Information Company, LLC.
Fig. 12: Climate Control System Description
Courtesy of AMERICAN HONDA MOTOR CO., INC.
This vehicle uses HFC-134a (R-134a) refrigerant, which does not contain chlorofluorocarbons. Pay attention to
the following service items:
 Do not mix refrigerants CFC-12 (R-12) and HFC-134a (R-134a). They are not compatible.
 Use only the recommended polyalkyleneglycol (PAG) refrigerant oil (DENSO ND-OIL 8) designed for
the R-134a A/C compressor. Intermixing the recommended (PAG) refrigerant oil with any other
refrigerant oil will result in A/C compressor failure.
 All A/C system parts (A/C compressor, discharge line, suction line, evaporator, A/C condenser,
receiver/dryer, expansion valve, O-rings for joints) are designed for refrigerant R-134a. Do not exchange
with R-12 parts.
 Use a halogen gas leak detector designed for refrigerant R-134a.
 R-12 and R-134a refrigerant servicing equipment are not interchangeable. Use only a
recovery/recycling/charging station that is U.L.-listed and is certified to meet the requirements of SAE
J2210 to service the R-134a air conditioning systems.
 Always recover refrigerant R-134a with an approved recovery/recycling/charging station before
disconnecting any A/C fitting.
HUMIDITY/IN-CAR TEMPERATURE SENSOR
2008 Acura MDX
2007-09 HVAC Climate Control - MDX
Microsoft
Saturday, May 22, 2010 11:20:29 AM Page 21 © 2006 Mitchell Repair Information Company, LLC.
The humidity sensor consists of two sensors. One sensor is for humidity detection, and the other is for in-car
temperature detection. When the climate control unit receives signals about the in-car condition from the
humidity sensor, and judges that the humidity in the vehicle is very low, the climate control unit reduces the
compressor run-time. Engine power loss is kept to a minimum, and fuel economy is increased.
Fig. 13: Identifying Humidity/In-Car Temperature Sensor Component
Courtesy of AMERICAN HONDA MOTOR CO., INC.
HUMIDITY/IN-CAR TEMPERATURE SENSOR QUALITY
The capacitance of the humidity sensor changes by the adsorption and the evaporation of moisture. The
resistance change of the humidity sensor changes the output voltage.
2008 Acura MDX
2007-09 HVAC Climate Control - MDX
Microsoft
Saturday, May 22, 2010 11:20:29 AM Page 22 © 2006 Mitchell Repair Information Company, LLC.
Fig. 14: Voltage Vs Humidity Level Graph
Courtesy of AMERICAN HONDA MOTOR CO., INC.
A/C PRESSURE SENSOR
The A/C pressure sensor converts A/C pressure into electrical signals to the PCM.
Fig. 15: Identifying A/C Pressure Sensor
Courtesy of AMERICAN HONDA MOTOR CO., INC.
The response of the A/C pressure sensor is shown in the graph.
NOTE: The pressures can be monitored using the HDS PGM-FI Data List.
NOTE: When the refrigerant is below 196 kPa (2.0 kgf/cm2 , 28 psi) or above 3,140 kPa
(32 kgf/cm2 , 455 psi), the PCM turns the compressor relay off to protect the A/C
compressor.
2008 Acura MDX
2007-09 HVAC Climate Control - MDX
Microsoft
Saturday, May 22, 2010 11:20:29 AM Page 23 © 2006 Mitchell Repair Information Company, LLC.
Fig. 16: A/C Pressure Sensor Graph
Courtesy of AMERICAN HONDA MOTOR CO., INC.
CLIMATE CONTROL DOOR POSITIONS
2008 Acura MDX
2007-09 HVAC Climate Control - MDX
Microsoft
Saturday, May 22, 2010 11:20:29 AM Page 24 © 2006 Mitchell Repair Information Company, LLC.
Fig. 17: Identifying Climate Control Door Positions
Courtesy of AMERICAN HONDA MOTOR CO., INC.
DUAL AIR MIX CONTROL SYSTEM
2008 Acura MDX
2007-09 HVAC Climate Control - MDX
Microsoft
Saturday, May 22, 2010 11:20:29 AM Page 25 © 2006 Mitchell Repair Information Company, LLC.
lc=-------==1
...
~
!VENTI
IHEAT/VENT)
IHEATI
IHEAT/DEFI
IDEFI
AIR MIX
DOORS
HEAT/VENT
DOOR
. . .HOT
. . .HOT
(==:JcooL
DEFROSTER
DOOR
(==:JcooL
Fig. 18: Identifying Dual Air Mix Control System
Courtesy of AMERICAN HONDA MOTOR CO., INC.
I-DUAL AND I-TRI CLIMATE CONTROL SYSTEM (WITH NAVIGATION SYSTEM)
The "i-Dual" climate control system automatically controls the temperature and the vent mode of the air
direction to the driver's and passenger's side, depending on the angle of the sun, and the direction of the vehicle.
It calculates information such as date, time, longitude, and latitude from the navigation system, as well as the
radiant strength of the sun from the sunlight sensor, to determine the appropriate mode position and temperature
to be directed to each side. The "i-Tri" climate control system is an addition of the automatic controls with the
temperature and the vent mode of the air direction to the rear section to the "i-Dual" climate control system.
2008 Acura MDX
2007-09 HVAC Climate Control - MDX
Microsoft
Saturday, May 22, 2010 11:20:29 AM Page 26 © 2006 Mitchell Repair Information Company, LLC.
Fig. 19: Identifying I-Dual And I-Tri Climate Control System
Courtesy of AMERICAN HONDA MOTOR CO., INC.
In the event that the navigation system malfunctions, or when driving in areas where the navigation system
cannot determine the vehicle position (non-coverage areas, tunnels, etc.), the climate control system will operate
the same as a vehicle without a navigation system.
CLIMATE CONTROL UNIT INPUTS AND OUTPUTS
2008 Acura MDX
2007-09 HVAC Climate Control - MDX
Microsoft
Saturday, May 22, 2010 11:20:29 AM Page 27 © 2006 Mitchell Repair Information Company, LLC.
Fig. 20: Identifying Climate Control Unit Connector A (40P) Terminals
Courtesy of AMERICAN HONDA MOTOR CO., INC.
CONNECTOR A
CLIMATE CONTROL UNIT INPUTS AND OUTPUTS - CONNECTOR A
Cavity Wire color Signal
1 WHT BACKUP INPUT
2 YEL NAVIGATION UNIT (SI)(1) INPUT
3 YEL IG2 (Power) INPUT
4 LT GRN B-CAN INPUT/OUTPUT
5 LT BLU IN-CAR TEMPERATURE SENSOR OUTPUT
6 GRY COMMON POTENTIAL 5V OUTPUT
8 RED SENSOR COMMON GROUND INPUT
9 BLU FRONT BLOWER FEEDBACK INPUT
10 RED FRONT POWER TRANSISTOR CONTROL OUTPUT
11 PUR DRIVER'S AIR MIX POTENTIAL INPUT
12 PNK DRIVER'S AIR MIX HOT OUTPUT
13 LT BLU DRIVER'S AIR MIX COOL OUTPUT
14 LT GRN PASSENGER'S AIR MIX HOT OUTPUT
15 YEL PASSENGER'S AIR MIX COOL OUTPUT
16 GRN FRONT MODE DEF OUTPUT
17 ORN FRONT MODE VENT OUTPUT
18 YEL FRESH OUTPUT
19 ORN RECIRCULATE OUTPUT
21 BLU NAVIGATION UNIT(CLK)(1) OUTPUT
22 RED NAVIGATION UNIT (SO)(1) OUTPUT
23 LT BLU ILLUMK+) INPUT
24 BRN FRONT EVAPORATOR TEMPERATURE SENSOR OUTPUT
25 PUR ACC INPUT
26 LT GRN A/C PRESSURE SENSOR OUTPUT
2008 Acura MDX
2007-09 HVAC Climate Control - MDX
Microsoft
Saturday, May 22, 2010 11:20:29 AM Page 28 © 2006 Mitchell Repair Information Company, LLC.
CLIMATE CONTROL UNIT INPUTS AND OUTPUTS
Fig. 21: Identifying Climate Control Unit Connector B (14P) Terminals
Courtesy of AMERICAN HONDA MOTOR CO., INC.
CONNECTOR B
CLIMATE CONTROL UNIT INPUTS AND OUTPUTS - CONNECTOR B
27 YEL HUMIDITY SENSOR OUTPUT
28 PNK OUTSIDE AIR TEMPERATURE SENSOR OUTPUT
29 PUR SUNLIGHT SENSOR OUTPUT
30 BLU PASSENGER'S AIR MIX POTENTIAL INPUT
31 WHT FRONT MODE CONTROL MODE 1 OUTPUT
32 LT GRN FRONT MODE CONTROL MODE 2 OUTPUT
33 PUR FRONT MODE CONTROL MODE 3 OUTPUT
34 BLU FRONT MODE CONTROL MODE 4 OUTPUT
35 WHT RECIRCULATION CONTROL MODE 1 OUTPUT
36 BLK RECIRCULATION CONTROL MODE 2 OUTPUT
37 BLK GROUND (G506) OUTPUT
38 GRN RECIRCULATION CONTROL MODE 3 OUTPUT
(1) With navigation system
Cavity Wire color Signal
1 GRN REAR AIR MIX COOL OUTPUT
2 PNK REAR AIR MIX HOT OUTPUT
3 YEL REAR MODE HEAT INPUT
4 BLK REAR MODE VENT INPUT
5 PUR REAR AIR MIX POTENTIAL INPUT
6 LT BLU REAR EVAPORATOR TEMPERATURE SENSOR OUTPUT
8 BLU AUDIO UNIT (HVAC BUS) INPUT/OUTPUT
11 ORN REAR CLIMATE CONTROL PANEL (A/C BUS RX) INPUT/OUTPUT
12 GRN REAR CLIMATE CONTROL PANEL (A/C BUS TX) INPUT/OUTPUT
2008 Acura MDX
2007-09 HVAC Climate Control - MDX
Microsoft
Saturday, May 22, 2010 11:20:29 AM Page 29 © 2006 Mitchell Repair Information Company, LLC.
REAR CLIMATE CONTROL UNIT INPUTS AND OUTPUTS
Fig. 22: Identifying Rear Climate Control Panel 10P Connector Terminals
Courtesy of AMERICAN HONDA MOTOR CO., INC.
REAR CLIMATE CONTROL UNIT INPUTS AND OUTPUTS
CIRCUIT DIAGRAM
13 RED REAR BLOWER FEEDBACK INPUT
14 BLU REAR POWER TRANSISTOR CONTROL OUTPUT
Cavity Wire color Signal
1 YEL IG2 (Power) INPUT
3 BLK GROUND (G506) OUTPUT
7 LT BLU ILLUMI (+) INPUT
9 GRN CLIMATE CONTROL UNIT (A/C BUS TX) INPUT/OUTPUT
10 ORN CLIMATE CONTROL UNIT (A/C BUS RX) INPUT/OUTPUT
2008 Acura MDX
2007-09 HVAC Climate Control - MDX
Microsoft
Saturday, May 22, 2010 11:20:30 AM Page 30 © 2006 Mitchell Repair Information Company, LLC.
Fig. 23: Climate Control Circuit Diagram (1 Of 4)
Courtesy of AMERICAN HONDA MOTOR CO., INC.
2008 Acura MDX
2007-09 HVAC Climate Control - MDX
Microsoft
Saturday, May 22, 2010 11:20:30 AM Page 31 © 2006 Mitchell Repair Information Company, LLC.
Fig. 24: Climate Control Circuit Diagram (2 Of 4)
Courtesy of AMERICAN HONDA MOTOR CO., INC.
2008 Acura MDX
2007-09 HVAC Climate Control - MDX
Microsoft
Saturday, May 22, 2010 11:20:30 AM Page 32 © 2006 Mitchell Repair Information Company, LLC.
Fig. 25: Climate Control Circuit Diagram (3 Of 4)
Courtesy of AMERICAN HONDA MOTOR CO., INC.
2008 Acura MDX
2007-09 HVAC Climate Control - MDX
Microsoft
Saturday, May 22, 2010 11:20:30 AM Page 33 © 2006 Mitchell Repair Information Company, LLC.
Fig. 26: Climate Control Circuit Diagram (4 Of 4)
Courtesy of AMERICAN HONDA MOTOR CO., INC.
DTC TROUBLESHOOTING
DTC B1202: CLIMATE CONTROL UNIT INTERNAL ERROR
1. Clear the DTC with the HDS.
NOTE: Check the battery condition (see BATTERY TEST ) and the charging system
(see CHARGING SYSTEM INDICATOR CIRCUIT TROUBLESHOOTING ).
2008 Acura MDX
2007-09 HVAC Climate Control - MDX
Microsoft
Saturday, May 22, 2010 11:20:30 AM Page 34 © 2006 Mitchell Repair Information Company, LLC.
2. Turn the ignition switch to LOCK (0), and then ON (II).
3. Wait for 6 seconds or more.
4. Do the self-diagnostic with the HDS (see HOW TO USE THE SELF-DIAGNOSTIC FUNCTION
WITH THE HDS ).
5. Check for DTCs.
Is DTC B1202 indicated?
YES - The climate control unit is faulty, replace the climate control unit.
NO - Intermittent failure, the climate control unit is OK at this time.
DTC B1205: CLIMATE CONTROL UNIT LOST COMMUNICATION WITH GAUGE CONTROL
MODULE (VSP/NE MESSAGE); DTC B1206 OR DTC INDICATOR AUTO: CLIMATE CONTROL
UNIT LOST COMMUNICATION WITH GAUGE CONTROL MODULE (ECT MESSAGE); DTC
B1207: CLIMATE CONTROL UNIT LOST COMMUNICATION WITH GAUGE CONTROL
MODULE (ILLUMI MESSAGE)
1. Clear the DTC with the HDS.
2. Turn the ignition switch to LOCK (0), and then ON (II).
3. Wait for 6 seconds or more.
4. Do the self-diagnostic with the HDS (see HOW TO USE THE SELF-DIAGNOSTIC FUNCTION
WITH THE HDS ) or climate control unit (see HOW TO USE THE SELF-DIAGNOSTIC
FUNCTION WITHOUT THE HDS ).
5. Check the DTCs.
Are DTCs B1205, and/or B1206 or AUTO, and/or B1207 indicated?
YES - Go to step 6.
NO - Intermittent failure, check for loose wires or poor connections on the climate control unit connector
A (40P).
6. Check for DTCs using the HDS.
Are any of the following DTCs indicated; B1011, B1060, B2160, B1357, B1805, B1408, or B2157?
YES - Do the gauge control module input test (see GAUGE CONTROL MODULE INPUT TEST ).
NO - Do the climate control unit troubleshooting (see CLIMATE CONTROL UNIT
NOTE: If you are troubleshooting multiple DTCs, be sure to follow the instructions in B-
can diagnosis test mode A (see TROUBLESHOOTING - B-CAN SYSTEM
DIAGNOSIS TEST MODE A ).
2008 Acura MDX
2007-09 HVAC Climate Control - MDX
Microsoft
Saturday, May 22, 2010 11:20:30 AM Page 35 © 2006 Mitchell Repair Information Company, LLC.
TROUBLESHOOTING ).
DTC B1213 OR DTC INDICATOR N: AN OPEN IN THE REAR EVAPORATOR TEMPERATURE
SENSOR CIRCUIT
1. Clear the DTC with the HDS.
2. Turn the ignition switch to LOCK (0), and then ON (II).
3. Do the self-diagnostic with the HDS (see HOW TO USE THE SELF-DIAGNOSTIC FUNCTION
WITH THE HDS ) or climate control unit (see HOW TO USE THE SELF-DIAGNOSTIC
FUNCTION WITHOUT THE HDS ).
4. Check for DTCs.
Is DTC B1213 or N indicated?
YES - Go to step 5.
NO - Intermittent failure, check for loose wires or poor connections on the rear evaporator temperature
sensor circuit.
5. Turn the ignition switch to LOCK (0).
6. Remove the rear evaporator temperature sensor (see REAR EVAPORATOR TEMPERATURE
SENSOR TEST ), and test it (see REAR EVAPORATOR TEMPERATURE SENSOR TEST ).
Is the rear evaporator temperature sensor OK?
YES - Go to step 7.
NO - Replace the rear evaporator temperature sensor.
7. Disconnect climate control unit connector B (14P).
8. Check for continuity between climate control unit connector B (14P) No. 6 terminal and the rear
evaporator temperature sensor 2P connector No. 2 terminal.
2008 Acura MDX
2007-09 HVAC Climate Control - MDX
Microsoft
Saturday, May 22, 2010 11:20:30 AM Page 36 © 2006 Mitchell Repair Information Company, LLC.
Fig. 27: Identifying Continuity Between Climate Control Unit Connector B (14P) No. 6 And No. 2
Terminal
Courtesy of AMERICAN HONDA MOTOR CO., INC.
Is there continuity?
YES - Go to step 9.
NO - Repair open in the wire between the climate control unit and the rear evaporator temperature sensor.
9. Check for continuity between climate control unit connector A (40P) No. 8 terminal and the rear
evaporator temperature sensor 2P connector No. 1 terminal.
Fig. 28: Identifying Continuity Between No. 8 And Rear Evaporator Temperature Sensor 2P
Connector No. 1 Terminal
Courtesy of AMERICAN HONDA MOTOR CO., INC.
Is there continuity?
YES - Check for loose wires or poor connections at climate control unit connector A (40P), B (14P), and
at the rear evaporator temperature sensor 2P connector. If the connections are good, substitute a known-
2008 Acura MDX
2007-09 HVAC Climate Control - MDX
Microsoft
Saturday, May 22, 2010 11:20:30 AM Page 37 © 2006 Mitchell Repair Information Company, LLC.
good climate control unit, and recheck. If the symptom/indication goes away, replace the original climate
control unit.
NO - Repair open in the wire between the climate control unit and the rear evaporator temperature sensor.
DTC B1214 OR DTC INDICATOR P: A SHORT IN THE REAR EVAPORATOR TEMPERATURE
SENSOR CIRCUIT
1. Clear the DTC with the HDS.
2. Turn the ignition switch to LOCK (0), and then ON (II).
3. Do the self-diagnostic with the HDS (see HOW TO USE THE SELF-DIAGNOSTIC FUNCTION
WITH THE HDS ) or climate control unit (see HOW TO USE THE SELF-DIAGNOSTIC
FUNCTION WITHOUT THE HDS ).
4. Check for DTCs.
Is DTC B1214 or P indicated?
YES - Go to step 5.
NO - Intermittent failure.
5. Turn the ignition switch to LOCK (0).
6. Remove the rear evaporator temperature sensor (see REAR EVAPORATOR TEMPERATURE
SENSOR TEST ), and test it (see REAR EVAPORATOR TEMPERATURE SENSOR TEST ).
Is the rear evaporator temperature sensor OK?
YES - Go to step 7.
NO - Replace the rear evaporator temperature sensor.
7. Disconnect climate control unit connector A (40P) and B(14P).
8. Check for continuity between climate control unit connector B (14P) No. 6 terminal and body ground.
2008 Acura MDX
2007-09 HVAC Climate Control - MDX
Microsoft
Saturday, May 22, 2010 11:20:30 AM Page 38 © 2006 Mitchell Repair Information Company, LLC.
Fig. 29: Identifying Continuity Between Climate Control Unit Connector B (14P) No. 6 Terminal
And Body Ground
Courtesy of AMERICAN HONDA MOTOR CO., INC.
Is there continuity?
YES - Repair short to body ground in the wire between the climate control unit and the rear evaporator
temperature sensor.
NO - Go to step 9.
9. Check for continuity between climate control unit connector A (40P) No. 8 terminal and climate control
unit connector B (14P) No. 6 terminal.
Fig. 30: Identifying Continuity Between Climate Control Unit Connector A (40P) No. 8 And No. 6
Terminal
Courtesy of AMERICAN HONDA MOTOR CO., INC.
Is there continuity?
YES - Repair short in the wires between the climate control unit and the rear evaporator temperature
sensor.
NO - Substitute a known-good climate control unit, and recheck. If the symptom/indication goes away,
replace the original climate control unit.
DTC B1215 OR DTC INDICATOR J: AN OPEN OR SHORT IN THE RECIRCULATION CONTROL
MOTOR CIRCUIT
1. Clear the DTC with the HDS.
2. Turn the ignition switch to LOCK (0), and then ON (II).
3. Do the self-diagnostic with the HDS (see HOW TO USE THE SELF-DIAGNOSTIC FUNCTION
WITH THE HDS ) or climate control unit (see HOW TO USE THE SELF-DIAGNOSTIC
FUNCTION WITHOUT THE HDS ).
2008 Acura MDX
2007-09 HVAC Climate Control - MDX
Microsoft
Saturday, May 22, 2010 11:20:30 AM Page 39 © 2006 Mitchell Repair Information Company, LLC.
4. Check for DTCs.
Is DTC B1215 or J indicated?
YES - Go to step 5.
NO - Intermittent failure, check for loose wires or poor connections on the recirculation control motor
circuit.
5. Turn the ignition switch to LOCK (0).
6. Test the recirculation control motor (see RECIRCULATION CONTROL MOTOR TEST ).
Is the recirculation control motor OK?
YES - Go to step 7.
NO - Replace the recirculation control motor (see RECIRCULATION CONTROL MOTOR
REPLACEMENT ).
7. Disconnect the recirculation control motor 7P connector.
8. Disconnect climate control unit connector A (40P).
9. Check for continuity between the following terminals of climate control unit connector A (40P) and the
recirculation control motor 7P connector.
40P: 7P:
No. 8 No. 7
No. 35 No. 5
No. 36 No. 4
No. 38 No. 3
2008 Acura MDX
2007-09 HVAC Climate Control - MDX
Microsoft
Saturday, May 22, 2010 11:20:30 AM Page 40 © 2006 Mitchell Repair Information Company, LLC.
Fig. 31: Identifying Continuity Between Climate Control Unit A (40P) And Recirculation Control
Motor 7P Connector
Courtesy of AMERICAN HONDA MOTOR CO., INC.
Is there continuity?
YES - Go to step 10.
NO - Repair open in the wire(s) between the climate control unit and the recirculation control motor.
10. Check for continuity between body ground and climate control unit connector A (40P) No. 35,36, and 38
terminals individually.
Fig. 32: Identifying Continuity Between Body Ground And Climate Control Unit Connector A
(40P) No. 35,36, And 38 Terminals
Courtesy of AMERICAN HONDA MOTOR CO., INC.
Is there continuity?
YES - Repair short to body ground in the wire(s) between the climate control unit and the recirculation
control motor.
2008 Acura MDX
2007-09 HVAC Climate Control - MDX
Microsoft
Saturday, May 22, 2010 11:20:30 AM Page 41 © 2006 Mitchell Repair Information Company, LLC.
NO - Go to step 11.
11. Check for continuity between climate control unit connector A (40P) terminals as follows.
TERMINALS REFERENCE CHART
Is there continuity between any of the terminals?
YES - Repair the short in the wires.
NO - Go to step 12.
12. Reconnect climate control unit connector A (40 P).
13. Turn the ignition switch to ON (II), and check the same terminals for voltage to body ground.
Fig. 33: Identifying Same Terminals For Voltage To Body Ground
Courtesy of AMERICAN HONDA MOTOR CO., INC.
Is there any voltage?
YES - Repair short to power in the wire(s) between the climate control unit and the recirculation control
motor. This short may also damage the climate control unit. Repair the short to power before replacing
the climate control unit.
NO - Check for loose wires or poor connections at climate control unit connector A (40P) and at the
recirculation control motor 7P connector. If the connections are good, substitute a known-good climate
control unit, and recheck. If the symptom/indication goes away, replace the original climate control unit.
DTC B1223 OR DTC INDICATOR M: A PROBLEM IN THE REAR BLOWER MOTOR CIRCUIT
1. Clear the DTC with the HDS.
2. Turn the ignition switch to LOCK (0), and then ON (II).
From terminal To terminals
35 36, 38
36 38
2008 Acura MDX
2007-09 HVAC Climate Control - MDX
Microsoft
Saturday, May 22, 2010 11:20:30 AM Page 42 © 2006 Mitchell Repair Information Company, LLC.
3. Do the self-diagnostic with the HDS (see HOW TO USE THE SELF-DIAGNOSTIC FUNCTION
WITH THE HDS ) or climate control unit (see HOW TO USE THE SELF-DIAGNOSTIC
FUNCTION WITHOUT THE HDS ).
4. Check for DTCs.
Is DTC B1223 or M indicated?
YES - Go to step 5.
NO - Intermittent failure, check for loose wires or poor connections on the rear blower motor circuit.
5. Turn the ignition switch to LOCK (0).
6. Check the No. 2 (RR BLOWER) (30 A) fuse in the under-hood fuse box, and the No. 30 (10 A) fuse in
the under-dash fuse/relay box.
Are the fuses OK?
YES - Go to step 7.
NO - Replace the fuse(s), and recheck. If fuse(s) blow again, check for a short in the No. 2 (RR
BLOWER) (30 A) and No. 30 (10 A) fuse(s) circuit.
7. Connect the rear blower motor 2P connector No. 2 terminal to body ground with a jumper wire.
Fig. 34: Identifying Rear Blower Motor 2P Connector No. 2 Terminal To Body Ground
Courtesy of AMERICAN HONDA MOTOR CO., INC.
8. Turn the ignition switch to ON (II).
Does the rear blower motor run at high speed?
YES - Go to step 9.
NO - Go to step 24.
9. Turn the ignition switch to LOCK (0).
2008 Acura MDX
2007-09 HVAC Climate Control - MDX
Microsoft
Saturday, May 22, 2010 11:20:30 AM Page 43 © 2006 Mitchell Repair Information Company, LLC.
10. Disconnect the jumper wire.
11. Disconnect the rear power transistor 4P connector.
12. Check for continuity between the rear power transistor 4P connector No. 2 terminal and body ground.
Fig. 35: Identifying Continuity Between Rear Power Transistor 4P Connector No. 2 Terminal And
Body Ground
Courtesy of AMERICAN HONDA MOTOR CO., INC.
Is there continuity?
YES - Go to step 13.
NO - Check for an open in the wire between the rear power transistor and body ground. If the wire is OK,
check for poor ground at G503 (see GROUND TO COMPONENTS INDEX ).
13. Connect the rear power transistor 4P connector No. 2 and No. 4 terminals with a jumper wire.
Fig. 36: Identifying Rear Power Transistor 4P Connector No. 2 And No. 4 Terminals
Courtesy of AMERICAN HONDA MOTOR CO., INC.
14. Turn the ignition switch to ON (II).
Does the rear blower motor run at high speed?
YES - Go to step 15.
NO - Repair open in the ORN wire between the rear power transistor and the rear blower motor.
2008 Acura MDX
2007-09 HVAC Climate Control - MDX
Microsoft
Saturday, May 22, 2010 11:20:30 AM Page 44 © 2006 Mitchell Repair Information Company, LLC.
15. Turn the ignition switch to LOCK (0).
16. Disconnect the jumper wire.
17. Disconnect climate control unit connector B (14P).
18. Check for continuity between body ground and climate control unit connector B (14P) No. 13 and No. 14
terminals individually.
Fig. 37: Identifying Continuity Between Body Ground And Climate Control Unit Connector B
(14P) No. 13 And No. 14 Terminals
Courtesy of AMERICAN HONDA MOTOR CO., INC.
Is there continuity?
YES - Repair short to body ground in the wire(s) between the climate control unit and the rear power
transistor.
NO - Go to step 19.
19. Check for continuity between the following terminals of climate control unit connector B (14P) and the
rear power transistor 4P connector.
14P 4P
No. 13 No. 3
No. 14 No. 1
2008 Acura MDX
2007-09 HVAC Climate Control - MDX
Microsoft
Saturday, May 22, 2010 11:20:30 AM Page 45 © 2006 Mitchell Repair Information Company, LLC.
Fig. 38: Identifying Continuity Between Climate Control Unit B (14P) And Rear Power Transistor
4P Connector Terminal
Courtesy of AMERICAN HONDA MOTOR CO., INC.
Is there continuity?
YES - Go to step 20.
NO - Repair open in the wire(s) between the climate control unit and the rear power transistor.
20. Turn the ignition switch to ON (II).
21. Measure the voltage between body ground and climate control unit connector B (14P) No. 13 and No. 14
terminals individually.
Fig. 39: Measuring Voltage Between Body Ground And Climate Control Unit Connector B (14P)
No. 13 And No. 14 Terminals
Courtesy of AMERICAN HONDA MOTOR CO., INC.
Is there any voltage?
YES - Repair short to power in the wire(s).
NO - Go to step 22.
22. Reconnect climate control unit connector B (14P).
2008 Acura MDX
2007-09 HVAC Climate Control - MDX
Microsoft
Saturday, May 22, 2010 11:20:30 AM Page 46 © 2006 Mitchell Repair Information Company, LLC.
23. Test the rear power transistor (see REAR POWER TRANSISTOR TEST ).
Is the rear power transistor OK?
YES - Check for loose wires or poor connections at climate control unit connector B (14P) and at the rear
power transistor 4P connector. If the connections are good, substitute a known-good climate control unit,
and recheck. If the symptom/ indication goes away, replace the original climate control unit.
NO - Replace the rear power transistor (see REAR POWER TRANSISTOR TEST ).
24. Disconnect the jumper wire.
25. Disconnect the rear blower motor 2P connector.
26. Measure the voltage between the rear blower motor 2P connector No. 1 terminal and body ground.
Fig. 40: Measuring Voltage Between Rear Blower Motor 2P Connector No. 1 Terminal And Body
Ground
Courtesy of AMERICAN HONDA MOTOR CO., INC.
Is there battery voltage?
YES - Replace the rear blower motor (see REAR CLIMATE CONTROL PANEL
REMOVAL/INSTALLATION ).
NO - Go to step 27.
27. Turn the ignition switch to LOCK (0).
28. Remove the rear blower motor relay from the dashboard wire harness, and test it (see POWER RELAY
TEST ).
Is the relay OK?
YES - Go to step 29.
NO - Replace the rear blower motor relay.
29. Measure the voltage between the rear blower motor relay 4P socket No. 1 terminal and body ground.
2008 Acura MDX
2007-09 HVAC Climate Control - MDX
Microsoft
Saturday, May 22, 2010 11:20:30 AM Page 47 © 2006 Mitchell Repair Information Company, LLC.
Fig. 41: Measuring Voltage Between Rear Blower Motor Relay 4P Socket No. 1 Terminal And
Body Ground
Courtesy of AMERICAN HONDA MOTOR CO., INC.
Is there battery voltage?
YES - Go to step 30.
NO - Repair open in the wire between the No. 2 (RR BLOWER) (30 A) in the under-hood fuse box and
the rear blower motor relay.
30. Turn the ignition switch to ON (II).
31. Measure the voltage between the rear blower motor relay 4P socket No. 2 terminal and body ground.
Fig. 42: Measuring Voltage Between Rear Blower Motor Relay 4P Socket No. 2 Terminal And
Body Ground
Courtesy of AMERICAN HONDA MOTOR CO., INC.
Is there battery voltage?
YES - Go to step 32.
NO - Repair open in the wire between the No. 30 (10 A) fuse in the under-dash fuse/relay box and the
rear blower motor relay.
32. Turn the ignition switch to LOCK (0).
33. Check for continuity between the rear blower motor relay 4P socket No. 4 terminal and body ground.
2008 Acura MDX
2007-09 HVAC Climate Control - MDX
Microsoft
Saturday, May 22, 2010 11:20:30 AM Page 48 © 2006 Mitchell Repair Information Company, LLC.
Fig. 43: Identifying Continuity Between Rear Blower Motor Relay 4P Socket No. 4 Terminal And
Body Ground
Courtesy of AMERICAN HONDA MOTOR CO., INC.
Is there continuity?
YES - Repair open in the GRY wire between the rear blower motor relay and the blower motor.
NO - Check for an open in the wire between the rear blower motor relay and body ground. If the wire is
OK, check for poor ground at G503 (see GROUND TO COMPONENTS INDEX ).
DTC B1225 OR DTC INDICATOR A AND AUTO: AN OPEN IN THE IN-CAR TEMPERATURE
SENSOR CIRCUIT
1. Clear the DTC with the HDS.
2. Turn the ignition switch to LOCK (0), and then ON (II).
3. Do the self-diagnostic with the HDS (see HOW TO USE THE SELF-DIAGNOSTIC FUNCTION
WITH THE HDS ) or climate control unit (see HOW TO USE THE SELF-DIAGNOSTIC
FUNCTION WITHOUT THE HDS ).
4. Check for DTCs.
Is DTC B1225 or A and AUTO indicated?
YES - Go to step 5.
NO - Intermittent failure, check for loose wires or poor connections on the in-car temperature sensor
circuit.
5. Turn the ignition switch to LOCK (0).
6. Remove the humidity/in-car temperature sensor (see HUMIDITY/IN-CAR TEMPERATURE
SENSOR REPLACEMENT ), and test it (see HUMIDITY/IN-CAR TEMPERATURE SENSOR
TEST ).
Is the in-car temperature sensor OK?
2008 Acura MDX
2007-09 HVAC Climate Control - MDX
Microsoft
Saturday, May 22, 2010 11:20:30 AM Page 49 © 2006 Mitchell Repair Information Company, LLC.
YES - Go to step 7.
NO - Replace the humidity/in-car temperature sensor.
7. Disconnect climate control unit connector A (40P).
8. Check for continuity between climate control unit connector A (40P) No. 5 terminal and the humidity/in-
car temperature sensor 4P connector No. 4 terminal.
Fig. 44: Identifying Continuity Between No. 5 And Humidity/In-Car Temperature Sensor 4P
Connector No. 4 Terminal
Courtesy of AMERICAN HONDA MOTOR CO., INC.
Is there continuity?
YES - Go to step 9.
NO - Repair open in the wire between the climate control unit and the in-car temperature sensor.
9. Check for continuity between climate control unit connector A (40P) No. 8 terminal and the humidity/in-
car temperature sensor 4P connector No. 3 terminal.
2008 Acura MDX
2007-09 HVAC Climate Control - MDX
Microsoft
Saturday, May 22, 2010 11:20:30 AM Page 50 © 2006 Mitchell Repair Information Company, LLC.
Fig. 45: Identifying Continuity Between Climate Control Unit Connector A (40P) No. 8 And No. 3
Terminal
Courtesy of AMERICAN HONDA MOTOR CO., INC.
Is there continuity?
YES - Check for loose wires or poor connections at climate control unit connector A (40P) and at the
humidity/in-car temperature sensor 4P connector. If the connections are good, substitute a known-good
climate control unit, and recheck. If the symptom/ indication goes away, replace the original climate
control unit.
NO - Repair open in the wire between the climate control unit and the in-car temperature sensor.
DTC B1226 OR DTC INDICATOR B AND AUTO: A SHORT IN THE IN-CAR TEMPERATURE
SENSOR CIRCUIT
1. Clear the DTC with the HDS.
2. Turn the ignition switch to LOCK (0), and then ON (II).
3. Do the self-diagnostic with the HDS (see HOW TO USE THE SELF-DIAGNOSTIC FUNCTION
WITH THE HDS ) or climate control unit (see HOW TO USE THE SELF-DIAGNOSTIC
FUNCTION WITHOUT THE HDS ).
4. Check for DTCs.
Is DTC B1226 or B and AUTO indicated?
YES - Go to step 5.
NO - Intermittent failure.
5. Turn the ignition switch to LOCK (0).
6. Remove the humidity/in-car temperature sensor (see HUMIDITY/IN-CAR TEMPERATURE
SENSOR REPLACEMENT ), and test it (see HUMIDITY/IN-CAR TEMPERATURE SENSOR
TEST ).
Is the in-car temperature sensor OK?
YES - Go to step 7.
NO - Replace the humidity/in-car temperature sensor.
7. Disconnect climate control unit connector A (40P).
8. Check for continuity between climate control unit connector A (40P) No. 5 terminal and body ground.
2008 Acura MDX
2007-09 HVAC Climate Control - MDX
Microsoft
Saturday, May 22, 2010 11:20:30 AM Page 51 © 2006 Mitchell Repair Information Company, LLC.
Fig. 46: Identifying Continuity Between Climate Control Unit Connector A (40P) No. 5 Terminal
And Body Ground
Courtesy of AMERICAN HONDA MOTOR CO., INC.
Is there continuity?
YES - Repair short to body ground in the wire between the climate control unit and the in-car temperature
sensor.
NO - Go to step 9.
9. Check for continuity between climate control unit connector A (40P) No. 5 and No. 8 terminals.
Fig. 47: Identifying Continuity Between Climate Control Unit Connector A (40P) No. 5 And No. 8
Terminals
Courtesy of AMERICAN HONDA MOTOR CO., INC.
Is there continuity?
YES - Repair short in the wires between the climate control unit and the in-car temperature sensor.
NO - Substitute a known-good climate control unit, and recheck. If the symptom/indication goes away,
replace the original climate control unit.
DTC B1227 OR DTC INDICATOR C AND AUTO: AN OPEN IN THE OUTSIDE AIR
TEMPERATURE SENSOR CIRCUIT
2008 Acura MDX
2007-09 HVAC Climate Control - MDX
Microsoft
Saturday, May 22, 2010 11:20:30 AM Page 52 © 2006 Mitchell Repair Information Company, LLC.
1. Clear the DTC with the HDS.
2. Turn the ignition switch to LOCK (0), and then ON (II).
3. Do the self-diagnostic with the HDS (see HOW TO USE THE SELF-DIAGNOSTIC FUNCTION
WITH THE HDS ) or climate control unit (see HOW TO USE THE SELF-DIAGNOSTIC
FUNCTION WITHOUT THE HDS ).
4. Check for DTCs.
Is DTC B1227 or C and AUTO indicated?
YES - Go to step 5.
NO - Intermittent failure, check for loose wires or poor connections on the outside air temperature sensor
circuit.
5. Turn the ignition switch to LOCK (0).
6. Remove the outside air temperature sensor (see OUTSIDE AIR TEMPERATURE SENSOR
REPLACEMENT ), and test it (see OUTSIDE AIR TEMPERATURE SENSOR TEST ).
Is the outside air temperature sensor OK?
YES - Go to step 7.
NO - Replace the outside air temperature sensor.
7. Disconnect climate control unit connector A (40P).
8. Check for continuity between climate control unit connector A (40P) No. 28 terminal and the outside air
temperature sensor 2P connector No. 2 terminal.
Fig. 48: Identifying Continuity Between No. 28 And Outside Air Temperature Sensor 2P Connector
No. 2 Terminal
Courtesy of AMERICAN HONDA MOTOR CO., INC.
2008 Acura MDX
2007-09 HVAC Climate Control - MDX
Microsoft
Saturday, May 22, 2010 11:20:30 AM Page 53 © 2006 Mitchell Repair Information Company, LLC.
Is there continuity?
YES - Go to step 9.
NO - Repair open in the wire between the climate control unit and the outside air temperature sensor.
9. Check for continuity between climate control unit connector A (40P) No. 8 terminal and the outside air
temperature sensor 2P connector terminal No. 1.
Fig. 49: Identifying Continuity Between Climate Control Unit Connector A (40P) No. 8 And
Terminal No. 1
Courtesy of AMERICAN HONDA MOTOR CO., INC.
Is there continuity?
YES - Check for loose wires or poor connections at climate control unit connector A (40P) and at the
outside air temperature sensor 2P connector. If the connections are good, substitute a known-good climate
control unit, and recheck. If the symptom/ indication goes away, replace the original climate control unit.
NO - Repair open in the wire between the climate control unit and the outside air temperature sensor.
DTC B1228 OR DTC INDICATOR D AND AUTO: A SHORT IN THE OUTSIDE AIR
TEMPERATURE SENSOR CIRCUIT
1. Clear the DTC with the HDS.
2. Turn the ignition switch to LOCK (0), and then ON (II).
3. Do the self-diagnostic with the HDS (see HOW TO USE THE SELF-DIAGNOSTIC FUNCTION
WITH THE HDS ) or climate control unit (see HOW TO USE THE SELF-DIAGNOSTIC
FUNCTION WITHOUT THE HDS ).
4. Check for DTCs.
Is DTC B1228 or D and AUTO indicated?
2008 Acura MDX
2007-09 HVAC Climate Control - MDX
Microsoft
Saturday, May 22, 2010 11:20:30 AM Page 54 © 2006 Mitchell Repair Information Company, LLC.
YES - Go to step 5.
NO - Intermittent failure.
5. Turn the ignition switch to LOCK (0).
6. Remove the outside air temperature sensor (see OUTSIDE AIR TEMPERATURE SENSOR
REPLACEMENT ), and test it (see OUTSIDE AIR TEMPERATURE SENSOR TEST ).
Is the outside air temperature sensor OK?
YES - Go to step 7.
NO - Replace the outside air temperature sensor.
7. Disconnect climate control unit connector A (40P).
8. Check for continuity between climate control unit connector A (40P) No. 28 terminal and body ground.
Fig. 50: Identifying Continuity Between Climate Control Unit Connector A (40P) No. 28 Terminal
And Body Ground
Courtesy of AMERICAN HONDA MOTOR CO., INC.
Is there continuity?
YES - Repair short to body ground in the wire between the climate control unit and the outside air
temperature sensor.
NO - Go to step 9.
9. Check for continuity between climate control unit connector A (40P) No. 8 and No. 28 terminals.
2008 Acura MDX
2007-09 HVAC Climate Control - MDX
Microsoft
Saturday, May 22, 2010 11:20:30 AM Page 55 © 2006 Mitchell Repair Information Company, LLC.
Fig. 51: Identifying Continuity Between Climate Control Unit Connector A (40P) No. 8 And No. 28
Terminals
Courtesy of AMERICAN HONDA MOTOR CO., INC.
Is there continuity?
YES - Repair short in the wires between the climate control unit and the outside air temperature sensor.
NO - Substitute a known-good climate control unit, and recheck. If the symptom/indication goes away,
replace the original climate control unit.
DTC B1229 OR DTC INDICATOR E AND AUTO: AN OPEN IN THE SUNLIGHT SENSOR CIRCUIT
1. Clear the DTC with the HDS.
2. Turn the ignition switch to LOCK (0), and then ON (II).
3. Do the self-diagnostic with the HDS (see HOW TO USE THE SELF-DIAGNOSTIC FUNCTION
WITH THE HDS ) or climate control unit (see HOW TO USE THE SELF-DIAGNOSTIC
FUNCTION WITHOUT THE HDS ).
4. Check for DTCs.
Is DTC B1229 or E and AUTO indicated?
YES - Go to step 5.
NO - Intermittent failure, check for loose wires or poor connections on the sunlight sensor circuit.
5. Turn the ignition switch to LOCK (0).
6. Disconnect the sunlight sensor 5P connector.
7. Disconnect climate control unit connector A (40P).
8. Check for continuity between climate control unit connector A (40P) No. 29 terminal and the sunlight
sensor 5P connector No. 4 terminal.
2008 Acura MDX
2007-09 HVAC Climate Control - MDX
Microsoft
Saturday, May 22, 2010 11:20:30 AM Page 56 © 2006 Mitchell Repair Information Company, LLC.
Fig. 52: Identifying Continuity Between No. 29 And Sunlight Sensor 5P Connector No. 4 Terminal
Courtesy of AMERICAN HONDA MOTOR CO., INC.
Is there continuity?
YES - Go to step 9.
NO - Repair open in the wire between the climate control unit and the sunlight sensor.
9. Check for continuity between climate control unit connector A (40P) No. 8 terminal and the sunlight
sensor 5P connector No. 2 terminal.
Fig. 53: Identifying Continuity Between Climate Control Unit Connector A (40P) No. 8 And No. 2
Terminal
Courtesy of AMERICAN HONDA MOTOR CO., INC.
Is there continuity?
YES - Go to step 10.
NO - Repair open in the wire between the climate control unit and the sunlight sensor.
10. Reconnect the sunlight sensor 5P connector.
2008 Acura MDX
2007-09 HVAC Climate Control - MDX
Microsoft
Saturday, May 22, 2010 11:20:30 AM Page 57 © 2006 Mitchell Repair Information Company, LLC.
11. Reconnect climate control unit connector A (40P).
12. Test the sunlight sensor (see SUNLIGHT SENSOR TEST ).
Is the sunlight sensor OK?
YES - Check for loose wires or poor connections at climate control unit connector A (40P) and at the
sunlight sensor 5P connector. If the connections are good, substitute a known-good climate control unit,
and recheck. If the symptom/indication goes away, replace the original climate control unit.
NO - Replace the sunlight sensor (see SUNLIGHT SENSOR REPLACEMENT ).
DTC B1230 OR DTC INDICATOR F AND AUTO: A SHORT IN THE SUNLIGHT SENSOR CIRCUIT
1. Clear the DTC with the HDS.
2. Turn the ignition switch to LOCK (0), and then ON (II).
3. Do the self-diagnostic with the HDS (see HOW TO USE THE SELF-DIAGNOSTIC FUNCTION
WITH THE HDS ) or climate control unit (see HOW TO USE THE SELF-DIAGNOSTIC
FUNCTION WITHOUT THE HDS ).
4. Check for DTCs.
Is DTC B1230 or F and AUTO indicated?
YES - Go to step 5.
NO - Intermittent failure.
5. Turn the ignition switch to LOCK (0).
6. Disconnect the sunlight sensor 5P connector.
7. Disconnect climate control unit connector A (40P).
8. Check for continuity between climate control unit connector A (40P) No. 29 terminal and body ground.
Fig. 54: Identifying Continuity Between Climate Control Unit Connector A (40P) No. 29 Terminal
And Body Ground
Courtesy of AMERICAN HONDA MOTOR CO., INC.
2008 Acura MDX
2007-09 HVAC Climate Control - MDX
Microsoft
Saturday, May 22, 2010 11:20:30 AM Page 58 © 2006 Mitchell Repair Information Company, LLC.
Is there continuity?
YES - Repair short to body ground in the wire between the climate control unit and the sunlight sensor.
NO - Go to step 9.
9. Check for continuity between climate control unit connector A (40P) No. 8 and No. 29 terminals.
Fig. 55: Identifying Continuity Between Climate Control Unit Connector A (40P) No. 8 And No. 29
Terminals
Courtesy of AMERICAN HONDA MOTOR CO., INC.
Is there continuity?
YES - Repair short in the wires between the climate control unit and the sunlight sensor.
NO - Go to step 10.
10. Reconnect the sunlight sensor 5P connector.
11. Reconnect climate control unit connector A (40P).
12. Test the sunlight sensor (see SUNLIGHT SENSOR TEST ).
Is the sunlight sensor OK?
YES - Substitute a known-good climate control unit, and recheck. If the symptom/indication goes away,
replace the original climate control unit.
NO - Replace the sunlight sensor (see SUNLIGHT SENSOR REPLACEMENT ).
DTC B1231 OR DTC INDICATOR G AND AUTO: AN OPEN IN THE FRONT EVAPORATOR
TEMPERATURE SENSOR CIRCUIT
1. Clear the DTC with the HDS.
2. Turn the ignition switch to LOCK (0), and then ON (II).
3. Do the self-diagnostic with the HDS (see HOW TO USE THE SELF-DIAGNOSTIC FUNCTION
2008 Acura MDX
2007-09 HVAC Climate Control - MDX
Microsoft
Saturday, May 22, 2010 11:20:30 AM Page 59 © 2006 Mitchell Repair Information Company, LLC.
WITH THE HDS ) or climate control unit (see HOW TO USE THE SELF-DIAGNOSTIC
FUNCTION WITHOUT THE HDS ).
4. Check for DTCs.
Is DTC B1231 or G and AUTO indicated?
YES - Go to step 5.
NO - Intermittent failure, check for loose wires or poor connections on the front evaporator temperature
sensor circuit.
5. Turn the ignition switch to LOCK (0).
6. Remove the front evaporator temperature sensor (see FRONT EVAPORATOR TEMPERATURE
SENSOR REPLACEMENT ), and test it (see FRONT EVAPORATOR TEMPERATURE SENSOR
TEST ).
Is the front evaporator temperature sensor OK?
YES - Go to step 7.
NO - Replace the front evaporator temperature sensor.
7. Disconnect climate control unit connector A (40P).
8. Check for continuity between climate control unit connector A (40P) No. 24 terminal and the front
evaporator temperature sensor 2P connector No. 2 terminal.
Fig. 56: Identifying Continuity Between No. 24 And Front Evaporator Temperature Sensor 2P
Connector No. 2 Terminal
Courtesy of AMERICAN HONDA MOTOR CO., INC.
Is there continuity?
YES - Go to step 9.
2008 Acura MDX
2007-09 HVAC Climate Control - MDX
Microsoft
Saturday, May 22, 2010 11:20:30 AM Page 60 © 2006 Mitchell Repair Information Company, LLC.
NO - Repair open in the wire between the climate control unit and the front evaporator temperature
sensor.
9. Check for continuity between climate control unit connector A (40P) No. 8 terminal and the front
evaporator temperature sensor 2P connector No. 1 terminal.
Fig. 57: Identifying Continuity Between Climate Control Unit Connector A (40P) No. 8 And No. 1
Terminal
Courtesy of AMERICAN HONDA MOTOR CO., INC.
Is there continuity?
YES - Check for loose wires or poor connections at climate control unit connector A (40P) and at the
front evaporator temperature sensor 2P connector. If the connections are good, substitute a known-good
climate control unit, and recheck. If the symptom/indication goes away, replace the original climate
control unit.
NO - Repair open in the wire between the climate control unit and the front evaporator temperature
sensor.
DTC B1232 OR DTC INDICATOR H AND AUTO: A SHORT IN THE FRONT EVAPORATOR
TEMPERATURE SENSOR CIRCUIT
1. Clear the DTC with the HDS.
2. Turn the ignition switch to LOCK (0), and then ON (II).
3. Do the self-diagnostic with the HDS (see HOW TO USE THE SELF-DIAGNOSTIC FUNCTION
WITH THE HDS ) or climate control unit (see HOW TO USE THE SELF-DIAGNOSTIC
FUNCTION WITHOUT THE HDS ).
4. Check for DTCs.
Is DTC B1232 or H and AUTO indicated?
YES - Go to step 5.
2008 Acura MDX
2007-09 HVAC Climate Control - MDX
Microsoft
Saturday, May 22, 2010 11:20:30 AM Page 61 © 2006 Mitchell Repair Information Company, LLC.
NO - Intermittent failure.
5. Turn the ignition switch to LOCK (0).
6. Remove the front evaporator temperature sensor (see FRONT EVAPORATOR TEMPERATURE
SENSOR REPLACEMENT ), and test it (see FRONT EVAPORATOR TEMPERATURE SENSOR
TEST ).
Is the front evaporator temperature sensor OK?
YES - Go to step 7.
NO - Replace the front evaporator temperature sensor.
7. Disconnect climate control unit connector A (40P).
8. Check for continuity between climate control unit connector A (40P) No. 24 terminal and body ground.
Fig. 58: Identifying Continuity Between Climate Control Unit Connector A (40P) No. 24 Terminal
And Body Ground
Courtesy of AMERICAN HONDA MOTOR CO., INC.
Is there continuity?
YES - Repair short to body ground in the wire between the climate control unit and the front evaporator
temperature sensor.
NO - Go to step 9.
9. Check for continuity between climate control unit connector A (40P) No. 8 and No. 24 terminals.
2008 Acura MDX
2007-09 HVAC Climate Control - MDX
Microsoft
Saturday, May 22, 2010 11:20:30 AM Page 62 © 2006 Mitchell Repair Information Company, LLC.
Fig. 59: Identifying Continuity Between Climate Control Unit Connector A (40P) No. 8 And No. 24
Terminals
Courtesy of AMERICAN HONDA MOTOR CO., INC.
Is there continuity?
YES - Repair short in the wires between the climate control unit and the front evaporator temperature
sensor.
NO - Substitute a known-good climate control unit, and recheck. If the symptom/indication goes away,
replace the original climate control unit.
DTC B1233 OR DTC INDICATOR J AND AUTO: AN OPEN IN THE DRIVER'S AIR MIX
CONTROL MOTOR CIRCUIT
1. Clear the DTC with the HDS.
2. Turn the ignition switch to LOCK (0), and then ON (II).
3. Do the self-diagnostic with the HDS (see HOW TO USE THE SELF-DIAGNOSTIC FUNCTION
WITH THE HDS ) or climate control unit (see HOW TO USE THE SELF-DIAGNOSTIC
FUNCTION WITHOUT THE HDS ).
4. Check for DTCs.
Is DTC B1233 or J and AUTO indicated?
YES - Go to step 5.
NO - Intermittent failure, check for loose wires or poor connections on the driver's air mix control motor
circuit.
5. Turn the ignition switch to LOCK (0).
6. Test the driver's air mix control motor (see DRIVER'S AIR MIX CONTROL MOTOR TEST ).
Is the driver's air mix control motor OK?
YES - Go to step 7.
2008 Acura MDX
2007-09 HVAC Climate Control - MDX
Microsoft
Saturday, May 22, 2010 11:20:30 AM Page 63 © 2006 Mitchell Repair Information Company, LLC.
NO - Replace the driver's air mix control motor (see DRIVER'S AIR MIX CONTROL MOTOR
REPLACEMENT ).
7. Disconnect the driver's air mix control motor 7P connector.
8. Disconnect climate control unit connector A (40P).
9. Check for continuity between the following terminals of climate control unit connector A (40P) and the
driver's air mix control motor 7P connector.
Fig. 60: Identifying Continuity Between Climate Control Unit A (40P) And Driver's Air Mix
Control Motor 7P Connector Terminals
Courtesy of AMERICAN HONDA MOTOR CO., INC.
Is there continuity?
YES - Check for loose wires or poor connections at climate control unit connector A (40P) and at the
driver's air mix control motor 7P connector. If the connections are good, substitute a known-good climate
control unit and recheck. If the symptom/ indication goes away, replace the original climate control unit.
NO - Repair open in the wire(s) between the climate control unit and the driver's air mix control motor.
DTC B1234 OR DTC INDICATOR K AND AUTO: A SHORT IN THE DRIVER'S AIR MIX
CONTROL MOTOR CIRCUIT
1. Clear the DTC with the HDS.
2. Turn the ignition switch to LOCK (0), and then ON (II).
40P 7P
No. 6 No. 7
No. 8 No. 5
No. 11 No. 3
2008 Acura MDX
2007-09 HVAC Climate Control - MDX
Microsoft
Saturday, May 22, 2010 11:20:30 AM Page 64 © 2006 Mitchell Repair Information Company, LLC.
3. Do the self-diagnostic with the HDS (see HOW TO USE THE SELF-DIAGNOSTIC FUNCTION
WITH THE HDS ) or climate control unit (see HOW TO USE THE SELF-DIAGNOSTIC
FUNCTION WITHOUT THE HDS ).
4. Check for DTCs.
Is DTC B1234 or K and AUTO indicated?
YES - Go to step 5.
NO - Intermittent failure.
5. Check for DTCs.
Are these DTCs also present; B1237 or N and AUTO, and/or B1245 or G, and/or B2968 or A and
WINDSHIELD DEFROST, and/or B2980 or B and WINDSHIELD DEFROST?
YES - Go to step 13.
NO - Go to step 6.
6. Turn the ignition switch to LOCK (0).
7. Test the driver's air mix control motor (see DRIVER'S AIR MIX CONTROL MOTOR TEST ).
Is the driver's air mix control motor OK?
YES - Go to step 8.
NO - Replace the driver's air mix control motor (see DRIVER'S AIR MIX CONTROL MOTOR
REPLACEMENT ).
8. Disconnect the driver's air mix control motor 7P connector.
9. Disconnect climate control unit connector A (40P).
10. Check for continuity between body ground and climate control unit connector A (40P) No. 11 terminal.
Fig. 61: Identifying Continuity Between Body Ground And Climate Control Unit Connector A
2008 Acura MDX
2007-09 HVAC Climate Control - MDX
Microsoft
Saturday, May 22, 2010 11:20:30 AM Page 65 © 2006 Mitchell Repair Information Company, LLC.
(40P) No. 11 Terminal
Courtesy of AMERICAN HONDA MOTOR CO., INC.
Is there continuity?
YES - Repair short to body ground in the wire between the climate control unit and the driver's air mix
control motor.
NO - Go to step 11.
11. Check for continuity between climate control unit connector A (40P) No. 6 and No. 11 terminals.
Fig. 62: Identifying Continuity Between Climate Control Unit Connector A (40P) No. 6 And No. 11
Terminals
Courtesy of AMERICAN HONDA MOTOR CO., INC.
Is there continuity?
YES - Repair the short in the wires.
NO - Go to step 12.
12. Turn the ignition switch to ON (II), and measure the voltage between climate control unit connector A
(40P) No. 11 terminal and body ground.
Fig. 63: Measuring Voltage Between Climate Control Unit Connector A (40P) No. 11 Terminal And
2008 Acura MDX
2007-09 HVAC Climate Control - MDX
Microsoft
Saturday, May 22, 2010 11:20:30 AM Page 66 © 2006 Mitchell Repair Information Company, LLC.
Body Ground
Courtesy of AMERICAN HONDA MOTOR CO., INC.
Is there any voltage?
YES - Repair short to power in the wire between the climate control unit and the driver's air mix control
motor. This short may also damage the climate control unit. Repair the short to power before replacing
the climate control unit.
NO - Substitute a known-good climate control unit, and recheck. If the symptom/indication goes away,
replace the original climate control unit.
13. Turn the ignition switch to LOCK (0), and disconnect the climate control unit.
14. Disconnect these items:
 Driver's air mix control motor
 Passenger's air mix control motor
 Rear air mix control motor
 Humidity/in-car temperature sensor
 A/C pressure sensor
15. Check for continuity between climate control unit connector A (40P) No. 6 terminal and body ground.
Fig. 64: Identifying Continuity Between Climate Control Unit Connector A (40P) No. 6 Terminal
And Body Ground
Courtesy of AMERICAN HONDA MOTOR CO., INC.
Is there continuity?
YES - Repair short to body ground in the wire.
NO - Go to step 16.
16. Turn the ignition switch to ON (II), and check the same terminal for voltage to body ground.
2008 Acura MDX
2007-09 HVAC Climate Control - MDX
Microsoft
Saturday, May 22, 2010 11:20:30 AM Page 67 © 2006 Mitchell Repair Information Company, LLC.
Fig. 65: Identifying Same Terminal For Voltage To Body Ground
Courtesy of AMERICAN HONDA MOTOR CO., INC.
Is there any voltage?
YES - Repair short to power in the wire. This short may have also damaged the climate control unit.
Repair the short to power before replacing the climate control unit.
NO - Go to step 17.
17. Turn the ignition switch to LOCK (0).
18. Reconnect the climate control unit connector (40P).
19. Turn the ignition switch to ON (II), and measure the voltage between climate control unit connector A
(40P) No. 6 terminal and body ground.
Fig. 66: Measuring Voltage Between Climate Control Unit Connector A (40P) No. 6 Terminal And
Body Ground
Courtesy of AMERICAN HONDA MOTOR CO., INC.
Is there about 5 V?
YES - Go to step 20.
NO - Check for a loose wire or poor connection at climate control unit connector A (40P). If the
connection is good, substitute a known-good climate control unit and recheck. If the symptom/ indication
goes away, replace the original climate control unit.
2008 Acura MDX
2007-09 HVAC Climate Control - MDX
Microsoft
Saturday, May 22, 2010 11:20:30 AM Page 68 © 2006 Mitchell Repair Information Company, LLC.
20. While checking the same terminal for voltage to ground, reconnect these items individually and note the
voltage reading each time:
 Driver's air mix control motor
 Passenger's air mix control motor
 Rear air mix control motor
 Humidity/in-car temperature sensor
 A/C pressure sensor
Fig. 67: Identifying Climate Control Unit Connector A (40P)
Courtesy of AMERICAN HONDA MOTOR CO., INC.
Does the voltage remain at about 5 V?
YES - Substitute a known-good climate control unit and recheck. If the symptom/indication goes away,
replace the original climate control unit.
NO - Replace the component that caused the voltage drop.
DTC B1235 OR DTC INDICATOR L AND AUTO: A PROBLEM IN THE DRIVER'S AIR MIX
CONTROL LINKAGE, DOOR, OR MOTOR CIRCUIT
1. Clear the DTC with the HDS.
2. Turn the ignition switch to LOCK (0), and then ON (II).
3. Do the self-diagnostic with the HDS (see HOW TO USE THE SELF-DIAGNOSTIC FUNCTION
WITH THE HDS ) or climate control unit (see HOW TO USE THE SELF-DIAGNOSTIC
FUNCTION WITHOUT THE HDS ).
4. Check for DTCs.
Is DTC B1235 or L and AUTO indicated?
YES - Go to step 5.
NO - Intermittent failure, check for loose wires or poor connections on the driver's air mix control motor
circuit.
2008 Acura MDX
2007-09 HVAC Climate Control - MDX
Microsoft
Saturday, May 22, 2010 11:20:30 AM Page 69 © 2006 Mitchell Repair Information Company, LLC.
5. Turn the ignition switch to LOCK (0).
6. Test the driver's air mix control motor (see DRIVER'S AIR MIX CONTROL MOTOR TEST ).
Is the driver's air mix control motor OK?
YES - Go to step 7.
NO - Replace the driver's air mix control motor (see DRIVER'S AIR MIX CONTROL MOTOR
REPLACEMENT ), or repair the driver's air mix control linkage or door.
7. Disconnect the driver's air mix control motor 7P connector.
8. Disconnect climate control unit connector A (40P).
9. Check for continuity between the following terminals of climate control unit connector A (40P) and the
driver's air mix control motor 7P connector.
Fig. 68: Identifying Continuity Between Climate Control Unit A (40P) And Driver's Air Mix
Control Motor 7P Connector Terminal
Courtesy of AMERICAN HONDA MOTOR CO., INC.
Is there continuity?
YES - Go to step 10.
NO - Repair open in the wire(s) between the climate control unit and the driver's air mix control motor.
10. Check for continuity between body ground and climate control unit connector A (40P) No. 12 and No. 13
terminals individually.
40P 7P
No. 12 No. 2
No. 13 No. 1
2008 Acura MDX
2007-09 HVAC Climate Control - MDX
Microsoft
Saturday, May 22, 2010 11:20:30 AM Page 70 © 2006 Mitchell Repair Information Company, LLC.
Fig. 69: Identifying Continuity Between Body Ground And Climate Control Unit Connector A
(40P) No. 12 And No. 13 Terminals
Courtesy of AMERICAN HONDA MOTOR CO., INC.
Is there continuity?
YES - Repair short to body ground in the wire(s) between the climate control unit and the driver's air mix
control motor.
NO - Substitute a known-good climate control unit, and recheck. If the symptom/indication goes away,
replace the original climate control unit.
DTC B1236 OR DTC INDICATOR M AND AUTO: AN OPEN IN THE PASSENGER'S AIR MIX
CONTROL MOTOR CIRCUIT
1. Clear the DTC with the HDS.
2. Turn the ignition switch to LOCK (0), and then ON (II).
3. Do the self-diagnostic with the HDS (see HOW TO USE THE SELF-DIAGNOSTIC FUNCTION
WITH THE HDS ) or climate control unit (see HOW TO USE THE SELF-DIAGNOSTIC
FUNCTION WITHOUT THE HDS ).
4. Check for DTCs.
Is DTC B1236 or M and AUTO indicated?
YES - Go to step 5.
NO - Intermittent failure, check for loose wires or poor connections on the passenger's air mix control
motor circuit.
5. Turn the ignition switch to LOCK (0).
6. Test the passenger's air mix control motor (see PASSENGER'S AIR MIX CONTROL MOTOR
TEST ).
Is the passenger's air mix control motor OK?
2008 Acura MDX
2007-09 HVAC Climate Control - MDX
Microsoft
Saturday, May 22, 2010 11:20:30 AM Page 71 © 2006 Mitchell Repair Information Company, LLC.
YES - Go to step 7.
NO - Replace the passenger's air mix control motor (see PASSENGER'S AIR MIX CONTROL
MOTOR REPLACEMENT ).
7. Disconnect the passenger's air mix control motor 7P connector.
8. Disconnect climate control unit connector A (40P).
9. Check for continuity between the following terminals of climate control unit connector A (40P) and the
passenger's air mix control motor 7P connector.
Fig. 70: Identifying Continuity Between Climate Control Unit A (40P) And Passenger's Air Mix
Control Motor 7P Connector Terminals
Courtesy of AMERICAN HONDA MOTOR CO., INC.
Is there continuity?
YES - Check for loose wires or poor connections at climate control unit connector A (40P) and at the
passenger's air mix control motor 7P connector. If the connections are good, substitute a known-good
climate control unit and recheck. If the symptom/ indication goes away, replace the original climate
control unit.
NO - Repair open in the wire(s) between the climate control unit and the passenger's air mix control
motor.
DTC B1237 OR DTC INDICATOR N AND AUTO: A SHORT IN THE PASSENGER'S AIR MIX
40P 7P
No. 6 No. 7
No. 8 No. 5
No. 30 No. 3
2008 Acura MDX
2007-09 HVAC Climate Control - MDX
Microsoft
Saturday, May 22, 2010 11:20:30 AM Page 72 © 2006 Mitchell Repair Information Company, LLC.
CONTROL MOTOR CIRCUIT
1. Clear the DTC with the HDS.
2. Turn the ignition switch to LOCK (0), and then ON (II).
3. Do the self-diagnostic with the HDS (see HOW TO USE THE SELF-DIAGNOSTIC FUNCTION
WITH THE HDS ) or climate control unit (see HOW TO USE THE SELF-DIAGNOSTIC
FUNCTION WITHOUT THE HDS ).
4. Check for DTCs.
Is DTC B1237 or N and AUTO indicated?
YES - Go to step 5.
NO - Intermittent failure.
5. Check for DTCs.
Are these DTCs also present; B1234 or K and AUTO, and/or B1245 or G, and/or B2968 or A and
WINDSHIELD DEFROST, and/or B2980 or B and WINDSHIELD DEFROST?
YES - Go to step 13.
NO - Go to step 6.
6. Turn the ignition switch to LOCK (0).
7. Test the passenger's air mix control motor (see PASSENGER'S AIR MIX CONTROL MOTOR
TEST ).
Is the passenger's air mix control motor OK?
YES - Go to step 8.
NO - Replace the passenger's air mix control motor (see PASSENGER'S AIR MIX CONTROL
MOTOR REPLACEMENT ).
8. Disconnect the passenger's air mix control motor 7P connector.
9. Disconnect climate control unit connector A (40P).
10. Check for continuity between body ground and climate control unit connector A (40P) No. 30 terminal.
2008 Acura MDX
2007-09 HVAC Climate Control - MDX
Microsoft
Saturday, May 22, 2010 11:20:30 AM Page 73 © 2006 Mitchell Repair Information Company, LLC.
Fig. 71: Identifying Continuity Between Body Ground And Climate Control Unit Connector A
(40P) No. 30 Terminal
Courtesy of AMERICAN HONDA MOTOR CO., INC.
Is there continuity?
YES - Repair short to body ground in the wire between the climate control unit and the passenger's air
mix control motor.
NO - Go to step 11.
11. Check for continuity between climate control unit connector A (40P) No. 6 and No. 30 terminals.
Fig. 72: Identifying Continuity Between Climate Control Unit Connector A (40P) No. 6 And No. 30
Terminals
Courtesy of AMERICAN HONDA MOTOR CO., INC.
Is there continuity?
YES - Repair the short in the wires.
NO - Go to step 12.
12. Turn the ignition switch to ON (II), and measure the voltage between climate control unit connector A
(40P) No. 30 terminal and body ground.
2008 Acura MDX
2007-09 HVAC Climate Control - MDX
Microsoft
Saturday, May 22, 2010 11:20:30 AM Page 74 © 2006 Mitchell Repair Information Company, LLC.
Fig. 73: Measuring Voltage Between Climate Control Unit Connector A (40P) No. 30 Terminal And
Body Ground
Courtesy of AMERICAN HONDA MOTOR CO., INC.
Is there any voltage?
YES - Repair short to power in the wire(s) between the climate control unit and the passenger's air mix
control motor. This short may also damage the climate control unit. Repair the short to power before
replacing the climate control unit.
NO - Substitute a known-good climate control unit, and recheck. If the symptom/indication goes away,
replace the original climate control unit.
13. Turn the ignition switch to LOCK (0), and disconnect the climate control unit.
14. Disconnect these items:
 Driver's air mix control motor
 Passenger's air mix control motor
 Rear air mix control motor
 Humidity/in-car temperature sensor
 A/C pressure sensor
15. Check for continuity between climate control unit connector A (40P) No. 6 terminal and body ground.
Fig. 74: Identifying Continuity Between Climate Control Unit Connector A (40P) No. 6 Terminal
And Body Ground
Courtesy of AMERICAN HONDA MOTOR CO., INC.
2008 Acura MDX
2007-09 HVAC Climate Control - MDX
Microsoft
Saturday, May 22, 2010 11:20:30 AM Page 75 © 2006 Mitchell Repair Information Company, LLC.
Is there continuity?
YES - Repair short to body ground in the wire.
NO - Go to step 16.
16. Turn the ignition switch to ON (II), and check the same terminal for voltage to body ground.
Fig. 75: Identifying Same Terminal For Voltage To Body Ground
Courtesy of AMERICAN HONDA MOTOR CO., INC.
Is there any voltage?
YES - Repair short to power in the wire. This short may have also damaged the climate control unit.
Repair the short to power before replacing the climate control unit.
NO - Go to step 17.
17. Turn the ignition switch to LOCK (0).
18. Reconnect the climate control unit connector (40P).
19. Turn the ignition switch to ON (II), and measure the voltage between climate control unit connector A
(40P) No. 6 terminal and body ground.
Fig. 76: Measuring Voltage Between Climate Control Unit Connector A (40P) No. 6 Terminal And
Body Ground
Courtesy of AMERICAN HONDA MOTOR CO., INC.
2008 Acura MDX
2007-09 HVAC Climate Control - MDX
Microsoft
Saturday, May 22, 2010 11:20:30 AM Page 76 © 2006 Mitchell Repair Information Company, LLC.
Is there about 5 V?
YES - Go to step 20.
NO - Check for a loose wire or poor connection at climate control unit connector A (40P). If the
connection is good, substitute a known-good climate control unit and recheck. If the symptom/ indication
goes away, replace the original climate control unit.
20. While checking the same terminal for voltage to ground, reconnect these items individually and note the
voltage reading each time:
 Driver's air mix control motor
 Passenger's air mix control motor
 Rear air mix control motor
 Humidity/in-car temperature sensor
 A/C pressure sensor
Fig. 77: Identifying Same Terminal For Voltage To Ground
Courtesy of AMERICAN HONDA MOTOR CO., INC.
Does the voltage remain at about 5 V?
YES - Substitute a known-good climate control unit and recheck. If the symptom/indication goes away,
replace the original climate control unit.
NO - Replace the component that caused the voltage drop.
DTC B1238 OR DTC INDICATOR P AND AUTO: A PROBLEM IN THE PASSENGER'S AIR MIX
CONTROL LINKAGE, DOOR, OR MOTOR CIRCUIT
1. Clear the DTC with the HDS.
2. Turn the ignition switch to LOCK (0), and then ON (II).
3. Do the self-diagnostic with the HDS (see HOW TO USE THE SELF-DIAGNOSTIC FUNCTION
WITH THE HDS ) or climate control unit (see HOW TO USE THE SELF-DIAGNOSTIC
FUNCTION WITHOUT THE HDS ).
2008 Acura MDX
2007-09 HVAC Climate Control - MDX
Microsoft
Saturday, May 22, 2010 11:20:30 AM Page 77 © 2006 Mitchell Repair Information Company, LLC.
4. Check for DTCs.
Is DTC B1238 or P and AUTO indicated?
YES - Go to step 5.
NO - Intermittent failure, check for loose wires or poor connections on the passenger's air mix control
motor circuit.
5. Turn the ignition switch to LOCK (0).
6. Test the passenger's air mix control motor (see PASSENGER'S AIR MIX CONTROL MOTOR
TEST ).
Is the passenger's air mix control motor OK?
YES - Go to step 7.
NO - Replace the passenger's air mix control motor (see PASSENGER'S AIR MIX CONTROL
MOTOR REPLACEMENT ), or repair the passenger's air mix control linkage or door.
7. Disconnect the passenger's air mix control motor 7P connector.
8. Disconnect climate control unit connector A (40P).
9. Check for continuity between the following terminals of climate control unit connector A (40P) and the
passenger's air mix control motor 7P connector.
Fig. 78: Identifying Continuity Between Climate Control Unit A (40P) And Passenger's Air Mix
Control Motor 7P Connector Terminal
40P 7P
No. 14 No. 2
No. 15 No. 1
2008 Acura MDX
2007-09 HVAC Climate Control - MDX
Microsoft
Saturday, May 22, 2010 11:20:30 AM Page 78 © 2006 Mitchell Repair Information Company, LLC.
Courtesy of AMERICAN HONDA MOTOR CO., INC.
Is there continuity?
YES - Go to step 10.
NO - Repair open in the wire(s) between the climate control unit and the passenger's air mix control
motor.
10. Check for continuity between body ground and climate control unit connector A (40P) No. 14 and No. 15
terminals individually.
Fig. 79: Identifying Continuity Between Body Ground And Climate Control Unit Connector A
(40P) No. 14 And No. 15 Terminals
Courtesy of AMERICAN HONDA MOTOR CO., INC.
Is there continuity?
YES - Repair short to body ground in the wire(s) between the climate control unit and the passenger's air
mix control motor.
NO - Substitute a known-good climate control unit, and recheck. If the symptom/indication goes away,
replace the original climate control unit.
DTC B1239 OR DTC INDICATOR A: AN OPEN OR SHORT IN THE FRONT MODE CONTROL
MOTOR CIRCUIT
1. Clear the DTC with the HDS.
2. Turn the ignition switch to LOCK (0), and then ON (II).
3. Do the self-diagnostic with the HDS (see HOW TO USE THE SELF-DIAGNOSTIC FUNCTION
WITH THE HDS ) or climate control unit (see HOW TO USE THE SELF-DIAGNOSTIC
FUNCTION WITHOUT THE HDS ).
4. Check for DTCs.
Is DTC B1239 or A indicated?
2008 Acura MDX
2007-09 HVAC Climate Control - MDX
Microsoft
Saturday, May 22, 2010 11:20:30 AM Page 79 © 2006 Mitchell Repair Information Company, LLC.
YES - Go to step 5.
NO - Intermittent failure, check for loose wires or poor connections on the front mode control motor
circuit.
5. Turn the ignition switch to LOCK (0).
6. Test the front mode control motor (see FRONT MODE CONTROL MOTOR TEST ).
Is the front mode control motor OK?
YES - Go to step 7.
NO - Replace the front mode control motor (see FRONT MODE CONTROL MOTOR
REPLACEMENT ).
7. Disconnect the front mode control motor 7P connector.
8. Disconnect climate control unit connector A (40P).
9. Check for continuity between the following terminals of climate control unit connector A (40P) and the
front mode control motor 7P connector.
40P 7P
No. 8 No. 7
No. 31 No. 6
No. 32 No. 5
No. 33 No. 4
No. 34 No. 3
2008 Acura MDX
2007-09 HVAC Climate Control - MDX
Microsoft
Saturday, May 22, 2010 11:20:30 AM Page 80 © 2006 Mitchell Repair Information Company, LLC.
Fig. 80: Identifying Continuity Between Climate Control Unit A (40P) And Front Mode Control
Motor 7P Connector Terminals
Courtesy of AMERICAN HONDA MOTOR CO., INC.
Is there continuity?
YES - Go to step 10.
NO - Repair open in the wire(s) between the climate control unit and the front mode control motor.
10. Check for continuity between body ground and climate control unit connector A (40P) No. 31,32, 33, and
34 terminals individually.
Fig. 81: Identifying Continuity Between Body Ground And Climate Control Unit Connector A
(40P) No. 31,32, 33, And 34 Terminals
Courtesy of AMERICAN HONDA MOTOR CO., INC.
Is there continuity?
YES - Repair short to body ground in the wire(s) between the climate control unit and the front mode
control motor.
NO - Go to step 11.
11. Check for continuity between climate control unit connector A (40P) terminals as follows.
TERMINALS REFERENCE CHART
Is there continuity between any of the terminals?
YES - Repair the short in the wires.
From terminal To terminals
31 32, 33, 34
32 33, 34
33 34
2008 Acura MDX
2007-09 HVAC Climate Control - MDX
Microsoft
Saturday, May 22, 2010 11:20:30 AM Page 81 © 2006 Mitchell Repair Information Company, LLC.
NO - Go to step 12.
12. Turn the ignition switch to ON (II), and check the same terminals for voltage to body ground.
Fig. 82: Identifying Same Terminals For Voltage To Body Ground
Courtesy of AMERICAN HONDA MOTOR CO., INC.
Is there any voltage?
YES - Repair short to power in the wire(s) between the climate control unit and the front mode control
motor. This short may also damage the climate control unit. Repair the short to power before replacing
the climate control unit.
NO - Check for loose wires or poor connections at climate control unit connector A (40P) and at the front
mode control motor 7P connector. If the connections are good, substitute a known-good climate control
unit, and recheck. If the symptom/ indication goes away, replace the original climate control unit.
DTC B1240 OR DTC INDICATOR B: A PROBLEM IN THE FRONT MODE CONTROL LINKAGE,
DOORS, OR MOTOR CIRCUIT
1. Clear the DTC with the HDS.
2. Turn the ignition switch to LOCK (0), and then ON (II).
3. Do the self-diagnostic with the HDS (see HOW TO USE THE SELF-DIAGNOSTIC FUNCTION
WITH THE HDS ) or climate control unit (see HOW TO USE THE SELF-DIAGNOSTIC
FUNCTION WITHOUT THE HDS ).
4. Check for DTCs.
Is DTC B1240 or B indicated?
YES - Go to step 5.
NO - Intermittent failure, check for loose wires or poor connections on the mode control motor circuit.
5. Turn the ignition switch to LOCK (0).
2008 Acura MDX
2007-09 HVAC Climate Control - MDX
Microsoft
Saturday, May 22, 2010 11:20:30 AM Page 82 © 2006 Mitchell Repair Information Company, LLC.
Honda climate control repair information

Weitere ähnliche Inhalte

Was ist angesagt?

Golf 92 wiring diagrams (eng)
Golf 92 wiring diagrams (eng)Golf 92 wiring diagrams (eng)
Golf 92 wiring diagrams (eng)
Gogo Kostov
 
Cummins isb6.7 cm2150 (2007-09)
Cummins   isb6.7 cm2150 (2007-09)Cummins   isb6.7 cm2150 (2007-09)
Cummins isb6.7 cm2150 (2007-09)
DiegoLira32
 
Diagnostico mariposa motorizada citroen peugeot
Diagnostico mariposa motorizada citroen peugeotDiagnostico mariposa motorizada citroen peugeot
Diagnostico mariposa motorizada citroen peugeot
Alejandro Lingua
 
Calefactores webasto guia de fallos
Calefactores webasto guia de fallosCalefactores webasto guia de fallos
Calefactores webasto guia de fallos
JUANLEONE
 
MF-4200E01-PT-preview.pdf
MF-4200E01-PT-preview.pdfMF-4200E01-PT-preview.pdf
MF-4200E01-PT-preview.pdf
ferney37
 

Was ist angesagt? (20)

Sistema elétrico constelation
Sistema elétrico constelationSistema elétrico constelation
Sistema elétrico constelation
 
MANUAL PARA CONDUCTORE VOLVO FH
MANUAL PARA CONDUCTORE VOLVO FHMANUAL PARA CONDUCTORE VOLVO FH
MANUAL PARA CONDUCTORE VOLVO FH
 
Ems 3 textbook spanish
Ems 3 textbook spanishEms 3 textbook spanish
Ems 3 textbook spanish
 
Sistema de controle do motor Scania
Sistema de controle do motor ScaniaSistema de controle do motor Scania
Sistema de controle do motor Scania
 
Toyota yaris diagrama
Toyota yaris diagramaToyota yaris diagrama
Toyota yaris diagrama
 
GM OBD1 Code List (PDF)
GM OBD1 Code List (PDF)GM OBD1 Code List (PDF)
GM OBD1 Code List (PDF)
 
2009 nissan rogue service repair manual
2009 nissan rogue service repair manual2009 nissan rogue service repair manual
2009 nissan rogue service repair manual
 
GM OBD1 Code List (PDF)
GM OBD1 Code List (PDF)GM OBD1 Code List (PDF)
GM OBD1 Code List (PDF)
 
Golf 92 wiring diagrams (eng)
Golf 92 wiring diagrams (eng)Golf 92 wiring diagrams (eng)
Golf 92 wiring diagrams (eng)
 
02 opirus motor
02 opirus motor02 opirus motor
02 opirus motor
 
70 c17 3.0 16v_euro5
70 c17 3.0 16v_euro570 c17 3.0 16v_euro5
70 c17 3.0 16v_euro5
 
Despiece scania
Despiece scaniaDespiece scania
Despiece scania
 
Cummins isb6.7 cm2150 (2007-09)
Cummins   isb6.7 cm2150 (2007-09)Cummins   isb6.7 cm2150 (2007-09)
Cummins isb6.7 cm2150 (2007-09)
 
Diagnostico mariposa motorizada citroen peugeot
Diagnostico mariposa motorizada citroen peugeotDiagnostico mariposa motorizada citroen peugeot
Diagnostico mariposa motorizada citroen peugeot
 
ecus varias reparacion.pdf
ecus varias reparacion.pdfecus varias reparacion.pdf
ecus varias reparacion.pdf
 
Calefactores webasto guia de fallos
Calefactores webasto guia de fallosCalefactores webasto guia de fallos
Calefactores webasto guia de fallos
 
MF-4200E01-PT-preview.pdf
MF-4200E01-PT-preview.pdfMF-4200E01-PT-preview.pdf
MF-4200E01-PT-preview.pdf
 
204406142 sistema-electrico-p-r-y-t
204406142 sistema-electrico-p-r-y-t204406142 sistema-electrico-p-r-y-t
204406142 sistema-electrico-p-r-y-t
 
Nrf 225-pemex-2009
Nrf 225-pemex-2009Nrf 225-pemex-2009
Nrf 225-pemex-2009
 
2011 nissan rogue service repair manual
2011 nissan rogue service repair manual2011 nissan rogue service repair manual
2011 nissan rogue service repair manual
 

Ähnlich wie Honda climate control repair information

Jcb 512 56 telescopic handler service repair manual (from1402020 onwards)
Jcb 512 56 telescopic handler service repair manual (from1402020 onwards)Jcb 512 56 telescopic handler service repair manual (from1402020 onwards)
Jcb 512 56 telescopic handler service repair manual (from1402020 onwards)
fujsefxdeksemm
 
Jcb 512 56 telescopic handler service repair manual (from1402020 onwards)
Jcb 512 56 telescopic handler service repair manual (from1402020 onwards)Jcb 512 56 telescopic handler service repair manual (from1402020 onwards)
Jcb 512 56 telescopic handler service repair manual (from1402020 onwards)
fusjfjsekemwer
 
Jcb 509 42 telescopic handler service repair manual (from1402000 onwards)
Jcb 509 42 telescopic handler service repair manual (from1402000 onwards)Jcb 509 42 telescopic handler service repair manual (from1402000 onwards)
Jcb 509 42 telescopic handler service repair manual (from1402000 onwards)
fujsefxdeksemm
 

Ähnlich wie Honda climate control repair information (20)

Manuales de reparaciones jeep compass y patriot limited 2007-2009
Manuales de reparaciones jeep compass y patriot limited 2007-2009Manuales de reparaciones jeep compass y patriot limited 2007-2009
Manuales de reparaciones jeep compass y patriot limited 2007-2009
 
Motore_D20DT-D27DT.pdf
Motore_D20DT-D27DT.pdfMotore_D20DT-D27DT.pdf
Motore_D20DT-D27DT.pdf
 
Lu
LuLu
Lu
 
Manual reparacion Jeep Compass - Patriot Limited 2007-2009_Exhaust
Manual reparacion Jeep Compass - Patriot Limited 2007-2009_ExhaustManual reparacion Jeep Compass - Patriot Limited 2007-2009_Exhaust
Manual reparacion Jeep Compass - Patriot Limited 2007-2009_Exhaust
 
2005 Pontiac GTO Service Repair Manual.pdf
2005 Pontiac GTO Service Repair Manual.pdf2005 Pontiac GTO Service Repair Manual.pdf
2005 Pontiac GTO Service Repair Manual.pdf
 
2005 Pontiac GTO Service Repair Manual.pdf
2005 Pontiac GTO Service Repair Manual.pdf2005 Pontiac GTO Service Repair Manual.pdf
2005 Pontiac GTO Service Repair Manual.pdf
 
2006 Pontiac GTO Service Repair Manual.pdf
2006 Pontiac GTO Service Repair Manual.pdf2006 Pontiac GTO Service Repair Manual.pdf
2006 Pontiac GTO Service Repair Manual.pdf
 
2004 Pontiac GTO Service Repair Manual.pdf
2004 Pontiac GTO Service Repair Manual.pdf2004 Pontiac GTO Service Repair Manual.pdf
2004 Pontiac GTO Service Repair Manual.pdf
 
2005 Pontiac GTO Service Repair Manual.pdf
2005 Pontiac GTO Service Repair Manual.pdf2005 Pontiac GTO Service Repair Manual.pdf
2005 Pontiac GTO Service Repair Manual.pdf
 
2006 Pontiac GTO Service Repair Manual.pdf
2006 Pontiac GTO Service Repair Manual.pdf2006 Pontiac GTO Service Repair Manual.pdf
2006 Pontiac GTO Service Repair Manual.pdf
 
2004 Pontiac GTO Service Repair Manual.pdf
2004 Pontiac GTO Service Repair Manual.pdf2004 Pontiac GTO Service Repair Manual.pdf
2004 Pontiac GTO Service Repair Manual.pdf
 
2004 Pontiac GTO Service Repair Manual.pdf
2004 Pontiac GTO Service Repair Manual.pdf2004 Pontiac GTO Service Repair Manual.pdf
2004 Pontiac GTO Service Repair Manual.pdf
 
2005 Pontiac GTO Service Repair Manual.pdf
2005 Pontiac GTO Service Repair Manual.pdf2005 Pontiac GTO Service Repair Manual.pdf
2005 Pontiac GTO Service Repair Manual.pdf
 
2006 Pontiac GTO Service Repair Manual.pdf
2006 Pontiac GTO Service Repair Manual.pdf2006 Pontiac GTO Service Repair Manual.pdf
2006 Pontiac GTO Service Repair Manual.pdf
 
2006 Pontiac GTO Service Repair Manual.pdf
2006 Pontiac GTO Service Repair Manual.pdf2006 Pontiac GTO Service Repair Manual.pdf
2006 Pontiac GTO Service Repair Manual.pdf
 
2005 Pontiac GTO Service Repair Manual.pdf
2005 Pontiac GTO Service Repair Manual.pdf2005 Pontiac GTO Service Repair Manual.pdf
2005 Pontiac GTO Service Repair Manual.pdf
 
2004 Pontiac GTO Service Repair Manual.pdf
2004 Pontiac GTO Service Repair Manual.pdf2004 Pontiac GTO Service Repair Manual.pdf
2004 Pontiac GTO Service Repair Manual.pdf
 
Jcb 512 56 telescopic handler service repair manual (from1402020 onwards)
Jcb 512 56 telescopic handler service repair manual (from1402020 onwards)Jcb 512 56 telescopic handler service repair manual (from1402020 onwards)
Jcb 512 56 telescopic handler service repair manual (from1402020 onwards)
 
Jcb 512 56 telescopic handler service repair manual (from1402020 onwards)
Jcb 512 56 telescopic handler service repair manual (from1402020 onwards)Jcb 512 56 telescopic handler service repair manual (from1402020 onwards)
Jcb 512 56 telescopic handler service repair manual (from1402020 onwards)
 
Jcb 509 42 telescopic handler service repair manual (from1402000 onwards)
Jcb 509 42 telescopic handler service repair manual (from1402000 onwards)Jcb 509 42 telescopic handler service repair manual (from1402000 onwards)
Jcb 509 42 telescopic handler service repair manual (from1402000 onwards)
 

Mehr von OBD Codex

Mehr von OBD Codex (20)

SAE DTC Definitions - J2012 Revised DEC2007
SAE DTC Definitions - J2012 Revised DEC2007SAE DTC Definitions - J2012 Revised DEC2007
SAE DTC Definitions - J2012 Revised DEC2007
 
Ford OBD1 Trouble Codes List – OBDCodex
Ford OBD1 Trouble Codes List – OBDCodexFord OBD1 Trouble Codes List – OBDCodex
Ford OBD1 Trouble Codes List – OBDCodex
 
Honda OBD1 Trouble Codes List – OBDCodex
Honda OBD1 Trouble Codes List – OBDCodexHonda OBD1 Trouble Codes List – OBDCodex
Honda OBD1 Trouble Codes List – OBDCodex
 
All Volkswagen OBD2 Trouble Codes List – OBDCodex
All Volkswagen OBD2 Trouble Codes List – OBDCodexAll Volkswagen OBD2 Trouble Codes List – OBDCodex
All Volkswagen OBD2 Trouble Codes List – OBDCodex
 
All Toyota OBD2 Trouble Codes List – OBDCodex
All Toyota OBD2 Trouble Codes List – OBDCodexAll Toyota OBD2 Trouble Codes List – OBDCodex
All Toyota OBD2 Trouble Codes List – OBDCodex
 
All Subaru OBD2 Trouble Codes List – OBDCodex
All Subaru OBD2 Trouble Codes List – OBDCodexAll Subaru OBD2 Trouble Codes List – OBDCodex
All Subaru OBD2 Trouble Codes List – OBDCodex
 
All Saab OBD2 Trouble Codes List – OBDCodex
All Saab OBD2 Trouble Codes List – OBDCodexAll Saab OBD2 Trouble Codes List – OBDCodex
All Saab OBD2 Trouble Codes List – OBDCodex
 
All RAM OBD2 Trouble Codes List – OBDCodex
All RAM OBD2 Trouble Codes List – OBDCodexAll RAM OBD2 Trouble Codes List – OBDCodex
All RAM OBD2 Trouble Codes List – OBDCodex
 
All Nissan OBD2 Trouble Codes List – OBDCodex
All Nissan OBD2 Trouble Codes List – OBDCodexAll Nissan OBD2 Trouble Codes List – OBDCodex
All Nissan OBD2 Trouble Codes List – OBDCodex
 
All Mitsubishi OBD2 Trouble Codes List – OBDCodex
All Mitsubishi OBD2 Trouble Codes List – OBDCodexAll Mitsubishi OBD2 Trouble Codes List – OBDCodex
All Mitsubishi OBD2 Trouble Codes List – OBDCodex
 
All MINI OBD2 Trouble Codes List – OBDCodex
All MINI OBD2 Trouble Codes List – OBDCodexAll MINI OBD2 Trouble Codes List – OBDCodex
All MINI OBD2 Trouble Codes List – OBDCodex
 
All Mercedes-Benz OBD2 Trouble Codes List – OBDCodex
All Mercedes-Benz OBD2 Trouble Codes List – OBDCodexAll Mercedes-Benz OBD2 Trouble Codes List – OBDCodex
All Mercedes-Benz OBD2 Trouble Codes List – OBDCodex
 
All Mazda OBD2 Trouble Codes List – OBDCodex
All Mazda OBD2 Trouble Codes List – OBDCodexAll Mazda OBD2 Trouble Codes List – OBDCodex
All Mazda OBD2 Trouble Codes List – OBDCodex
 
All Lexus OBD2 Trouble Codes List – OBDCodex
All Lexus OBD2 Trouble Codes List – OBDCodexAll Lexus OBD2 Trouble Codes List – OBDCodex
All Lexus OBD2 Trouble Codes List – OBDCodex
 
All KIA OBD2 Trouble Codes List – OBDCodex
All KIA OBD2 Trouble Codes List – OBDCodexAll KIA OBD2 Trouble Codes List – OBDCodex
All KIA OBD2 Trouble Codes List – OBDCodex
 
All Jeep OBD2 Trouble Codes List – OBDCodex
All Jeep OBD2 Trouble Codes List – OBDCodexAll Jeep OBD2 Trouble Codes List – OBDCodex
All Jeep OBD2 Trouble Codes List – OBDCodex
 
All Infiniti OBD2 Trouble Codes List – OBDCodex
All Infiniti OBD2 Trouble Codes List – OBDCodexAll Infiniti OBD2 Trouble Codes List – OBDCodex
All Infiniti OBD2 Trouble Codes List – OBDCodex
 
All Hyundai OBD2 Trouble Codes List – OBDCodex
All Hyundai OBD2 Trouble Codes List – OBDCodexAll Hyundai OBD2 Trouble Codes List – OBDCodex
All Hyundai OBD2 Trouble Codes List – OBDCodex
 
All Honda OBD2 Trouble Codes List – OBDCodex
All Honda OBD2 Trouble Codes List – OBDCodexAll Honda OBD2 Trouble Codes List – OBDCodex
All Honda OBD2 Trouble Codes List – OBDCodex
 
All GMC OBD2 Trouble Codes List – OBDCodex
All GMC OBD2 Trouble Codes List – OBDCodexAll GMC OBD2 Trouble Codes List – OBDCodex
All GMC OBD2 Trouble Codes List – OBDCodex
 

Kürzlich hochgeladen

Call Girls In Kotla Mubarakpur Delhi ❤️8448577510 ⊹Best Escorts Service In 24...
Call Girls In Kotla Mubarakpur Delhi ❤️8448577510 ⊹Best Escorts Service In 24...Call Girls In Kotla Mubarakpur Delhi ❤️8448577510 ⊹Best Escorts Service In 24...
Call Girls In Kotla Mubarakpur Delhi ❤️8448577510 ⊹Best Escorts Service In 24...
lizamodels9
 
Greenery-Palette Pitch Deck by Slidesgo.pptx
Greenery-Palette Pitch Deck by Slidesgo.pptxGreenery-Palette Pitch Deck by Slidesgo.pptx
Greenery-Palette Pitch Deck by Slidesgo.pptx
zohiiimughal286
 
Tata_Nexon_brochure tata nexon brochure tata
Tata_Nexon_brochure tata nexon brochure tataTata_Nexon_brochure tata nexon brochure tata
Tata_Nexon_brochure tata nexon brochure tata
aritradey27234
 
Call Girls Kadugodi Just Call 👗 7737669865 👗 Top Class Call Girl Service Bang...
Call Girls Kadugodi Just Call 👗 7737669865 👗 Top Class Call Girl Service Bang...Call Girls Kadugodi Just Call 👗 7737669865 👗 Top Class Call Girl Service Bang...
Call Girls Kadugodi Just Call 👗 7737669865 👗 Top Class Call Girl Service Bang...
amitlee9823
 
Bangalore Call Girls: 🍓 7737669865 🍓 High Profile Model Escorts | Bangalore E...
Bangalore Call Girls: 🍓 7737669865 🍓 High Profile Model Escorts | Bangalore E...Bangalore Call Girls: 🍓 7737669865 🍓 High Profile Model Escorts | Bangalore E...
Bangalore Call Girls: 🍓 7737669865 🍓 High Profile Model Escorts | Bangalore E...
amitlee9823
 
Top Rated Call Girls South Mumbai : 9920725232 We offer Beautiful and sexy Ca...
Top Rated Call Girls South Mumbai : 9920725232 We offer Beautiful and sexy Ca...Top Rated Call Girls South Mumbai : 9920725232 We offer Beautiful and sexy Ca...
Top Rated Call Girls South Mumbai : 9920725232 We offer Beautiful and sexy Ca...
amitlee9823
 
Sanjay Nagar Call Girls: 🍓 7737669865 🍓 High Profile Model Escorts | Bangalor...
Sanjay Nagar Call Girls: 🍓 7737669865 🍓 High Profile Model Escorts | Bangalor...Sanjay Nagar Call Girls: 🍓 7737669865 🍓 High Profile Model Escorts | Bangalor...
Sanjay Nagar Call Girls: 🍓 7737669865 🍓 High Profile Model Escorts | Bangalor...
amitlee9823
 
FULL NIGHT — 9999894380 Call Girls In Jagat Puri | Delhi
FULL NIGHT — 9999894380 Call Girls In Jagat Puri | DelhiFULL NIGHT — 9999894380 Call Girls In Jagat Puri | Delhi
FULL NIGHT — 9999894380 Call Girls In Jagat Puri | Delhi
SaketCallGirlsCallUs
 
Vip Mumbai Call Girls Mumbai Call On 9920725232 With Body to body massage wit...
Vip Mumbai Call Girls Mumbai Call On 9920725232 With Body to body massage wit...Vip Mumbai Call Girls Mumbai Call On 9920725232 With Body to body massage wit...
Vip Mumbai Call Girls Mumbai Call On 9920725232 With Body to body massage wit...
amitlee9823
 
83778-77756 ( HER.SELF ) Brings Call Girls In Laxmi Nagar
83778-77756 ( HER.SELF ) Brings Call Girls In Laxmi Nagar83778-77756 ( HER.SELF ) Brings Call Girls In Laxmi Nagar
83778-77756 ( HER.SELF ) Brings Call Girls In Laxmi Nagar
dollysharma2066
 
Rekha Agarkar Escorts Service Kollam ❣️ 7014168258 ❣️ High Cost Unlimited Har...
Rekha Agarkar Escorts Service Kollam ❣️ 7014168258 ❣️ High Cost Unlimited Har...Rekha Agarkar Escorts Service Kollam ❣️ 7014168258 ❣️ High Cost Unlimited Har...
Rekha Agarkar Escorts Service Kollam ❣️ 7014168258 ❣️ High Cost Unlimited Har...
nirzagarg
 
Call Girls Bangalore Just Call 👗 7737669865 👗 Top Class Call Girl Service Ban...
Call Girls Bangalore Just Call 👗 7737669865 👗 Top Class Call Girl Service Ban...Call Girls Bangalore Just Call 👗 7737669865 👗 Top Class Call Girl Service Ban...
Call Girls Bangalore Just Call 👗 7737669865 👗 Top Class Call Girl Service Ban...
amitlee9823
 
Top Rated Call Girls Mumbai Central : 9920725232 We offer Beautiful and sexy ...
Top Rated Call Girls Mumbai Central : 9920725232 We offer Beautiful and sexy ...Top Rated Call Girls Mumbai Central : 9920725232 We offer Beautiful and sexy ...
Top Rated Call Girls Mumbai Central : 9920725232 We offer Beautiful and sexy ...
amitlee9823
 

Kürzlich hochgeladen (20)

Call Girls In Kotla Mubarakpur Delhi ❤️8448577510 ⊹Best Escorts Service In 24...
Call Girls In Kotla Mubarakpur Delhi ❤️8448577510 ⊹Best Escorts Service In 24...Call Girls In Kotla Mubarakpur Delhi ❤️8448577510 ⊹Best Escorts Service In 24...
Call Girls In Kotla Mubarakpur Delhi ❤️8448577510 ⊹Best Escorts Service In 24...
 
Greenery-Palette Pitch Deck by Slidesgo.pptx
Greenery-Palette Pitch Deck by Slidesgo.pptxGreenery-Palette Pitch Deck by Slidesgo.pptx
Greenery-Palette Pitch Deck by Slidesgo.pptx
 
Tata_Nexon_brochure tata nexon brochure tata
Tata_Nexon_brochure tata nexon brochure tataTata_Nexon_brochure tata nexon brochure tata
Tata_Nexon_brochure tata nexon brochure tata
 
Call Girls Kadugodi Just Call 👗 7737669865 👗 Top Class Call Girl Service Bang...
Call Girls Kadugodi Just Call 👗 7737669865 👗 Top Class Call Girl Service Bang...Call Girls Kadugodi Just Call 👗 7737669865 👗 Top Class Call Girl Service Bang...
Call Girls Kadugodi Just Call 👗 7737669865 👗 Top Class Call Girl Service Bang...
 
Bangalore Call Girls: 🍓 7737669865 🍓 High Profile Model Escorts | Bangalore E...
Bangalore Call Girls: 🍓 7737669865 🍓 High Profile Model Escorts | Bangalore E...Bangalore Call Girls: 🍓 7737669865 🍓 High Profile Model Escorts | Bangalore E...
Bangalore Call Girls: 🍓 7737669865 🍓 High Profile Model Escorts | Bangalore E...
 
Top Rated Call Girls South Mumbai : 9920725232 We offer Beautiful and sexy Ca...
Top Rated Call Girls South Mumbai : 9920725232 We offer Beautiful and sexy Ca...Top Rated Call Girls South Mumbai : 9920725232 We offer Beautiful and sexy Ca...
Top Rated Call Girls South Mumbai : 9920725232 We offer Beautiful and sexy Ca...
 
Sanjay Nagar Call Girls: 🍓 7737669865 🍓 High Profile Model Escorts | Bangalor...
Sanjay Nagar Call Girls: 🍓 7737669865 🍓 High Profile Model Escorts | Bangalor...Sanjay Nagar Call Girls: 🍓 7737669865 🍓 High Profile Model Escorts | Bangalor...
Sanjay Nagar Call Girls: 🍓 7737669865 🍓 High Profile Model Escorts | Bangalor...
 
FULL NIGHT — 9999894380 Call Girls In Jagat Puri | Delhi
FULL NIGHT — 9999894380 Call Girls In Jagat Puri | DelhiFULL NIGHT — 9999894380 Call Girls In Jagat Puri | Delhi
FULL NIGHT — 9999894380 Call Girls In Jagat Puri | Delhi
 
What Does The Engine Malfunction Reduced Power Message Mean For Your BMW X5
What Does The Engine Malfunction Reduced Power Message Mean For Your BMW X5What Does The Engine Malfunction Reduced Power Message Mean For Your BMW X5
What Does The Engine Malfunction Reduced Power Message Mean For Your BMW X5
 
Vip Mumbai Call Girls Mumbai Call On 9920725232 With Body to body massage wit...
Vip Mumbai Call Girls Mumbai Call On 9920725232 With Body to body massage wit...Vip Mumbai Call Girls Mumbai Call On 9920725232 With Body to body massage wit...
Vip Mumbai Call Girls Mumbai Call On 9920725232 With Body to body massage wit...
 
83778-77756 ( HER.SELF ) Brings Call Girls In Laxmi Nagar
83778-77756 ( HER.SELF ) Brings Call Girls In Laxmi Nagar83778-77756 ( HER.SELF ) Brings Call Girls In Laxmi Nagar
83778-77756 ( HER.SELF ) Brings Call Girls In Laxmi Nagar
 
Why Does My Porsche Cayenne's Exhaust Sound So Loud
Why Does My Porsche Cayenne's Exhaust Sound So LoudWhy Does My Porsche Cayenne's Exhaust Sound So Loud
Why Does My Porsche Cayenne's Exhaust Sound So Loud
 
What Could Cause Your Subaru's Touch Screen To Stop Working
What Could Cause Your Subaru's Touch Screen To Stop WorkingWhat Could Cause Your Subaru's Touch Screen To Stop Working
What Could Cause Your Subaru's Touch Screen To Stop Working
 
Rekha Agarkar Escorts Service Kollam ❣️ 7014168258 ❣️ High Cost Unlimited Har...
Rekha Agarkar Escorts Service Kollam ❣️ 7014168258 ❣️ High Cost Unlimited Har...Rekha Agarkar Escorts Service Kollam ❣️ 7014168258 ❣️ High Cost Unlimited Har...
Rekha Agarkar Escorts Service Kollam ❣️ 7014168258 ❣️ High Cost Unlimited Har...
 
Hyundai World Rally Team in action at 2024 WRC
Hyundai World Rally Team in action at 2024 WRCHyundai World Rally Team in action at 2024 WRC
Hyundai World Rally Team in action at 2024 WRC
 
Dubai Call Girls R0yalty O525547819 Call Girls Dubai
Dubai Call Girls R0yalty O525547819 Call Girls DubaiDubai Call Girls R0yalty O525547819 Call Girls Dubai
Dubai Call Girls R0yalty O525547819 Call Girls Dubai
 
Call Girls in Malviya Nagar Delhi 💯 Call Us 🔝9205541914 🔝( Delhi) Escorts Ser...
Call Girls in Malviya Nagar Delhi 💯 Call Us 🔝9205541914 🔝( Delhi) Escorts Ser...Call Girls in Malviya Nagar Delhi 💯 Call Us 🔝9205541914 🔝( Delhi) Escorts Ser...
Call Girls in Malviya Nagar Delhi 💯 Call Us 🔝9205541914 🔝( Delhi) Escorts Ser...
 
Call Girls Bangalore Just Call 👗 7737669865 👗 Top Class Call Girl Service Ban...
Call Girls Bangalore Just Call 👗 7737669865 👗 Top Class Call Girl Service Ban...Call Girls Bangalore Just Call 👗 7737669865 👗 Top Class Call Girl Service Ban...
Call Girls Bangalore Just Call 👗 7737669865 👗 Top Class Call Girl Service Ban...
 
John Deere Tractors 6130M 6140M Diagnostic Manual
John Deere Tractors  6130M 6140M Diagnostic ManualJohn Deere Tractors  6130M 6140M Diagnostic Manual
John Deere Tractors 6130M 6140M Diagnostic Manual
 
Top Rated Call Girls Mumbai Central : 9920725232 We offer Beautiful and sexy ...
Top Rated Call Girls Mumbai Central : 9920725232 We offer Beautiful and sexy ...Top Rated Call Girls Mumbai Central : 9920725232 We offer Beautiful and sexy ...
Top Rated Call Girls Mumbai Central : 9920725232 We offer Beautiful and sexy ...
 

Honda climate control repair information

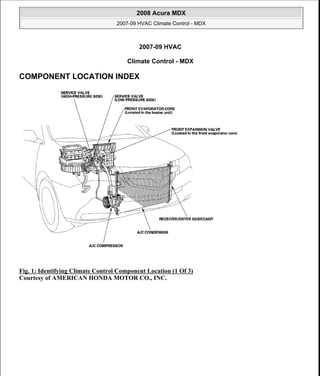
  • 1. 2007-09 HVAC Climate Control - MDX COMPONENT LOCATION INDEX Fig. 1: Identifying Climate Control Component Location (1 Of 3) Courtesy of AMERICAN HONDA MOTOR CO., INC. 2008 Acura MDX 2007-09 HVAC Climate Control - MDX 2008 Acura MDX 2007-09 HVAC Climate Control - MDX Microsoft Saturday, May 22, 2010 11:20:29 AM Page 1 © 2006 Mitchell Repair Information Company, LLC. Microsoft Saturday, May 22, 2010 11:20:50 AM Page 1 © 2006 Mitchell Repair Information Company, LLC.
  • 2. Fig. 2: Identifying Climate Control Component Location (2 Of 3) Courtesy of AMERICAN HONDA MOTOR CO., INC. 2008 Acura MDX 2007-09 HVAC Climate Control - MDX Microsoft Saturday, May 22, 2010 11:20:29 AM Page 2 © 2006 Mitchell Repair Information Company, LLC.
  • 3. Fig. 3: Identifying Climate Control Component Location (3 Of 3) Courtesy of AMERICAN HONDA MOTOR CO., INC. A/C SERVICE TIPS AND PRECAUTIONS WARNING:  Compressed air mixed with the R-134a forms a combustible vapor.  The vapor can burn or explode causing serious injury.  Never use compressed air to pressure test R-134a service equipment or vehicle air conditioning systems. CAUTION:  Air conditioning refrigerant or lubricant vapor can irritate your eyes, nose, or throat.  Be careful when connecting service equipment.  Do not breathe refrigerant or vapor. 2008 Acura MDX 2007-09 HVAC Climate Control - MDX Microsoft Saturday, May 22, 2010 11:20:29 AM Page 3 © 2006 Mitchell Repair Information Company, LLC.
  • 4. The air conditioning system uses HFC-134a (R-134a) refrigerant and polyalkyleneglycol (PAG) refrigerant oil, which are not compatible with CFC-12 (R-12) refrigerant and mineral oil. Do not use R-12 refrigerant or mineral oil in this system, and do not attempt to use R-12 servicing equipment; damage to the air conditioning system or your servicing equipment will result. Use only service equipment that is U.L-listed and is certified to meet the requirements of SAE J2210 to remove R-134a from the air conditioning system. If accidental system discharge occurs, ventilate the work area before resuming service. R-134a service equipment or vehicle air conditioning systems should not be pressure tested or leak tested with compressed air. Additional health and safety information may be obtained from the refrigerant and lubricant manufacturers.  Always disconnect the negative cable from the battery whenever replacing air conditioning parts.  Keep moisture and dirt out of the system. When disconnecting any lines, plug or cap the fittings immediately; don't remove the caps or plugs until just before you reconnect each line.  Before connecting any hose or line, apply a few drops of refrigerant oil to the O-ring.  When tightening or loosening a fitting, use a second wrench to support the matching fitting.  When discharging the system, use an R-134a refrigerant recovery/recycling/charging station; don't release refrigerant into the atmosphere. A/C REFRIGERANT OIL REPLACEMENT Recommended PAG oil: DENSO ND-OIL 8  P/N 38897-PR7-A01AH: 120 mL (4 fl.oz)  P/N 38899-PR7-A01: 40 mL (1 1/3 fl.oz) Add the recommended refrigerant oil in the amount listed if you replace any of the following parts.  To avoid contamination, do not return the oil to the container once dispensed, and never mix it with other refrigerant oils.  Immediately after using the oil, reinstall the cap on the container, and seal it to avoid moisture absorption.  Do not spill the refrigerant oil on the vehicle; it may damage the paint; if it gets on the paint, wash it off immediately. A/C condenser (including Dryer Desiccant) 50 mL (1 2/3 fl.oz) Front Evaporator 40 mL (1 1/3 fl.oz) Rear Evaporator 30 mL (1 fl.oz) Line or hose 10 mL (1/3 fl.oz) Receiver/Dryer Desiccant 10 mL (1/3 fl.oz) Leakage repair 25 mL (5/7 fl.oz) A/C compressor For A/C compressor replacement, subtract the volume of oil drained from the removed A/C 2008 Acura MDX 2007-09 HVAC Climate Control - MDX Microsoft Saturday, May 22, 2010 11:20:29 AM Page 4 © 2006 Mitchell Repair Information Company, LLC.
  • 5. Fig. 4: Identifying Refrigerant Oil Level Courtesy of AMERICAN HONDA MOTOR CO., INC. FRONT A/C LINE REPLACEMENT compressor from 125 mL (4 2/9 fl.oz), and drain the calculated volumne of oil from the new A/C compressor: 135 mL (4 2/9 fl.oz) - Volume of removed A/C compressor = Volume to drain from new A/C commpressor. NOTE: Even if no oil is drained from the removed A/C compressor, don't drain more than 50 mL (1 2/3 fl.oz) from the new A/C compressor. 2008 Acura MDX 2007-09 HVAC Climate Control - MDX Microsoft Saturday, May 22, 2010 11:20:29 AM Page 5 © 2006 Mitchell Repair Information Company, LLC.
  • 6. Fig. 5: Identifying Front A/C Line Courtesy of AMERICAN HONDA MOTOR CO., INC. A/C SYSTEM INSPECTION Before troubleshooting any problem with the air conditioning system, do the following: 2008 Acura MDX 2007-09 HVAC Climate Control - MDX Microsoft Saturday, May 22, 2010 11:20:29 AM Page 6 © 2006 Mitchell Repair Information Company, LLC.
  • 7. 1. With the ignition switch in the LOCK (0), inspect the A/C components, pressure lines and hoses for stains that may indicate a refrigerant or a compressor oil leak. Fig. 6: Identifying Compressor Oil Leak Courtesy of AMERICAN HONDA MOTOR CO., INC. 2. Check the condenser for material clogging the fins or for damage to the fins:  Carefully clean any material from the condenser fins with water and detergent.  Be sure to dry the condenser completely. Fig. 7: Identifying Condenser Courtesy of AMERICAN HONDA MOTOR CO., INC. 3. Inspect the drive belt (see DRIVE BELT INSPECTION ). 4. Make sure no material is blocking the airflow to the condenser. 5. Check the dust and pollen filter, and replace it if it is clogged (see DUST AND POLLEN FILTER REPLACEMENT ). 6. Check the operation of the heater valve. Make sure the cable is adjusted properly (see HEATER VALVE CABLE ADJUSTMENT ). 7. Start the engine, turn the air conditioning system on, and allow it to normalize for a few minutes. 8. Check that the A/C operates at each position of the blower fan switch (except OFF). 9. Check that the compressor clutch is engaged. The pressure plate should be rotating at the same speed as the pulley. 2008 Acura MDX 2007-09 HVAC Climate Control - MDX Microsoft Saturday, May 22, 2010 11:20:29 AM Page 7 © 2006 Mitchell Repair Information Company, LLC.
  • 8. 10. Check that the cooling fans operate when the compressor clutch is engaged. 11. Check that the engine idle speed is correctly maintained when the A/C is switched on and off when the compressor clutch is engaged and disengaged. Fig. 8: Identifying Radiator Fan, A/C Condenser Fan And A/C Compressor Courtesy of AMERICAN HONDA MOTOR CO., INC. GENERAL TROUBLESHOOTING INFORMATION HOW TO CHECK FOR DTCS WITH THE HDS 1. Make sure the ignition switch is LOCK (0). 2. Connect the HDS to the data link connector (DLC) (A) located under the driver's side of the dashboard. 2008 Acura MDX 2007-09 HVAC Climate Control - MDX Microsoft Saturday, May 22, 2010 11:20:29 AM Page 8 © 2006 Mitchell Repair Information Company, LLC.
  • 9. Fig. 9: Connecting HDS To DLC Courtesy of AMERICAN HONDA MOTOR CO., INC. 3. Turn the ignition switch to ON (II). 4. Make sure the HDS communicates with the vehicle and the climate control unit. If it doesn't, troubleshoot the DLC circuit (see DLC CIRCUIT TROUBLESHOOTING ). 5. Select HVAC/CLIMATE CONTROL in the BODY ELECTRICAL menu. 6. Select DTCs in the HVAC/CLIMATE CONTROL menu. 7. Check for DTCs. If any DTCs are indicated, write down the DTCs, then go to the indicated DTC troubleshooting. If no DTCs are indicated, refer to symptom troubleshooting. HOW TO USE THE SELF-DIAGNOSTIC FUNCTION WITH THE HDS 1. Make sure the ignition switch is LOCK (0). 2. Connect the HDS to the data link connector (DLC). 3. Turn the ignition switch to ON (II). 4. Make sure the HDS communicates with the vehicle and the climate control unit. If it doesn't, troubleshoot the DLC circuit (see DLC CIRCUIT TROUBLESHOOTING ). 5. Select HVAC/CLIMATE CONTROL in the BODY ELECTRICAL menu. 6. Select INSPECTION in the HVAC/CLIMATE CONTROL menu. NOTE:  After troubleshooting, clear the DTCs with the HDS.  For specific operations, refer to the user's manual that came with the HDS. 2008 Acura MDX 2007-09 HVAC Climate Control - MDX Microsoft Saturday, May 22, 2010 11:20:29 AM Page 9 © 2006 Mitchell Repair Information Company, LLC.
  • 10. 7. Select CLIMATE CONTROL SELF TEST in the INSPECTION menu. 8. Check for DTCs. If any DTCs are indicated, write down the DTCs, then go to the indicated DTC troubleshooting. HOW TO USE THE SELF-DIAGNOSTIC FUNCTION WITHOUT THE HDS The climate control unit has a self-diagnostic function. To run the self-diagnostic function, do the following: 1. Turn the ignition switch to LOCK (0), and then ON (II). 2. Press and hold the OFF button, then press the RECIRCULATION CONTROL button five times within 10 seconds. Release the OFF and RECIRCULATION CONTROL buttons; then the self-diagnostic begins. Canceling the Self-diagnostic Function NOTE:  After troubleshooting, clear the DTCs with the HDS.  For specific operations, refer to the user's manual that came with the HDS. NOTE:  The blower motor will run at various speeds regardless of what the panel is displaying.  If there is any problem in the system, the system flashes "88 AUTO WINDSHIELD DEFROST" or alternately flashes "88 AUTO WINDSHIELD DEFROST" and one or more of the 14 segments (A through P). Refer to CHECKING FOR DTCS.  If there are no problems detected, the segments will not illuminate, and the system will appear to be turned off. Fig. 10: Identifying Auto Button, Driver Temperature Indicator And Rear Window Defogger Courtesy of AMERICAN HONDA MOTOR CO., INC. 2008 Acura MDX 2007-09 HVAC Climate Control - MDX Microsoft Saturday, May 22, 2010 11:20:29 AM Page 10 © 2006 Mitchell Repair Information Company, LLC.
  • 11. 3. Turn the ignition switch to LOCK (0), to cancel the self-diagnostic function. After completing the repair work, run the self-diagnostic function again to make sure that there are no other DTCs. CHECKING FOR DTCS The temperature display indicates single or multiple DTCs. If indicator segments A, B, C, E, G, J, M, N, AUTO, and WINDSHIELD DEFROST are on at the same time, there may be an open in the common ground wire. If no DTCs are present, the indicator remains blank. Fig. 11: Identifying A/C Control Panel Courtesy of AMERICAN HONDA MOTOR CO., INC. DTC (DRIVER'S TEMPERATURE INDICATOR SEGMENT, AUTO, AND WINDSHIELD DEFROST INDICATOR) CHART DTC (Driver's Temperature Indicator Segment, AUTO, and WINDSHIELD DEFROST Indicator) Detection Item A and AUTO An open in the in-car temperature sensor circuit (see DTC B1225 or DTC indicator A and AUTO: An Open in the In-car Temperature Sensor Circuit ) B and AUTO A short in the in-car temperature sensor circuit (see DTC B1226 or DTC indicator B and AUTO: A Short in the In-car Temperature Sensor Circuit ) C and AUTO An open in the outside air temperature sensor circuit (see DTC B1227 or DTC indicator C and AUTO: An Open in the Outside Air Temperature Sensor Circuit ) D and AUTO A short in the outside air temperature sensor circuit (see DTC B1228 or DTC indicator D and AUTO: A Short in the Outside Air Temperature Sensor Circuit ) E and AUTO An open in the sunlight sensor circuit (see DTC B1229 or DTC indicator E and AUTO: An Open in the Sunlight Sensor Circuit ) F and AUTO A short in the sunlight sensor circuit (see DTC B1230 or DTC indicator F and AUTO: A Short in the Sunlight Sensor Circuit ) 2008 Acura MDX 2007-09 HVAC Climate Control - MDX Microsoft Saturday, May 22, 2010 11:20:29 AM Page 11 © 2006 Mitchell Repair Information Company, LLC.
  • 12. G and AUTO An open in the front evaporator temperature sensor circuit (see DTC B1231 or DTC indicator G and AUTO: An Open in the Front Evaporator Temperature Sensor Circuit ) Hand AUTO A short in the front evaporator temperature sensor circuit (see DTC B1232 or DTC indicator H and AUTO: A Short in the Front Evaporator Temperature Sensor Circuit ) J and AUTO An open in the driver's air mix control motor circuit (see DTC B1233 or DTC indicator J and AUTO: An Open in the Driver's Air Mix Control Motor Circuit ) K and AUTO A short in the driver's air mix control motor circuit (see DTC B1234 or DTC indicator K and AUTO: A Short in the Driver's Air Mix Control Motor Circuit ) L and AUTO A problem in the driver's air mix control linkage, door, or motor circuit (see DTC B1235 or DTC indicator L and AUTO: A Problem in the Driver's Air Mix Control Linkage, Door, or Motor Circuit ) M and AUTO An open in the passenger's air mix control motor circuit (see DTC B1236 or DTC indicator M and AUTO: An Open in the Passenger's Air Mix Control Motor Circuit ) N and AUTO A short in the passenger's air mix control motor circuit (see DTC B1237 or DTC indicator N and AUTO: A Short in the Passenger's Air Mix Control Motor Circuit ) P and AUTO A problem in the passenger's air mix control linkage, door, or motor circuit (see DTC B1238 or DTC indicator P and AUTO: A Problem in the Passenger's Air Mix Control Linkage, Door, or Motor Circuit ) AUTO Climate control unit lost communication with gauge control module (ECT message) (see DTC B1205: Climate Control Unit Lost Communication with Gauge Control Module (VSP/NE message); DTC B1206 or DTC indicator AUTO: Climate Control Unit Lost Communication with Gauge Control Module (ECT message); DTC B1207: Climate Control Unit Lost Communication with Gauge Control Module (ILLUMI message) ) A An open or short in the front mode control motor circuit (see DTC B1239 or DTC indicator A: An Open or Short in the Front Mode Control Motor Circuit ) B A problem in the front mode control linkage, doors, or motor circuit (see DTC B1240 or DTC indicator B: A Problem in the Front Mode Control Linkage, Doors, or Motor Circuit ) C A problem in the front blower motor circuit (see DTC B1241 or DTC indicator C: A Problem in the Front Blower Motor Circuit ) F An open in the rear air mix control motor circuit (see DTC B1244 or DTC indicator F: An Open in the Rear Air Mix Control Motor Circuit ) G A short in the rear air mix control motor circuit (see DTC B1245 or DTC indicator G: A Short in the Rear Air Mix Control Motor Circuit ) H A problem in the rear air mix control linkage, door, or motor circuit (see DTC B1246 or DTC indicator H: A Problem in the Rear Air Mix 2008 Acura MDX 2007-09 HVAC Climate Control - MDX Microsoft Saturday, May 22, 2010 11:20:29 AM Page 12 © 2006 Mitchell Repair Information Company, LLC.
  • 13. DISPLAYING SENSOR INPUTS AT THE CLIMATE CONTROL UNIT The climate control unit has a mode that displays sensor inputs it receives. This mode shows you what the climate control unit is receiving from each of the sensors, one at a time, and it can help you determine if a sensor is faulty. CHECK THESE ITEMS BEFORE USING THE SENSOR INPUT DISPLAY MODE 1. Turn the ignition switch to ON (II), and check the recirculation door function; press the recirculation button to switch from FRESH to RECIRC. The air volume and sound should change slightly. 2. Set the temperature control knob to the desired test temperature. When selecting the test temperature, note these items:  "Lo" temperature setting will default to MAX COOL, VENT, and RECIRC.  "Hi" temperature setting will default to MAX HOT, FLOOR, and FRESH.  58 through 86°F settings will use the automatic climate control logic. 3. Turn the ignition switch to LOCK (0). TO RUN THE SENSOR INPUT DISPLAY MODE, FOLLOW THESE STEPS Control Linkage, Door, or Motor Circuit ) J An open or short in the recirculation control motor circuit (see DTC B1215 or DTC indicator J: An Open or Short in the Recirculation Control Motor Circuit ) K A problem in the recirculation control linkage, door, or motor circuit (see DTC B2983 or DTC indicator K: A problem in the Recirculation Control Linkage, Door, or Motor Circuit ) M A problem in the rear blower motor circuit (see DTC B1223 or DTC indicator M: A Problem in the Rear Blower Motor Circuit ) N An open in the rear evaporator temperature sensor circuit (see DTC B1213 or DTC indicator N: An Open in the Rear Evaporator Temperature Sensor Circuit ) P A short in the rear evaporator temperature sensor circuit (see DTC B1214 or DTC indicator P: A Short in the Rear Evaporator Temperature Sensor Circuit ) A and WINDSHIELD DEFROST An open in the humidity sensor circuit (see DTC B2967 or DTC indicator A and WINDSHIELD DEFROST: An Open in the Humidity Sensor Circuit ), a short in the humidity sensor circuit (see DTC B2968 or DTC indicator A and WINDSHIELD DEFROST: A Short in the Humidity Sensor Circuit ) Band WINDSHIELD DEFROST An open in the A/C pressure sensor circuit (see DTC B2979 or DTC indicator B and WINDSHIELD DEFROST: An Open in the A/C Pressure Sensor Circuit ), a short in the A/C pressure sensor circuit (see DTC B2980 or DTC indicator B and WINDSHIELD DEFROST: A short in the A/C Pressure Sensor Circuit ) 2008 Acura MDX 2007-09 HVAC Climate Control - MDX Microsoft Saturday, May 22, 2010 11:20:29 AM Page 13 © 2006 Mitchell Repair Information Company, LLC.
  • 14. 1. Turn the ignition switch to LOCK (0). 2. Press and hold both the AUTO and RECIRCULATION CONTROL buttons, then start the engine. 3. After the engine starts, release both buttons. The display panel control unit will flash the sensor number and then the value for that sensor. Record the value displayed. 4. To advance to the next sensor, press the REAR WINDOW DEFOGGER button. SENSOR DISPLAYED CHART 5. To cancel the sensor input display mode, press the AUTO button or turn the ignition switch to LOCK (0). Celsius to Fahrenheit Conversion Table Sensor Item Displayed Value 1 In-car Temperature °C 2 Outside Air Temperature °C 3 Solar Radiation Sensor Value: Dark = 00, Flashlight = 04, Cloudy = 10, Sunny = 65 kcal/m2 .h 4 Front Evaporator Outlet Air Temperature °C 5 Driver's and Passenger's Air Mix Opening (Low value indicates cooler air distribution, higher value indicates warmer air distribution) % of opening 6 Vent Temperature Air Out (TAO) °C 7 Vehicle Speed (Vehicle must be driven to display speed) km/h 8 A/C Pressure 10 kPa 9 Rear Air Mix Opening % of opening A Rear Vent Temperature Air Out (TAO) °C B Rear Evaporator Outlet Air Temperature °C C Humidity Sensor Value %rh D Fog Margin °C E Solar Radiation azimuth (With navigation system) 10° F Solar Radiation angle of elevation (With navigation system) 10° NOTE:  The sensor values will be displayed in degrees Celsius (°C) or an alphanumeric code. Use the chart to convert the value to degrees Fahrenheit (°F).  If the sensor value displays "Er" this indicates there is an open or short in the circuit or sensor. Check for DTCs using the HDS, or refer to CHECKING DTCS by DTC indication.  If necessary, compare the sensor input display to a known-good vehicle under the same test conditions.  If the sensor is out of the normal range, refer to the sensor test or substitute a known-good sensor, and recheck. 2008 Acura MDX 2007-09 HVAC Climate Control - MDX Microsoft Saturday, May 22, 2010 11:20:29 AM Page 14 © 2006 Mitchell Repair Information Company, LLC.
  • 15. CELSIUS TO FAHRENHEIT CONVERSION CHART CELSIUS TO FAHRENHEIT CONVERSION CHART Alphanumeric Conversion Table ALPHANUMERIC CONVERSION CHART DTC TROUBLESHOOTING INDEX Checking the DTCs by HDS DTC TROUBLESHOOTING CHART °C °F °C °F °C °F °C °F °C °F 0 32 10 50 20 68 30 86 40 104 1 34 11 52 21 70 31 88 41 106 2 36 12 54 22 72 32 90 42 108 3 37 13 55 23 73 33 91 43 109 4 39 14 57 24 75 34 93 44 111 5 41 15 59 25 77 35 95 45 113 6 43 16 61 26 79 36 97 46 115 7 45 17 63 27 81 37 99 47 117 8 46 18 64 28 82 38 100 48 118 9 48 19 66 29 84 39 102 49 120 °C °F °C °F °C °F °C °F °C °F 50 122 60 140 70 158 80 176 90 194 51 124 61 142 71 160 81 178 91 196 52 126 62 144 72 162 82 180 92 198 53 127 63 145 73 163 83 181 93 199 54 128 64 147 74 165 84 183 94 201 55 131 65 149 75 167 85 185 95 203 56 133 66 151 76 169 86 187 96 205 57 135 67 152 77 170 87 188 97 207 58 136 68 154 78 172 88 190 98 208 59 139 69 158 79 174 89 192 99 210 Display Reading (Alphanumeric) °C °F % A1 thru A9 - 1 thru -9 30 thru 16 - 1 thru -9 B0 thru B9 - 10 thru -19 14 thru -2 -10 thru -19 C0 thru C9 -20 thru -29 -4 thru -20 -20 thru -29 D0 thru D9 -30 thru -39 -22 thru -38 -30 thru -39 E0 thru E9 -40 thru -49 -40 thru -58 -40 thru -49 F0 thru F9 -- -- +100 thru +109 2008 Acura MDX 2007-09 HVAC Climate Control - MDX Microsoft Saturday, May 22, 2010 11:20:29 AM Page 15 © 2006 Mitchell Repair Information Company, LLC.
  • 16. DTC Detection Item or Symptom ECU DTC type B1200 Communication bus line error (bus-off) Climate control unit Loss of communication B1202 Climate control unit internal error Climate control unit Internal error B1205 Climate control unit lost communication with gauge control module (VSP/NE message) Climate control unit Loss of communication B1206 Climate control unit lost communication with gauge control module (ECT message) Climate control unit Loss of communication B1207 Climate control unit lost communication with gauge control module (ILLUMI message) Climate control unit Loss of communication B1213 An open in the rear evaporator temperature sensor circuit Climate control unit Signal error B1214 A short in the rear evaporator temperature sensor circuit Climate control unit Signal error B1215 An open or short in the recirculation control motor circuit Climate control unit Signal error B1223 A problem in the rear blower motor circuit Climate control unit Signal error B1225 An open in the in-car temperature sensor circuit Climate control unit Signal error B1226 A short in the in-car temperature sensor circuit Climate control unit Signal error B1227 An open in the outside air temperature sensor circuit Climate control unit Signal error B1228 A short in the outside air temperature sensor circuit Climate control unit Signal error B1229 An open in the sunlight sensor circuit Climate control unit Signal error B1230 A short in the sunlight sensor circuit Climate control unit Signal error B1231 An open in the front evaporator temperature sensor circuit Climate control unit Signal error B1232 A short in the front Climate control unit Signal error 2008 Acura MDX 2007-09 HVAC Climate Control - MDX Microsoft Saturday, May 22, 2010 11:20:29 AM Page 16 © 2006 Mitchell Repair Information Company, LLC.
  • 17. evaporator temperature sensor circuit B1233 An open in the driver's air mix control motor circuit Climate control unit Signal error B1234 A short in the driver's air mix control motor circuit Climate control unit Signal error B1235 A problem in the driver's air mix control linkage, door, or motor circuit Climate control unit Signal error B1236 An open in the passenger's air mix control motor circuit Climate control unit Signal error B1237 A short in the passenger's air mix control motor circuit Climate control unit Signal error B1238 A problem in the passenger's air mix control linkage, door, or motor circuit Climate control unit Signal error B1239 An open or short in the front mode control motor circuit Climate control unit Signal error B1240 A problem in the front mode control linkage, doors, or motor circuit Climate control unit Signal error B1241 A problem in the front blower motor circuit Climate control unit Signal error B1244 An open in the rear air mix control motor circuit Climate control unit Signal error B1245 A short in the rear air mix control motor circuit Climate control unit Signal error B1246 A problem in the rear air mix control linkage, door, or motor circuit Climate control unit Signal error B2965 Climate control unit lost communication with rear climate control panel Climate control unit Loss of communication B2967 An open in the humidity sensor circuit Climate control unit Signal error B2968 A short in the humidity sensor circuit Climate control unit Signal error B2969 Climate control unit lost communication with combination switch control unit (WIPSW Climate control unit Loss of communication 2008 Acura MDX 2007-09 HVAC Climate Control - MDX Microsoft Saturday, May 22, 2010 11:20:29 AM Page 17 © 2006 Mitchell Repair Information Company, LLC.
  • 18. SYMPTOM TROUBLESHOOTING INDEX SYMPTOM TROUBLESHOOTING CHART message) B2970 Climate control unit lost communication with relay control module (RM message) Climate control unit Loss of communication B2979 An open in the A/C pressure sensor circuit Climate control unit Signal error B2980 A short in the A/C pressure sensor circuit Climate control unit Signal error B2981 Climate control unit lost communication with navigation unit Climate control unit Loss of communication B2983 A problem in the recirculation control linkage, door, or motor circuit Climate control unit Signal error B2991 Climate control unit lost communication with audio unit Climate control unit Loss of communication Symptom Diagnostic procedure Also check for Rear mode control doors do not change between ceiling vents (cool) and floor vents (hot) Rear mode control motor circuit troubleshooting (see REAR MODE CONTROL MOTOR CIRCUIT TROUBLESHOOTING )  HVAC DTCs (see GENERAL TROUBLESHOOTING INFORMATION )  Blown fuse No. 30 (10 A) in the under-dash fuse/relay box  Cleanliness and tightness of all terminals Blower, heater controls, and A/C do not work Climate control unit troubleshooting (see CLIMATE CONTROL UNIT TROUBLESHOOTING )  HVAC DTCs (see GENERAL TROUBLESHOOTING INFORMATION )  Blown fuse No. 30 (10 A) in the under-dash fuse/relay box  Poor ground at G506 (see GROUND TO COMPONENTS INDEX )  Cleanliness and tightness of all terminals  HVAC DTCs (see GENERAL TROUBLESHOOTING 2008 Acura MDX 2007-09 HVAC Climate Control - MDX Microsoft Saturday, May 22, 2010 11:20:29 AM Page 18 © 2006 Mitchell Repair Information Company, LLC.
  • 19. Both fans do not run at low speed with the A/C on (but the A/C compressor runs with the A/C on) Radiator and A/C condenser fan low speed circuit troubleshooting (see RADIATOR AND A/C CONDENSER FAN LOW SPEED CIRCUIT TROUBLESHOOTING ) INFORMATION )  Blown fuse No. 15 (30 A) in the relay block, and No. 30 (10 A) in the under-dash fuse/ relay box  Poor ground at G301 (see GROUND TO COMPONENTS INDEX )  Cleanliness and tightness of all terminals The A/C condenser fan does not run at high speed (but both fans run at low speed and the A/C compressor operates with the A/C on) A/C condenser fan high speed circuit troubleshooting (see A/C CONDENSER FAN HIGH SPEED CIRCUIT TROUBLESHOOTING )  HVAC DTCs (see GENERAL TROUBLESHOOTING INFORMATION )  Cleanliness and tightness of all terminals Both fans do not run at high speed with the A/C on (but both fans run at low speed and the A/C compressor operates with the A/C on) ECT troubleshooting: ECT sensor 2 circuit low voltage (see DTC P2184: ECT SENSOR 2 CIRCUIT LOW VOLTAGE ), ECT sensor 2 circuit high voltage (see DTC P2185: ECT SENSOR 2 CIRCUIT HIGH VOLTAGE )  Powertrain DTCs (see GENERAL TROUBLESHOOTING INFORMATION )  Cleanliness and tightness of all terminals The A/C compressor clutch does not engage (but both fans run with the A/C on) A/C compressor clutch circuit troubleshooting (see A/C COMPRESSOR CLUTCH CIRCUIT TROUBLESHOOTING )  HVAC DTCs (see GENERAL TROUBLESHOOTING INFORMATION )  Blown fuse No. 17 (7.5 A) in the relay block, and No. 30 (10 A) in the under-dash fuse/ relay box  Blower motor operation  Cleanliness and tightness of all terminals Blower fan(s) runs slower than expected in cold weather ECT troubleshooting: ECT sensor 2 circuit low voltage (see DTC P2184: ECT SENSOR 2 CIRCUIT LOW VOLTAGE ), ECT sensor 2 circuit high voltage (see DTC P2185: ECT SENSOR 2 CIRCUIT HIGH VOLTAGE ) NOTE: It is normal for the blower(s) to run slowly until the engine coolant temperature begins to rise. If the blower  Powertrain DTCs (see GENERAL TROUBLESHOOTING INFORMATION )  Blower motor operation 2008 Acura MDX 2007-09 HVAC Climate Control - MDX Microsoft Saturday, May 22, 2010 11:20:29 AM Page 19 © 2006 Mitchell Repair Information Company, LLC.
  • 20. SYSTEM DESCRIPTION The air conditioning system removes heat from the passenger compartment by transferring heat from the ambient air to the evaporator. The evaporator cools the air with the refrigerant that is circulating through the evaporator. The refrigerant expands in the evaporator, and the evaporator becomes very cold and absorbs the heat from the ambient air. The blower fan pushes air across the evaporator where the heat is absorbed, and then it blows the cool air into the passenger compartment. continues to run slowly for an abnormal length of time, continue to troubleshoot the problem. HDS does not communicate with the climate control unit or the vehicle Troubleshoot the DLC circuit (see DLC CIRCUIT TROUBLESHOOTING ) Insufficient heating 1. Check the coolant level (see COOLANT CHECK ) 2. Check the radiator cap (see RADIATOR CAP TEST ) 3. Check the operation of the air mix control motor and door (see DRIVER'S AIR MIX CONTROL MOTOR TEST ) 4. Check the coolant temperature 5. Check the operation of the heater valve (see HEATER VALVE CABLE ADJUSTMENT ) 6. Check the blower motor unit for obstructions 7. Check for air leaks around the ducts and vents 8. Check the inlet hose temperature  If it is COLD, check for restrictions in the hose, a damaged or leaking thermostat, and a damaged or leaking water pump.  If it is HOT, check for restrictions in the heater core. Back flush the heater core using standard commercially available equipment, or replace the heater core. Damaged cylinder head gasket 2008 Acura MDX 2007-09 HVAC Climate Control - MDX Microsoft Saturday, May 22, 2010 11:20:29 AM Page 20 © 2006 Mitchell Repair Information Company, LLC.
  • 21. Fig. 12: Climate Control System Description Courtesy of AMERICAN HONDA MOTOR CO., INC. This vehicle uses HFC-134a (R-134a) refrigerant, which does not contain chlorofluorocarbons. Pay attention to the following service items:  Do not mix refrigerants CFC-12 (R-12) and HFC-134a (R-134a). They are not compatible.  Use only the recommended polyalkyleneglycol (PAG) refrigerant oil (DENSO ND-OIL 8) designed for the R-134a A/C compressor. Intermixing the recommended (PAG) refrigerant oil with any other refrigerant oil will result in A/C compressor failure.  All A/C system parts (A/C compressor, discharge line, suction line, evaporator, A/C condenser, receiver/dryer, expansion valve, O-rings for joints) are designed for refrigerant R-134a. Do not exchange with R-12 parts.  Use a halogen gas leak detector designed for refrigerant R-134a.  R-12 and R-134a refrigerant servicing equipment are not interchangeable. Use only a recovery/recycling/charging station that is U.L.-listed and is certified to meet the requirements of SAE J2210 to service the R-134a air conditioning systems.  Always recover refrigerant R-134a with an approved recovery/recycling/charging station before disconnecting any A/C fitting. HUMIDITY/IN-CAR TEMPERATURE SENSOR 2008 Acura MDX 2007-09 HVAC Climate Control - MDX Microsoft Saturday, May 22, 2010 11:20:29 AM Page 21 © 2006 Mitchell Repair Information Company, LLC.
  • 22. The humidity sensor consists of two sensors. One sensor is for humidity detection, and the other is for in-car temperature detection. When the climate control unit receives signals about the in-car condition from the humidity sensor, and judges that the humidity in the vehicle is very low, the climate control unit reduces the compressor run-time. Engine power loss is kept to a minimum, and fuel economy is increased. Fig. 13: Identifying Humidity/In-Car Temperature Sensor Component Courtesy of AMERICAN HONDA MOTOR CO., INC. HUMIDITY/IN-CAR TEMPERATURE SENSOR QUALITY The capacitance of the humidity sensor changes by the adsorption and the evaporation of moisture. The resistance change of the humidity sensor changes the output voltage. 2008 Acura MDX 2007-09 HVAC Climate Control - MDX Microsoft Saturday, May 22, 2010 11:20:29 AM Page 22 © 2006 Mitchell Repair Information Company, LLC.
  • 23. Fig. 14: Voltage Vs Humidity Level Graph Courtesy of AMERICAN HONDA MOTOR CO., INC. A/C PRESSURE SENSOR The A/C pressure sensor converts A/C pressure into electrical signals to the PCM. Fig. 15: Identifying A/C Pressure Sensor Courtesy of AMERICAN HONDA MOTOR CO., INC. The response of the A/C pressure sensor is shown in the graph. NOTE: The pressures can be monitored using the HDS PGM-FI Data List. NOTE: When the refrigerant is below 196 kPa (2.0 kgf/cm2 , 28 psi) or above 3,140 kPa (32 kgf/cm2 , 455 psi), the PCM turns the compressor relay off to protect the A/C compressor. 2008 Acura MDX 2007-09 HVAC Climate Control - MDX Microsoft Saturday, May 22, 2010 11:20:29 AM Page 23 © 2006 Mitchell Repair Information Company, LLC.
  • 24. Fig. 16: A/C Pressure Sensor Graph Courtesy of AMERICAN HONDA MOTOR CO., INC. CLIMATE CONTROL DOOR POSITIONS 2008 Acura MDX 2007-09 HVAC Climate Control - MDX Microsoft Saturday, May 22, 2010 11:20:29 AM Page 24 © 2006 Mitchell Repair Information Company, LLC.
  • 25. Fig. 17: Identifying Climate Control Door Positions Courtesy of AMERICAN HONDA MOTOR CO., INC. DUAL AIR MIX CONTROL SYSTEM 2008 Acura MDX 2007-09 HVAC Climate Control - MDX Microsoft Saturday, May 22, 2010 11:20:29 AM Page 25 © 2006 Mitchell Repair Information Company, LLC. lc=-------==1 ... ~ !VENTI IHEAT/VENT) IHEATI IHEAT/DEFI IDEFI AIR MIX DOORS HEAT/VENT DOOR . . .HOT . . .HOT (==:JcooL DEFROSTER DOOR (==:JcooL
  • 26. Fig. 18: Identifying Dual Air Mix Control System Courtesy of AMERICAN HONDA MOTOR CO., INC. I-DUAL AND I-TRI CLIMATE CONTROL SYSTEM (WITH NAVIGATION SYSTEM) The "i-Dual" climate control system automatically controls the temperature and the vent mode of the air direction to the driver's and passenger's side, depending on the angle of the sun, and the direction of the vehicle. It calculates information such as date, time, longitude, and latitude from the navigation system, as well as the radiant strength of the sun from the sunlight sensor, to determine the appropriate mode position and temperature to be directed to each side. The "i-Tri" climate control system is an addition of the automatic controls with the temperature and the vent mode of the air direction to the rear section to the "i-Dual" climate control system. 2008 Acura MDX 2007-09 HVAC Climate Control - MDX Microsoft Saturday, May 22, 2010 11:20:29 AM Page 26 © 2006 Mitchell Repair Information Company, LLC.
  • 27. Fig. 19: Identifying I-Dual And I-Tri Climate Control System Courtesy of AMERICAN HONDA MOTOR CO., INC. In the event that the navigation system malfunctions, or when driving in areas where the navigation system cannot determine the vehicle position (non-coverage areas, tunnels, etc.), the climate control system will operate the same as a vehicle without a navigation system. CLIMATE CONTROL UNIT INPUTS AND OUTPUTS 2008 Acura MDX 2007-09 HVAC Climate Control - MDX Microsoft Saturday, May 22, 2010 11:20:29 AM Page 27 © 2006 Mitchell Repair Information Company, LLC.
  • 28. Fig. 20: Identifying Climate Control Unit Connector A (40P) Terminals Courtesy of AMERICAN HONDA MOTOR CO., INC. CONNECTOR A CLIMATE CONTROL UNIT INPUTS AND OUTPUTS - CONNECTOR A Cavity Wire color Signal 1 WHT BACKUP INPUT 2 YEL NAVIGATION UNIT (SI)(1) INPUT 3 YEL IG2 (Power) INPUT 4 LT GRN B-CAN INPUT/OUTPUT 5 LT BLU IN-CAR TEMPERATURE SENSOR OUTPUT 6 GRY COMMON POTENTIAL 5V OUTPUT 8 RED SENSOR COMMON GROUND INPUT 9 BLU FRONT BLOWER FEEDBACK INPUT 10 RED FRONT POWER TRANSISTOR CONTROL OUTPUT 11 PUR DRIVER'S AIR MIX POTENTIAL INPUT 12 PNK DRIVER'S AIR MIX HOT OUTPUT 13 LT BLU DRIVER'S AIR MIX COOL OUTPUT 14 LT GRN PASSENGER'S AIR MIX HOT OUTPUT 15 YEL PASSENGER'S AIR MIX COOL OUTPUT 16 GRN FRONT MODE DEF OUTPUT 17 ORN FRONT MODE VENT OUTPUT 18 YEL FRESH OUTPUT 19 ORN RECIRCULATE OUTPUT 21 BLU NAVIGATION UNIT(CLK)(1) OUTPUT 22 RED NAVIGATION UNIT (SO)(1) OUTPUT 23 LT BLU ILLUMK+) INPUT 24 BRN FRONT EVAPORATOR TEMPERATURE SENSOR OUTPUT 25 PUR ACC INPUT 26 LT GRN A/C PRESSURE SENSOR OUTPUT 2008 Acura MDX 2007-09 HVAC Climate Control - MDX Microsoft Saturday, May 22, 2010 11:20:29 AM Page 28 © 2006 Mitchell Repair Information Company, LLC.
  • 29. CLIMATE CONTROL UNIT INPUTS AND OUTPUTS Fig. 21: Identifying Climate Control Unit Connector B (14P) Terminals Courtesy of AMERICAN HONDA MOTOR CO., INC. CONNECTOR B CLIMATE CONTROL UNIT INPUTS AND OUTPUTS - CONNECTOR B 27 YEL HUMIDITY SENSOR OUTPUT 28 PNK OUTSIDE AIR TEMPERATURE SENSOR OUTPUT 29 PUR SUNLIGHT SENSOR OUTPUT 30 BLU PASSENGER'S AIR MIX POTENTIAL INPUT 31 WHT FRONT MODE CONTROL MODE 1 OUTPUT 32 LT GRN FRONT MODE CONTROL MODE 2 OUTPUT 33 PUR FRONT MODE CONTROL MODE 3 OUTPUT 34 BLU FRONT MODE CONTROL MODE 4 OUTPUT 35 WHT RECIRCULATION CONTROL MODE 1 OUTPUT 36 BLK RECIRCULATION CONTROL MODE 2 OUTPUT 37 BLK GROUND (G506) OUTPUT 38 GRN RECIRCULATION CONTROL MODE 3 OUTPUT (1) With navigation system Cavity Wire color Signal 1 GRN REAR AIR MIX COOL OUTPUT 2 PNK REAR AIR MIX HOT OUTPUT 3 YEL REAR MODE HEAT INPUT 4 BLK REAR MODE VENT INPUT 5 PUR REAR AIR MIX POTENTIAL INPUT 6 LT BLU REAR EVAPORATOR TEMPERATURE SENSOR OUTPUT 8 BLU AUDIO UNIT (HVAC BUS) INPUT/OUTPUT 11 ORN REAR CLIMATE CONTROL PANEL (A/C BUS RX) INPUT/OUTPUT 12 GRN REAR CLIMATE CONTROL PANEL (A/C BUS TX) INPUT/OUTPUT 2008 Acura MDX 2007-09 HVAC Climate Control - MDX Microsoft Saturday, May 22, 2010 11:20:29 AM Page 29 © 2006 Mitchell Repair Information Company, LLC.
  • 30. REAR CLIMATE CONTROL UNIT INPUTS AND OUTPUTS Fig. 22: Identifying Rear Climate Control Panel 10P Connector Terminals Courtesy of AMERICAN HONDA MOTOR CO., INC. REAR CLIMATE CONTROL UNIT INPUTS AND OUTPUTS CIRCUIT DIAGRAM 13 RED REAR BLOWER FEEDBACK INPUT 14 BLU REAR POWER TRANSISTOR CONTROL OUTPUT Cavity Wire color Signal 1 YEL IG2 (Power) INPUT 3 BLK GROUND (G506) OUTPUT 7 LT BLU ILLUMI (+) INPUT 9 GRN CLIMATE CONTROL UNIT (A/C BUS TX) INPUT/OUTPUT 10 ORN CLIMATE CONTROL UNIT (A/C BUS RX) INPUT/OUTPUT 2008 Acura MDX 2007-09 HVAC Climate Control - MDX Microsoft Saturday, May 22, 2010 11:20:30 AM Page 30 © 2006 Mitchell Repair Information Company, LLC.
  • 31. Fig. 23: Climate Control Circuit Diagram (1 Of 4) Courtesy of AMERICAN HONDA MOTOR CO., INC. 2008 Acura MDX 2007-09 HVAC Climate Control - MDX Microsoft Saturday, May 22, 2010 11:20:30 AM Page 31 © 2006 Mitchell Repair Information Company, LLC.
  • 32. Fig. 24: Climate Control Circuit Diagram (2 Of 4) Courtesy of AMERICAN HONDA MOTOR CO., INC. 2008 Acura MDX 2007-09 HVAC Climate Control - MDX Microsoft Saturday, May 22, 2010 11:20:30 AM Page 32 © 2006 Mitchell Repair Information Company, LLC.
  • 33. Fig. 25: Climate Control Circuit Diagram (3 Of 4) Courtesy of AMERICAN HONDA MOTOR CO., INC. 2008 Acura MDX 2007-09 HVAC Climate Control - MDX Microsoft Saturday, May 22, 2010 11:20:30 AM Page 33 © 2006 Mitchell Repair Information Company, LLC.
  • 34. Fig. 26: Climate Control Circuit Diagram (4 Of 4) Courtesy of AMERICAN HONDA MOTOR CO., INC. DTC TROUBLESHOOTING DTC B1202: CLIMATE CONTROL UNIT INTERNAL ERROR 1. Clear the DTC with the HDS. NOTE: Check the battery condition (see BATTERY TEST ) and the charging system (see CHARGING SYSTEM INDICATOR CIRCUIT TROUBLESHOOTING ). 2008 Acura MDX 2007-09 HVAC Climate Control - MDX Microsoft Saturday, May 22, 2010 11:20:30 AM Page 34 © 2006 Mitchell Repair Information Company, LLC.
  • 35. 2. Turn the ignition switch to LOCK (0), and then ON (II). 3. Wait for 6 seconds or more. 4. Do the self-diagnostic with the HDS (see HOW TO USE THE SELF-DIAGNOSTIC FUNCTION WITH THE HDS ). 5. Check for DTCs. Is DTC B1202 indicated? YES - The climate control unit is faulty, replace the climate control unit. NO - Intermittent failure, the climate control unit is OK at this time. DTC B1205: CLIMATE CONTROL UNIT LOST COMMUNICATION WITH GAUGE CONTROL MODULE (VSP/NE MESSAGE); DTC B1206 OR DTC INDICATOR AUTO: CLIMATE CONTROL UNIT LOST COMMUNICATION WITH GAUGE CONTROL MODULE (ECT MESSAGE); DTC B1207: CLIMATE CONTROL UNIT LOST COMMUNICATION WITH GAUGE CONTROL MODULE (ILLUMI MESSAGE) 1. Clear the DTC with the HDS. 2. Turn the ignition switch to LOCK (0), and then ON (II). 3. Wait for 6 seconds or more. 4. Do the self-diagnostic with the HDS (see HOW TO USE THE SELF-DIAGNOSTIC FUNCTION WITH THE HDS ) or climate control unit (see HOW TO USE THE SELF-DIAGNOSTIC FUNCTION WITHOUT THE HDS ). 5. Check the DTCs. Are DTCs B1205, and/or B1206 or AUTO, and/or B1207 indicated? YES - Go to step 6. NO - Intermittent failure, check for loose wires or poor connections on the climate control unit connector A (40P). 6. Check for DTCs using the HDS. Are any of the following DTCs indicated; B1011, B1060, B2160, B1357, B1805, B1408, or B2157? YES - Do the gauge control module input test (see GAUGE CONTROL MODULE INPUT TEST ). NO - Do the climate control unit troubleshooting (see CLIMATE CONTROL UNIT NOTE: If you are troubleshooting multiple DTCs, be sure to follow the instructions in B- can diagnosis test mode A (see TROUBLESHOOTING - B-CAN SYSTEM DIAGNOSIS TEST MODE A ). 2008 Acura MDX 2007-09 HVAC Climate Control - MDX Microsoft Saturday, May 22, 2010 11:20:30 AM Page 35 © 2006 Mitchell Repair Information Company, LLC.
  • 36. TROUBLESHOOTING ). DTC B1213 OR DTC INDICATOR N: AN OPEN IN THE REAR EVAPORATOR TEMPERATURE SENSOR CIRCUIT 1. Clear the DTC with the HDS. 2. Turn the ignition switch to LOCK (0), and then ON (II). 3. Do the self-diagnostic with the HDS (see HOW TO USE THE SELF-DIAGNOSTIC FUNCTION WITH THE HDS ) or climate control unit (see HOW TO USE THE SELF-DIAGNOSTIC FUNCTION WITHOUT THE HDS ). 4. Check for DTCs. Is DTC B1213 or N indicated? YES - Go to step 5. NO - Intermittent failure, check for loose wires or poor connections on the rear evaporator temperature sensor circuit. 5. Turn the ignition switch to LOCK (0). 6. Remove the rear evaporator temperature sensor (see REAR EVAPORATOR TEMPERATURE SENSOR TEST ), and test it (see REAR EVAPORATOR TEMPERATURE SENSOR TEST ). Is the rear evaporator temperature sensor OK? YES - Go to step 7. NO - Replace the rear evaporator temperature sensor. 7. Disconnect climate control unit connector B (14P). 8. Check for continuity between climate control unit connector B (14P) No. 6 terminal and the rear evaporator temperature sensor 2P connector No. 2 terminal. 2008 Acura MDX 2007-09 HVAC Climate Control - MDX Microsoft Saturday, May 22, 2010 11:20:30 AM Page 36 © 2006 Mitchell Repair Information Company, LLC.
  • 37. Fig. 27: Identifying Continuity Between Climate Control Unit Connector B (14P) No. 6 And No. 2 Terminal Courtesy of AMERICAN HONDA MOTOR CO., INC. Is there continuity? YES - Go to step 9. NO - Repair open in the wire between the climate control unit and the rear evaporator temperature sensor. 9. Check for continuity between climate control unit connector A (40P) No. 8 terminal and the rear evaporator temperature sensor 2P connector No. 1 terminal. Fig. 28: Identifying Continuity Between No. 8 And Rear Evaporator Temperature Sensor 2P Connector No. 1 Terminal Courtesy of AMERICAN HONDA MOTOR CO., INC. Is there continuity? YES - Check for loose wires or poor connections at climate control unit connector A (40P), B (14P), and at the rear evaporator temperature sensor 2P connector. If the connections are good, substitute a known- 2008 Acura MDX 2007-09 HVAC Climate Control - MDX Microsoft Saturday, May 22, 2010 11:20:30 AM Page 37 © 2006 Mitchell Repair Information Company, LLC.
  • 38. good climate control unit, and recheck. If the symptom/indication goes away, replace the original climate control unit. NO - Repair open in the wire between the climate control unit and the rear evaporator temperature sensor. DTC B1214 OR DTC INDICATOR P: A SHORT IN THE REAR EVAPORATOR TEMPERATURE SENSOR CIRCUIT 1. Clear the DTC with the HDS. 2. Turn the ignition switch to LOCK (0), and then ON (II). 3. Do the self-diagnostic with the HDS (see HOW TO USE THE SELF-DIAGNOSTIC FUNCTION WITH THE HDS ) or climate control unit (see HOW TO USE THE SELF-DIAGNOSTIC FUNCTION WITHOUT THE HDS ). 4. Check for DTCs. Is DTC B1214 or P indicated? YES - Go to step 5. NO - Intermittent failure. 5. Turn the ignition switch to LOCK (0). 6. Remove the rear evaporator temperature sensor (see REAR EVAPORATOR TEMPERATURE SENSOR TEST ), and test it (see REAR EVAPORATOR TEMPERATURE SENSOR TEST ). Is the rear evaporator temperature sensor OK? YES - Go to step 7. NO - Replace the rear evaporator temperature sensor. 7. Disconnect climate control unit connector A (40P) and B(14P). 8. Check for continuity between climate control unit connector B (14P) No. 6 terminal and body ground. 2008 Acura MDX 2007-09 HVAC Climate Control - MDX Microsoft Saturday, May 22, 2010 11:20:30 AM Page 38 © 2006 Mitchell Repair Information Company, LLC.
  • 39. Fig. 29: Identifying Continuity Between Climate Control Unit Connector B (14P) No. 6 Terminal And Body Ground Courtesy of AMERICAN HONDA MOTOR CO., INC. Is there continuity? YES - Repair short to body ground in the wire between the climate control unit and the rear evaporator temperature sensor. NO - Go to step 9. 9. Check for continuity between climate control unit connector A (40P) No. 8 terminal and climate control unit connector B (14P) No. 6 terminal. Fig. 30: Identifying Continuity Between Climate Control Unit Connector A (40P) No. 8 And No. 6 Terminal Courtesy of AMERICAN HONDA MOTOR CO., INC. Is there continuity? YES - Repair short in the wires between the climate control unit and the rear evaporator temperature sensor. NO - Substitute a known-good climate control unit, and recheck. If the symptom/indication goes away, replace the original climate control unit. DTC B1215 OR DTC INDICATOR J: AN OPEN OR SHORT IN THE RECIRCULATION CONTROL MOTOR CIRCUIT 1. Clear the DTC with the HDS. 2. Turn the ignition switch to LOCK (0), and then ON (II). 3. Do the self-diagnostic with the HDS (see HOW TO USE THE SELF-DIAGNOSTIC FUNCTION WITH THE HDS ) or climate control unit (see HOW TO USE THE SELF-DIAGNOSTIC FUNCTION WITHOUT THE HDS ). 2008 Acura MDX 2007-09 HVAC Climate Control - MDX Microsoft Saturday, May 22, 2010 11:20:30 AM Page 39 © 2006 Mitchell Repair Information Company, LLC.
  • 40. 4. Check for DTCs. Is DTC B1215 or J indicated? YES - Go to step 5. NO - Intermittent failure, check for loose wires or poor connections on the recirculation control motor circuit. 5. Turn the ignition switch to LOCK (0). 6. Test the recirculation control motor (see RECIRCULATION CONTROL MOTOR TEST ). Is the recirculation control motor OK? YES - Go to step 7. NO - Replace the recirculation control motor (see RECIRCULATION CONTROL MOTOR REPLACEMENT ). 7. Disconnect the recirculation control motor 7P connector. 8. Disconnect climate control unit connector A (40P). 9. Check for continuity between the following terminals of climate control unit connector A (40P) and the recirculation control motor 7P connector. 40P: 7P: No. 8 No. 7 No. 35 No. 5 No. 36 No. 4 No. 38 No. 3 2008 Acura MDX 2007-09 HVAC Climate Control - MDX Microsoft Saturday, May 22, 2010 11:20:30 AM Page 40 © 2006 Mitchell Repair Information Company, LLC.
  • 41. Fig. 31: Identifying Continuity Between Climate Control Unit A (40P) And Recirculation Control Motor 7P Connector Courtesy of AMERICAN HONDA MOTOR CO., INC. Is there continuity? YES - Go to step 10. NO - Repair open in the wire(s) between the climate control unit and the recirculation control motor. 10. Check for continuity between body ground and climate control unit connector A (40P) No. 35,36, and 38 terminals individually. Fig. 32: Identifying Continuity Between Body Ground And Climate Control Unit Connector A (40P) No. 35,36, And 38 Terminals Courtesy of AMERICAN HONDA MOTOR CO., INC. Is there continuity? YES - Repair short to body ground in the wire(s) between the climate control unit and the recirculation control motor. 2008 Acura MDX 2007-09 HVAC Climate Control - MDX Microsoft Saturday, May 22, 2010 11:20:30 AM Page 41 © 2006 Mitchell Repair Information Company, LLC.
  • 42. NO - Go to step 11. 11. Check for continuity between climate control unit connector A (40P) terminals as follows. TERMINALS REFERENCE CHART Is there continuity between any of the terminals? YES - Repair the short in the wires. NO - Go to step 12. 12. Reconnect climate control unit connector A (40 P). 13. Turn the ignition switch to ON (II), and check the same terminals for voltage to body ground. Fig. 33: Identifying Same Terminals For Voltage To Body Ground Courtesy of AMERICAN HONDA MOTOR CO., INC. Is there any voltage? YES - Repair short to power in the wire(s) between the climate control unit and the recirculation control motor. This short may also damage the climate control unit. Repair the short to power before replacing the climate control unit. NO - Check for loose wires or poor connections at climate control unit connector A (40P) and at the recirculation control motor 7P connector. If the connections are good, substitute a known-good climate control unit, and recheck. If the symptom/indication goes away, replace the original climate control unit. DTC B1223 OR DTC INDICATOR M: A PROBLEM IN THE REAR BLOWER MOTOR CIRCUIT 1. Clear the DTC with the HDS. 2. Turn the ignition switch to LOCK (0), and then ON (II). From terminal To terminals 35 36, 38 36 38 2008 Acura MDX 2007-09 HVAC Climate Control - MDX Microsoft Saturday, May 22, 2010 11:20:30 AM Page 42 © 2006 Mitchell Repair Information Company, LLC.
  • 43. 3. Do the self-diagnostic with the HDS (see HOW TO USE THE SELF-DIAGNOSTIC FUNCTION WITH THE HDS ) or climate control unit (see HOW TO USE THE SELF-DIAGNOSTIC FUNCTION WITHOUT THE HDS ). 4. Check for DTCs. Is DTC B1223 or M indicated? YES - Go to step 5. NO - Intermittent failure, check for loose wires or poor connections on the rear blower motor circuit. 5. Turn the ignition switch to LOCK (0). 6. Check the No. 2 (RR BLOWER) (30 A) fuse in the under-hood fuse box, and the No. 30 (10 A) fuse in the under-dash fuse/relay box. Are the fuses OK? YES - Go to step 7. NO - Replace the fuse(s), and recheck. If fuse(s) blow again, check for a short in the No. 2 (RR BLOWER) (30 A) and No. 30 (10 A) fuse(s) circuit. 7. Connect the rear blower motor 2P connector No. 2 terminal to body ground with a jumper wire. Fig. 34: Identifying Rear Blower Motor 2P Connector No. 2 Terminal To Body Ground Courtesy of AMERICAN HONDA MOTOR CO., INC. 8. Turn the ignition switch to ON (II). Does the rear blower motor run at high speed? YES - Go to step 9. NO - Go to step 24. 9. Turn the ignition switch to LOCK (0). 2008 Acura MDX 2007-09 HVAC Climate Control - MDX Microsoft Saturday, May 22, 2010 11:20:30 AM Page 43 © 2006 Mitchell Repair Information Company, LLC.
  • 44. 10. Disconnect the jumper wire. 11. Disconnect the rear power transistor 4P connector. 12. Check for continuity between the rear power transistor 4P connector No. 2 terminal and body ground. Fig. 35: Identifying Continuity Between Rear Power Transistor 4P Connector No. 2 Terminal And Body Ground Courtesy of AMERICAN HONDA MOTOR CO., INC. Is there continuity? YES - Go to step 13. NO - Check for an open in the wire between the rear power transistor and body ground. If the wire is OK, check for poor ground at G503 (see GROUND TO COMPONENTS INDEX ). 13. Connect the rear power transistor 4P connector No. 2 and No. 4 terminals with a jumper wire. Fig. 36: Identifying Rear Power Transistor 4P Connector No. 2 And No. 4 Terminals Courtesy of AMERICAN HONDA MOTOR CO., INC. 14. Turn the ignition switch to ON (II). Does the rear blower motor run at high speed? YES - Go to step 15. NO - Repair open in the ORN wire between the rear power transistor and the rear blower motor. 2008 Acura MDX 2007-09 HVAC Climate Control - MDX Microsoft Saturday, May 22, 2010 11:20:30 AM Page 44 © 2006 Mitchell Repair Information Company, LLC.
  • 45. 15. Turn the ignition switch to LOCK (0). 16. Disconnect the jumper wire. 17. Disconnect climate control unit connector B (14P). 18. Check for continuity between body ground and climate control unit connector B (14P) No. 13 and No. 14 terminals individually. Fig. 37: Identifying Continuity Between Body Ground And Climate Control Unit Connector B (14P) No. 13 And No. 14 Terminals Courtesy of AMERICAN HONDA MOTOR CO., INC. Is there continuity? YES - Repair short to body ground in the wire(s) between the climate control unit and the rear power transistor. NO - Go to step 19. 19. Check for continuity between the following terminals of climate control unit connector B (14P) and the rear power transistor 4P connector. 14P 4P No. 13 No. 3 No. 14 No. 1 2008 Acura MDX 2007-09 HVAC Climate Control - MDX Microsoft Saturday, May 22, 2010 11:20:30 AM Page 45 © 2006 Mitchell Repair Information Company, LLC.
  • 46. Fig. 38: Identifying Continuity Between Climate Control Unit B (14P) And Rear Power Transistor 4P Connector Terminal Courtesy of AMERICAN HONDA MOTOR CO., INC. Is there continuity? YES - Go to step 20. NO - Repair open in the wire(s) between the climate control unit and the rear power transistor. 20. Turn the ignition switch to ON (II). 21. Measure the voltage between body ground and climate control unit connector B (14P) No. 13 and No. 14 terminals individually. Fig. 39: Measuring Voltage Between Body Ground And Climate Control Unit Connector B (14P) No. 13 And No. 14 Terminals Courtesy of AMERICAN HONDA MOTOR CO., INC. Is there any voltage? YES - Repair short to power in the wire(s). NO - Go to step 22. 22. Reconnect climate control unit connector B (14P). 2008 Acura MDX 2007-09 HVAC Climate Control - MDX Microsoft Saturday, May 22, 2010 11:20:30 AM Page 46 © 2006 Mitchell Repair Information Company, LLC.
  • 47. 23. Test the rear power transistor (see REAR POWER TRANSISTOR TEST ). Is the rear power transistor OK? YES - Check for loose wires or poor connections at climate control unit connector B (14P) and at the rear power transistor 4P connector. If the connections are good, substitute a known-good climate control unit, and recheck. If the symptom/ indication goes away, replace the original climate control unit. NO - Replace the rear power transistor (see REAR POWER TRANSISTOR TEST ). 24. Disconnect the jumper wire. 25. Disconnect the rear blower motor 2P connector. 26. Measure the voltage between the rear blower motor 2P connector No. 1 terminal and body ground. Fig. 40: Measuring Voltage Between Rear Blower Motor 2P Connector No. 1 Terminal And Body Ground Courtesy of AMERICAN HONDA MOTOR CO., INC. Is there battery voltage? YES - Replace the rear blower motor (see REAR CLIMATE CONTROL PANEL REMOVAL/INSTALLATION ). NO - Go to step 27. 27. Turn the ignition switch to LOCK (0). 28. Remove the rear blower motor relay from the dashboard wire harness, and test it (see POWER RELAY TEST ). Is the relay OK? YES - Go to step 29. NO - Replace the rear blower motor relay. 29. Measure the voltage between the rear blower motor relay 4P socket No. 1 terminal and body ground. 2008 Acura MDX 2007-09 HVAC Climate Control - MDX Microsoft Saturday, May 22, 2010 11:20:30 AM Page 47 © 2006 Mitchell Repair Information Company, LLC.
  • 48. Fig. 41: Measuring Voltage Between Rear Blower Motor Relay 4P Socket No. 1 Terminal And Body Ground Courtesy of AMERICAN HONDA MOTOR CO., INC. Is there battery voltage? YES - Go to step 30. NO - Repair open in the wire between the No. 2 (RR BLOWER) (30 A) in the under-hood fuse box and the rear blower motor relay. 30. Turn the ignition switch to ON (II). 31. Measure the voltage between the rear blower motor relay 4P socket No. 2 terminal and body ground. Fig. 42: Measuring Voltage Between Rear Blower Motor Relay 4P Socket No. 2 Terminal And Body Ground Courtesy of AMERICAN HONDA MOTOR CO., INC. Is there battery voltage? YES - Go to step 32. NO - Repair open in the wire between the No. 30 (10 A) fuse in the under-dash fuse/relay box and the rear blower motor relay. 32. Turn the ignition switch to LOCK (0). 33. Check for continuity between the rear blower motor relay 4P socket No. 4 terminal and body ground. 2008 Acura MDX 2007-09 HVAC Climate Control - MDX Microsoft Saturday, May 22, 2010 11:20:30 AM Page 48 © 2006 Mitchell Repair Information Company, LLC.
  • 49. Fig. 43: Identifying Continuity Between Rear Blower Motor Relay 4P Socket No. 4 Terminal And Body Ground Courtesy of AMERICAN HONDA MOTOR CO., INC. Is there continuity? YES - Repair open in the GRY wire between the rear blower motor relay and the blower motor. NO - Check for an open in the wire between the rear blower motor relay and body ground. If the wire is OK, check for poor ground at G503 (see GROUND TO COMPONENTS INDEX ). DTC B1225 OR DTC INDICATOR A AND AUTO: AN OPEN IN THE IN-CAR TEMPERATURE SENSOR CIRCUIT 1. Clear the DTC with the HDS. 2. Turn the ignition switch to LOCK (0), and then ON (II). 3. Do the self-diagnostic with the HDS (see HOW TO USE THE SELF-DIAGNOSTIC FUNCTION WITH THE HDS ) or climate control unit (see HOW TO USE THE SELF-DIAGNOSTIC FUNCTION WITHOUT THE HDS ). 4. Check for DTCs. Is DTC B1225 or A and AUTO indicated? YES - Go to step 5. NO - Intermittent failure, check for loose wires or poor connections on the in-car temperature sensor circuit. 5. Turn the ignition switch to LOCK (0). 6. Remove the humidity/in-car temperature sensor (see HUMIDITY/IN-CAR TEMPERATURE SENSOR REPLACEMENT ), and test it (see HUMIDITY/IN-CAR TEMPERATURE SENSOR TEST ). Is the in-car temperature sensor OK? 2008 Acura MDX 2007-09 HVAC Climate Control - MDX Microsoft Saturday, May 22, 2010 11:20:30 AM Page 49 © 2006 Mitchell Repair Information Company, LLC.
  • 50. YES - Go to step 7. NO - Replace the humidity/in-car temperature sensor. 7. Disconnect climate control unit connector A (40P). 8. Check for continuity between climate control unit connector A (40P) No. 5 terminal and the humidity/in- car temperature sensor 4P connector No. 4 terminal. Fig. 44: Identifying Continuity Between No. 5 And Humidity/In-Car Temperature Sensor 4P Connector No. 4 Terminal Courtesy of AMERICAN HONDA MOTOR CO., INC. Is there continuity? YES - Go to step 9. NO - Repair open in the wire between the climate control unit and the in-car temperature sensor. 9. Check for continuity between climate control unit connector A (40P) No. 8 terminal and the humidity/in- car temperature sensor 4P connector No. 3 terminal. 2008 Acura MDX 2007-09 HVAC Climate Control - MDX Microsoft Saturday, May 22, 2010 11:20:30 AM Page 50 © 2006 Mitchell Repair Information Company, LLC.
  • 51. Fig. 45: Identifying Continuity Between Climate Control Unit Connector A (40P) No. 8 And No. 3 Terminal Courtesy of AMERICAN HONDA MOTOR CO., INC. Is there continuity? YES - Check for loose wires or poor connections at climate control unit connector A (40P) and at the humidity/in-car temperature sensor 4P connector. If the connections are good, substitute a known-good climate control unit, and recheck. If the symptom/ indication goes away, replace the original climate control unit. NO - Repair open in the wire between the climate control unit and the in-car temperature sensor. DTC B1226 OR DTC INDICATOR B AND AUTO: A SHORT IN THE IN-CAR TEMPERATURE SENSOR CIRCUIT 1. Clear the DTC with the HDS. 2. Turn the ignition switch to LOCK (0), and then ON (II). 3. Do the self-diagnostic with the HDS (see HOW TO USE THE SELF-DIAGNOSTIC FUNCTION WITH THE HDS ) or climate control unit (see HOW TO USE THE SELF-DIAGNOSTIC FUNCTION WITHOUT THE HDS ). 4. Check for DTCs. Is DTC B1226 or B and AUTO indicated? YES - Go to step 5. NO - Intermittent failure. 5. Turn the ignition switch to LOCK (0). 6. Remove the humidity/in-car temperature sensor (see HUMIDITY/IN-CAR TEMPERATURE SENSOR REPLACEMENT ), and test it (see HUMIDITY/IN-CAR TEMPERATURE SENSOR TEST ). Is the in-car temperature sensor OK? YES - Go to step 7. NO - Replace the humidity/in-car temperature sensor. 7. Disconnect climate control unit connector A (40P). 8. Check for continuity between climate control unit connector A (40P) No. 5 terminal and body ground. 2008 Acura MDX 2007-09 HVAC Climate Control - MDX Microsoft Saturday, May 22, 2010 11:20:30 AM Page 51 © 2006 Mitchell Repair Information Company, LLC.
  • 52. Fig. 46: Identifying Continuity Between Climate Control Unit Connector A (40P) No. 5 Terminal And Body Ground Courtesy of AMERICAN HONDA MOTOR CO., INC. Is there continuity? YES - Repair short to body ground in the wire between the climate control unit and the in-car temperature sensor. NO - Go to step 9. 9. Check for continuity between climate control unit connector A (40P) No. 5 and No. 8 terminals. Fig. 47: Identifying Continuity Between Climate Control Unit Connector A (40P) No. 5 And No. 8 Terminals Courtesy of AMERICAN HONDA MOTOR CO., INC. Is there continuity? YES - Repair short in the wires between the climate control unit and the in-car temperature sensor. NO - Substitute a known-good climate control unit, and recheck. If the symptom/indication goes away, replace the original climate control unit. DTC B1227 OR DTC INDICATOR C AND AUTO: AN OPEN IN THE OUTSIDE AIR TEMPERATURE SENSOR CIRCUIT 2008 Acura MDX 2007-09 HVAC Climate Control - MDX Microsoft Saturday, May 22, 2010 11:20:30 AM Page 52 © 2006 Mitchell Repair Information Company, LLC.
  • 53. 1. Clear the DTC with the HDS. 2. Turn the ignition switch to LOCK (0), and then ON (II). 3. Do the self-diagnostic with the HDS (see HOW TO USE THE SELF-DIAGNOSTIC FUNCTION WITH THE HDS ) or climate control unit (see HOW TO USE THE SELF-DIAGNOSTIC FUNCTION WITHOUT THE HDS ). 4. Check for DTCs. Is DTC B1227 or C and AUTO indicated? YES - Go to step 5. NO - Intermittent failure, check for loose wires or poor connections on the outside air temperature sensor circuit. 5. Turn the ignition switch to LOCK (0). 6. Remove the outside air temperature sensor (see OUTSIDE AIR TEMPERATURE SENSOR REPLACEMENT ), and test it (see OUTSIDE AIR TEMPERATURE SENSOR TEST ). Is the outside air temperature sensor OK? YES - Go to step 7. NO - Replace the outside air temperature sensor. 7. Disconnect climate control unit connector A (40P). 8. Check for continuity between climate control unit connector A (40P) No. 28 terminal and the outside air temperature sensor 2P connector No. 2 terminal. Fig. 48: Identifying Continuity Between No. 28 And Outside Air Temperature Sensor 2P Connector No. 2 Terminal Courtesy of AMERICAN HONDA MOTOR CO., INC. 2008 Acura MDX 2007-09 HVAC Climate Control - MDX Microsoft Saturday, May 22, 2010 11:20:30 AM Page 53 © 2006 Mitchell Repair Information Company, LLC.
  • 54. Is there continuity? YES - Go to step 9. NO - Repair open in the wire between the climate control unit and the outside air temperature sensor. 9. Check for continuity between climate control unit connector A (40P) No. 8 terminal and the outside air temperature sensor 2P connector terminal No. 1. Fig. 49: Identifying Continuity Between Climate Control Unit Connector A (40P) No. 8 And Terminal No. 1 Courtesy of AMERICAN HONDA MOTOR CO., INC. Is there continuity? YES - Check for loose wires or poor connections at climate control unit connector A (40P) and at the outside air temperature sensor 2P connector. If the connections are good, substitute a known-good climate control unit, and recheck. If the symptom/ indication goes away, replace the original climate control unit. NO - Repair open in the wire between the climate control unit and the outside air temperature sensor. DTC B1228 OR DTC INDICATOR D AND AUTO: A SHORT IN THE OUTSIDE AIR TEMPERATURE SENSOR CIRCUIT 1. Clear the DTC with the HDS. 2. Turn the ignition switch to LOCK (0), and then ON (II). 3. Do the self-diagnostic with the HDS (see HOW TO USE THE SELF-DIAGNOSTIC FUNCTION WITH THE HDS ) or climate control unit (see HOW TO USE THE SELF-DIAGNOSTIC FUNCTION WITHOUT THE HDS ). 4. Check for DTCs. Is DTC B1228 or D and AUTO indicated? 2008 Acura MDX 2007-09 HVAC Climate Control - MDX Microsoft Saturday, May 22, 2010 11:20:30 AM Page 54 © 2006 Mitchell Repair Information Company, LLC.
  • 55. YES - Go to step 5. NO - Intermittent failure. 5. Turn the ignition switch to LOCK (0). 6. Remove the outside air temperature sensor (see OUTSIDE AIR TEMPERATURE SENSOR REPLACEMENT ), and test it (see OUTSIDE AIR TEMPERATURE SENSOR TEST ). Is the outside air temperature sensor OK? YES - Go to step 7. NO - Replace the outside air temperature sensor. 7. Disconnect climate control unit connector A (40P). 8. Check for continuity between climate control unit connector A (40P) No. 28 terminal and body ground. Fig. 50: Identifying Continuity Between Climate Control Unit Connector A (40P) No. 28 Terminal And Body Ground Courtesy of AMERICAN HONDA MOTOR CO., INC. Is there continuity? YES - Repair short to body ground in the wire between the climate control unit and the outside air temperature sensor. NO - Go to step 9. 9. Check for continuity between climate control unit connector A (40P) No. 8 and No. 28 terminals. 2008 Acura MDX 2007-09 HVAC Climate Control - MDX Microsoft Saturday, May 22, 2010 11:20:30 AM Page 55 © 2006 Mitchell Repair Information Company, LLC.
  • 56. Fig. 51: Identifying Continuity Between Climate Control Unit Connector A (40P) No. 8 And No. 28 Terminals Courtesy of AMERICAN HONDA MOTOR CO., INC. Is there continuity? YES - Repair short in the wires between the climate control unit and the outside air temperature sensor. NO - Substitute a known-good climate control unit, and recheck. If the symptom/indication goes away, replace the original climate control unit. DTC B1229 OR DTC INDICATOR E AND AUTO: AN OPEN IN THE SUNLIGHT SENSOR CIRCUIT 1. Clear the DTC with the HDS. 2. Turn the ignition switch to LOCK (0), and then ON (II). 3. Do the self-diagnostic with the HDS (see HOW TO USE THE SELF-DIAGNOSTIC FUNCTION WITH THE HDS ) or climate control unit (see HOW TO USE THE SELF-DIAGNOSTIC FUNCTION WITHOUT THE HDS ). 4. Check for DTCs. Is DTC B1229 or E and AUTO indicated? YES - Go to step 5. NO - Intermittent failure, check for loose wires or poor connections on the sunlight sensor circuit. 5. Turn the ignition switch to LOCK (0). 6. Disconnect the sunlight sensor 5P connector. 7. Disconnect climate control unit connector A (40P). 8. Check for continuity between climate control unit connector A (40P) No. 29 terminal and the sunlight sensor 5P connector No. 4 terminal. 2008 Acura MDX 2007-09 HVAC Climate Control - MDX Microsoft Saturday, May 22, 2010 11:20:30 AM Page 56 © 2006 Mitchell Repair Information Company, LLC.
  • 57. Fig. 52: Identifying Continuity Between No. 29 And Sunlight Sensor 5P Connector No. 4 Terminal Courtesy of AMERICAN HONDA MOTOR CO., INC. Is there continuity? YES - Go to step 9. NO - Repair open in the wire between the climate control unit and the sunlight sensor. 9. Check for continuity between climate control unit connector A (40P) No. 8 terminal and the sunlight sensor 5P connector No. 2 terminal. Fig. 53: Identifying Continuity Between Climate Control Unit Connector A (40P) No. 8 And No. 2 Terminal Courtesy of AMERICAN HONDA MOTOR CO., INC. Is there continuity? YES - Go to step 10. NO - Repair open in the wire between the climate control unit and the sunlight sensor. 10. Reconnect the sunlight sensor 5P connector. 2008 Acura MDX 2007-09 HVAC Climate Control - MDX Microsoft Saturday, May 22, 2010 11:20:30 AM Page 57 © 2006 Mitchell Repair Information Company, LLC.
  • 58. 11. Reconnect climate control unit connector A (40P). 12. Test the sunlight sensor (see SUNLIGHT SENSOR TEST ). Is the sunlight sensor OK? YES - Check for loose wires or poor connections at climate control unit connector A (40P) and at the sunlight sensor 5P connector. If the connections are good, substitute a known-good climate control unit, and recheck. If the symptom/indication goes away, replace the original climate control unit. NO - Replace the sunlight sensor (see SUNLIGHT SENSOR REPLACEMENT ). DTC B1230 OR DTC INDICATOR F AND AUTO: A SHORT IN THE SUNLIGHT SENSOR CIRCUIT 1. Clear the DTC with the HDS. 2. Turn the ignition switch to LOCK (0), and then ON (II). 3. Do the self-diagnostic with the HDS (see HOW TO USE THE SELF-DIAGNOSTIC FUNCTION WITH THE HDS ) or climate control unit (see HOW TO USE THE SELF-DIAGNOSTIC FUNCTION WITHOUT THE HDS ). 4. Check for DTCs. Is DTC B1230 or F and AUTO indicated? YES - Go to step 5. NO - Intermittent failure. 5. Turn the ignition switch to LOCK (0). 6. Disconnect the sunlight sensor 5P connector. 7. Disconnect climate control unit connector A (40P). 8. Check for continuity between climate control unit connector A (40P) No. 29 terminal and body ground. Fig. 54: Identifying Continuity Between Climate Control Unit Connector A (40P) No. 29 Terminal And Body Ground Courtesy of AMERICAN HONDA MOTOR CO., INC. 2008 Acura MDX 2007-09 HVAC Climate Control - MDX Microsoft Saturday, May 22, 2010 11:20:30 AM Page 58 © 2006 Mitchell Repair Information Company, LLC.
  • 59. Is there continuity? YES - Repair short to body ground in the wire between the climate control unit and the sunlight sensor. NO - Go to step 9. 9. Check for continuity between climate control unit connector A (40P) No. 8 and No. 29 terminals. Fig. 55: Identifying Continuity Between Climate Control Unit Connector A (40P) No. 8 And No. 29 Terminals Courtesy of AMERICAN HONDA MOTOR CO., INC. Is there continuity? YES - Repair short in the wires between the climate control unit and the sunlight sensor. NO - Go to step 10. 10. Reconnect the sunlight sensor 5P connector. 11. Reconnect climate control unit connector A (40P). 12. Test the sunlight sensor (see SUNLIGHT SENSOR TEST ). Is the sunlight sensor OK? YES - Substitute a known-good climate control unit, and recheck. If the symptom/indication goes away, replace the original climate control unit. NO - Replace the sunlight sensor (see SUNLIGHT SENSOR REPLACEMENT ). DTC B1231 OR DTC INDICATOR G AND AUTO: AN OPEN IN THE FRONT EVAPORATOR TEMPERATURE SENSOR CIRCUIT 1. Clear the DTC with the HDS. 2. Turn the ignition switch to LOCK (0), and then ON (II). 3. Do the self-diagnostic with the HDS (see HOW TO USE THE SELF-DIAGNOSTIC FUNCTION 2008 Acura MDX 2007-09 HVAC Climate Control - MDX Microsoft Saturday, May 22, 2010 11:20:30 AM Page 59 © 2006 Mitchell Repair Information Company, LLC.
  • 60. WITH THE HDS ) or climate control unit (see HOW TO USE THE SELF-DIAGNOSTIC FUNCTION WITHOUT THE HDS ). 4. Check for DTCs. Is DTC B1231 or G and AUTO indicated? YES - Go to step 5. NO - Intermittent failure, check for loose wires or poor connections on the front evaporator temperature sensor circuit. 5. Turn the ignition switch to LOCK (0). 6. Remove the front evaporator temperature sensor (see FRONT EVAPORATOR TEMPERATURE SENSOR REPLACEMENT ), and test it (see FRONT EVAPORATOR TEMPERATURE SENSOR TEST ). Is the front evaporator temperature sensor OK? YES - Go to step 7. NO - Replace the front evaporator temperature sensor. 7. Disconnect climate control unit connector A (40P). 8. Check for continuity between climate control unit connector A (40P) No. 24 terminal and the front evaporator temperature sensor 2P connector No. 2 terminal. Fig. 56: Identifying Continuity Between No. 24 And Front Evaporator Temperature Sensor 2P Connector No. 2 Terminal Courtesy of AMERICAN HONDA MOTOR CO., INC. Is there continuity? YES - Go to step 9. 2008 Acura MDX 2007-09 HVAC Climate Control - MDX Microsoft Saturday, May 22, 2010 11:20:30 AM Page 60 © 2006 Mitchell Repair Information Company, LLC.
  • 61. NO - Repair open in the wire between the climate control unit and the front evaporator temperature sensor. 9. Check for continuity between climate control unit connector A (40P) No. 8 terminal and the front evaporator temperature sensor 2P connector No. 1 terminal. Fig. 57: Identifying Continuity Between Climate Control Unit Connector A (40P) No. 8 And No. 1 Terminal Courtesy of AMERICAN HONDA MOTOR CO., INC. Is there continuity? YES - Check for loose wires or poor connections at climate control unit connector A (40P) and at the front evaporator temperature sensor 2P connector. If the connections are good, substitute a known-good climate control unit, and recheck. If the symptom/indication goes away, replace the original climate control unit. NO - Repair open in the wire between the climate control unit and the front evaporator temperature sensor. DTC B1232 OR DTC INDICATOR H AND AUTO: A SHORT IN THE FRONT EVAPORATOR TEMPERATURE SENSOR CIRCUIT 1. Clear the DTC with the HDS. 2. Turn the ignition switch to LOCK (0), and then ON (II). 3. Do the self-diagnostic with the HDS (see HOW TO USE THE SELF-DIAGNOSTIC FUNCTION WITH THE HDS ) or climate control unit (see HOW TO USE THE SELF-DIAGNOSTIC FUNCTION WITHOUT THE HDS ). 4. Check for DTCs. Is DTC B1232 or H and AUTO indicated? YES - Go to step 5. 2008 Acura MDX 2007-09 HVAC Climate Control - MDX Microsoft Saturday, May 22, 2010 11:20:30 AM Page 61 © 2006 Mitchell Repair Information Company, LLC.
  • 62. NO - Intermittent failure. 5. Turn the ignition switch to LOCK (0). 6. Remove the front evaporator temperature sensor (see FRONT EVAPORATOR TEMPERATURE SENSOR REPLACEMENT ), and test it (see FRONT EVAPORATOR TEMPERATURE SENSOR TEST ). Is the front evaporator temperature sensor OK? YES - Go to step 7. NO - Replace the front evaporator temperature sensor. 7. Disconnect climate control unit connector A (40P). 8. Check for continuity between climate control unit connector A (40P) No. 24 terminal and body ground. Fig. 58: Identifying Continuity Between Climate Control Unit Connector A (40P) No. 24 Terminal And Body Ground Courtesy of AMERICAN HONDA MOTOR CO., INC. Is there continuity? YES - Repair short to body ground in the wire between the climate control unit and the front evaporator temperature sensor. NO - Go to step 9. 9. Check for continuity between climate control unit connector A (40P) No. 8 and No. 24 terminals. 2008 Acura MDX 2007-09 HVAC Climate Control - MDX Microsoft Saturday, May 22, 2010 11:20:30 AM Page 62 © 2006 Mitchell Repair Information Company, LLC.
  • 63. Fig. 59: Identifying Continuity Between Climate Control Unit Connector A (40P) No. 8 And No. 24 Terminals Courtesy of AMERICAN HONDA MOTOR CO., INC. Is there continuity? YES - Repair short in the wires between the climate control unit and the front evaporator temperature sensor. NO - Substitute a known-good climate control unit, and recheck. If the symptom/indication goes away, replace the original climate control unit. DTC B1233 OR DTC INDICATOR J AND AUTO: AN OPEN IN THE DRIVER'S AIR MIX CONTROL MOTOR CIRCUIT 1. Clear the DTC with the HDS. 2. Turn the ignition switch to LOCK (0), and then ON (II). 3. Do the self-diagnostic with the HDS (see HOW TO USE THE SELF-DIAGNOSTIC FUNCTION WITH THE HDS ) or climate control unit (see HOW TO USE THE SELF-DIAGNOSTIC FUNCTION WITHOUT THE HDS ). 4. Check for DTCs. Is DTC B1233 or J and AUTO indicated? YES - Go to step 5. NO - Intermittent failure, check for loose wires or poor connections on the driver's air mix control motor circuit. 5. Turn the ignition switch to LOCK (0). 6. Test the driver's air mix control motor (see DRIVER'S AIR MIX CONTROL MOTOR TEST ). Is the driver's air mix control motor OK? YES - Go to step 7. 2008 Acura MDX 2007-09 HVAC Climate Control - MDX Microsoft Saturday, May 22, 2010 11:20:30 AM Page 63 © 2006 Mitchell Repair Information Company, LLC.
  • 64. NO - Replace the driver's air mix control motor (see DRIVER'S AIR MIX CONTROL MOTOR REPLACEMENT ). 7. Disconnect the driver's air mix control motor 7P connector. 8. Disconnect climate control unit connector A (40P). 9. Check for continuity between the following terminals of climate control unit connector A (40P) and the driver's air mix control motor 7P connector. Fig. 60: Identifying Continuity Between Climate Control Unit A (40P) And Driver's Air Mix Control Motor 7P Connector Terminals Courtesy of AMERICAN HONDA MOTOR CO., INC. Is there continuity? YES - Check for loose wires or poor connections at climate control unit connector A (40P) and at the driver's air mix control motor 7P connector. If the connections are good, substitute a known-good climate control unit and recheck. If the symptom/ indication goes away, replace the original climate control unit. NO - Repair open in the wire(s) between the climate control unit and the driver's air mix control motor. DTC B1234 OR DTC INDICATOR K AND AUTO: A SHORT IN THE DRIVER'S AIR MIX CONTROL MOTOR CIRCUIT 1. Clear the DTC with the HDS. 2. Turn the ignition switch to LOCK (0), and then ON (II). 40P 7P No. 6 No. 7 No. 8 No. 5 No. 11 No. 3 2008 Acura MDX 2007-09 HVAC Climate Control - MDX Microsoft Saturday, May 22, 2010 11:20:30 AM Page 64 © 2006 Mitchell Repair Information Company, LLC.
  • 65. 3. Do the self-diagnostic with the HDS (see HOW TO USE THE SELF-DIAGNOSTIC FUNCTION WITH THE HDS ) or climate control unit (see HOW TO USE THE SELF-DIAGNOSTIC FUNCTION WITHOUT THE HDS ). 4. Check for DTCs. Is DTC B1234 or K and AUTO indicated? YES - Go to step 5. NO - Intermittent failure. 5. Check for DTCs. Are these DTCs also present; B1237 or N and AUTO, and/or B1245 or G, and/or B2968 or A and WINDSHIELD DEFROST, and/or B2980 or B and WINDSHIELD DEFROST? YES - Go to step 13. NO - Go to step 6. 6. Turn the ignition switch to LOCK (0). 7. Test the driver's air mix control motor (see DRIVER'S AIR MIX CONTROL MOTOR TEST ). Is the driver's air mix control motor OK? YES - Go to step 8. NO - Replace the driver's air mix control motor (see DRIVER'S AIR MIX CONTROL MOTOR REPLACEMENT ). 8. Disconnect the driver's air mix control motor 7P connector. 9. Disconnect climate control unit connector A (40P). 10. Check for continuity between body ground and climate control unit connector A (40P) No. 11 terminal. Fig. 61: Identifying Continuity Between Body Ground And Climate Control Unit Connector A 2008 Acura MDX 2007-09 HVAC Climate Control - MDX Microsoft Saturday, May 22, 2010 11:20:30 AM Page 65 © 2006 Mitchell Repair Information Company, LLC.
  • 66. (40P) No. 11 Terminal Courtesy of AMERICAN HONDA MOTOR CO., INC. Is there continuity? YES - Repair short to body ground in the wire between the climate control unit and the driver's air mix control motor. NO - Go to step 11. 11. Check for continuity between climate control unit connector A (40P) No. 6 and No. 11 terminals. Fig. 62: Identifying Continuity Between Climate Control Unit Connector A (40P) No. 6 And No. 11 Terminals Courtesy of AMERICAN HONDA MOTOR CO., INC. Is there continuity? YES - Repair the short in the wires. NO - Go to step 12. 12. Turn the ignition switch to ON (II), and measure the voltage between climate control unit connector A (40P) No. 11 terminal and body ground. Fig. 63: Measuring Voltage Between Climate Control Unit Connector A (40P) No. 11 Terminal And 2008 Acura MDX 2007-09 HVAC Climate Control - MDX Microsoft Saturday, May 22, 2010 11:20:30 AM Page 66 © 2006 Mitchell Repair Information Company, LLC.
  • 67. Body Ground Courtesy of AMERICAN HONDA MOTOR CO., INC. Is there any voltage? YES - Repair short to power in the wire between the climate control unit and the driver's air mix control motor. This short may also damage the climate control unit. Repair the short to power before replacing the climate control unit. NO - Substitute a known-good climate control unit, and recheck. If the symptom/indication goes away, replace the original climate control unit. 13. Turn the ignition switch to LOCK (0), and disconnect the climate control unit. 14. Disconnect these items:  Driver's air mix control motor  Passenger's air mix control motor  Rear air mix control motor  Humidity/in-car temperature sensor  A/C pressure sensor 15. Check for continuity between climate control unit connector A (40P) No. 6 terminal and body ground. Fig. 64: Identifying Continuity Between Climate Control Unit Connector A (40P) No. 6 Terminal And Body Ground Courtesy of AMERICAN HONDA MOTOR CO., INC. Is there continuity? YES - Repair short to body ground in the wire. NO - Go to step 16. 16. Turn the ignition switch to ON (II), and check the same terminal for voltage to body ground. 2008 Acura MDX 2007-09 HVAC Climate Control - MDX Microsoft Saturday, May 22, 2010 11:20:30 AM Page 67 © 2006 Mitchell Repair Information Company, LLC.
  • 68. Fig. 65: Identifying Same Terminal For Voltage To Body Ground Courtesy of AMERICAN HONDA MOTOR CO., INC. Is there any voltage? YES - Repair short to power in the wire. This short may have also damaged the climate control unit. Repair the short to power before replacing the climate control unit. NO - Go to step 17. 17. Turn the ignition switch to LOCK (0). 18. Reconnect the climate control unit connector (40P). 19. Turn the ignition switch to ON (II), and measure the voltage between climate control unit connector A (40P) No. 6 terminal and body ground. Fig. 66: Measuring Voltage Between Climate Control Unit Connector A (40P) No. 6 Terminal And Body Ground Courtesy of AMERICAN HONDA MOTOR CO., INC. Is there about 5 V? YES - Go to step 20. NO - Check for a loose wire or poor connection at climate control unit connector A (40P). If the connection is good, substitute a known-good climate control unit and recheck. If the symptom/ indication goes away, replace the original climate control unit. 2008 Acura MDX 2007-09 HVAC Climate Control - MDX Microsoft Saturday, May 22, 2010 11:20:30 AM Page 68 © 2006 Mitchell Repair Information Company, LLC.
  • 69. 20. While checking the same terminal for voltage to ground, reconnect these items individually and note the voltage reading each time:  Driver's air mix control motor  Passenger's air mix control motor  Rear air mix control motor  Humidity/in-car temperature sensor  A/C pressure sensor Fig. 67: Identifying Climate Control Unit Connector A (40P) Courtesy of AMERICAN HONDA MOTOR CO., INC. Does the voltage remain at about 5 V? YES - Substitute a known-good climate control unit and recheck. If the symptom/indication goes away, replace the original climate control unit. NO - Replace the component that caused the voltage drop. DTC B1235 OR DTC INDICATOR L AND AUTO: A PROBLEM IN THE DRIVER'S AIR MIX CONTROL LINKAGE, DOOR, OR MOTOR CIRCUIT 1. Clear the DTC with the HDS. 2. Turn the ignition switch to LOCK (0), and then ON (II). 3. Do the self-diagnostic with the HDS (see HOW TO USE THE SELF-DIAGNOSTIC FUNCTION WITH THE HDS ) or climate control unit (see HOW TO USE THE SELF-DIAGNOSTIC FUNCTION WITHOUT THE HDS ). 4. Check for DTCs. Is DTC B1235 or L and AUTO indicated? YES - Go to step 5. NO - Intermittent failure, check for loose wires or poor connections on the driver's air mix control motor circuit. 2008 Acura MDX 2007-09 HVAC Climate Control - MDX Microsoft Saturday, May 22, 2010 11:20:30 AM Page 69 © 2006 Mitchell Repair Information Company, LLC.
  • 70. 5. Turn the ignition switch to LOCK (0). 6. Test the driver's air mix control motor (see DRIVER'S AIR MIX CONTROL MOTOR TEST ). Is the driver's air mix control motor OK? YES - Go to step 7. NO - Replace the driver's air mix control motor (see DRIVER'S AIR MIX CONTROL MOTOR REPLACEMENT ), or repair the driver's air mix control linkage or door. 7. Disconnect the driver's air mix control motor 7P connector. 8. Disconnect climate control unit connector A (40P). 9. Check for continuity between the following terminals of climate control unit connector A (40P) and the driver's air mix control motor 7P connector. Fig. 68: Identifying Continuity Between Climate Control Unit A (40P) And Driver's Air Mix Control Motor 7P Connector Terminal Courtesy of AMERICAN HONDA MOTOR CO., INC. Is there continuity? YES - Go to step 10. NO - Repair open in the wire(s) between the climate control unit and the driver's air mix control motor. 10. Check for continuity between body ground and climate control unit connector A (40P) No. 12 and No. 13 terminals individually. 40P 7P No. 12 No. 2 No. 13 No. 1 2008 Acura MDX 2007-09 HVAC Climate Control - MDX Microsoft Saturday, May 22, 2010 11:20:30 AM Page 70 © 2006 Mitchell Repair Information Company, LLC.
  • 71. Fig. 69: Identifying Continuity Between Body Ground And Climate Control Unit Connector A (40P) No. 12 And No. 13 Terminals Courtesy of AMERICAN HONDA MOTOR CO., INC. Is there continuity? YES - Repair short to body ground in the wire(s) between the climate control unit and the driver's air mix control motor. NO - Substitute a known-good climate control unit, and recheck. If the symptom/indication goes away, replace the original climate control unit. DTC B1236 OR DTC INDICATOR M AND AUTO: AN OPEN IN THE PASSENGER'S AIR MIX CONTROL MOTOR CIRCUIT 1. Clear the DTC with the HDS. 2. Turn the ignition switch to LOCK (0), and then ON (II). 3. Do the self-diagnostic with the HDS (see HOW TO USE THE SELF-DIAGNOSTIC FUNCTION WITH THE HDS ) or climate control unit (see HOW TO USE THE SELF-DIAGNOSTIC FUNCTION WITHOUT THE HDS ). 4. Check for DTCs. Is DTC B1236 or M and AUTO indicated? YES - Go to step 5. NO - Intermittent failure, check for loose wires or poor connections on the passenger's air mix control motor circuit. 5. Turn the ignition switch to LOCK (0). 6. Test the passenger's air mix control motor (see PASSENGER'S AIR MIX CONTROL MOTOR TEST ). Is the passenger's air mix control motor OK? 2008 Acura MDX 2007-09 HVAC Climate Control - MDX Microsoft Saturday, May 22, 2010 11:20:30 AM Page 71 © 2006 Mitchell Repair Information Company, LLC.
  • 72. YES - Go to step 7. NO - Replace the passenger's air mix control motor (see PASSENGER'S AIR MIX CONTROL MOTOR REPLACEMENT ). 7. Disconnect the passenger's air mix control motor 7P connector. 8. Disconnect climate control unit connector A (40P). 9. Check for continuity between the following terminals of climate control unit connector A (40P) and the passenger's air mix control motor 7P connector. Fig. 70: Identifying Continuity Between Climate Control Unit A (40P) And Passenger's Air Mix Control Motor 7P Connector Terminals Courtesy of AMERICAN HONDA MOTOR CO., INC. Is there continuity? YES - Check for loose wires or poor connections at climate control unit connector A (40P) and at the passenger's air mix control motor 7P connector. If the connections are good, substitute a known-good climate control unit and recheck. If the symptom/ indication goes away, replace the original climate control unit. NO - Repair open in the wire(s) between the climate control unit and the passenger's air mix control motor. DTC B1237 OR DTC INDICATOR N AND AUTO: A SHORT IN THE PASSENGER'S AIR MIX 40P 7P No. 6 No. 7 No. 8 No. 5 No. 30 No. 3 2008 Acura MDX 2007-09 HVAC Climate Control - MDX Microsoft Saturday, May 22, 2010 11:20:30 AM Page 72 © 2006 Mitchell Repair Information Company, LLC.
  • 73. CONTROL MOTOR CIRCUIT 1. Clear the DTC with the HDS. 2. Turn the ignition switch to LOCK (0), and then ON (II). 3. Do the self-diagnostic with the HDS (see HOW TO USE THE SELF-DIAGNOSTIC FUNCTION WITH THE HDS ) or climate control unit (see HOW TO USE THE SELF-DIAGNOSTIC FUNCTION WITHOUT THE HDS ). 4. Check for DTCs. Is DTC B1237 or N and AUTO indicated? YES - Go to step 5. NO - Intermittent failure. 5. Check for DTCs. Are these DTCs also present; B1234 or K and AUTO, and/or B1245 or G, and/or B2968 or A and WINDSHIELD DEFROST, and/or B2980 or B and WINDSHIELD DEFROST? YES - Go to step 13. NO - Go to step 6. 6. Turn the ignition switch to LOCK (0). 7. Test the passenger's air mix control motor (see PASSENGER'S AIR MIX CONTROL MOTOR TEST ). Is the passenger's air mix control motor OK? YES - Go to step 8. NO - Replace the passenger's air mix control motor (see PASSENGER'S AIR MIX CONTROL MOTOR REPLACEMENT ). 8. Disconnect the passenger's air mix control motor 7P connector. 9. Disconnect climate control unit connector A (40P). 10. Check for continuity between body ground and climate control unit connector A (40P) No. 30 terminal. 2008 Acura MDX 2007-09 HVAC Climate Control - MDX Microsoft Saturday, May 22, 2010 11:20:30 AM Page 73 © 2006 Mitchell Repair Information Company, LLC.
  • 74. Fig. 71: Identifying Continuity Between Body Ground And Climate Control Unit Connector A (40P) No. 30 Terminal Courtesy of AMERICAN HONDA MOTOR CO., INC. Is there continuity? YES - Repair short to body ground in the wire between the climate control unit and the passenger's air mix control motor. NO - Go to step 11. 11. Check for continuity between climate control unit connector A (40P) No. 6 and No. 30 terminals. Fig. 72: Identifying Continuity Between Climate Control Unit Connector A (40P) No. 6 And No. 30 Terminals Courtesy of AMERICAN HONDA MOTOR CO., INC. Is there continuity? YES - Repair the short in the wires. NO - Go to step 12. 12. Turn the ignition switch to ON (II), and measure the voltage between climate control unit connector A (40P) No. 30 terminal and body ground. 2008 Acura MDX 2007-09 HVAC Climate Control - MDX Microsoft Saturday, May 22, 2010 11:20:30 AM Page 74 © 2006 Mitchell Repair Information Company, LLC.
  • 75. Fig. 73: Measuring Voltage Between Climate Control Unit Connector A (40P) No. 30 Terminal And Body Ground Courtesy of AMERICAN HONDA MOTOR CO., INC. Is there any voltage? YES - Repair short to power in the wire(s) between the climate control unit and the passenger's air mix control motor. This short may also damage the climate control unit. Repair the short to power before replacing the climate control unit. NO - Substitute a known-good climate control unit, and recheck. If the symptom/indication goes away, replace the original climate control unit. 13. Turn the ignition switch to LOCK (0), and disconnect the climate control unit. 14. Disconnect these items:  Driver's air mix control motor  Passenger's air mix control motor  Rear air mix control motor  Humidity/in-car temperature sensor  A/C pressure sensor 15. Check for continuity between climate control unit connector A (40P) No. 6 terminal and body ground. Fig. 74: Identifying Continuity Between Climate Control Unit Connector A (40P) No. 6 Terminal And Body Ground Courtesy of AMERICAN HONDA MOTOR CO., INC. 2008 Acura MDX 2007-09 HVAC Climate Control - MDX Microsoft Saturday, May 22, 2010 11:20:30 AM Page 75 © 2006 Mitchell Repair Information Company, LLC.
  • 76. Is there continuity? YES - Repair short to body ground in the wire. NO - Go to step 16. 16. Turn the ignition switch to ON (II), and check the same terminal for voltage to body ground. Fig. 75: Identifying Same Terminal For Voltage To Body Ground Courtesy of AMERICAN HONDA MOTOR CO., INC. Is there any voltage? YES - Repair short to power in the wire. This short may have also damaged the climate control unit. Repair the short to power before replacing the climate control unit. NO - Go to step 17. 17. Turn the ignition switch to LOCK (0). 18. Reconnect the climate control unit connector (40P). 19. Turn the ignition switch to ON (II), and measure the voltage between climate control unit connector A (40P) No. 6 terminal and body ground. Fig. 76: Measuring Voltage Between Climate Control Unit Connector A (40P) No. 6 Terminal And Body Ground Courtesy of AMERICAN HONDA MOTOR CO., INC. 2008 Acura MDX 2007-09 HVAC Climate Control - MDX Microsoft Saturday, May 22, 2010 11:20:30 AM Page 76 © 2006 Mitchell Repair Information Company, LLC.
  • 77. Is there about 5 V? YES - Go to step 20. NO - Check for a loose wire or poor connection at climate control unit connector A (40P). If the connection is good, substitute a known-good climate control unit and recheck. If the symptom/ indication goes away, replace the original climate control unit. 20. While checking the same terminal for voltage to ground, reconnect these items individually and note the voltage reading each time:  Driver's air mix control motor  Passenger's air mix control motor  Rear air mix control motor  Humidity/in-car temperature sensor  A/C pressure sensor Fig. 77: Identifying Same Terminal For Voltage To Ground Courtesy of AMERICAN HONDA MOTOR CO., INC. Does the voltage remain at about 5 V? YES - Substitute a known-good climate control unit and recheck. If the symptom/indication goes away, replace the original climate control unit. NO - Replace the component that caused the voltage drop. DTC B1238 OR DTC INDICATOR P AND AUTO: A PROBLEM IN THE PASSENGER'S AIR MIX CONTROL LINKAGE, DOOR, OR MOTOR CIRCUIT 1. Clear the DTC with the HDS. 2. Turn the ignition switch to LOCK (0), and then ON (II). 3. Do the self-diagnostic with the HDS (see HOW TO USE THE SELF-DIAGNOSTIC FUNCTION WITH THE HDS ) or climate control unit (see HOW TO USE THE SELF-DIAGNOSTIC FUNCTION WITHOUT THE HDS ). 2008 Acura MDX 2007-09 HVAC Climate Control - MDX Microsoft Saturday, May 22, 2010 11:20:30 AM Page 77 © 2006 Mitchell Repair Information Company, LLC.
  • 78. 4. Check for DTCs. Is DTC B1238 or P and AUTO indicated? YES - Go to step 5. NO - Intermittent failure, check for loose wires or poor connections on the passenger's air mix control motor circuit. 5. Turn the ignition switch to LOCK (0). 6. Test the passenger's air mix control motor (see PASSENGER'S AIR MIX CONTROL MOTOR TEST ). Is the passenger's air mix control motor OK? YES - Go to step 7. NO - Replace the passenger's air mix control motor (see PASSENGER'S AIR MIX CONTROL MOTOR REPLACEMENT ), or repair the passenger's air mix control linkage or door. 7. Disconnect the passenger's air mix control motor 7P connector. 8. Disconnect climate control unit connector A (40P). 9. Check for continuity between the following terminals of climate control unit connector A (40P) and the passenger's air mix control motor 7P connector. Fig. 78: Identifying Continuity Between Climate Control Unit A (40P) And Passenger's Air Mix Control Motor 7P Connector Terminal 40P 7P No. 14 No. 2 No. 15 No. 1 2008 Acura MDX 2007-09 HVAC Climate Control - MDX Microsoft Saturday, May 22, 2010 11:20:30 AM Page 78 © 2006 Mitchell Repair Information Company, LLC.
  • 79. Courtesy of AMERICAN HONDA MOTOR CO., INC. Is there continuity? YES - Go to step 10. NO - Repair open in the wire(s) between the climate control unit and the passenger's air mix control motor. 10. Check for continuity between body ground and climate control unit connector A (40P) No. 14 and No. 15 terminals individually. Fig. 79: Identifying Continuity Between Body Ground And Climate Control Unit Connector A (40P) No. 14 And No. 15 Terminals Courtesy of AMERICAN HONDA MOTOR CO., INC. Is there continuity? YES - Repair short to body ground in the wire(s) between the climate control unit and the passenger's air mix control motor. NO - Substitute a known-good climate control unit, and recheck. If the symptom/indication goes away, replace the original climate control unit. DTC B1239 OR DTC INDICATOR A: AN OPEN OR SHORT IN THE FRONT MODE CONTROL MOTOR CIRCUIT 1. Clear the DTC with the HDS. 2. Turn the ignition switch to LOCK (0), and then ON (II). 3. Do the self-diagnostic with the HDS (see HOW TO USE THE SELF-DIAGNOSTIC FUNCTION WITH THE HDS ) or climate control unit (see HOW TO USE THE SELF-DIAGNOSTIC FUNCTION WITHOUT THE HDS ). 4. Check for DTCs. Is DTC B1239 or A indicated? 2008 Acura MDX 2007-09 HVAC Climate Control - MDX Microsoft Saturday, May 22, 2010 11:20:30 AM Page 79 © 2006 Mitchell Repair Information Company, LLC.
  • 80. YES - Go to step 5. NO - Intermittent failure, check for loose wires or poor connections on the front mode control motor circuit. 5. Turn the ignition switch to LOCK (0). 6. Test the front mode control motor (see FRONT MODE CONTROL MOTOR TEST ). Is the front mode control motor OK? YES - Go to step 7. NO - Replace the front mode control motor (see FRONT MODE CONTROL MOTOR REPLACEMENT ). 7. Disconnect the front mode control motor 7P connector. 8. Disconnect climate control unit connector A (40P). 9. Check for continuity between the following terminals of climate control unit connector A (40P) and the front mode control motor 7P connector. 40P 7P No. 8 No. 7 No. 31 No. 6 No. 32 No. 5 No. 33 No. 4 No. 34 No. 3 2008 Acura MDX 2007-09 HVAC Climate Control - MDX Microsoft Saturday, May 22, 2010 11:20:30 AM Page 80 © 2006 Mitchell Repair Information Company, LLC.
  • 81. Fig. 80: Identifying Continuity Between Climate Control Unit A (40P) And Front Mode Control Motor 7P Connector Terminals Courtesy of AMERICAN HONDA MOTOR CO., INC. Is there continuity? YES - Go to step 10. NO - Repair open in the wire(s) between the climate control unit and the front mode control motor. 10. Check for continuity between body ground and climate control unit connector A (40P) No. 31,32, 33, and 34 terminals individually. Fig. 81: Identifying Continuity Between Body Ground And Climate Control Unit Connector A (40P) No. 31,32, 33, And 34 Terminals Courtesy of AMERICAN HONDA MOTOR CO., INC. Is there continuity? YES - Repair short to body ground in the wire(s) between the climate control unit and the front mode control motor. NO - Go to step 11. 11. Check for continuity between climate control unit connector A (40P) terminals as follows. TERMINALS REFERENCE CHART Is there continuity between any of the terminals? YES - Repair the short in the wires. From terminal To terminals 31 32, 33, 34 32 33, 34 33 34 2008 Acura MDX 2007-09 HVAC Climate Control - MDX Microsoft Saturday, May 22, 2010 11:20:30 AM Page 81 © 2006 Mitchell Repair Information Company, LLC.
  • 82. NO - Go to step 12. 12. Turn the ignition switch to ON (II), and check the same terminals for voltage to body ground. Fig. 82: Identifying Same Terminals For Voltage To Body Ground Courtesy of AMERICAN HONDA MOTOR CO., INC. Is there any voltage? YES - Repair short to power in the wire(s) between the climate control unit and the front mode control motor. This short may also damage the climate control unit. Repair the short to power before replacing the climate control unit. NO - Check for loose wires or poor connections at climate control unit connector A (40P) and at the front mode control motor 7P connector. If the connections are good, substitute a known-good climate control unit, and recheck. If the symptom/ indication goes away, replace the original climate control unit. DTC B1240 OR DTC INDICATOR B: A PROBLEM IN THE FRONT MODE CONTROL LINKAGE, DOORS, OR MOTOR CIRCUIT 1. Clear the DTC with the HDS. 2. Turn the ignition switch to LOCK (0), and then ON (II). 3. Do the self-diagnostic with the HDS (see HOW TO USE THE SELF-DIAGNOSTIC FUNCTION WITH THE HDS ) or climate control unit (see HOW TO USE THE SELF-DIAGNOSTIC FUNCTION WITHOUT THE HDS ). 4. Check for DTCs. Is DTC B1240 or B indicated? YES - Go to step 5. NO - Intermittent failure, check for loose wires or poor connections on the mode control motor circuit. 5. Turn the ignition switch to LOCK (0). 2008 Acura MDX 2007-09 HVAC Climate Control - MDX Microsoft Saturday, May 22, 2010 11:20:30 AM Page 82 © 2006 Mitchell Repair Information Company, LLC.