
Empfohlen
Empfohlen
Weitere ähnliche Inhalte
Ähnlich wie Experiment 4.docx
Ähnlich wie Experiment 4.docx (20)
Kürzlich hochgeladen
Kürzlich hochgeladen (20)
Experiment 4.docx
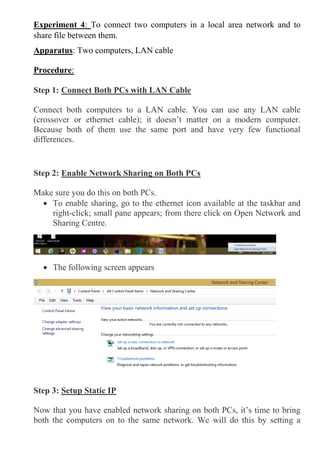
- 1. Experiment 4: To connect two computers in a local area network and to share file between them. Apparatus: Two computers, LAN cable Procedure: Step 1: Connect Both PCs with LAN Cable Connect both computers to a LAN cable. You can use any LAN cable (crossover or ethernet cable); it doesn’t matter on a modern computer. Because both of them use the same port and have very few functional differences. Step 2: Enable Network Sharing on Both PCs Make sure you do this on both PCs. To enable sharing, go to the ethernet icon available at the taskbar and right-click; small pane appears; from there click on Open Network and Sharing Centre. The following screen appears Step 3: Setup Static IP Now that you have enabled network sharing on both PCs, it’s time to bring both the computers on to the same network. We will do this by setting a
- 2. static IP address of the same class. Just like the previous step, you need to do this on both PCs. The following are the steps. Click on Change Adapter Settings On the next window, you will see the active connections which should be Ethernet, since both PCs are connected with a physical LAN cable. Click on the Ethernet link. A new dialog box will open, here click on the Properties button. In the next pop-up, select “Internet Protocol Version 4 (TCP/IPv4)”. Now, click on Properties. This will open another dialogue box. Here, you need to configure the two PCs with different IP settings. On computer 1, select the option “Use the following IP address.” and, put the following values IP Address: 192.168.1.11
- 3. Subnet mask: 225.225.225.0 On the second computer, do similar steps, but flip the IP address and Default gateway values IP address: 192.168.1.1 Subnet mask: 225.225.225.0 What we are doing is keeping the subnet mask the same and changing the IP address. Next, open your Window’s File Explorer and click on Network tab at the left side of the window. If you have set up everything right, both the PCs should appear in this Network window on both computers. Now, you can just click on the other PC’s icon and browse the file. But wait, you still need to configure one last setting. Step 4: Change Sharing Options Go to control panel; click on Network and Sharing Centre
- 4. In the next window that appears; turn on all the setting options. Step 5: Network List Manager Policy Search secpol.msc in the search tab. A window appears; click on Network List Manager Policies and select Private option.
- 5. Step 6: Share a folder Assuming that you have connected the cable properly, enabled the sharing options, and configured the IP addresses. Now, it is time to send files from one PC to another. For that, you first need to share the target folder on LAN. To check whether both the PCs are connected; open command prompt (either of the PCs) and type the command “ping 192.168.1.1 (IP address of the other PC)” If you see same as in the above image means the connection has been established successfully. Next, select the folder you want to share and right-click on it. From the context menu, navigate to “Give access to” and select the option “Specific People.” In the File Sharing window, choose Everyone from the drop-down menu. Click on the Add button next to it and finally hit the Share button.
- 6. Once you have shared it, the next window will show you the network location of the folder. That’s it. Just go back to the other PC from where you want to access the file, open the Networks panel and click on the other computer’s name. Here, you will see the folder you just shared. From there, just open the folder and transfer the files and folders as you normally do. i.e., by copy and paste. Similarly, you can repeat the same steps from the other computer.