1. Ángel Acaymo M. G.
Electrónica PIC
http://electronica-pic.blogspot.com.es
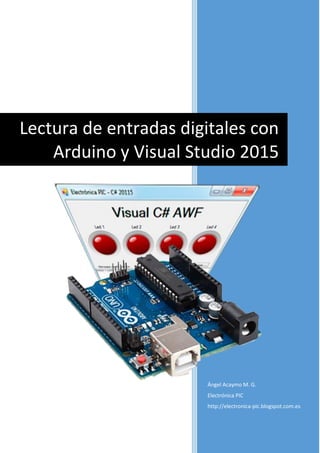
Lectura de entradas digitales con
Arduino y Visual Studio 2015
2. LECTURA DE ENTRADAS DIGITALES CON ARDUINO Y VISUAL STUDIO 2015
Electrónica PIC | http://electronica-pic.blogspot.com.es 1
Índice
¿Qué puerto uso? ………………………………………………………………………………………………..…………. 3.
Códigos de Arduino ……………………………………………………………………………………………………….…7.
Visual C# AWF 2015 ………………………………………………………………………………………………….…... 15.
Visual C# WPF 2015 ………………………………………………………………………………………………..…...… 34.
Visual Basic AWF 2015 ……………………………………………………………………………………..……………. 50.
Visual Basic WPF 2015 ………………………………………………………………………………………………….… 68.
Visual C++ CLR 2015 ………………………………………………………………………………………………………... 84.
Vídeos …………………………………………………………………………………………………………………………..… 121.
Enlaces ………………………………………………………………………………………………………………………….. 123.
Autor ……………………………………………………………………………………………………………………..……….. 124.
3. LECTURA DE ENTRADAS DIGITALES CON ARDUINO Y VISUAL STUDIO 2015
Electrónica PIC | http://electronica-pic.blogspot.com.es 2
En esta ocasión se trata de leer las entradas digitales de Arduino UNO r3 y mostrar los
resultados con tu propia interfaz hecha bajo Visual Studio Community 2015 en cualquiera de
los lenguajes y tecnologías disponibles como Visual C#, Visual C++, Visual Basic .net, WPF C# y
WPF VB. No olvidar que también les vale Visual Studio Express 2015, en general es la versión
más capada, lo que necesitamos en este momento lo incluye sin problemas.
Hay dos códigos de ejemplo en Arduino. De los 4 interruptores como entradas digitales que
vamos a usar, muestra los resultados en Visual Studio en forma de cambiar los colores como
un panel de verde si está activado, rojo si está apagado, un label que indica palabra como
Activado, Desactivado y una imagen con pictureBox cuando muestra un Led en forma de
dibujo apagado y el otro encendido.
El otro ejemplo de Arduino se trata de comprobar los estados de los interruptores nada más
encender Arduino o Resetearlo, a parte que muestra la información en el componente
richTextBox en Visual Studio.
Descargar Visual Studio Community 2015:
https://www.visualstudio.com/es-es/products/visual-studio-community-vs.aspx
Descargar Visual Studio Express 2015:
https://www.visualstudio.com/es-es/products/visual-studio-express-vs.aspx
Descargar Arduino IDE:
https://www.arduino.cc/en/Main/Software
Descargar códigos fuentes de ejemplos de Visual Studio, Arduino e imágenes de los Led:
Enlace
Enlace
4. LECTURA DE ENTRADAS DIGITALES CON ARDUINO Y VISUAL STUDIO 2015
Electrónica PIC | http://electronica-pic.blogspot.com.es 3
¿Qué puerto uso?
Para saber que puerto estamos usando con Arduino.
Entras desde Windows “InicioPanel de controlTodos los elementos de Panel de
controlSistema”.
Luego pulsas “Administrador de dispositivos”.
5. LECTURA DE ENTRADAS DIGITALES CON ARDUINO Y VISUAL STUDIO 2015
Electrónica PIC | http://electronica-pic.blogspot.com.es 4
En mi caso usaré el COM4, en tu caso puede ser diferente, así que para todo usarás el que te
haya tocado.
6. LECTURA DE ENTRADAS DIGITALES CON ARDUINO Y VISUAL STUDIO 2015
Electrónica PIC | http://electronica-pic.blogspot.com.es 5
Haz doble clic en Arduino UNO (COM4) para mostrar la ventana Propiedades: Arduino UNO
(COM4). En este caso para todo usaré la configuración que obtienes en la imagen, tanto para
Arduino UNO, en el Monitor Serie, en tu interfaz hecho con Visual Studio y en el código de
Arduino.
7. LECTURA DE ENTRADAS DIGITALES CON ARDUINO Y VISUAL STUDIO 2015
Electrónica PIC | http://electronica-pic.blogspot.com.es 6
8. LECTURA DE ENTRADAS DIGITALES CON ARDUINO Y VISUAL STUDIO 2015
Electrónica PIC | http://electronica-pic.blogspot.com.es 7
Códigos de Arduino
Ejemplo Arduino 1:
Entrada digital con Arduino y Visual Studio 2015. Muestra los estados de las entradas digitales
en componentes Panel, label y pictureBox de Visual Studio.
int estadoBoton=0; // Guardará el estado del botón HIGH o LOW.
int anteriorBoton=0;
char caracter;
String comando;
int flagMensaje=0;
void setup()
{
pinMode(13,OUTPUT); // Donde está el Led 13.
pinMode(8,INPUT); // Entrada digital donde está el pulsador.
Serial.begin(115200);
}
void loop()
{
estadoBoton=digitalRead(8); // Leer entrada digital número 8.
// Si el pulsador está pulsado, se enciende el Led 13 y
// envía comando HIGH por el puerto serie.
if(estadoBoton != anteriorBoton) // Comprueba si ha habido un cambio en el estado del
botón.
{
flagMensaje = 0; // Resetea la bandera a 0.
anteriorBoton = estadoBoton; // Guarda el estado actual del botón.
}
if (estadoBoton == HIGH && flagMensaje == 0) // Comprueba que el botón esté pulsado y que
no se haya enviado el mensaje.
{
digitalWrite(13,HIGH);
Serial.write("ON");
delay(50);
if(flagMensaje == 0) // Si se envió el mensaje aumenta la variable a 1 para no enviarlo la
próxima vez.
flagMensaje++;
}
9. LECTURA DE ENTRADAS DIGITALES CON ARDUINO Y VISUAL STUDIO 2015
Electrónica PIC | http://electronica-pic.blogspot.com.es 8
// De lo contrario, Led 13 apagado y envía LOW al puerto serie.
else if(flagMensaje == 0) // Si el botón no está presionado y aún no se envía el mensaje.
{
digitalWrite(13,LOW);
Serial.write("OFF");
delay(50);
if(flagMensaje == 0) // Si se envió el mensaje aumenta la variable en 1 para no enviarla la
próxima vez.
flagMensaje++;
}
}
10. LECTURA DE ENTRADAS DIGITALES CON ARDUINO Y VISUAL STUDIO 2015
Electrónica PIC | http://electronica-pic.blogspot.com.es 9
Ejemplo Arduino 2:
Muestra los datos o entradas digitales en el componente richTextBox de Visual Studio en
forma de texto, a parte si enciende o resetea físicamente Arduino UNO, también muestra los
últimos interruptores que tienes activados o no en ese momento. Si ejecutas a aplicación, de
entrada no muestra nada, pulsas el botón “Actualizar estados” la interfaz que has creado con
Visual Studio para que te muestre los estados de las entradas digitales que tienes en ese
momento. En el Monitor Serie de Arduino IDE escribes el comando ACTUALIZAR, recibe la
misma orden para comprobar los estados.
byte estadoBoton1, estadoBoton2, estadoBoton3, estadoBoton4;
byte estadoBotonAnt1, estadoBotonAnt2, estadoBotonAnt3, estadoBotonAnt4;
char buffer[44];
char caracter;
String comando;
void setup()
{
pinMode(13,OUTPUT); // Donde está el Led 13.
pinMode(12,OUTPUT);
pinMode(11,OUTPUT);
pinMode(10,OUTPUT);
pinMode(8,INPUT); // Entrada digital 8.
pinMode(7,INPUT);
pinMode(6,INPUT);
pinMode(5,INPUT);
Serial.begin(115200);
leeEstado();
printEstado();
}
void loop() {
leeEstado();
if ((estadoBoton1 != estadoBotonAnt1) ||
(estadoBoton2 != estadoBotonAnt2) ||
(estadoBoton3 != estadoBotonAnt3) ||
(estadoBoton4 != estadoBotonAnt4))
{
printEstado();
delay(50);
}
11. LECTURA DE ENTRADAS DIGITALES CON ARDUINO Y VISUAL STUDIO 2015
Electrónica PIC | http://electronica-pic.blogspot.com.es 10
while (Serial.available() > 0)
{
caracter= Serial.read();
comando.concat(caracter);
delay(10);
}
if (comando.equals("ACTUALIZAR") == true)
{
printEstado();
}
// Limpiamos la cadena para volver a recibir el siguiente comando.
comando="";
}
// Funciones.
void leeEstado()
{
estadoBoton1 = digitalRead(8);
estadoBoton2 = digitalRead(7);
estadoBoton3 = digitalRead(6);
estadoBoton4 = digitalRead(5);
}
void printEstado(void)
{
digitalWrite(13,estadoBoton1);
digitalWrite(12,estadoBoton2);
digitalWrite(11,estadoBoton3);
digitalWrite(10,estadoBoton4);
sprintf(buffer,"%s %s %s %s",
estadoBoton1?"HIGH 1":"LOW 1",
estadoBoton2?"HIGH 2":"LOW 1",
estadoBoton3?"HIGH 3":"LOW 3",
estadoBoton4?"HIGH 4":"LOW 4");
12. LECTURA DE ENTRADAS DIGITALES CON ARDUINO Y VISUAL STUDIO 2015
Electrónica PIC | http://electronica-pic.blogspot.com.es 11
Serial.println(buffer);
estadoBotonAnt1 = estadoBoton1;
estadoBotonAnt2 = estadoBoton2;
estadoBotonAnt3 = estadoBoton3;
estadoBotonAnt4 = estadoBoton4;
}
13. LECTURA DE ENTRADAS DIGITALES CON ARDUINO Y VISUAL STUDIO 2015
Electrónica PIC | http://electronica-pic.blogspot.com.es 12
Ejemplo Arduino 3:
Igual que en el anterior exceptuando el cambio de nombres de la salida de los datos hacia
visual Studio.
byte estadoBoton1,
estadoBoton2,
estadoBoton3,
estadoBoton4;
byte estadoBotonAnt1,
estadoBotonAnt2,
estadoBotonAnt3,
estadoBotonAnt4;
char buffer[36];
char caracter;
String comando;
void setup()
{
pinMode(13,OUTPUT); // Donde está el Led 13.
pinMode(12,OUTPUT);
pinMode(11,OUTPUT);
pinMode(10,OUTPUT);
pinMode(8,INPUT); // Entrada digital 8.
pinMode(7,INPUT);
pinMode(6,INPUT);
pinMode(5,INPUT);
Serial.begin(115200);
leeEstado();
printEstado();
}
void loop()
{
leeEstado();
if ((estadoBoton1 != estadoBotonAnt1) ||
(estadoBoton2 != estadoBotonAnt2) ||
(estadoBoton3 != estadoBotonAnt3) ||
(estadoBoton4 != estadoBotonAnt4))
{
printEstado();
delay(100);
}
14. LECTURA DE ENTRADAS DIGITALES CON ARDUINO Y VISUAL STUDIO 2015
Electrónica PIC | http://electronica-pic.blogspot.com.es 13
while (Serial.available() > 0)
{
caracter= Serial.read();
comando.concat(caracter);
delay(10);
}
if (comando.equals("ACTUALIZAR") == true)
{
printEstado();
}
// Limpiamos la cadena para volver a recibir el siguiente comando.
comando="";
}
// Funciones.
void leeEstado()
{
estadoBoton1 = digitalRead(8);
estadoBoton2 = digitalRead(7);
estadoBoton3 = digitalRead(6);
estadoBoton4 = digitalRead(5);
}
void printEstado(void)
{
digitalWrite(13,estadoBoton1);
digitalWrite(12,estadoBoton2);
digitalWrite(11,estadoBoton3);
digitalWrite(10,estadoBoton4);
sprintf(buffer,"%s %s %s %s",
estadoBoton1?"1=ON":"1=OFF",
estadoBoton2?"2=ON":"2=OFF",
estadoBoton3?"3=ON":"3=OFF",
estadoBoton4?"4=ON":"4=OFF");
Serial.print(buffer);
estadoBotonAnt1 = estadoBoton1;
estadoBotonAnt2 = estadoBoton2;
estadoBotonAnt3 = estadoBoton3;
estadoBotonAnt4 = estadoBoton4;
}
15. LECTURA DE ENTRADAS DIGITALES CON ARDUINO Y VISUAL STUDIO 2015
Electrónica PIC | http://electronica-pic.blogspot.com.es 14
16. LECTURA DE ENTRADAS DIGITALES CON ARDUINO Y VISUAL STUDIO 2015
Electrónica PIC | http://electronica-pic.blogspot.com.es 15
Visual C# AWF 2015
17. LECTURA DE ENTRADAS DIGITALES CON ARDUINO Y VISUAL STUDIO 2015
Electrónica PIC | http://electronica-pic.blogspot.com.es 16
Ejemplo 1:
Este ejemplo corresponde al código del Ejemplo 1 de Arduino.
Creamos un proyecto nuevo con Visual C#.
Selecciona Entorno clásico en Visual C#, Aplicación de Windows Forms, he puesto como
nombre del proyecto en este caso Entrada_Arduino_AWF_1_CS, luego pulsar Aceptar.
18. LECTURA DE ENTRADAS DIGITALES CON ARDUINO Y VISUAL STUDIO 2015
Electrónica PIC | http://electronica-pic.blogspot.com.es 17
Arrastramos al formulario los componentes que indica en el Cuadro de Herramientas.
Cambiamos las propiedades de cada componente o controles.
Panel:
Propiedad Cambie a
BorderStyle FixedSingle
Label:
Propiedad Cambie a
(Name) Label_Entrada
Text Leyendo...
PictureBox:
Propiedad Cambie a
(Name) pictureBox_Dibujo
SizeMode StretchImage
19. LECTURA DE ENTRADAS DIGITALES CON ARDUINO Y VISUAL STUDIO 2015
Electrónica PIC | http://electronica-pic.blogspot.com.es 18
Seguimos en el componente PictureBox, pulsamos … en la propiedad Image como indica abajo
para introducir dos imágenes de dos Led, encendido y apagado.
20. LECTURA DE ENTRADAS DIGITALES CON ARDUINO Y VISUAL STUDIO 2015
Electrónica PIC | http://electronica-pic.blogspot.com.es 19
Se abre un cuadro llamado Seleccionar recurso en el cual podemos añadir las imágenes que
queramos.
Pulsamos el botón Importar… y elegimos las imágenes de Leds que queramos, en este caso
selecciono el rojo apagado y encendido.
21. LECTURA DE ENTRADAS DIGITALES CON ARDUINO Y VISUAL STUDIO 2015
Electrónica PIC | http://electronica-pic.blogspot.com.es 20
Queda guardado en recursos.
Pulsa Aceptar.
Dejar claro que en la propiedad SizeMode del PicturreBox le he puesto StretchImage par
redimensionar el dibujo o imagen al cuadro.
En cuanto al formulario principal, en la propiedad StartPosition se ha cambiado a CenterScreen
para cuando lo compilemos o lo ejecutemos salga en el centro de la pantalla.
22. LECTURA DE ENTRADAS DIGITALES CON ARDUINO Y VISUAL STUDIO 2015
Electrónica PIC | http://electronica-pic.blogspot.com.es 21
Añade el componente SerialPort haciendo doble clic en él o arrastrándolo al formulario.
23. LECTURA DE ENTRADAS DIGITALES CON ARDUINO Y VISUAL STUDIO 2015
Electrónica PIC | http://electronica-pic.blogspot.com.es 22
Cambiamos las propiedades indicadas abajo.
SerialPort:
Tanto en Visual Studio como Arduino UNO y Arduino IDE tienen que funcionar en el mismo
puerto y baudios, en mi caso es:
Propiedad Cambie a
BuadRate 115200
PortName COM4
StopBits Two
En tu caso puede ser diferente, tanto el puerto y los baudios el que desee.
24. LECTURA DE ENTRADAS DIGITALES CON ARDUINO Y VISUAL STUDIO 2015
Electrónica PIC | http://electronica-pic.blogspot.com.es 23
Tener claro estas líneas al recibir datos desde Arduino como ON y OFF.
25. LECTURA DE ENTRADAS DIGITALES CON ARDUINO Y VISUAL STUDIO 2015
Electrónica PIC | http://electronica-pic.blogspot.com.es 24
Ejemplo 1:
Código fuente del Ejemplo 1 de Visual C# AWF.
using System;
using System.Collections.Generic;
using System.ComponentModel;
using System.Data;
using System.Drawing;
using System.Linq;
using System.Text;
using System.Threading.Tasks;
using System.Windows.Forms;
using System.IO.Ports; // No olvidar.
namespace Entrada_Arduino_AWF_1_CS
{
public partial class Form1 : Form
{
// Utilizaremos un string como buffer de recepción.
string Recibidos;
public Form1()
{
InitializeComponent();
if (!serialPort1.IsOpen)
{
try
{
serialPort1.Open();
}
catch (System.Exception ex)
{
MessageBox.Show(ex.ToString());
}
serialPort1.DataReceived += new
SerialDataReceivedEventHandler(Recepcion);
}
}
// Al recibir datos.
private void Recepcion(object sender, SerialDataReceivedEventArgs e)
{
// Acumula los caracteres recibidos a nuestro 'buffer' (string).
Recibidos += serialPort1.ReadExisting();
// Invocar o llamar al proceso de tramas.
Invoke(new EventHandler(Actualizar));
}
26. LECTURA DE ENTRADAS DIGITALES CON ARDUINO Y VISUAL STUDIO 2015
Electrónica PIC | http://electronica-pic.blogspot.com.es 25
// Procesar los datos recibidos en el bufer y extraer tramas completas.
private void Actualizar(object sender, EventArgs e)
{
switch (Recibidos)
{
case "ON":
panel1.BackColor = Color.Green;
label_Lectura.Text = "Activado";
pictureBox_Dibujo.Image =
Properties.Resources.Led_rojo_encendido;
Recibidos = "";
break;
case "OFF":
panel1.BackColor = Color.Red;
label_Lectura.Text = "Desactivado";
pictureBox_Dibujo.Image =
Properties.Resources.Led_rojo_apagado;
Recibidos = "";
break;
}
}
// Cuando cierre la aplicación.
private void Form1_FormClosing(object sender, FormClosingEventArgs e)
{
if (serialPort1.IsOpen) // ¿El puerto está abierto?
{
serialPort1.Close(); // Cerrar puerto.
}
}
}
}
27. LECTURA DE ENTRADAS DIGITALES CON ARDUINO Y VISUAL STUDIO 2015
Electrónica PIC | http://electronica-pic.blogspot.com.es 26
Ejemplo 2:
Este ejemplo corresponde al código del Ejemplo 2 de Arduino.
Si has llegado aquí directamente, se recomienda leer paso a paso el primer ejemplo.
Creamos el proyecto nuevo al igual que el Ejemplo 1 y esta vez lo llamamos
Entrada_Arduino_WPF_2_CS, puedes poner el nombre que quieras del proyecto.
28. LECTURA DE ENTRADAS DIGITALES CON ARDUINO Y VISUAL STUDIO 2015
Electrónica PIC | http://electronica-pic.blogspot.com.es 27
Código fuente del Ejemplo 2 de Visual C# AWF.
using System;
using System.Collections.Generic;
using System.ComponentModel;
using System.Data;
using System.Drawing;
using System.Linq;
using System.Text;
using System.Threading.Tasks;
using System.Windows.Forms;
using System.IO.Ports; // No olvidar.
namespace Entrada_Arduino_AWF_2_CS
{
public partial class Form1 : Form
{
// Utilizaremos un string como buffer de recepción.
string Recibidos;
public Form1()
{
InitializeComponent();
if (!serialPort1.IsOpen)
{
try
{
serialPort1.Open();
}
catch (System.Exception ex)
{
MessageBox.Show(ex.ToString());
}
serialPort1.DataReceived += new
SerialDataReceivedEventHandler(Recepcion);
}
}
// Al recibir datos.
private void Recepcion(object sender, SerialDataReceivedEventArgs e)
{
// Acumula los caracteres recibidos a nuestro 'buffer' (string).
Recibidos += serialPort1.ReadExisting();
// Invocar o llamar al proceso de tramas.
Invoke(new EventHandler(Actualizar));
}
29. LECTURA DE ENTRADAS DIGITALES CON ARDUINO Y VISUAL STUDIO 2015
Electrónica PIC | http://electronica-pic.blogspot.com.es 28
// Procesar los datos recibidos en el bufer y extraer tramas completas.
private void Actualizar(object sender, EventArgs e)
{
// Asignar el valor de la trama al richTextBox.
richTextBox1.Text = Recibidos + "n";
// Selecciona la posición final para leer los mensajes entrantes.
richTextBox1.SelectionStart = richTextBox1.Text.Length;
// Mantiene el scroll en la entrada de cada mensaje.
richTextBox1.ScrollToCaret();
}
private void Form1_FormClosing(object sender, FormClosingEventArgs e)
{
if (serialPort1.IsOpen) // ¿El puerto está abierto?
{
serialPort1.Close(); // Puerto cerrado.
}
}
private void button_Actualizar_Click(object sender, EventArgs e)
{
Actualizar();
}
private void button_Limpiar_Click(object sender, EventArgs e)
{
richTextBox1.Clear(); // Limpiar contenido del richTextBox.
Recibidos = "";
}
void Actualizar()
{
byte[] mBuffer = Encoding.ASCII.GetBytes("ACTUALIZAR"); // Envía
comando ACTUALIZAR por el puerto.
serialPort1.Write(mBuffer, 0, mBuffer.Length);
}
private void Form1_Load(object sender, EventArgs e)
{
Actualizar();
}
}
}
30. LECTURA DE ENTRADAS DIGITALES CON ARDUINO Y VISUAL STUDIO 2015
Electrónica PIC | http://electronica-pic.blogspot.com.es 29
Ejemplo 3:
Este ejemplo corresponde al código del Ejemplo 3 de Arduino.
Se trata en este caso unir los dos ejemplos de Visual Studio, las imágenes de los Leds y mostrar
mensajes en el richTextBox.
Se recomienda mirar el primer ejemplo para seguir bien la guía o entender el concepto si eres
muy novel.
31. LECTURA DE ENTRADAS DIGITALES CON ARDUINO Y VISUAL STUDIO 2015
Electrónica PIC | http://electronica-pic.blogspot.com.es 30
Código fuente del Ejemplo 3 de Visual C# AWF.
using System;
using System.Collections.Generic;
using System.ComponentModel;
using System.Data;
using System.Drawing;
using System.Linq;
using System.Text;
using System.Threading.Tasks;
using System.Windows.Forms;
using System.IO.Ports; // No olvidar.
namespace Entrada_Arduino_AWF_3_CS
{
public partial class Form1 : Form
{
// Utilizaremos un string como buffer de recepción.
string Recibidos;
public Form1()
{
InitializeComponent();
if (!serialPort1.IsOpen)
{
try
{
serialPort1.Open();
}
catch (System.Exception ex)
{
MessageBox.Show(ex.ToString());
}
serialPort1.DataReceived += new
SerialDataReceivedEventHandler(Recepcion);
}
}
// Al recibir datos.
private void Recepcion(object sender, SerialDataReceivedEventArgs e)
{
// Acumula los caracteres recibidos a nuestro 'buffer' (string).
Recibidos += serialPort1.ReadExisting();
// Invocar o llamar al proceso de tramas.
Invoke(new EventHandler(Actualizar));
}
// Procesar los datos recibidos en el bufer y extraer tramas completas.
private void Actualizar(object sender, EventArgs e)
{
// Asignar el valor de la trama al richTextBox.
richTextBox1.Text += Recibidos;
// Selecciona la posición final para leer los mensajes entrantes.
richTextBox1.SelectionStart = richTextBox1.Text.Length;
// Mantiene el scroll en la entrada de cada mensaje.
richTextBox1.ScrollToCaret();
32. LECTURA DE ENTRADAS DIGITALES CON ARDUINO Y VISUAL STUDIO 2015
Electrónica PIC | http://electronica-pic.blogspot.com.es 31
char[] Delimitador = { ' ', 'r', 'n' };
string[] Palabras = Recibidos.Split(Delimitador);
foreach (string Comandos in Palabras)
{
switch (Comandos)
{
case "1=ON":
pictureBox1.Image =
Properties.Resources.Led_rojo_encendido;
Recibidos = "";
break;
case "1=OFF":
pictureBox1.Image =
Properties.Resources.Led_rojo_apagado;
Recibidos = "";
break;
case "2=ON":
pictureBox2.Image =
Properties.Resources.Led_rojo_encendido;
Recibidos = "";
break;
case "2=OFF":
pictureBox2.Image =
Properties.Resources.Led_rojo_apagado;
Recibidos = "";
break;
case "3=ON":
pictureBox3.Image =
Properties.Resources.Led_rojo_encendido;
Recibidos = "";
break;
case "3=OFF":
pictureBox3.Image =
Properties.Resources.Led_rojo_apagado;
Recibidos = "";
break;
case "4=ON":
pictureBox4.Image =
Properties.Resources.Led_rojo_encendido;
Recibidos = "";
break;
case "4=OFF":
pictureBox4.Image =
Properties.Resources.Led_rojo_apagado;
Recibidos = "";
break;
}
}
richTextBox1.Text += " " + DateTime.Now.ToString() + "r";
}
33. LECTURA DE ENTRADAS DIGITALES CON ARDUINO Y VISUAL STUDIO 2015
Electrónica PIC | http://electronica-pic.blogspot.com.es 32
private void Form1_FormClosing(object sender, FormClosingEventArgs e)
{
if (serialPort1.IsOpen) // ¿El puerto está abierto?
{
serialPort1.Close(); // Puerto cerrado.
}
}
void Actualizar()
{
byte[] mBuffer = Encoding.ASCII.GetBytes("ACTUALIZAR"); // Envía
comando ACTUALIZAR por el puerto.
serialPort1.Write(mBuffer, 0, mBuffer.Length);
}
private void button_Actualizar_Click(object sender, EventArgs e)
{
Actualizar();
}
private void Form1_Load(object sender, EventArgs e)
{
Actualizar();
}
private void button2_Click(object sender, EventArgs e)
{
richTextBox1.Clear(); // Limpiar contenido del richTextBox.
Recibidos = "";
}
}
}
34. LECTURA DE ENTRADAS DIGITALES CON ARDUINO Y VISUAL STUDIO 2015
Electrónica PIC | http://electronica-pic.blogspot.com.es 33
35. LECTURA DE ENTRADAS DIGITALES CON ARDUINO Y VISUAL STUDIO 2015
Electrónica PIC | http://electronica-pic.blogspot.com.es 34
Visual C# WPF 2015
36. LECTURA DE ENTRADAS DIGITALES CON ARDUINO Y VISUAL STUDIO 2015
Electrónica PIC | http://electronica-pic.blogspot.com.es 35
Creamos un proyecto nuevo con Visual C#.
Como nombre en este caso lo he llamado Entrada_Arduino_WPF_1_CS.
37. LECTURA DE ENTRADAS DIGITALES CON ARDUINO Y VISUAL STUDIO 2015
Electrónica PIC | http://electronica-pic.blogspot.com.es 36
Arrastramos tres componentes al formulario llamado Rectangle, label y Image.
Cambiamos las propiedades de cada componente o controles.
Rectangle:
Propiedades Cambie a
Nombre Rectangulo
Label:
Propiedades Cambie a
Nombre label_Leyendo
Content Leyendo…
Image:
Propiedades Cambie a
Nombre Image
Source Led rojo apagado.png
38. LECTURA DE ENTRADAS DIGITALES CON ARDUINO Y VISUAL STUDIO 2015
Electrónica PIC | http://electronica-pic.blogspot.com.es 37
Seguimos en el componente image, pulsamos … en la propiedad Image como indica abajo,
Proyecto Agregar elemento existente…
Podemos seleccionar las imágenes que queremos, en este caso he elegido el Led apagado y el
otro encendido de color rojo. Para finalizar, pulsa el botón Agregar.
39. LECTURA DE ENTRADAS DIGITALES CON ARDUINO Y VISUAL STUDIO 2015
Electrónica PIC | http://electronica-pic.blogspot.com.es 38
En la propiedad Source, eliges el Led rojo apagado, si lo deseas, puede escoger el verde, pero
que sea apagado.
40. LECTURA DE ENTRADAS DIGITALES CON ARDUINO Y VISUAL STUDIO 2015
Electrónica PIC | http://electronica-pic.blogspot.com.es 39
Tener claro estas líneas al recibir datos desde Arduino como ON y OFF.
41. LECTURA DE ENTRADAS DIGITALES CON ARDUINO Y VISUAL STUDIO 2015
Electrónica PIC | http://electronica-pic.blogspot.com.es 40
Ejemplo 1:
Código fuente del Ejemplo 1 de Visual C# WPF.
using System;
using System.Collections.Generic;
using System.Linq;
using System.Text;
using System.Threading.Tasks;
using System.Windows;
using System.Windows.Controls;
using System.Windows.Data;
using System.Windows.Documents;
using System.Windows.Input;
using System.Windows.Media;
using System.Windows.Media.Imaging;
using System.Windows.Navigation;
using System.Windows.Shapes;
using System.IO.Ports; // No olvidar.
using System.Threading;
namespace Entrada_Arduino_WPF_1_CS
{
/// <summary>
/// Lógica de interacción para MainWindow.xaml
/// </summary>
public partial class MainWindow : Window
{
// Utilizaremos un string como buffer de recepción.
string Recibidos;
SerialPort serialPort1 = new SerialPort();
public MainWindow()
{
InitializeComponent();
// Configuramos el puerto serie.
serialPort1.BaudRate = 115200; // Baudios, tiene que ser el mismo que
Arduino.
serialPort1.PortName = "COM4"; // Elegijos el mismo puerto que de
Arduino.
serialPort1.Parity = Parity.None; // Nada de paridad.
serialPort1.DataBits = 8; // 8 bits.
serialPort1.StopBits = StopBits.Two; // Recomendado con 2 bits de
Stop o parada.
// Abrir y mantener abierto el puerto serie mientras se ejecute la
aplicación.
if (!serialPort1.IsOpen)
{
try
{
serialPort1.Open();
}
catch (System.Exception ex)
{
MessageBox.Show(ex.ToString());
}
}
42. LECTURA DE ENTRADAS DIGITALES CON ARDUINO Y VISUAL STUDIO 2015
Electrónica PIC | http://electronica-pic.blogspot.com.es 41
// Ejecutar la función Recepción por disparo del evento ¡DataReived!
serialPort1.DataReceived += Recepcion;
}
private void Recepcion(object sender, SerialDataReceivedEventArgs e)
{
// Acumular los caracteres recibidos a nuestro "buffer" (string).
Recibidos += serialPort1.ReadExisting();
// Invocar o llamar al proceso de tramas.
this.Dispatcher.Invoke(Actualizar);
}
// Procesar los datos recibidos en el buffer y extraer tramas completas.
private void Actualizar()
{
var doc = new FlowDocument();
doc.Blocks.Add(new Paragraph(new Run(Recibidos)));
switch(Recibidos)
{
case "ON":
image.Source = (new BitmapImage(new Uri("Led rojo
encendido.png", UriKind.Relative)));
label_Leyendo.Content = "Encendido.";
Rectangulo.Fill = new SolidColorBrush(Colors.Green);
Recibidos = ""; // Limpiar.
break;
case "OFF":
image.Source = (new BitmapImage(new Uri("Led rojo
apagado.png", UriKind.Relative)));
label_Leyendo.Content = "Apagado.";
Rectangulo.Fill = new SolidColorBrush(Colors.Red);
Recibidos = ""; // Limpiar.
break;
}
}
private void Form_principal_Closing(object sender,
System.ComponentModel.CancelEventArgs e)
{
if (serialPort1.IsOpen) // ¿El puerto está abierto?
{
serialPort1.Close(); // Cerrar puerto.
}
}
}
}
43. LECTURA DE ENTRADAS DIGITALES CON ARDUINO Y VISUAL STUDIO 2015
Electrónica PIC | http://electronica-pic.blogspot.com.es 42
Este ejemplo corresponde al código del Ejemplo 2 de Arduino.
Si has llegado aquí directamente, se recomienda leer paso a paso el primer ejemplo.
Creamos el proyecto nuevo al igual que el Ejemplo 1 y esta vez lo llamamos
Entrada_Arduino_WPF_2_CS, puedes poner el nombre que quieras del proyecto.
44. LECTURA DE ENTRADAS DIGITALES CON ARDUINO Y VISUAL STUDIO 2015
Electrónica PIC | http://electronica-pic.blogspot.com.es 43
Ejemplo 2:
Código fuente del Ejemplo 2 de Visual C# WPF.
using System;
using System.Collections.Generic;
using System.Linq;
using System.Text;
using System.Threading.Tasks;
using System.Windows;
using System.Windows.Controls;
using System.Windows.Data;
using System.Windows.Documents;
using System.Windows.Input;
using System.Windows.Media;
using System.Windows.Media.Imaging;
using System.Windows.Navigation;
using System.Windows.Shapes;
using System.IO.Ports; // No olvidar.
using System.Threading;
namespace Entrada_Arduino_WPF_2_CS
{
/// <summary>
/// Lógica de interacción para MainWindow.xaml
/// </summary>
public partial class MainWindow : Window
{
// Utilizaremos un string como buffer de recepción.
string Recibidos;
SerialPort serialPort1 = new SerialPort();
public MainWindow()
{
InitializeComponent();
// Configuramos el puerto serie.
serialPort1.BaudRate = 115200; // Baudios, tiene que ser el mismo que
Arduino.
serialPort1.PortName = "COM4"; // Elegijos el mismo puerto que de
Arduino.
serialPort1.Parity = Parity.None; // Nada de paridad.
serialPort1.DataBits = 8; // 8 bits.
serialPort1.StopBits = StopBits.Two; // Recomendado con 2 bits de
Stop o parada.
// Abrir y mantener abierto el puerto serie mientras se ejecute la
aplicación.
if (!serialPort1.IsOpen)
{
try
{
serialPort1.Open();
}
catch (System.Exception ex)
{
MessageBox.Show(ex.ToString());
}
}
45. LECTURA DE ENTRADAS DIGITALES CON ARDUINO Y VISUAL STUDIO 2015
Electrónica PIC | http://electronica-pic.blogspot.com.es 44
// Ejecutar la función Recepción por disparo del evento ¡DataReived!
serialPort1.DataReceived += Recepcion;
}
private void Recepcion(object sender, SerialDataReceivedEventArgs e)
{
// Acumular los caracteres recibidos a nuestro "buffer" (string).
Recibidos += serialPort1.ReadExisting();
// Invocar o llamar al proceso de tramas.
this.Dispatcher.Invoke(Actualizar);
}
// Procesar los datos recibidos en el buffer y extraer tramas completas.
private void Actualizar()
{
// Muestra el scroll vertical.
richTextBox.VerticalScrollBarVisibility =
ScrollBarVisibility.Visible;
// Asignar el valor de la trama al richTextBox.
var doc = new FlowDocument();
doc.Blocks.Add(new Paragraph(new Run(Recibidos +=
Environment.NewLine)));
richTextBox.Document = doc;
// // Mantiene el scroll en la entrada de cada mensaje.
richTextBox.ScrollToEnd();
}
void Actualizar_estados()
{
byte[] miBuffer = Encoding.ASCII.GetBytes("ACTUALIZAR"); // Envía
comando ACTUALIZAR por el puerto.
serialPort1.Write(miBuffer, 0, miBuffer.Length);
}
private void button_Actualizar_estados_Click(object sender,
RoutedEventArgs e)
{
Actualizar_estados();
}
private void button_Limpiar_Click(object sender, RoutedEventArgs e)
{
richTextBox.Document.Blocks.Clear(); // Limpiar contenido del
richTextBox.
Recibidos = ""; // Limpiar variable.
}
// Desde que cierres el programa, cierra el puerto.
private void Form_Principal_Closing(object sender,
System.ComponentModel.CancelEventArgs e)
{
if (serialPort1.IsOpen) // ¿El puerto está abierto?
{
serialPort1.Close(); // Cerrar puerto.
}
}
}
}
46. LECTURA DE ENTRADAS DIGITALES CON ARDUINO Y VISUAL STUDIO 2015
Electrónica PIC | http://electronica-pic.blogspot.com.es 45
Ejemplo 3:
Este ejemplo corresponde al código del Ejemplo 3 de Arduino.
Se trata en este caso unir los dos ejemplos de Visual Studio, las imágenes de los Leds y mostrar
mensajes en el richTextBox.
Se recomienda mirar el primer ejemplo para seguir bien la guía o entender el concepto si eres
muy novel.
47. LECTURA DE ENTRADAS DIGITALES CON ARDUINO Y VISUAL STUDIO 2015
Electrónica PIC | http://electronica-pic.blogspot.com.es 46
Ejemplo 3:
Código fuente del Ejemplo 3 de Visual C# WPF.
using System;
using System.Collections.Generic;
using System.Linq;
using System.Text;
using System.Threading.Tasks;
using System.Windows;
using System.Windows.Controls;
using System.Windows.Data;
using System.Windows.Documents;
using System.Windows.Input;
using System.Windows.Media;
using System.Windows.Media.Imaging;
using System.Windows.Navigation;
using System.Windows.Shapes;
using System.IO.Ports; // No olvidar.
using System.Threading;
namespace Entrada_Arduino_WPF_3_CS
{
/// <summary>
/// Lógica de interacción para MainWindow.xaml
/// </summary>
public partial class MainWindow : Window
{
// Utilizaremos un string como buffer de recepción.
string Recibidos;
SerialPort serialPort1 = new SerialPort();
public MainWindow()
{
InitializeComponent();
// Configuramos el puerto serie.
serialPort1.BaudRate = 115200; // Baudios, tiene que ser el mismo que
Arduino.
serialPort1.PortName = "COM4"; // Elegijos el mismo puerto que de
Arduino.
serialPort1.Parity = Parity.None; // Nada de paridad.
serialPort1.DataBits = 8; // 8 bits.
serialPort1.StopBits = StopBits.Two; // Recomendado con 2 bits de
Stop o parada.
// Abrir y mantener abierto el puerto serie mientras se ejecute la
aplicación.
if (!serialPort1.IsOpen)
{
try
{
serialPort1.Open();
}
catch (System.Exception ex)
{
MessageBox.Show(ex.ToString());
}
}
48. LECTURA DE ENTRADAS DIGITALES CON ARDUINO Y VISUAL STUDIO 2015
Electrónica PIC | http://electronica-pic.blogspot.com.es 47
// Ejecutar la función Recepción por disparo del evento ¡DataReived!
serialPort1.DataReceived += Recepcion;
}
private void Recepcion(object sender, SerialDataReceivedEventArgs e)
{
// Acumular los caracteres recibidos a nuestro "buffer" (string).
Recibidos += serialPort1.ReadExisting();
// Invocar o llamar al proceso de tramas.
this.Dispatcher.Invoke(Actualizar);
}
// Procesar los datos recibidos en el buffer y extraer tramas completas.
private void Actualizar()
{
// Muestra el scroll vertical.
richTextBox.VerticalScrollBarVisibility =
ScrollBarVisibility.Visible;
// Asignar el valor de la trama al richTextBox.
var doc = new FlowDocument();
doc.Blocks.Add(new Paragraph(new Run(Recibidos +=
Environment.NewLine)));
richTextBox.Document = doc;
// // Mantiene el scroll en la entrada de cada mensaje.
richTextBox.ScrollToEnd();
char[] Delimitador = { ' ', 'r', 'n' };
string[] Palabras = Recibidos.Split(Delimitador);
foreach (string Comandos in Palabras)
{
switch (Comandos)
{
case "1=ON":
image_1.Source = (new BitmapImage(new Uri("Led rojo
encendido.png", UriKind.Relative)));
Recibidos = ""; // Limpiar.
break; ;
case "1=OFF":
image_1.Source = (new BitmapImage(new Uri("Led rojo
apagado.png", UriKind.Relative)));
Recibidos = ""; // Limpiar.
break;
case "2=ON":
image_2.Source = (new BitmapImage(new Uri("Led rojo
encendido.png", UriKind.Relative)));
Recibidos = ""; // Limpiar.
break;
case "2=OFF":
image_2.Source = (new BitmapImage(new Uri("Led rojo
apagado.png", UriKind.Relative)));
Recibidos = ""; // Limpiar.
break;
49. LECTURA DE ENTRADAS DIGITALES CON ARDUINO Y VISUAL STUDIO 2015
Electrónica PIC | http://electronica-pic.blogspot.com.es 48
case "3=ON":
image_3.Source = (new BitmapImage(new Uri("Led rojo
encendido.png", UriKind.Relative)));
Recibidos = ""; // Limpiar.
break;
case "3=OFF":
image_3.Source = (new BitmapImage(new Uri("Led rojo
apagado.png", UriKind.Relative)));
Recibidos = ""; // Limpiar.
break;
case "4=ON":
image_4.Source = (new BitmapImage(new Uri("Led rojo
encendido.png", UriKind.Relative)));
Recibidos = ""; // Limpiar.
break;
case "4=OFF":
image_4.Source = (new BitmapImage(new Uri("Led rojo
apagado.png", UriKind.Relative)));
Recibidos = ""; // Limpiar.
break;
}
}
}
void Actualizar_estados()
{
byte[] miBuffer = Encoding.ASCII.GetBytes("ACTUALIZAR"); // Envía
comando ACTUALIZAR por el puerto.
serialPort1.Write(miBuffer, 0, miBuffer.Length);
}
private void button_Actualizar_estados_Click(object sender,
RoutedEventArgs e)
{
Actualizar_estados();
}
private void button_Limpiar_Click(object sender, RoutedEventArgs e)
{
richTextBox.Document.Blocks.Clear(); // Limpiar contenido del
richTextBox.
Recibidos = ""; // Limpiar variable.
}
private void Form_Principal_Closing(object sender,
System.ComponentModel.CancelEventArgs e)
{
if (serialPort1.IsOpen) // ¿El puerto está abierto?
{
serialPort1.Close(); // Cerrar puerto.
}
}
}
}
50. LECTURA DE ENTRADAS DIGITALES CON ARDUINO Y VISUAL STUDIO 2015
Electrónica PIC | http://electronica-pic.blogspot.com.es 49
51. LECTURA DE ENTRADAS DIGITALES CON ARDUINO Y VISUAL STUDIO 2015
Electrónica PIC | http://electronica-pic.blogspot.com.es 50
Visual Basic AWF 2015
52. LECTURA DE ENTRADAS DIGITALES CON ARDUINO Y VISUAL STUDIO 2015
Electrónica PIC | http://electronica-pic.blogspot.com.es 51
Ejemplo 1:
Este ejemplo corresponde al código del Ejemplo 1 de Arduino.
Creamos un proyecto nuevo con Visual Basic.
Selecciona Entorno clásico en Visual Basic, Aplicación de Windows Forms, he puesto como
nombre del proyecto en este caso Entrada_Arduino_AWF_1_VB, luego pulsar Aceptar.
53. LECTURA DE ENTRADAS DIGITALES CON ARDUINO Y VISUAL STUDIO 2015
Electrónica PIC | http://electronica-pic.blogspot.com.es 52
Arrastramos al formulario los componentes que indica en el Cuadro de Herramientas.
Cambiamos las propiedades de cada componente o controles.
Panel:
Propiedad Cambie a
BorderStyle FixedSingle
Label:
Propiedad Cambie a
(Name) Label_Entrada
Text Leyendo...
PictureBox:
Propiedad Cambie a
(Name) pictureBox_Dibujo
SizeMode StretchImage
54. LECTURA DE ENTRADAS DIGITALES CON ARDUINO Y VISUAL STUDIO 2015
Electrónica PIC | http://electronica-pic.blogspot.com.es 53
Seguimos en el componente PictureBox, pulsamos … en la propiedad Image como indica abajo
para introducir dos imágenes de dos Led, encendido y apagado.
55. LECTURA DE ENTRADAS DIGITALES CON ARDUINO Y VISUAL STUDIO 2015
Electrónica PIC | http://electronica-pic.blogspot.com.es 54
Se abre un cuadro llamado Seleccionar recurso en el cual podemos añadir las imágenes que
queramos.
Pulsamos el botón Importar… y elegimos las imágenes de Leds que queramos, en este caso
selecciono el rojo apagado y encendido.
56. LECTURA DE ENTRADAS DIGITALES CON ARDUINO Y VISUAL STUDIO 2015
Electrónica PIC | http://electronica-pic.blogspot.com.es 55
Queda guardado en recursos.
Pulsa Aceptar.
Dejar claro que en la propiedad SizeMode del PicturreBox le he puesto StretchImage par
redimensionar el dibujo o imagen al cuadro.
En cuanto al formulario principal, en la propiedad StartPosition se ha cambiado a CenterScreen
para cuando lo compilemos o lo ejecutemos salga en el centro de la pantalla.
57. LECTURA DE ENTRADAS DIGITALES CON ARDUINO Y VISUAL STUDIO 2015
Electrónica PIC | http://electronica-pic.blogspot.com.es 56
Añade el componente SerialPort haciendo doble clic en él o arrastrándolo al formulario.
58. LECTURA DE ENTRADAS DIGITALES CON ARDUINO Y VISUAL STUDIO 2015
Electrónica PIC | http://electronica-pic.blogspot.com.es 57
Cambiamos las propiedades indicadas abajo.
SerialPort:
Tanto en Visual Studio como Arduino UNO y Arduino IDE tienen que funcionar en el mismo
puerto y baudios, en mi caso es:
Propiedad Cambie a
BuadRate 115200
PortName COM4
StopBits Two
En tu caso puede ser diferente, tanto el puerto y los baudios el que desee.
59. LECTURA DE ENTRADAS DIGITALES CON ARDUINO Y VISUAL STUDIO 2015
Electrónica PIC | http://electronica-pic.blogspot.com.es 58
Tener claro estas líneas al recibir datos desde Arduino como ON y OFF.
60. LECTURA DE ENTRADAS DIGITALES CON ARDUINO Y VISUAL STUDIO 2015
Electrónica PIC | http://electronica-pic.blogspot.com.es 59
Ejemplo 1:
Código fuente del Ejemplo 1 de Visual Basic AWF.
Imports System.IO.Ports ' No olvidar.
Imports System.Threading
Public Class Form1
' Utilizaremos un string como buffer de recepción.
Private Recibidos As String
Public Sub New()
InitializeComponent()
If Not SerialPort1.IsOpen Then
Try
SerialPort1.Open()
Catch ex As System.Exception
MessageBox.Show(ex.ToString())
End Try
'Ejecutar la función Recepcion por disparo del evento DataReceived.
AddHandler SerialPort1.DataReceived, AddressOf Recepcion
End If
End Sub
' Al recibir datos.
Private Sub Recepcion(sender As Object, e As SerialDataReceivedEventArgs)
' Acumula los caracteres recibidos a nuestro 'buffer' (string).
Recibidos += SerialPort1.ReadExisting()
' Invocar o llamar al proceso de tramas.
Invoke(New EventHandler(AddressOf Actualizar))
End Sub
' Procesar los datos recibidos en el bufer y extraer tramas completas.
Private Sub Actualizar(sender As Object, e As EventArgs)
Select Case Recibidos
Case "ON"
Panel1.BackColor = Color.Green
Label_Leyendo.Text = "Activado"
PictureBox_Dibujo.Image = My.Resources.Led_rojo_encendido
Recibidos = ""
Exit Select
Case "OFF"
Panel1.BackColor = Color.Red
Label_Leyendo.Text = "Desactivado"
PictureBox_Dibujo.Image = My.Resources.Led_rojo_apagado
Recibidos = ""
Exit Select
End Select
End Sub
End Class
61. LECTURA DE ENTRADAS DIGITALES CON ARDUINO Y VISUAL STUDIO 2015
Electrónica PIC | http://electronica-pic.blogspot.com.es 60
Ejemplo 2:
Este ejemplo corresponde al código del Ejemplo 2 de Arduino.
Si has llegado aquí directamente, se recomienda leer paso a paso el primer ejemplo.
Creamos el proyecto nuevo al igual que el Ejemplo 1 y esta vez lo llamamos
Entrada_Arduino_AWF_2_VS, puedes poner el nombre que quieras del proyecto.
62. LECTURA DE ENTRADAS DIGITALES CON ARDUINO Y VISUAL STUDIO 2015
Electrónica PIC | http://electronica-pic.blogspot.com.es 61
Imports System.IO.Ports ' No olvidar.
Imports System.Text
Imports System.Threading
Public Class Form1
' Utilizaremos un string como buffer de recepción.
Private Recibidos As String
Public Sub New()
InitializeComponent()
If Not SerialPort1.IsOpen Then
Try
SerialPort1.Open()
Catch ex As System.Exception
MessageBox.Show(ex.ToString())
End Try
'Ejecutar la función Recepcion por disparo del evento DataReceived.
AddHandler SerialPort1.DataReceived, AddressOf Recepcion
End If
End Sub
' Al recibir datos.
Private Sub Recepcion(sender As Object, e As SerialDataReceivedEventArgs)
' Acumula los caracteres recibidos a nuestro 'buffer' (string).
Recibidos += SerialPort1.ReadExisting()
' Invocar o llamar al proceso de tramas.
Invoke(New EventHandler(AddressOf Actualizar))
End Sub
' Procesar los datos recibidos en el bufer y extraer tramas completas.
Private Sub Actualizar(sender As Object, e As EventArgs)
' Asignar el valor de la trama al richTextBox.
RichTextBox1.Text = Recibidos + vbLf
' Selecciona la posición final para leer los mensajes entrantes.
RichTextBox1.SelectionStart = RichTextBox1.Text.Length
' Mantiene el scroll en la entrada de cada mensaje.
RichTextBox1.ScrollToCaret()
End Sub
Private Sub Actualizar()
Dim mBuffer As Byte() = Encoding.ASCII.GetBytes("ACTUALIZAR")
' Envía comando ACTUALIZAR por el puerto.
SerialPort1.Write(mBuffer, 0, mBuffer.Length)
End Sub
Private Sub Button_Actualizar_Click(sender As Object, e As EventArgs) Handles
Button_Actualizar.Click
Actualizar()
End Sub
63. LECTURA DE ENTRADAS DIGITALES CON ARDUINO Y VISUAL STUDIO 2015
Electrónica PIC | http://electronica-pic.blogspot.com.es 62
Private Sub Button_Limpiar_Click(sender As Object, e As EventArgs) Handles
Button_Limpiar.Click
RichTextBox1.Clear() ' Limpiar contenido del richTextBox.
Recibidos = ""
End Sub
Private Sub Form1_Load(sender As Object, e As EventArgs) Handles MyBase.Load
Actualizar()
End Sub
End Class
64. LECTURA DE ENTRADAS DIGITALES CON ARDUINO Y VISUAL STUDIO 2015
Electrónica PIC | http://electronica-pic.blogspot.com.es 63
Ejemplo 3:
Este ejemplo corresponde al código del Ejemplo 3 de Arduino.
Se trata en este caso unir los dos ejemplos de Visual Studio, las imágenes de los Leds y mostrar
mensajes en el richTextBox.
Se recomienda mirar el primer ejemplo para seguir bien la guía o entender el concepto si eres
muy novel.
65. LECTURA DE ENTRADAS DIGITALES CON ARDUINO Y VISUAL STUDIO 2015
Electrónica PIC | http://electronica-pic.blogspot.com.es 64
Imports System.IO.Ports ' No olvidar.
Imports System.Text
Imports System.Threading
Public Class Form1
' Utilizaremos un string como buffer de recepción.
Private Recibidos As String
Public Sub New()
InitializeComponent()
If Not SerialPort1.IsOpen Then
Try
SerialPort1.Open()
Catch ex As System.Exception
MessageBox.Show(ex.ToString())
End Try
'Ejecutar la función Recepcion por disparo del evento DataReceived.
AddHandler SerialPort1.DataReceived, AddressOf Recepcion
End If
End Sub
' Al recibir datos.
Private Sub Recepcion(sender As Object, e As SerialDataReceivedEventArgs)
' Acumula los caracteres recibidos a nuestro 'buffer' (string).
Recibidos += SerialPort1.ReadExisting()
' Invocar o llamar al proceso de tramas.
Invoke(New EventHandler(AddressOf Actualizar))
End Sub
' Procesar los datos recibidos en el bufer y extraer tramas completas.
Private Sub Actualizar(sender As Object, e As EventArgs)
' Asignar el valor de la trama al richTextBox.
RichTextBox1.Text = Recibidos + vbLf
' Selecciona la posición final para leer los mensajes entrantes.
RichTextBox1.SelectionStart = RichTextBox1.Text.Length
' Mantiene el scroll en la entrada de cada mensaje.
RichTextBox1.ScrollToCaret()
Dim Delimitador As Char() = {" "c, ControlChars.Cr, ControlChars.Lf}
Dim Palabras As String() = Recibidos.Split(Delimitador)
66. LECTURA DE ENTRADAS DIGITALES CON ARDUINO Y VISUAL STUDIO 2015
Electrónica PIC | http://electronica-pic.blogspot.com.es 65
For Each Comandos As String In Palabras
Select Case Comandos
Case "1=ON"
PictureBox1.Image = My.Resources.Led_rojo_encendido
Recibidos = ""
Exit Select
Case "1=OFF"
PictureBox1.Image = My.Resources.Led_rojo_apagado
Recibidos = ""
Exit Select
Case "2=ON"
PictureBox2.Image = My.Resources.Led_rojo_encendido
Recibidos = ""
Exit Select
Case "2=OFF"
PictureBox2.Image = My.Resources.Led_rojo_apagado
Recibidos = ""
Exit Select
Case "3=ON"
PictureBox3.Image = My.Resources.Led_rojo_encendido
Recibidos = ""
Exit Select
Case "3=OFF"
PictureBox3.Image = My.Resources.Led_rojo_apagado
Recibidos = ""
Exit Select
Case "4=ON"
PictureBox4.Image = My.Resources.Led_rojo_encendido
Recibidos = ""
Exit Select
Case "4=OFF"
PictureBox4.Image = My.Resources.Led_rojo_apagado
Recibidos = ""
Exit Select
End Select
Next
RichTextBox1.Text += " " + DateTime.Now.ToString() + vbCr
End Sub
Private Sub Actualizar()
Dim mBuffer As Byte() = Encoding.ASCII.GetBytes("ACTUALIZAR") ' Envía
comando ACTUALIZAR por el puerto.
SerialPort1.Write(mBuffer, 0, mBuffer.Length)
End Sub
Private Sub Button_Actualizar_Click(sender As Object, e As EventArgs) Handles
Button_Actualizar.Click
Actualizar()
End Sub
Private Sub Button_Limpiar_Click(sender As Object, e As EventArgs) Handles
Button_Limpiar.Click
RichTextBox1.Clear() ' Limpiar contenido del richTextBox.
67. LECTURA DE ENTRADAS DIGITALES CON ARDUINO Y VISUAL STUDIO 2015
Electrónica PIC | http://electronica-pic.blogspot.com.es 66
Recibidos = ""
End Sub
Private Sub Form1_FormClosing(sender As Object, e As FormClosingEventArgs)
Handles MyBase.FormClosing
If SerialPort1.IsOpen Then ' ¿El puerto está abierto?
SerialPort1.Close() ' Puerto cerrado.
End If
End Sub
Private Sub Form1_Load(sender As Object, e As EventArgs) Handles MyBase.Load
Actualizar()
End Sub
End Class
68. LECTURA DE ENTRADAS DIGITALES CON ARDUINO Y VISUAL STUDIO 2015
Electrónica PIC | http://electronica-pic.blogspot.com.es 67
69. LECTURA DE ENTRADAS DIGITALES CON ARDUINO Y VISUAL STUDIO 2015
Electrónica PIC | http://electronica-pic.blogspot.com.es 68
Visual Basic WPF 2015
70. LECTURA DE ENTRADAS DIGITALES CON ARDUINO Y VISUAL STUDIO 2015
Electrónica PIC | http://electronica-pic.blogspot.com.es 69
Creamos un proyecto nuevo con Visual Basic.
Como nombre en este caso lo he llamado Entrada_Arduino_WPF_1_VB.
71. LECTURA DE ENTRADAS DIGITALES CON ARDUINO Y VISUAL STUDIO 2015
Electrónica PIC | http://electronica-pic.blogspot.com.es 70
Arrastramos tres componentes al formulario llamado Rectangle, label y Image.
Cambiamos las propiedades de cada componente o controles.
Rectangle:
Propiedades Cambie a
Nombre Rectangulo
Label:
Propiedades Cambie a
Nombre label_Leyendo
Content Leyendo…
Image:
Propiedades Cambie a
Nombre Image
Source Led rojo apagado.png
72. LECTURA DE ENTRADAS DIGITALES CON ARDUINO Y VISUAL STUDIO 2015
Electrónica PIC | http://electronica-pic.blogspot.com.es 71
Seguimos en el componente image, pulsamos … en la propiedad Image como indica abajo,
Proyecto Agregar elemento existente…
Podemos seleccionar las imágenes que queremos, en este caso he elegido el Led apagado y el
otro encendido de color rojo. Para finalizar, pulsa el botón Agregar.
En la propiedad Source, eliges el Led rojo apagado, si lo deseas, puede escoger el verde, pero
que sea apagado.
73. LECTURA DE ENTRADAS DIGITALES CON ARDUINO Y VISUAL STUDIO 2015
Electrónica PIC | http://electronica-pic.blogspot.com.es 72
74. LECTURA DE ENTRADAS DIGITALES CON ARDUINO Y VISUAL STUDIO 2015
Electrónica PIC | http://electronica-pic.blogspot.com.es 73
Tener claro estas líneas al recibir datos desde Arduino como ON y OFF.
75. LECTURA DE ENTRADAS DIGITALES CON ARDUINO Y VISUAL STUDIO 2015
Electrónica PIC | http://electronica-pic.blogspot.com.es 74
Ejemplo 1:
Código fuente del Ejemplo 1 de Visual Basic WPF.
Imports System.IO.Ports ' No olvidar.
Imports System.Text ' No olvidar.
Class MainWindow
' Utilizaremos un string como buffer de recepción.
Dim Recibidos As String
' Creamos un objeto sdel puerto serie.
Dim serialPort1 As New SerialPort()
Private Sub Form_Principal_Loaded(sender As Object, e As RoutedEventArgs)
Handles Form_Principal.Loaded
' Configuramos el puerto serie.
serialPort1.BaudRate = 115200 ' Baudios, tiene que ser el mismo que
Arduino UNO.
serialPort1.PortName = "COM4" ' Elegimos el COM4 igual que Arduino en mi
caso.
serialPort1.Parity = Parity.None ' Nada de paridad.
serialPort1.DataBits = 8 ' 8 bits.
serialPort1.StopBits = StopBits.Two ' Funciona mejor con 2 bits de Stop.
' Abrir puerto mientras se ejecute la aplicación.
If Not serialPort1.IsOpen Then
Try
serialPort1.Open()
Catch ex As System.Exception
MessageBox.Show(ex.ToString())
End Try
End If
' Ejecutar la función Recepción por disparo del evento ¡DataReived!
AddHandler serialPort1.DataReceived, AddressOf Recepcion
End Sub
Private Sub Recepcion(sender As Object, e As SerialDataReceivedEventArgs)
' Acumular los caracteres recibidos a nuestro "buffer" (string).
Recibidos += serialPort1.ReadExisting()
' Invocar o llamar al proceso de tramas.
Me.Dispatcher.Invoke(AddressOf Actualizar)
End Sub
' Procesar los datos recibidos en el buffer y extraer tramas completas.
Private Sub Actualizar()
Dim doc = New FlowDocument()
doc.Blocks.Add(New Paragraph(New Run(Recibidos)))
Select Case Recibidos
Case "ON"
image.Source = (New BitmapImage(New Uri("Led rojo encendido.png",
UriKind.Relative)))
label_Leyendo.Content = "Encendido."
Rectangulo.Fill = New SolidColorBrush(Colors.Green)
Recibidos = "" ' Limpiar.
Exit Select
Case "OFF"
image.Source = (New BitmapImage(New Uri("Led rojo apagado.png",
UriKind.Relative)))
76. LECTURA DE ENTRADAS DIGITALES CON ARDUINO Y VISUAL STUDIO 2015
Electrónica PIC | http://electronica-pic.blogspot.com.es 75
label_Leyendo.Content = "Apagado."
Rectangulo.Fill = New SolidColorBrush(Colors.Red)
Recibidos = "" ' Limpiar.
Exit Select
End Select
End Sub
' Desde que cierres el programa, cierra el puerto.
Private Sub Form_Principal_Closing(sender As Object, e As
ComponentModel.CancelEventArgs) Handles Form_Principal.Closing
If serialPort1.IsOpen Then ' ¿El puerto está abierto?
serialPort1.Close() ' Cerrar puerto.
End If
End Sub
End Class
77. LECTURA DE ENTRADAS DIGITALES CON ARDUINO Y VISUAL STUDIO 2015
Electrónica PIC | http://electronica-pic.blogspot.com.es 76
Este ejemplo corresponde al código del Ejemplo 2 de Arduino.
Si has llegado aquí directamente, se recomienda leer paso a paso el primer ejemplo.
Creamos el proyecto nuevo al igual que el Ejemplo 1 y esta vez lo llamamos
Entrada_Arduino_WPF_2_VB, puedes poner el nombre que quieras del proyecto.
78. LECTURA DE ENTRADAS DIGITALES CON ARDUINO Y VISUAL STUDIO 2015
Electrónica PIC | http://electronica-pic.blogspot.com.es 77
Ejemplo 2:
Código fuente del Ejemplo 2 de Visual Basic WPF.
Imports System.IO.Ports ' No olvidar.
Imports System.Text ' No olvidar.
Imports System.Threading ' No olvidar.
Class MainWindow
' Utilizaremos un string como buffer de recepción.
Dim Recibidos As String
' Creamos un objeto sdel puerto serie.
Dim serialPort1 As New SerialPort()
Private Sub Form_Principal_Loaded(sender As Object, e As RoutedEventArgs)
Handles Form_Principal.Loaded
' Configuramos el puerto serie.
serialPort1.BaudRate = 115200 ' Baudios, tiene que ser el mismo que
Arduino UNO.
serialPort1.PortName = "COM4" ' Elegimos el COM4 igual que Arduino en mi
caso.
serialPort1.Parity = Parity.None ' Nada de paridad.
serialPort1.DataBits = 8 ' 8 bits.
serialPort1.StopBits = StopBits.Two ' Funciona mejor con 2 bits de Stop.
' Abrir puerto mientras se ejecute la aplicación.
If Not serialPort1.IsOpen Then
Try
serialPort1.Open()
Catch ex As System.Exception
MessageBox.Show(ex.ToString())
End Try
End If
' Ejecutar la función Recepción por disparo del evento ¡DataReived!
AddHandler serialPort1.DataReceived, AddressOf Recepcion
End Sub
Private Sub Recepcion(sender As Object, e As SerialDataReceivedEventArgs)
' Acumular los caracteres recibidos a nuestro "buffer" (string).
Recibidos += serialPort1.ReadExisting()
' Invocar o llamar al proceso de tramas.
Me.Dispatcher.Invoke(AddressOf Actualizar)
End Sub
' Procesar los datos recibidos en el buffer y extraer tramas completas.
Private Sub Actualizar()
' Muestra el scroll vertical.
richTextBox.VerticalScrollBarVisibility = ScrollBarVisibility.Visible
' Asignar el valor de la trama al richTextBox.
Dim doc = New FlowDocument()
doc.Blocks.Add(New Paragraph(New Run(Recibidos + Environment.NewLine)))
richTextBox.Document = doc
' // Mantiene el scroll en la entrada de cada mensaje.
richTextBox.ScrollToEnd()
End Sub
79. LECTURA DE ENTRADAS DIGITALES CON ARDUINO Y VISUAL STUDIO 2015
Electrónica PIC | http://electronica-pic.blogspot.com.es 78
Private Sub Actualizar_estados()
Dim miBuffer As Byte() = Encoding.ASCII.GetBytes("ACTUALIZAR")
' Envía comando ACTUALIZAR por el puerto.
serialPort1.Write(miBuffer, 0, miBuffer.Length)
End Sub
Private Sub button_Actualizar_estados_Click(sender As Object, e As
RoutedEventArgs) Handles button_Actualizar_estados.Click
Actualizar_estados()
End Sub
Private Sub button_Limpiar_Click(sender As Object, e As RoutedEventArgs)
Handles button_Limpiar.Click
richTextBox.Document.Blocks.Clear() ' Limpiar contenido del richTextBox.
Recibidos = "" ' Limpiar variable.
End Sub
' Desde que cierres el programa, cierra el puerto.
Private Sub Form_Principal_Closing(sender As Object, e As
ComponentModel.CancelEventArgs) Handles Form_Principal.Closing
If serialPort1.IsOpen Then ' ¿El puerto está abierto?
serialPort1.Close() ' Cerrar puerto.
End If
End Sub
End Class
80. LECTURA DE ENTRADAS DIGITALES CON ARDUINO Y VISUAL STUDIO 2015
Electrónica PIC | http://electronica-pic.blogspot.com.es 79
Ejemplo 3:
Este ejemplo corresponde al código del Ejemplo 3 de Arduino.
Se trata en este caso unir los dos ejemplos de Visual Studio, las imágenes de los Leds y mostrar
mensajes en el richTextBox.
Se recomienda mirar el primer ejemplo para seguir bien la guía o entender el concepto si eres
muy novel.
81. LECTURA DE ENTRADAS DIGITALES CON ARDUINO Y VISUAL STUDIO 2015
Electrónica PIC | http://electronica-pic.blogspot.com.es 80
Ejemplo 3:
Código fuente del Ejemplo 3 de Visual Basic WPF.
Imports System.IO.Ports ' No olvidar.
Imports System.Text ' No olvidar.
Imports System.Threading ' No olvidar.
Class MainWindow
' Utilizaremos un string como buffer de recepción.
Dim Recibidos As String
' Creamos un objeto sdel puerto serie.
Dim serialPort1 As New SerialPort()
Private Sub Form_Principal_Loaded(sender As Object, e As RoutedEventArgs)
Handles Form_Principal.Loaded
' Configuramos el puerto serie.
serialPort1.BaudRate = 115200 ' Baudios, tiene que ser el mismo que
Arduino UNO.
serialPort1.PortName = "COM4" ' Elegimos el COM4 igual que Arduino en mi
caso.
serialPort1.Parity = Parity.None ' Nada de paridad.
serialPort1.DataBits = 8 ' 8 bits.
serialPort1.StopBits = StopBits.Two ' Funciona mejor con 2 bits de Stop.
' Abrir puerto mientras se ejecute la aplicación.
If Not serialPort1.IsOpen Then
Try
serialPort1.Open()
Catch ex As System.Exception
MessageBox.Show(ex.ToString())
End Try
End If
' Ejecutar la función Recepción por disparo del evento ¡DataReived!
AddHandler serialPort1.DataReceived, AddressOf Recepcion
End Sub
Private Sub Recepcion(sender As Object, e As SerialDataReceivedEventArgs)
' Acumular los caracteres recibidos a nuestro "buffer" (string).
Recibidos += serialPort1.ReadExisting()
' Invocar o llamar al proceso de tramas.
Me.Dispatcher.Invoke(AddressOf Actualizar)
End Sub
' Procesar los datos recibidos en el buffer y extraer tramas completas.
Private Sub Actualizar()
' Muestra el scroll vertical.
richTextBox.VerticalScrollBarVisibility = ScrollBarVisibility.Visible
' Asignar el valor de la trama al richTextBox.
Dim doc = New FlowDocument()
doc.Blocks.Add(New Paragraph(New Run(Recibidos + Environment.NewLine)))
richTextBox.Document = doc
' // Mantiene el scroll en la entrada de cada mensaje.
richTextBox.ScrollToEnd()
Dim Delimitador As Char() = {" "c, ControlChars.Cr, ControlChars.Lf}
82. LECTURA DE ENTRADAS DIGITALES CON ARDUINO Y VISUAL STUDIO 2015
Electrónica PIC | http://electronica-pic.blogspot.com.es 81
Dim Palabras As String() = Recibidos.Split(Delimitador)
For Each Comandos As String In Palabras
Select Case Comandos
Case "1=ON"
image_1.Source = (New BitmapImage(New Uri("Led rojo
encendido.png", UriKind.Relative)))
Recibidos = "" ' Limpiar.
Exit Select
Case "1=OFF"
image_1.Source = (New BitmapImage(New Uri("Led rojo
apagado.png", UriKind.Relative)))
Recibidos = "" ' Limpiar.
Exit Select
Case "2=ON"
image_2.Source = (New BitmapImage(New Uri("Led rojo
encendido.png", UriKind.Relative)))
Recibidos = "" ' Limpiar.
Exit Select
Case "2=OFF"
image_2.Source = (New BitmapImage(New Uri("Led rojo
apagado.png", UriKind.Relative)))
Recibidos = "" ' Limpiar.
Exit Select
Case "3=ON"
image_3.Source = (New BitmapImage(New Uri("Led rojo
encendido.png", UriKind.Relative)))
Recibidos = "" ' Limpiar.
Exit Select
Case "3=OFF"
image_3.Source = (New BitmapImage(New Uri("Led rojo
apagado.png", UriKind.Relative)))
Recibidos = "" ' Limpiar.
Exit Select
Case "4=ON"
image_4.Source = (New BitmapImage(New Uri("Led rojo
encendido.png", UriKind.Relative)))
Recibidos = "" ' Limpiar.
Exit Select
Case "4=OFF"
image_4.Source = (New BitmapImage(New Uri("Led rojo
apagado.png", UriKind.Relative)))
Recibidos = "" ' Limpiar.
Exit Select
End Select
Next
End Sub
Private Sub Actualizar_estados()
Dim miBuffer As Byte() = Encoding.ASCII.GetBytes("ACTUALIZAR")
' Envía comando ACTUALIZAR por el puerto.
serialPort1.Write(miBuffer, 0, miBuffer.Length)
End Sub
83. LECTURA DE ENTRADAS DIGITALES CON ARDUINO Y VISUAL STUDIO 2015
Electrónica PIC | http://electronica-pic.blogspot.com.es 82
Private Sub button_Actualizar_estados_Click(sender As Object, e As
RoutedEventArgs) Handles button_Actualizar_estados.Click
Actualizar_estados()
End Sub
Private Sub button_Limpiar_Click(sender As Object, e As RoutedEventArgs)
Handles button_Limpiar.Click
richTextBox.Document.Blocks.Clear() ' Limpiar contenido del richTextBox.
Recibidos = "" ' Limpiar variable.
End Sub
' Desde que cierres el programa, cierra el puerto.
Private Sub Form_Principal_Closing(sender As Object, e As
ComponentModel.CancelEventArgs) Handles Form_Principal.Closing
If serialPort1.IsOpen Then ' ¿El puerto está abierto?
serialPort1.Close() ' Cerrar puerto.
End If
End Sub
End Class
84. LECTURA DE ENTRADAS DIGITALES CON ARDUINO Y VISUAL STUDIO 2015
Electrónica PIC | http://electronica-pic.blogspot.com.es 83
85. LECTURA DE ENTRADAS DIGITALES CON ARDUINO Y VISUAL STUDIO 2015
Electrónica PIC | http://electronica-pic.blogspot.com.es 84
Visual C++ CLR 2015
86. LECTURA DE ENTRADAS DIGITALES CON ARDUINO Y VISUAL STUDIO 2015
Electrónica PIC | http://electronica-pic.blogspot.com.es 85
Antes de empezar, hay que instalar las herramientas comunes para Visual C++ 2015 como
indica la imagen.
87. LECTURA DE ENTRADAS DIGITALES CON ARDUINO Y VISUAL STUDIO 2015
Electrónica PIC | http://electronica-pic.blogspot.com.es 86
Cuando tengas Visual Studio Community 2015 ya ejecutado, creamos un proyecto
nuevo.
ArchivoNuevoProyecto…
Mirar imagen grande en la página siguiente.
88. LECTURA DE ENTRADAS DIGITALES CON ARDUINO Y VISUAL STUDIO 2015
Electrónica PIC | http://electronica-pic.blogspot.com.es 87
Le ventana Nuevo proyecto está abierta y seguimos en orden lo que indica la imagen.
1) Visual C++ en Plantillas.
2) CLR.
3) Proyecto vacío de CLR.
4) Ponemos el nombre que queramos, en este caso lo he llamado
Entrada_Arduino_CPP_CLR_1.
5) Pulsamos Aceptar.
89. LECTURA DE ENTRADAS DIGITALES CON ARDUINO Y VISUAL STUDIO 2015
Electrónica PIC | http://electronica-pic.blogspot.com.es 88
En el “Explorador de soluciones” seleccionamos el nombre de nuestro proyecto, en este caso
Entrada_Arduino_CPP_CLR_1 como el primer paso.
En la barra de herramientas Proyecto, luego Agregar un nuevo elemento tal como indica en la
imagen de abajo.
90. LECTURA DE ENTRADAS DIGITALES CON ARDUINO Y VISUAL STUDIO 2015
Electrónica PIC | http://electronica-pic.blogspot.com.es 89
Como muestra la imagen de abajo. Cloqueamos en Visual C++ UI y Señalamos Windows
Forms, le he añadido como nombre en el tercer paso Form_Principal, puedes poner cualquier
nombre, al final, pulsa Aceptar.
91. LECTURA DE ENTRADAS DIGITALES CON ARDUINO Y VISUAL STUDIO 2015
Electrónica PIC | http://electronica-pic.blogspot.com.es 90
En mi caso puede ver que hay un mensaje de error como muestra en esta imagen y en
la página siguiente.
No preocuparse, aún no hemos acabado.
92. LECTURA DE ENTRADAS DIGITALES CON ARDUINO Y VISUAL STUDIO 2015
Electrónica PIC | http://electronica-pic.blogspot.com.es 91
Cierra la pestaña pulsando la X. En la página siguiente lo volverás a abrir con el
formulario.
93. LECTURA DE ENTRADAS DIGITALES CON ARDUINO Y VISUAL STUDIO 2015
Electrónica PIC | http://electronica-pic.blogspot.com.es 92
Indicamos en el “Explorador de soluciones”, hacemos clic en el botón derecho del
ratón y luego pulsamos “Propiedades”.
94. LECTURA DE ENTRADAS DIGITALES CON ARDUINO Y VISUAL STUDIO 2015
Electrónica PIC | http://electronica-pic.blogspot.com.es 93
Sigue el procedimiento indicado abajo, en Subsistema tiene que ser Windows
(/SUBSYSTEM:WINDOWS), luego pulsas aplicar.
95. LECTURA DE ENTRADAS DIGITALES CON ARDUINO Y VISUAL STUDIO 2015
Electrónica PIC | http://electronica-pic.blogspot.com.es 94
Vete a la pestaña “Avanzadas”, Punto de entrada escribes main.
Finalmente el botón Aceptar.
96. LECTURA DE ENTRADAS DIGITALES CON ARDUINO Y VISUAL STUDIO 2015
Electrónica PIC | http://electronica-pic.blogspot.com.es 95
Escribe los códigos necesarios como muestra en la imagen, pero antes, mira la
página siguiente que se ve más grande y mejor.
97. LECTURA DE ENTRADAS DIGITALES CON ARDUINO Y VISUAL STUDIO 2015
Electrónica PIC | http://electronica-pic.blogspot.com.es 96
Cambiamos las propiedades de cada componente o controles.
Panel:
Propiedad Cambie a
BorderStyle FixedSingle
Label:
Propiedad Cambie a
(Name) Label_Entrada
Text Leyendo...
PictureBox:
Propiedad Cambie a
(Name) pictureBox_Dibujo
SizeMode StretchImage
98. LECTURA DE ENTRADAS DIGITALES CON ARDUINO Y VISUAL STUDIO 2015
Electrónica PIC | http://electronica-pic.blogspot.com.es 97
Seguimos en el componente PictureBox, pulsamos … en la propiedad Image como indica abajo
para introducir dos imágenes de dos Led, encendido y apagado.
99. LECTURA DE ENTRADAS DIGITALES CON ARDUINO Y VISUAL STUDIO 2015
Electrónica PIC | http://electronica-pic.blogspot.com.es 98
Buscamos y elegimos en este caso el Led rojo apagado.png.
Dejar claro que en la propiedad SizeMode del PicturreBox le he puesto StretchImage par
redimensionar el dibujo o imagen al cuadro.
En cuanto al formulario principal, en la propiedad StartPosition se ha cambiado a CenterScreen
para cuando lo compilemos o lo ejecutemos salga en el centro de la pantalla.
100. LECTURA DE ENTRADAS DIGITALES CON ARDUINO Y VISUAL STUDIO 2015
Electrónica PIC | http://electronica-pic.blogspot.com.es 99
Añade el componente SerialPort haciendo doble clic en él o arrastrándolo al formulario.
101. LECTURA DE ENTRADAS DIGITALES CON ARDUINO Y VISUAL STUDIO 2015
Electrónica PIC | http://electronica-pic.blogspot.com.es 100
Cambiamos las propiedades indicadas abajo.
SerialPort:
Tanto en Visual Studio como Arduino UNO y Arduino IDE tienen que funcionar en el mismo
puerto y baudios, en mi caso es:
Propiedad Cambie a
BuadRate 115200
PortName COM4
StopBits Two
En tu caso puede ser diferente, tanto el puerto y los baudios el que desee.
102. LECTURA DE ENTRADAS DIGITALES CON ARDUINO Y VISUAL STUDIO 2015
Electrónica PIC | http://electronica-pic.blogspot.com.es 101
Tener claro estas líneas al recibir datos desde Arduino como ON y OFF.
103. LECTURA DE ENTRADAS DIGITALES CON ARDUINO Y VISUAL STUDIO 2015
Electrónica PIC | http://electronica-pic.blogspot.com.es 102
Ejemplo 1:
Código fuente del Ejemplo 1 de Visual C+ CLR.
#pragma once
namespace Entrada_Arduino_CPP_CLR_1 {
using namespace System;
using namespace System::ComponentModel;
using namespace System::Collections;
using namespace System::Windows::Forms;
using namespace System::Data;
using namespace System::Drawing;
using namespace System::IO::Ports; // No olvidar.
/// <summary>
/// Resumen de Form_Principal
/// </summary>
public ref class Form_Principal : public System::Windows::Forms::Form
{
// Utilizaremos un string como buffer de recepción.
String^ Recibidos;
public:
Form_Principal(void)
{
InitializeComponent();
//
//TODO: agregar código de constructor aquí
//
if (!serialPort1->IsOpen)
{
try
{
serialPort1->Open();
}
catch (Exception ^ex)
{
MessageBox::Show(ex->ToString());
}
serialPort1->DataReceived += gcnew
SerialDataReceivedEventHandler(this, &Form_Principal::Recepcion);
}
}
// Al recibir datos.
private: Void Recepcion(Object^ sender,
SerialDataReceivedEventArgs^ e)
{
// Acumula los caracteres recibidos a nuestro 'buffer'
(string).
Recibidos += serialPort1->ReadExisting();
// Invocar o llamar al proceso de tramas.
Invoke(gcnew EventHandler(this,
&Form_Principal::Actualizar));
}
104. LECTURA DE ENTRADAS DIGITALES CON ARDUINO Y VISUAL STUDIO 2015
Electrónica PIC | http://electronica-pic.blogspot.com.es 103
// Procesar los datos recibidos en el bufer y extraer tramas
completas.
private: Void Actualizar(Object^ sender, EventArgs^ e)
{
if (Recibidos == "ON")
{
panel1->BackColor = Color::Green;
label_Lectura->Text = "Activado";
pictureBox_Dibujo-
>Load("LedLed_rojo_encendido.png");
Recibidos = "";
}
else
{
panel1->BackColor = Color::Red;
label_Lectura->Text = "Desactivado";
pictureBox_Dibujo->Load("LedLed_rojo_apagado.png");
Recibidos = "";
}
}
protected:
/// <summary>
/// Limpiar los recursos que se estén usando.
/// </summary>
~Form_Principal()
{
if (components)
{
delete components;
}
}
private: System::Windows::Forms::Label^ label_titulo;
protected:
private: System::Windows::Forms::Panel^ panel1;
private: System::Windows::Forms::Label^ label_Lectura;
private: System::Windows::Forms::PictureBox^ pictureBox_Dibujo;
private: System::IO::Ports::SerialPort^ serialPort1;
private: System::Windows::Forms::Label^ label1;
private: System::ComponentModel::IContainer^ components;
private:
/// <summary>
/// Variable del diseñador necesaria.
/// </summary>
#pragma region Windows Form Designer generated code
/// <summary>
/// Método necesario para admitir el Diseñador. No se puede
modificar
/// el contenido de este método con el editor de código.
/// </summary>
void InitializeComponent(void)
{
this->components = (gcnew
System::ComponentModel::Container());
System::ComponentModel::ComponentResourceManager^ resources
= (gcnew
System::ComponentModel::ComponentResourceManager(Form_Principal::typeid));
this->label_titulo = (gcnew System::Windows::Forms::Label());
107. LECTURA DE ENTRADAS DIGITALES CON ARDUINO Y VISUAL STUDIO 2015
Electrónica PIC | http://electronica-pic.blogspot.com.es 106
Ejemplo 2:
Este ejemplo corresponde al código del Ejemplo 2 de Arduino.
Si has llegado aquí directamente, se recomienda leer paso a paso el primer ejemplo.
Creamos el proyecto nuevo al igual que el Ejemplo 1 y esta vez lo llamamos
Entrada_Arduino_CPP_CLR_2, puedes poner el nombre que quieras del proyecto.
108. LECTURA DE ENTRADAS DIGITALES CON ARDUINO Y VISUAL STUDIO 2015
Electrónica PIC | http://electronica-pic.blogspot.com.es 107
Código fuente del Ejemplo 2 de Visual C++ CLR.
#pragma once
namespace Entrada_Arduino_CPP_CLR_2 {
using namespace System;
using namespace System::ComponentModel;
using namespace System::Collections;
using namespace System::Windows::Forms;
using namespace System::Data;
using namespace System::Drawing;
using namespace System::IO::Ports; // No olvidar.
using namespace System::Text;
/// <summary>
/// Resumen de Form_Principal
/// </summary>
public ref class Form_Principal : public System::Windows::Forms::Form
{
public:
// Utilizaremos un string como buffer de recepción.
String^ Recibidos;
Form_Principal(void)
{
InitializeComponent();
if (!serialPort1->IsOpen)
{
try
{
serialPort1->Open();
}
catch (Exception^ ex)
{
MessageBox::Show(ex->ToString());
}
serialPort1->DataReceived += gcnew
SerialDataReceivedEventHandler(this, &Form_Principal::Recepcion);
}
}
// Al recibir datos.
private: Void Recepcion(Object^ sender, SerialDataReceivedEventArgs^ e)
{
// Acumula los caracteres recibidos a nuestro 'buffer' (string).
Recibidos += serialPort1->ReadExisting();
// Invocar o llamar al proceso de tramas.
Invoke(gcnew EventHandler(this, &Form_Principal::Actualizar));
}
// Procesar los datos recibidos en el bufer y extraer tramas
completas.
private: Void Actualizar(Object^ sender, EventArgs^ e)
{
// Asignar el valor de la trama al richTextBox.
richTextBox1->Text += Recibidos;
109. LECTURA DE ENTRADAS DIGITALES CON ARDUINO Y VISUAL STUDIO 2015
Electrónica PIC | http://electronica-pic.blogspot.com.es 108
// Selecciona la posición final para leer los mensajes entrantes.
richTextBox1->SelectionStart = richTextBox1->Text->Length;
// Mantiene el scroll en la entrada de cada mensaje.
richTextBox1->ScrollToCaret();
}
protected:
/// <summary>
/// Limpiar los recursos que se estén usando.
/// </summary>
~Form_Principal()
{
if (components)
{
delete components;
}
}
private: System::Windows::Forms::RichTextBox^ richTextBox1;
protected:
private: System::Windows::Forms::Label^ label_Mensajes_desde_Arduino;
private: System::Windows::Forms::Label^ label1;
private: System::Windows::Forms::Label^ label2;
private: System::Windows::Forms::Button^ button_Actualizar;
private: System::Windows::Forms::Button^ button_Limpiar;
private: System::IO::Ports::SerialPort^ serialPort1;
private: System::ComponentModel::IContainer^ components;
private:
/// <summary>
/// Variable del diseñador necesaria.
/// </summary>
#pragma region Windows Form Designer generated code
/// <summary>
/// Método necesario para admitir el Diseñador. No se puede
modificar
/// el contenido de este método con el editor de código.
/// </summary>
void InitializeComponent(void)
{
this->components = (gcnew
System::ComponentModel::Container());
this->richTextBox1 = (gcnew
System::Windows::Forms::RichTextBox());
this->label_Mensajes_desde_Arduino = (gcnew
System::Windows::Forms::Label());
this->label1 = (gcnew System::Windows::Forms::Label());
this->label2 = (gcnew System::Windows::Forms::Label());
this->button_Actualizar = (gcnew
System::Windows::Forms::Button());
this->button_Limpiar = (gcnew
System::Windows::Forms::Button());
this->serialPort1 = (gcnew
System::IO::Ports::SerialPort(this->components));
this->SuspendLayout();
//
// richTextBox1
//
this->richTextBox1->Location = System::Drawing::Point(12,
110);
112. LECTURA DE ENTRADAS DIGITALES CON ARDUINO Y VISUAL STUDIO 2015
Electrónica PIC | http://electronica-pic.blogspot.com.es 111
private: System::Void Form_Principal_Load(System::Object^ sender,
System::EventArgs^ e) {
Actualizar();
}
};
}
113. LECTURA DE ENTRADAS DIGITALES CON ARDUINO Y VISUAL STUDIO 2015
Electrónica PIC | http://electronica-pic.blogspot.com.es 112
Ejemplo 3:
Este ejemplo corresponde al código del Ejemplo 3 de Arduino.
Se trata en este caso unir los dos ejemplos de Visual Studio, las imágenes de los Leds y mostrar
mensajes en el richTextBox.
Se recomienda mirar el primer ejemplo para seguir bien la guía o entender el concepto si eres
muy novel.
114. LECTURA DE ENTRADAS DIGITALES CON ARDUINO Y VISUAL STUDIO 2015
Electrónica PIC | http://electronica-pic.blogspot.com.es 113
Código fuente del Ejemplo 3 de Visual C++ CLR.
#pragma once
namespace Entrada_Arduino_CPP_CLR_3 {
using namespace System;
using namespace System::ComponentModel;
using namespace System::Collections;
using namespace System::Windows::Forms;
using namespace System::Data;
using namespace System::Drawing;
using namespace System::IO::Ports; // No olvidar.
using namespace System::Text;
/// <summary>
/// Resumen de Form_Principal
/// </summary>
public ref class Form_Principal : public Form
{
public:
// Utilizaremos un string como buffer de recepción.
String^ Recibidos;
Form_Principal(void)
{
InitializeComponent();
if (!serialPort1->IsOpen)
{
try
{
serialPort1->Open();
}
catch (Exception^ ex)
{
MessageBox::Show(ex->ToString());
}
serialPort1->DataReceived += gcnew
SerialDataReceivedEventHandler(this, &Form_Principal::Recepcion);
}
}
// Al recibir datos.
private: Void Recepcion(Object^ sender,
SerialDataReceivedEventArgs^ e)
{
// Acumula los caracteres recibidos a nuestro 'buffer'
(string).
Recibidos += serialPort1->ReadExisting();
// Invocar o llamar al proceso de tramas.
Invoke(gcnew EventHandler(this,
&Form_Principal::Actualizar));
}
// Procesar los datos recibidos en el bufer y extraer tramas
completas.
private: Void Actualizar(Object^ sender, EventArgs^ e)
115. LECTURA DE ENTRADAS DIGITALES CON ARDUINO Y VISUAL STUDIO 2015
Electrónica PIC | http://electronica-pic.blogspot.com.es 114
{
// Asignar el valor de la trama al richTextBox.
richTextBox1->Text += Recibidos;
// Selecciona la posición final para leer los mensajes entrantes.
richTextBox1->SelectionStart = richTextBox1->Text->Length;
// Mantiene el scroll en la entrada de cada mensaje.
richTextBox1->ScrollToCaret();
array<wchar_t, 1>^ Delimitador = { ' ','r','n' };
array<String^>^ Palabras = Recibidos->Split(Delimitador);
for each (String^ Comandos in Palabras)
{
if (Comandos == "1=ON")
pictureBox1->Load("LedLed_rojo_encendido.png");
else if (Comandos == "1=OFF")
pictureBox1->Load("LedLed_rojo_apagado.png");
else if (Comandos == "2=ON")
pictureBox2->Load("LedLed_rojo_encendido.png");
else if (Comandos == "2=OFF")
pictureBox2->Load("LedLed_rojo_apagado.png");
else if (Comandos == "3=ON")
pictureBox3->Load("LedLed_rojo_encendido.png");
else if (Comandos == "3=OFF")
pictureBox3->Load("LedLed_rojo_apagado.png");
else if (Comandos == "4=ON")
pictureBox4->Load("LedLed_rojo_encendido.png");
else if (Comandos == "4=OFF")
pictureBox4->Load("LedLed_rojo_apagado.png");
Recibidos = "";
}
richTextBox1->Text += " " + DateTime::Now.ToString() + "r";
}
//
#################################################################################
###############################
protected:
/// <summary>
/// Limpiar los recursos que se estén usando.
/// </summary>
~Form_Principal()
{
if (components)
{
delete components;
}
}
private: System::Windows::Forms::Label^ label_Visual_Cpp_CLR;
private: System::Windows::Forms::Label^ label1;
private: System::Windows::Forms::PictureBox^ pictureBox1;
private: System::Windows::Forms::PictureBox^ pictureBox2;
private: System::Windows::Forms::PictureBox^ pictureBox3;
private: System::Windows::Forms::PictureBox^ pictureBox4;
private: System::Windows::Forms::Label^ label_Led_1;
116. LECTURA DE ENTRADAS DIGITALES CON ARDUINO Y VISUAL STUDIO 2015
Electrónica PIC | http://electronica-pic.blogspot.com.es 115
private: System::Windows::Forms::Label^ label2;
private: System::Windows::Forms::Label^ label3;
private: System::Windows::Forms::Label^ label4;
private: System::Windows::Forms::RichTextBox^ richTextBox1;
private: System::Windows::Forms::Button^ button_Limpiar;
private: System::Windows::Forms::Button^ button_Actualizar;
private: System::Windows::Forms::Label^ label_Mensajes_desde_Arduino;
private: System::IO::Ports::SerialPort^ serialPort1;
private: System::ComponentModel::IContainer^ components;
protected:
private:
/// <summary>
/// Variable del diseñador necesaria.
/// </summary>
#pragma region Windows Form Designer generated code
/// <summary>
/// Método necesario para admitir el Diseñador. No se puede
modificar
/// el contenido de este método con el editor de código.
/// </summary>
void InitializeComponent(void)
{
this->components = (gcnew
System::ComponentModel::Container());
System::ComponentModel::ComponentResourceManager^ resources
= (gcnew
System::ComponentModel::ComponentResourceManager(Form_Principal::typeid));
this->label_Visual_Cpp_CLR = (gcnew
System::Windows::Forms::Label());
this->label1 = (gcnew System::Windows::Forms::Label());
this->pictureBox1 = (gcnew
System::Windows::Forms::PictureBox());
this->pictureBox2 = (gcnew
System::Windows::Forms::PictureBox());
this->pictureBox3 = (gcnew
System::Windows::Forms::PictureBox());
this->pictureBox4 = (gcnew
System::Windows::Forms::PictureBox());
this->label_Led_1 = (gcnew System::Windows::Forms::Label());
this->label2 = (gcnew System::Windows::Forms::Label());
this->label3 = (gcnew System::Windows::Forms::Label());
this->label4 = (gcnew System::Windows::Forms::Label());
this->richTextBox1 = (gcnew
System::Windows::Forms::RichTextBox());
this->button_Limpiar = (gcnew
System::Windows::Forms::Button());
this->button_Actualizar = (gcnew
System::Windows::Forms::Button());
this->label_Mensajes_desde_Arduino = (gcnew
System::Windows::Forms::Label());
this->serialPort1 = (gcnew
System::IO::Ports::SerialPort(this->components));
(cli::safe_cast<System::ComponentModel::ISupportInitialize^>(this-
>pictureBox1))->BeginInit();
(cli::safe_cast<System::ComponentModel::ISupportInitialize^>(this-
>pictureBox2))->BeginInit();