The Gigging Musician pedal board package consists of an aluminum pedal board measuring 323 x 611mm that can fit up to 10 pedals, a protective wooden case, a removable storage tray, and a friction mounting system. The pedal board uses an aluminum rail system to allow different mounting options to securely attach pedals. It includes 8 friction mounts and 16 double friction mounts. The case features a folding built-in amplifier stand and handles for easy transport. A removable storage tray lined with foam allows for customization and storage of additional gear.
Booking open Available Pune Call Girls Kirkatwadi 6297143586 Call Hot Indian...
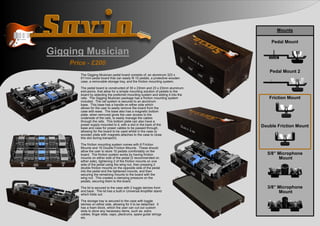
Pedal Board Presentation boards
1. Pedal Mount
Pedal Mount 2
Friction Mount
Double Friction Mount
5/8” Microphone
Mount
3/8” Microphone
Mount
Mounts
Gigging Musician
The Gigging Musician pedal board consists of; an aluminum 323 x
611mm pedal board that can easily fit 10 pedals, a protective wooden
case, a removable storage tray, and the friction mounting system.
The pedal board is constructed of 30 x 23mm and 23 x 23mm aluminum
extrusions, that allow for a simple mounting solution of pedals to the
board by selecting the preferred mounting system and sliding it into the
rails. The Gigging Musician package has a friction mounting system
included. The rail system is secured to an aluminum
base. This base has a handle on either side which
allows for the user to easily remove the board from the
case with ease. The base also has a magnetic bottom
plate, when removed gives the user access to the
underside of the rails, to easily manage the cables
through the rails. This bottom plate can also have a
power supply mounted to it, with a slot in the back of the
base and case for power cables to be passed through,
allowing for the board to be used whilst in the case (a
wooden plate with magnets attaches to the case to close
this slot during transport).
The friction mounting system comes with 8 Friction
Mounts and 16 Double Friction Mounts. These should
allow the user to store 10 pedals comfortably on the
board. The friction system works by having friction
mounts on either side of the pedal (2 recommended on
either side), tightening 2 of the friction mounts on one
side of the pedal using the wing nut, then pressing 2
double friction mounts on the opposite side of the pedal
into the pedal and the tightened mounts, and then
securing the remaining mounts to the board with the
wing nut. This creates a clamping pressure on the
pedals, securing them to the board.
The lid is secured to the case with 2 toggle latches front
and back. The lid has a built in Universal Amplifier stand
which folds out.
The storage tray is secured to the case with toggle
latches on either side, allowing for it to be detached. It
has a foam block, which the user can cut out custom
slots to store any necessary items, such as, extra
cables, finger slide, capo, plectrums, spare guitar strings
etc.
Price - £200
2. Component Materials Used
Board Rails • Black Anodised Aluminum (glossy)
Board Rail Bracket • 3mm Black Anodised Aluminum (glossy)
Board Base
• 3mm Dark Grey Anodised Aluminum (rough)
• Square Neodymium Magnets
Savio Board Base
Branding (Handles and
Back)
• PVC Vinyl
Case
• 7mm Dark Bamboo Plywood (semi-gloss)
*Walnut was used for wood components as the
rendering texture, as there were texture issues
with the software*
• Nickle Plated Steel Toggle Latches
• Polyethylene Foam
• Nickle Plated Steel Handle, Black Leather on
Handle Grip
• Round Neodymium Magnets
Case Cable Door
• 7mm Dark Bamboo (semi-gloss)
• Round Neodymium Magnets
Case Lid
• 7mm Dark Bamboo (semi-gloss)
• Nickle Plated Steel Toggle Latches
• 4mm Dark Grey Anodised Aluminum (rough)
• 3mm Steel Rod
• Flat Woven Elastic
• ABS Side Release Buckle
Savio Case Branding
(Front)
• Polished Chrome
Savio Case Logo (Top) • PVC Vinyl
Storage Tray
• 7mm Dark Bamboo (semi-gloss)
• Nickle Plated Steel Toggle Latches
• Polyethylene Foam
Mounting Systems
The friction mount system employs a clamping pressure to mount the a
pedal to the board. Ideally 4 mounts are used per pedal. The pedals
closest to either side of the board will have 2 friction mounts on the
outside face and 2 double friction mounts on the inside. Using this layout
allows the user to get the maximum usage out of the board. The double
friction mounts are 44mm long, which should be suitable distance
between each pedal to allows for cables. The user can opt for using only
friction mounts, enabling them to space out the pedals further.
The pedal mount system is similar to the bike chain link method of
mounting pedals to a board. One end of the mount is mounted to the
rails of the board, and the other uses a thumb screw that threads into the base of the pedal. On the pedal mount 2, the slot for the pedal is
recessed, to allow the use of the screw/bolt that is already in the pedal, as this slot is only 1mm thick in this area. The pedal mounts are
attached to the four corners of the pedal.
The mounts that I have designed, were designed with the intentions of being as robust as possible, simple, and inexpensive to produce.
For all of the mounts, the main body is made from 3mm thick Stainless steel. This would be laser cut and bent into shape. The laser cutting
would cut out the general shape of the body and the bolt holes. The
additional features would then be bent into shape, depending on the
specific mount. The mounts (not applicable to double friction mount)
have a small 5mm 45° bend on the back of the mount. This bend is
intended to provide the user with better ergonomics to slide the mount
along the rail, and make it easier to apply clamping pressure. The main
bodies requires minimal post processing, with each part given a gloss
black anodised coating to provide additional protection against corrosion/
rust. This coating will also help disguise the mounts with the black
anodised rails on the board, for better aesthetics. A small chamfer would
be added to all the edges to take away any sharp edges from the laser
cutting. The two friction mounts also have an adhesive rubber plate
applied to the clamping faces, firstly for additional friction between the
mount and the pedals, and to protect the pedals from being marked, as
the mounts are made from stainless steel.
Each mount is secured to the board with a square ABS block which
slides along the inner of the rails. This ABS block would be injection
moulded for rapid production and low per part costs. An M6 bolt is
passed through the ABS block (extrusion cut in the part allows for the
head of the bolt to sit flush inside the block) and through the hole in the body of the mount. This is then tightened down to the board with a
wing nut on top of the mount body. Both the M6 bolts and the wing nuts would be bought in bulk as these are readily available fasteners. I
decided to use a bolt and wing nut to ensure a simple design, which has less chance of failure as there is a reduction in moving parts, and
if the user loses a bolt or wing nut, they are readily available at any hardware store.
The pedal mount design has a thumb screw in the design, this again
would be bought in bulk depending on the thread diameter requirements
of different pedal manufacturers. The thumb screws allows the user to
easily hand tighten the mount to the underside of a pedal, in the same
manner of a bike chain link system. The thumb screw would have a slot
cut into the head of the screw, for extra tightening using the likes of a
coin if required. An area around the slot on the pedal mount 2 is
recessed by 2mm, to allow the use of the screws already used on the
underside of a pedal, providing a truly universal solution.
During research of mic stands, the two most common threads used are
5/8” - 27 and 3/8” - 16. I have designed a mount for each of these thread
types. The main body is the same as the other mounts, but I have
included 2 bolt holes on the mic mounts, to ensure the microphone is
stable when mounted. Stainless steel rods would be cut to length, a hole
would be milled into one side, this would then be tapped to the specific
thread diameter and length. The barrel would then be welded to the
mount body before the normal post processing stages.
3/8 Mic Mount 5/8 Mic Mount
Friction Mount Double Friction Mount
Pedal Mount Pedal Mount 2
3. Pedal Board
Rail Design
Extrusion Profiles
Rail Bracket
From left to right - the first profile is 23 x 22.75mm, the next seven
profiles are the same at 30 x 23mm, and the last profile is again 23 x
22.75mm. Each one is 600mm in length. In the centre of each
extrusion are two 2.5mm diameter screw ports, that allows a 3mm self
tapping screw to fasten the extrusions to the bracket.
The rail bracket is 29.2 (H) x 23 (W) x 314 (L)mm. It has slots to fit the
profile of the mounts, allowing them to slide along the rails. Holes are
aligned 33.5mm apart to ensure that the extrusions are the perfect
distance apart, ensuring the correct tolerance to allow the mounts to
slide with ease. Each hole is 3mm for the self tapping screws to secure
the extrusions to the bracket. There are four 3mm holes along the
centre of the bracket. These holes are there to fasten the assembly to
the aluminum pedal board shell.
Pedal Board Packages
1. The Hobbyist (up to 10 Pedals) - £100 - Includes; a 323 x 614mm Pedal Board.
2. The Gigging Musician (up to 10 Pedals) - £200 - Includes; a 323 x 614mm Pedal
Board, Friction Mounting system (8 Friction Mounts & 16 Double Friction Mounts), Wooden
case with built in Folding Amplifier Stand, and a removable Storage Tray.
3. The Professional (up to 16 Pedals) - £300 - Includes; a 323 x 814mm Pedal Board,
choice of mounting system, choice of Microphone Stand, Wooden case with built in Folding
Amplifier Stand, and a removable Storage Tray.
The board is constructed from black anodised aluminum extrusions (detailed right),
secured to black anodised aluminum brackets, that are then fastened to a dark grey rough
anodised aluminum shell, with 3mm bolts. This forms the rails that allow for to mounting
systems to slide along the board. The extrusions are glossy to allow the mounts to glide
along the rails.
As a rail system was used, mentioned in the research report, this allows the user to apply
Hook & Loop / Velcro tape to the board. Therefore, if the user selects The Hobbyist
package, they can choose to use 30mm Hook & Loop / Velcro tape, or they can add one of
our mounting systems of choice at an additional cost.
The rail system also allows the users to pass cables through the slots to the underside of
the board. The pedal board shell has a magnetic bottom plate, with strong neodymium
magnets to secure it to the shell. This can be easily removed, giving the user access to the
underside of the board to manage their cables, out of sight from the top of the board. A
power supply can also be mounted to this bottom plate to store inside the board. There is a
cutout on the back of the shell that allows for the power cable to be passed through. The
bottom plate has non-slip rubber feet on the underside, to prevent the board marking any
flooring, and to prevent the board from sliding during use.
The pedal board has a 10° tilt towards the user on the top face. This makes it more
ergonomic for the user to activate the pedals towards the back of the board. The shell also
has a handle on either side, making it easier for the board to be lifted and moved, or
removed from the case. Chrome effect decals of the Savio brand name are on the outside
of these handle, as well as on the back of the board, for audience members to see.
With further planning, the board design could be optimised for laser cutting and bending
using 3mm sheet aluminum, that would be assembled with fasteners. Another option would
be aluminum die casting. Post production would include a dark grey anodisation to protect
the metal from corrosion, and the removal of any sharp edges with a small fillet.
4. Pedal Board Case
Branding
Savio Brand Name
Savio Logo
Universal Folding Amplifier Stand
The folding arms have are designed to
be at a 30° tilt upwards, which was
requested in the design proposal. The
wings are 345mm apart which should fit
the most popular amps (based off the
ones I had researched), with the back of
the wings being 250mm long for the amp
to rest on.
A folding Amplifier stand is mounted on the inside of the case lid.
It’s constructed from 4mm sheet aluminum and has a dark grey
anodised coating to match the pedal board. The wings of the
stand hinge open on stainless steel rods. The stand is secured
closed by woven elasticated bands and a side release buckle.
The wooden pedal board case is included with the Gigging Musician and Professional pedal
board packages. It is a stylish box made from dark semi-gloss bamboo plywood (in the
renders walnut has been used as there was an issue processing the bamboo plywood
texture). In the model I used 7mm thick plywood, but I think it would be more suitable to use
12mm or thicker to ensure that the box is sturdy enough for the environments it would be put
in. The wooden boards would be joined together with glued mitre joints. This would have to
be tested to ensure that it is durable, but I think that metal corner plates could be added to the
outside of the joints to reinforce them.
A nickle plated steel handle with a leather grip on the front of the case transporting the board
from place to place, in a briefcase style. When in transport, the case shows off a coloured
decal of the Savio logo. On the front of the case above the handle, is the Savio brand name
in polished chrome.
Inside the case is 15mm thick Polyethylene Foam that is moulded to fit the pedal board snug
inside the case. This is in place to help protect the board inside the case from any knocks and
bumps. On the back of the case, there is a magnetic cable door. This is simply a cutout in the
back of the case, which allows power cables to pass through the case, allowing the board to
be used without having to remove it from the case. The case also has a 10° slant in the
design, to match the tilt of the board, ensuring that the board is fully functional whilst the lid is
removed from the main body.
The cable door can be quickly closed again with round neodymium magnets on a matching
piece of plywood, that snaps in place, preventing loose items inside the board from falling out
of the case. This require there to be neodymium magnets embedded into both the plywood
cable door and the case, which can simply done with a drilled hole and glue. The handle on
the pedal board protrude from the case when it is open, making it more ergonomic for the
user to get a grip of the board to remove it.
Nickle Plated Steel Toggle Latches makes it quick to remove the lid and storage tray from the
case. The orientation of the toggle latches on the storage tray was purposely chosen to have
the latches on the storage tray and the catches on the case. This was done so that if the
storage tray was not required it could be removed, and the user wouldn’t be carrying the case
with latches flopping around, or having to carry unnecessary weight. The toggle latches
would be bought in bulk as these are a readily available item. Another option to use are
butterfly latches, which are commonly found on flight cases as an alternative to toggle
latches. Butterfly latches are more robust, but are more costly in comparison to toggle
latches.
The storage tray consists of a block of 629 x 338 x 40mm
Polyethylene Foam, that provides a customisable storage solution to
the user. They can cut the foam to suit their storage requirements,
with plenty of room for a finger slide, extra strings, plectrums and much
more. The foam will provide some impact protection to the items
during any knocks etc, and will hold the items securely in place.