Guide to Weebly
•Als PPTX, PDF herunterladen•
0 gefällt mir•266 views

A step-by-step guide to building your Weebly site.

Empfohlen
Weitere ähnliche Inhalte
Was ist angesagt?
Was ist angesagt? (20)
Ähnlich wie Guide to Weebly
Ähnlich wie Guide to Weebly (20)
Mehr von Studyvibe
Mehr von Studyvibe (20)
Kürzlich hochgeladen
Kürzlich hochgeladen (20)
Guide to Weebly
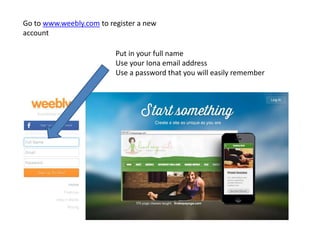
- 1. Go to www.weebly.com to register a new account Put in your full name Use your Iona email address Use a password that you will easily remember
- 2. You will be given three options for a website type – Choose Site
- 3. You will then be given the option of choosing a theme. Suggestion - Choose the first theme to start with – you can always go back and change it. It is best to create some pages first before you choose your final theme as it is hard to see what the website will look like with empty pages.
- 4. After you have chosen your theme you will be asked yo choose your website domain. CHOOSE the first option
- 5. • Select the first radio button. • The subdomain that you create will become the URL for your website so it should be meaningful and not too long.
- 6. You will be given an opportunity to watch an introductory video to help you create your website. If you don’t wish to watch it select the X in the top right hand corner to close.
- 7. Creating Pages for your Website Go to the Page view. Here you will find three default pages. These can be deleted or you can change the names if you do not want them. It is on this screen that you plane your website structure You can delete the About and Contact pages if you do not want them OR you can rename them as another page
- 8. Adding Pages to your Website To add a page select the Add Page + tab. You will be given 4 options for the type of page you can have. Select Standard Page.
- 9. Naming Pages You can name your pages in two places – see diagram below Once created click on the Save and Edit the page Once you have selected your page type you can give it a name. This can be changed at any time. Click the Save and Edit to take you to that page
- 10. Choosing your Page Layout There are four page layouts that you can choose from. Suggestion: Use the No Header page and build your page from scratch. When you have chosen your Page Layout select the Save and Edit button to start working on your page.
- 11. Creating your Site Name The default title for your site is My Site. You will need to go into Settings and change the Site Ttile to something of your choice. Save your changes when you are finished. You can also change the website URL here also.
- 12. Categorising your website Once you have created your initial website you must categorize it. Select the EDUCATION type and CLASS PROJECT category.
- 13. Building your Page Select the page you wish to start building (we are staring with the Home page) You will come into the Build function on the website. From here you can ‘Drag and Drop’ elements for the Build menu on the left of the screen. Choose the elements you wish to start working with and drag them onto the webpage. You can move them around the page as you require
- 14. Use the tool bar to change your text, fonts, size and colour Once you have chosen the text tool you can start adding your own text and editing it using the Editing Toolbar. Adding Features to your page There are many different features you can add to your page. Some require special techniques and will be discussed individually. Below is an example of a Title and text that has been added.
- 15. Adding a You Tube Video You can easily add a You Tube video to your site. Drag the You tube icon onto your page. An instructional video on how to add a video will start to play. If you don’t want to listen to it click on the video and a window will appear asking for the URL for your video. You will need to go to You Tube to get the URL for the video Drag the You Tube icon onto the webpage.
- 16. Adding a You Tube Video If you don’t want to listen to the instructional video click on it and a window will appear asking for the URL for your video. You will need to go to You Tube to get the URL for the video then paste it into the window. The video will automatically appear on the page. You can then move the video wherever you would like it to go on the page.
Hinweis der Redaktion
- When you are in the Page view you will see three default pages: Home About Contact You may not want the About and Contact pages – you can delete them if you don’t want them or RENAME them as another page