1. Android Development Module
1
Contents
Development Infrastructure.........................................................................................................2
Updating update packages using Android SDK Manager.............................................................2
Setting up your Android Virtual Device ......................................................................................3
Coding our First Android Application Program.........................................................................10
Adding Toast to your Hello World ............................................................................................24
Creating Another Activity and Adding Camera Functionality....................................................29
Adding the SMS Function into the Mix.....................................................................................35
Since I can’t send SMS, I guess I’ll just E-mail then .................................................................42
Are you a Robot? ......................................................................................................................50
2. Android Development Module
2
Android Development Module
Written by Keviindran Ramachandran/ MMXIV
Development Infrastructure
Setting up the development infrastructure:
i. Java Development Kit (JDK) , download it here
www.oracle.com/technetwork/java/javase/downloads/
ii. Eclipse Android Developer Tool (ADT), download it here
http://developer.android.com/sdk/index.html
Once you have installed the latest version of JDK (the installation method should be relatively
simple), extract the downloaded version of Eclipse ADT. Please note that if you extract the
ADT directly with the conventional name (eg. adt-bundle-windows-x86-20140702.zip), you
might run into an error of extract file path name too long (being more than 260 characters), it is
advised that you rename the zip file before extracting it.
After you have done extracting the Eclipse ADT, it should produce this three in the directory
eclipse
sdk
SDKManager.exe
Updating update packages using Android SDK Manager
Run the SDKManager.exe to update all the plugins and other essential files for the
development. Also, as of the time of writing, the Eclipse ADT is bundled with Android L
preview (codename Lollipop) system image which is targeted for Android TV and also Android
4.4.W which is targeted for Android Wear device (Android watches and etc.). So you would
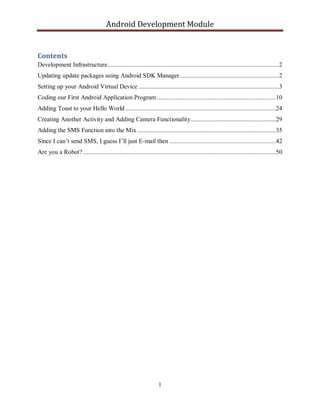
have to tick a few stuffs from the SDK Manager window.
3. Android Development Module
3
As shown on the image above, you will need to tick these two if your application development
is targeted for Android 4.4.2 (KitKat) which is more for mobile. You may omit the Intel x86
Atom System Image since most of the mobile phone is running on ARM architecture (unless
your device is running on Atom of course). The download process should take some time so you
can go ahead and take a walk or something while waiting.
Setting up your Android Virtual Device
Once all your update packages is downloaded completely and updated, you should fire
up your Eclipse. It is located under the directory of eclipse. As of the time of writing, the
version of Eclipse being used by the ADT is Kepler. Once your Eclipse is started, something like
this will pop up
4. Android Development Module
4
Assuming you have installed any other version of Eclipse before, it is advised that you rename
your Workspace so that it will not conflict with your previous version Eclipse workspace. An
easy solution to this is just to add another (backslash) and add name for your new workspace
directory (like android or something like that).
Once your Eclipse has fully loaded, you should be able to see some buttons on the top row that
are a bit different from the normal Eclipse. Click the icon that looks like the android logo is in a
mobile phone. That would be your Android Virtual Device (AVD) Manager.
Android Virtual
Device Manager
Android SDK
Manager
5. Android Development Module
5
Once you click the AVD Manager, a new window like this should pop up.
Mine has an AVD created, if you have never created one before, there should not be any AVD
device defined.
The way I create my device is by going to Device Definition tab. After that I choose Nexus S
(but you may choose any other device definitions depending on the screen size of your
application development) and click on the button Create AVD….
6. Android Development Module
6
After you click the button, a new window called “Create new Android Virtual Device (AVD)”
will pop up.
There are a few things that we need to make sure so that the AVD is set up properly.
The target is Android 4.4.2 – API level 19 (Android KitKat)
The CPU should be ARM
Set the skin as “Skin with dynamic hardware controls”
Set the back camera as “emulated”
Set a little space for the SD (at least 1 GiB)
And click “Okay”
1
2
3
7. Android Development Module
7
You set up would look like something above.
So once you have set up, you should try to start your AVD to see whether your setup is proper.
You can do this by going to the “Android Virtual Device” tab and choose your device and
click the “Start” button.
10. Android Development Module
10
Coding our First Android Application Program
Since the AVD will take a while to boot up, why don’t we start to code our first android
application instead? But first, we need to understand the three important things in android
application programming
i. Manifest (.xml) – This is where you have to define which activities will be in your app
and permissions that the app is going to use.
ii. Activity (.java) – This is the back end process of the application, the logics and algorithm
will be programmed in this part.
iii. Layout (.xml) – This is the graphical interface part of the application (the GUI). You may
do this part using the drag & drop or get your hands dirty and code this part.
So to create the our first project, we would have to click on File > New > Android Application
Project (if you have added ADT plugin on your default Eclipse, this would be listed under the
Other category). Then a new window called New Android Application will appear.
11. Android Development Module
11
So name your Application as HelloWorld and Eclipse will automatically generate the Project
Name and the Package Name (please take note on what is the generated package name as we
might be using it later on). After you have filled the Application name, you have to make sure
that your Target SDK and Compile With is KitKat (API 19). You may ignore the theme and
minimum SDK. It will look something like this (ignore the fact that my project is named
HelloWorld2 since I have created HelloWorld before).
12. Android Development Module
12
Click Next and in the next window, uncheck Create activity and click Next as well
In the next window for Configure Launcher Icon, you may change the icon to your preference.
I am just going to let it be and click Next. And finally under the Create Activity, I am just going
to leave it to Blank Activity and just click Finish.
13. Android Development Module
13
Once the IDE finish loading, there will be a new folder called HelloWorld located under the
Package Explorer tab. The image below explains the location of Activity, Layout and Manifest.
14. Android Development Module
14
This is where your Activity will
be located
This folder will hold
your layouts
And this is where
you need to edit
your Manifest
15. Android Development Module
15
What we going to do now is to create a package that holds our Activity(s). So we click our src
folder and choose New > Package. In the Name part, we are going to fill the Package Name
that is generated when we create the project just now (the one that I ask you to take note). It
should be something like this. After that just click Finish.
16. Android Development Module
16
After the package has been created, we are going to create our layout first (since you will need
to bind the layout first to the Activity). So we go to our layout folder, right click it and choose
New>Android (Layout) XML File.
*Note: The word layout may not appear, if it doesn’t just choose Android XML File.
In the File part, we are going to just fill it with main_activity. For this example, we are going to
choose the Absolute Layout under the Root window and we are going to just click Finish.
This will create the editor area for your main_activity.xml. This may take a while to load but
once it loads, it will look something like this.
17. Android Development Module
17
Notice that there are two tabs at the bottom, one is Graphical Layout and the other is
main_activity.xml. The first tab is where you can edit your layout using drag & drop and the
second one is for the coding. So what we going to do for our first activity is just going to drag the
TextView from Form Widget tab onto our layout. Once your drop on the layout, you can press
F2 after choosing the TextView to change your text.
For this example, we are going to change the text to Hello World! and just click Okay.
18. Android Development Module
18
The xml code would look something like this
<?xml version="1.0" encoding="utf-8"?>
<AbsoluteLayout xmlns:android="http://schemas.android.com/apk/res/android"
android:layout_width="match_parent"
android:layout_height="match_parent" >
<TextView
android:id="@+id/textView1"
android:layout_width="wrap_content"
android:layout_height="wrap_content"
android:layout_x="129dp"
android:layout_y="201dp"
android:text="Hello World!" />
</AbsoluteLayout>
19. Android Development Module
19
Make sure you save your changes (this can be done easily by using Ctrl+S). New we are going
to code our activity. So go back to your package location. Right click, New > Class.
Since this is going to be bound with main_activity.xml, I am just going to name my activity as
main_activity. Then just click Finish.
20. Android Development Module
20
After you click finish, main_activity.java will appear on the editor window. Just edit your code
to be of the code snippet below.
package com.example.helloworld;
import android.app.Activity;
import android.os.Bundle;
public class main_activity extends Activity{
public void onCreate(Bundle savedInstanceState){
super.onCreate(savedInstanceState);
setContentView(R.layout.main_activity);
}
}
Once that is done, save the changes and we are going to move on to the Manifest. Double click
the Manifest.xml so that it will appear on the editor. There are a few tabs under the HelloWorld
Manifest that allows you to change things one by one but we are going to change the things using
code so we going straight to the last tab which is AndroidManifest.xml.
21. Android Development Module
21
We need to edit the code so that the program will recognize that the main activity will the main
and the launcher. Your edited code would look something like this.
<manifest xmlns:android="http://schemas.android.com/apk/res/android"
package="com.example.helloworld"
android:versionCode="1"
android:versionName="1.0" >
<uses-sdk
android:minSdkVersion="8"
android:targetSdkVersion="19" />
<application
android:allowBackup="true"
android:icon="@drawable/ic_launcher"
android:label="@string/app_name"
android:theme="@style/AppTheme" >
<activity android:name = "com.example.helloworld.main_activity">
<intent-filter >
<action android:name="android.intent.action.MAIN"/>
<category android:name="android.intent.category.LAUNCHER"/>
</intent-filter>
</activity>
</application>
</manifest>
Make sure your activity tag is in between the application tag. Save your changes and we are
going to compile our codes. Make sure you are at the activity tab since we can only compile our
code through the activity. Just click Run as.. button and choose Android Application and click
Okay.
22. Android Development Module
22
After you click Okay, a green progress bar will appear at the bottom right corner to show that
your code is being compiled and being installed on your AVD (hopefully your AVD is done
booting up by now).
Once that is done, you can check your AVD for the installed application and the application
should start immediately. The output should be something like this.
23. Android Development Module
23
If you manage to get the output like the one above, that means that you have successfully coded
your first application. Congratulations! Give yourself a pat on the back. If there are problems
where your application crashes, chances are you have coded your Manifest wrong or you have
made a typo somewhere. You may use the Logcat and Console tab at the bottom debugging
window to trace your errors.
24. Android Development Module
24
*Note: Debugging is actually a very important skill to acquire by programmers which can only
be acquired through experience and practice. So, try to debug your error on your own first before
asking your friend and trainer. And whenever you do ask your peers or trainer, take note on what
they do and how they solved the problem. Seriously, you might just embarrass yourself because
of small and trivial errors.
Adding Toast to your Hello World
So we are going to expand our existing code so that it will have a message notification for the
user to see (it is called Toast in the coding part). This message will be triggered with a push of a
button. Since we are going to modify the existing layout and activity to accommodate the
change, we do not need to create new layouts and activities, so we do not need to make any
changes to the manifest as well.
So we are going to add a button to the layout, so just click the main_activity.xml tab at the
editor and choose Graphical Layout at the bottom to make changes to the layout. The just drag
the Button (you may choose Button or Small Button) on to the layout.
25. Android Development Module
25
After you have drag the button on the layout, press F2 to change the text, and for this I am going
to add “Say Something” on to the button.
26. Android Development Module
26
Now the text of the button will change to Say Something. Next we will need to change the code
of the layout so we click the tab main_activity.xml at the bottom and make the changes to code
to add an onClick function to the code. I am going to name my function as saySomething. The
xml code will now look something like this.
<?xml version="1.0" encoding="utf-8"?>
<AbsoluteLayout xmlns:android="http://schemas.android.com/apk/res/android"
android:layout_width="match_parent"
android:layout_height="match_parent" >
<TextView
27. Android Development Module
27
android:id="@+id/textView1"
android:layout_width="wrap_content"
android:layout_height="wrap_content"
android:layout_x="129dp"
android:layout_y="201dp"
android:text="Hello World!" />
<Button
android:id="@+id/button1"
android:layout_width="wrap_content"
android:layout_height="wrap_content"
android:layout_x="89dp"
android:layout_y="344dp"
android:onClick="saySomething"
android:text="Say Something" />
</AbsoluteLayout>
Next we are going to add the function that actually shows the Toast message when you click the
Say Something button. So click the main_activity.java tab in the editor and make the changes to
the code so it will look something like this.
package com.example.helloworld;
import android.app.Activity;
import android.os.Bundle;
import android.view.View;
import android.widget.Toast;
public class main_activity extends Activity{
public void onCreate(Bundle savedInstanceState){
super.onCreate(savedInstanceState);
setContentView(R.layout.main_activity);
}
public void saySomething(View v){
Toast.makeText(this, "Hello :D", Toast.LENGTH_SHORT).show();
}
}
After this, save all the changes you have made and compile the code like how we did before.
The output at the AVD will look something like this when you press the button.
29. Android Development Module
29
Creating Another Activity and Adding Camera Functionality
Next, we are going to create another activity that holds the camera functionality and link it to the
main_activity. So first, we are going to create a button that allows us to access the camera
activity. Like always, we are going to make changes to the main_activity.xml. So drag the button
and change the text to camera. This time I am going to be using Small Button instead. Next I am
going to add the onClick function called goToCamera to the button.
The changed .xml code will look something like this.
<?xml version="1.0" encoding="utf-8"?>
<AbsoluteLayout xmlns:android="http://schemas.android.com/apk/res/android"
android:layout_width="match_parent"
android:layout_height="match_parent" >
<Button
android:id="@+id/button1"
android:layout_width="wrap_content"
android:layout_height="wrap_content"
android:layout_x="87dp"
android:layout_y="74dp"
android:onClick="saySomething"
android:text="Say Something" />
<TextView
android:id="@+id/textView1"
android:layout_width="wrap_content"
android:layout_height="wrap_content"
android:layout_x="121dp"
android:layout_y="27dp"
android:text="Hello World!" />
<Button
android:id="@+id/button2"
style="?android:attr/buttonStyleSmall"
android:layout_width="wrap_content"
android:layout_height="wrap_content"
android:layout_x="29dp"
android:layout_y="137dp"
android:onClick="goToCamera"
android:text="Camera" />
</AbsoluteLayout>
Next we are going to add the function goToCamera to the main_activity.java.
30. Android Development Module
30
package com.example.helloworld;
import android.app.Activity;
import android.content.Intent;
import android.os.Bundle;
import android.view.View;
import android.widget.Toast;
public class main_activity extends Activity{
public void onCreate(Bundle savedInstanceState){
super.onCreate(savedInstanceState);
setContentView(R.layout.main_activity);
}
public void saySomething(View v){
Toast.makeText(this, "Hello :D", Toast.LENGTH_SHORT).show();
}
public void goToCamera(View v){
Intent myintent = new Intent(this, camera.class);
startActivity(myintent);
}
}
Since we have completed the code for the button to go to the camera Activity, now we are going
to create the activity and the layout for camera. So, create a layout called camera.xml under the
layout folder. For camera, we are going to use the Absolute Layout again. Drag a button to the
layout, this button will be the button that is used for opening the camera on your phone (or your
AVD since we have added the emulated back camera to the AVD). Then, drag an ImageView
which is under the Image & Media palette tab. Just click Okay when a window pops up after
you have dragged the ImageView to the layout. Resize the button and ImageView to your desire.
31. Android Development Module
31
Next we are going to add an onClick function to the button. The function is going be called
capturePhoto. The xml code will look something like this.
<?xml version="1.0" encoding="utf-8"?>
<AbsoluteLayout xmlns:android="http://schemas.android.com/apk/res/android"
android:layout_width="match_parent"
android:layout_height="match_parent" >
<ImageView
android:id="@+id/imageView1"
android:layout_width="216dp"
android:layout_height="216dp"
android:layout_x="44dp"
android:layout_y="40dp"
android:src="@drawable/ic_launcher" />
<Button
android:id="@+id/button1"
android:layout_width="wrap_content"
android:layout_height="wrap_content"
android:layout_x="113dp"
32. Android Development Module
32
android:layout_y="343dp"
android:onClick="capturePhoto"
android:text="Capture" />
</AbsoluteLayout>
After that, we are going to create the functionalities using camera.java. So create the class
camera.java and code something like this to allow the button to access the device camera,
capture the photo and update the ImageView with the captured photo. The code will look
something like this
package com.example.helloworld;
import android.app.Activity;
import android.content.Intent;
import android.graphics.Bitmap;
import android.os.Bundle;
import android.view.View;
import android.widget.ImageView;
public class camera extends Activity {
private static final int CAMERA_PIC_REQUEST = 1337;
public void onCreate(Bundle savedInstanceState) {
super.onCreate(savedInstanceState);
setContentView(R.layout.camera);
}
public void capturePhoto(View v) {
Intent cameraIntent = new Intent(
android.provider.MediaStore.ACTION_IMAGE_CAPTURE);
startActivityForResult(cameraIntent, CAMERA_PIC_REQUEST);
}
protected void onActivityResult(int requestCode, int resultCode, Intent data)
{
if (requestCode == CAMERA_PIC_REQUEST) {
Bitmap thumbnail = (Bitmap) data.getExtras().get("data");
ImageView image = (ImageView) findViewById(R.id.imageView1);
image.setImageBitmap(thumbnail);
}
}
}
33. Android Development Module
33
Last but not least, we will need to make changes to the Manifest. The modified Manifest will
look something like shown below, take note on how activities that are not main activities are
declared and permission for accessing the camera.
<manifest xmlns:android="http://schemas.android.com/apk/res/android"
package="com.example.helloworld"
android:versionCode="1"
android:versionName="1.0" >
<uses-sdk
android:minSdkVersion="8"
android:targetSdkVersion="19" />
<uses-permission android:name="android.permission.CAMERA"/>
<application
android:allowBackup="true"
android:icon="@drawable/ic_launcher"
android:label="@string/app_name"
android:theme="@style/AppTheme" >
<activity android:name = "com.example.helloworld.main_activity">
<intent-filter >
<action android:name="android.intent.action.MAIN"/>
<category android:name="android.intent.category.LAUNCHER"/>
</intent-filter>
</activity>
<activity android:name = "com.example.helloworld.camera"></activity>
</application>
</manifest>
This is how your application will look like once you have captured the photo using camera
function.
35. Android Development Module
35
Adding the SMS Function into the Mix
Now we are going to add the SMS function to application which involves us adding more
activity. So, it will look similar to how we have added activity for the camera. First step would
be adding a button with an onClick function, the edited main_activity.xml code will look like
this.
<?xml version="1.0" encoding="utf-8"?>
<AbsoluteLayout xmlns:android="http://schemas.android.com/apk/res/android"
android:layout_width="match_parent"
android:layout_height="match_parent" >
<Button
android:id="@+id/button1"
android:layout_width="wrap_content"
android:layout_height="wrap_content"
android:layout_x="87dp"
android:layout_y="74dp"
android:onClick="saySomething"
android:text="Say Something" />
<TextView
android:id="@+id/textView1"
android:layout_width="wrap_content"
android:layout_height="wrap_content"
android:layout_x="121dp"
android:layout_y="27dp"
android:text="Hello World!" />
<Button
android:id="@+id/button2"
style="?android:attr/buttonStyleSmall"
android:layout_width="wrap_content"
android:layout_height="wrap_content"
android:layout_x="29dp"
android:layout_y="137dp"
android:onClick="goToCamera"
android:text="Camera" />
<Button
android:id="@+id/button3"
android:layout_width="wrap_content"
android:layout_height="wrap_content"
android:layout_x="32dp"
android:layout_y="193dp"
android:onClick="goToSMS"
android:text="SMS" />
</AbsoluteLayout>
36. Android Development Module
36
Next we are going to make changes to the java at the main_activity.java.
package com.example.helloworld;
import android.app.Activity;
import android.content.Intent;
import android.os.Bundle;
import android.view.View;
import android.widget.Toast;
public class main_activity extends Activity{
public void onCreate(Bundle savedInstanceState){
super.onCreate(savedInstanceState);
setContentView(R.layout.main_activity);
}
public void saySomething(View v){
Toast.makeText(this, "Hello :D", Toast.LENGTH_SHORT).show();
}
public void goToCamera(View v){
Intent myintent = new Intent(this, camera.class);
startActivity(myintent);
}
public void goToSMS(View v){
Intent myintent = new Intent(this, sms.class);
startActivity(myintent);
}
}
After we have done with the changes of the activity, we are going to design the layout for the
SMS. After we have create sms.xml under the layout, we are going to design the layout so that it
have labels to inform where the user need to fill in the phone number and the message, and text
field for the user to fill them and finally a button to send the SMS. You will have to drag the
text field from the Text Fields tab under the palette (Phone text field for the phone number and
Plain Text for the message).
37. Android Development Module
37
The code would look something like this.
<?xml version="1.0" encoding="utf-8"?>
<AbsoluteLayout xmlns:android="http://schemas.android.com/apk/res/android"
android:layout_width="match_parent"
android:layout_height="match_parent" >
<Button
android:id="@+id/button1"
android:layout_width="326dp"
android:layout_height="wrap_content"
android:layout_x="-2dp"
android:layout_y="304dp"
android:onClick="sendsms"
android:text="Send" />
<EditText
android:id="@+id/editText1"
android:layout_width="333dp"
38. Android Development Module
38
android:layout_height="187dp"
android:layout_x="-2dp"
android:layout_y="102dp"
android:ems="10" >
</EditText>
<TextView
android:id="@+id/textView1"
android:layout_width="match_parent"
android:layout_height="wrap_content"
android:layout_x="0dp"
android:layout_y="14dp"
android:text="Phone Number:" />
<TextView
android:id="@+id/textView2"
android:layout_width="match_parent"
android:layout_height="wrap_content"
android:layout_x="1dp"
android:layout_y="73dp"
android:text="Message:" />
<EditText
android:id="@+id/editText2"
android:layout_width="322dp"
android:layout_height="wrap_content"
android:layout_x="0dp"
android:layout_y="37dp"
android:ems="10"
android:inputType="phone">
<requestFocus/>
</EditText>
</AbsoluteLayout>
Finally, like always, we would need to code the java part in sms.java. The code would be
something like this. Please take note on matching your functions to the Buttons and EditText
part.
package com.example.helloworld;
import android.app.Activity;
import android.os.Bundle;
import android.telephony.SmsManager;
import android.view.View;
import android.widget.Button;
import android.widget.EditText;
40. Android Development Module
40
Last but not least you will need to make changes to the Manifest.
<manifest xmlns:android="http://schemas.android.com/apk/res/android"
package="com.example.helloworld"
android:versionCode="1"
android:versionName="1.0" >
<uses-sdk
android:minSdkVersion="8"
android:targetSdkVersion="19" />
<uses-permission android:name="android.permission.CAMERA"/>
<uses-permission android:name="android.permission.SEND_SMS"/>
<application
android:allowBackup="true"
android:icon="@drawable/ic_launcher"
android:label="@string/app_name"
android:theme="@style/AppTheme" >
<activity android:name = "com.example.helloworld.main_activity">
<intent-filter >
<action android:name="android.intent.action.MAIN"/>
<category android:name="android.intent.category.LAUNCHER"/>
</intent-filter>
</activity>
<activity android:name = "com.example.helloworld.camera"></activity>
<activity android:name = "com.example.helloworld.sms"></activity>
</application>
</manifest>
41. Android Development Module
41
The output will look something like this.
You will be able to send SMS if you debug the code using your phone (since sending SMS will
consume credit from your telco).
42. Android Development Module
42
Since I can’t send SMS, I guess I’ll just E-mail then
Not being able to send an SMS using AVD is a bummer, so we are going to add the functionality
of sending email from our application. The same lather, rinse repeat process.
Changes for main_activity.xml
<?xml version="1.0" encoding="utf-8"?>
<AbsoluteLayout xmlns:android="http://schemas.android.com/apk/res/android"
android:layout_width="match_parent"
android:layout_height="match_parent" >
<Button
android:id="@+id/button1"
android:layout_width="wrap_content"
android:layout_height="wrap_content"
android:layout_x="87dp"
android:layout_y="74dp"
android:onClick="saySomething"
android:text="Say Something" />
<TextView
android:id="@+id/textView1"
android:layout_width="wrap_content"
android:layout_height="wrap_content"
android:layout_x="121dp"
android:layout_y="27dp"
android:text="Hello World!" />
<Button
android:id="@+id/button2"
style="?android:attr/buttonStyleSmall"
android:layout_width="wrap_content"
android:layout_height="wrap_content"
android:layout_x="29dp"
android:layout_y="137dp"
android:onClick="goToCamera"
android:text="Camera" />
<Button
android:id="@+id/button3"
android:layout_width="wrap_content"
android:layout_height="wrap_content"
android:layout_x="32dp"
android:layout_y="193dp"
android:onClick="goToSMS"
android:text="SMS" />
43. Android Development Module
43
<Button
android:id="@+id/button4"
android:layout_width="wrap_content"
android:layout_height="wrap_content"
android:layout_x="35dp"
android:layout_y="245dp"
android:onClick="goToEmail"
android:text="E-mail" />
</AbsoluteLayout>
Changes to the main_activity.java
package com.example.helloworld;
import android.app.Activity;
import android.content.Intent;
import android.os.Bundle;
import android.view.View;
import android.widget.Toast;
public class main_activity extends Activity{
public void onCreate(Bundle savedInstanceState){
super.onCreate(savedInstanceState);
setContentView(R.layout.main_activity);
}
public void saySomething(View v){
Toast.makeText(this, "Hello :D", Toast.LENGTH_SHORT).show();
}
public void goToCamera(View v){
Intent myintent = new Intent(this, camera.class);
startActivity(myintent);
}
public void goToSMS(View v){
Intent myintent = new Intent(this, sms.class);
startActivity(myintent);
}
public void goToEmail(View v){
Intent myintent = new Intent(this, email.class);
startActivity(myintent);
}
}
44. Android Development Module
44
After you have done the changes to the two codes, we are going to create the email.xml using
the same way we did the layout for the sms but instead of the putting the label to tell the user, we
are going to give hint to the user on the space for the user to fill. Also, we will be putting a
button for the user to attach attachments (maybe the photo that was taken with our camera
function). Also, we will be using Relative Layout for this to show the differences between this
layout and Absolute Layout.
The email.xml code will look something like this.
<ScrollView xmlns:android="http://schemas.android.com/apk/res/android"
xmlns:tools="http://schemas.android.com/tools"
android:layout_width="match_parent"
android:layout_height="match_parent"
android:padding="5dp"
tools:context=".MainActivity" >
<RelativeLayout
android:layout_width="match_parent"
android:layout_height="match_parent"
android:layout_margin="5dp"
android:padding="5dp" >
<EditText
android:id="@+id/editTextTo"
android:layout_width="wrap_content"
android:layout_height="wrap_content"
android:layout_alignParentLeft="true"
android:layout_alignParentTop="true"
android:layout_margin="5dp"
android:hint="Email Address"
android:inputType="textEmailAddress"
android:singleLine="true" />
<EditText
android:id="@+id/editTextSubject"
android:layout_width="match_parent"
android:layout_height="wrap_content"
android:layout_below="@id/editTextTo"
android:layout_margin="5dp"
android:hint="Subject"
android:singleLine="true" />
<EditText
android:id="@+id/editTextMessage"
android:layout_width="match_parent"
android:layout_height="200dp"
android:layout_below="@id/editTextSubject"
android:layout_margin="5dp"
45. Android Development Module
45
android:gravity="top|left"
android:hint="Type message here"
android:inputType="textMultiLine" />
<Button
android:id="@+id/buttonSend"
android:layout_width="80dp"
android:layout_height="50dp"
android:layout_below="@id/editTextMessage"
android:layout_margin="5dp"
android:text="Send" />
<Button
android:id="@+id/buttonAttachment"
android:layout_width="wrap_content"
android:layout_height="50dp"
android:layout_alignParentRight="true"
android:layout_alignParentTop="true"
android:text="attachment" />
</RelativeLayout>
</ScrollView>
And when you click the Graphical Layout tab, the GUI will look something like this.
46. Android Development Module
46
After that, just create the email.java class and code it to be something like this.
package com.example.helloworld;
import android.app.Activity;
import android.content.Intent;
import android.database.Cursor;
import android.net.Uri;
import android.os.Bundle;
import android.provider.MediaStore;
import android.util.Log;
import android.view.View;
import android.view.View.OnClickListener;
import android.widget.Button;
import android.widget.EditText;
import android.widget.Toast;
public class email extends Activity implements OnClickListener {
EditText editTextEmail, editTextSubject, editTextMessage;
Button btnSend, btnAttachment;
String email, subject, message, attachmentFile;
Uri URI = null;
private static final int PICK_FROM_GALLERY = 101;
int columnIndex;
@Override
protected void onCreate(Bundle savedInstanceState) {
super.onCreate(savedInstanceState);
setContentView(R.layout.email);
editTextEmail = (EditText) findViewById(R.id.editTextTo);
editTextSubject = (EditText) findViewById(R.id.editTextSubject);
editTextMessage = (EditText) findViewById(R.id.editTextMessage);
btnAttachment = (Button) findViewById(R.id.buttonAttachment);
btnSend = (Button) findViewById(R.id.buttonSend);
btnSend.setOnClickListener(this);
btnAttachment.setOnClickListener(this);
}
protected void onActivityResult(int requestCode, int resultCode, Intent data)
{
if (requestCode == PICK_FROM_GALLERY && resultCode == RESULT_OK) {
/**
* Get Path
*/
Uri selectedImage = data.getData();
String[] filePathColumn = { MediaStore.Images.Media.DATA };
Cursor cursor = getContentResolver().query(selectedImage,
filePathColumn, null, null, null);
cursor.moveToFirst();
columnIndex = cursor.getColumnIndex(filePathColumn[0]);
attachmentFile = cursor.getString(columnIndex);
47. Android Development Module
47
Log.e("Attachment Path:", attachmentFile);
URI = Uri.parse("file://" + attachmentFile);
cursor.close();
}
}
@Override
public void onClick(View v) {
if (v == btnAttachment) {
openGallery();
}
if (v == btnSend) {
try {
email = editTextEmail.getText().toString();
subject = editTextSubject.getText().toString();
message = editTextMessage.getText().toString();
final Intent emailIntent = new Intent(
android.content.Intent.ACTION_SEND);
emailIntent.setType("plain/text");
emailIntent.putExtra(android.content.Intent.EXTRA_EMAIL,
new String[] { email });
emailIntent.putExtra(android.content.Intent.EXTRA_SUBJECT,
subject);
if (URI != null) {
emailIntent.putExtra(Intent.EXTRA_STREAM, URI);
}
emailIntent
.putExtra(android.content.Intent.EXTRA_TEXT,
message);
this.startActivity(Intent.createChooser(emailIntent,
"Sending email..."));
} catch (Throwable t) {
Toast.makeText(this,
"Request failed try again: " + t.toString(),
Toast.LENGTH_LONG).show();
}
}
}
public void openGallery() {
Intent intent = new Intent();
intent.setType("image/*");
intent.setAction(Intent.ACTION_GET_CONTENT);
intent.putExtra("return-data", true);
startActivityForResult(
Intent.createChooser(intent, "Complete action using"),
PICK_FROM_GALLERY);
}
48. Android Development Module
48
}
Now that was a long code, Phew! After you have done that, don’t forget to change your manifest
to add the email activity into the list of activities and the permission for sending emails.
It should look something like this once you have done the editing.
<manifest xmlns:android="http://schemas.android.com/apk/res/android"
package="com.example.helloworld"
android:versionCode="1"
android:versionName="1.0" >
<uses-sdk
android:minSdkVersion="8"
android:targetSdkVersion="19" />
<uses-permission android:name="android.permission.CAMERA"/>
<uses-permission android:name="android.permission.SEND_SMS"/>
<uses-permission android:name="android.permission.READ_EXTERNAL_STORAGE" />
<uses-permission android:name="android.permission.READ_INTERNAL_STORAGE" />
<uses-permission android:name="android.permission.ACCESS_NETWORK_STATE" />
<application
android:allowBackup="true"
android:icon="@drawable/ic_launcher"
android:label="@string/app_name"
android:theme="@style/AppTheme" >
<activity android:name = "com.example.helloworld.main_activity">
<intent-filter >
<action android:name="android.intent.action.MAIN"/>
<category android:name="android.intent.category.LAUNCHER"/>
</intent-filter>
</activity>
<activity android:name = "com.example.helloworld.camera"></activity>
<activity android:name = "com.example.helloworld.sms"></activity>
<activity android:name = "com.example.helloworld.email"></activity>
</application>
</manifest>
After those long changes and coding, you should compile the code (and keep your fingers
crossed). The output will look something like this.
49. Android Development Module
49
*Note: The application will crash on the AVD when you try to add an attachment but will work
fine if you debug with your mobile phone.
50. Android Development Module
50
Are you a Robot?
Now that we have added a few features to our application, why don’t we add a login page so that
the only verified user will be able to use the application. The username and password that will
be entered by the user will be checked with the hardcoded username and password. So first,
we are going to create a login layout. The code for login.xml will look something like this. The
design is basically the combination of things that we have learned before this.
<?xml version="1.0" encoding="utf-8"?>
<AbsoluteLayout xmlns:android="http://schemas.android.com/apk/res/android"
android:layout_width="match_parent"
android:layout_height="match_parent" >
<Button
android:id="@+id/button1"
android:layout_width="match_parent"
android:layout_height="wrap_content"
android:layout_x="0dp"
android:layout_y="183dp"
android:onClick="process"
android:text="GO" />
<TextView
android:id="@+id/TextView01"
android:layout_width="wrap_content"
android:layout_height="wrap_content"
android:layout_x="2dp"
android:layout_y="102dp"
android:text="Password" />
<TextView
android:id="@+id/textView1"
android:layout_width="wrap_content"
android:layout_height="wrap_content"
android:layout_x="4dp"
android:layout_y="64dp"
android:text="Username" />
<EditText
android:id="@+id/editText1"
android:layout_width="wrap_content"
android:layout_height="wrap_content"
android:layout_x="100dp"
android:layout_y="57dp"
android:hint="Enter ur username here"
android:ems="10" >
<requestFocus />
</EditText>
<EditText
52. Android Development Module
52
package com.example.helloworld;
import android.app.Activity;
import android.content.Intent;
import android.os.Bundle;
import android.view.View;
import android.widget.EditText;
import android.widget.Toast;
public class login extends Activity {
public void onCreate(Bundle savedInstanceState) {
super.onCreate(savedInstanceState);// this will invoke the super method
setContentView(R.layout.login);
}
public void process(View v) {// attached to GO button
// Toast.makeText(this,
// "It is suppose to work, I don't know what happen",
// Toast.LENGTH_LONG).show();
if (validate() == true) {
Intent myintent = new Intent(this, main_activity.class);
startActivity(myintent);
}
}
public boolean validate() {
EditText username = (EditText) findViewById(R.id.editText1);
EditText password = (EditText) findViewById(R.id.editText2);
if (username.getText().toString().equals("")) {
Toast.makeText(this, "username is required", Toast.LENGTH_SHORT)
.show();
return false;
} else if (password.getText().toString().equals("")) {
Toast.makeText(this, "password is required", Toast.LENGTH_SHORT)
.show();
return false;
} else if (username.getText().toString().equals("adam")
&& password.getText().toString().equals("password")) {
Toast.makeText(this, "Welcome Master",
Toast.LENGTH_SHORT).show();
return true;
} else {
Toast.makeText(this, "Invalid Username/Password",
Toast.LENGTH_SHORT)
.show();
return false;
}
}
}
53. Android Development Module
53
For this example, I have hardcoded the username to be adam and password to be password
(very weak password strength ). Last but not the very least, we will need to change the
manifest so that login will be the main action and launcher category. The Manifest will now
look something like this.
<manifest xmlns:android="http://schemas.android.com/apk/res/android"
package="com.example.helloworld"
android:versionCode="1"
android:versionName="1.0" >
<uses-sdk
android:minSdkVersion="8"
android:targetSdkVersion="19" />
<uses-permission android:name="android.permission.CAMERA"/>
<uses-permission android:name="android.permission.SEND_SMS"/>
<uses-permission android:name="android.permission.READ_EXTERNAL_STORAGE" />
<uses-permission android:name="android.permission.READ_INTERNAL_STORAGE" />
<uses-permission android:name="android.permission.ACCESS_NETWORK_STATE" />
<application
android:allowBackup="true"
android:icon="@drawable/ic_launcher"
android:label="@string/app_name"
android:theme="@style/AppTheme" >
<activity android:name = "com.example.helloworld.login">
<intent-filter >
<action android:name="android.intent.action.MAIN"/>
<category android:name="android.intent.category.LAUNCHER"/>
</intent-filter>
</activity>
<activity android:name = "com.example.helloworld.camera"></activity>
<activity android:name = "com.example.helloworld.sms"></activity>
<activity android:name = "com.example.helloworld.email"></activity>
<activity android:name = "com.example.helloworld.main_activity"></activity>
</application>
</manifest>
The output will look something like this.
58. Android Development Module
58
The “Welcome Master” message will only appear if you enter the valid combination of username
and password and will send you to the main_activity page.
So with that, you have just completed your very first Android Application. Hope that this will
propel you into creating much more and greater application. Who knows, the next big thing
might just be lying in the corner, waiting to be found by you. So with that