The Path to Product Excellence: Avoiding Common Pitfalls and Enhancing Commun...
Art on0208
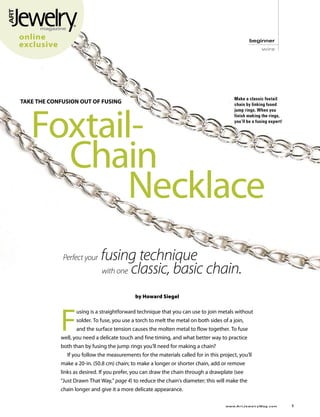
1. online beginner
exclusive wire
Make a classic foxtail
TAKE THE CONFUSION OUT OF FUSING
Foxtail-
chain by linking fused
jump rings. When you
finish making the rings,
you’ll be a fusing expert!
Chain
Necklace
fusing technique
Perfect your
with one classic, basic chain.
by Howard Siegel
F
using is a straightforward technique that you can use to join metals without
solder. To fuse, you use a torch to melt the metal on both sides of a join,
and the surface tension causes the molten metal to flow together. To fuse
well, you need a delicate touch and fine timing, and what better way to practice
both than by fusing the jump rings you’ll need for making a chain?
If you follow the measurements for the materials called for in this project, you’ll
make a 20-in. (50.8 cm) chain; to make a longer or shorter chain, add or remove
links as desired. If you prefer, you can draw the chain through a drawplate (see
“Just Drawn That Way,” page 4) to reduce the chain’s diameter; this will make the
chain longer and give it a more delicate appearance.
www.A r t J e w e l r y M a g . c o m
2. 1 2
3 4
Make a clothespin tool. This is a handy NOTE: The wire will wear a groove in the angles. Adjust the cut ends as necessary
tool for controlling the tension of your wooden clothespin. When the tool can no until they’re aligned and touching.
wire as you coil it around your mandrel. longer apply tension to the wire because Place the closed ring at the left rear
Use a drill bit in a flex shaft to drill a hole of wear, replace the clothespin tool. of the Solderite pad, with the cut facing
through one leg of a wooden clothespin forward. Continue closing and placing
below the rope recess. The hole should Cut the coil to make rings. Hold a coil the remaining rings, leaving about 1 ⁄8 in.
be slightly larger than the gauge of wire between the thumb and fingers of your (3 mm) between the rings and about ¼ in.
you’ll be using and drilled at roughly a 45° nondominant hand. Position the coil so (6.5 mm) between the rows [3].
angle to the rope recess; this will allow the that it crosses your palm at a 45° angle.
wire to pass smoothly through the tool Insert the lower jaw of a pair of shears Fuse the rings. Put on your Optivisor.
without kinking. into the coil [2]. The shears should be Light your torch and adjust the flame to
pointed between your thumb and fingers. about half its maximum length. You may
Coil the wire. Cut a manageable section Cut the rings, being careful not to cut need to readjust the flame to get the
of wire from a 10-ft. (3.05 m) length of your hand. control you need for fusing the rings.
fine-silver wire. Insert one end of the fine- When it is difficult to cut any further, Work on one ring at a time. Move the
silver wire through the hole you drilled in withdraw the shears and remove the cut tip of the flame in a circular motion so that
your clothespin. Pull the wire through the rings. Reinsert the shears, being careful the flame passes just inside the rear of the
clothespin until the wire extends about to align the lower jaw with the edge of ring, over the side, and just in front. Keep
1 in. (25.5 mm) beyond the jaws. Make a the last cut on the coil. Cut rings from circling until the ring glows a dull red.
90° bend about ½ in. (13 mm) from the the remaining coil. Repeat with the rest
end of the wire. of the coils. TIP: When you’re working
Place a mandrel into a coil winder. Place with a torch, dim the lights in
the bent portion of the wire between the Prepare the rings for fusing. Place a your workroom so it’s easier
jaws of the coil-winder chuck to secure the firebrick on your workbench, and place a to see when the metal
wire. Using the clothespin tool to keep ten- Solderite pad on top of the firebrick. changes color.
sion on the wire and guide it, wind a coil In order for the rings to fuse correctly,
about 3 in. (76 mm) long onto the mandrel the cut ends must be aligned and in good When the ring changes to a dull red,
[1]. Cut the wire and slide the coil off the contact. Click on “How To” and then center the flame tip on the cut ends of the
mandrel. Wind 3-in. (76 mm) coils until you “Wirework” at www.artjewelrymag.com to ring and move the torch with a small
use all the wire. see how to open and close jump rings. circular motion so that you uniformly heat
Close a ring and look at it from all both cut ends [4].
www.A r t J e w e l r y M a g . c o m
3. Process photos by Howard Siegel.
c
5 6 7
a b
b
a
8 9
Watch the cut carefully so that you see the ring until its sides are parallel. Don’t second link until it is centered. Bend the
when the metal melts, or “flashes.” (Molten squeeze too hard, or the ring will break. legs of the third link together until they
metal is more reflective than solid metal, Use roundnose pliers to pinch the are parallel.
so metal “flashes” when it melts.) When center of the ring to form a propeller-like Continue to add links until the chain
you see the flash, immediately remove the shape. Reposition your roundnose pliers is the desired length.
flame to avoid either overfusing or so they’re perpendicular to the bow-
burning through the ring. Continue until opening pliers, and grasp the ring where NOTE: If you can’t insert a link through
you have fused all the rings. it’s pinched [6]. Release the pressure on both legs of the previous link, you can
Properly fused rings show a smooth the bow-opening pliers and use the insert an awl into the legs to enlarge the
join [5a]; overfused rings show some roundnose pliers to lift the ring off. opening. Rotate and push on the awl to
thinning of the join and thickening of the Holding the ring in the roundnose round out the opening.
ring adjacent to the join [5b]; burned- pliers, bend the ring’s two legs up with
through rings show a small ball of silver on your fingers to begin forming a U. Stop True-up the chain. To make the links in
each side of an open cut [5c]. bending the legs of the U before they are your chain look uniform, you must “true-
parallel. Try to make both legs the same up” the chain by inserting the awl into
NOTE: You can still use slightly overfused length [7]. Repeat to form all the rings. each link from all four directions, rotating
rings to make the chain, because you can the awl each time to round out the link.
hide the imperfect join inside the chain. Weave the chain. Place a twist tie in the The woven links [9a] look flatter than
But these rings will be weaker than a U of one link. This is the starter link. Bend the trued-up links [9b]. When you’ve
properly fused ring, so use them near the the legs of the U together until they are finished truing-up the chain, it will be
end of your chain in case they break later parallel. Holding the twist tie in your more uniform and slightly shorter.
in the chain-forming process. nondominant hand, place one leg of a If you are happy with the appearance of
second link through both legs of the the chain, proceed to the next step to add
Stretch and form the rings. Hold a pair starter link. Pull this link through the the clasp. If you prefer a more delicate
of bow-opening pliers (a tool that opens, starter link until it is centered. (Positioning look, see “Just Drawn That Way,” page 4.
rather than closes, when you squeeze it) this link will pull the legs of the starter link
closed in your nondominant hand. closer together.) Bend the legs of the Add the clasp and finish the chain.
Place a fused ring over the jaws of the second link together until they are parallel. Remove the twist tie from the starter link.
bow-opening pliers, positioning the fused Holding the second link, insert one leg Open a 5 mm-inside-diameter jump
join at the tip of one jaw. Squeeze the of a third link through both legs of the ring. Thread the jump ring through the U
bow-opening pliers’ handles to elongate second link [8]. Pull this link through the of the starter link and through a lobster
www.A r t J e w e l r y M a g . c o m
4. materials
■ Fine-silver wire: 22-gauge (0.6 mm),
round, 10 ft. (3.05 m)
claw clasp. Close the jump ring. Attach
■ Sterling silver jump rings: 18-gauge
another 5 mm jump ring to the other end
(1.0 mm), 5 mm inside diameter, 2
of the chain. ■ Lobster claw clasp: 10 x 5 mm
Place the assembled chain in a tumbler
with steel shot and burnishing compound. tools supplies
Tumble the chain (click on “How To” and ■ Clothespin
then “Metals” at www.artjewelrymag.com ■ Flex shaft, drill bits
for more information) for about an hour to ■ Wire cutters: flush
smooth any rough spots on the chain and Howard Siegal has a master’s degree ■ Mandrel: 5 ⁄16-in. (8 mm) diameter
to polish the surfaces. in metallurgy and works in lapidary, ■ Coil winder
Rinse the chain in clean running water silversmithing, and chain making. ■ Shears
and dry it. Pull it through your hands to He teaches at the William Holland ■ Firebrick
■ Solderite pad
make sure that there aren’t any rough School of Lapidary Arts, the Society
■ Torch: propane pencil torch, Blazer-type
spots. If it’s not smooth enough, tumble it for Midwest Metalsmiths, the Craft
butane torch, or conventional acetylene/
for another hour or two. (Additional Alliance, and the Jacoby Arts Center. air torch with a very small tip
tumbling will not damage the chain.) ■ Pliers: chainnose (two pairs), roundnose,
bow-opening
■ Optivisor or other optical magnifier
just ■ Twist tie
drawn
■ Awl
■ Drawplate (optional)
that way ■
■
Beeswax (optional)
Tumbler, steel shot, burnishing
compound
To make the chain even more uniform — and longer and smaller
in diameter — pull it through a drawplate. (I used a homemade
one, but they’re also readily available through tool suppliers.) See Safety Basics: click on “How To” at
www.artjewelrymag.com
Before drawing the chain, coat it with beeswax to lubricate it.
Then, insert one end of the chain through the hole in the plate
that’s only slightly smaller than the chain’s diameter, and pull suppliers
the chain through the hole. ■ Mandrels, Blazer-type butane torch
(Harbor Freight Tools, 800.444.3353,
I prefer to pull the chain through each hole in the drawplate www.harborfreight.com)
twice before proceeding to the next-smaller hole.
ACKNOWLEDGEMENTS
I learned to make this chain from the
following books:
McOmber, Robert W. Chain Making.
McOmber, 1976.
Stark and Smith. Classical Loop-In-
Loop Chains and Their Derivatives.
Brynmorgen Press, 1999.
Untracht, Oppi. Jewelry Concepts and
Technology. Doubleday, 1982.
The clothespin tool was shown to me
by Cao Madina. I am indebted to him
for sharing this extremely useful tool.
The drawplate I used for this
project was given to me by David
Newman, one of my students.
www.A r t J e w e l r y M a g . c o m
5. Make jewelry
that makes a
statement . . .
your statement
Looking for projects that use different
materials such as metalwork, wirework,
stone, glass, polymer, and enamel? Then
Art Jewelry is the magazine for you!
Discover the secrets you need to create
breathtaking pieces that express your own
distinctive style like never before! Whether
you want to learn a new technique, try a
Subscribe
different material, or get ideas for your
own jewelry projects, there’s something for
Today!
you in Art Jewelry!
Order online at
www.artjewelrymag.com/promo
Enter code: I4XZ1
or call 800-533-6644
Monday-Friday, 8:30 a.m. - 5:00 p.m. Central Time.
Outside the U.S. and Canada, call 262-796-8776, ext. 661.
05X1017
I4XZ1
![1 2
3 4
Make a clothespin tool. This is a handy NOTE: The wire will wear a groove in the angles. Adjust the cut ends as necessary
tool for controlling the tension of your wooden clothespin. When the tool can no until they’re aligned and touching.
wire as you coil it around your mandrel. longer apply tension to the wire because Place the closed ring at the left rear
Use a drill bit in a flex shaft to drill a hole of wear, replace the clothespin tool. of the Solderite pad, with the cut facing
through one leg of a wooden clothespin forward. Continue closing and placing
below the rope recess. The hole should Cut the coil to make rings. Hold a coil the remaining rings, leaving about 1 ⁄8 in.
be slightly larger than the gauge of wire between the thumb and fingers of your (3 mm) between the rings and about ¼ in.
you’ll be using and drilled at roughly a 45° nondominant hand. Position the coil so (6.5 mm) between the rows [3].
angle to the rope recess; this will allow the that it crosses your palm at a 45° angle.
wire to pass smoothly through the tool Insert the lower jaw of a pair of shears Fuse the rings. Put on your Optivisor.
without kinking. into the coil [2]. The shears should be Light your torch and adjust the flame to
pointed between your thumb and fingers. about half its maximum length. You may
Coil the wire. Cut a manageable section Cut the rings, being careful not to cut need to readjust the flame to get the
of wire from a 10-ft. (3.05 m) length of your hand. control you need for fusing the rings.
fine-silver wire. Insert one end of the fine- When it is difficult to cut any further, Work on one ring at a time. Move the
silver wire through the hole you drilled in withdraw the shears and remove the cut tip of the flame in a circular motion so that
your clothespin. Pull the wire through the rings. Reinsert the shears, being careful the flame passes just inside the rear of the
clothespin until the wire extends about to align the lower jaw with the edge of ring, over the side, and just in front. Keep
1 in. (25.5 mm) beyond the jaws. Make a the last cut on the coil. Cut rings from circling until the ring glows a dull red.
90° bend about ½ in. (13 mm) from the the remaining coil. Repeat with the rest
end of the wire. of the coils. TIP: When you’re working
Place a mandrel into a coil winder. Place with a torch, dim the lights in
the bent portion of the wire between the Prepare the rings for fusing. Place a your workroom so it’s easier
jaws of the coil-winder chuck to secure the firebrick on your workbench, and place a to see when the metal
wire. Using the clothespin tool to keep ten- Solderite pad on top of the firebrick. changes color.
sion on the wire and guide it, wind a coil In order for the rings to fuse correctly,
about 3 in. (76 mm) long onto the mandrel the cut ends must be aligned and in good When the ring changes to a dull red,
[1]. Cut the wire and slide the coil off the contact. Click on “How To” and then center the flame tip on the cut ends of the
mandrel. Wind 3-in. (76 mm) coils until you “Wirework” at www.artjewelrymag.com to ring and move the torch with a small
use all the wire. see how to open and close jump rings. circular motion so that you uniformly heat
Close a ring and look at it from all both cut ends [4].
www.A r t J e w e l r y M a g . c o m](data:image/gif;base64,R0lGODlhAQABAIAAAAAAAP///yH5BAEAAAAALAAAAAABAAEAAAIBRAA7)