Office 2010 Mail Merge With Word and Excel by Jandy Warner
•
0 gefällt mir•83 views

The document provides instructions for performing a mail merge in Microsoft Word using an Excel mailing list to create personalized letters, explaining that the mailing list should be created in Excel with field names in the top row and then linked in Word where merge fields can be inserted to pull contact information for each recipient; the mail merge wizard is used to guide users through selecting the mailing list, inserting fields, previewing results, and completing the merge to generate individual letters.

Empfohlen
Weitere ähnliche Inhalte
Was ist angesagt?
Was ist angesagt? (20)
Andere mochten auch
Ähnlich wie Office 2010 Mail Merge With Word and Excel by Jandy Warner
Ähnlich wie Office 2010 Mail Merge With Word and Excel by Jandy Warner (20)
Office 2010 Mail Merge With Word and Excel by Jandy Warner
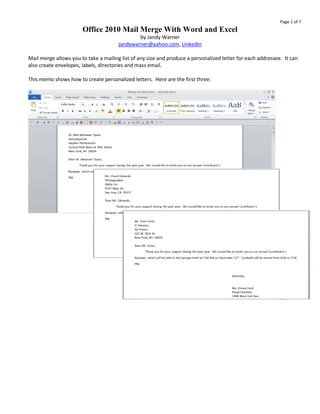
- 1. Page 1 of 7 Office 2010 Mail Merge With Word and Excel by Jandy Warner jandywarner@yahoo.com, LinkedIn Mail merge allows you to take a mailing list of any size and produce a personalized letter for each addressee. It can also create envelopes, labels, directories and mass email. This memo shows how to create personalized letters. Here are the first three:
- 2. Page 2 of 7 Instructions: 1. Create mailing list in Excel a. Field names must be in the top row b. There should be no blank rows or blank columns c. Example of mailing list: d. Save and close mailing list, making note of what you name it and where you save it. 2. Create the form letter in Word Click on a. The Mailings Tab b. The Start Mail Merge button c. The option of your choice (This example will choose the Step by Step Mail Merge Wizard)
- 3. Page 3 of 7 3. Follow the prompts in the pane and click on Next as you complete each step 4. When you get to this step a. click on Use an existing list and Browse b. Navigate to the mailing list file and double-click on its name
- 4. Page 4 of 7 5. Make sure the worksheet name of your choice is highlighted, then click on OK 6. If you wish, refine the list, then click on OK
- 5. Page 5 of 7 7. Insert the merge fields where you’d like the information to appear in the finished letter, being sure to add spaces (for instance between a salutation and a first name,) punctuation (for instance a comma between a city and state) and begin new lines as needed. Although there are several ways insert fields one of the easiest is to click on the Insert Merge Field button and the field name of your choice. Depending on exactly where you click you’ll either see a window or a pull-down list. a. If you click on the middle of the button the field names will appear in a new window. You’ll have to click on Cancel to close it every time you want to change the document by adding spaces, etc. b. If you click on the arrow on the button you’ll see a pull-down list that will automatically close after click on a field name.
- 6. Page 6 of 7 8. Insert the fields and text, then click the Preview Results button. 9. If you need to edit the field codes click on the Preview Results button again and do so. 10. When you’re ready, click on the Finish & Merge button and the option of your choice.
- 7. Page 7 of 7 11. This will create a personalized letter for each person on the mailing list. Here are the first three: