
Empfohlen
Empfohlen
Weitere ähnliche Inhalte
Was ist angesagt?
Was ist angesagt? (18)
Ähnlich wie HOW TO INSTALL AND CONFIGURE AZURE AD CONNECT.docx
Ähnlich wie HOW TO INSTALL AND CONFIGURE AZURE AD CONNECT.docx (20)
Kürzlich hochgeladen
Kürzlich hochgeladen (20)
HOW TO INSTALL AND CONFIGURE AZURE AD CONNECT.docx
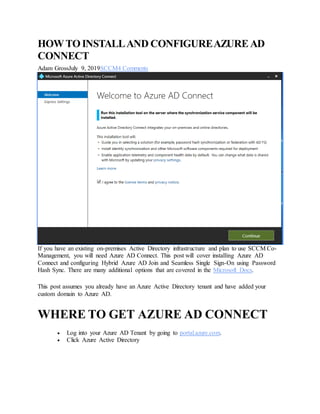
- 1. HOWTOINSTALLAND CONFIGUREAZUREAD CONNECT Adam GrossJuly 9, 2019SCCM4 Comments If you have an existing on-premises Active Directory infrastructure and plan to use SCCM Co- Management, you will need Azure AD Connect. This post will cover installing Azure AD Connect and configuring Hybrid Azure AD Join and Seamless Single Sign-On using Password Hash Sync. There are many additional options that are covered in the Microsoft Docs. This post assumes you already have an Azure Active Directory tenant and have added your custom domain to Azure AD. WHERE TO GET AZURE AD CONNECT Log into your Azure AD Tenant by going to portal.azure.com. Click Azure Active Directory
- 2. Select Azure AD Connect Click Download Azure AD Connect
- 3. INSTALLING AZURE AD CONNECT Review the latest latest prerequisite information from Microsoft Docs, specifically the Azure AD Connect server section to ensure that your server meets the requirements. Launch the AzureADConnect.msi that you downloaded in the previous step. You will be presented with the Microsoft Azure Active Directory Connect wizard welcome screen. Click Continue.
- 4. Once you have chosen the server begin installation. You will choose between Express and Custom installation. This post will cover using Express settings. Notice message below indicating that the domain is not routable. This will be covered later in the post. Click Use express settings.
- 5. Enter your Azure AD global administrator credentials and click Next – this account is only needed for configuring AAD Connect.
- 6. Enter the Active Directory Domain Services enterprise administrator credentials and click Next – this account is only needed for configuring AAD Connect.
- 7. If you see the Azure AD Sign-in configuration page, review any domains not listed as Verified and verify it in Azure AD before continuing. Once you’ve verified your domain, click the Refresh icon and the status should change to Verified. Alternatively, you can check the box for Continue without matching all UPN sufixes to verified domains. This will allow you to continue the Azure AD Connect wizard, however you will need to complete the verification process before users can log into Azure AD. Click Next
- 8. If you verified your domain(s) in the previous step, check the box for Start the synchronization process when configuration completes, otherwise uncheck the box and click Install. If you unchecked the box, sync will be configured, but won’t run until you re-run the AAD Connect wizard.
- 9. Any errors or action items will be listed in the Configuration complete page. Click Exit to complete setup.
- 10. When you log into your Azure AD tenant and select Users, you should see new synchronized user accounts indicating that sync is working as expected. You can also begin assigning licenses to users in Azure at this time.
- 11. CONFIGURING HYBRID AZURE AD JOIN IN AZURE ACTIVE DIRECTORY CONNECT To Enable Hybrid Azure AD join for your on-premises devices, launch the AAD Connect wizard again and click Configure on the first page. On the Additional tasks screen, there are many options for additional configuration. Select Configure device options then click Next.
- 12. The Overview page describes the difference between Hybrid Azure AD Join and Device writeback. Click Next.
- 13. Enter your Azure AD global administrator credentials and click Next.
- 14. Select Configure Hybrid Azure AD join and click Next.
- 15. Check the box for Windows 10 or later domain-joined devices and click Next.
- 16. The Service Connection Point (SCP) will need to be configured for each forest where you want to enable Hybrid Azure AD join. Using the drop down, for each domain, select the Authentication Service. Click Add to enter your on premises Active Directory Enterprise Admin credentials. Click Next.
- 17. Click Configure to begin configuring the SCP.
- 18. Any errors or action items will be listed in the Configuration complete page. Click Exit to complete setup.
- 19. CONFIGURING SEAMLESS SINGLE SIGN ON IN AZURE ACTIVE DIRECTORY CONNECT To enable Seamless Single Sign On (SSO), relaunch the AAD Connect configuration wizard. and click Configure.
- 20. Select Change user sign-in and click Next.
- 21. Enter your Azure AD global administrator credentials and click Next.
- 22. On the User sign-in page, you can select various sign-in options. In this case, we will select Password Hash Synchronization. Check the box for Enable single sign-on then click Next.
- 23. Check the box for Start the synchronization process when configuration completes and click Configure.
- 24. Any errors or action items will be listed in the Configuration complete page. Click Exit to complete setup.
- 25. DEPLOYINGSEAMLESS SINGLE SIGN ON USING GROUP POLICY For a full explanation of SSO, including a deployment planning guide, check out the Microsoft Docs. Assuming you’ve already done so, here’s how you deploy SSO using GPO. To enable SSO on your on-premises devices, you must configure group policy settings. Add the following settings to a new or existing GPO and deploy to any devices that you wish to enable SSO on. See Microsoft Docs for additional options for rolling out SSO. In the Group Policy Management Editor, navigate to User Configuration > Policy > Administrative Templates > Windows Components > Internet Explorer > Internet Control Panel > Security Page. Select Site to Zone Assignment List.
- 26. Select the Enabled radio button then enter the following value. Value name: https://autologon.microsoftazuread-sso.com Value: 1
- 27. Navigate to User Configuration > Administrative Templates Policy > **> Windows Components > Internet Explorer > Internet Control Panel > Security Page > Intranet Zone. Select Allow updates to status bar via script.
- 28. Click the Enabled radio button then select Enable from the drop down as shown.
- 29. MANAGING NON-ROUTABLEINTERNAL DOMAIN NAMES If you your internal domain name is non-routable, like asd.local or asd.lab, you will need either change your internal domain name (which would require you to migrate your SCCM instance to a new domain) or add a UPN and update your user’s with the new routable domain. You can find more information and a script to automate changing all of your users here. To add a new UPN, open Active Directory Domains and Trusts, right click on the domain you want to add a UPN to and click Properties.
- 30. Enter the your new UPN and click Add. (I purchased a cheap domain name with the extension .site for this demo.)
- 31. Open Active Directory Users and Computers, right click the user you want to edit and click Properties then select the Account Tab. From the drop down next the user name, you will see your newly added UPN. Select it and click OK.
- 32. Add the new custom domain to Azure AD by navigating to https://portal.azure.com then clicking Azure Active Directory then Custom domain names. Click Add custom domain
- 33. Enter your custom domain name then click Add Domain. You will see a screen with TXT records that you will need to enter with your domain name registrar. Once entered, click Verify to complete the setup.
- 34. TESTING SEAMLESS SINGLE-SIGN ON You can test SSO by using the following tests provided by Microsoft: To test the scenario where the user enters only the username, but not the password: – Sign in to https://myapps.microsoft.com/ in a new private browser session. To test the scenario where the user doesn’t have to enter the username or the password, use one of these steps:
- 35. – Sign in to https://myapps.microsoft.com/contoso.onmicrosoft.com in a new private browser session. Replace contoso with your tenant’s name. – Sign in to https://myapps.microsoft.com/contoso.com in a new private browser session. Replace contoso.com with a verified domain (not a federated domain) on your tenant. SUMMARY Now, whenever your users log in using their local domain credentials, they will be able to access Azure resources via single sign-on. Also, your devices are being synced to Azure Active Directory now and can be configured to Auto-Enroll into Intune to enable Co-Management and more! Stay tuned! 4 COMMENTS ON “HOW TO INSTALL AND CONFIGURE AZURE AD CONNECT” 1. Pingback: Azure AD Connect a replikace účtů z On-Premises AD DS – ITmix.cz