
Empfohlen
Weitere ähnliche Inhalte
Was ist angesagt?
Was ist angesagt? (20)
Ähnlich wie Chromakey effect
Ähnlich wie Chromakey effect (20)
Mehr von Irene_campos
Mehr von Irene_campos (20)
Kürzlich hochgeladen
Kürzlich hochgeladen (20)
Chromakey effect
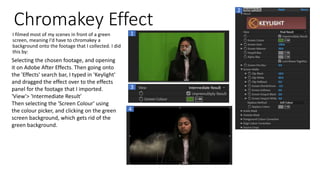
- 1. Chromakey Effect I filmed most of my scenes in front of a green screen, meaning I'd have to chromakey a background onto the footage that I collected. I did this by: Selecting the chosen footage, and opening it on Adobe After Effects. Then going onto the 'Effects' search bar, I typed in 'Keylight' and dragged the effect over to the effects panel for the footage that I imported. 'View'> 'Intermediate Result' Then selecting the 'Screen Colour' using the colour picker, and clicking on the green screen background, which gets rid of the green background. 1 2 3 4
- 2. Changing the 'View'> 'Screen Matte'; this changes the footage so you can see the darks and lights of the image. By using 'Clip Black' and 'Clip White' I can adjust the whites and the blacks that are present in the footage. Once there are no greys in the image, the whites and blacks are flat I can then change the 'View'> 'Final Result', showing what the actual footage looks like. If there are any edges that still appear green, then you can use the ‘Spill Suppresor' (found in effects) and simply select the colour that you want to use with the colour picking tool and it will automatically get rid of the green edges. ‘Screen Matte’ 1 2 3
- 3. Once the green screen has been removed, you can add an image that you want to the footage, and using the ‘Anchor Point’ and ‘Position’, you can adjust the image so the footage looks realistic.