Sanat Meht's Low cost house - Revised June 2022.pdf
Project Spotlight_PR0415
1. I
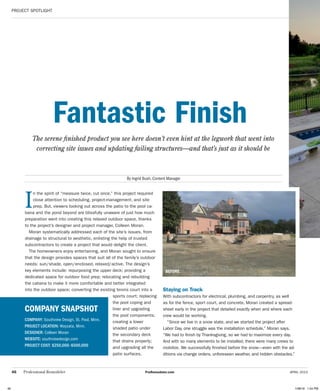
n the spirit of “measure twice, cut once,” this project required
close attention to scheduling, project-management, and site
prep. But, viewers looking out across the patio to the pool ca-
bana and the pond beyond are blissfully unaware of just how much
preparation went into creating this relaxed outdoor space, thanks
to the project’s designer and project manager, Colleen Moran.
Moran systematically addressed each of the site’s issues, from
drainage to structural to aesthetic, enlisting the help of trusted
subcontractors to create a project that would delight the client.
The homeowners enjoy entertaining, and Moran sought to ensure
that the design provides spaces that suit all of the family’s outdoor
needs: sun/shade, open/enclosed, relaxed/active. The design’s
key elements include: repurposing the upper deck; providing a
dedicated space for outdoor food prep; relocating and rebuilding
the cabana to make it more comfortable and better integrated
into the outdoor space; converting the existing tennis court into a
sports court; replacing
the pool coping and
liner and upgrading
the pool components;
creating a lower
shaded patio under
the secondary deck
that drains properly;
and upgrading all the
patio surfaces.
Staying on Track
With subcontractors for electrical, plumbing, and carpentry, as well
as for the fence, sport court, and concrete, Moran created a spread-
sheet early in the project that detailed exactly when and where each
crew would be working.
“Since we live in a snow state, and we started the project after
Labor Day, one struggle was the installation schedule,” Moran says.
“We had to finish by Thanksgiving, so we had to maximize every day.
And with so many elements to be installed, there were many crews to
mobilize. We successfully finished before the snow—even with the ad-
ditions via change orders, unforeseen weather, and hidden obstacles.”
project spotlight
46 Professional Remodeler ProRemodeler.com APRIL 2015
By Ingrid Bush, Content Manager
Company Snapshot
Company: Southview Design, St. Paul, Minn.
Project Location: Wayzata, Minn.
Designer: Colleen Moran
Website: southviewdesign.com
Project Cost: $250,000–$500,000
The serene finished product you see here doesn’t even hint at the legwork that went into
correcting site issues and updating failing structures—and that’s just as it should be
Fantastic Finish
BEFORE
46 1/28/16 1:54 PM
2. project spotlight
APRIL 2015 ProRemodeler.com Professional Remodeler 47
photos courtesy of Southview Design
Site Surprises
“The existing elements were more than 10 years old,” Moran says, “so
none could be salvaged. ... Only the pool stayed in the same place.”
Given the extent of the sitework, the team had to protect the parts
of the site and house that they weren’t working on. “Erosion logs and
blankets were used in case materials decided to run during rain,”
Moran says. “We also used 6 mil poly liner to cover open/unfin-
ished elements and to protect newly installed elements, such as the
stonework.” The public utilities were marked, but when the crew broke
ground to remove the tennis court surface, they unexpectedly found
several live gas and electrical lines, none of them buried at the proper
depth. Moran brought in a licensed plumber and an electrician to find,
fix, relocate, and document all of the existing utilities.
In another unexpected turn, patio removal by the pool unearthed
sinkholes, buried timber walls, and 13 frost footings that no one
could account for. “We removed the debris and filled with struc-
tural and planting soil,” Moran says. All of these unforeseen site
conditions pushed the project’s completion date back by about
two weeks.
Land o’ Lakes
“Drainage is always one of my first concerns, and that’s figured out
before we step on site,” Moran says. There is a pond about 100
feet from the house, and in Minnesota, Land of 10,000 Lakes, Mo-
ran is always intent on making sure there is a filtering distance—in
this case a minimum of 20 feet—of lawn or planting where the
drain tile can exit, filter, and then, if necessary, flow into the pond.
All of the patio area is properly sloped so that runoff either enters
into a planting bed or a surface drain box that’s connected to drain
tile in the lawn area. To handle any water that’s directed into the
planting area held up by the retaining wall, Moran installed drain tile
within the wall to collect excess water and divert it to the lawn below.
47 1/28/16 1:54 PM
3. project spotlight
48 Professional Remodeler ProRemodeler.com APRIL 2015
The original timber walls that surrounded and supported
the entire pool environment were failing, and the client
wanted the walls to have a more artisan look. The crew
installed 1,300 square feet of segmental retaining wall,
at a height of about 4 feet throughout, without any mis-
alignment, Moran says with pride.
A solid base and good drainage is essential for proper
wall design. Segmental retaining walls need a 6-inch-
deep by 18-inch-wide compacted aggregate base, and
this wall has a class 5 base to mitigate frost heaving. To minimize the hydrostatic pressure that
excess trapped water exerts on the wall, a 12-to-18-inch vertical layer of drainage rock was also
installed behind it, along with drain tile.
”Whether you’re laying a brick patio, pouring concrete, building a retaining wall, or installing a
fireplace, kitchen, or cabana, soil stabilization plays a role,” Moran says. “Careful excavation—and
temporary shoring-up, if needed—an aggregate base and a frost footing, if necessary, as well as
drainage rock are essential.” Frost footings were needed for the weightier items such as the fire-
place, kitchen, pergola posts, and the deck and cabana pillars. “In our section of the state,” Moran
says, “frost footings need to reach a minimum of 42 inches.”
BEFORE
A Way With Walls
Parts of a Whole
Coordinating the color and surface texture of the brick pavers, con-
crete, stone, and the retaining walls creates a cohesive aesthetic. The
choice of paving for the pool deck, outdoor kitchen, and cabana area
intentionally designates distinct spaces, Moran says, similar to what
area rugs do in your home. “Over the years, I’ve honed my design
style, and one of my strong suits is the coordination of materials to
create a unified project,” she says. Stone veneer similar to that used
inside the house comes into play on the outdoor fireplace, pillars, and
kitchen. The patio is a combination of stone textured/colored con-
crete and Cambry Tan Tumbled Charleston Pavers by Anchor Block.
48 1/28/16 1:54 PM
4. project spotlight
50 Professional Remodeler ProRemodeler.com APRIL 2015
For the sport court, rubber sports flooring sits atop a
4-inch-thick concrete slab that has a 3- to 4-inch compacted
aggregate base to mitigate frost heaving. No winter cover
is necessary for the court, and lighting allows for extended
play. Moran says that the court gets extensive use in the
evenings whenever the weather allows.
The existing pool’s vinyl liner, drains, coping, lights, div-
ing board, electrical, and plumbing were all replaced. The
new concrete coping for the pool was poured continu-
ously using Stegmeier Styrofoam coping forms to create
a pool deck that comes right up and over the edge of
the pool. Moran’s landscape, pool, and concrete crews
worked closely to complete this detail, she says.
Then, when the pool was ready to be filled, “we
trucked in filtered water,” Moran says, “since iron-
laden water is prevalent in this area and would have
caused rust stains on the new liner.”
Outdoor Eats
In the Swim of Things
It’s Sports, of Courts
The homeowners requested a grilling area, which,
Moran says, quickly mushroomed into a full-
fledged outdoor kitchen with a refrigerator, sink,
ice maker, trash bin, counters, and storage.
Due to the location of the home’s dormer,
windows, and AC units, the kitchen required
thoughtful design for a limited space. The lit,
covered grill area is positioned under the dormer,
and cedar screening dissipates the noise from
the air conditioner. A full frost footing—42 inches
deep—was needed for the kitchen, and most
of the excavation was done by hand due to the
kitchen’s proximity to the house and pool.
The details of the outdoor kitchen roof tie in
with those of the pergola and the cabana.
BEFORE
50 1/28/16 1:54 PM
5. project spotlight
APRIL 2015 ProRemodeler.com Professional Remodeler 51
Pool surfacing: vinyl
Pool deck: Mesa Beige stamped, textured concrete; integral concrete color
additive provided by Scofield System
Paving: Cambry Tan Tumbled Charleston Pavers by Anchor Block
Retaining wall structure: Gold Creek Artisana Retaining Wall by Anchor
Block; Indiana limestone column cap
Fireplace/cabana/kitchen countertop stone facing: Indian Creek
Fieldstone–Indiana limestone caps/hearth/mantle
Pergola structure: rough cedar
Cabana structure/roof: rough cedar frame; cedar shake roof; tongue-and-
groove knotty pine ceiling, sanded with polyurethane seal coat
Sport court surface: concrete base with rubber sports flooring provided by
Sports Court North
Fence: Alumi-Guard aluminum bronze
Landscape & low-voltage lighting: Kichler architectural bronze
Product List
The client wanted to reimagine the original cabana
and upgrade its features, adding a fireplace and AV
equipment. Moran sought to make the structure both
larger and to give it a more substantial feel, as well as
better integrating it into the outdoor living spaces. The
cabana is more enclosed on the two sides that are on
the site’s periphery, while the other two sides open up
to the pool and engage that space.
Moran designed the cabana to reflect the style and
materials of the main house—its dormer, rooflines,
and shingles, while the choice of stone for the fire-
place was inspired by stone used inside the home.
The hand-crafted beams, which were scribed, cut,
and fit together using 32 cedar components, mimic
the arched window that overlooks the secondary
deck. The wood was sanded and stained to bring out
its rich color, and heavy black iron bolts provide a
rustic accent. PR
Cabana Comforts
51 1/28/16 1:54 PM